
1 Northwestern University Human Resources Operations
myHR Administration
Advanced Query Functions
Revised
5/28/2019
© 2019 Northwestern University
HCM
9.2, PT 8.55

MYHR: ADVANCED QUERY FUNCTIONS USER'S GUIDE INTRODUCTION
2 Northwestern University Human Resources Operations
INTRODUCTION
Structured Query Language
This manual contains terms, concepts, and procedures that are rooted in traditional Structured Query Language (SQL).
Please note that this guide does not attempt to provide a complete technical definition of any SQL concept; rather, the
information is presented in the context of its specific functionality in the myHR Query environment.
myHR Reporting Database
Remember: All queries must be created in the myHR Reporting database; queries should never be created in Production.
The potential exists to lock up or significantly slow down the database if something is implemented incorrectly; running
queries in the Reporting database protects the daily HR and Payroll processes that regularly occur in the Production system.
Assistance
For general myHR questions, including lockouts and security, contact:
myHR Help Desk: 847-467-4800, myHRhelp@northwestern.edu
For query resources, visit the myHR website:
https://www.northwestern.edu/hr/essentials/hr-systems/myhr/index.html
For upcoming query training classes, visit the myHR Learn website:
https://learn.northwestern.edu/

MYHR: ADVANCED QUERY FUNCTIONS USER'S GUIDE TABLE OF CONTENTS
3 Northwestern University Human Resources Operations
TABLE OF CONTENTS
Introduction ...................................................................................................................................................................................... 2
Table of Contents ............................................................................................................................................................................. 3
Section 1 Joining Tables in Query ................................................................................................................................................. 4
Introduction to Joins......................................................................................................................................................................... 5
Standard & Left Outer Joins ............................................................................................................................................................. 7
Creating Standard & Left Outer Joins ............................................................................................................................................. 10
Criteria with Left Outer Joins .......................................................................................................................................................... 12
Hierarchy Join ................................................................................................................................................................................. 15
Related Record Join ........................................................................................................................................................................ 16
Full Outer Join................................................................................................................................................................................. 17
Unions............................................................................................................................................................................................. 19
Section 2 Subqueries ................................................................................................................................................................. 20
Introduction to Subqueries ............................................................................................................................................................ 21
Exists / Does Not Exist / In List / Not In List .................................................................................................................................... 22
Equal To / Greater Than / Less Than .............................................................................................................................................. 26
Section 3 Expressions................................................................................................................................................................. 34
Introduction to Expressions ............................................................................................................................................................ 35
“Case” Function .............................................................................................................................................................................. 37
“Concatenate” Function ................................................................................................................................................................. 38
“Decode” Function ......................................................................................................................................................................... 39
“Replace” Function ......................................................................................................................................................................... 40
“Substring” Function ...................................................................................................................................................................... 41
Date Functions ................................................................................................................................................................................ 42
Other Functions .............................................................................................................................................................................. 44
Section 4 Other Query Functionality .......................................................................................................................................... 45
Using "Having" To Filter by Aggregate Functions ........................................................................................................................... 46
List Matching with Expressions ...................................................................................................................................................... 47
Drilling URLs .................................................................................................................................................................................... 49
Creating a Browser Shortcut / Link to a Query ............................................................................................................................... 50

MYHR: ADVANCED QUERY FUNCTIONS USER'S GUIDE
4 Northwestern University Human Resources Operations
Section 1
Joining Tables in Query

MYHR: ADVANCED QUERY FUNCTIONS USER'S GUIDE INTRODUCTION TO JOINS
5 Northwestern University Human Resources Operations
INTRODUCTION TO JOINS
Definition
A JOIN is the method used to combine data from two different tables into one set of results. For example, querying the JOB
table provides appointment information, but does not contain an employee's name. The name can be easily added,
however, by locating a second table which does contain the name (e.g. PERSONAL_DATA), and joining it to the JOB table.
To join two tables together, there must be at least one piece of common data (or field) between them. Typically this is a KEY
FIELD of at least one of the two tables.
Key Fields
A KEY FIELD is a field on a particular table that acts as an identifier for each row of data. In any table, no two rows of data
will have the same values for all key fields. On the PERSONAL_DATA table,
EMPLID is the Key Field; no two rows on
PERSONAL_DATA will have the same
EMPLID.
Multiple Key Fields: A table often will require more than one Key Field. The NW_EMPLOYEES table contains active
appointments; because an employee can have more than one appointment, both EMPLID and EMPL_RCD must be used to
identify an appointment. As such, both are Key Fields for NW_EMPLOYEES.
Dates as Key Fields: Tables that contain historical data often will include a date as a Key Field. In the case of
POSITION_DATA, the field POSITION_NBR is not unique on its own. Because the table contains the entire history for a
Position, one
POSITION_NBR will have many rows of data. In this case, the EFFDT (Effective Date) field is used as a second Key;
no two rows will have the same
POSITION_NBR and EFFDT.
Non-Unique Key Fields: Sometimes fields on a table will be named as keys to assist in processing queries and data searches.
For example, NW_GL_TABLE contains the NW_GL_NUM_ASSIGN key; this field identifies each row of data and is enough on its
own to provide uniqueness. But the table also assigns
EMPLID, EMPL_RCD, and PAYGROUP as additional keys. This allows for
better functionality behind the scenes, such as quicker processing, sorting, and searching of data.
Here are some other examples of Key Fields; notice how the Keys provide a unique identifier for the data on each table:
Table Name Type of Data Key Field(s)
DEPT_TBL Departments DEPTID, EFFDT
PERSONAL_DATA Employee's Personal Information EMPLID
NW_EMPLOYEES Active Appointments EMPLID, EMPL_RCD
JOBCODE_TBL Job Codes (Job Titles) JOBCODE, EFFDT
POSITION_DATA All Position Data & History POSITION_NBR, EFFDT
JOB All Job Data & History EMPLID, EMPL_RCD, EFFDT, EFFSEQ
After adding a table to your query, its Key Fields can be seen on the tab, indicated by a key icon to the right of the
field name:

MYHR: ADVANCED QUERY FUNCTIONS USER'S GUIDE INTRODUCTION TO JOINS
6 Northwestern University Human Resources Operations
How Joins Work
When you combine data from two tables, the system needs to find one or more fields that both tables have in common; this
allows the query to match data from the first table with corresponding data from the second table. Consider the following
tables and fields:
Since the
EMPLID appears on both tables, an employee's Job Data can be matched with his/her Personal Data. Where the
EMPLID corresponds, data is combined:
Types of Joins
There are five JOIN types available in myHR Query that can be used to match data together from different tables. The most
commonly used Joins occur when you add a new table or data to your query:
• Standard Join (also called an “Inner Join”)
• Left Outer Join
Other Joins are identified automatically while creating your query and are presented as options within the Query Manager:
• Hierarchy Join
• Related Record Join
A final Join type can be accomplished indirectly, using the Union feature:
• Full Outer Join
Each of these Join Types is discussed in further detail in the following sections.
JOB
EMPLID | EMPL_RCD | DEPTID
PERSONAL_DATA
EMPLID | NAME | PHONE
JOB
EMPLID | EMPL_RCD | DEPTID
1040322 0 187100
1070655 0 203400
PERSONAL_DATA
EMPLID | NAME | PHONE
1040322 Willie Wildcat 847-467-5555
1070655 Patricia Purple 312-503-5555
QUERY RESULTS AFTER JOINING
EMPLID | EMPL_RCD | DEPTID | NAME | PHONE
1040322 0 187100 Willie Wildcat 847-467-5555
1070655 0 203400 Patricia Purple 312-503-5555

MYHR: ADVANCED QUERY FUNCTIONS USER'S GUIDE STANDARD & LEFT OUTER JOINS
7 Northwestern University Human Resources Operations
STANDARD & LEFT OUTER JOINS
Definitions
The Standard Join and the Left Outer Join allow you to manually combine data from two tables in myHR. Every time an
additional table is added to your query via the R
ECORDS tab, you are presented with these two options:
A STANDARD JOIN is very strict. It will look for data that matches between the two tables; where there is a match, data from
both tables will be combined and reported. Where there is not a match, no data from either table will be reported.
The LEFT OUTER JOIN is more lenient. This join will report all data from the first (left) table, regardless of whether or not it
matches something in the second table.
The Difference Between a Standard and a Left Outer Join
Before selecting which of the two joins to use, it is very important to understand how it will affect your data. Consider a
query that combines NW_EMPLOYEES to pull employees' names and NW_GL_TABLE to pull their year-to-date earnings:
Notice that “Patricia Purple” does not have a row in the NW_GL_TABLE; she was just
hired into the department and has not yet received her first paycheck.
STANDARD JOIN: Using a STANDARD JOIN, you will receive only one result; Patricia does not have a row on the second
table, so she will not appear:
LEFT OUTER JOIN: When using the LEFT OUTER JOIN, Patricia will appear since all information on the left table is reported.
Her GL Amount will simply be blank (or zero), since there was nothing that matched:
NW_EMPLOYEES
EMPLID | EMPL_RCD | NAME
1040322 0 Wilma Wildcat
2070655
0 Patricia Purple
NW_GL_TABLE
EMPLID | Sum(NW_GL_AMT)
1040322 3225.43
QUERY RESULTS – STANDARD JOIN
EMPLID | EMPL_RCD | NAME | Sum(NW_GL_AMT)
1040322 0 Wilma Wildcat 3225.43
QUERY RESULTS – LEFT OUTER JOIN
EMPLID | EMPL_RCD | NAME | Sum(NW_GL_AMT)
1040322 0 Wilma Wildcat 3225.43
2070655
0 Patricia Purple

MYHR: ADVANCED QUERY FUNCTIONS USER'S GUIDE STANDARD & LEFT OUTER JOINS
8 Northwestern University Human Resources Operations
Standard Join
As you can see in the previous example, a Standard Join provides inherent filtering. If we wanted to see only the employees
that have earned pay, this would be the correct option: it will automatically ignore those who have not been paid.
Use a Standard Join when you only want to see data that has a match in both tables.
When using a Standard Join:
• It doesn't matter which table is first and which is second.
• You can Standard Join any table to any other table in your query.
• Criteria is not adversely impacted.
Left Outer Join
If our goal in the previous example was to see all of our employees, regardless of whether they have been paid, the Left
Outer Join is the correct option.
Use a Left Outer Join if some data in the first table might not match data
in the second table, but you still want to keep that data.
When using a Left Outer Join:
• Order matters – the data you want to keep must be the first table in the join. Nonmatching data in the second table
will always be thrown out.
o In the above example, if the tables were reversed, we would not see Patricia with a Left Outer Join.
• Criteria on the second table may have an adverse impact if not set up correctly.
Joining Code Tables
Tables that contain code descriptions always can be joined to any other table using a Standard Join. They will contain a
match for every corresponding code, and there is no security applied to these tables. As a result, there is no concern for
“dropping” unmatched rows. For example, DEPT_TBL will always have a match for every
DEPTID.
These Code Tables are available to all query users:
Table Name Type of Data Defines the Field/Code
DEPT_TBL Department Names DEPTID
JOBCODE_TBL Job Codes (Job Titles) JOBCODE
PERSON_NAME Current Names EMPLID
LOCATION_TBL Addresses Associated with
Location Codes
LOCATION
NW_ADMIN_UNIT Administrative Units NW_ADMIN_UNIT
FUND_TBL
NW_FN_DEPT_TBL
PROJECT
Descriptions and related data for
chartstring Fund, FN Dept, and
Project
FUND_CODE
DEPTID (matches to NW_FN_DEPT)
PROJECT_ID

MYHR: ADVANCED QUERY FUNCTIONS USER'S GUIDE STANDARD & LEFT OUTER JOINS
9 Northwestern University Human Resources Operations
Joining Core Data Tables
Core Data Tables usually can be joined reliably with a Standard Join. For example, every POSITION_NBR will have a match on
POSITION_DATA; every
EMPLID will have a match on PERSONAL_DATA.
However, because these tables contain security, results may be lost when Standard-Joining to another table if a person or
position has since transferred out of your access. Use a Left Outer Join if the first table is a GL table (e.g. NW_GL_TABLE), and
the second table is a core data table which may contain an employee or position record that has since transferred out of
your department.
The Core Data Tables available to users include:
Table Name Type of Data Based on the Data Code
POSITION_DATA All position information POSITION_NBR
PERSONAL_DATA All personal information EMPLID
JOB All appointment information EMPLID, EMPL_RCD
Tip: PERSON_NAME has a name for each employee and does not have any security restrictions. Use this table instead of
PERSONAL_DATA if you only need name. You can safely use Standard Join with PERSON_NAME.

MYHR: ADVANCED QUERY FUNCTIONS USER'S GUIDE CREATING STANDARD & LEFT OUTER JOINS
10 Northwestern University Human Resources Operations
CREATING STANDARD & LEFT OUTER JOINS
Preparation
When preparing a complex query, it is very important to identify the tables required and how you will join them before
creating the query in myHR.
Before creating any joins in a complex query, first determine:
1. which tables will be required,
2. which common data fields will be used to join each pair of tables,
3. which Join Types will be implemented to avoid dropping results, and
4. the order in which the tables must be placed (remember, order matters for Left Outer Join: the table from which all
records should be kept needs to go first)
Implementing a Standard or Left Outer Join
Once you have determined the order in which tables will be joined, creating the join is as simple as adding a new table to
your query.
Procedure
1.
Begin your Query as normal by adding the first table.
2.
Switch back to the tab and search for the new table:
3.
Click Join Record.
4.
Select the appropriate Join Type:
5.
Select the table to which you are joining this new table:
• For the purposes of a Left Outer Join, the first table is considered the “left” table; the table you are
joining is considered the “right” table. All records in the first (left) table will be kept.
MYHR: ADVANCED QUERY FUNCTIONS USER'S GUIDE CREATING STANDARD & LEFT OUTER JOINS
11 Northwestern University Human Resources Operations
6.
The system will try to identify the matching fields between the two tables; select the fields, if any, that you
have identified for your join:
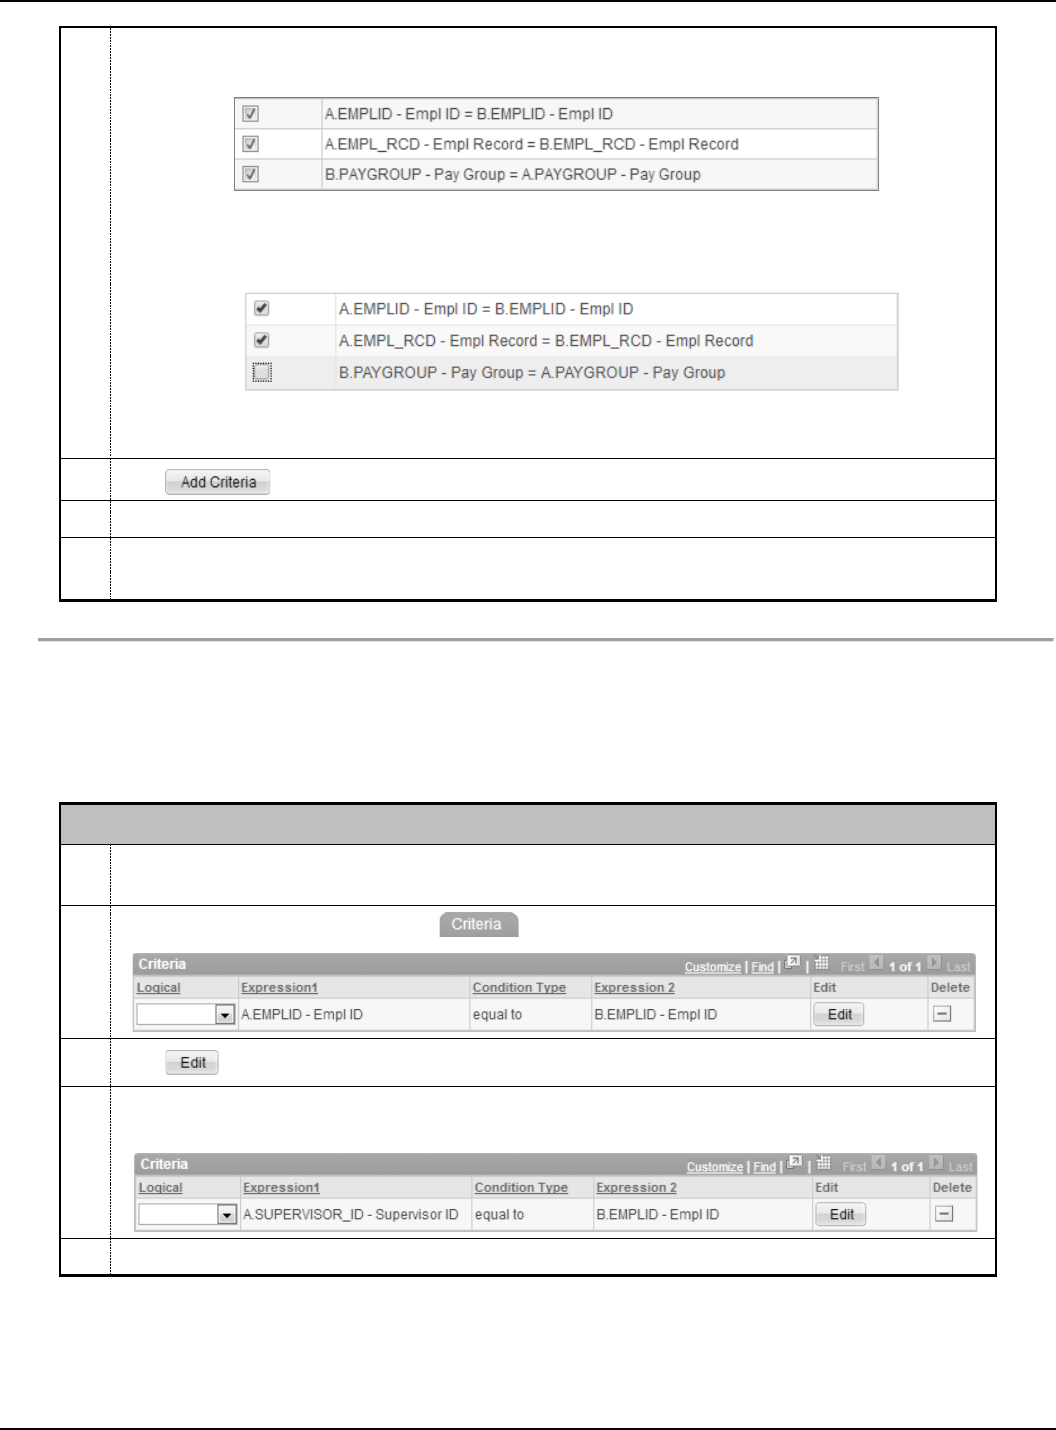
• You do not have to select all fields that are displayed. For example, uncheck
PAYGROUP if your query
does not want to distinguish between paygroups. (For example, because the person may have had a
different position in the past.)
• If the system does not identify the correct field you want to match, simply leave one option checked
and edit it in the criteria tab later. (See “Joining Tables with Manual Criteria” below.)
7.
Click to complete the join.
8.
Repeat Steps 2-7 until all tables are joined.
9.
If you created a Left Outer Join, and the system automatically added an Effective-Dated criteria, edit the
criteria. See “Criteria with Left Outer Joins.”
Joining Tables with Manual Criteria
You can match any field on one table to any field on another table; the fields do not have to be the same name. If you try to
match two fields that do not have the same name, the system will not automatically identify them for you; when this occurs
you will have to manually edit the join.
Procedure
1.
Create the Join using the procedure above. In Step #6, leave one of the criteria checked; even though it's
incorrect, you will be able to manually edit it.
2.
After completing the join, switch to the tab and locate the incorrect criteria that was just added:
3.
Click for that criteria.
4.
Using the normal criteria procedure, edit the criteria to manually match the fields that you intended to
match for this join:
5.
By changing the criteria, you have now manually edited the join.
Note: Sometimes you will attempt to join two tables, and the system will not identify any matching fields that you can later
edit. In this case, create your join as usual. Then switch to the Criteria tab and add a new criteria to manually match the
fields as necessary.

MYHR: ADVANCED QUERY FUNCTIONS USER'S GUIDE CRITERIA WITH LEFT OUTER JOINS
12 Northwestern University Human Resources Operations
CRITERIA WITH LEFT OUTER JOINS
Overview
When using a Left Outer Join, the placement of the criteria can greatly impact the set of results received. Consider a query in
which we want a list of employees and their earnings for the pay period ending 2/16/2013. We decide to use a Left Outer
Join so that the query still contains the names of employees who did not receive pay for that period. Here is the data on
NW_EMPLOYEES and NW_GL_TABLE:
In addition to the Left Outer Join, we must add a criteria stating that
PAY_END_DT = 2/16/2013. This criteria can be applied
either before or after the data is combined.
Criteria Applied After a Left Outer Join
By default, criteria are applied after the Left Outer Join, appearing in the CRITERIA tab as:
GOAL: Display all employees, and their earnings from period ending 2/16/13. If no one had earnings on 2/16/13, display
their names with no pay.
STEP 1: Before the criteria is considered, the Left Outer Join is applied:
STEP 2: After the data is combined, then the criteria of “PAY_END_DATE = 2013-02-16” is applied, leaving us with one row
of results:
RESULT: Even though we are using a Left Outer Join, Patricia Purple will not appear in the results. Initially, she did have a
match between both tables, but her row was removed by the
PAY_END_DT criteria in Step 2.
NW_EMPLOYEES
EMPLID | EMPL_RCD | NAME
1040322 0 Wilma Wildcat
2070655
0 Patricia Purple
NW_GL_TABLE
EMPLID | PAY_END_DT | NW_GL_AMT
1040322 2/02/2013 1205.44
1040322
2/16/2013 1134.58
2070655
2/02/2013 789.02
Left-Joined Data
EMPLID | EMPL_RCD | NAME | PAY_END_DT | NW_GL_AMT
1040322 0 Wilma Wildcat 2/02/2013 1205.44
1040322
0 Wilma Wildcat 2/16/2013 1134.58
2070655 0 Patricia Purple 2/02/2013 789.02
NW_EMPLOYEES
EMPLID | EMPL_RCD | NAME
1040322 0 Wilma Wildcat
2070655
0 Patricia Purple
NW_GL_TABLE
EMPLID | PAY_END_DT | NW_GL_AMT
1040322 2/02/2013 1205.44
1040322
2/16/2013 1134.58
2070655
2/02/2013 789.02
QUERY RESULTS – Criteria Applied after Left Outer Join
EMPLID | EMPL_RCD | NAME | PAY_END_DT | NW_GL_AMT
1040322 0 Wilma Wildcat 2/02/2013 1205.44
1040322 0 Wilma Wildcat 2/16/2013 1134.58
2070655 0 Patricia Purple 2/02/2013 789.02

MYHR: ADVANCED QUERY FUNCTIONS USER'S GUIDE CRITERIA WITH LEFT OUTER JOINS
13 Northwestern University Human Resources Operations
For Patricia to appear, Steps 1 & 2 must be reversed.
Criteria Applied BEFORE a Left Outer Join
If the criteria is set to occur before the Left Outer Join, the CRITERIA tab will indicate that it “Belongs to” a particular table:
GOAL: Display all employees, and their earnings from period ending 2/16/13. If no one had earnings on 2/16/13, display
their names with no pay.
STEP 1: Before the data is joined, the criteria is applied only to the table in question:
STEP 2: Now the Left Outer Join occurs with the pre-filtered data on the GL Table:
RESULT: The criteria occurred first; this time when the data was “joined,” Patricia Purple did not have a match between the
tables. As expected (and desired) by the Left Outer Join, she now appears in the results without pay data.
QUERY RESULTS – Criteria Applied before the Left Outer Join
EMPLID | EMPL_RCD | NAME | PAY_END_DT | NW_GL_AMT
1040322 0 Wilma Wildcat 2/16/2013 1134.58
2070655
0
Patricia Purple
NW_EMPLOYEES
EMPLID | EMPL_RCD | NAME
1040322 0 Wilma Wildcat
2070655
0 Patricia Purple
NW_GL_TABLE
EMPLID | PAY_END_DT | NW_GL_AMT
1040322 2/16/2013 1134.58
NW_GL_TABLE
EMPLID | PAY_END_DT | NW_GL_AMT
1040322 2/02/2013 1205.44
1040322 2/16/2013 1134.58
2070655 2/02/2013 789.02

MYHR: ADVANCED QUERY FUNCTIONS USER'S GUIDE CRITERIA WITH LEFT OUTER JOINS
14 Northwestern University Human Resources Operations
How to Change a Criteria to Occur Before the Left Outer Join
When Left Outer Joining tables, criteria for the second table are applied after the join by
default.
THIS INCLUDES ALL EFFECTIVE-DATE CRITERIA THAT ARE AUTOMATICALLY ADDED.
If a criteria for the second table must occur before the data is joined, including any Effective-Date criteria, the setting must
be changed manually.
Procedure
1.
On the tab, add or edit the criteria that needs to occur before the join.
2.
In the Criteria Properties, select the “This criteria belongs
to” drop-down box.
• If the criteria should be applied before the join, select:
“On clause of outer join {table}.” Be sure to choose the
letter that corresponds to the second table of the join.
•
If the criteria should be applied after the join, select: “WHERE clause.”
3.
Click to save the Criteria.
4.
The Criteria tab now confirms that this filter will be applied before the join, as this criteria “Belongs to” the
B table only:

MYHR: ADVANCED QUERY FUNCTIONS USER'S GUIDE HIERARCHY JOIN
15 Northwestern University Human Resources Operations
HIERARCHY JOIN
Definition
Some tables in myHR have an inherent hierarchy, where a second table is considered a “child” of the first. Consider the
following two tables:
POSITION_DATA is a “parent” table, containing all position information. NW_POSN_DIST is closely related; it is a “child” of
the first table, containing the Position Funding for each Position.
When you add a table to your query that has a related child or parent, the HIERARCHY JOIN becomes available
automatically.
Implementing a Hierarchy Join
Procedure
1.
After adding a table to your query that is part of a hierarchy, a Hierarchy Join link becomes visible next to
that table on the tab:
2.
Click the Hierarchy Join link to see related
tables:
3.
To join a related table, click the table name; the table is automatically added to your query.
POSITION_DATA
NW_POSN_DIST

MYHR: ADVANCED QUERY FUNCTIONS USER'S GUIDE RELATED RECORD JOIN
16 Northwestern University Human Resources Operations
RELATED RECORD JOIN
Definition
While some tables have a formal Parent-Child relationship, others contain partially-related data that can be accessed
through a RELATED RECORD JOIN. This often occurs when one table contains a code or number (such as
DEPTID), and that
code or number's definition (such as the Department Name) is in another table. Consider:
JOB contains all appointment data, including
DEPTID, and JOBCODE. Each of these fields is related to another table, shown on
the right, which contains a related description.
Using Related Record Joins, related data from these tables, such as Department Name and Job Title, can be quickly added to
a query.
Implementing a Related Record Join
Procedure
1.
After adding a table to your query, look at the fields on the tab. Wherever a related record is
identified, a Join {Table Name} link will appear to the right of the field:
2.
To add the related table, click the Join
{Table Name} link. The Join Type screen
will appear:
3.
Choose the correct Join Type, and click OK; the table will be added to your query.
• If you are joining a table that contains descriptive data for codes or ID numbers, such as the tables
above, the Join Type can be Standard Join.
• In other instances, review the previous sections to determine which Join Type is appropriate for your
query.
JOB
EMPLID | DEPTID | JOBCODE
DEPT_TBL
(Department Names)
JOBCODE_TBL
(Job Titles)

MYHR: ADVANCED QUERY FUNCTIONS USER'S GUIDE FULL OUTER JOIN
17 Northwestern University Human Resources Operations
FULL OUTER JOIN
Overview
Remember that a Left Outer Join takes all the results from the first table, and pulls in only matching data from the second
table. But what if there is also data in the second table that doesn't have a match? A FULL OUTER JOIN allows you to retain
unmatched data from both tables.
Consider this data, where we want to see all General Ledger earnings for Pay Period End Date 2/16/2013:
Notice there is data on each table without a match:
• Charlie Crown is an active employee, but didn't receive a paycheck on 2/16/2013.
• EmplID 1001093 is no longer an active employee, but did receive pay on 2/16/2013.
Consider the ways we can join these tables:
• If we use a Standard Join, the query will return only the matching data for Wilma and Patricia; we will not know that
Charlie Crown is an active employee, nor will we see the paycheck for EmplID 1001093.
• If we implement a Left Outer Join with NW_EMPLOYEES first, Charlie Crown's row will be returned – but we still won't
see the paycheck for EmplID 1001093.
• If we reverse the table order and perform a Left Outer Join with NW_GL_TABLE first, we will get the paycheck for
1001093, but we will not see Charlie Crown.
NW_EMPLOYEES
EMPLID | EMPL_RCD | NAME
1040322 0 Wilma Wildcat
2070655
0 Patricia Purple
2556877 0 Charlie Crown
NW_GL_TABLE
EMPLID | PAY_END_DT | NW_GL_AMT
1001093 2/16/2013 1003.59
1040322
2/16/2013 1134.58
2070655
2/16/2013 789.02
QUERY RESULTS – Standard Join
EMPLID | EMPL_RCD | NAME | PAY_END_DT | NW_GL_AMT
1040322 0 Wilma Wildcat 2/16/2013 1134.58
2070655
0
Patricia Purple 2/16/2013 789.02
QUERY RESULTS – Left Join, with NW_EMPLOYEES First
EMPLID | EMPL_RCD | NAME | PAY_END_DT | NW_GL_AMT
1040322 0 Wilma Wildcat 2/16/2013 1134.58
2070655
0 Patricia Purple 2/16/2013 789.02
2556877 0 Charlie Crown
QUERY RESULTS – Left Join, with NW_GL_TABLE First
EMPLID | EMPL_RCD | NAME | PAY_END_DT | NW_GL_AMT
1001093 2/16/2013 1003.59
1040322
0 Wilma Wildcat 2/16/2013 1134.58
2070655 0 Patricia Purple 2/16/2013 789.02

MYHR: ADVANCED QUERY FUNCTIONS USER'S GUIDE FULL OUTER JOIN
18 Northwestern University Human Resources Operations
• If we want to see all data, including the data from both tables that do not have a match, we must combine both Left
Outer Joins. Only then will we capture the unmatched data from each side:
In practice, this is called a FULL OUTER JOIN. In myHR, this is accomplished by:
1. creating a query using the first Left Outer Join;
2. repeating the exact same query, but reversing the order of the tables;
3. combining the results from both queries via a UNION. *
In this scenario, duplicate rows of data are automatically removed, providing the final results that include all matched and
unmatched rows:
* See the next section on Unions for details on how to combine these two queries into one.
QUERY RESULTS – Combined Results from Both Left Outer Joins
EMPLID | EMPL_RCD | NAME | PAY_END_DT | NW_GL_AMT
1040322 0 Wilma Wildcat 2/16/2013 1134.58
2070655
0 Patricia Purple 2/16/2013 789.02
2556877 0 Charlie Crown
1001093
2/16/2013 1003.59
1040322
0 Wilma Wildcat 2/16/2013 1134.58
2070655
0 Patricia Purple 2/16/2013 789.02
FINAL QUERY RESULTS – Using a Full Outer Join / Union
EMPLID | EMPL_RCD | NAME | PAY_END_DT | NW_GL_AMT
1040322 0 Wilma Wildcat 2/16/2013 1134.58
2070655
0 Patricia Purple 2/16/2013 789.02
2556877 0 Charlie Crown
1001093 2/16/2013 1003.59

MYHR: ADVANCED QUERY FUNCTIONS USER'S GUIDE UNIONS
19 Northwestern University Human Resources Operations
UNIONS
Definition
A UNION allows results from two or more queries to be combined into one set of data. Each query and its criteria are
independent and processed separately; after each query is run, the results are then combined and sorted together. The
queries may be similar or completely different, however:
• all queries must have the same number of columns (fields),
• the column headings set in the first query will be used,
• the sort order set in the first query will be used to sort all results,
• the field length from the first query will be used.
Creating a Union
Procedure
1.
Create your first query with all necessary criteria. Be sure to order the fields before continuing. Take note
of the fields you are using, and in which order they appear.
2.
At the bottom right of the Query Manager, select New Union:
3.
Create the second query with its criteria. Be sure to place the fields in the same order as your first query.
• Each part of the Union is completely independent; you cannot refer directly to a field or criteria in the
other part of the Union. You must re-create the criteria for the second Union separately.
• If you are attempting to mimic a Full Outer Join, simply re-create the first query – will all its criteria –
but reverse the order of the two Left Outer Joined tables.
•
Unfortunately you cannot “copy” the first query into the second; you must re-create it from scratch.
4.
To navigate back and forth between parts of the Union, click Subquery/Union Navigation in the top right
corner of Query Manager:
•
The portion of the Union you are currently viewing is noted as the Working on Selection.
5.
Select the part of the query you wish to view/edit. “Top Level of
Query” is the main (first) query in the Union.
Notes:
• When using a Union, duplicate rows are automatically removed from your results. As such, the “Remove Duplicates”
checkbox is not available for your query.
• To delete a Union, first navigate to the part you wish to remove (Step 4), and then choose the Delete Union link from
the bottom right corner.

MYHR: ADVANCED QUERY FUNCTIONS USER'S GUIDE
20 Northwestern University Human Resources Operations
Section 2
Subqueries

MYHR: ADVANCED QUERY FUNCTIONS USER'S GUIDE INTRODUCTION TO SUBQUERIES
21 Northwestern University Human Resources Operations
INTRODUCTION TO SUBQUERIES
Definition
A SUBQUERY is a query whose results are used as part of a criteria; because of this, subqueries are always initiated by
adding a new criteria to the main query.
When a subquery is created, it is applied to every row of data – just like any other criteria. For example, if you set a criteria
for NW_POSN_TYPE = “STF,” your query will test every row of data and will only display rows with a Position Type of “STF.”
Likewise, the subquery tests every row of data to determine whether or not that row will be displayed.
Types of Subqueries
There are many ways subqueries can be integrated into the criteria of your main query:
Subquery Condition The data from your main query is displayed if the subquery finds...
Exists If the subquery finds any result, the row from the main query is displayed.
Does Not Exist If the subquery finds no result, the row from the main query is displayed.
In List The subquery finds a list of values, such as EmplIDs. If the main query matches
any value in this list, the row is displayed.
Not In List
The subquery finds a list of values, such as EmplIDs. If the main query does not
match a value in this list, the row is displayed.
(Not) Equal To,
(Not) Greater Than,
(Not) Less Than
The subquery finds a specific value that can be matched to the main query like
any conditional.

MYHR: ADVANCED QUERY FUNCTIONS USER'S GUIDE SUBQUERIES - EXISTS / DOES NOT EXIST / IN LIST / NOT IN LIST
22 Northwestern University Human Resources Operations
EXISTS / DOES NOT EXIST / IN LIST / NOT IN LIST
Description
When using EXISTS or DOES NOT EXIST, a subquery is written that may or may not bring back any results. In this test, the
result itself does not matter – what matters is whether the subquery finds any result.
By contrast, IN LIST or NOT IN LIST allows the subquery to return a list of specific values. The query will test to see if your
main data matches (or doesn't match) any value in that list.
Example
Query: Obtain a list of current employees and their appointments for each employee that was
newly hired to the University in fiscal year 2012.
Procedure
1.
Create the main query using the NW_EMPLOYEES table.
2.
Add fields to the query: EMPLID, EMPL_RCD, NAME, JOBTITLE, DEPTNAME
3.
On the tab, click .
4.
Set Expression 1 to field A.EMPLID
5.
Set Condition Type to “in list”. (We use “in list” because we will use a subquery to generate a list of employee ids for
people who were hired in FY12.)
6.
Choose Expression 2 Type: select “Subquery”
7.
Click Define/Edit Subquery.
8.
Begin building the subquery by adding the JOB table. An effective date criterion is automatically added, we will edit
this later. Note that “Working on section” at the top will say “Subquery for A.EMPLID” to let you know that the
current query you are building is the subquery for the criterion.

MYHR: ADVANCED QUERY FUNCTIONS USER'S GUIDE SUBQUERIES - EXISTS / DOES NOT EXIST / IN LIST / NOT IN LIST
23 Northwestern University Human Resources Operations
9.
Click the “Select” link next to EMPLID in the JOB table. The EMPLID list will be the output of the subquery, which will
be used as the “in list” criterion for the main query. You can't add more than one field.
10.
Click on the “Criteria” tab. It has the automatically-added effective date criterion.
11.
Edit the Effective Date criterion to be B.EFFDT between 9/1/2011 and 8/31/2012 (this is fiscal year 2012)

MYHR: ADVANCED QUERY FUNCTIONS USER'S GUIDE SUBQUERIES - EXISTS / DOES NOT EXIST / IN LIST / NOT IN LIST
24 Northwestern University Human Resources Operations
12.
Click Add Criteria. For Expression 1 select the field B.ACTION. Condition type will be “equal to” and Expression 2 will
be “HIR”. This is the action for new hires. Click OK.
13.
Click Add Criteria. For Expression 1 select the field B.ACTION_REASON. Condition type will be “equal to” and
Expression 2 will be “HIR”. This is the action-reason code for new hires. (Using this action-reason code will eliminate
cases where an additional appointment was added to an existing employee in FY12.) Click OK.

MYHR: ADVANCED QUERY FUNCTIONS USER'S GUIDE SUBQUERIES - EXISTS / DOES NOT EXIST / IN LIST / NOT IN LIST
25 Northwestern University Human Resources Operations
14.
You now have three criteria for the subquery: effective date in fiscal year 2012, action of hire, and action-reason code
of hire.
15.
Click Subquery/Union Navigation in the top right corner to return to the Top Level of the query. Then click “Top Level
of Query”. This wil return you to the main query. You can make any further edits here (add more columns, sort the
output, etc.)
16.
Click “Run” to execute your query. Now you will see current employees who were hired in fiscal year 2012.

MYHR: ADVANCED QUERY FUNCTIONS USER'S GUIDE SUBQUERIES - EQUAL TO / GREATER THAN / LESS THAN
26 Northwestern University Human Resources Operations
EQUAL TO / GREATER THAN / LESS THAN
Subquery Test
In addition to the “In List” and “Exists” functions, a subquery can be used to return a specific value which is then compared
to the original query.
Example
Query: Obtain a list of current employees and show their last promotion date and promotion
reason code. If they never had a promotion, include them in the list and just leave the promotion
columns blank.
Strategy: we will get current employees from the NW_EMPLOYEES table. We will Left Outer Join the JOB table to get the
effective date of the last promotion. We will then use a subquery to find the last date in case the person had multiple
promotions. The subquery will use the JOB table as well.
Procedure
1.
Create the main query using the NW_EMPLOYEES table.
2.
Add fields to the query: EMPLID, EMPL_RCD, NAME, JOBTITLE, DEPTNAME
3.
On the “Criteria” tab, delete the effective date criterion. NW_EMPLOYEES table is already restricted to only show
currently effective rows. (It doesn't hurt to leave the criterion there, it's just unnecessary.)
4.
Click on the “Records” tab and Left Outer Join the JOB table. We will use the effective date from the JOB table to
display the promotion date. However, not everyone has had a promotion, and we don't want to remove people
without a promotion from the report. That's why we are using Left Outer Join instead of Standard Join. Select “Join to
get additional fields only” and click on the hyperlink for A = NW_EMPLOYEES.

MYHR: ADVANCED QUERY FUNCTIONS USER'S GUIDE SUBQUERIES - EQUAL TO / GREATER THAN / LESS THAN
27 Northwestern University Human Resources Operations
5.
In the Auto Join Criteria, unselect the effective sequence join. We only want to join on employee id and employee
record. Click “Add Criteria”.
An automatic effective date criterion will be added for the Job table. Just click “OK” on the pop-up message. We will
edit that criterion later.
6.
From the JOB table (table B), add the following fields to the report: EFFDT, ACTION_DT, ACTION_REASON
Action-reason code tells you the type of promotion: PRC is reclassification, PRP is promoted to different position
7.
Go to the Fields tab and rename B.EFFDT field to “Last Promotion Date”
8.
Go to the “Criteria” tab.

MYHR: ADVANCED QUERY FUNCTIONS USER'S GUIDE SUBQUERIES - EQUAL TO / GREATER THAN / LESS THAN
28 Northwestern University Human Resources Operations
9.
Find the row for B.EFFDT and click “Edit”. We want to find the JOB table effective date that is the date of the last
promotion. We will use a subquery to do this.
Leave Experssion 1 as B.EFFDT.
Set Condition Type to “equal to”
Set Expression 2 Type to Subquery.
Don't click OK.
10.
Click “Define/Edit Subquery” under Expression 2
11.
Now, we have to find the last promotion date for a person. This information is in the JOB table. While on the Records
tab for the subquery, search for record JOB and click “Add Record”. An effective date criterion will automatically be
added, we will edit this later.
Notice that we have a “Working on section” label now that tells us that we are working on the “Subquery for
B.EFFDT.”

MYHR: ADVANCED QUERY FUNCTIONS USER'S GUIDE SUBQUERIES - EQUAL TO / GREATER THAN / LESS THAN
29 Northwestern University Human Resources Operations
12.
Click the “Select” hyperlink next to EFFDT. The output of the subquery will be the effective date of the last promotion.
Remember that a subquery cannot have multiple columns.
13.
Go to the “Criteria” tab and delete the C.EFFDT criterion. We are using the JOB table to find the last promotion date.
We don't want to restrict the results to the currently-effective row.
14.
Click “Add Criteria”. For Expression 1, select C.ACTION. Condition Type should be “equal to”. And Expression 2 will be
PRO, which is the action code for promotions. Click OK.

MYHR: ADVANCED QUERY FUNCTIONS USER'S GUIDE SUBQUERIES - EQUAL TO / GREATER THAN / LESS THAN
30 Northwestern University Human Resources Operations
15.
Click “Add Criteria”. Expression 1 will be C.EMPLID. Condition Type is “equal to”, Expression 2 Type is “Field”, and
Expression 2 is A.EMPLID. There is no auto-join between the tables in the main query and the tables in the subquery.
We need to use Criteria to add the join condition on EMPLID between the main query's NW_EMPLOYEES table (table
A) and the subquery JOB table (table C).
16.
Add a criterion for C.EMPL_RCD = A.EMPL_RCD. You will now have three items in the Criteria tab for the subquery.

MYHR: ADVANCED QUERY FUNCTIONS USER'S GUIDE SUBQUERIES - EQUAL TO / GREATER THAN / LESS THAN
31 Northwestern University Human Resources Operations
17.
Go to the “Fields” tab. Click “Edit” for the C.EFFDT field. Under “Aggregate” select “Max”. If a person had multiple
promotions, we want the date of the most recent one. The output of the subquery will be the latest promotion date.
18.
Click Subquery/Union Navigation in the top right corner to return to the Top Level of the query. Then click “Top Level
of Query”. This wil return you to the main query.
19.
Notice that now “Working on section” says “Top Level of Query”

MYHR: ADVANCED QUERY FUNCTIONS USER'S GUIDE SUBQUERIES - EQUAL TO / GREATER THAN / LESS THAN
32 Northwestern University Human Resources Operations
20.
Go to the “Criteria” tab. Find the B.EFFDT equal to SUBQUERY row and click “Edit”. In the pull-down menu for “This
criteria belongs to”, set the value to “ON clause of outer join B”. Since we want to keep people who never had a
promotion, it's important to move the criterion to the join clause and not leave it in the WHERE clause.
21.
Still on the “Criteria” tab, click “Add Criteria”. Add a criterion for B.ACTION = PRO.
We only want the promotion row's effective date to display. Since people often have multiple JOB row changes on a
day when they get a promotion, you will get multiple rows for the same person in the output if you don't add this
condition.
Set “This criteria belongs to” as “ON clause of outer join B”. Since we have an outer join on B, we don't want to add a
condition to the WHERE clause. Then click “OK”.

MYHR: ADVANCED QUERY FUNCTIONS USER'S GUIDE SUBQUERIES - EQUAL TO / GREATER THAN / LESS THAN
33 Northwestern University Human Resources Operations
22.
There should be four items on the Criteria tab, all of them with a “Belongs to” value of “B” since we are Left Outer
Joining to table B (JOB).
23.
It is always a good idea to save your query as a private query with your initials in the beginning prior to hitting “Run”.
If the query runs for a long time and you have to cancel it, you will lose your work if you didn't save before running.
24.
Click “Run” to execute your query. Now you will see current employees and information about their last promotion (if
any).

MYHR: ADVANCED QUERY FUNCTIONS USER'S GUIDE
34 Northwestern University Human Resources Operations
Section 3
Expressions

MYHR: ADVANCED QUERY FUNCTIONS USER'S GUIDE INTRODUCTION TO EXPRESSIONS
35 Northwestern University Human Resources Operations
INTRODUCTION TO EXPRESSIONS
Overview
An EXPRESSION utilizes special query functions to manipulate the appearance of data in your output or criteria. Expressions
can be used one of two ways: to display a calculated field, or to restrict the output via a more complex criterion.
Creating an Expression
All of the expressions discussed in this section can be implemented as fields (to display formatted data) or as criteria (to
provide more robust testing). Each expression must be entered on the Expressions tab of the Query Manager.
Procedure
1.
Click the tab.
2.
Select .
3.
In the Expression Type box, choose the type of data that your
expression will create. The most common data types used will be:
• “Character” – if your data will be letters, numbers, or a
combination of both.
• “Date” – if your data will create a full date (including month, day,
and year).
• “Number” – if your data will create a number or decimal that will
be operated on in the query (such as adding, summing or
averaging).
4.
Enter the Length and Decimal values if required:
• If using a “Character” type, Length is the maximum number of characters in
the data. Decimals is not required.
• If using a “Date” type, neither is required.
• If using a “Number” type, Length is the total number of digits, including decimal places; Decimals is
the number of decimal places. (Ex: a dollar amount of 15345.00 would have a Length of 7 and a
Decimal of 2.)
5.
Enter the Expression Text. (See the following pages for specific expression text.) For example:
6.
Click .

MYHR: ADVANCED QUERY FUNCTIONS USER'S GUIDE INTRODUCTION TO EXPRESSIONS
36 Northwestern University Human Resources Operations
7.
At this point, your expression is part of the query like any other field. You can add it as a column to your
results by choosing Use as Field, or you can add a criteria on it by clicking the criteria funnel :
Expression Code in this Manual
For each expression discussed in the following pages, the code used to create the expression will be presented with the
following styling:
Style Example Meaning
DECODE
Uppercase words are expression functions that must be entered exactly as they
appear.
string
Lowercase italic text indicates where you will manually enter a field, data, or
something else.
( ) , ' '
These characters should all be entered exactly as they appear. Character
constants you enter (e.g. employee status codes, pay group codes) need to be
enclosed in single quotes.
[ ]
Anything in brackets is optional.
...
The ellipsis indicates that the preceding section of code may be repeated as
many times as necessary.
A.EMPLID
This format refers to a specific field in table “A” of your query. Table letters can
be found to the left of the table name on the Query tab. In most instances, you
can refer to any field from any table in your query in this manner.
Notes:
• Indentation of expression text in this section is indented to provide clarity. Although it is recommended to indent your
expressions for readability, it is not required and will not impact the processing of your query.
• Never include double quotation marks (“) in your query.
• If you use an expression as a field, it's generally a good idea to edit the heading text.

MYHR: ADVANCED QUERY FUNCTIONS USER'S GUIDE “CASE” FUNCTION
37 Northwestern University Human Resources Operations
“CASE” FUNCTION
Description
The CASE function allows you to include a level of IF…THEN…ELSE testing in your query. Using any number of test
conditions, you can specify what the output should be for a row of data.
Expression Text
CASE
WHEN condition [condition]... THEN output
[WHEN condition [condition]... THEN output]...
[ELSE output]
ENDA.NW_POSN_TYPE
Details
• CASE identifies the beginning of the test block.
• Each WHEN line presents one or more test conditions; if a condition is satisfied, its output is provided.
o Multiple conditions may be joined with AND or OR, and may be grouped using parentheses.
o OUTPUT can be another field, another expression, or a line of text enclosed in single quotes.
o The first WHEN statement that is satisfied will be processed for that row of data; any subsequent WHEN statements
will be ignored.
• ELSE is not required. If it is included at the end of the WHEN statements, its output will be provided if no WHEN
statement is satisfied.
• END identifies the ending of the test block.
Example
Different fields on the NW_EMPLOYEES table can contribute to determining the type of appointment. This example uses
numerous criteria to determine and display an appointment type:
CASE
WHEN A.NW_POSN_CATEGORY = 'RES' THEN 'Research Fac'
WHEN A.NW_POSN_TYPE = 'FAC' THEN 'Non-Research Faculty'
WHEN A.NW_POSN_TYPE = 'STF' THEN 'Staff'
WHEN A.JOBCODE = '100029' THEN 'Temporary Student'
WHEN A.DEPTID LIKE '%98' THEN 'Work-Study Student'
WHEN A.NW_POSN_TYPE = ' ' THEN 'Other Temp Employee'
ELSE A.NW_POSN_TYPE
END
Remember, only the first WHEN statement that is satisfied will be processed for a particular row of data. A Research Faculty
appointment will stop processing after Line #2, and will display “Research Fac” in the results. Any other faculty appointment
will continue to Line #3, displaying “Non-Research Faculty.”

MYHR: ADVANCED QUERY FUNCTIONS USER'S GUIDE “CONCATENATE” FUNCTION
38 Northwestern University Human Resources Operations
“CONCATENATE” FUNCTION
Description
The CONCAT statement or operator allows you to combine (concatenate) any number of data fields and/or text strings into
one piece of output.
Expression Text
Option 1: data1 || data2 [|| data3]...
Option 2: CONCAT(data1, data2)
Details
• data may be a field name, such as A.EMPLID; a text string in single quotes, such as 'Evanston;' or another
expression.
• Using Option 1, any number of data may be combined with the || operator between them.
• Using Option 2, only two pieces of data can be combined in one CONCAT statement.
Example
Instead of using separate columns for the Department ID and Department Name, we can combine them into one field,
separated by a colon, using the || operator.
A.DEPTID || ': ' || A.DEPTNAME
The output of the expression above would produce one piece of data for each row, such as:
004500: Human Resources

MYHR: ADVANCED QUERY FUNCTIONS USER'S GUIDE “DECODE” FUNCTION
39 Northwestern University Human Resources Operations
“DECODE” FUNCTION
Description
The DECODE function provides shorthand IF-THEN-ELSE testing where only one field is evaluated.
Expression Text
DECODE(test, searchfor1, result1 [, searchfor2, result2]... [, default])
Details
• test may be any field name or another expression
• searchfor is the value you are looking for test to equal
• If test matches searchfor1, result1 will be returned; you may have as many search/result pairs as you like
• default is not required, but if present, it will be used when none of the preceding searchfor values are matched
Example
This expression:
DECODE(A.PAYGROUP, 'MOF', 'Monthly Fac', 'MON', 'Monthly Stf', A.PAYGROUP)
Will returning the following:
When Paygroup = MOF -> Monthly Faculty
When Paygroup = MON -> Monthly Staff
When Paygroup = NMF -> NMF

MYHR: ADVANCED QUERY FUNCTIONS USER'S GUIDE “REPLACE” FUNCTION
40 Northwestern University Human Resources Operations
“REPLACE” FUNCTION
Description
The REPLACE function searches for specific text within a field and replaces it with something else.
Expression Text
REPLACE(string, searchfor [, replacewith])
Details
• string may be any field name or expression
• searchfor is the value you are searching for
• If searchfor is found anywhere within string, it will be replaced with replacewith
• replacewith is not required; if it is not provided, then searchfor will be removed and replaced with nothing
Example
Northwestern email address can take up a large amount of space in a spreadsheet. Using REPLACE, we can remove the full
“northwestern.edu” suffix, and replace with a shorter “n...”
REPLACE(A.NW_EMAIL_ADDRESS, 'northwestern.edu', 'n...')
This expression would translate email addresses into new values as follows:

MYHR: ADVANCED QUERY FUNCTIONS USER'S GUIDE “SUBSTRING” FUNCTION
41 Northwestern University Human Resources Operations
“SUBSTRING” FUNCTION
Description
The Substring function, SUBSTR, extracts and returns only a specific part of the data.
Expression Text
SUBSTR(string, startposition [, length])
Details
• string is the field or expression you are extracting a piece from.
• startposition is the character you want to start at
o A positive start position of n will begin at the nth character from the left.
o A negative start position of -n will begin at the nth character from the right.
• length is the number of characters to return; if not provided, the rest of the characters, to the end of the string, will be
returned.
Example
If you'd like to display the first 4 digits of the department ID number:
SUBSTR(A.DEPTID, 1, 4)
This expression will yield the following output:
339010 -> 3390
434100 -> 4341

MYHR: ADVANCED QUERY FUNCTIONS USER'S GUIDE DATE FUNCTIONS
42 Northwestern University Human Resources Operations
DATE FUNCTIONS
Add or Subtract Days from a Date Field
Expression: Use simple (+) or (-) operators to add or subtract days
Examples: A.EFFDT + 1 -> Returns the day after A.EFFDT
A.EFFDT - 7 -> Returns the date 7 days before A.EFFDT
Add or Subtract Months from a Date Field
Expression: ADD_MONTHS(field, months)
Examples: ADD_MONTHS(A.EFFDT, 1) -> Returns the month after A.EFFDT
ADD_MONTHS(A.EFFDT, -1) -> Returns the month before A.EFFDT
Reformatting and Extracting Date Fields
Description: Using expressions, you can easily extract part of a date (such as the year), or reformat the date to display
differently. Because PeopleSoft stores different date fields in different ways, you may need to translate the date into a
different data type first.
Expressions:
• If the date field is stored in PeopleSoft as a “date” type, such as an Effective Date:
TO_CHAR(TO_DATE(field), 'format')
• If the date field is stored in PeopleSoft as a “time” type, such as Last Updated Date/Time:
TO_CHAR(TO_TIMESTAMP(field, 'HH24.MI.SS.FF'), 'format')
• If the date field is stored as plain text, you must specify its existing format before re-formatting it:
TO_CHAR(TO_DATE(field, 'currentformat'), 'format')
Format: The format must be in single quotes and specifies the formatting you'd like to apply to the date:
Date Code Meaning Date Code Meaning
YYYY
4-digit year
DY
Abbreviated name of day
YY
2-digit year
HH
Hour of day (1-12)
MM
Month (01-12; JAN = 01)
HH24
Hour of day (0-23)
MON
Abbreviated name of month
MI
Minute (0-59)
DAY
Name of day
SS
Second (0-59)
DD
Day of month (1-31)
AM
Meridian indicator
Examples: For an Effective Date of 2013-01-06:
TO_CHAR(TO_DATE(A.EFFDT), 'YYYY') -> 2013
TO_CHAR(TO_DATE(A.EFFDT), 'Mon DD, YYYY') -> Jan 06, 2013

MYHR: ADVANCED QUERY FUNCTIONS USER'S GUIDE DATE FUNCTIONS
43 Northwestern University Human Resources Operations
SYSDATE
Description: Returns the current date/time for comparison to data. Use with the above functions to provide testing for
certain time periods. Because SYSDATE contains a time, you may have to remove the time by changing it to a flat date.
Expression: SYSDATE
Examples: SYSDATE -> Returns the current date and time.
TRUNC(SYSDATE) -> Returns today's date without a time component.
SYSDATE + 7 -> Returns 7 days from the exact current date and time.
TO_DATE(SYSDATE + 7) -> Returns 7 days from the current date, without a time.

MYHR: ADVANCED QUERY FUNCTIONS USER'S GUIDE OTHER FUNCTIONS
44 Northwestern University Human Resources Operations
OTHER FUNCTIONS
Aggregate Functions
Just as fields can be aggregated within the Fields tab, expressions can be used to aggregate data as well. These expressions
are useful it you want multiple aggregates on the same field at the same time.
These Aggregate functions are entered as any expression; the Aggregate Field checkbox must be checked when creating one
of these expressions.
Aggregate Expression
Sum
SUM(field)
Minimum
MIN(field)
Maximum
MAX(field)
Average
AVG(field)
Count all values
COUNT(field)
Count only
distinct values
COUNT(DISTINCT field)
Number Rounding Functions
Expression Description
ROUND(field, decimals)
Rounds the field to the specified number of
decimal places.
FLOOR(field)
Rounds the number down to the nearest
whole number.
CEIL(field)
Rounds the number up to the nearest whole
number.
Character Formatting Functions
Expression Description
INITCAP(field)
Capitalizes the first letter of each word.
LOWER(field)
Converts the entire field to lowercase.
UPPER(field)
Converts the entire field to uppercase.
Constants
Any constant can be created as an expression by entering the string in single quotes. For example, this expression:
'Faculty'
will output the literal data Faculty for every row in the query.

MYHR: ADVANCED QUERY FUNCTIONS USER'S GUIDE
45 Northwestern University Human Resources Operations
Section 4
Other Query Functionality

MYHR: ADVANCED QUERY FUNCTIONS USER'S GUIDE USING "HAVING" TO FILTER BY AGGREGATE FUNCTIONS
46 Northwestern University Human Resources Operations
USING "HAVING" TO FILTER BY AGGREGATE FUNCTIONS
Overview
The "Having" tab in Query Manager allows us to filter the output using the result of an aggregate function. It is similar to the
"Criteria" tab, but it's used when we have aggregate columns. You must first build a query that has an aggregate field (e.g.
count, sum, minimum, maximum).
Example
Find all department IDs that have more than 50 employees.
Procedure
1.
Create a query using the NW_EMPLOYEES table that has EMPLID and DEPTID as fields.
2.
On the "Fields" tab, click "Edit" for EMPLID. Change the Aggregate setting to "Count Distinct". Click "OK".
3.
Go to the "Having" tab and click "Add Having Criteria".
4.
For Experssion 1, select field A.EMPLID. Condition Type, use "greater than". For Expression 2, leave as
"Constant" and type in 50. Click OK.
5.
Run the report. Now you will only see department IDs that have more than 50 current employees.

MYHR: ADVANCED QUERY FUNCTIONS USER'S GUIDE LIST MATCHING WITH EXPRESSIONS
47 Northwestern University Human Resources Operations
LIST MATCHING WITH EXPRESSIONS
Overview
A query Expression can be used to produce query results that match one of a list of values. The result is similar to using an
“In List” on the Criteria page, but provides an easier method to “import” a long list of values, as opposed to entering them
one-by-one into a list.
myHR has developed a simple web form that will allow you to create the expression for use in matching a list of EmplIDs,
Position Numbers, Projects, or any other data.
The process, though simple, involves a few steps:
1. Identify the Table and Field to match, using the “Query” tab.
2. Create your list of matching values in Excel, Word, or Notepad.
3. Format the values into an Expression using the myHR tool.
4. Create the Expression using the “E
XPRESSIONS” tab in Query Manager.
5. Create the Criteria using the “C
RITERIA” tab.
1. Identify the Table & Field to Match
The query has to know what table and field you are trying to
match; these can be found on the “Q
UERY” tab in Query
Manager.
In this example, if you want to pull data from
NW_EMPLOYEES for a list of
EMPLIDS, looking at the “QUERY”
tab shows the Table Letter is “A” and the Field Name is
“EMPLID”:
This information will be used when we complete the expression in Step #4.
2. Create Your List of Matching Values
If you don't already have a list of values you want to match, create a simple list in Excel, Word, or
Notepad.
Note: There is no limit to the length of the list; you may have 7 values or 7000 values. This is one of the
benefits of using Expression Matching.
3. Format the Values for the Expression
You must now format the list into a query expression. Using the tool on the HR/myHR website, the
expression can automatically be generated for you.
a.
Copy the list of values by highlighting the cells, right-clicking, and choose “Copy.”
b.
In your web browser, open the following webpage:
https://www.northwestern.edu/hr/essentials/hr-systems/myhr/administration/expression-filter.html
c.
Select the "myHR Query Expression for Filtering" option.

MYHR: ADVANCED QUERY FUNCTIONS USER'S GUIDE LIST MATCHING WITH EXPRESSIONS
48 Northwestern University Human Resources Operations
d.
Enter the list of values you want to match into the appropriate box.
If you already have a list or column of data, you can copy and paste
that list from Excel, Word, or Notepad.
e.
Ensure the Table Letter and Field Name indicate the field from
your query you are trying to match.
f.
Click .
g.
The full Expression is created for you. Copy the entire expression; this will be used in the next step.
4. Create the Expression
Navigate to the “Expressions” tab in your query, and add a new
expression as normal. Paste the entire Expression from the
previous step, and modify no other data. Click "OK."
5. Create the Criteria
Navigate to the “Criteria” tab in your query, and add a
new criteria as normal. For the first part of your
criteria, choose the Expression you just created using
the search magnifying glass. That Expression should be
equal to 1. Click OK. Now you can run your query and
only the list of IDs you imported will be included.

MYHR: ADVANCED QUERY FUNCTIONS USER'S GUIDE DRILLING URLS
49 Northwestern University Human Resources Operations
DRILLING URLS
Overview
Any query field in your results can be turned into clickable link, directing a user to a specific PeopleSoft page or another
Query. This is a special type of Expression known as a DRILLING URL.
Drilling into a PeopleSoft Page
Imagine a query that provides EmplIDs and appointment data. For every query result, you want to be able to click an
employee's Name and be directed to that employee's Job Data page.
Procedure
1.
First, set up your query as usual with all necessary fields and criteria. For this example, we will include basic
appointment data, including the employee's EMPLID, EMLP_RCD, and NAME.
2.
Click the tab.
3.
Select .
4.
In the Expression Type box, choose “Drilling URL.”
5.
Choose the Component URL link.
6.
Click the Add Content Reference Link, and use the folders to navigate to a PeopleSoft page. In this example,
we will choose the “Job Data” page.
• Note that all PeopleSoft pages are available, but users will get a security error if attempting to click
through to a page they do not have access to.
7.
Use the prompt to select the Page to view.
8.
Click . This is where you will create the link to a particular employee's data.
9.
For each piece of data that you'd like to match to a particullar myHR page, first click the Selection Flag.
Then choose the field in your query that matches. In the example above, you want to ensure that the
Employee's
EMPLID and EMPL_RCD for the myHR page match that of the query results:
10.
Click . This tells the query what you want to click on to get to the employee's Job
Data page.
11.
If we want each Employee's name in my query results to be a clickable link, we will select the
NAME
field:
12.
Click .
When viewing your query, each Employee's Name will now be a clickable link, taking you to the Job Data page that matches
that employee's
EMPLID and EMPL_RCD.

MYHR: ADVANCED QUERY FUNCTIONS USER'S GUIDE CREATING A BROWSER SHORTCUT / LINK TO A QUERY
50 Northwestern University Human Resources Operations
CREATING A BROWSER SHORTCUT / LINK TO A QUERY
Overview
Like any page in myHR, a shortcut link can be created that will take you directly to your query results after logging into the
Reporting database.
1. Your link will always begin with this:
https://myhrreports.northwestern.edu/psp/hr92rept/EMPLOYEE/HRMS/q/?ICAction=
2. Do you want to exclude menu navigation?
If you want your query results to open in a simple browser window with no myHR navigation, replace the “psp” with
“psc.”
3. Format the Values for the Expression
To specify the exact query, add the following to the URL:
ICQryNameURL=PRIVATE.QUERY_NAME
• If the query is a public query, replace “PRIVATE” with “PUBLIC”
• Replace QUERY_NAME with the query's name
• To cause the link to download to Excel immediately, replace “ICQryNameURL” with “ICQryNameExcelURL”.
Otherwise, results will open in the standard HTML view.
Your link will now look similar to this:
https://myhrreports.northwestern.edu/psp/hr92rept/EMPLOYEE/HRMS/q/?ICAction=ICQryNam
eURL=PRIVATE.KEM_TEST
