
EMBRAVA CONNECT | USER GUIDE
©2020 Embrava Pty Ltd
1
User Guide
©2020 Embrava Pty Ltd
Embrava Connect
EMBRAVA CONNECT | USER GUIDE
©2020 Embrava Pty Ltd
2
Contents
Overview ............................................................................................................................................................... 4
Embrava Connect for Windows ....................................................................................................................... 5
Installation............................................................................................................................................................. 5
Prerequisites ....................................................................................................................................... 5
Supported Applications for Availability Display ................................................................................ 5
Connect your Embrava Device .......................................................................................................... 5
Install Software ................................................................................................................................... 6
Features ................................................................................................................................................................. 9
Configuring Alerts .............................................................................................................................. 9
Configuring the Blynclight Nameplate ............................................................................................ 10
Manual operation ............................................................................................................................. 12
Windows Deployment ...................................................................................................................................... 13
Prerequisites ..................................................................................................................................... 13
Install Software ................................................................................................................................. 13
Usage ................................................................................................................................................ 16
Step 1: Select Configurations ....................................................................................................... 16
Step 2: Select Organisational Unit ............................................................................................... 17
Step 3: Create Configuration ....................................................................................................... 18
Step 4: Deploy Configuration ...................................................................................................... 19
Embrava Connect for Mac ............................................................................................................................. 23
Installation.......................................................................................................................................................... 23
Prerequisites ..................................................................................................................................... 23
Supported Applications for Availability Display .............................................................................. 23
Connect your Embrava Device ........................................................................................................ 23
Install Software ................................................................................................................................. 24
Features .............................................................................................................................................................. 29
Configuring Alerts ............................................................................................................................ 29
Manual operation ............................................................................................................................. 31
Mac Deployment .............................................................................................................................................. 32
Installation ......................................................................................................................................... 32
.......................................................................................................................................................... 32
EMBRAVA CONNECT | USER GUIDE
©2020 Embrava Pty Ltd
3
Configuration .................................................................................................................................... 32
Support .............................................................................................................................................................. 33
FAQ ................................................................................................................................................... 33
Log a Support Call ........................................................................................................................... 33
Appendix A - Configuring Contact Center Optimization (CCO) for Cisco Finesse ............................ 34
Overview ........................................................................................................................................... 34
Appendix B - Configuring Contact Center Optimization (CCO) for Genesys PureCloud ................. 35
Download and Install Embrava Connect ......................................................................................... 35
Activate the Genesys PureCloud Connection within Embrava Connect ....................................... 35
Appendix C - Configuring Desk Booking with EMS Software ................................................................. 38
Download and Install Embrava Connect ......................................................................................... 38
Configure EMS Software Platform Services and Embrava Connect Density Feature License ...... 38
Appendix D - Configuring Embrava Connect for RingCentral ............................................................... 39
Download and Install Embrava Connect ......................................................................................... 39
Configure RingCentral Connection ................................................................................................. 39
Appendix E - Configuring Embrava Connect for Broadsoft .................................................................... 43
Enable API access on Broadsoft Communicator Server ................................................................. 43
Download and Install Embrava Connect ......................................................................................... 43
Configure Broadsoft Connection ..................................................................................................... 43
Appendix F - Configuring Microsoft Teams ............................................................................................... 44
Appendix G - Configuring for Slack ..............................................................................................................47

EMBRAVA CONNECT | USER GUIDE
©2020 Embrava Pty Ltd
4
Overview
This user guide has been developed to assist users to install and configure Embrava Connect for
the following solutions:
• Availability Display
o Use our devices to let your colleagues know when you are on a call, busy with a
task or available to chat.
o This solution has been developed for the following platforms:
▪ Microsoft Teams
▪ Skype for Business / Microsoft Lync
▪ Cisco Jabber
▪ RingCentral
▪ Slack
▪ CounterPath Bria
• Contact Center Optimization (CCO)
o Use our devices to streamline the communication between agents and supervisors
to boost the performance of your contact center
o This solution has been developed for the following contact center platforms:
▪ Cisco Finesse – see Appendix A for configuration details
▪ Genesys PureCloud – see Appendix B for configuration details
• Desk Booking & Workplace Analytics
o Use our devices to book and check into desks and provide workplace analytics in
Hot Desking, Activity-based Working and Office Hoteling work environments.
o This solution has been developed for the following platforms:
▪ EMS Software – see Appendix C for configuration details
▪ 3
rd
party platforms – our devices can send desk booking information to
any platform with a REST API.
The following sections will illustrate how to install the basic version of Embrava Connect for
availability display with Appendices used to configure the advanced Feature License options.
This solution requires the CCO Feature License. Please Contact Us if you
require this Feature License.
This solution requires the Density Feature License. Please Contact Us if you
require this Feature License.
EMBRAVA CONNECT | USER GUIDE
©2020 Embrava Pty Ltd
5
Embrava Connect for Windows
Installation
The purpose of this section is to describe what is required to successfully install Embrava Connect
on your Windows PC.
Prerequisites
• Microsoft Windows Operating System – supports following versions:
o 10
o 8
o 7
o Vista
o XP
• .NET Framework 4.5
Supported Applications for Availability Display
Embrava Connect will synchronize with the following applications to display your availability:
• Microsoft Teams – see Appendix F for configuration details.
• Skype for Business 2016, 2015
• Microsoft Lync 2013, 2010
• Cisco Jabber for Windows 10, 11
• Slack – see Appendix G for configuration details.
• Skype v7 and above
• RingCentral – see Appendix D for configuration details.
• CounterPath Bria 4 and above. Embrava Connect for Windows supports Bria Teams and
Enterprise plan accounts only and Bria Solo and Solo Free plan accounts are not
supported.
Connect your Embrava Device
1. Unpack the device from its packaging.
2. Connect the USB cable from your device into an available USB port on your PC.
3. (Optional) Peel off the protective coating from one side of the mount adhesive and attach
the adhesive to the bottom of the Blynclight device or mount. Ensure surfaces are cleaned
and free of dust before applying adhesive.
4. (Optional) Peel off the protective coating from the other side of the mount adhesive and
place your Blynclight device or mount in an appropriate position in view of your
surrounding colleagues. Ensure surfaces are cleaned and apply approximately 10 seconds
of pressure when attaching mount to a surface.

EMBRAVA CONNECT | USER GUIDE
©2020 Embrava Pty Ltd
6
Install Software
1. Download the latest Embrava Connect software from http://www.embrava.com/install
2. Extract the Embrava Connect installer from the zip file downloaded in Step 1.
3. Double click the Embrava Connect installer to commence the installation process.
4. After you have read the License Agreement and agree to the terms select ‘I Agree’ and
click ‘Next’.

EMBRAVA CONNECT | USER GUIDE
©2020 Embrava Pty Ltd
7
5. Select the Installation folder for your Embrava Connect software and if you will be the only
user of the software on this particular machine.
6. Click ‘Next’ and the installation will begin.
a. You may be prompted by a User Access Control dialog to confirm you wish to
install the software. Click ‘Yes’ to confirm the installation.
7. The installation process will now complete and Embrava Connect will run immediately.
a. If you had connected the Embrava devices correctly, as described in the ‘Connect
Device’ section above, and you have your Microsoft Lync client signed in you
should see your status automatically display on the Blync device.

EMBRAVA CONNECT | USER GUIDE
©2020 Embrava Pty Ltd
8
8. When Embrava Connect first runs you will be asked to select which applications you would
like your Embrava devices to connect to as illustrated below.
Uncheck any applications you do not wish to use. If you are using one device to display
your status from multiple applications, you can set the order of which application should
get priority over the device.
9. Once Embrava Connect is installed and running the application can be configured by
clicking the Embrava icon in your System Tray.

EMBRAVA CONNECT | USER GUIDE
©2020 Embrava Pty Ltd
9
Features
The Embrava Connect software controls all Embrava devices by configuring Alerts for a set of
defined Activities. This section will describe how these Alerts are configured for each Activity and
provides some example Alert configurations.
Configuring Alerts
The Activities that Embrava Connect can be configured to provide Alerts for depend on the UC
applications you have selected to connect to (Skype for Business, Cisco Jabber etc.). A full list of
Activities include:
• Incoming IM – when an Instant Message is received.
• Incoming Call – when a Call is incoming
• On Call – when you are on a Call.
• Available – when your status becomes Available.
• Busy – when your status becomes Busy.
• Do Not Disturb – when your status becomes Do Not Disturb.
For each Activity, you can define the characteristics of the Alert you would like once that Activity
occurs. The Alert characteristics you can configure are:
• Light – the color of the light to be displayed on your Embrava device.
• Brightness – if you would like the light to be dimmed (available for v3.0 devices only).
• Flash – the speed the light should flash at.
• Tone – the ringtone to be played (available for Blynclight Plus and Mini devices only).
• Volume – the volume at which the selected ringtone should be played (available for
Blynclight Plus and Mini devices only).
• Incoming Caller ID – display the name/number of the caller (for Nameplate only).
To configure Activity Alerts, select the ‘Open Embrava Connect’ menu item when clicking the
Embrava icon in your system tray. The ‘Embrava Connect’ screen is displayed below.

EMBRAVA CONNECT | USER GUIDE
©2020 Embrava Pty Ltd
10
The functionality of the above interface is described below:
1. Connection tabs – each tab represents the configuration of your selected UC application
(eg. Skype for Business, Cisco Jabber etc.)
2. Active checkbox – enable/disable this UC application from connecting to any Embrava
device.
3. Device dropdown – select the device you would like this UC application to connect to.
4. Activities – the list of activities supported by your UC application from which you can
configure alerts.
5. Alert definition – select the characteristics of the alert you wish to invoke for the selected
Activity
6. Connect button – connect/disconnect this UC application from the selected device.
For example, the configuration above illustrates that the Blynclight Mini device will display a
Medium-paced flashing Red light at full brightness with no sound for Incoming Calls on Skype for
Business.
Configuring the Blynclight Nameplate
The Blynclight Nameplate can display the name of the user from 3 different sources:
1. Connection – here the Display Name from Skype for Business or Cisco Jabber can be
automatically displayed on the Nameplate.
2. Windows Display Name – when selected, the Nameplate can display the Windows Display
Name of the person logged into the PC.
3. Manual – the Nameplate can display text manually entered into Embrava Connect.
To configure the Name Source of the Nameplate:
1. Click ‘Devices’ from ‘File’ menu within Embrava Connect. The listing of devices is shown as
below:
2. Select the Nameplate device and click ‘Configure’
3. Choose your Name Source and click ‘Ok’
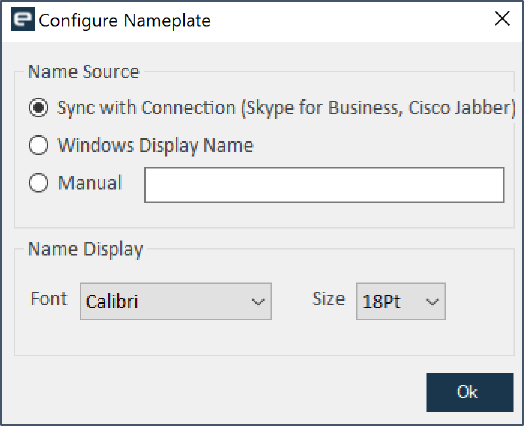
EMBRAVA CONNECT | USER GUIDE
©2020 Embrava Pty Ltd
11
4. The Nameplate will now display the name from the selected source.

EMBRAVA CONNECT | USER GUIDE
©2020 Embrava Pty Ltd
12
Manual operation
Many users who do not have the provided UC applications installed or simply do not wish to have
their Embrava device replicate their UC application status can have their devices controlled
manually. To achieve this simply check the Active box on the Manual connection tab and click
‘Connect’ as shown below:
Note: Checking the Active checkbox will deactivate all other UC application connections.
Unchecking the Active checkbox here will re-activate your previous UC application connections.
From this screen, the user can select any color, flash speed, brightness, ringtone or volume and it
will be displayed on the selected device immediately.
The user can also configure Hotkeys to quickly change the color of their status light to display
their availability. For example, if a user is about to answer the phone they can press Ctrl+Alt+B
and the light will change to the Busy Red color letting colleagues know the user is Busy.

EMBRAVA CONNECT | USER GUIDE
©2020 Embrava Pty Ltd
13
Windows Deployment
Embrava Connect has been designed so that it can be easily deployed and configured within the
enterprise.
The Embrava Connect installation package can be used with all major Windows deployment tools
such as SCCM, GPO, etc.
Once Embrava Connect is installed on all client PCs a standard configuration is also required on
each PC.
On Windows, the Enterprise Admin Tool is used to create, push out and lock down a standard
Embrava Connect configuration on client PCs.
The following steps describe the use of the Enterprise Admin Tool.
Prerequisites
• Microsoft Windows Server:
o 2012 R2
o 2012
• .NET Framework 4.0
Install Software
1. Download the latest Enterprise Admin software from http://www.embrava.com/install
2. Extract the Enterprise Admin installer from the zip file downloaded in Step 1.
3. Double click the Enterprise Admin installer to commence the installation process.

EMBRAVA CONNECT | USER GUIDE
©2020 Embrava Pty Ltd
14
4. Select ‘I Agree’ and click ‘Next’ once you accept the Licence Agreement.
5. Select the Installation folder for your Enterprise Admin software and if you will be the only
user of the software on this particular machine.

EMBRAVA CONNECT | USER GUIDE
©2020 Embrava Pty Ltd
15
6. Click ‘Next’ and the installation will begin.
a. You may be prompted by a User Access Control dialog to confirm you wish to
install the software. Click ‘Yes’ to confirm the installation.
7. The installation process will now complete and the Enterprise Admin shortcut will be
added to your desktop.

EMBRAVA CONNECT | USER GUIDE
©2020 Embrava Pty Ltd
16
Usage
This section will describe how to use the Enterprise Admin to deploy a standard Embrava Connect
configuration across your organisation.
Step 1: Select Configurations
To begin developing a standard Embrava Connect configuration, double-click the Enterprise
Admin shortcut on your desktop. The following screen is then displayed:
Now, select the Configurations from which you would like to develop standard Embrava Connect
configurations.
Once complete the following screen will be displayed:
An Configuration tab will be displayed for each application selected.

EMBRAVA CONNECT | USER GUIDE
©2020 Embrava Pty Ltd
17
Step 2: Select Organisational Unit
From your selected Configuration tab, click the ‘Browse’ button to select the Organisation Unit
(OU) of the client machines you would like the configuration to be deployed.
Clicking the ‘Browse’ button - will open the Organizational Units dialog, select an OU under your
particular domain name as shown below. Here in this example we have selected the "Software
Development" OU under the domain "EMBRAVA.COM"
Click OK once complete and the selected OU will be displayed within the Configuration tab and
the button ‘Create’ will now be enabled as shown on the following page.

EMBRAVA CONNECT | USER GUIDE
©2020 Embrava Pty Ltd
18
Step 3: Create Configuration
The Enterprise Admin Console can be used to configure alerts for the following Activities on your
client machines:
• Incoming IM – when an Instant Message is received. (Skype for Business Only)
• Incoming Call – when a Call is incoming
• On Call – when you are on a Call.
• Available – when your status becomes Available.
• Busy – when your status becomes Busy. (Skype for Business Only)
• Do Not Disturb – when your status becomes Do Not Disturb.
For each Activity, you can define the characteristics of the Alert you would like once that Activity
occurs. The Alert characteristics you can configure are:
• Light – the color of the light to be displayed on the device.
• Brightness – if you would like the light to be dimmed (available for v3.0 devices only).
• Flash – the speed the light should flash at.
• Tone – the ringtone to be played (available for Blynclight Plus/Mini devices only).
• Volume – the volume at which the selected ringtone should be played (available for
Blynclight Plus/Mini devices only).
• Ring mode – the tone can be configured to play once or repeated (available for Blynclight
Plus/Mini devices only).

EMBRAVA CONNECT | USER GUIDE
©2020 Embrava Pty Ltd
19
As illustrated above, the alert for Cisco Jabber Incoming Calls is to display a Red light, flashing at a
Medium pace, Full brightness, playing the Standard ringtone at 25% volume in Repeat mode.
Select the other Activity buttons on the left of the screen to configure alerts for all the other
activities.
Use the ‘Disable Client Configuration’ checkbox to prevent users from modifying the configuration
on their machines.
Once complete, click on ‘Create Configuration’ button to generate the configuration information
to be added to the selected OU through group policy.
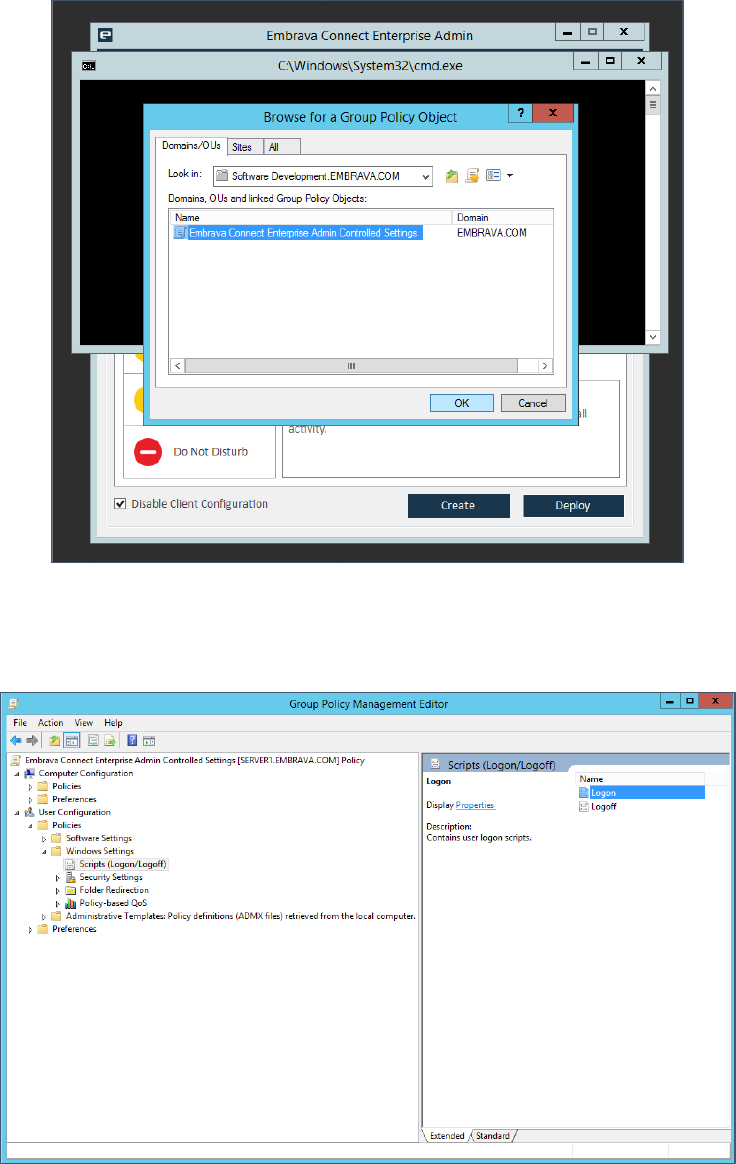
Step 4: Deploy Configuration
Once your desired configuration has been created in Step 3, the ‘Deploy Configuration’ button
will now be enabled.
Clicking the ‘Deploy Configuration’ button will do the following:
1. Create a new group policy object (GPO) with your Embrava Connect configuration
settings contained within this GPO as Logon/Logoff scripts.
2. Link the GPO to your selected OU.
3. Execute the Group Policy Management Editor (GPME) to enable the GPO. (The GPO must
be opened within the GPME to make the GPO valid.)

EMBRAVA CONNECT | USER GUIDE
©2020 Embrava Pty Ltd
20
Follow these steps to validate the GPO:
1. Once the GPO editor dialog appears, you will see the dialog "Browse for a Group Policy
Object" as shown below.
In the ‘Domains/OUs’ tab, select the Domain name in the ‘Look In’ dropdown and select
the OU that you have selected in Step One: Select Organisational Unit and click ‘OK’. (We
have selected Software Development.EMBRAVA.COM in the example above).
2. Once done, the GPOs in the selected OU will now be displayed. Select the GPO named
‘Embrava Connect Enterprise Admin Controlled Settings’ and click ‘OK’ as shown below.
EMBRAVA CONNECT | USER GUIDE
©2020 Embrava Pty Ltd
21
3. The Group Policy Management Editor dialog will now appear. Select ‘User Configuration’ -
> ‘Policies’ -> ‘Windows Settings’ -> ‘Scripts (Logon/Logoff)’ -> ‘Logon’ as shown in
below.
4. Double click on ‘Logon’ and the Logon Properties dialog will be displayed as illustrated
below. Just click OK and the GPO will now be validated. This completes the Embrava
Connect Configuration Settings Deployment to the selected OU. You may close the Group
Policy Management Editor at this point.

EMBRAVA CONNECT | USER GUIDE
©2020 Embrava Pty Ltd
22
The GPO is now active and the Embrava Connect configuration will be applied to each
machine in the selected OU next time someone logs into that machine.
EMBRAVA CONNECT | USER GUIDE
©2020 Embrava Pty Ltd
23
Embrava Connect for Mac
Installation
The purpose of this section is to describe what is required to successfully install Embrava Connect
for Mac.
Prerequisites
• Mac OS 10.15 – 10.9.
• If using Skype for Business Online, please follow the steps outlined in Appendix F –
Configuring Authentication App for Skype for Business Online before proceeding to allow
Embrava Connect to gather status updates from Skype for Business Online.
Supported Applications for Availability Display
Embrava Connect for Mac will connect to the following servers to display your availability:
• Microsoft Teams
• Skype for Business Online
• Skype for Business Server 2015 and above
• Microsoft Lync Server 2013
• Cisco Unified Presence Server (CUPS)
Connect your Embrava Device
1. Unpack the device from its packaging.
2. Connect the USB cable from your device into an available USB port on your PC.
3. (Optional) Peel off the protective coating from one side of the mount adhesive and attach
the adhesive to the bottom of the Blynclight device or mount. Ensure surfaces are cleaned
and free of dust before applying adhesive.
4. (Optional) Peel off the protective coating from the other side of the mount adhesive and
place your Blynclight device or mount in an appropriate position in view of your
surrounding colleagues. Ensure surfaces are cleaned and apply approximately 10 seconds
of pressure when attaching mount to a surface.

EMBRAVA CONNECT | USER GUIDE
©2020 Embrava Pty Ltd
24
Install Software
1. Download the latest Embrava Connect for Mac software from
http://www.embrava.com/install
2. Double click the Embrava Connect installer to commence the installation process.
3. After you have read the License Agreement and agree to the terms click ‘Continue’ and
select ‘Agree’.

EMBRAVA CONNECT | USER GUIDE
©2020 Embrava Pty Ltd
25
4. Select a Destination for your Embrava Connect for Mac software.
5. Click ‘Continue’ and the installation will begin. Once the installation is complete the
following screen will be displayed.

EMBRAVA CONNECT | USER GUIDE
©2020 Embrava Pty Ltd
26
6. Run the Embrava Connect for Mac application by double-clicking the application icon
within your Launchpad screen.
7. When Embrava Connect first runs you will be asked to select which applications you would
like your Embrava devices to connect.
a. Microsoft Teams: The following steps are required when synchronizing with
Microsoft Teams
i. Select Microsoft Teams connection as shown below and click Connect.
ii. A sign-in dialog will be displayed. Login using your user credentials.
iii. The first time the application is run within your organization, you will be
asked to provide consent for Embrava Connect to access presence
information. Please check the “Consent on behalf of your organization”
checkbox (as shown below) to allow Embrava Connect to read presence
information for all users in your organization so their status can be
displayed on the status light. An administrator account is required to
provide this consent.

EMBRAVA CONNECT | USER GUIDE
©2020 Embrava Pty Ltd
27
iv. Once this consent has been given for your organization, your users will no
longer require giving consent and the status light will immediately display
the users Teams status.
b. Skype for Business: The following parameters are required for the Skype for
Business Connection:
i. Username – Skype for Business or Lync sign-in address E.g.
ii. Password – password of the user account specified by the Username
above.
c. Cisco Jabber: The following parameters are required for the Cisco Jabber
Connection:
i. Domain – Domain name of the CUPS in format domain.com. E.g.
acme.net
ii. Username – Cisco Jabber Sign-in Name (without @domain.com). E.g. If
Cisco Jabber Sign-in ID is jcitizen@acme.net, the Username field to be
entered is jcitizen.
iii. Password – password of the user account specified by the Username
above.
iv. Http Binding URL - BOSH URL of the CUPS. The BOSH URL is usually in the
format http(s)://server.[domain]:7335/httpbinding. See here for more
information in determining your BOSH URL.

EMBRAVA CONNECT | USER GUIDE
©2020 Embrava Pty Ltd
28
Uncheck any Connections you do not wish to use and then click ‘Ok’ to begin using the
application.
EMBRAVA CONNECT | USER GUIDE
©2020 Embrava Pty Ltd
29
Features
The Embrava Connect for Mac software controls all Embrava devices by configuring Alerts for a
set of defined Activities. This section will describe how these Alerts are configured for each Activity
and provides some example Alert configurations.
Configuring Alerts
The Activities that Embrava Connect for Mac can be configured to provide Alerts for depend on
the UC applications you have selected to connect to (Skype for Business, Cisco Jabber etc.). A full
list of Activities includes:
• On Call – when you are on a Call.
• Available – when your status becomes Available.
• Away – when your machine is in Sleep/Standby mode.
• In a Meeting – when you are in a Cisco Jabber or WebEx meeting.
• Busy – when your status becomes Busy.
• Do Not Disturb – when your status becomes Do Not Disturb.
For each Activity, you can define the characteristics of the Alert you would like once that Activity
occurs. The Alert characteristics you can configure are:
• Light – the color of the light to be displayed on your Embrava device.
• Brightness – if you would like the light to be dimmed (available for v3.0 devices only).
• Flash – the speed the light should flash at.
• Tone – the ringtone to be played (available for Blynclight Plus and Mini devices only).
• Volume – the volume at which the selected ringtone should be played (available for
Blynclight Plus and Mini devices only).
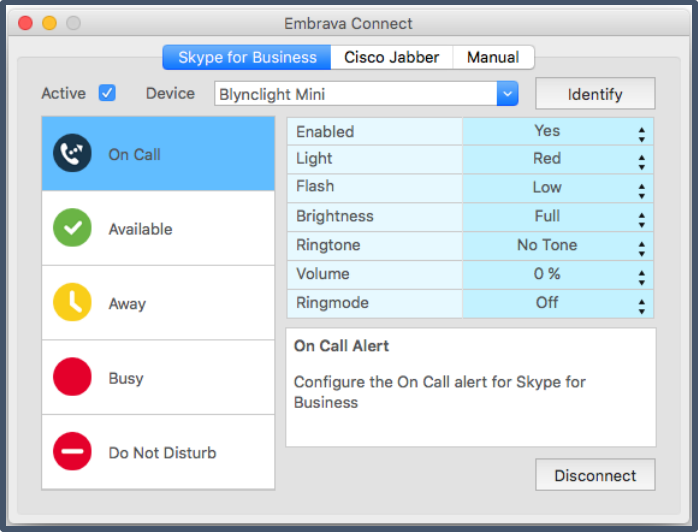
To configure Activity Alerts, double click the Embrava Connect for Mac icon held in the dock. The
‘Embrava Connect’ screen is displayed below.
EMBRAVA CONNECT | USER GUIDE
©2020 Embrava Pty Ltd
30
The functionality of the above interface is described below:
1. Connection tabs – each tab represents the configuration of your selected UC application
(eg. Skype for Business, Cisco Jabber and Manual)
2. Active checkbox – enable/disable this UC application from connecting to any Embrava
device.
3. Device dropdown – select the device you would like this UC application to connect to.
4. Activities – the list of activities supported by your UC application from which you can
configure alerts.
5. Alert definition – select the characteristics of the alert you wish to invoke for the selected
Activity
6. Connect button – connect/disconnect this UC application from the selected device.
For example, the configuration above illustrates that the Blynclight Mini device will display a Low-
paced flashing Red light at full brightness with no sound for when on a call using Skype for
Business.

EMBRAVA CONNECT | USER GUIDE
©2020 Embrava Pty Ltd
31
Manual operation
Many users who do not have the provided UC applications installed or simply do not wish to have
their Embrava device replicate their UC application status can have their devices controlled
manually. To achieve this simply check the Active box on the Manual connection tab and click
‘Connect’ as shown below:
Note: Checking the Active checkbox will deactivate all other UC application connections.
Unchecking the Active checkbox here will re-activate your previous UC application connections.
From this screen, the user can select any color, flash speed, brightness, ringtone or volume and it
will be displayed on the selected device immediately.

EMBRAVA CONNECT | USER GUIDE
©2020 Embrava Pty Ltd
32
Mac Deployment
Embrava Connect for Mac has been designed so that it can be easily deployed and configured
within the enterprise.
Installation
Using the Apple Remote Desktop software, administrators can easily install Embrava Connect for
many Mac clients across an organization.
Configuration
Embrava Connect for Mac uses a preferences file to store its configuration. This preferences file
can be distributed to other Mac machines within the organization.
Perform the following steps to deploy an Embrava Connect configuration to Mac machines within
an organization:
1. Install Embrava Connect for Mac on a machine and configure the alerts (light, color,
sounds) for your connections within Embrava Connect as required.
2. Once configured, exit Embrava Connect by clicking File -> Quit in the main navigation
menu.
3. Now navigate to the following folder
/Users/<UserName>/Library/Containers/com.embrava.EmbravaConnec
t.v413/Data/Library/Preferences
(Note: the version - v413- might vary in the path based on version you have installed.)
4. The preference file is a Plist file usually named in the following format -
com.embrava.EmbravaConnect.v413.plist
5. Use Apple Remote Desktop or other enterprise management tools to copy this plist file to
the same path on other Mac machines within your organization.

EMBRAVA CONNECT | USER GUIDE
©2020 Embrava Pty Ltd
33
Support
This section details the different areas you can utilize to get help with your implementation of your
Embrava devices.
FAQ
Our Frequently Asked Questions (or FAQ) lists the responses to all of our commonly received
questions.
This should be your first point of support as 9 out of 10 queries are usually resolved by the FAQ.
You can access the FAQ at the URL below:
http://www.embrava.com/faq
Log a Support Call
If you are unable to resolve your query via the FAQ please log a call with our support team.
To log a support call please visit the URL below:
http://www.embrava.com/support-call

EMBRAVA CONNECT | USER GUIDE
©2020 Embrava Pty Ltd
34
Appendix A - Configuring Contact Center
Optimization (CCO) for Cisco Finesse
Overview
The CCO for Cisco Finesse solution is an advanced feature of Embrava Connect. The following
diagram illustrates the different components that make up the solution.
To get started with CCO for Cisco Finesse please contact us using the form below:
https://embrava.com/pages/wants-more-information
Embrava
Connect
UC Platforms
Embrava Connect
displays alerts on
status based on
received events
Sends agent
status & stats
Embrava
Finesse
Gadget
Embrava
Connector
Service
UCCE
UCCX
PCCE
Caches contact
center stats
Requests contact
center statistics (for
Personal Wallboard
only)
CCO Feature
Licence

EMBRAVA CONNECT | USER GUIDE
©2020 Embrava Pty Ltd
35
Appendix B - Configuring Contact Center
Optimization (CCO) for Genesys PureCloud
Download and Install Embrava Connect
1. Download and Install Embrava Connect as described on page 3 of this User Guide.
Activate the Genesys PureCloud Connection within Embrava Connect
1. Enter your CCO for Genesys PureCloud License key by opening Embrava Connect and
selecting ‘About Embrava Connect’ from the ‘Help’ menu and click ‘Upgrade’ as shown
below:
2. Enter your license key in the dialog displayed and click ‘Add License’. You may be asked to
restart Embrava Connect once the license has been added.
a. Alternatively, you may apply a license key to your version of Embrava Connect by
running the Embrava Connect MSI with the license key contained in a text file
called license.txt. The MSI will pickup and apply the license key from the file during
installation.
3. Once the license has been applied you will see the details of the license within the About
Embrava Connect dialog as shown below:

EMBRAVA CONNECT | USER GUIDE
©2020 Embrava Pty Ltd
36
4. Now the license has been applied, the Genesys option will now appear within the
Connections dialog. The Connections dialog can be accessed from the ‘File’ menu within
Embrava Connect. Check the Genesys connection option and click ‘Connect’ as shown
below.
5. A Genesys PureCloud authorization screen will now be displayed. Enter your PureCloud
credentials and click ‘Log In’.
EMBRAVA CONNECT | USER GUIDE
©2020 Embrava Pty Ltd
37
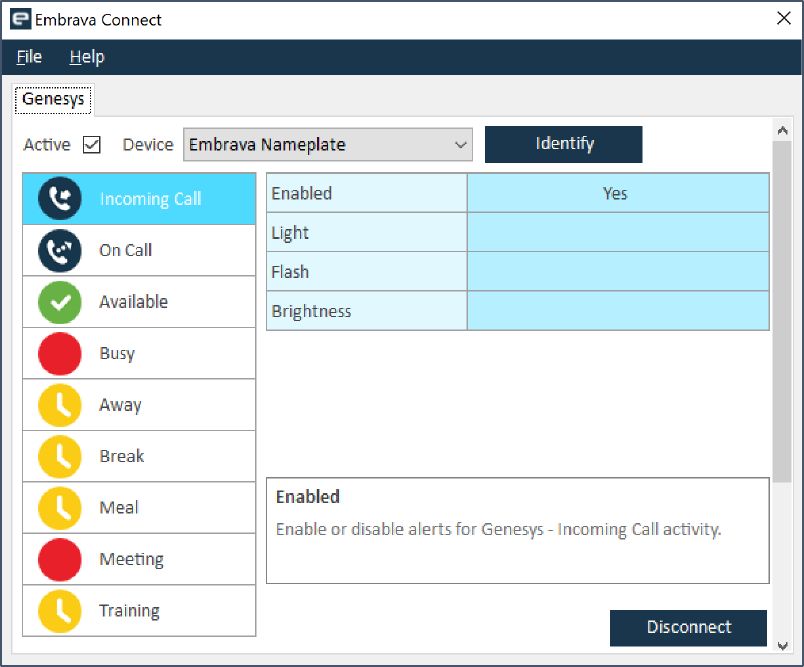
6. Once authorized, the Genesys PureCloud connection will now be active. You may
configure the alerts for different agent states and call duration as shown below.
7. Embrava Connect is now ready to receive data from Genesys PureCloud and display
alerts.

EMBRAVA CONNECT | USER GUIDE
©2020 Embrava Pty Ltd
38
Appendix C - Configuring Desk Booking with
EMS Software
Download and Install Embrava Connect
1. Download and Install Embrava Connect as described on page 3 of this User Guide.
Configure EMS Software Platform Services and Embrava Connect Density Feature
License
1. View the Desk Booking with EMS Software Configuration Guide for full details.

EMBRAVA CONNECT | USER GUIDE
©2020 Embrava Pty Ltd
39
Appendix D - Configuring Embrava Connect
for RingCentral
Download and Install Embrava Connect
1. Download and Install Embrava Connect as described on page 3 of this User Guide.
Configure RingCentral Connection
1. If you are running Embrava Connect for the first time, the Manage Connections window
will be displayed. If you have configured Embrava Connect previously, please open the
Embrava Connect main panel from the System Tray Embrava icon -> Open Embrava
Connect. Now select from Menu File -> Connections and the Manage Connections
window will be displayed.
2. On the Manage Connections dialog select the connection RingCentral.
3. Now click on the Connect button, a browser window called “RingCentral Authorization”
will be displayed. Sign-in to your production RingCentral account – Enter Phone number,
password (extension is optional but mandatory when using your main company number)
and click the Sign-In button

EMBRAVA CONNECT | USER GUIDE
©2020 Embrava Pty Ltd
40
4. The browser window will now go to next page displaying “Access Request” – Embrava
Connect for Windows is requesting access to RingCentral – “View your presence”. Click the
Authorize button.
NB: Our Embrava Connect for Windows software supports RingCentral MVP Premium and
Ultimate plans. Our RingCentral integration does not support RingCentral Essentials or Standard
accounts since RingCentral does not support developer platform APIs and custom integrations for
the Essentials or Standard plan accounts.

EMBRAVA CONNECT | USER GUIDE
©2020 Embrava Pty Ltd
41
5. If you have entered the correct credentials, the browser window will be closed and
authorization completed silently. The Manage Connections window will then be displayed
again with ‘Connect’ button disabled and ‘Disconnect’ button enabled.

EMBRAVA CONNECT | USER GUIDE
©2020 Embrava Pty Ltd
42
6. Now click on the OK button on the Manage Connections window. Then you should see
RingCentral tab added to the Embrava Connect UI.
7. Please ensure that you have connected your Embrava device to the PC. Now if the
‘Connect’ button is displayed on the RingCentral tab, click on the Connect button and
your Embrava device will display the color as per the status of your RingCentral account.

EMBRAVA CONNECT | USER GUIDE
©2020 Embrava Pty Ltd
43
Appendix E - Configuring Embrava Connect
for Broadsoft
Enable API access on Broadsoft Communicator Server
1. On the Broadsoft Communicator Server, update the config.xml to set the “api-provider”
value to ‘true’ to allow Embrava Connect to access Broadsoft user presence. See Section
10.21 -API for Third-Party Applications in UC-One for Desktop – Configuration Guide for
more details.
NB: The api-provider value should be set to true for v22 and above.
2. Once the “api-provider” value has been set to true, users should restart their
Communicator application.
Download and Install Embrava Connect
3. Download and Install Embrava Connect as described on page 3 of this User Guide.
Configure Broadsoft Connection
1. If you are running Embrava Connect for the first time, the Manage Connections window
will be displayed. If you have configured Embrava Connect previously, please open the
Embrava Connect main panel from the System Tray Embrava icon -> Open Embrava
Connect. Now select from Menu File -> Connections and the Manage Connections
window will be displayed.
2. On the Manage Connections dialog select the connection Broadsoft connection and click
OK.
3. A ‘New Add-in’ dialog will be displayed on the Communicator application as shown
below:
4. Click ‘Enable’ and your presence and call events will now be displayed on your status light.
EMBRAVA CONNECT | USER GUIDE
©2020 Embrava Pty Ltd
44
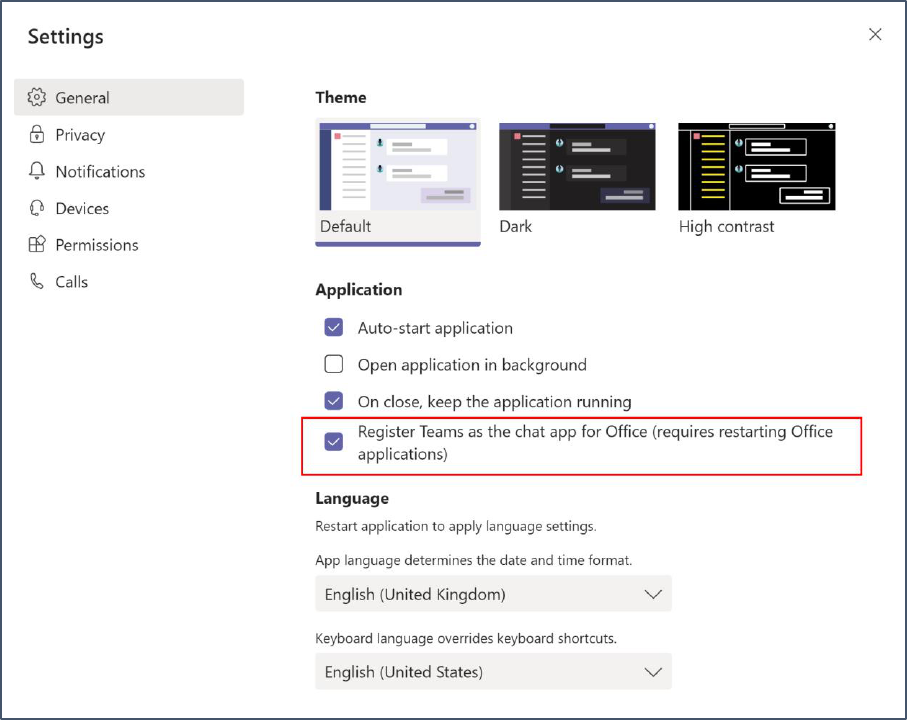
Appendix F - Configuring Microsoft Teams
Microsoft Team (client-side) Connection
Embrava Connect integrates with Microsoft Teams using the Office UC Collaboration interface
when running Microsoft Teams in Teams Only mode. To allow Embrava Connect to subscribe to
status changes from Microsoft Teams please check the ‘Register Teams as the chat app for Office’
checkbox from the Settings menu within Microsoft Teams as shown below:
You may need to restart Embrava Connect or your PC once this change has been made.
Microsoft Team (server-side) Connection
1. Open Embrava Connect -> Manage Connections window.
2. From the Connections list, select Microsoft Teams.

EMBRAVA CONNECT | USER GUIDE
©2020 Embrava Pty Ltd
45
3. Click the Connect button on the Manage Connections window. It will open the Microsoft
Teams account login page in your PC’s default web browser as shown below.
a. Embrava Connect also open a pop-up named “Microsoft Teams Authorization” as
shown below. You don’t need to close this pop-up. This pop-up will be closed
automatically once you complete signing-in on the browser.
4. Enter your Microsoft Teams account credentials on the sign-in page opened in your
browser and complete signing-in to your account.
5. A user consent message or admin consent message will now be displayed in the browser.
If it is a user consent message, please consent. If you see the Admin consent message,

EMBRAVA CONNECT | USER GUIDE
©2020 Embrava Pty Ltd
46
please send the following URL to your Teams admin to accept the consent. Once the
Admin provides consent, repeat the sign-in process again by closing the authorization
pop-up and click the Connect button again on Manage Connections window of Embrava
Connect.
a. Admin Consent url
https://login.microsoftonline.com/common/adminconsent?client_id=965e190f-
6cfb-47c9-8d52-
b3c8aeb54f3c&redirect_uri=https://embrava.github.io/embrava/graph/index.html
6. Once you have signed-in, the following message will be displayed within your browser:
7. While the above page is being displayed, the browser will pop-up a dialog and prompt
you to open the link – “Open Embrava Connect”. Here you must click on the “Open
Embrava Connect” button on the pop-up as shown below. If you click Cancel or close the
browser window without clicking the “Open Embrava Connect” button, then Embrava
Connect will not be able to complete the authentication process and will not be able to
sync with Microsoft Teams.
8. Once you click “Open Embrava Connect”, all pop-up dialogs will be closed.
9. Now click OK on the Manage Connections window of Embrava Connect and you will now
see your Blynclight display your Microsoft Teams presence status.
EMBRAVA CONNECT | USER GUIDE
©2020 Embrava Pty Ltd
47
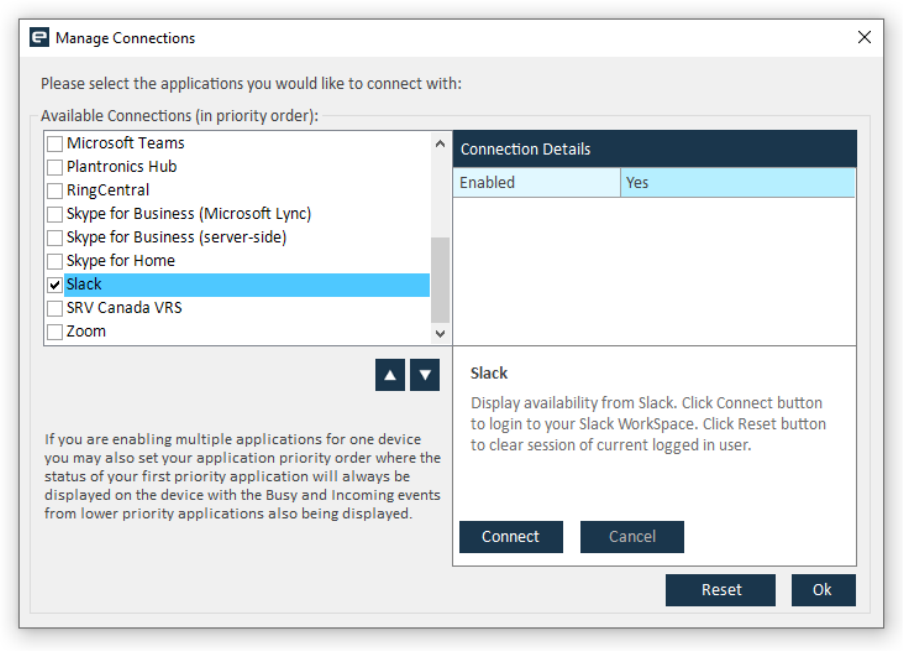
Appendix G - Configuring for Slack
1. Once Embrava Connect is installed, run Embrava Connect by clicking on the Embrava
Connect icon on the system tray and selecting Open Embrava Connect.
2. From the menu, click File -> Connections to open the Manage Connections window as
shown below. Select the Slack connection and then click Connect.
3. The Slack workspace sign-in window is now displayed as shown below. Sign in to the
workspace using your Slack workspace and user id credentials.

EMBRAVA CONNECT | USER GUIDE
©2020 Embrava Pty Ltd
48
4. Once signed-in the Permissions screen will be displayed as shown in the screenshot
below. Accept the permissions by clicking on the Allow button.

EMBRAVA CONNECT | USER GUIDE
©2020 Embrava Pty Ltd
49
NB: Embrava Connect for Slack is using Slack’s Real Time Messaging (RTM) API to connect
with the Slack workspace to get the presence events, call events, IM events and custom
status events. Because Embrava Connect uses the RTM API and does not add functionality
to the Slack application (only provides functionality to Embrava Connect), Slack cannot
approve the application to be listed on the Slack App Directory. Because of this you will
see the yellow banner mentioning that this application has not been approved by Slack.
We assure that Embrava Connect does not and will not store or communicate any
personal information and will not store or communicate any direct message/channel
message data of the Slack user/workspace. Embrava Connect uses the RTM API purely to
gather the users presence change events (Active and Away), status change events, call
events (Incoming Call and On Call) and Instant Messaging events and using these events
to display the appropriate notification on our status light.
5. Once the app permissions are accepted, the Sign-In window will close. The Connect
button in Embrava Connect will be greyed out and the Cancel button will be enabled on
the Manage Connections window as shown below.
6. Click Ok to add Slack as a connection to the Embrava Connect main tab. Immediately
Embrava Connect will gather status, call and IM events from Slack and display the
appropriate notifications on the status light.

EMBRAVA CONNECT | USER GUIDE
©2020 Embrava Pty Ltd
50
Signing in as a different user
If you would like the status light to show the status of a different Slack user, click the Cancel button
for the Slack connection in the Manage Connections screen as shown above. Click the Reset
button to open the Slack Sign-out window as shown below. Click on the Sign Out From Browser
button to sign out. Follow steps 2-6 above to sign in as a different user.
Configuring Custom Statuses
By default, Embrava Connect displays the Orange color for all of the Custom Status events. You
can add up to 5 Custom Statuses so that each custom status can be configured to display a
different alert.
To add a Custom Status, click on the “Custom Status” activity on the left side panel of Embrava
Connect Slack tab. Click on the “Manage Slack Status” button and click on Add button. Enter the
text as displayed on the Slack workspace. For example, if the status value on the Slack Workspace
is “In a meeting”, enter exactly the same string (case sensitive) on the "Add Slack Custom Status”
window and click OK.
Now select custom status from the Custom Status combo box and configure the alert
light/flash/brightness/tone values.
END OF DOCUMENT
