
1
self-locking glider
Thera-Glide®
R, T & W Series (Wood & Oasis)
W-3 MODEL
WOOD MODEL (W-2)
FOCUSED ON WHAT MATTERS
INSTRUCTION MANUAL
lpamedical.com
2527 Dalton avenue, Quebec (Qc) G1P 3S6 CANADA
T 418-681-1313 1-800-663-4863 F 418-681-4488
2
A WORD OF THANKS
Congratulations and thank you for purchasing your chair from
LPA Medical.
Since 1989, LPA Medical has been dedicated to designing and
manufacturing chairs to meet the most demanding requirements of
the healthcare community. Our products are designed with comfort
and durability in mind for both long-term and short-term uses. We are
proud to manufacture quality products that incorporate advanced
features into an aesthetic design that helps maintain the user’s dignity
and well-being.
Please read this instruction manual carefully and consult it often to
maximize the benets of your LPA chair. If you have any questions after
reading it, do not hesitate to contact your LPA representative, contact
us directly through our website, or use our phone number, listed below.
We hope that you enjoy your LPA Medical chair and we thank you for
your business.
Bryan Welch
President
LPA Medical inc.
2527 avenue Dalton,
Quebec City, QC, Canada G1P 3S6
T : 418-681-1313
F : 418-681-4488
Toll free : 1-800-663-4863
www.lpamedical.com

3
TABLE OF CONTENT
A Word of Thanks 2
Replacement Parts Availability Policy 4
General Information 4
Denitions 4
Safety Measures 5
Applications 5
Inspection Before Use 6
Risk Prevention 6
Improper Uses 6
Cleaning 7
Maintenance 7
Operating Functions 7
Models and Options 8
Adjustment and Operating Instructions 9
Seat Height 9
Seat Depth 10
Backrest Angle 11
Seat 13
Contemporary Backrest 14
Locking the Chair 16
Additional Ergonomic Recommendations 17
Getting Up 17
Sitting Down 17
Options and Accessories 17
Terms & Conditions 18
General 18
Damage During Transportation 18
Returns 18
General Warranty 19
Our Commitment 19
Exclusions 19
Parts List 20
Serial Number Location 21
Exploded View 22
4
REPLACEMENT PARTS AVAILABILITY POLICY
LPA Medical’s replacement parts availability policy ensures parts for at
least 10 years after the purchase of your LPA product, which makes it:
•
An eco-friendly purchase. If anything breaks, you know that
replacement parts will be available for a long time. Why throw your
chair away when you can x it?
•
An economical purchase. You’ll enjoy substantial savings due to your
LPA chair’s enhanced durability.
In addition, we are proud to provide one of the most comprehensive
warranties on the market.
GENERAL INFORMATION
This document is a guide for the use and maintenance of your LPA chair.
It is important that anyone using the chair reads it in its entirety.
It is the responsibility of caregivers, including family or loved ones using
this chair, to follow the instructions in this manual at all times and to
ensure proper care and maintenance of the LPA chair.
LPA Medical Inc. accepts no responsibility for any breakage, incident,
injury, damage or accident caused by improper use, failure to safely
maintain the chair in good operating condition through any unauthorized
modication of the chair, failure to follow instructions in this manual or
any other use deemed abnormal.
LPA products are not designed to be pressure-washed or washed in
automatic wheelchair washers.
LPA products are not designed to be used outdoors or to be used in the
shower.
DEFINITIONS
Self-locking glider chair
A chair that can be used for rocking while being safe for seated/standing
transfers because of its automatic locking mechanism and its stability.
Adjustments (height, depth, backrest angle)
Functions to congure the chair to t different body types.
Locking system activation lever
Function to switch the chair from rocking into a xed position.
Patient or user
The chair’s end-user; the person receiving the care.

5
SAFETY MEASURES
The assignment of the Thera-Glide® chair, its positioning adjustments
and mobilization maneuvers must be performed by professionals who
have received training for this purpose. Caregivers must have received
adequate training by an LPA Medical representative or by a third party
having received this training before using the chair. This instruction
manual will be used as a reference for continuing education. It is strongly
recommended to appoint a caregiver responsible for training and to
maintain an up-to-date list of those who have received it. For patient
safety, anyone who has not received the proper training should not be
allowed to operate the chair.
APPLICATIONS
The Thera-Glide® chair is intended for all users in home care, long-term
care, and short-term care settings. The Thera-Glide® is renown for its
therapeutic effects reducing anxiety and maintaining independence,
and for its safety features.
The Thera-Glide® chair is not designed to be cleaned with a pressure
washer or an industrial washing machine. Such practices can lead
to component rust and void warranties. In addition, LPA chairs are
not designed for outdoor use.
The Thera-Glide® chair must be used with accessories specically
designed for it by LPA Medical Inc. It must be used in accordance
with recognized health and safety practices.
6
INSPECTION BEFORE USE
The chair can be shipped fully assembled or partially assembled. It must
be inspected when unpackaged and you must notify your supplier if
there is any damage or missing parts/accessories so that the situation
is remedied before taking possession.
RISK PREVENTION
The wide spectrum of use of the Thera-Glide® chair requires special
attention for risk assessment and prevention. It acts as a preventive
measure for autonomous users or those with a loss of autonomy. Adjust-
ments to accommodate different body shapes must be made properly by
a qualied person or supervised by this person. In cases where the patient
is restless, in-chair behavior should be observed to assess the risks. In
addition, the chair must not be placed within reach of guardrails, bed rails
or xed objects that could be gripped and cause a tip-over, or to avoid a
possible pinch point. Note that for these cases the patient should always
be under assistance and supervision. These measures are necessary for
patient safety. Using a tray for restraint purposes is prohibited and can
lead to situations of strangulation that may cause death. Only the use of
approved and prescribed restraints is accepted.
Note: Contact us for more information about installing positioning straps.
IMPROPER USES
•
Handling the chair without proper training.
•
Moving the chair without using the rear casters (if present).
•
Use with a patient without professional referral.
•
Making adjustments without supervision or prior training.
•
Leaving an at-risk patient in an unsecured or unattended place.
•
Moving the chair with the patient in it.
•
Exceeding the permitted weight limit.

7
CLEANING
Follow the selected covering manufacturer’s recommendations for
cleaning. Check with your supplier that the products you use are
compatible.
The chair should not be pressure-washed or placed inside a washing
machine. These practices may cause the chair components to rust
internally, as well as deteriorate the adjustment components, thus
voiding the LPA chair warranty.
MAINTENANCE
As long as the recommendations for use and cleaning are followed, the
Thera-Glide® chair does not require any preventive maintenance. Some
parts will need to be replaced due to normal wear and tear over years
of use.
OPERATING FUNCTIONS
The main components for safe use of the Thera-Glide® chair are:
A. Backrest cushion.
B. Backrest mechanism.
C. Locking system
activation lever.
D. Locking system
control cable.
E. Self-locking cylinder.
F. Anti-tip stabilizers.

8
MODELS AND OPTIONS
The Thera-Glide® chair is available in three different models with three widths
(17", 20" and 24") and options and accessories to provide better comfort.
•
W-1 with upholstered arms and steel legs with rear wheels.
•
W-2 with Mission-style wooden side frames and wood legs.
•
W-3 with upholstered arms, overstitchiching and wood legs.
Code Description
R-C1*
Adjustable seat depth and backrest angle, 15" to 18" (38 to 46 cm)
/ 95 to 115 degrees
RA-01 Plastic table tray
RA-02 Activity tray with Lexan window
RA-03 Lateral tray straps
RA-03A Wrap-around tray strap
RA-04 Rear wheel set for Thera-Glide® wood
RA-09 Side storage bag
RA-10 1" (2.5 cm) seat insert
RA-13 Seat wedge insert
RA-19 Universal perineal abductor kit with black xing mat
RA-23 4" (10 cm) lateral trunk supports with backrest canvas
RA-24 6" (15 cm) lateral trunk supports with backrest canvas
RA-28-D Option without undercarriage cover
RA-29 Option without backrest lever
RB-18 Cervical support
WOF-22 Fabric-covered ottoman with footrest
Z-C8 PRE-CURE® PRO cushion
* Optional on 20", standard on 17" and 24" models.

9
SEAT HEIGHT
ADJUSTMENT AND OPERATING
INSTRUCTIONS
1. Lay the chair on its side.
2. Using a
5
⁄8" wrench and an
11
/16"
wrench, unscrew the hex nut on
the inside of the leg support, then
remove the washers and bolt.
If the leg support seems stuck,
apply a gentle twist to release it.
4. Repeat this operation on the other
side of the chair.
Adjust the height (from 17" to 20") based on the length of the user’s
lower leg. It is important that their hips, knees and ankles are at
90 degrees. The feet must be able to make good contact with the oor.
3. Place it at the desired height, and
replace the bolt, washers and nut.
Tighten rmly.

10
SEAT DEPTH
1. Remove the backrest and
seat cushions (see assembly
instructions to do this).
2. Using a 1⁄2” (13 mm) open-end
wrench, loosen (DO NOT REMOVE)
the 2 hex bolts on the slots
located on each side of the back of
the seat.
3. Adjust the depth as desired and
tighten the bolts. Adjust the
2 sides to the same depth using
the guide marks along the slots.
4. Reinstall the seat and back rest
cushions.
The seat depth adjustment (from 15" to 18") is done according to the
length of the user’s leg. It is important that the back of the knee (called
the popliteal fossa) has clearance. Adjust the depth of the seat so that
you can pass a hand easily between the knee and the seat cushion. This
adjustment will provide good seat and back contact with the backrest.

11
BACKREST ANGLE
1. Remove the backrest and
seat cushions (see assembly
instructions to do this).
2. Remove the protective covers
by loosening the screw with a
Robertson #2 screwdriver.
3. Using a
9
⁄16"(14mm) wrench,
loosen the two cap nuts at
the bottom of the backrest’s
tubular frame.
4. Move the bolts back to decrease
the back angle, or forward to
increase it. Make sure you have
the same number of turns on
each side.

12
BACKREST ANGLE (continued)
5. Make sure the frame is fully
seated on the set bolts and
tighten the cap nuts on the
tubular frame.
6. Replace the protective covers.
7. Reinstall the seat and backrest
cushions.
The backrest angle adjustment can vary from 95 to 115 degrees to
accommodate the shape of a user’s back. Adjust the backrest tilt for
a comfortable position with the lower back supported as well as the
head so that there is a good eld of vision in front of you. This posture
will make it easier to activate your chair’s rocking mechanism.

13
SEAT
1. Insert the pocket located under
the seat cushion into the front
part of the frame.
2. Push the seat cushion all the way
to the back of the frame.
3. Behind the chair, attach the seat
on each side around the rear seat
tube using the snap straps.

14
CONTEMPORARY BACKREST
1. Pick up the cushion, head up.
Make sure the inner straps
dangle freely at the bottom of the
backrest. The end of the straps
should slightly extend beyond the
bottom of the cushion.
2. Begin slipping the bottom of the
backrest cushion over the tubular
backrest frame. Pass the straps
behind the padded part of the
top of the tubular frame, then
over the two slats of the locking
mechanism.
3. Continue to slip the cushion on the backrest
by pulling on the straps and/or the bottom
ap. Make sure to slide the locking
system activation lever through the hole
in the backrest cover. If you encounter
resistance, stop pulling; the straps may
be stuck somewhere. Remove the cushion
and start over.
4. When the cushion is fully-lowered,
run the straps under the lower slat
of the tubular backrest structure.
These instructions apply to the Contemporary backrest. If you have another
model of backrest cushion, go to the next section.

15
CONTEMPORARY BACKREST (continued)
5. Pull one strap down, then fold it
over the bottom slat and hook
the plastic J-molding over the
top of the slat. Repeat with the
other strap.
6. Close the zippers on each side.
7. Insert the washer with instruction
sticker over the locking system
activation lever, and press it
against the backrest cushion.
8. Thread the black elastic ring over
the locking system activation
lever, and press it onto the washer
to secure it in place.

16
LOCKING THE CHAIR
1. Turn the locking system activation
lever upward to activate the
mechanism.
2. Turn the locking system activation
lever down to prevent rocking.
ROCKS
DOESN’T ROCK

17
ADDITIONAL ERGONOMIC RECOMMENDATIONS
GETTING UP
To get up from the Thera-Glide® chair more easily (always do so in the presence
of another person who has received training):
•
Slide your buttocks to the front of the chair.
•
Bring your feet under the seat.
•
Place your hands on the armrests.
•
Lean forward while looking straight ahead.
SITTING DOWN
To sit in the Thera-Glide® chair safely (always do so in the presence of another
person who has received training):
•
Position yourself in front of the chair and step back until the back of your
knees touch the seat.
•
Bend your knees while placing your hands on the armrests.
•
Slide your buttocks into the back of the chair.
OPTIONS AND ACCESSORIES
There are a multitude of options and accessories available to customize your
Thera-Glide® chair for your specic needs and/or if your condition changes
in order to optimize your rocking experience. Don’t hesitate to ask questions
about the t of your chair.
18
TERMS & CONDITIONS
APPLICABLE TO PRODUCTS PURCHASED AS OF SEPTEMBER 1, 2018
GENERAL
LPA Medical inc. reserves the right to modify without notice or obligation the
design, specications and prices of the equipment it manufactures. Shipping
is charged at the current price at the time of delivery.
The minimum order requirement is $25.
DAMAGE DURING TRANSPORTATION
All goods damaged by transport must be immediately reported upon delivery,
followed by a written claim within ve (5) days. A copy of the claim must
be sent to LPA. Any unreported damage during this period will void the
LPA Medical Inc. warranty.
Additional costs of handling and/or using a platform when unloading may
apply and are at the customer's expense.
RETURNS
Merchandise to be returned must have prior written authorization from our
Customer Service Department. All return requests must contain the following
information:
•
The reason(s) for the return.
•
The LPA invoice number or delivery slip.
•
The LPA model or part number.
•
The number of items being returned.
Unauthorized returns will not be accepted. All authorized returns must be
shipped pre-paid except where there has been an error in processing or a
defect in materials or workmanship. In this case, contact LPA Medical Inc.
for special instructions.
19
GENERAL WARRANTY
The LPA Medical Inc. warranty covers manufacturing defects for the original
owner/user, except for the exclusions below, for the periods below from the
date of purchase:
Useful life* for the metal structure of the chairs.
5 years on the wooden structures of self-locking rocking chairs Thera-Glide®
models W and T.
3 years for the backrest mechanism of Thera-Glide® self-locking rocking chairs.
3 years on the padding of the chairs.
2 years for all other mechanisms, gas or mechanical locking cylinders, control
cables, wheels, table trays.
1 year on all accessories purchased separately from chairs and replacement
parts.
If a part is missing, contact our customer service with the following information:
1. Model, serial # and part #.
2. Purchase date and invoice number.
3. Description of the problem.
* The useful lifespan of an LPA chair is estimated to be 10 years.
OUR COMMITMENT
LPA Medical inc. agrees to provide replacement parts for a period of 10 years
after the date of purchase of the product. LPA Medical Inc. reserves the right
to provide replacement parts with a different design than that of the replaced
part, at its sole discretion.
LPA Medical Inc.’s obligation is expressly limited to correcting the defect by
adjusting, repairing or replacing the equipment, at LPA’s sole discretion.
EXCLUSIONS
•
Normal wear and tear.
•
Water or re damage, including damage from pressure washers and
automatic wheelchair washers.
•
Rust and damaged covering.
•
Unauthorized repair or modication or done with parts other than the
original ones.
•
Damage resulting from abnormal or abusive use.
•
Damage caused by exposure to weather.
– Edited on 2021-08 –

20
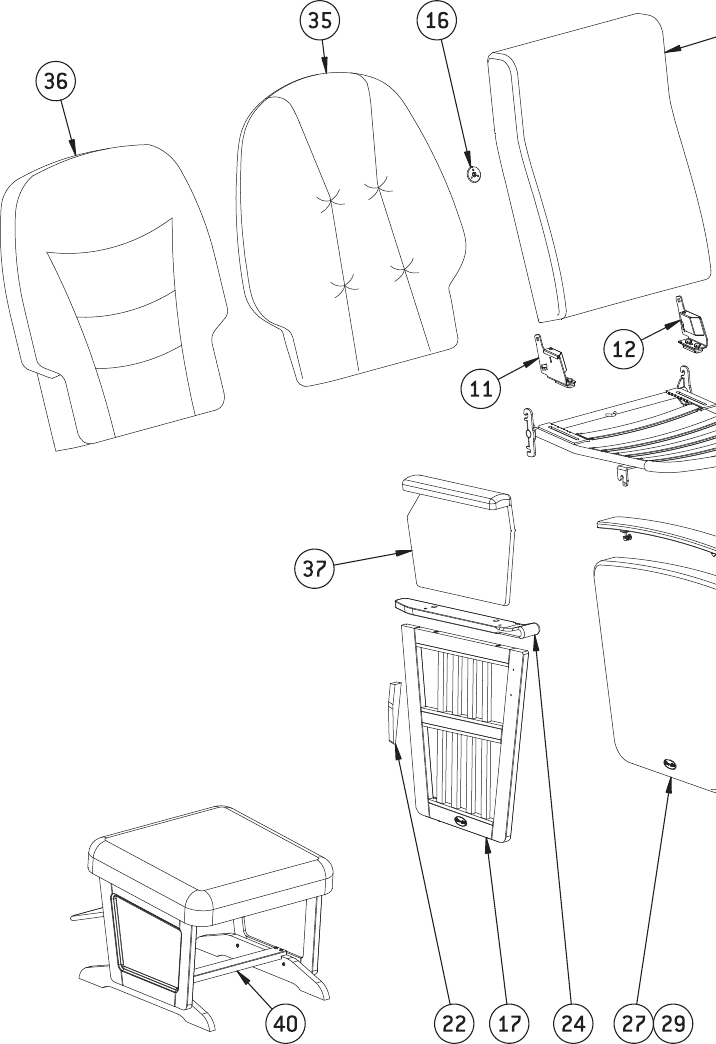
PARTS LIST
N
o
(17”) (20”) (24”) Description
1 RP-2117 RP-2017 RP-2217 Base and rocker set (incl. 2,3,4)
2 RP-2116 RP-2016 RP-2216 Base frame only
3 RP-2122 RP-2022 RP-2222 Front swing arm
4 RP-2121 RP-2021 RP-2221 Rear swing arm
5 RP-2018-DR W series right side wooden leg and metal rail support
6 RP-2018-GA W series left side wooden leg and metal rail support
7 RP-2015-DR W-10 tubular metal leg, right
8 RP-2015-GA W-10 tubular meta leg, left
9 N/A RP-2030 N/A Seat frame for xed backrest
10 RP-2131 RP-2031 RP-2231 Seat frame for depth-adjustable backrest (R-C1 option)
11 RP-1055-DR R-C1 right adjustable backrest support bracket with cover
12 RP-1055-GA R-C1 left adjustable backrest support bracket with cover
13 RP-0940 RP-1040 RP-4040 Backrest frame
14 RP-1060 Thera-Glide® backrest activation mechanism
15 RP-1080 RP-1080.24 Thera-Glide® locking cylinder with hardware
16 RP-50 Thera-Glide® hole cover washer
17 RP-20-DR* RP-21-DR*
Right side Mission-style wooden frame with metal
xation bracket
18 RP-20-GA* RP-21-GA*
Left side Mission-style wooden frame with metal
xation bracket
19 RP-3010-DR Curved wooden armrest with mounting brackets, right
20 RP-3010-GA Curved wooden armrest with mounting brackets, left
21 RP-01 Left or right rear anti-tip with wheel (unit)
22 RF-12* Right side wooden armrest wedge
23 RF-13* Left side wooden armrest wedge
24 RF-14* Right side wooden armrest
25 RF-15* Left side wooden armrest
26 RA-28-17* RA-28-20* RA-28-24* Thera-Glide® W series undercarriage cover
27 RY-40-DR* RY-41-DR*
Right side W-10 upholstered armrest with mounting
bracket
28 RY-40-GA* RY-41-GA*
Left side W-10 upholstered armrest with mounting
bracket
29 RY-45-DR* RY-46-DR*
Right side W-30 upholstered armrest with stitching and
mounting bracket
30 RY-45-GA* RY-46-GA*
Left side W-30 upholstered armrest with stitching and
mounting bracket
31 RY-51-17* RY-51-20* RY-51-24* W-10 seat cushion
32 RY-52-17* RY-52-20* RY-52-24* W-20 and W-30 seat cushion with stitching
33 RY-53-17* RY-53-20* RY-53-24* W-10 Contemporary backrest cushion
34 RY-54-17* RY-54-20* RY-54-24*
W-20 and W-30 Contemporary backrest cushion with
stitching
35 RY-64-17* RY-64-20* RY-64-24* Comfort plus backrest cushion
36 RY-67-17* RY-67-20* RY-67-24* W series Classic backrest cushion
37 RY-68* W-20 armrest cushion, right
38 RY-69* W-20 armrest cushion, left
39 STP0101 Locking system control cable
40 WOF-22* Fixed wooden ottoman
* Always specify the color, width, fabric pattern and serial number of the Thera-Glide® chair when ordering
replacement parts. See page 21 for the location of the serial number. Replacement parts may have
slight color differences from those of the original chair. LPA Medical cannot be held responsible for
these differences.
21
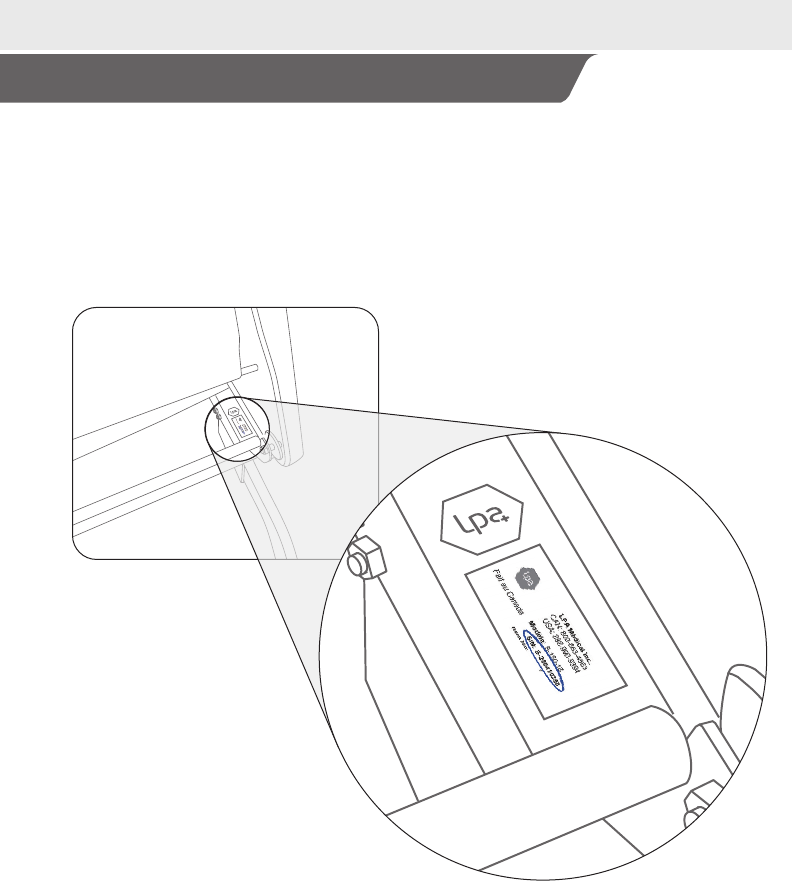
Each LPA Medical Inc. chair is identied by a serial number. Always provide
your LPA chair’s serial number when ordering replacement parts.
The serial number can be found on a label afxed on the right rear of the metal
base structure.
SERIAL NUMBER LOCATION
22
VUE ÉCLATÉE
EXPLODED VIEW

23
