
The Guide to
Files and Filing
ATG-4154
©2018 Apex Tool Group, LLC
www.crescenttool.com
Crescent® and Nicholson® are registered trademarks of Apex Brands, Inc.,
A Division of Apex Tool Group, LLC. Specifications subject to change without notice.
Apex Tool Group, LLC
1000 Lufkin Road, Apex, NC 27539

Introduction
Choosing the right file can be confusing; with so many sizes,
shapes and cuts available it is difficult to decide the right one for
the job. The range of Crescent Nicholson
®
files covers every job
task requirement. This booklet has been specially produced to
simplify file selection and application for any file user.
History The file has been with man now
for many years and one of the
first recordings is in the Bible
during the reign of King Saul.This
would be approximately 1090 BC
and at that time files would have
been used for sharpening various
types of primitive tools. From the
first files, the development and
evolution can be traced from stone
implements to files with teeth
running at right angles across the
file blank to present day quality machine-produced files. The first
attempt to cut files by machine was approximately 1490 AD and
resulted from an invention by Leonardo Da Vinci. However, the
first machine which actually cut files successfully was made by
the Frenchman, Chopitel, in 1750.
At this time, files were made from mild material and did not
require annealing. To produce a hardened surface, various
preparations were used to carburize the file teeth. But it was the
inventions of such men as Bernot, Nicholson, Whipple, and Weed
that provided machines capable of producing better files than
those produced by hand.
How a File is Made
Today, various kinds of materials,
product finishes, and working
conditions make file development
an industrial science. File
manufacture involves the study
of file steels, file design, and file
performance for all file applications.
File Steel: Raw stock is cut to
proper length from various widths,
thicknesses, and cross sections, such as
rectangular, square, triangular, round, and half round.
2
3
Rough Shaping: The blank is punched to shape or is heated and
forged with drop hammers and rollers to shape the tang and
point.
Annealing: The forged blank is heated to an elevated temperature
and then cooled slowly under controlled conditions to soften
the steel for tooth cutting and to make internal steel structure
uniform.
Final Shaping: The annealed blanks are ground or milled to
produce a surface necessary for the uniform formation of the
teeth. This is followed by drawfiling that produces the perfectly
true flat or curved surface necessary for the uniform formation
of the teeth.
Forming Teeth: The teeth are
formed by a rapidly reciprocating
chisel that strikes successive blows
on the blank. The hardened chisel
cuts into the soft blank, displacing
and raising the steel into the desired
tooth structure.
Hardening: The file is then hardened
by heating it in a molten bath to a predetermined temperature.
This is followed by immersing the file in a quenching solution.
This combination of heating and cooling under carefully controlled
conditions brings the file to the maximum hardness to the very top
of the cutting edges.
Finishing: The file is cleaned and sharpened by bead blasting.
The tang is reheated to give strength without brittleness. It is
then given a series of tests by trained inspectors, and is oiled
to prevent rust.
Rectangle Square Triangle Round

File Terminology
This section of the booklet will help you understand the file and
the terms used. Each part of the file has a name and there are
many different shapes and sizes of files. Furthermore, there are
varying types of file cuts.
Type: The cross-sectional shape or style
of the file (i. e. quadrangular, circular,
triangular, or irregular.) These sections
are further classified according to their
contours (i.e. blunt, taper, etc.)
Blunt: A file whose edges are parallel
from end to end and of constant width.
Taper: The reduction in cross section of
the file from its heel to the point. A file
may taper with width, in thickness, or in both.
Coarseness: The number of teeth per
inch length of the file.
Cut: The character of the file teeth with respect to the coarseness
(bastard, second-cut, and smooth)
A Single-Cut: A single set of parallel,
diagonal rows of teeth. Single-cut files
are often used with light pressure to
produce a smooth surface finish or to
put a keen edge on knives, shears, or saws.
A Double-Cut: Two sets of diagonal
rows of teeth. The second set of teeth
is cut in the opposite diagonal direction,
and on top of the first set. The first set
of teeth is known as the overcut while the second is called the
upcut. The upcut is finer than the overcut. The double-cut file
is used with heavier pressure than the single-cut and removes
material faster from the workpiece.
Length
Point Belly Heel Tang
4
5
Rasp-Cut: A series of individual teeth
that are formed by a single-pointed tool.
This produces a rough-cut and is used
primarily on wood, hooves, aluminum, and lead.
A Curved-Cut/Mill Tooth: Teeth are
arranged in curved contours across the
file face. Normally used in automotive
body shops for smoothing body panels.
Plater’s Rasp: A Rasp File combination
that is used primarily by farriers in the
trimming of horses’ hooves.
Woodchuck: A multi-purpose wood
chisel/rasp combination tool used by
cabinetmakers, homebuilders, and
construction workers.
Bastard: File coarseness between “coarse and second cut.”
Back: The convex side of a half-round or other similarly shaped file.
Edge: The intersection of two adjacent
faces of the file.
Safe Edge: A smooth or uncut edge of the file.
Pinning: Filings wedged between the file
teeth.
Shelling: The breaking of file teeth, usually
caused by using too much pressure reverse
filing, filing sharp corners, or edges.
Handle: A holder into which the tang of the
file fits. If the file has an integral holder this
is known as a solid handle file.

Filing is an industrial art. Grip, stroke and pressure may vary to
fit the job. There are three elemental ways a file can be put to
work. They are:
Straight Filing: This consists of pushing the file lengthwise-
straight ahead or slightly diagonally-across the workpiece.
Draw Filing: This consists of grasping the file at each end,
pushing and drawing it across the workpiece.
Lathe Filing: This consists of stroking the file against work
revolving in a lathe.
When holding a workpiece in a vise for normal filing, the vise
should be about elbow height. When there is a great deal of
heavy filing it is better to have the work slightly lower. If the work
is of fine and delicate nature, the work can be raised to eye level.
For work that could become damaged in the vise through
pressure, a pair of protectors made of zinc, copper or aluminum
sheet should be used between the workpiece and vise jaws.
The Grip
For files needing two-handed operation, the handle should be
grasped in one hand and the point of the file in the other hand.
The file handle should be rested in the palm with the thumb
pointing along the top of the handle and the fingers gripping the
underside.
The point of the file should be
grasped between the thumb
and the first two fingers with
the thumb being on the top of
the file.
When heavy filing strokes are
required, the thumb on the point
is normally in line with the file, the tip of the thumb pointed
forward. For lighter strokes however, the thumb can be turned to
as much as right angles to the direction of the stroke
If the file is being used one-handed for filing pins, dies, or edged
tools not being held in a vise, the forefinger and not the thumb is
placed on top of the handle in line with the file.
6
7
Choosing the Right File
To achieve the desired results it is essential that the right file
be used for the job. In selecting the right file the user should
consider the shape, size and coarseness of the file.
The size and the coarseness of
the file are directly related, so the
larger the file the more stock it will
remove and the smaller the file the
finer the finish it will achieve.
The coarser the cut of the file, the rougher the finish of the work.
Therefore, the size of the file and the grade of its cut must be
taken into account against the amount of stock to be removed
and the fineness of finish that is required.
Generally speaking, bastard and second-cut grades of double-
cut files would be chosen for the fast removal of stock while
single-cut files and smooth double-cut files would be chosen
for finishing. It is however almost impossible to lay down exact
guidelines for the right file for the job, but using the basic facts
given here the user should have a reasonably clear picture in
mind, the nature, size of the work, the kind of finish required, the
working tolerance allowed, and the risks (if any) of spoiling the work.
In addition to the amount of stock to be removed, the contour of its
removal is equally important and is determined by the shape of the
file. For example, a triangular file should be used on acute internal
angles, to clear out square corners and in sharpening saw teeth.
A Flat File should be used
for general-purpose work,
a Square File for enlarging
rectangular holes and a Round
File for enlarging round holes.
A Half-Round File can be used
for dual purposes, the flat face
for filing flat surfaces and the
curved face for grooves.
Did
You
?
Know
American pattern
files have 3 grades of
courseness: Bastard,
Second, and Smooth cut
Round
Rectangular
Triangle
Rectangular with
Rounded Edges

Lathe Filing
When filing work revolving in a lathe,
the file should not be held rigid or
stationary, but stroked constantly.
A slight gliding or lateral motion
assists the file to clear itself and
eliminate ridges and grooves.
While a Mill File is capable of good
lathe filing, there is a special long angle lathe file with teeth cut
at a much larger angle. This provides a cleaner shearing, self-
clearing file, eliminates drag or tear, overcomes chatter and
reduces clogging. Uncut edges on this file protect any shoulders
on the work, which are not filed, and the dog, which holds the
workpiece.
Lathe filing is usually employed for fitting shafts. Where stock is
to be removed, a 12"/300mm or 14"/350mm long angle Lathe File
is preferable. This file will provide the finish suitable for a drive
fit. For a running fit a Mill File will provide a smooth finish. Where
a fine finish is required a Swiss Pattern and or Pillar file in No. 4
should be used.
Recommended Surface Feet Per Minute For Lathe Filing
Many Lathe Filers make a practice of not using a new file for work
requiring an extremely fine finish.
In using the long angle Lathe File,
care should be taken at shaft ends
as this fast cutting file may cut
too deeply. Don’t run a hand over
lathe work, as oil and moisture can coat the surface and make
it difficult for the file to take hold. For lathe work that has oval,
eliptical or irregularly round form, the finer swiss pattern files are
most satisfactory.
Carrying the File
For normal flat filing, the
operator should aim to carry
the file forward on an almost
straight line in the same plane,
changing its course enough
to prevent grooving. Too
much pressure often results
in a rocking motion causing a
rounded surface.
Keep the File Cutting
Different materials of course require different touches; however,
in general, just enough pressure should be applied to keep the file
cutting. If allowed to slide over the harder metals the teeth of the
file rapidly become dull, and if they are overloaded by too much
pressure, they are likely to chip or clog.
On the reverse stroke, it is
best to lift the file clear of the
workpiece, except on very soft
metals. Even then pressure
should be very light, never
more than the weight of the
file itself.
Draw Filing
Draw Filing consists of grasping the file firmly at each end and
alternatively pushing and pulling the file sideways across the
work. Since files are made primarily to cut on a longitudinal
forward stroke, a file with a
short-angle cut should never
be used, as it will score and
scratch instead of shaving and
shearing. When accomplished
properly, draw filing produces a
finer finish than straight filing.
Normally, a standard Mill
Bastard File is used for draw
filing, but where a considerable amount of stock has to be
removed, a flat or hand file (double cut) will work faster. However,
this roughing down leaves small ridges that will have to be
smoothed by finishing with a single cut Mill File.
Don’t apply too much
pressure, or too little,
on the forward stroke.
Material: Distance:
Cast Iron 150
Annealed Tool Steel 175
Machinery Steel 350
Soft Yellow Brass 500
8 9

Depending on the shape, there is a variety of Crescent Nicholson
®
files. Suggested files are found in the “job by job” file selector of
this book, or you may contact your Crescent Nicholson
®
customer
service representative.
Filing Stainless Steel
The use of stainless steel and alloy steels has created other filing
techniques. These steels with hard chromium and nickel content
are tough and dense. This causes them to be abrasive, which
shortens the life of the normal file.
To overcome these problems, files have been developed with
good wearing qualities. These files, when used with a light
pressure and a slow, steady stroke, will remove metal and provide
a good finish.
Filing Aluminum
Aluminum is soft and is difficult to file; file teeth clog even under
moderate pressure. Filing aluminum is divided into:
• Filing roughness from aluminum castings
• Filing sheet and bar aluminum
• Filing aluminum alloys
To produce a good finish, the
aluminum type A file has been
developed. The file upcut is
deep with an open throat, the
overcut fine which produces
small scallops on the upcut. This breaks up the filings and allows
the file to clear. This also overcomes chatter and prevents too
large a bite. By using a shearing stroke toward the left, a good
finish can be obtained.
Filing Brass
Brass is difficult to file because
it is softer than steel, but tough.
This demands teeth that are
sharp and sturdy, cut to prevent
grooving and running the file off the work.
The Magicut
®
file has a short upcut angle and a fine long angle
overcut which produces small scallops to break up filings and
enable the file to clear. With pressure, the sharp high-cut teeth
bite deep. With less pressure, the short upcut angle smoothes.
10
11
Filing Different Metals
Different metals vary greatly in character and
properties. Some are softer than others, some are
more ductile, and so on. The nature of the metal has
to be taken carefully into account when choosing the
right file and applying it to the job. For instance, a soft ductile
metal requires a keen file and only light pressure must be applied
during filing if the work is not to be deformed. Conversely, a hard
and less ductile metal may require a file with duller teeth to avoid
them biting too deep and breaking off when pressure is applied.
When filing a material the user can normally feel whether or not
he or she is using the right file, and filing in the correct manner.
All things being correct, a smooth cutting action and a good clean
finish on the work is achieved. If there is stubborn resistance,
chances are the wrong file is being used, the file is damaged,
or the wrong method is being used.
Filing Rough Castings
Snagging castings and
removing fins, spurs, and other
projections is hard on normal
files. Their teeth are for fast
cutting and do not possess the
ruggedness for driving against
hard projections and edges.
This filing engages only a few
teeth, thus putting a strain on
each. For such work, it is better
to use a Flat Aluminum Type A
File or a Half Round Bastard File with
sturdier teeth and heavy set edges to
resist shelling or breaking out.
Filing Die Castings
Like foundry castings, die
castings usually have sharp
corners, webs, fins, or
flashings which may damage
a normal file. In addition,
die castings consist of
magnesium, zinc, aluminum,
alloy, or similar combinations
of metal which have the
tendency to clog regular files.

Filing Bronze (Copper, Tin, or
Other Alloying Elements)
Bronze is similar in nature to
brass in some aspects, but varies
according to the percentages of alloying elements.
Average sharpness of the file is satisfactory for some bronzes,
while for others, a file that can maintain its sharpness for longer
periods is required. Thus, for the harder bronzes, a file with a
more acute angle at the top of the tooth is desirable. This is
known as a thin topped tooth.
The direction of stroke of the file should be crossed frequently to
avoid grooving with bronze and brass.
Filing Wrought Iron
Wrought iron is relatively simple to file. It is soft but only
moderately ductile so it is not necessary for a file to be very
sharp to obtain good results.
Filing Plastics
Hard plastics are dense and
brittle, and material is removed as
light powder. The abrasiveness of
hard plastics requires files with
high sharp teeth. Soft plastics
are filed in shreds so shear tooth
files should be used for this
application.
For almost every density material, there is a Crescent Nicholson
®
file that will meet the required application. Suggested files
are found in the “job by job” file selector of this book, or you
may contact your Crescent Nicholson
®
Tools customer service
representative.
Filing Soft Materials
For soft materials such as
aluminum, brass, copper, plastics,
hard rubber, and wood, a Shear
Tooth file provides fast material
removal with good smoothing qualities. The combination of the
single cut and the long angle helps the shear tooth file to clear.
Because of the long angle the file has a tendency to run to the
left on narrow surfaces. This can be overcome by filing with a
diagonal stroke to the right.
Precision Filing
For filing such as that employed by the
instrument industry, there is a range of
Swiss Pattern files. The delicate precision
work calls for these files to be made to
exacting measurements and finer cuts.
The flat precision file should be used with
a slow smooth stroke, moving the file
laterally along the work on the forward
stroke. In using round or half round
types, the filing should be clockwise to ensure a deeper cut and a
smoother finish.
Saw Filing
Efficient saw filing demands, first of all, a steady hand and a good
file. Also, the file must be correct in design, cut, and size for the
type of saw and the type of teeth to be filed.
The stroke must be absolutely
level, as the slightest rocking will
affect the cutting edge of the saw-
tooth. The file must be lifted off
the work when drawing back for
the next stroke.
The teeth have to be set at the
correct angle in relation to each
other. This is best done with a
“Saw Set” usually before filing.
However, some filers prefer to do this after the saw has been
filed. To file saw teeth, provisions must be made to hold the
saw. A saw vise should be used, to be sure there is no chatter or
vibration in the saw. This will shorten the life of the file.
Sharpening Hand Saws
Handsaws of two types, the crosscut and the rip, must be reset,
normally every fourth or fifth filing. Check that teeth are of equal
height. This can be accomplished by passing the file lightly
lengthwise along the tops of the
teeth. Some may be flattened, others
are hardly touched. The flattened
teeth will require more filing to put
them in shape.
12
13
Check that the teeth
are of equal height.
Taper (Triangular) Saw Files
Filing Chain
Saw Teeth
Rounded hooded
chain saws:
These type of chain saws
require round chain saw files
specifically designed for the
task. These files are available
in various diameters to fit a sizes of round hooded chain saws.
Place the file against the beveled cutting surface of the teeth
that face both sides and provide their own clearance at an angle
of 20° to 45° with the saw blade, depending on manufacturer’s
specifications. The direction of the filing stroke is off the cutting
edge. It is essential that the file be held level and it should be
pressed back and slightly up during the filing stroke. Every other
tooth is filed, and then the chain saw is reversed. The depth
gauges of this type of saw control the depth of the cut that the
saw will take. As the cutting teeth are sharpened, they become
lower, and it is necessary to lower the depth gauges an equal
extent. The difference in height between cutting teeth and depth
gauge should be between 0.020"/0.51mm and 0.030"/0.76mm.
14
15
File the depth gauge only as required to maintain dimensions
between cutter and gauge as cutter is filed back. Do not file off
too much. This overloads motor and chain and the chain will clog.
Use a Depth Gauge, Chainsaw File, or a Mill File.
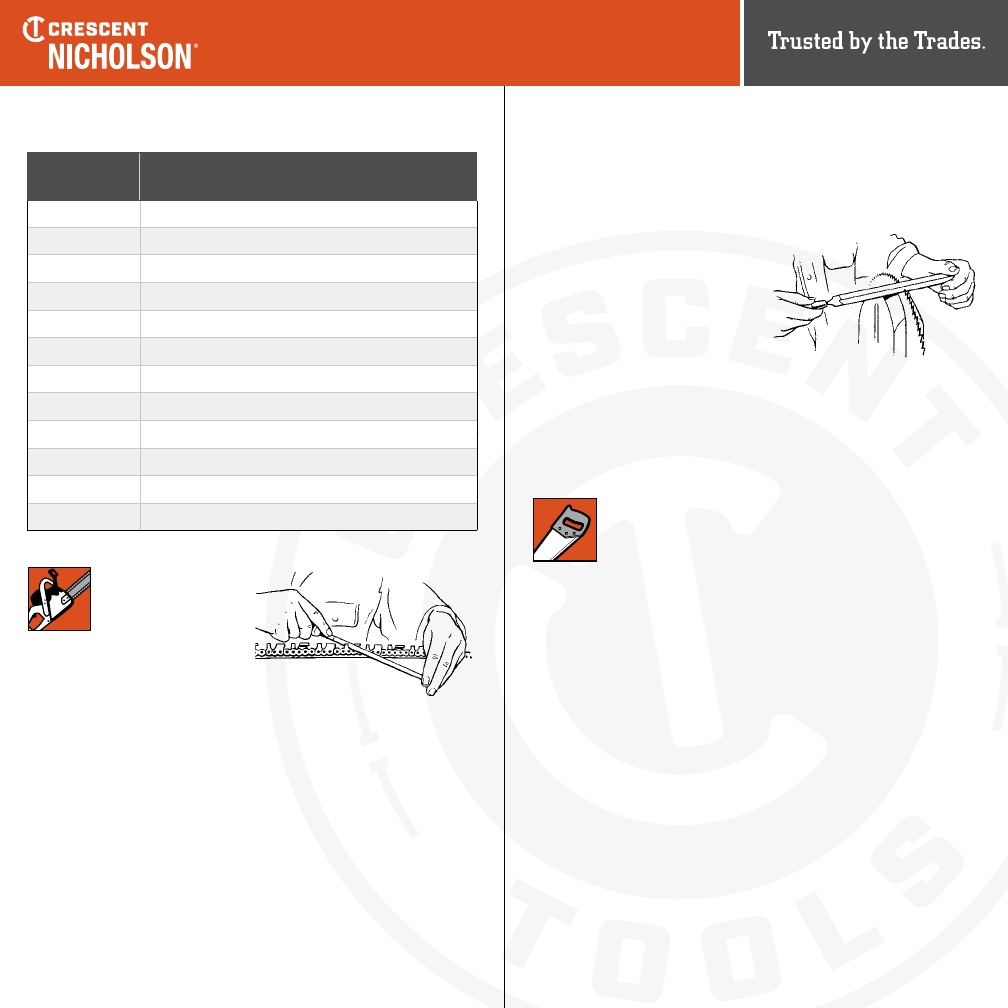
Sharpening Circular Saws
Before removing the saw blades
from saw, lower the blade until
only 1/64" (0.40mm) protrudes
above the table. Place a file over
the opening in the table and by
hand, revolve the saw backward
against the file. Be sure that
the file touches each tooth top.
Remove the saw blade and sharpen.
Some large size circular saws may be sharpened without
removing them from the saw as long as there is no chatter. Large
circular saws with insert type teeth are sharpened with a Mill File.
The larger the saw, the larger the file.
Filing The Hand Crosscut Saw
The teeth of the crosscut saws cut with their edges
and points: edges must be beveled and sharp. Start
at the point of the saw and work towards the handle.
Place the file in the gullet to the left of the first tooth set away
from you. Hold the file level with the angle of the saw blade.
At this angle, it should touch on the bevels of both teeth. When
filing the flattened teeth, only half should be filed away at a time.
Miss the next gullet and file the one following until every other
gullet has been filed.
Reverse the saw and begin process from second gullet away
from saw point.
Filing Hand Ripsaws
For pointing and filing, follow the same procedure as the crosscut
saw. It must be remembered that the rip saw is filed so that the
tooth points do the cutting, not the edges. Teeth should be filed at
right angles to the blade. Every other tooth is brought to a square
edge, the saw is reversed and the remaining teeth filed.
Number of
Saw Points
Files Recommended
4 7" Heavy or 8" Regular Taper
5 7" Regular Taper or 10" Slim
5 1/2 7" Regular Taper or 10" Slim
6 5" or 6" Regular Taper 7" or 8" Slim
7 6" or 7" Slim
8 4" Regular Taper, 6" Slim, 7" X Slim, 8" XX Slim
9 5" Slim, 6" X Slim, 7" XX Slim
10 3 1/2" Regular Taper or 5" Slim, 5" or 6" X Slim
11 3" Regular Taper or 4" Slim, 5" X Slim, 6" XX Slim
12 3" Regular Taper or 5" X Slim
13, 14 4" X Slim or 5" XX Slim
15, 16 4" XX Slim

16
The Wood Rasp is a coarser cut than
the cabinet rasp and is made primarily
for the rapid removal of stock. For finer
woodwork, the Cabinet Rasp provides a
means of bringing mortise-and-tenon
joints to a proper fit. The Horse Rasp is
used for shoeing horses. The Plater’s
Rasp is available for light hooves such as racehorses.
Woodchuck
Woodchuck Rasp is a Chisel/
Rasp combination tool used for
a variety of wood working tasks. Each tool features a flat Wood
Rasp on one side and a Half-Round Wood Rasp on the other.
There are edge teeth for those hard to get spots. The chisel point
features an extremely sharp, polished and ground blade.
Care of the File
The teeth of the file should be
protected when the file is not in use
by hanging it in a rack or keeping it
in a drawer with wooden divisions.
Files should always be kept clear of
water or grease, since this impairs
the filing action. It is advisable to
wrap the file in a cloth for protection
when it is carried in a toolbox.
The file teeth should be kept clean
at all times by using a file card, or a
wire file brush, to clear the grooves
between the teeth.
Safety
For safety reasons, a file should never be used without a tight
fitting handle. Serious accidents can result if the handle becomes
detached exposing the sharp point of the tang.
Crescent Nicholson
®
offers a variety of different size
file handles produced in traditional wood, or from
modern plastics. If you need help in selecting which
handle is right for your file, contact your Crescent
Nicholson
®
customer service representative today.
17
Sharpening Crosscut Saws
The crosscut saw has two types
of teeth, cutters and rakers. The
cutters do the cutting, the rakers
clear the cut. This is filed at an
angle of 45° from the filer. This
permits access to cutters and
enables the teeth to be filed at the correct angle.
Teeth should be checked for levelness, the raker teeth being
between 1/100"/0.25mm and 1/64"/0.40mm below level of
cutting teeth. The filer should file all cutter teeth to a point. The
saw is placed vertically and the file used across the rakers.
Should the gullets of the teeth require deepening, a Round file or
a Mill File with round edge can be used.
Sharpening Tools and Implements
There are many tools and
implements in industry, agriculture,
and gardening that require regular
sharpening. Such tools may be filed
towards or away from the edge,
the former for the early part of
the task and the latter for the light
finishing touches. For coarse steel
cutting edges for hoes, ploughs etc.,
home and garden files, as well as
axe and handy files, are available.
For harder carbon steels in cutter
knives, shears etc., the second cut
or Smooth Mill provides a sure, but
smoother bite. It is essential that
the work glaze be removed in the
first few strokes, so apply extra
pressure in very slow, deliberate
strokes at the beginning.
Rasps
Also available are rasp combinations known as four-in-hand
and shoe rasp.
There are 3 types of
classified Rasps:
Wood, Cabinet and Horse
Did
You
?
Know

18
Job by Job File Selector
19
Job by Job File Selector
Type: Description:
Aluminum Alloy Flat Bastard File, Aluminum File, Magicut
®
Auto Body Bodifiles
Babbit Flat Babbitt, Curved Tooth, Flat Files
Bearing, Brass Magicut
®
Bearing, Bronze Flat Bastard File, Magicut
®
Beveling Flat Bastard, Mill File
Blacksmith
Rasp and Flat Bastard, Half-Round Bastard,
Flat Bastard File
Bolt threads Taper, Mill or Knife File, Mill Bastard
Brass Flat Bastard File, Magicut
®
, Curved Tooth
Bronze Flat Bastard File, Magicut
®
Cabinet, Wood Half Round File, Cabinet Rasp or Woodchuck
Cast Iron
Flat, Half-Round, Square or Round File,
according to shape of material
Casting Rough Flat Bastard File
Contact Points
Mill Bastard, Second Cut, and Tungsten Point
Files
Copper Flat Bastard File, Magicut
®
Cutter,
Machine Tool
Ground and sharpened by an emery wheel. Can
be filed only when in an annealed condition. Use
file to suit shape or surface.
Cutter, Milling See Cutter, Machine tool
De-Scaling Flat Bastard File
Die Block Flat Bastard File
Die Casting
Flat Bastard File, Half-Round Bastard File, Round
Bastard File, Square Bastard File, or Mill Bastard
File, according to shape of the die casting and
finish desired
Die Forging
Flat Bastard File or Half Round Bastard File,
according to shape of the die forging
Type: Description:
Die Shop Swiss pattern files of appropriate shape
Electric Connections
(Cleaning)
If surface is large, use Mill Bastard File,
otherwise use Tungsten Point File
Fender, Auto Bodifiles
Fiber Flat Bastard File or Rasp
Fine Work Swiss Pattern Files
Finishing
Mill Bastard File. For Lathe Filing, use
Mill Bastard File or Long Angle Lathe File
Foundry Casting Flat Bastard, Mill File
Furniture, Making
Half Round File, Cabinet Rasp, or Mill
Bastard File
Garden Tool Home and Garden File
Grooving
Square Bastard, Round Bastard,
Half-Round Bastard, or Slim Taper,
according to shape of groove
Hand Rubber Flat Bastard File
Hole Round Bastard File or Square Bastard File
Horse-Shoeing Horse Rasp, Plater’s Rasp
Hot Metal, Filing Flat Bastard File
Iron
Bastard-Cut File according to shape
of material
Joint, Mortise and
Tenon
Half Round File or Cabinet Rasp
Key Way Square Bastard or Pillar File
Keys, Filing Warding Bastard File
Knife Mill File
Lathe-Turned Section Mill Bastard File or Long Angle Lathe File
Laminate
Magicut
®
Laminate File, Plastic File,
Mill Bastard File

21
Band Saw 6" Regular Tape or 7" Slim Taper File
Cant Saw Mill Bastard File
Chain Saw
Round Chain Saw, Special Square,
Depth Gauge Chain Saw File
Circular Saw Mill Bastard, or Slim Taper Files
Cross-Cut Saw Mill Bastard, Round, or Round Edge Mill File
Hand Saw
Taper
Slim Taper, Extra Slim Taper, or Double Extra Slim File,
according to points of saw. File recommended for saw
points per inch.
Saw points shown in Bold.
• 4 - 7" Heavy or 8" Regular Taper
• 5 - 7" Regular Taper or 10" Slim
• 5 1/2 - 7" Regular Taper or 10" Slim
• 6 - 5" or 6" Regular Taper 7" or 8" Slim
• 7 - 6" or 7" Slim
• 8 - 4" Regular Taper, 6" Slim, 7" X Slim, 8" XX Slim
• 9 - 5" Slim. 6 X Slim, 7" XX Slim
• 10 - 3 1/2" Regular Taper or 5" Slim, 5 or 6" X Slim
• 11 - 3" Regular Taper or 4" Slim, 5" X Slim, 6" XX Slim
• 12 - 3" Regular Taper or 5" X Slim
• 13, 14 - 4" X Slim or 5" XX Slim
• 15, 16 - 4" XX Slim
Wood or Buck Saw
Mill Bastard and Slim Taper Files
20
Type: Description:
Lawn Mower Mill Bastard File or Handy File
Lock, Mending Warding Bastard File
Machinists’ Work
Machinists’ File such as Flat, Half Round,
Square or Round. Also Mill or Tapers, in cuts
according to work
Millwrights’ Work Flat, Half-Round, Round, Square Mill Files
Model, Metal Swiss Pattern Files
Molded Part Flat Bastard File or Mill Bastard File
Notch Taper or Knife File
Ornaments,
Wood Making
Half Round File, Cabinet Rasp. Round Bastard
Mill Bastard and Slim Taper File
Pattern Making,
Wood
Half Round File, Cabinet
Wood Rasp, Pattern Makers Rasp,
Woodchuck, Round Bastard, Square Bastard,
Mill Bastard and Slim Taper File
Pipe Fitting Half-Round Bastard File
Planer Knife
Carbon Steel
Mill Bastard File
Plastics
Flat Bastard File. Also Mill Bastard File,
Magicut
®,
Plastics File, Laminate File,
sharpened for plastics
Plumbers’ Work Half-Round Bastard
Rotary Mower
Blade
Handy File, Flat Bastard
Rough Filing Bastard File depending on shape to be filed
Slot Knife File, Slim Taper or Warding
Snagging Flat Bastard File
Soft Metal Flat Bastard
Stainless Steel Flat, or Mill File sharpened for stainless
Steel Flat Bastard File
Job by Job File Selector
Type: Description:
Steel Alloy
Use file applicable to the shape of the material.
File steel alloy only when it is annealed
Switch Contacts
Tungsten Point File or Mill Bastard File,
according to surface area of switch contacts
Switch, Electric
Mill Bastard File or Tungsten Point File,
according to size of switch
Template
Flat Bastard File, Half-Round Bastard File,
Mill Bastard File, or Round Bastard File
V-Groove
Files, including Knife, Taper, Slim Taper,
X Slim Taper, XX Slim Taper
Wood Working Half Round File or Cabinet Rasp
Zinc Babbit File
Job by Job File Selector
Saws

Profile Selector for Machinist’s Files
Profile Selector for Special Purpose Files
Cross Section: Name: Shape: Character of Teeth: Taper: General Uses:
Flat Rectangular
Usually Bastard. Also
second-cut and smooth
Taper in width
A general
purpose file
Hand Rectangular
One-edge safe. Bastard
second-cut and smooth
Uniform in width
Finishing flat
surfaces
Warding Thin
Usually Bastard. Also
second-cut and smooth
Width sharply
tapered thick-
ness uniform
Filing and notches in
keys. Narrow work
Square Square
Bastard, second-cut
and smooth
Tapered
Enlarging holes or
recesses mortises,
keyways and splines
Three Square Triangular
Sharp edges. Bastard
second-cut and smooth
Tapered
Filing acute angles,
corners, grooves and
notches
Round Circular
Usually Bastard. Also
second-cut and smooth
Either tapered
“Rat Tail” or
blunt
Enlarging holes;
shaping curved
surfaces
Half Round Third-Circular
Usually Bastard. Also
second-cut and smooth
Uniform in width
Concave corners
crevices, round holes
Knife Knife-Shaped
Usually Bastard. Also
second-cut and smooth
Tapered curving
to a narrow point
Cleaning out acute
angles, corners, slots
22
23
Cross Section: Name: Shape: Character of Teeth: Taper: General Uses:
Aluminum Flat Rectangular
Made in one cut only.
Fast-cutting teeth
Tapered
Filing aluminum
alloys and other soft
metals
Long Angle Flat Rectangular
Made in one cut only.
Both edges safe
Slightly tapered
Lathe work where
smooth finish is
desired. Also soft
metals

Profile Selector for Swiss Pattern Files
24
25
Cross
Section:
Name: Shape: Character of Teeth: Taper: General
Uses:
Hand Rectangular
Double-cut on two flat faces
and one edge. Other edge
safe or uncut
Taper in width Flat surfaces
Pillar Width narrower than hand file
Double-cut on two flat
faces. Both edges safe
Uniform in width Flat surfaces
Warding Thin Rectangular
Double-cut on two flat faces.
Single-cut on two edges
Tapered in width
uniform in thick-
ness
Slots, locks
and keys
Square Square Double-cut Tapered Corners, holes
Three Square Triangular (Equilateral)
Double-cut on three faces.
Single-cut on edges
Tapered Corners, holes
Round Circular Double-cut
Either tapered
“Rat Tail” or blunt
Corners, holes
Half Round Third-Circular Double-cut Tapered Corners, holes
Knife Knife-Shaped
Double-cut on flat faces.
Single-cut on edges
Tapered Slots

26
27
Notes:Notes:
