
Download CBPOne on Android / Google Phone
You can use your camera to scan this bar codes to find the app,
or you can just search for “CBPOne” in the Google Play Store.
Step One:
Open the Google
Play Store
Step Two:
Type CBP One into
the search bar
Step Three:
Click on the Install
button to download the
app
Step Four:
Open the app

Create an Account
The first time you
use CBPOne, you
will have to create a
login.gov account.
This is free.
Click on this red
button to create
your account

Accept the Terms
and Conditions
You are promising
that you will not lie
on the form and that
if you do
intentionally lie, you
may get fined or put
in prison.
You are also
promising that you
are only using the
app for yourself, or
for someone with
their permission.
The last part says
that the form will
take 10 minutes to
fill out
Click on this
ACCEPT button to
agree.

Create a Login.gov
Account
Click on Create an
account button to
make an account

Enter your Email
Address
You need an email
address to use
CBPOne. Email
addresses are free
on many websites,
including gmail.com.
No one should
make you pay
money for an email
address.
Make sure that you
use an email
address that you
know how to open,
because you will
have to open your
email to confirm
your account.
Click that you
Agree
Click on this
checkbox to say
you agree to
follow the rules of
the website.
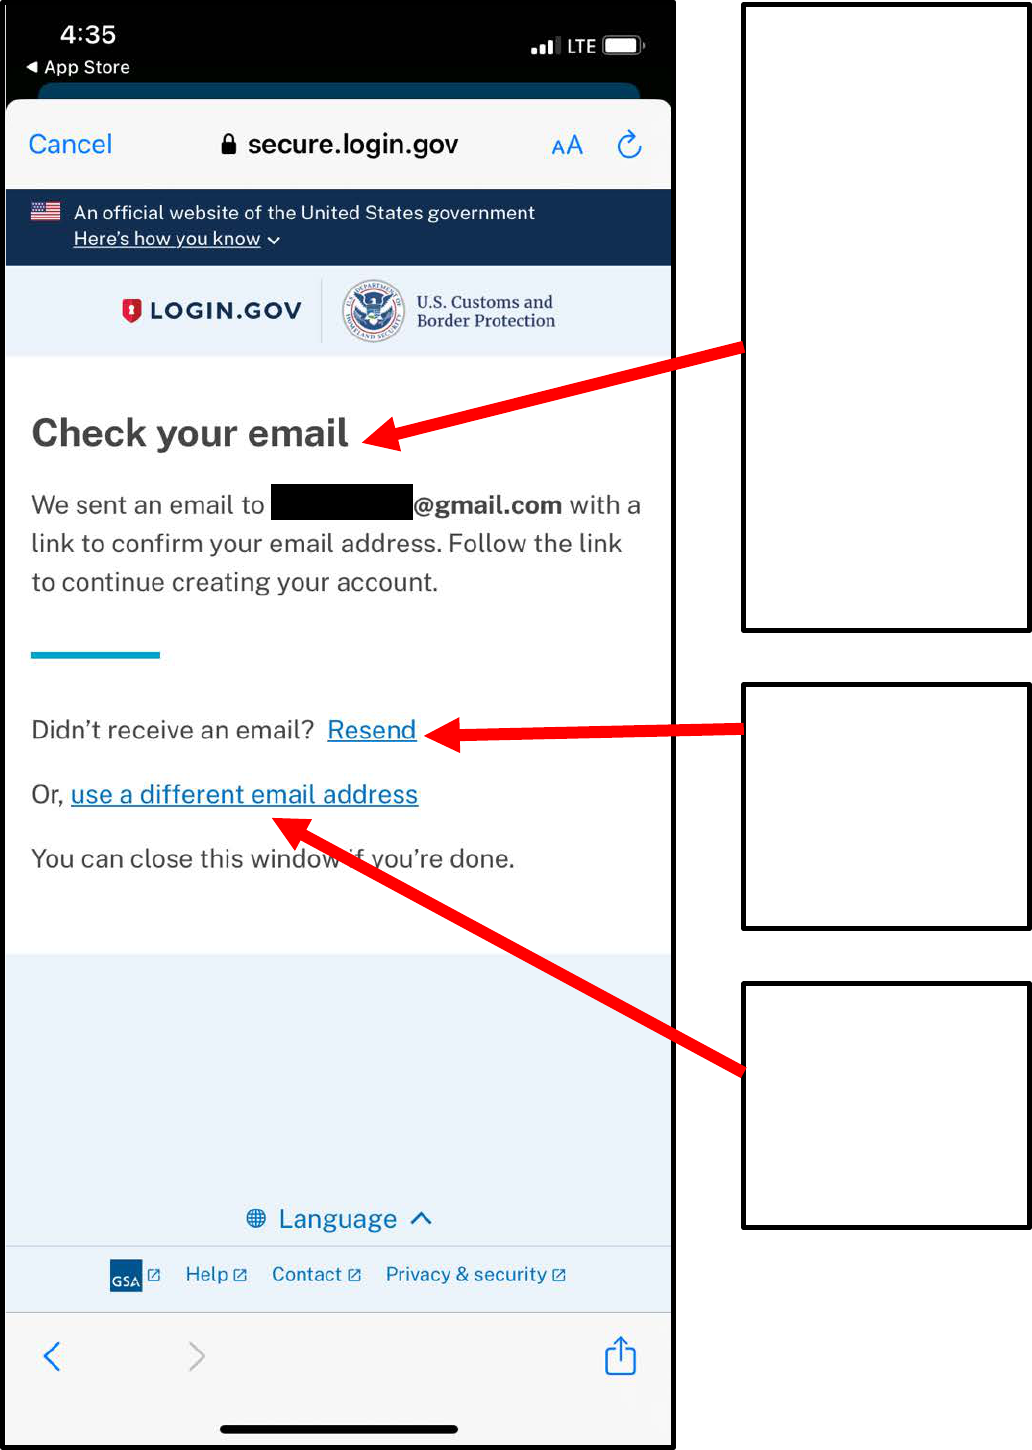
Confirm Your
Account Using
Email
Now you need to
go to your email
account and look
for the email from
login.gov.
This email should
be in your inbox.
If you cannot find
it, it might be in
your Spam or
Junk folder.
If you cannot
find the email…
Click here and
they will send the
email again!
If you cannot
find the email…
Click here to use
a different email
address

Confirm Your
Email Address
This is what the
email looks like.
Click on the blue
button to confirm
your email
address
This email should
be in your inbox.
If you cannot find
it, it might be in
your Spam or
Junk folder.

Create Your
Password
Invent a password for
your account. It has to
have 12 characters,
which means is can be
12 letters or numbers
or symbols.
If you click on this box,
it will show you what
you are typing, instead
of the dots that are
hiding what you are
typing.
You will know your
password is good
when this bar turns
green
Suggestion
Make sure you
remember your
password. Maybe call
someone you really
trust in your family and
tell them your
password. If you text
them your password,
make sure you delete
it from your phone
immediately so no one
else can find it if you
lose your phone.

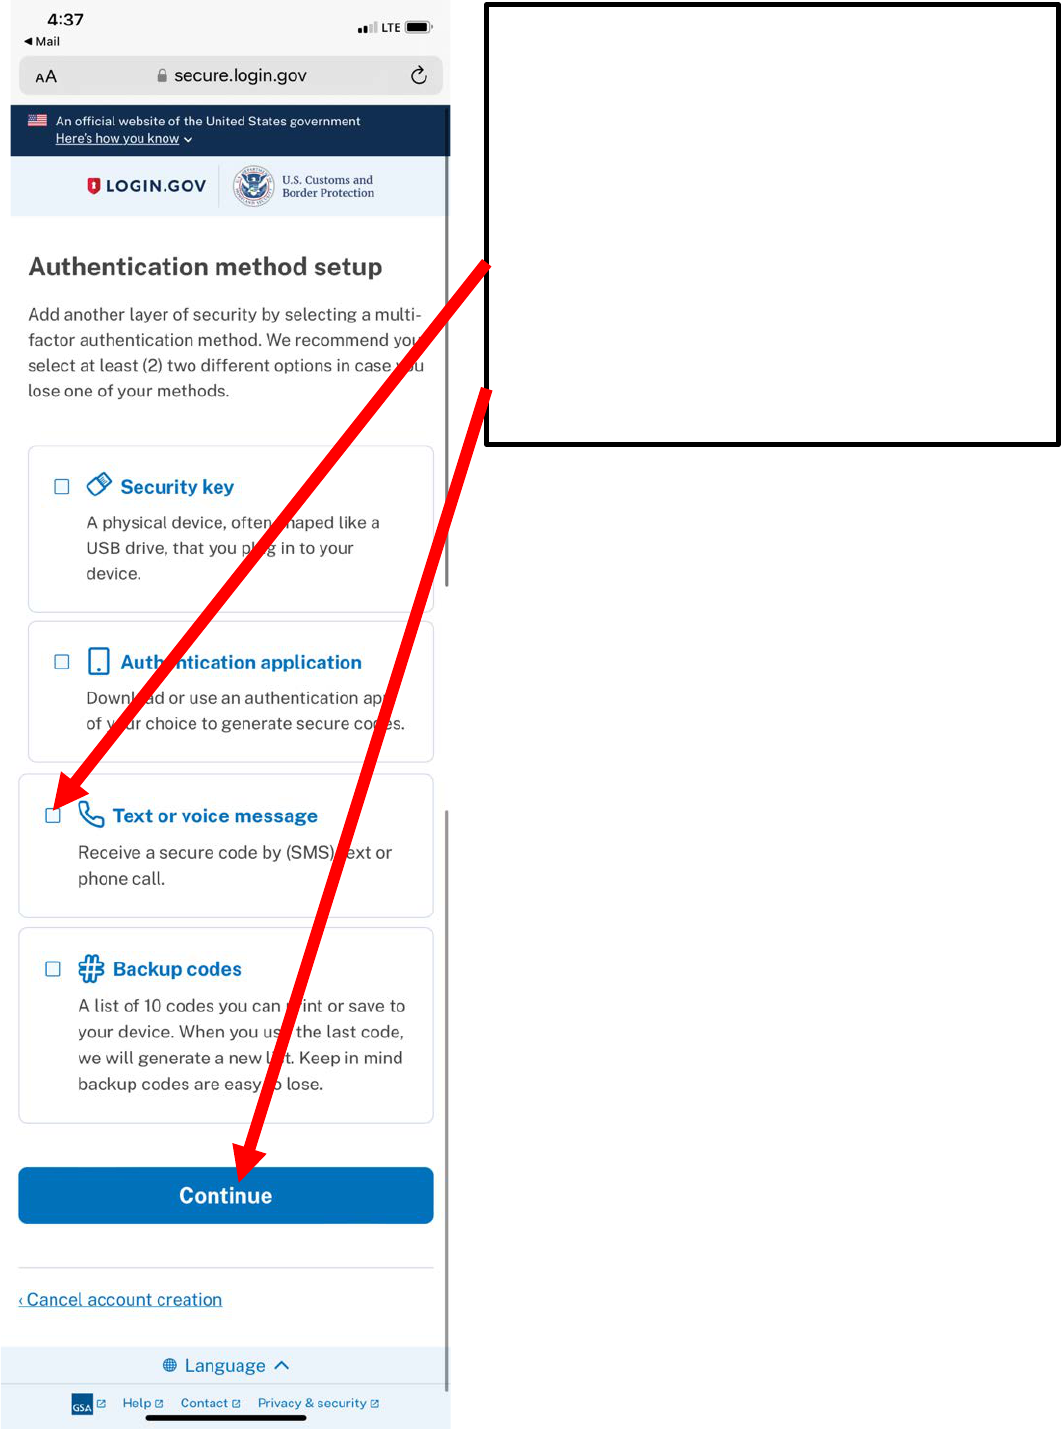
Create Authentication Method
CBPOne requires that you have to
identify yourself again even after you
enter your email address and
password.
This means you need to remember
your password, but you ALSO need
to set up another way to prove who
you are. This is what “authentication”
means – proving that you really are
you.
We suggest that you set up TWO
additional ways to identify
yourself:
1. Backup Codes
2. Text Message
Setting up BOTH methods is
important in case you lose your
phone or if you do not have enough
money on your phone to receive text
messages.

Create Authentication Method:
BACKUP CODES
First, click on this box next to the
picture of the #
Second, click on the blue button that
says “Continue”

Create
Authentication
Method: BACKUP
CODES
Click on the blue
button that says
“Continue”

Create
Authentication
Method: BACKUP
CODES
These codes are very
important. You can
use them to log in to
CBPOne with your
password. This will
work even if you lose
your phone or cannot
get text messages.

Create
Authentication
Method: BACKUP
CODES
Save these codes by
writing them down or
taking a picture
(screenshot) on your
phone and sending it
to someone who you
really trust. You can
also select the “copy”
button to copy and
paste them into a
message.
Make sure you delete
the message from
your phone after you
send it, in case your
phone is stolen.
Create BACKUP
CODES
Authentication
Method
Once you are SURE
that you have saved
the codes, click the
blue button that says
“Continue”

Create
Authentication
Method: Text
Message
Now it is time to set up
a SECOND
authentication method
with text messages.
Click on the blue
button that says “Add
another method.”
v
Create Authentication Method:
TEXT MESSAGES
Now it is time to set up the SECOND
authentication method.
First, click on this box next to the
picture of the phone.
Second, click on the blue button that
says “Continue”

Create
Authentication
Method: TEXT
MESSAGES
First, click on the flag
so you can select the
right country for your
telephone’s country
code. This is where
you select if you have
a Mexican phone
number or a phone
number from another
country.
Second, type in your
phone number.
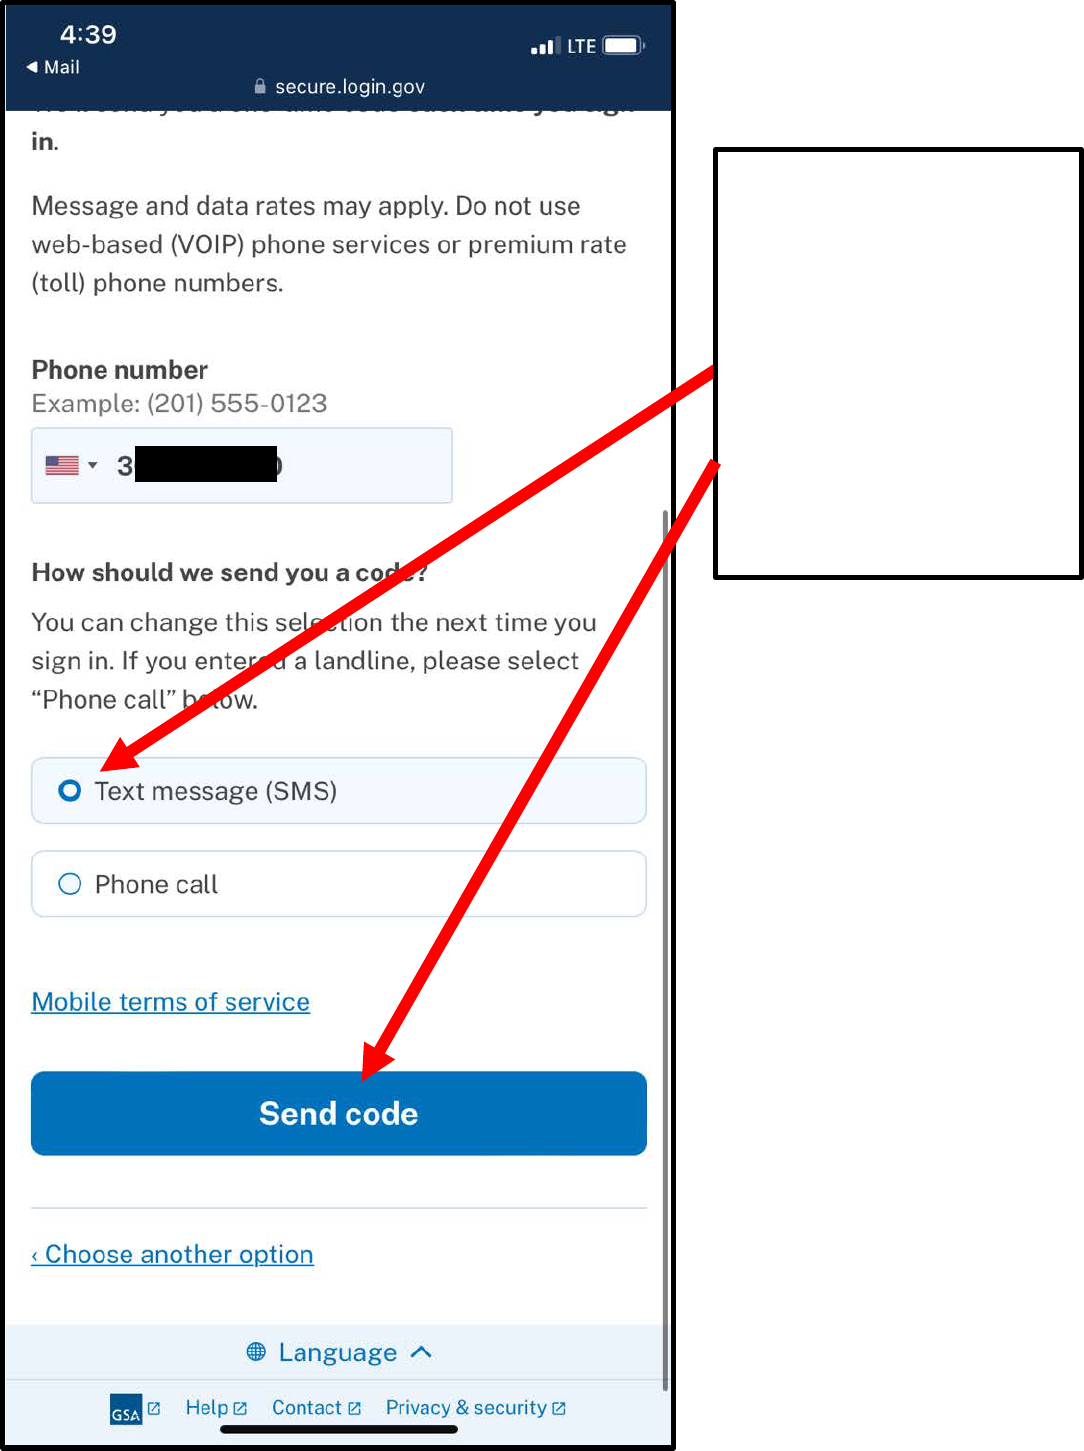
Create
Authentication
Method: TEXT
MESSAGES
First, select Text
Message.
Second, click the blue
button that says “Send
code”

Create
Authentication
Method: TEXT
MESSAGES
First, find the code in
your text messages
and write it in this box
Second, check the box
that says “Remember
this browser”
Third, click the blue
button that says
“Submit”

Create
Authentication
Method: TEXT
MESSAGES
Click the blue button
that says “Agree and
continue”

Error Message
If something like this
happens, do not worry.
Close the internet
program and go back
to open CBPOne
again.

Log-In to CBPOne
Click on this red
button to log in with
your account

Accept the Terms
and Conditions
You are promising
that you will not lie
on the form and that
if you do
intentionally lie, you
may get fined or put
in prison.
You are also
promising that you
are only using the
app for yourself, or
for someone with
their permission.
The last part says
that the think the
form will take 10
minutes to fill out
Click on this
ACCEPT button to
agree.

Log-In to CBPOne
Click on this
Continue button

Log-In to CBPOne
Type your email
address here.
Type your password
here.
Click the blue button
that says “Sign in”

Log-In to CBPOne
You should get a
text message with a
“one time code.”
Find that text
message and enter
it in this box.
Then click the blue
button that says
“Submit.”
Text Message
Problems?
If you have lost your
cell phone or cell
phone number or do
not receive the text,
click on this to use
your special codes
instead.
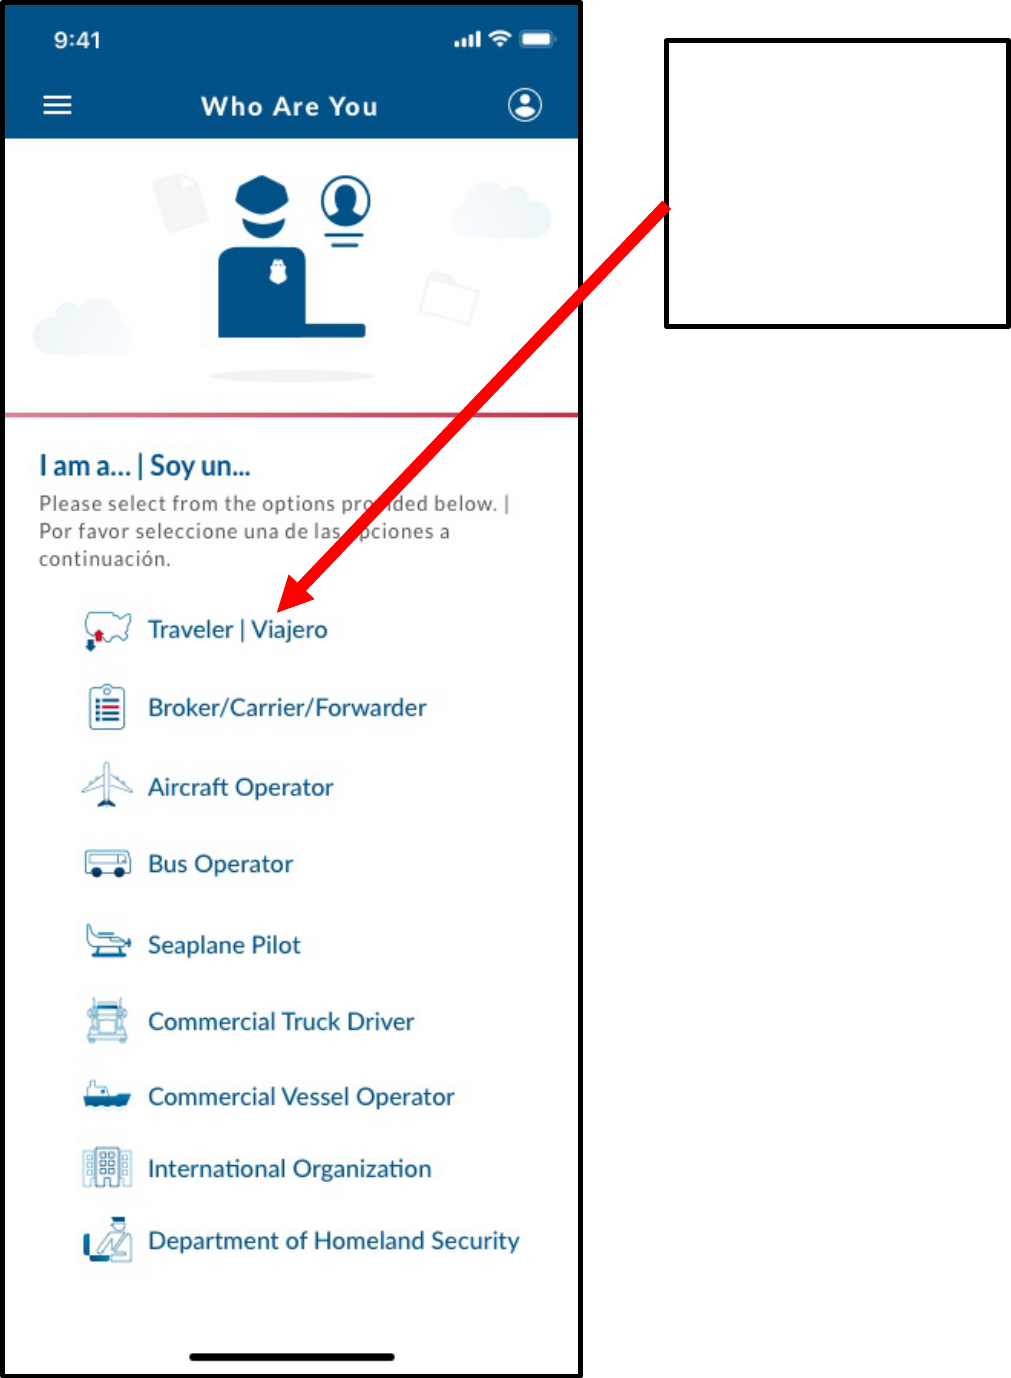
Submit Profile in
CBPOne
Click on this that
says Traveler /
Viajero

Select Travel
Method
Click on this that
says Land / Tierra.
Then click here on
CONTINUE

Submit Profile in
CBPOne
Click on this that
says Submit
Advance Information
/ Enviar Informacion
Anticpada

Submit Profile in
CBPOne
This says “Missing
Information. Please
fill out first and last
name in the profile.”
Click on “go to
Profile”

Submit Profile in
CBPOne
Type your First
Name(s) here.
Type your Last
Name(s) here.
Then click on “done”

Submit Profile in
CBPOne
Pick if that you want
to use CBPOne in
English.
Then click on
“CONTINUE”

Give CBPOne
Permission to use
your Location
CBPOne only works
for people who are
close to the U.S.-
Mexico Border. You
have to give the app
permission to see
your location via
GPS.
This picture is from
an IPhone. It looks
different on Android,
but give permission
for the App to use
your location.
“Allow While Using
the App”

Vulnerability Criteria
CBPOne appointments are for
people who want to seek
asylum and protection in the
U.S. In this section, you are
promising that you are
“vulnerable” in one of these
ways. When you go to your
appointment, immigration
officials are going to ask you
WHY you said you were
“vulnerable” in Mexico.
Then click CONTINUE
TRANSLATION
Use this box to translation the
vulnerability attestation.

Submit Profile in
CBPOne
Click on “Submit
Advance Information”

Submit Profile in
CBPOne
Click on “ADD
INDIVIDUAL”

Biographical Information
First click here on TAKE A
PHOTO.
You must take a video picture
of yourself using your phone.
Click anywhere on the screen
when you are ready for the
picture
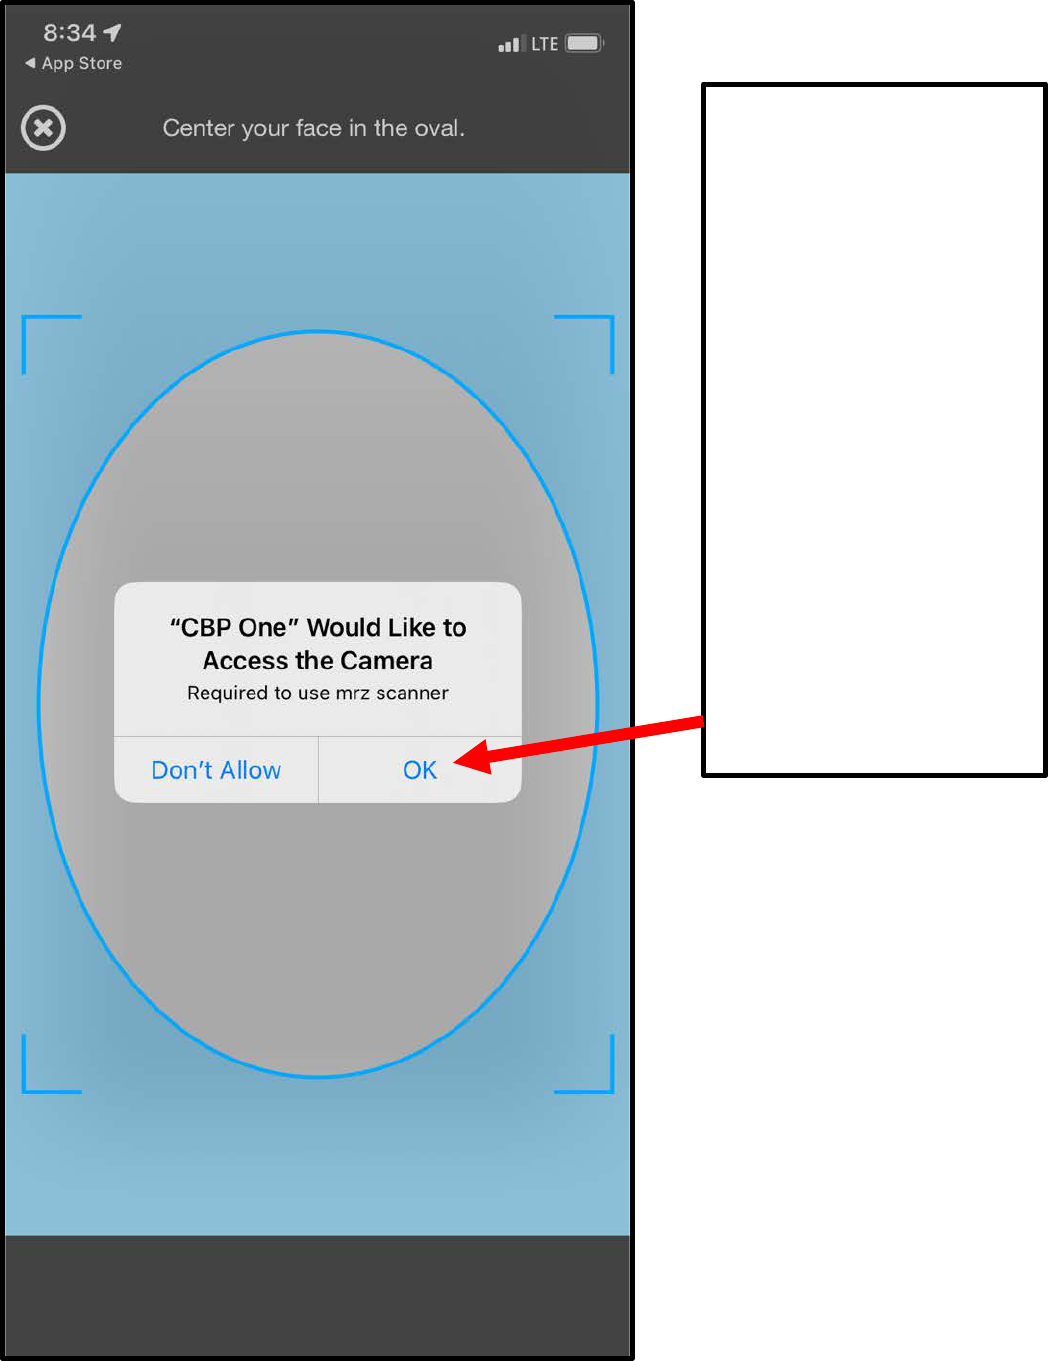
Give CBPOne
Permission to use
your Location
You need to give the
CBPOne permission
to see your location
via GPS.
This picture is from
an IPhone. It looks
different on Android,
but give permission
for the App to use
your location.
Click on “Ok”

Take a Video
Picture of Your
Face
This is what it looks
like when CBPOne is
scanning your face. It
is like a video picture.
It will scan you face
and then when it has
enough information,
it will stop
automatically.
Make sure that you
have enough light
/brightness in the
room when you take
the video picture,
especially if you have
darker skin tone.
Also turn the
brightness settings
all the way up on
your phone.
If it still does not work,
try deleting the app and
installing it again.

Take a Video
Picture of Your
Face
When CBPOne has
taken your video
picture correctly, this
is what the screen
will look like.
Click on “OK”

Biographical Information
Answer the questions honestly.
Translate
Translate
Translate
Translate
Translate
Translate
Translate
Translate
Translate
Translate

Biographical Information
Answer the questions honestly.
Translate
Translate
Translate
Translate
Translate
Translate
Translate
Translate
Translate
Translate
Drop Down Menus
There are drop-down menus to make your
selections for Hair Color and Eye Color

Document Information
The question “Do you have a
travel document” is asking if
you have a PASSPORT.
Answer this question
HONESTLY about if you have
a passport. If you select “No,”
you will still be allowed to make
an appointment.
If you do have your Passport,
you need to answer “Yes” and
provide the information
honestly.
The click “CONTINUE”
Translate
Translate
Translate
Translate
Translate

Employment
Information
Answer the questions
honestly.
If you have a regular job in
MEXICO or another country,
select “Yes” and provide the
information about your
employer.
If you do not have a regular
job, you can select “No”
Translate
Translate
Translate
Translate
Translate

Have you traveled to another country in the last year?
Answer the questions honestly.
You need to include EVERY country you have traveled to in the last year.
If you do not remember the exact dates, guess.
You DO NOT include MEXICO.
It is only countries you have EXITED already.
Translate
Translate
Translate
Click here to add more
countries
When you have added all the
countries, click on
“CONTINUE”

Biographical Information
Answer the questions honestly.
Translate
Translate
Translate
Translate
Translate
Translate
Translate
Translate

Translate
Is your father alive?
Translate
Translate
Translate
Translate
Translate
Fill out the same information
for your Mother, then click
“CONTINUE
Biographical Information
Answer the questions honestly.
The same questions are asked
for your Father and your
Mother

Where are you going to
live?
Answer the questions honestly.
Translate
Translate
Translate
Translate
Translate
Translate
Translate
Translate

Emergency USA Contact
Information
Answer the questions honestly.
This can be the SAME as
where you plan to live
.
Translate
Translate
Translate
Translate
Translate
Translate
Translate
Translate
Translate
Translate
Translate

Description
This question just means you
need to answer how you know
this person. Are they your
friend? Your relative? It can be a
short answer.
When you are done, click
“CONTINUE”

Permanent Address
Abroad/Foreign
Answer the questions honestly.
This is your permanent address outside of
the United States.
If you are homeless, or living in a
temporary situation, you can select “I don’t
have one”
Translate
Translate
Translate
Translate
Translate
Did someone assist you in
submitting this information?
Answer the questions honestly.
Translate
Translate
Translate
When you are done, click “CONTINUE”

Add Individual
You are allowed to add more
people who are traveling with
you, such as your family
members, if all of you in your
group are going to live at the
same address in the U.S., and
if you have the same address
in Mexico.
Click on the plus sign to add
more people, like your family
members, spouses, children.
THIS IS VERY
IMPORTANT!!!!
Be honest. Lying to immigration
is a very bad idea and can
cause you many problems.
Only include people in your
travel group if you really do live
with them now, and do plan to
live with them in the U.S.
Once you have finished adding
everyone in your Travel Group,
click on the word CONTINUE.

Confirmation Screen
This is the confirmation screen,
where you can review your answers
and make changes.
Make sure that you can see
all of the “Individuals” in
your family / “travel group”
listed here. THIS IS VERY
IMPORTANT!!!!
You can be in a travel group with
anyone who lives with you now
AND plans to live with you in the
U.S. You should not lie.
If you want to make changes, you
can click on “EDIT”.
Once you are done, click on
SUBMIT.
IMPORTANT! After you click
“SUBMIT” you cannot add more
Travel Group members, and will
have to start again.

SUBMITTED – NOT
SCHEDULED
If you see this screen, it
means that you did
everything right and are
registered in CBPOne, but
you still need to schedule
your appointment.
You click on SCHEDULE to
see if there are available
appointments.
There are new appointments
added to CBPOne every day
at 8:00 am CST.
Come back to CBPOne each
day at that time to look for
available appointments by
clicking the blue button that
says SCHEDULE.
CBPOne app only works if
you are close the U.S.
Mexico border.
BEWARE OF SCAMS!
If someone offers to sell you
their appointment, this is a
scam! Each appointment is
linked to the individual, and
they cannot be sold or given
away. If anyone tells you that
you can pay them for a faster
appointment, that is also a
scam! Be careful!
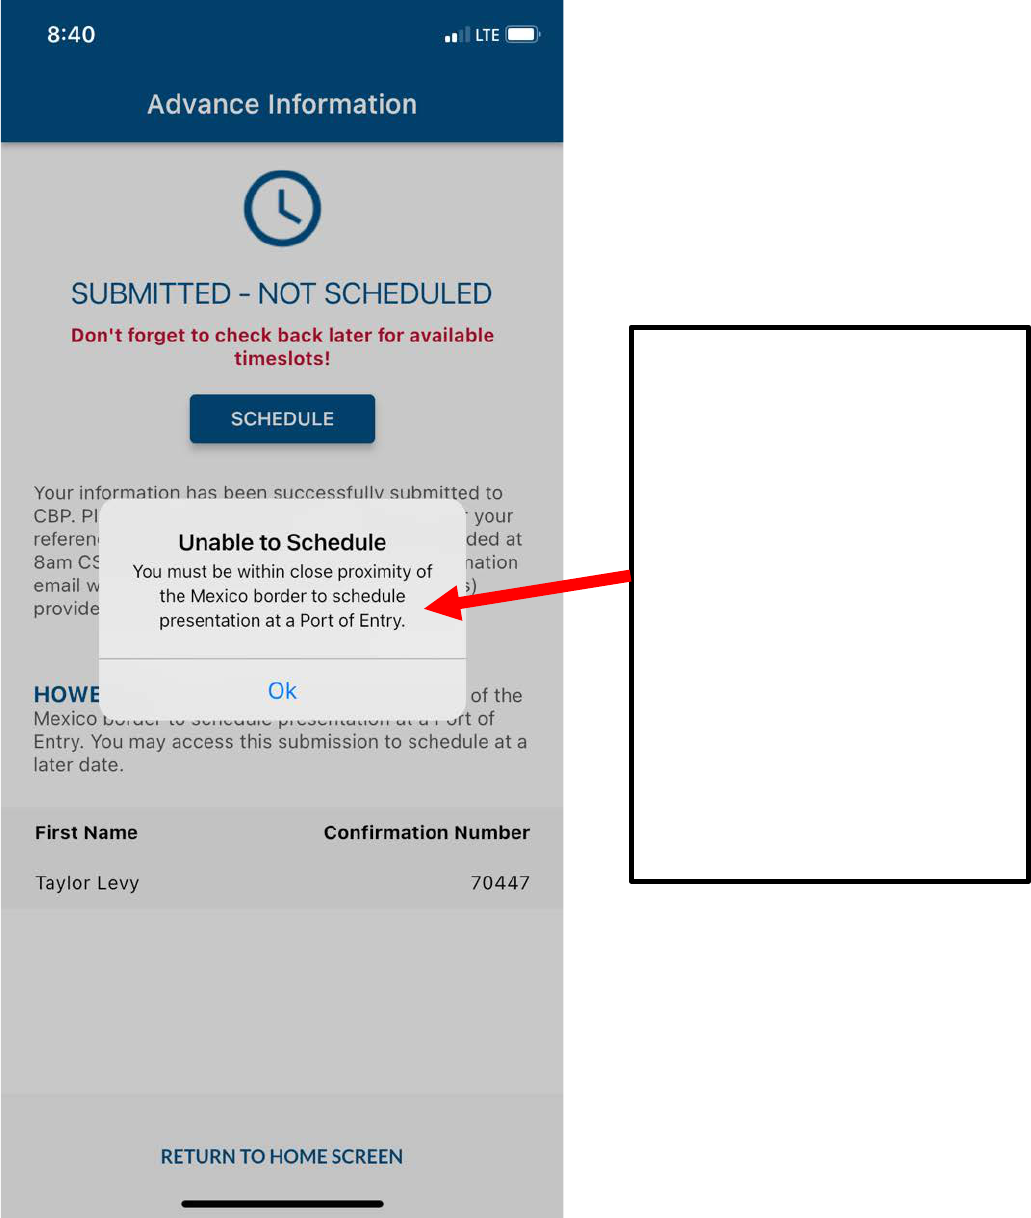
Unable to Schedule
You must be within close
proximity of the Mexico
border to schedule
presentation at a Port of
Entry.
This means that you
CANNOT make an
appointment on CBPOne
unless you are physically
close to the border, or in
Mexico City, or maybe some
other cities in Central
Mexico.

Requested Port of Entry
Be careful choosing where you
want to cross. Many cities are
very dangerous. If you do not
have proper papers in Mexico,
Mexican immigration and police
may try and arrest you when
you travel to that city.
Nuevo Laredo is the MOST
DANGEROUS city. Piedras
Negras is also VERY
DANGEROUS.
Matamoros
Mexicali
Piedras Negras
Reynosa
Nuevo Laredo
Nogales
Ciudad Juarez
Tijuana

Calendar to Choose
Appointment
I only have this picture in
Spanish, but it looks the same
in English.
Use the calendar to select a
date that is bold, that is how
you know that there is an
appointment available.
If there is nothing in bold,
check CBPOne again the next
morning for new appointments.

Calendar to Choose
Appointment
I only have this picture in
Spanish, but it looks the same
in English.
Once you select a date, you
will see times of appointments
if they are available.
Click on one of the times and
then click “Submit”

Confirmation Screen
I only have this picture in
Spanish, but it looks the same
in English.
Once you select a date and
time, you will be able to edit
your information. Make sure
there are not any mistakes.
Once you are sure everything
is correct, click on “Submit”
(this is a Spanish picture, so it
says “ENVIAR” but in English it
will say “SUBMIT”).

SUBMITTED - SCHEDULED
If you are able to schedule an
appointment, this is what the screen
will look like.
You will also get an email
confirmation of your appointment.
This is your “ticket” to your
appointment to go to the Port of
Entry (bridge) and ask for asylum.
This “ticket” DOES NOT MEAN that
you have been granted asylum, it
simply means that you are permitted
to lawfully go to the Port of Entry
(bridge) and ask for asylum at a
specific date and time. .
This “ticket” and your appointment is
ONLY good for YOU and your travel
group; you cannot buy or sell these
appointments. Immigration is going
to verify your identity by checking
your photo you submitted when you
applied.
If you need to change your
appointment, you can click the blue
button that says RESCHEDULE.
Make sure that you can see all
of the “Individuals” in your
family / “travel group” listed
here. THIS IS VERY
IMPORTANT!!!! If not, you
must start the process again!
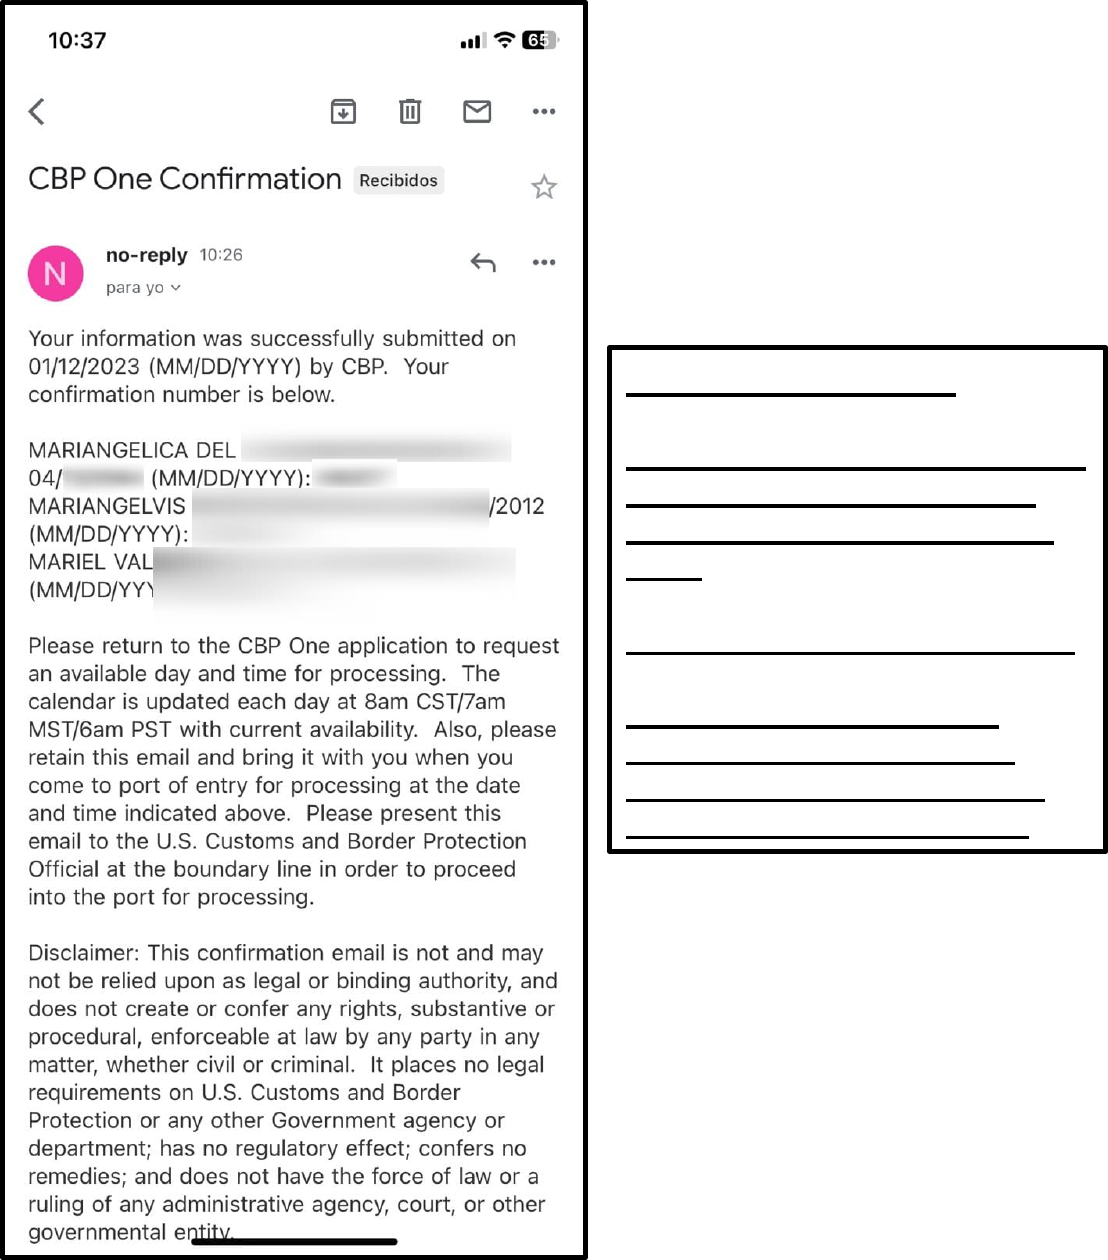
Confirmation Email
Make sure that you can see all
of the “Individuals” in your
family / “travel group” listed
here.
THIS IS VERY IMPORTANT!!!!
If not, you must start the
process again, because it
means you did not make an
appointment for everyone!
