
V.2 (2010)
Concord Technologies
Concord Fax Premier/Pro
User Guide

Concord Fax Premier Pro User Guide Page | 2
Publication Notice
The contents of this publication the specifications of this application are subject to change without
notice.
Concord reserves the right to make changes without notice to this publication, Concord software, and
services, and shall not be responsible for any damages, consequential or otherwise, caused by reliance
on the materials presented herein, including typographical errors.
This is the Second edition of this publication.
Version
This guide describes Fax Premier Pro version 2.0 and revised June 11, 2010.

Concord Fax Premier Pro User Guide Page | 3
Contents
Publication Notice .......................................................................................................... 2
Version ....................................................................................................................... 2
Contents ..................................................................................................................... 3
Introduction ................................................................................................................. 4
Signing up for Concord Services ......................................................................................... 4
Concord Fax Premier Or Concord Fax Pro .............................................................................. 4
Setting Up Your Concord Fax Service ................................................................................... 5
Message Center ............................................................................................................. 5
Profile ........................................................................................................................ 6
Contact Information ............................................................................................. 7
Password ........................................................................................................... 7
Preferences .................................................................................................................. 8
Options ............................................................................................................. 8
Display Options ................................................................................................... 9
Receiving Email .................................................................................................. 10
Sending Email .................................................................................................... 11
Phone Numbers .................................................................................................. 12
Default Cover Page ........................................................................................................ 13
Creating a Quick Cover Page .................................................................................. 13
Cover Page Example ............................................................................................ 14
Activity Reports ............................................................................................................ 15
Received Logs (Default) ........................................................................................ 15
Sent Logs .......................................................................................................... 15
How To Send a Fax ........................................................................................................ 16
Using Email to Send a Fax ...................................................................................... 16
Attaching Your Fax Document ................................................................................. 17
Setting Up Your Outbound fax Service ................................................................................. 17
Making Changes to Your Outbound Fax Service ...................................................................... 17
Validating Your Email Address .......................................................................................... 17
Getting Help ................................................................................................................ 18
Contacting Concord Technologies Customer Service ...................................................... 18
Concord Enhanced Fax Error Descriptions ............................................................................ 19
Concord Enhanced Fax Error Descriptions (cont) .................................................................... 20

Concord Fax Premier Pro User Guide Page | 4
INTRODUCTION
Welcome to Concord Internet Faxing! This User Guide will provide you information and instructions on
how to use your Concord Fax service. Our Concord Fax Premier and Concord Fax Pro services are a
simple and cost effective way to send and receive all your faxes through the Internet, using your PC or
mobile device.
This User Guide explains:
• Signing up for Concord Fax services
• Configuring the Premier or Pro service
• Creating, sending and receiving all your faxes using the service
• Customer Support options
Signing Up for Concord Fax Services
Please visit the Concord email to Fax / Fax to email web sites to examine Fax Premier services at the
following web page: This is the link to the Fax Premier Service
Or, for Fax Pro: This is the link to the Fax Pro Service
Connect directly to these links and sign up via the Web or call a Concord Representative at 1-800-792-
0329 or 1-206-441-3346 to sign up for an account over the phone.
Concord Fax Premier or Concord Fax Pro?
Concord Fax Premier: (See web page for current pricing)
• Send and Receive faxes through your internet connection
• Receive faxes to your own toll-free number
• Local U.S. number available for international dialing access
• Access to your fax messages from anywhere via www.concordfax.com.
• Receive incoming fax messages delivered to up to 5 different email addresses
• Includes 50 Inbound fax pages and 50 Outbound pages per month free of charge
Concord Fax Pro: (See web page for current pricing)
• Send and Receive faxes through your internet connection
• Receive faxes to your own toll-free number
• Local U.S. number available for international dialing access
• Access to your fax from anywhere via www.concordfax.com.
• Receive incoming fax delivered to up to 5 different email addresses
• Includes 150 Inbound fax pages and 150 Outbound fax pages per month free on charge
Note:150 inbound and Outbound includes pages to/from USA & Canada only!

Concord Fax Premier Pro User Guide Page | 5
Setting Up Your Concord Fax Service
Once you have activated a fax account with Concord, you must now sign into the Concord website
www.concordfax.com and setup you fax service. From the home page click “Login”. This will bring you
to a login screen show below.
You will be prompted to enter a User ID and Password. Your User ID will be the 800 number provided to
you at the time of signup for the fax service as well as the Password. If you do not have either the User
ID or Password, please contact Concord Customer Support and we will provide you with your Login
information.
Message Center
When logged into your Concord Fax account the main screen will default to your Profile. This is where
you view all of your Contact Info and you can edit your Password. Also, if at any time you wish to close
your account, this screen enables you to do that, as well. You will also be able to go to the other areas
in your Profile, enabling you to adjust your Preferences and receive Activity Reports. For security
reasons, we also suggest you “Logout” of your account when you are finished editing it.

Concord Fax Premier Pro User Guide Page | 6
Profile
After logging in, the Profile area will be displayed. This page displays your contact information and also
allows access to change your password. By default, you are greeted by the Profile area when you log in.

Concord Fax Premier Pro User Guide Page | 7
Contact Info
When logged into your Fax Pro or Fax Premier account, the main screen will display customer contact
information. To update your contact information, please do so in this area. You may also navigate to
this area by selecting Contact Info under Profile in the menu bar located in the left-hand margin of this
page.
Password
From this screen, you may verify and change the Password, or PIN that was issued to you. In order to
change your password, enter the password originally assigned to you (“Current Password”) and then
type in your new password in the “New Password” and “Verify Password” fields. After doing this, click
on the Submit button to initiate the change.
Passwords must be numeric and between 4 and 10 characters in length.

Concord Fax Premier Pro User Guide Page | 8
Preferences
To edit your preferred settings for the Fax Pro or Fax Premier services, please click on Preferences in
the menu area in the left hand margin of the screen. There are 5 choices to select from in the
Preferences area: Options, Display Options, Receiving Email, Sending Email, and Activate PC.
Options
Under Options you may change the Fax file format that you receive faxes to either PDF or TIF format.
You may change the Fax CSID (Call Subscriber ID). Your fax number is recommended, though some
people choose to use the name of their business, or full name. It is unlawful to send a fax without a
CSID. Below the Fax CSID field, there is a box to check if you would like to receive a notification when
your faxes are sent. The Message Notification area allows you to designate which email address you
would like your notification delivered. (The sent fax notification address need not be the same address
you use for sending and receiving messages)
Be sure to press Update to implement your changes. (See screenshot of Options, above.)
Concord Fax Premier Pro User Guide Page | 9
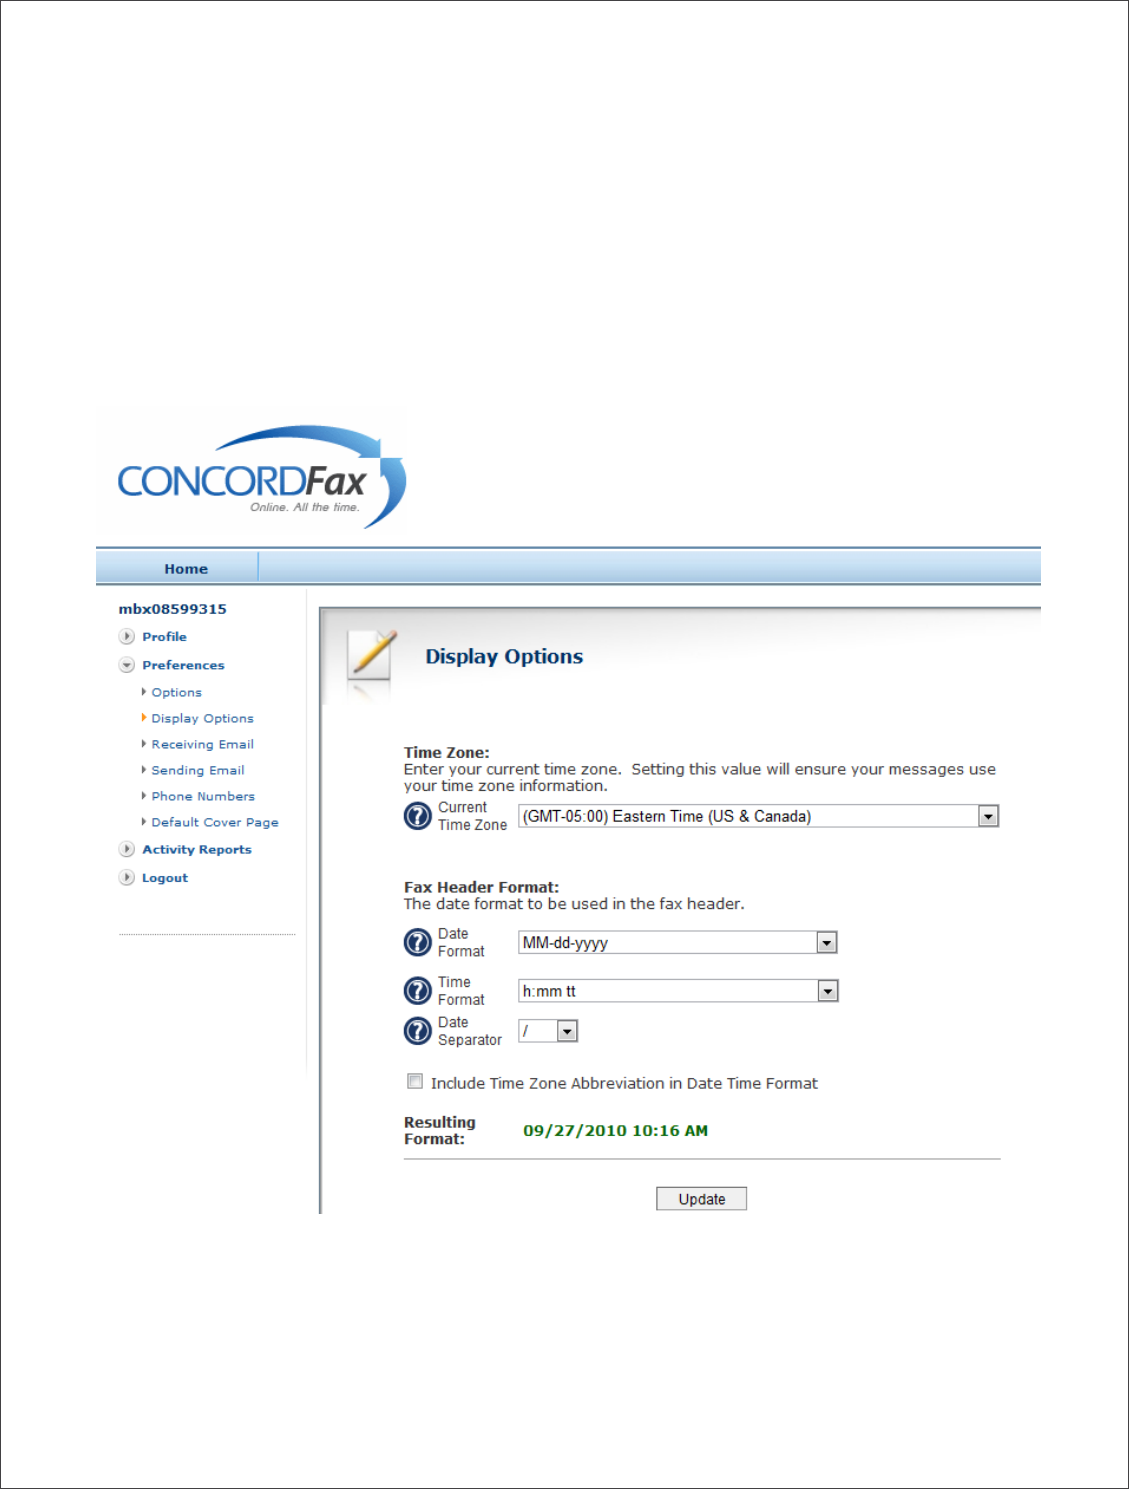
Display Options
The Display Options area provides you with the ability to change your time zone designation as well as
the format for the date and time information that is printed on your fax header. These tools allow you
completely customize the look and feel of your outbound fax messages.
A sample of the date and time formats are displayed as choose from the corresponding drop-down
menus.
Be sure to press Update to implement your changes.

Concord Fax Premier Pro User Guide Page | 10
Receiving email
To add, remove, and editing the email addresses you choose to „receive‟ your faxes, this is where you
would look in your Concord account. The Fax Premier and Pro accounts allow you to have up to five (5)
email addresses which to have your fax messages forwarded. It can take up to two (2) minutes to add
each additional address.

Concord Fax Premier Pro User Guide Page | 11
Sending Email
In order to send a Fax using email a valid email address must be used. In the field below email addresses
may be added, edited or removed. After each new sending email address is added, a validation request
is generated and emailed back to you at that address. In order to activate each new sending address,
you will need to open this email and click on the appropriate link in the email of the body of the
validation request. Only addresses that have been validated will be able to successfully send a fax
message. You may select up to three (3) sending email addresses.
Concord Fax Premier Pro User Guide Page | 12
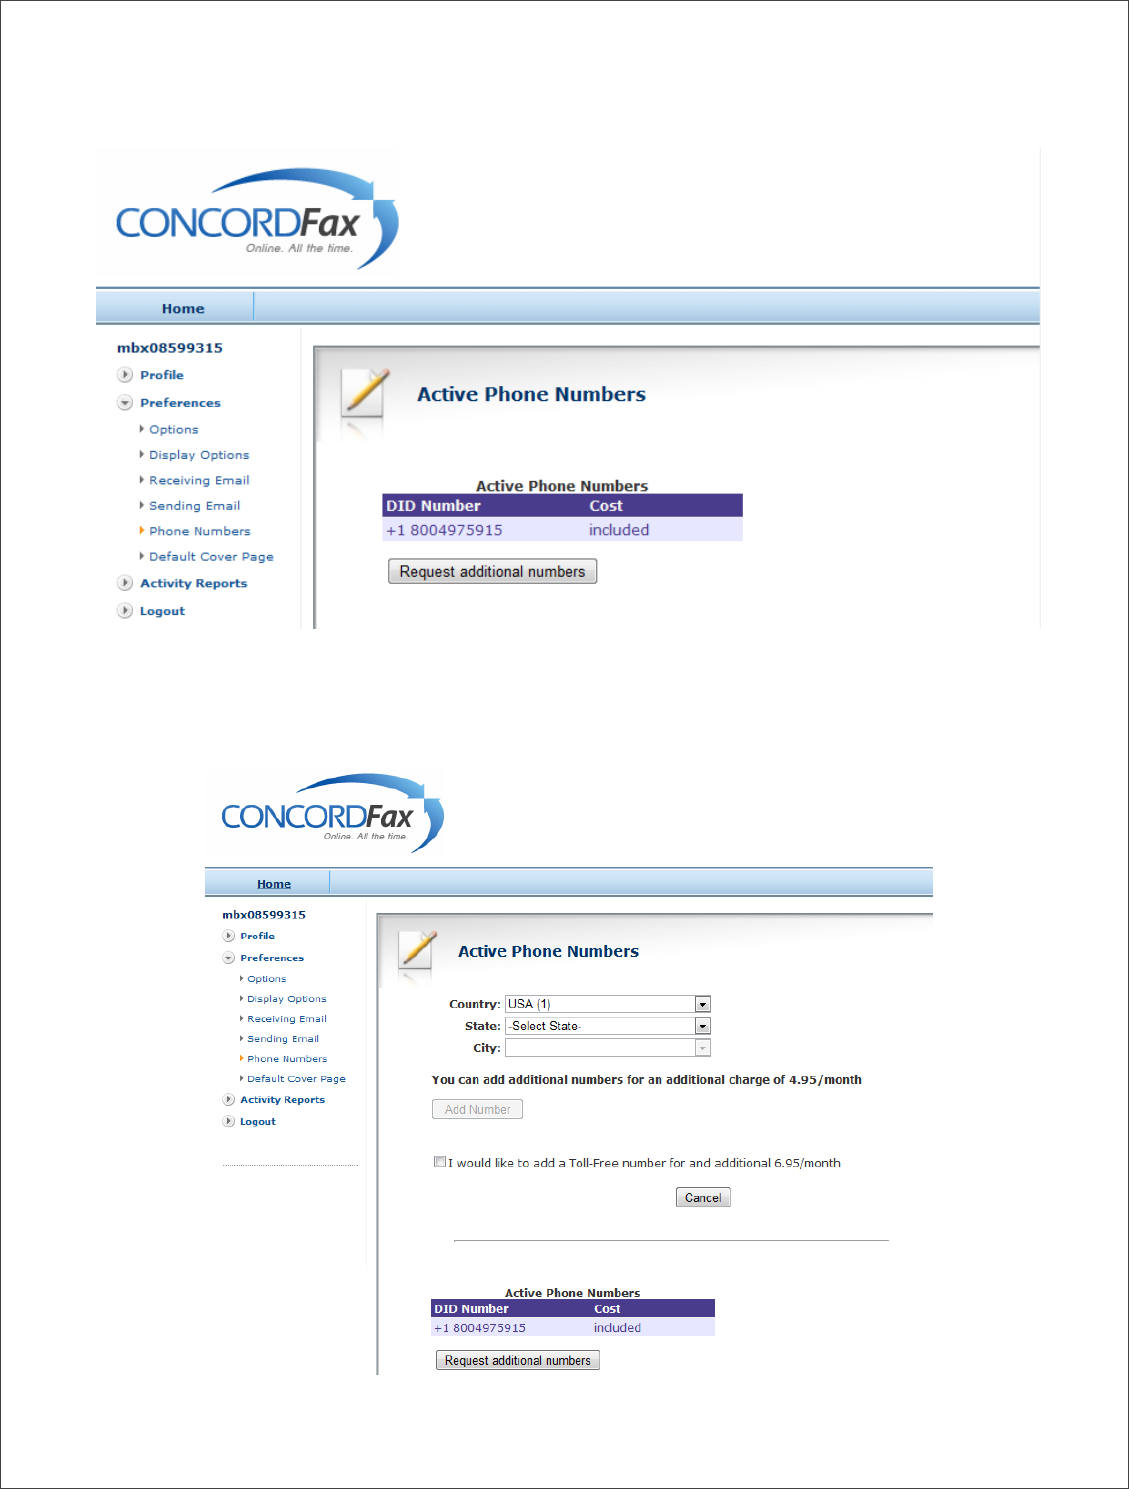
Phone Numbers
This section is for adding additional phone numbers. Select as many additional numbers as needed.
Please note that additional pricing for „local‟ numbers can be found on the web page, as well as the
additional Toll-Free numbers pricing, as shown below. (Pricing subject to change)
After choosing “Request additional numbers” these fields appear.

Concord Fax Premier Pro User Guide Page | 13
Default Cover Page
To utilize Concord‟s Cover Page feature you will need to select a cover page in the window below.
To take advantage of the Concord Default cover page you should populate “Available Cover Pages” with
Concord Default and then click “Set Default”.
Creating a Quick Cover Page
The new cover sheet fax feature for Fax Premier and Fax Pro is built into Concord‟s Faxing options and
is designed to quickly enable our customers with the ability to send a fax in the body of their email. It is
an extremely basic fax cover page. To have a more attractive and customizable fax cover page you
could simply attach a fax template to your emails that you have customized to your needs.
When sending a “Cover Page” fax through the body of your email the “To:” field is the same as always,
however the “Subject” line should contain the following:- %{cover} - Then if you want something in the
“Subject” line after %{cover} you could put something following %{cover}.
In the example below I put the following in the Subject line: %{cover}Testing Cover Pages.
[Then in the body of the email I put the following]
Dear Customer,
If you have any additional questions regarding automatically generated Cover Pages, or
other issues, Concord customer support is available Monday through Friday, from 6:00
am to 5:00 pm, Pacific Time at 1-800-792-0329 or 206-441-3346. You may also contact
us via email at service@concordfax.com and we will respond within one business day.
Thank you for using Concord's faxing solutions.
Best regards,
Customer Support
Concord Technologies
Ph: 800-792-0329 Ext.220
Fax: 800-301-0329

Concord Fax Premier Pro User Guide Page | 14
Cover Page Sample
[Here is the sample of what the Concord “automatically generated” cover page looks like. (see below)]
FYI – There is NO preview feature in the “automatically generated” Concord Cover Page.

Concord Fax Premier Pro User Guide Page | 15
Activity Reports
The Activity Reports feature allows you to monitor your activity up to 30 days. Using the Begin Date and
End Date you can look back on your faxing activity.
Received Logs: When you click on Activity Reports the default is Received Logs.
Sent Logs: A sample of the type of information found in the Sent Logs is shown below.

Concord Fax Premier Pro User Guide Page | 16
How To Send a Fax
Your outbound fax service may be setup through your email. (Please keep in mind that your User ID is
your 10-digit toll, or toll-free number!) Almost any email program can send faxes. Not only programs
such as Microsoft Outlook, Outlook Express and Lotus Notes, can send faxes. Hosted on-line email
services, like Yahoo, Hot Mail, and GMail are also able to send and receive faxes.
Using Email to Send a Fax
The typical email message screen below is an example of sending a fax using an email. All one needs to
do is to follow these 3 steps to send a fax via email in the US or Canada, or even Internationally.
1. Enter the number “1” for US and Canada emails, or, 011 plus the „Country Code‟ for emails
outside of the US or Canada. For example, 01144 would be the number to enter for a UK fax
(the Country Code for the UK is 44.
2. Follow the “1”, or the 011 plus the „Country Code,‟ with the Fax Number of the person you are
sending a fax. (Shown in the sample email screen below as xxxxxxxxxx)
3. Follow the Fax Number with @Concordsend.com
You can send a fax to up to 5 fax numbers in a single email following the 3 steps above for each number.
Examples of sending a US fax with the number 800-555-1212: 18005551212@concordsend.com.
An example of a Fax to the UK with the fax number 12-345-6789: 01144123456789@concordsend.com
Note: Never use any hyphens, spaces, or dashes between any parts of the fax number!

Concord Fax Premier Pro User Guide Page | 17
Attaching your Fax Document
You will need to attach an electronic file to send as the fax. From your message screen you will need to
insert or attach the document by browsing within your computer and selecting a file. You may attach up
to a maximum of 5 files of almost any page length to each faxed email.
The following file types are supported:
.TIF/TIFF (Tagged Image File Format)
.TXT (Plain Text)
.HTML(Hypertext Markup Language)
.RTF (Rich Text Format)
.DOC, DOCX (Microsoft Word Windows v.97, 2000, XP, 2003, 2007, 2010)(shown in the
example above)
.XLS, XLSX (Microsoft Excel Windows v.97, 2000, XP, 2003, 2007, 2010)
.PPT, PPTX (Microsoft PowerPoint Windows v.97, 2000, XP, 2003, 2007, 2010)
.PDF (Adobe Portable Document Format)
.JPG, VSD (Visio and JPEG)
.GIF (Graphics Interchange Format) 114412345678[email protected].
Setting Up Your Outbound Fax Service
To set up your Outbound Fax Service log into your account at www.concordfax.com with your password
and your account‟s “toll free” or “local” Fax numbers. Then, follow the steps below.
Select Preferences from the menu on the left side of your inbox.
Select Sending email. This will bring you to the setup window for your outbound fax service.
Once you have entered the first email address you want enabled for sending faxes you will
be sent a confirmation email to the same address prompting you to validate the request.
You must validate the email address before you will be able to send outbound faxes from
that email address!
You are able to add up to 3 individual email addresses for sending faxes.
Making Changes to Your Outbound Fax Service
You may enable Password Protection for each individual email address or delete any or all of the email
addresses for outbound faxing. To delete an email address, simply click the Delete option to the right of
the address.
Validating Your Email Address
After adding any new email address you will automatically be sent a Validation Request. After the
request is sent please check the same email for the validation email, open it and click the link within

Concord Fax Premier Pro User Guide Page | 18
the email to confirm the email address is valid. To resend the request, click the Send button to the right
of the newly added address.
Getting Help
This section explains how you can contact Concord Technologies‟ Customer Service, for questions
regarding your account or general questions on Concord services.
Contacting Concord Technologies Customer Service
Normal service hours are Monday–Friday from 6:00 AM to 5:00 PM (Pacific Time).
Telephone: +1 (206) 441-3346 or 1-800-792-0329
For written support, please either fax or e-mail your question to the number or address below and a
representative will respond within one business day:
Fax: +1 (206) 441-7965 or 1-800-301-0329
Email: service@concordfax.com
You can contact Concord Technologies Customer Service to:
Subscribe to additional services
o Internet Fax for Microsoft Office (IFOF)
Inquire about billing and charges.
Change your current account information. For example, if you want to switch your current
credit card billing to another credit card, contact Customer Service. All account changes are
subject to the appropriate credit approval.
We recommend that you visit our web site at www.concordfax.com for frequently asked questions
regarding our services.

Concord Fax Premier Pro User Guide Page | 19
Concord Enhanced Fax Error Descriptions
Error Message
Enhanced Error Description
Busy
"Busy" Indicates that the called number (phone line) is already in use or
engaged.
No Answer
"No Answer" indicates that the line was not picked up (answered) by a fax
machine or person before timing out. The timeout is sufficient to ensure at
a minimum of 5-8 standard rings.
Not a Fax Machine
"Not a fax machine" indicates that a fax device has failed to answer the
call. Specifically, fax tones or the fax signal from a remote machine has
not been detected. This may for a number of reason including but not
limited to, a wrong number, a machine not configured to automatically
answer, or a device that has stopped answering because it is out of paper
or has a paper jam.
Voice Answer
"Voice Answer" indicates that either a person or voicemail message
answered the call.
Fast Busy
“Fast Busy" indicates that there was no available path to the attempted fax
number. This normally indicates that the destination is currently
overloaded, or that there is an outage with the specific number or in the
area attempted such as that due to a fibre cut. This can also be caused by
severe weather conditions in the area of the destination. In most cases
Fast Busy conditions are temporary, please verify the fax number you‟re
trying to reach is valid and if so please try again later.
Sit-Tone / Operator Msg
"Sit-Tone / Operator Msg" indicates that the call was intercepted by the
special situation information tones followed by an operator message,
examples include "The number you have dialed is disconnected or is no
longer in service. Please check the listing and try your call again.", "The
number you have dialed has been changed…the new number is…XXX-XXX-
XXXX", "All circuits are currently busy, please try your call again later".
"Operator Msg" indicates the same issue however the special situation
information tones were not detected.

Concord Fax Premier Pro User Guide Page | 20
Concord Enhanced Fax Error Descriptions (cont.)
Error Message
Enhanced Error Description
Negotiation Failed
“Negotiation Failed” indicates the call was answered by a fax device but
during the initial training phase of the call, communication between the fax
transmitter and the receiving fax device failed or the two devices could not
agree on the parameters to be used for the call. This often indicates a phone
line quality issue and may occur at the beginning of the fax transmission, or,
during the fax transmission between pages on a multi-page fax.
Transmission Failed
"Transmission Failed“ indicates the receiving fax machine has answered and
connected but the fax was not able to be fully and successfully transmitted.
This can be caused by line quality issues, fax device issues, the sharing of
phone line with other devices such as credit card processing terminals.
Temporary conditions such as severe weather conditions in the destination
area can also cause transmissions failures.
Exceeded ECM
Retransmit
“Exceeded ECM Retransmit” indicates the call was answered by a fax device
and connected using ECM or Error Correction Mode. Due to poor line quality
or a poor connection for that specific call attempt the transmission of the fax
required an excessive amount of data to be retransmitted to the receiving
device to get acknowledgment of successful reception of the fax, the call was
aborted to allow a retry or new attempt to get a better connection and to
ensure the call duration did not ensure excessive overtime charges.
Job Cancelled
"Job Cancelled" indicates that the job or recipient number was cancelled or
the set time for delivery expired.
General Error
"General Error" indicates that another uncommon error not listed above has
occurred resulting in the failure to transmit your fax. Please retry the fax
job or recipient again. If you get the same error again please contact
Concord customer service for further assistance and investigation.
