
User Guide
1
v.05252022
This page is intentionally blank.
2
v.05252022
Contents
What is TouchNet? ..................................................................................................................................... 3
Getting Started ........................................................................................................................................... 3
Request Access to TouchNet ................................................................................................................... 3
Setting up your profile ............................................................................................................................ 4
Logging in and out of TouchNet .............................................................................................................. 7
TouchNet Roles .......................................................................................................................................... 7
Exploring TouchNet by Role ....................................................................................................................... 8
Marketplace Payment Clerk .................................................................................................................... 8
Navigation ........................................................................................................................................... 8
Searching payment transactions ......................................................................................................... 9
Processing a refund ........................................................................................................................... 10
Resending Purchase and Refund notifications .................................................................................. 12
Looking up Customer Information .................................................................................................... 13
Marketplace Accountant ...................................................................................................................... 14
Navigation ......................................................................................................................................... 14
Viewing financial reports .................................................................................................................. 14
Searching payment transactions ....................................................................................................... 16
Payment Gateway Accountant ............................................................................................................ 16
Navigation ......................................................................................................................................... 16
Generating Batch Settlements .......................................................................................................... 17
Viewing Payment Activity ................................................................................................................. 18
Troubleshooting Payment Issues, Investigate Validation Errors ....................................................... 19
Common Payment Processing Errors ................................................................................................ 20
Getting Help ............................................................................................................................................. 20
About this User Guide .............................................................................................................................. 20

3
v.05252022
What is TouchNet?
TouchNet is a global payments company, providing secure and convenient ways to process web-based,
card-not-present payments. It is the University's payment gateway and it's a hosted solution. All
electronic storage, processing, and transmission of cardholder data is NOT on the campus network but is
off premises, taking place at TouchNet, in their data center. Because TouchNet is the University’s online
payment gateway, the Finance CERTIFI Committee
c
an centrally manage procedures, streamline
merchant requests, and provide additional security. All these things help to ensure the University
remains PCI compliant.
Getting Started
Request Access to TouchNet
1. To request TouchNet access, use this link to submit a help request: ServiceNow request for
TouchNet.
Result: You will be taken to the TouchNet/Online Credit Card Payment Support page.
2. Select TouchNet/Online Credit Card Payment Support to request access for new users and
general help. Single Sign-on will prompt you to log in with your Onyen if you are not already
signed in.

4
v.05252022
Note: You can also navigate directly to help.unc.edu and use the search bar to filter TouchNet
resource links, as shown on the next page.
Note: When you submit a request for access, TouchNet support will verify prerequisites (PCI
Training, supervisor approval, SAQ/merchant approval), set up the requested access, then
communicate next steps in an email message to the new user.
Setting up your profile
Once you have received access to TouchNet you’ll complete the following steps to finish setting up your
user profile.
1. You will receive an email with the following information, including a temporary password:
2. Click the link provided in the email.
Result: The TouchNet login screen will display, where you will be prompted to set up an
authentication email address.
You have been set up as a user on the TouchNet system.
url: https://secure.touchnet.com/ucommercecentral
User ID: c21551.ONYEN
Temporary password: Mc62gR$zKz

5
v.05252022
3. Click the Continue button.
4. Enter an authentication email address.
5. Click the Send verification code button.
6. You will be prompted to enter a verification code sent to the email address that you provided.
Check your email for the code. If you do not see the email in your inbox, check your spam or
junk folder.

6
v.05252022
7. Once you have verified an authentication email address you will be prompted to verify an
authentication phone number. Click the Continue button.
8. Enter the phone number you wish to use for authentication purposes. A code will be sent to that
number via text or call depending on the option that you choose.
9. Select the Send Code button to receive the code by text or the Call Me button to receive the
code by phone.
10. You will be prompted to enter the verification code sent phone number that you provided.
11. TouchNet will ask you to reset your password as a first-time user. Enter a new password and
then reenter that same password.
12. Then click the Continue button.
Result: You have now successfully completed new user login for TouchNet.

7
v.05252022
Important: Remember to keep your login credentials in a safe and secure place and do not
share them with others.
Logging in and out of TouchNet
Each time you log in to TouchNet, if it has been more than 24 hours since you last visited the site, you
will be required to re-authenticate using the phone number or email you provided during setup.
Important: Be sure to use the TouchNet URL and only that URL. If you bookmark the URL, edit it to
remove any extra parameters that have been added.
For security, TouchNet is designed to log out idle users quickly.
Best practices for using TouchNet include:
• Have a specific task in mind, log in, complete the task, and log out.
• Don’t forget about your session and let it time out. Use the logout button to logout.
• Only have one session of TouchNet going at a time.
• Clear your cache often and restart the browser. It is best to start with a clean browser session
every time you log in.
Note: Marketplace and Payment Gateway menus can time out at different times.
TouchNet Roles
Users may be granted one or more roles depending on their campus merchant needs. These roles
determine the functionality you’ll have access to within the TouchNet application.
• Marketplace – this role reports at the uPay site level.
• Payment Gateway – this role reports at the merchant level.
Common user roles are described below. Other less common roles are available to central campus
administrators and student services support staff and are intentionally omitted from the guide.

8
v.05252022
• Marketplace Payment Clerk: This role allows the user to search for payment transactions and
process refunds. Payment search results can be helpful for order fulfillment and looking up
customer information (name, address).
• Marketplace Accountant: Users with this role can view and download financial reports. They
can also search transactions but cannot process refunds.
• Payment Gateway Accountant: Users with this role can review all reports for their assigned
campus merchant(s). Common reporting activities are generating batch settlements to support
daily deposit processing, reviewing payment activity for a specific day or date range, and
troubleshooting customer payment issues. Payment Gateway Accountants will typically have
access to ConnectCarolina Finance to submit Daily Deposits. Reasons for having this role are to
generate revenue and settlement reports and to investigate credit card validation errors.
Exploring TouchNet by Role
The following is a brief description about navigation based on user roles. Please note that not all menu
options/features are accessible. This section will highlight the features based on user role.
Marketplace Payment Clerk
Common tasks performed by payment clerk users include:
• Searching for payment transactions.
• Processing refunds.
• Looking up customer information.
Navigation
Follow these steps to access the Marketplace resources:
1. Click the drop-down menu on Applications tab.
2. Select Marketplace from the list.
9
v.05252022
Note: For business offices with multiple sites per TouchNet merchant, you may want to use
Marketplace, which reports on one site at a time.
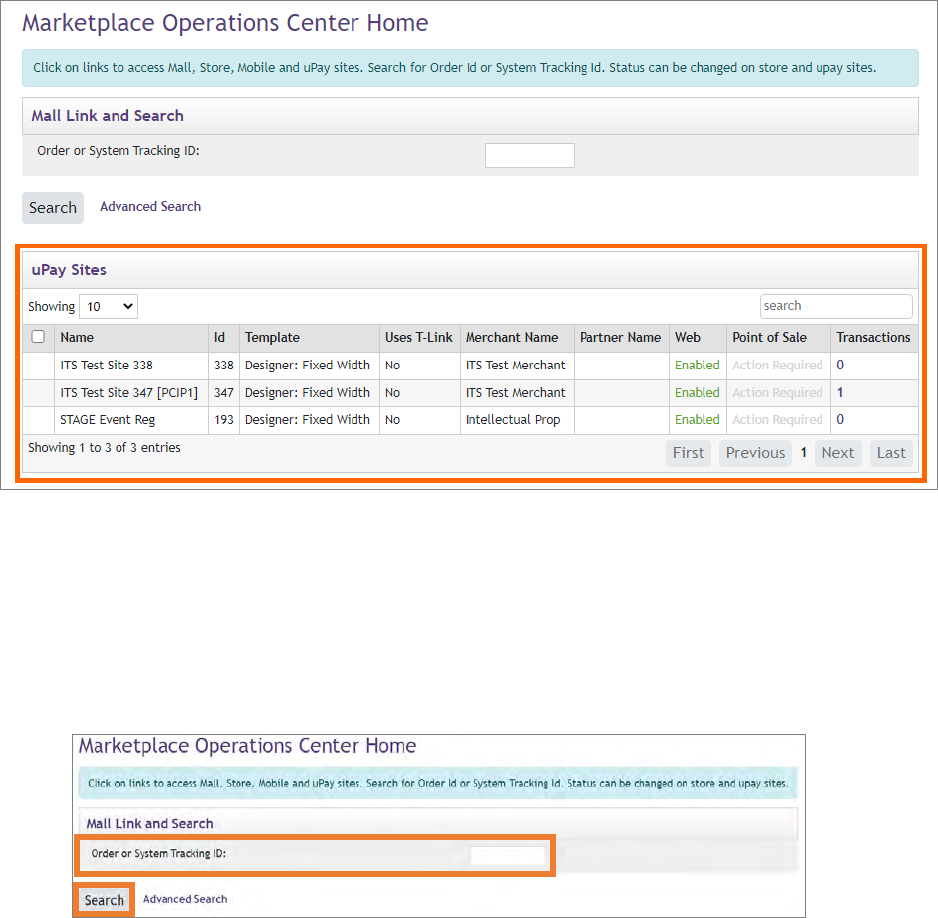
The middle section of the Marketplace home page will show you what sites you have access to. See
example below.
Searching payment transactions
Follow these steps to search for payment transactions:
1. Enter the Order or System Tracking ID.
2. Click the Search button.
Note: If you do not know the Order or System Tracking ID, you can perform an Advanced Search.
Click the Advanced Search link, enter one or more filter values, then click the Run Search
button.

10
v.05252022
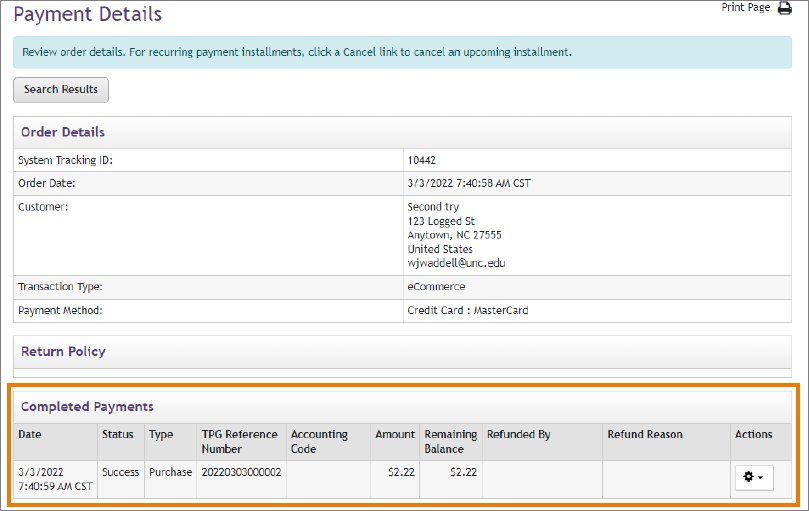
Result: The payment search returns records of any payments that fit the search criteria you
entered. To see more detailed information about the payment click the System Tracking ID.
Processing a refund
You can process a refund from the Payment Details page or by using the uPay Refunds option. Follow
these steps to process a refund from the Payment Details page:
1. After performing a Payment Search and locating the transaction that you need to refund, click
on the System Tracking ID for that transaction to access the Payment Details page.
2. In the Completed Payments section, click on the Action dropdown menu to initiate the refund
process.
Result: You will be redirected to the Refunds page.
3. Enter all or part of the amount in the Refund field.
4. Enter a Refund Reason.
5. Click the Refund link that is in the Action column.

11
v.05252022
Result: If the refund was processed successfully, a "Refund issued" message displays at the top
of the page and the Complete Payments section will display both the Purchase and Return
transactions. Refer to the picture on the following page.
Follow these steps to process a refund using the uPay Refunds option:
1. From the Marketplace Home page, navigate to the Merchant, select Sites, select the uPay Site, then
click on the Refunds option.
2. On the Single Payment Refund tab, search for the payment you wish to refund.
12
v.05252022
3. In the Payment Search Results, locate the payment to refund then click the Refund link that is in the
Action cell for that payment.
4. Enter the refund amount and provide a reason.
5. Click the Refund link to process.
Note: The steps, process, and result are like the first method that was described on the previous
page.
Resending Purchase and Refund notifications
For payments and refunds, your customer receives an email notification. This email is configured to
appear that it is coming from the email address of your uPay Site. Sometimes these notifications are
flagged as spam and may get deleted from the customer’s inbox. You can resend these notifications.
You can also modify the customer’s email address in case it was mistyped when the payment was
processed. Follow these steps to resend a payment or refund email notification:
1. Search for the transaction using the uPay Payment Search option.
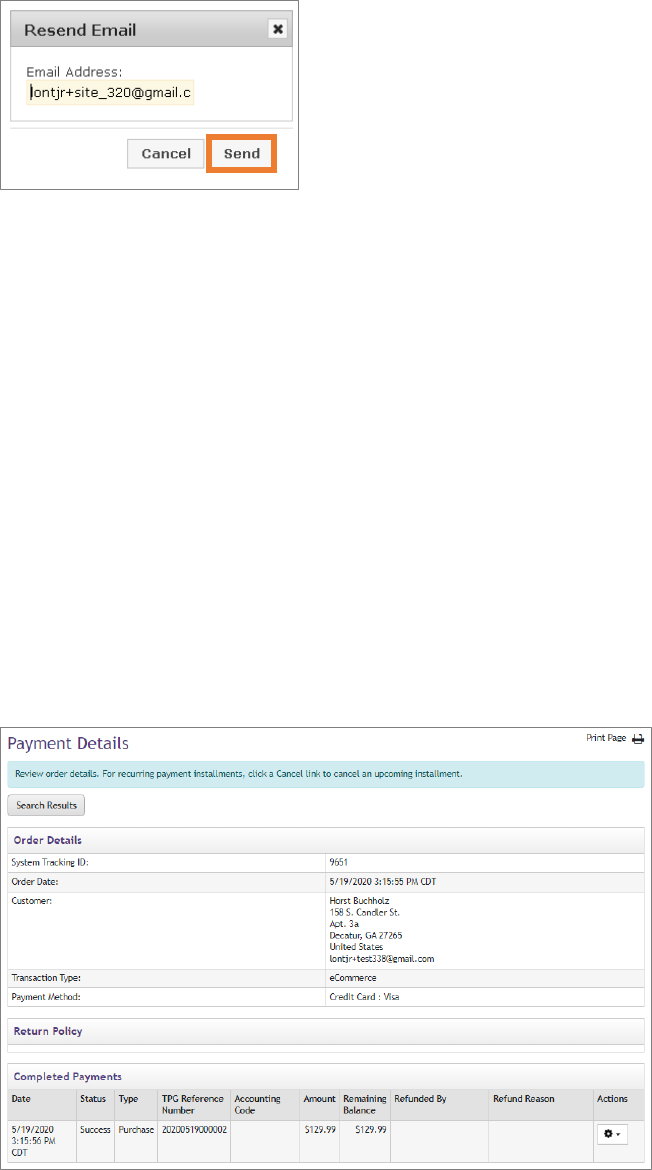
2. Click on the System Tracking Id to open the Payment Details page.
3. In the Completed Payments section, click the Actions dropdown menu and select Resend
Purchase Receipt.
Result: The Resend Email prompt appears.
13
v.05252022
4. The Email Address field is prepopulated with the purchaser's email address, or you can enter a
different address.
5. Click the Send button.
Result: The notification is sent, and a success message will display at the top of the page.
Looking up Customer Information
Marketplace Payment Clerks can view details about payment transactions, including customer name and
address information. Follow these steps to view customer information, use the Payment Search option:
1. From the Marketplace Home page, navigate to the Merchant page.
2. Select Sites.
3. Select the uPay Site, then click on the Payment Search option.
4. Enter values in one or more of the search fields and then select the Run Search button.
In the search results list, click on the System Tracking ID link to access customer information for
the transaction.
Result: The Payment Details page appears. Customer information appears in the Order Details
section as shown below.

14
v.05252022
Marketplace Accountant
Common tasks performed by accountant users include:
• Viewing financial reports.
• Accountants can also search payment transactions but cannot process refunds.
Note: For Accountants who also have Payment Gateway access, if your merchant has multiple uPay Sites
you may want to use Marketplace which reports on one site at a time. Payment Gateway reports are at
the merchant level and include all sites for the merchant.
Navigation
Follow these steps to access the Marketplace resource:
1. Click the drop-down menu on Applications tab.
2. Select Marketplace from the list.
Viewing financial reports
The middle section of the Marketplace home page will show you what sites you have access to. Choose
the left side navigation menu to access reports.
The Revenue report provides evidence of the uPay Site deposit:
1. From the navigation menu on the left, choose Marketplace Reports.
2. Select uPay Sites.
3. Choose your site.
4. Select Revenue.

15
v.05252022
Result: The uPay Revenue Report page appears. Report filters are prefilled and will need to be
adjusted.
5. Adjust the settings to the desired date and time values then click View.
Result: The report will display based on your criteria. Click the Export to CSV to download the
report into an Excel file.

16
v.05252022
Searching payment transactions
The Transaction Detail report contains all available transaction information for a date and time range.
1. From the left navigation menu, select Marketplace Reports, then uPay Sites. Choose your site.
2. Select Transaction Details. The Transaction Detail Report page appears.
3. Adjust the settings to the correct date and time values then click View.
Result: The report will display based on your criteria. You can choose to export summary or
details into an Excel file.
Payment Gateway Accountant
Common tasks performed by payment gateway users include:
• Generating batch settlement and payment activity reports.
• Troubleshooting customer payment issues.
Navigation
Follow these steps to access the Payment Gateway resources:
1. Click the Applications tab.
2. From the drop-down menu select Payment Gateway.
Result: The Payment Gateway Home page will appear.

17
v.05252022
Generating Batch Settlements
A Batch Settlement is a type of report that can be useful in preparing daily deposits. Follow these steps
to complete a Batch Settlement in Payment Gateway:
1. Select Reports from the navigation menu on the left.
Result: The Report Selection screen will display.
2. Select Credit Card from the Payment Type options.
3. Select Batch Settlement from the Report options.
4. Click the View button.
Result: The report displays.
Note: You can be liberal with the day and time ranges, as you will only get one line per day.

18
v.05252022
Follow these steps to combine the batch summary and export as an Excel or CSV file:
1. Select Payment Gateway from the navigation menu on the left.
2. Select Reports.
Result: The Report Selection screen will display.
3. Select Credit Card from the Payment Type options.
4. Select Batch Details from the Report options.
5. Choose your date range.
6. In the Export field choose from the dropdown Excel or CSV.
Result: A pop-up window will display offering you the option to Open or Save the file.
Note: Opening in Excel will allow you to configure the report to choose certain batch numbers
and file them as evidence for the deposit.
Viewing Payment Activity
Follow these steps to view the Activity Report:
1. Select Payment Gateway from the navigation menu on the left.
2. Click Reports.
Result: The Report Selection screen will display.
3. Select Credit Card from the Payment Type options.
4. Select Activity from the Report options.

19
v.05252022
5. Choose your date range then click View.
Troubleshooting Payment Issues, Investigate Validation Errors
Credit Card Validation Errors
• The Activity report lists all transactions for your date range. The report includes a return code
value for each transaction, the “TPG Rc” value. A negative return code indicates an error was
returned to TouchNet by the customer’s card issuing bank.
• You can look up return codes and descriptions on this publicly available
website: https://secure.touchnet.net/help/ech/default.htm
.

20
v.05252022
Common Payment Processing Errors
Getting Help
About this User Guide
This guide provides step-by-step instructions on how to perform various functions in the TouchNet
system. If you have questions about the content of this guide, or notice missing or out-of-date
information, please email [email protected].edu
.
Error Code
Description
-1657
Generic failed: card will not be accepted, must go to card issuer
-1698
Generic failed: card will not be accepted, must go to card issuer
-1724
Address verification failed: zip code only is checked
-1741
CVV2 invalid
-1757
Card rejected because of too many failures
-1764
Insufficient funds
-1772
“need verbal auth from merchant”
-1777
Generic failed: card will not be accepted, must go to card issuer
