
CRICOS Provider No. 00103D
Moodle Module 3 - Assessment. Prepared May 2016. Moodle version 3.0
This Document was accurate at time of printing.
Page 1 of 87
Module 3: Assignments, Quizzes and
the Gradebook in Moodle
Participant Guide
Course Duration: Approx 3.5 hrs
Course Objective:
By the end of this module you will be able to set up and manage all your student assessment
through Moodle, including setting up online assignment submission, quizzes, offline activities
and managing the gradebook.
Contents:
Setting up Assignments for online submission
Grading and giving feedback to students through Moodle
Setting up and Managing the Moodle gradebook
Handling offline assignments
Setting up Quizzes in Moodle (both graded and ungraded for self-assessment revision)
Quickly creating question banks by importing questions
This course has been prepared by the Centre for Learning Innovation and
Professional Practice (CLIPP) to train Federation University in the use of the Moodle
online learning systems.
This material was prepared using version 3.0 of Moodle and may be subject to minor
changes with upgrades.
Module 3 – Assignments, Quizzes and the Gradebook in Moodle
Prepared by Kellie Macneil & Adam Barbary for CLIPP, version 13 updated Aug 2016.
Moodle version 3.0 This document was accurate at time of printing.
Page 2 of 87
CRICOS Provider Number 00103D
Table of Contents
Module 3: Assignments, Quizzes and the Gradebook in Moodle ......................... 1
Participant Guide ...................................................................................................... 1
About Assessment .................................................................................................... 4
Summative assessment...................................................................................................... 4
Formative assessment........................................................................................................ 4
Where to put Assessment information ................................................................... 5
Types of assessments you might use in your course: ......................................... 6
Change to how you choose Assignment types in Moodle ............................................. 7
Assignment activity in Moodle .......................................................................................... 7
Creating an Assignment (Online submission) ....................................................... 8
Setting up an assignment activity ..................................................................................... 8
To add an assignment activity ...................................................................................... 8
Students submitting the assignment .............................................................................. 13
To submit an assignment as a student ....................................................................... 13
Accessing submitted assignments ................................................................................. 16
To access submitted assignments ............................................................................. 16
To download all assignment files ............................................................................... 17
To view an individual assignment submission ............................................................ 17
To mark and add comments to the essay .................................................................. 18
To upload multiple feedback files ............................................................................... 18
Grade Assignments Offline ......................................................................................... 20
To enable offline grading ............................................................................................. 20
To download the offline grading worksheet .................................................................... 20
To upload grading worksheet ...................................................................................... 21
To grade individual student assignments and return feedback to students ............... 22
To quickly grade many assignments at once ............................................................. 23
To access feedback as a student ............................................................................... 24
Assignment for Exam/Presentation/etc. ............................................................... 26
To add a placeholder assignment .............................................................................. 26
Turnitin submission ................................................................................................ 28
To create a Turnitin assessed assignment in your course: ........................................ 28
Quizzes..................................................................................................................... 32
Categories .......................................................................................................................... 32
Naming & organising categories ..................................................................................... 32
To create question categories .................................................................................... 33
Questions ........................................................................................................................... 34
Question types ................................................................................................................ 34
To create questions .................................................................................................... 39
To create a Multiple Choice question ......................................................................... 40
To create a True/False question................................................................................. 41
To create a Short answer question ............................................................................ 42
To create a Numerical question.................................................................................. 43
To create a Calculated question ................................................................................. 45
To create a Matching question ................................................................................... 47
To create an Embedded answers (Cloze) question ................................................... 48
To create a Calculated Simple question ..................................................................... 49
To create a Calculated multichoice ............................................................................ 51
To create a Drag and drop into text ............................................................................ 52
To create a Drag and drop markers ........................................................................... 53
To create a Drag and drop onto image ...................................................................... 55
To create a Select missing words .............................................................................. 56
Importing Questions ......................................................................................................... 58
Formatting your questions in Aiken format ..................................................................... 58
Module 3 – Assignments, Quizzes and the Gradebook in Moodle
Prepared by Kellie Macneil & Adam Barbary for CLIPP, version 13 updated Aug 2016.
Moodle version 3.0 This document was accurate at time of printing.
Page 3 of 87
CRICOS Provider Number 00103D
To import questions into your question bank .............................................................. 59
Creating a Quiz .................................................................................................................. 62
Step 1 - Creating the quiz ........................................................................................... 62
Step 2 - Adding questions to your quiz ....................................................................... 67
Additional task: Add a graded quiz ................................................................................. 70
Reviewing student attempts ............................................................................................ 71
To view student attempts ............................................................................................ 71
To view an individual student’s attempt ...................................................................... 71
To download results ................................................................................................... 72
To analyse individual questions.................................................................................. 72
Special Conditions – Time extensions, re-tests etc. ..................................................... 74
Creating a User override ............................................................................................ 74
Editing quizzes .................................................................................................................. 75
To delete attempts ...................................................................................................... 75
The Gradebook ........................................................................................................ 76
To open the Gradebook .............................................................................................. 76
How the Gradebook calculates grades ........................................................................... 76
Entering grades manually ................................................................................................ 77
To enter manual grades in the Gradebook ................................................................. 77
Prevent quiz results from contributing to the overall grade. ........................................ 78
To set a quiz to not count towards the final grade...................................................... 78
Exporting from the gradebook ......................................................................................... 80
To export grades from the gradebook ........................................................................ 80
Appendix 1: Quiz FAQs .......................................................................................... 82
Appendix 2: Advanced Grading ............................................................................. 83
Creating Rubrics ............................................................................................................. 83
Marking with Rubrics ....................................................................................................... 84
Creating Marking Guides ................................................................................................ 85
Marking with Marking Guides ......................................................................................... 86
Appendix 3: Where to go for help .......................................................................... 87
Moodle Support Forums ................................................................................................. 87
Moodle.org Documentation and Support Forums ........................................................... 87

Module 3 – Assignments, Quizzes and the Gradebook in Moodle
Prepared by Kellie Macneil & Adam Barbary for CLIPP, version 13 updated Aug 2016.
Moodle version 3.0 This document was accurate at time of printing.
Page 4 of 87
CRICOS Provider Number 00103D
About Assessment
Assessment is a critical component in any course. Assessment is not only important for the
teacher and institution to rank and grade students, it is also important to enable students to gauge
their own performance and provide them with opportunities for reflection and improvement.
In this course, we’ll limit our discussion to two types of assessment:
Formative assessment
Summative assessment
Summative assessment
Summative assessment is generally at the end of a course, such as a final exam or major essay.
This kind of assessment is used to grade the student. Feedback is still important, however as the
students will receive this feedback at the end of the course, this feedback will not help them
improve for this course. Summative assessment is also referred to as ‘Assessment of learning’.
Formative assessment
Formative assessment is assessment that happens throughout the course. The primary focus of
this kind of assessment is on providing feedback to the students on their progress. This feedback
will provide students with an indicator of their progress, allow them to reflect on where they may
be going wrong, and allow them to improve. It is critical that students are provided with formative
feedback throughout the course to give them these opportunities.
Formative assessment does not necessarily have to be graded although, including a smaller,
graded assessment as a mid-point in the course, is good practice. Formative assessment could
comprise of self-assessment revision quizzes, provided sufficient feedback is built in, or of
teachers and students replying to student discussion posts. Formative assessment is also
referred to as ‘Assessment for learning’.

Module 3 – Assignments, Quizzes and the Gradebook in Moodle
Prepared by Kellie Macneil & Adam Barbary for CLIPP, version 13 updated Aug 2016.
Moodle version 3.0 This document was accurate at time of printing.
Page 5 of 87
CRICOS Provider Number 00103D
Where to put Assessment information
It is a good idea to keep all course assessment information – as opposed to topic assessments –
separated from the learning content. Federation University has implemented a set of navigation
templates that assist with structuring your Moodle course, not just with topic sections, but also
with Course and Assessment information areas. If using a template, please be guided by its
structure when organising your assessment information including assignment drop boxes.
Note: Course assessment generally refers to the mid and end of semester assessments. Topic and
revision quizzes that you want to be assessed, should be placed at the end of the topic to which they
relate.
The following images show an example of a navigation template with the Assessment topic link
clearly listed within the course banner.
Tip: You may want to link a copy of your course description, which contains information on the
assessment requirements of your course, within your Assessment area. Simply ‘Duplicate’ your course
description in your Course Information topic and drag the copy to your Assessment topic.
Assessment topic
navigation link.
Add all assessment
related information and
submission areas in the
Assessment topic.

Module 3 – Assignments, Quizzes and the Gradebook in Moodle
Prepared by Kellie Macneil & Adam Barbary for CLIPP, version 13 updated Aug 2016.
Moodle version 3.0 This document was accurate at time of printing.
Page 6 of 87
CRICOS Provider Number 00103D
Types of assessments you might use in your course:
essay individual
exam
group work - presentation etc.
reflective journals
participation in discussion forum
Type of
assignment
How to handle in Moodle
Essay
individual
Add an Assignment activity in Moodle for this type of assignment to
allow students to submit online. If you are using groups, there is
also a feature to allow for a single submission from the group
Exam
Add an Assignment activity in Moodle, but untick the upload file
and online submission boxes. This allows Moodle to store the date
of the exam in the calendar and make the exam a gradebook entry
so you can enter the grades online.
Use the quiz tool to create online exams.
Group work -
presentation
For a presentation delivered in class you can add an Assessment
without submission in Moodle so you can enter marks in the
gradebook.
Moodle also supports group submissions within the Assignment
tool, and has several tools that your students could use to
collaborate on their group project, such as discussion forums and
wikis. If you require students in study groups you will need to set
up and assign students to groups.
Reflective
journals
The Journal tool currently in Moodle has been deprecated.
Essentially the function of this tool is duplicated by allowing Online
text within the Assignment tool. A better tool for students to use
and keep a journal is the Mahara, an ePortfolio tool.
(https://eportfolios.federation.edu.au/)
The assignment activity can now be configured to allow for easy
linking of Mahara ePortfolio pages and collections. With a single
checkbox the assignment can prevent changes to the portfolio once
submitted and provides easy access for grading.
Participation
in discussion
forum
You can set discussion forums to be graded. You can set
numerical grades for discussion forums or use the separate and
connected ways of knowing grade scale to grade the quality of
posts, or create a new grade scale.
These ratings can be set to be graded or not graded.
If you just wanted to set participation in a discussion forum as a
nominal mark, e.g. if they participated they get 10, then you could
set up an offline activity to record this, however you should hide the
activity from your students.

Module 3 – Assignments, Quizzes and the Gradebook in Moodle
Prepared by Kellie Macneil & Adam Barbary for CLIPP, version 13 updated Aug 2016.
Moodle version 3.0 This document was accurate at time of printing.
Page 7 of 87
CRICOS Provider Number 00103D
Change to how you choose Assignment types in Moodle
There are currently two assignment options in Moodle, Assignment, and Turnitin Assignment 2.
Both of these will be covered in detail below.
Assignment activity in Moodle
When you add an assignment as an activity in Moodle there are several options available. All
options, (excluding Turnitin) are available through the Assignment activity listed at the top of the
activity chooser.
Assignment
activity type
Description
Assignment
The Assignment activity can be configured, and reconfigured to perform many
assignment variations.
You can:
configure the Assignment settings to allow students to upload one or more
files.
allow students to submit drafts of their assignment before they submit the
final. Moodle will also keep track of all submitted versions.
add feedback, including uploading response documents or annotating
directly in the browser* (e.g. an annotated Word document or an
assessment criteria sheet).
use an online text box which allows students to type directly into the
browser window. (Not recommended for substantial text input, as a network
or computer failure could result in the student losing some of their work.**)
remove the submission controls for assessments being performed outside
of Moodle eg. class presentation, invigilated exam. These activities still
have a gradebook and calendar entry.
Control the release of grades, allocate markers and set marking workflows.
Turnitin
Turnitin allows for the submission of assignments through the Turnitin
plagiarism detection software service. Students are usually allowed to submit
several times up to the due date to identify cited works and check original
content. Students are encouraged to self-assess and ensure their assignment
meets University standards before final submission. Turnitin also has an
integrated, browser based, marking system called Grademark.
* Available only when students submit a PDF
** Moodle’s text editor has an auto-save feature that saves once every 5 minutes.
Module 3 – Assignments, Quizzes and the Gradebook in Moodle
Prepared by Kellie Macneil & Adam Barbary for CLIPP, version 13 updated Aug 2016.
Moodle version 3.0 This document was accurate at time of printing.
Page 8 of 87
CRICOS Provider Number 00103D
Creating an Assignment (Online submission)
Setting up an assignment activity
To add an assignment activity
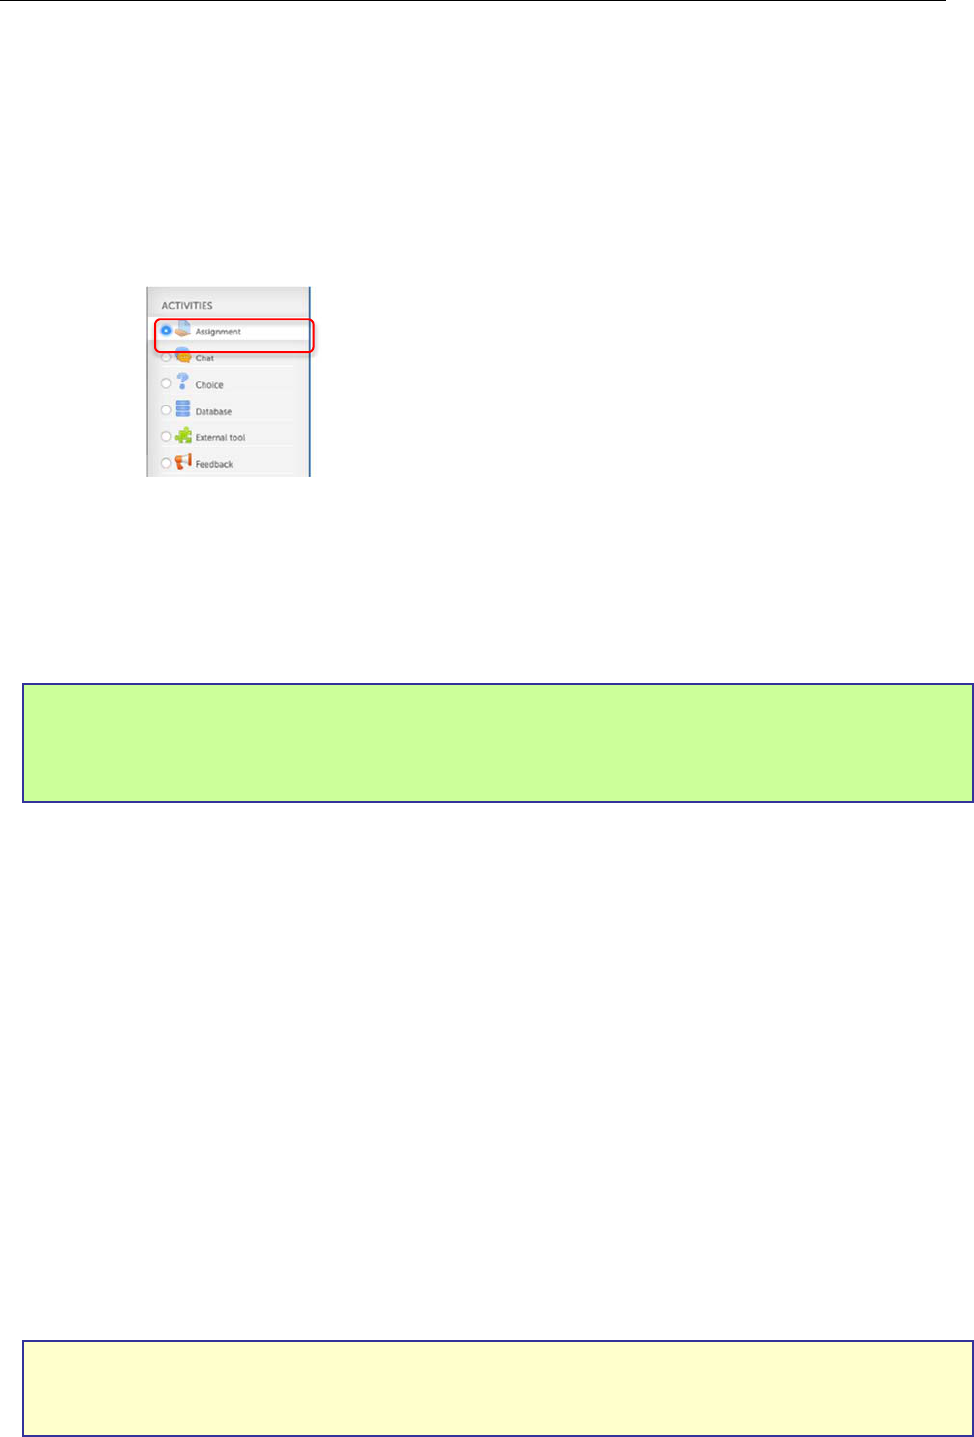
1. In the course topic of your Moodle course, click +Add and activity or resource, select
Assignment at the top of the Activity Chooser pop-up then click Add.
The Adding a new Assignment settings window appears.
The type of assignment submission you want to set up will determine the settings you
choose. In this example we will be setting up an online file submission.
2. In the Assignment Name field type the assignment name, in this case Essay 1.
Tip: The name of the assignment will appear in the student calendar complete with due date. As the
student’s calendar will show assignments for all their courses it is important to include sufficient
information in the Assignment Name field to avoid confusion, e.g. ITECH 1002 Essay 1: Computer
Networks.
3. In the Description field, enter sufficient instructions for your students:
Task instructions: It is a good idea to copy the assessment instructions from the
course description document. You could also attach links to files such as marking
criteria, rubrics* or assessment instruction files.
Submission instructions: You should also include technical instructions for your
students, such as what the expected file type, version and size should be, if they are
able to submit drafts and if so how many (see below for details) and how they should
name files.
Declaration: If your school requires that students sign a submission declaration/
cover sheet you could include an online declaration instead of making students
submit a paper-based one.
4. For the purposes of this training, Open the document Essay1_instructions.doc, from the
downloaded resources, and copy the instructions and paste them into the Description
field.
*Moodle supports marking with Rubrics and Grading scales under the Advanced Grading settings
Note: This example is based on the assignment cover sheet for the Business School and includes
information on plagiarism and student conduct as well as a Student’s Statement. You should check the
appropriateness of using this online declaration text with your school.

Module 3 – Assignments, Quizzes and the Gradebook in Moodle
Prepared by Kellie Macneil & Adam Barbary for CLIPP, version 13 updated Aug 2016.
Moodle version 3.0 This document was accurate at time of printing.
Page 9 of 87
CRICOS Provider Number 00103D
5. Format your Description instructions as you would in any text editor.
Tip: Rather than having to recreate this, and other standard content every time you set up
a new course, you can import resources and activities into your course from another
course that you are an instructor in. To make this easier for schools CLIPP staff are
available to work with schools to come up with school navigation templates and Master
Courses
Availability
6. In the Allow submissions from fields, set the date when the assignment is
open for submissions. Leave it as today’s date for this example.
Note: The default date and time allow the assignment to open immediately with
submission due 1 week later.
7. In the Due Date field, enter the date and time the assignment is due.
8. The Cut-off date refers to the last day/time that students can submit. Once
this time is reached the submission button disappears.
9. Leave the Always show description setting as Yes. This will allow students
to see the description of the assignment even if submissions are not allowed.
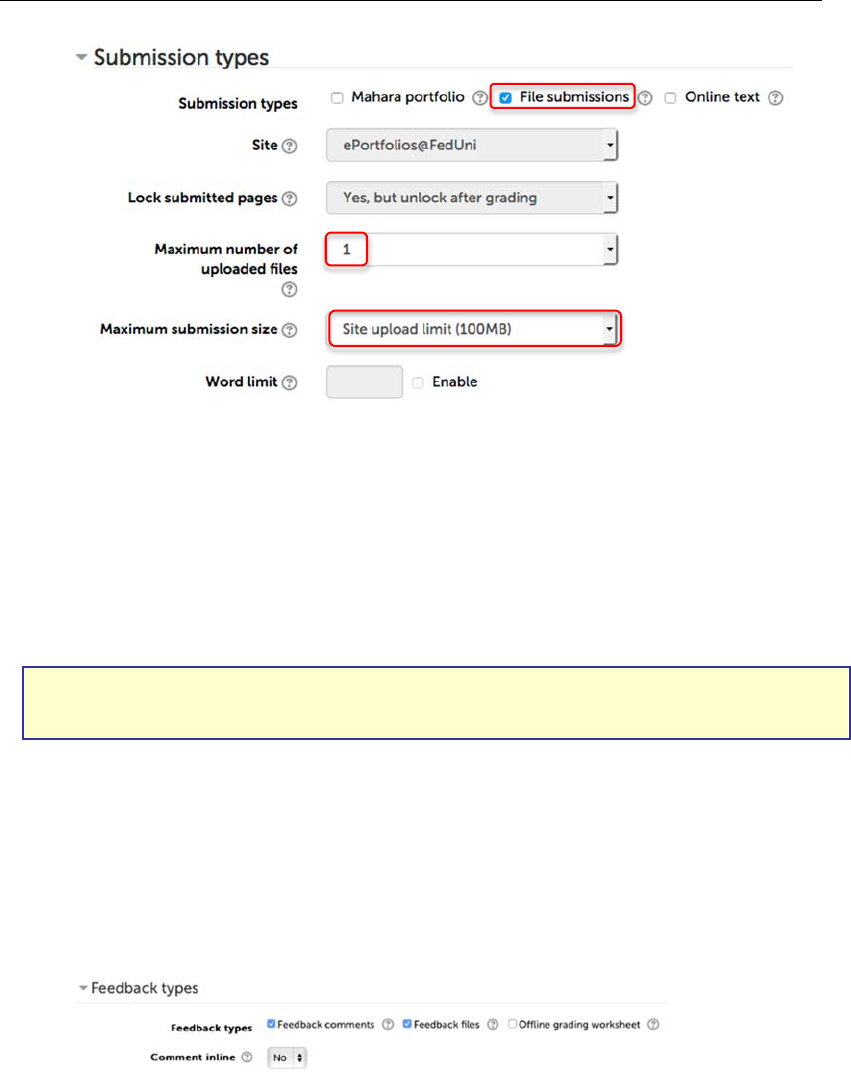
Submission Types
10. Ensure File submissions is checked. Leave the Mahara portfolio and
Online text unchecked.
Module 3 – Assignments, Quizzes and the Gradebook in Moodle
Prepared by Kellie Macneil & Adam Barbary for CLIPP, version 13 updated Aug 2016.
Moodle version 3.0 This document was accurate at time of printing.
Page 10 of 87
CRICOS Provider Number 00103D
11. In the Maximum number of uploaded files, set how many files you want
students to be able to submit, you will need to include any drafts in this
number. e.g. 1 draft, a cover sheet and a final document will be 3 files in
total.
12. In the Maximum submission size field, set the individual file size limit. By
default, this is set as the course limit, we recommend you change this to a
smaller size. Depending on the types of files you require submitted, 5 – 10
MB should be sufficient for most written pieces.
Note: The files size limit relates to the individual size, not the collective size. If you
choose 5MB, that is 5MB x Number of files.
Feedback Settings
13. Leave the Feedback settings checked to enable you to provide students with
comments and files as feedback. If you will not be using a particular feedback
item, uncheck it to help streamline the marking interface. The Offline grading
worksheet allows you to download a spreadsheet to complete and reload to
Moodle. Leave this unchecked for now.
Submission Settings
14. If you want to allow students to submit draft versions of their assignments, for
example if you give feedback on drafts, prior to submitting the final version,
change the Require students click submit button to Yes. Once students
click Yes, it will require intervention from you before they can change the final
submission.
15. Require that students accept the submission statement. Moodle has a
generic submission agreement however, as is not currently endorsed by
FedUni, it is best to leave this off.

Module 3 – Assignments, Quizzes and the Gradebook in Moodle
Prepared by Kellie Macneil & Adam Barbary for CLIPP, version 13 updated Aug 2016.
Moodle version 3.0 This document was accurate at time of printing.
Page 11 of 87
CRICOS Provider Number 00103D
Group Settings
These settings are only applicable if you have configured groups within your
course, and you require an assignment to involve group work.
16. If you are utilising groups, then enabling Students submit in groups allows
a group to submit a single set of documents, rather than one for each student.
You can still grade the students separately. This setting is not necessary if
you just require the ability to filter based on campus groups.
Important Note: If you set Students submit in groups to yes, and do not specify which
groups may submit (use restrict access or Groupings) then only one student from each
default campus group will be able to submit. All other students within the group will be
able to view this student(s)’ work.
Once a submission has occurred this setting cannot be changed!
For assistance with group setup, please contact CLIPP.
17. Enabling Require group to make submission prevents any student who is
not a member of a group from making a submission.
18. Enabling Require all group members submit, makes it compulsory for all
members of a group to click the submit button before the assignment is
considered complete.
19. Groupings for student groups allows you to limit access to this assignment
based on grouping membership. Eg. If you create a groups for tutorials, then
place these groups into a grouping called Tutorials, the students will have to
submit as a member of their tutorial group, not their campus location.
Notification Settings
20. Change the Notify graders about submissions setting to No. Leaving this
setting as Yes means all teachers in a course will receive an email whenever
a student submits an assignment. We recommend that you set this to No, as
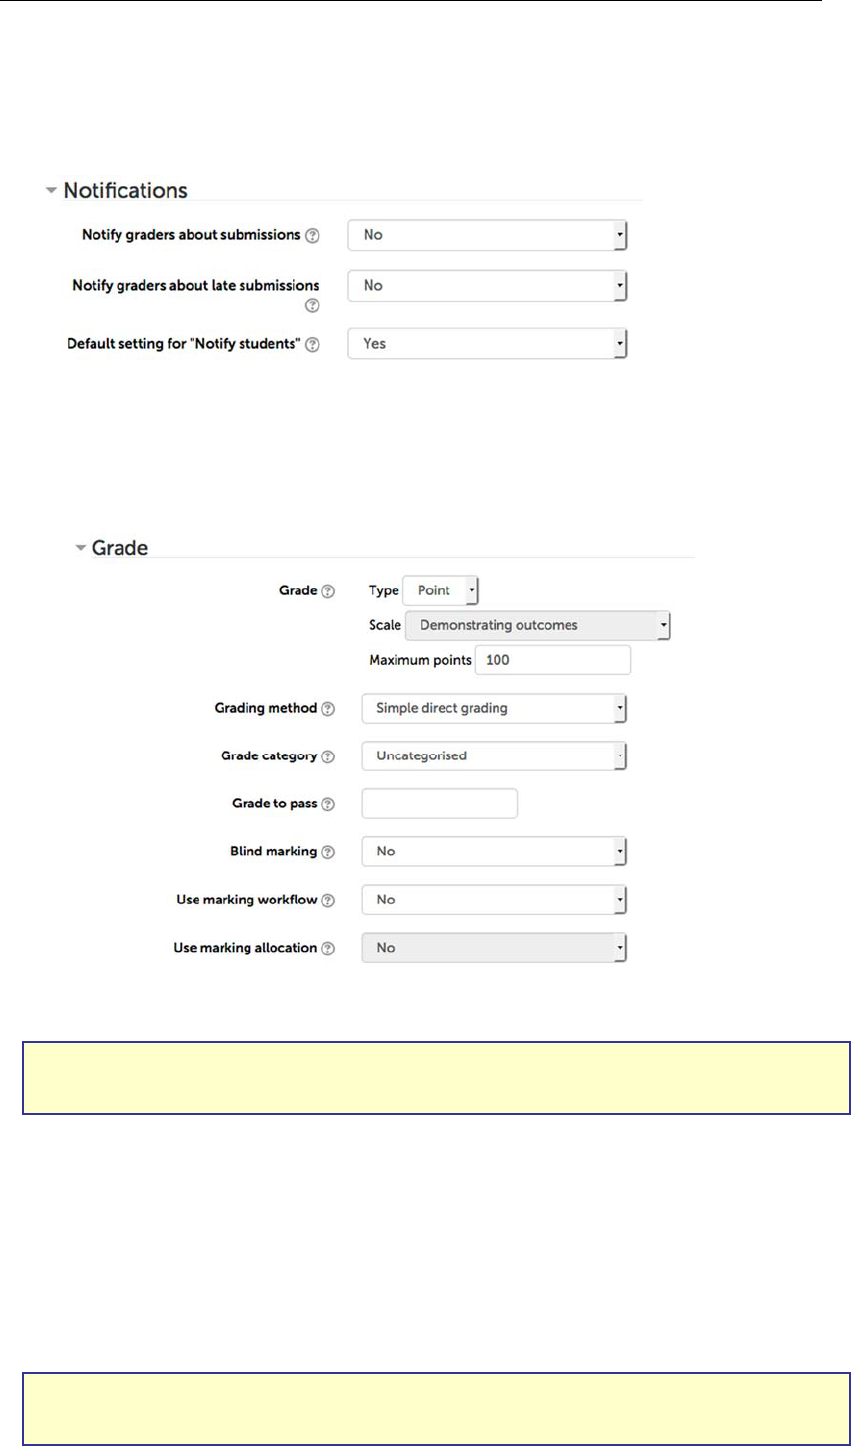
Module 3 – Assignments, Quizzes and the Gradebook in Moodle
Prepared by Kellie Macneil & Adam Barbary for CLIPP, version 13 updated Aug 2016.
Moodle version 3.0 This document was accurate at time of printing.
Page 12 of 87
CRICOS Provider Number 00103D
in most instances you won’t be looking at assignments until after the due
date.
21. Change Notify graders about late submissions to Yes to receive email
notifications when a student submits after the due date.
Grade Settings
22. In the Grade field, select the overall grade the assignment is worth. In this
case the essay we’ll be marking out of 100, so set the grade to 100.
23. For standard marking leave the Grading method set to Simple direct grading.
Note: This example uses Simple direct grading. Advanced grading in the form of rubrics
is also available. See Appendix 2 for more information.
24. If you have set different categories in the Grade Book, you can choose these
from the Grade Category option. In most cases leave this as
Uncategorised.
25. Grade to pass can be set to determine the completion state if required.
26. Grading workflows and marker allocation are beyond the scope of this
training, however, if you would like more information on these features,
please contact CLIPP
Note: Activating workflows will prevent grades from being automatically released to
students.

Module 3 – Assignments, Quizzes and the Gradebook in Moodle
Prepared by Kellie Macneil & Adam Barbary for CLIPP, version 13 updated Aug 2016.
Moodle version 3.0 This document was accurate at time of printing.
Page 13 of 87
CRICOS Provider Number 00103D
27. Leave all common module settings as is.
28. Leave all Restrict access settings as is, unless you want to set conditional
release (access) options for this assignment.
29. When you have finished setting your assignment, click Save and display,
your window should look like the following:
Students submitting the assignment
To submit an assignment as a student
1. Click the Essay 1 assignment link . The Essay 1 submission area
appears:

Module 3 – Assignments, Quizzes and the Gradebook in Moodle
Prepared by Kellie Macneil & Adam Barbary for CLIPP, version 13 updated Aug 2016.
Moodle version 3.0 This document was accurate at time of printing.
Page 14 of 87
CRICOS Provider Number 00103D
2. Scroll to the bottom of the page and click the Add submission button.
3. The File submissions area appears:
4. Drag a file from your computer and drop it into the file submission area.
Note: For this to work your computer needs to be up to date with Java and one of the
latest w3c compliant web browsers. eg. Firefox.
5. Alternatively, if the file does not upload, click the Add link. The File picker
window will now open, and you will need to select where the file is to be
retrieved from. In most cases, you will choose the Upload a file button on the
left, then click the Browse button on the right. For convenience Google Drive,
Dropbox and OneDrive are also available for file uploading.

Module 3 – Assignments, Quizzes and the Gradebook in Moodle
Prepared by Kellie Macneil & Adam Barbary for CLIPP, version 13 updated Aug 2016.
Moodle version 3.0 This document was accurate at time of printing.
Page 15 of 87
CRICOS Provider Number 00103D
6. The Browse button opens the file browser on your computer and you will
then need to select the file you require.
7. Click Upload this file. You can change the name of the file as it is uploaded,
by changing the Save as: dialogue box as required.
8. You will now be returned to the file manager area. You can now add additional
files if required/allowed, or click Save changes if you are finished adding files.
Note: You must wait until the file icon is displayed before clicking Save changes.
Note: Depending on the type of assignment your lecturer has set up a Send for Marking
button may appear. If you don’t see this button, don't worry your submission is complete.
However, if you do, you must click it to finalise the submission. Failing to do so will prevent
Moodle from time stamping your submission, which will make it appear late.
9. Finally you will be returned to the assignment screen, which will show you a
list of the files submitted. In the example below, the Require students click
submit feature is enabled. This leaves the submission status as Draft until
you click the Submit assignment button. Until you do, the assignment
submission date is not locked in, and you may continue to make changes.

Module 3 – Assignments, Quizzes and the Gradebook in Moodle
Prepared by Kellie Macneil & Adam Barbary for CLIPP, version 13 updated Aug 2016.
Moodle version 3.0 This document was accurate at time of printing.
Page 16 of 87
CRICOS Provider Number 00103D
Accessing submitted assignments
To simulate correcting submitted assignments, an assignment has been set up in
your training course in which students have submitted
To access submitted assignments
1. To access submitted assignments; access the assignment area by clicking
the Essay 1 assignment link.
Tip: If you chose the option to have an email alert sent to you when a student submits an
assignment, you could just click on the link contained in the alert email to be taken directly
to the student’s assignment submission.
2. The Grading summary table shows the number of participants in course,
students who have submitted, and assignments that need grading.
3. To access the submitted assignments, click View/grade all submissions.
The Submissions area appears.
Note: To view all content you need to scroll sideways, which is not supported by all
computers. In this case, it is better to click Grade, to view the individual’s files, or follow
the instructions below to download all files.
Tip: You can collapse columns by clicking the icon, and restore them by clicking
If the student has submitted more than one file, Moodle will display copies of all
of them in this view.

Module 3 – Assignments, Quizzes and the Gradebook in Moodle
Prepared by Kellie Macneil & Adam Barbary for CLIPP, version 13 updated Aug 2016.
Moodle version 3.0 This document was accurate at time of printing.
Page 17 of 87
CRICOS Provider Number 00103D
To download all assignment files
For convenience you can download all submitted files in one quick step. This is
the most effective method of retrieving student submissions as Moodle
automatically renames files to include the student’s name to prevent confusion.
1. From the View all assignments screen, choose Download all
submissions.
2. The following window appears:
3. Choose the Save File option, then click OK. The files download within a zip
file.
4. To unzip the file, double click on the .zip file, choose Extract all files and
follow the prompts to unzip the files.
To view an individual assignment submission
1. To view a student essay, click the file name under the File submissions
column in the grading area. You will be prompted to Open or Save the file.
2. Save the file to your computer.

Module 3 – Assignments, Quizzes and the Gradebook in Moodle
Prepared by Kellie Macneil & Adam Barbary for CLIPP, version 13 updated Aug 2016.
Moodle version 3.0 This document was accurate at time of printing.
Page 18 of 87
CRICOS Provider Number 00103D
Tip: It is recommended that if you intend to add comments directly to all students’ essays
– for example using comments in Word, then you should download all of the files at once
by using the above method, or by clicking the Download all Submissions in the top left
corner of the Grading screen. You can then perform a bulk upload to upload the marked
assessment files back into Moodle as a zip, as long as the individual file names have not
changed.
Tip: Moodle now supports online PDF comments. Click on the grade icon, then scroll
down to locate the Annotate PDF heading, and click the Launch PDF editor… button.
To mark and add comments to the essay
1. Open the downloaded student essay (normally a .DOC or .DOCX).
2. Click the Review tab from the Ribbon bar at the top of the screen in Word.
3. Add comments to the file by clicking the New post-it-note icon
Tip: The best way to edit a student’s essay in word is to add comments. To do this place
the cursor or highlight a section of text where you want to insert your comment, click the
New post-it-note icon.
4. Save the changes to the file.
Note: It is recommended that you do not change the file name, as Moodle’s upload
multiple feedback files depends on the name being the same as the file downloaded.
To upload multiple feedback files
Once you have finished grading and commenting on the downloaded files, you
must then create a new zip file to re-upload the files to Moodle.
1. Select all the files to be uploaded. Either drag a box over the files whilst
holding the left mouse button, or by clicking on the top of a folder list and,
whilst holding shift.
2. Right click and select
Windows – Send to, then Compressed (Zipped) Folder
Mac – Compress (X) items
Note: You must compress the individual files, NOT a folder of items.

Module 3 – Assignments, Quizzes and the Gradebook in Moodle
Prepared by Kellie Macneil & Adam Barbary for CLIPP, version 13 updated Aug 2016.
Moodle version 3.0 This document was accurate at time of printing.
Page 19 of 87
CRICOS Provider Number 00103D
3. Return to the Assignment, click View/grade all submissions.
4. Choose Upload multiple feedback files in a zip from the Grading action
drop down menu.
5. Drag zip file to the upload box.
6. Click Import feedback files(s).
7. Click Confirm.
8. Click Continue.
9. Files will be uploaded to their respective student.
Note: Uploading multiple feedback files only refers to the file attachment. If you also
require grades, you must enter this information separately.

Module 3 – Assignments, Quizzes and the Gradebook in Moodle
Prepared by Kellie Macneil & Adam Barbary for CLIPP, version 13 updated Aug 2016.
Moodle version 3.0 This document was accurate at time of printing.
Page 20 of 87
CRICOS Provider Number 00103D
Grade Assignments Offline
Moodle provides support for grading assignments offline. Once enabled, staff are
able to download a marking worksheet that can be edited with any spreadsheet
software. eg. Microsoft Excel. Once editing is complete, the worksheet can be
uploaded to Moodle and the grades and comments are then added to the assignment
gradebook.
To enable offline grading
1. Add or edit an existing assignment. See the Add an assignment guide for
more assistance
2. Change the
Offline grading worksheet
drop down to Yes. This is located in
the
Feedback settings
area of the Assignment settings.
3. Click
Save and return to course
.
To download the offline grading worksheet
1. Click assignment title
2. Click View/Grade all submissions
3. Select
Download grading worksheet
from the
Grading action
drop down
list at the top of the page.
Note: How and where the file downloads is dependent on the computer and web browser
you are using. (normally this will be your Downloads folder)
To edit grading worksheet
The grading worksheet is a CSV file and will be opened on most computers by the
default spreadsheet application. If this does not happen, open your spreadsheet
program, then click File, then Open. Locate and confirm the grading worksheet to
begin editing. Do not forget to save your work.
Note: If you have already commenced marking in Moodle, these grades and feedback will
already be present in in the worksheet.

Module 3 – Assignments, Quizzes and the Gradebook in Moodle
Prepared by Kellie Macneil & Adam Barbary for CLIPP, version 13 updated Aug 2016.
Moodle version 3.0 This document was accurate at time of printing.
Page 21 of 87
CRICOS Provider Number 00103D
To upload grading worksheet
1. Click assignment title
2. Click
View/Grade all submissions
3. Select
Upload grading worksheet
from the
Grading action
drop down list at
the top of the page.
4. Drag and drop the grading worksheet in to the upload box.
5. When the file appears in the upload window, click
Upload grading
worksheet
.
6. Review changes to be made, then click
Confirm
.
7. Click
Continue

Module 3 – Assignments, Quizzes and the Gradebook in Moodle
Prepared by Kellie Macneil & Adam Barbary for CLIPP, version 13 updated Aug 2016.
Moodle version 3.0 This document was accurate at time of printing.
Page 22 of 87
CRICOS Provider Number 00103D
To grade individual student assignments and return feedback to
students
10. Go back into the Submissions area of your Moodle course.
11. In the row for the student you want to grade, click either the Grade icon , or
click the edit link , then choose Grade.
The Grade window appears.
12. In the Grade out of xx (in this case 100 as that is what we specified in the
assignment settings) field, enter the grade.
Note: If you enter a value that is outside of the scale, in this case 100, you will be asked
to correct the value to within the scale. You will be unable to save until you do.
13. In the Feedback comments area, enter some basic text for your student, e.g.
general comments about the assignment, or a message directing students to
open the marked copy of their assignment for feedback.
14. In the Feedback files area, drag and drop any feedback files such as the
marked version of the essay, or click Browse to find the file.
Your window should now look like the following:

Module 3 – Assignments, Quizzes and the Gradebook in Moodle
Prepared by Kellie Macneil & Adam Barbary for CLIPP, version 13 updated Aug 2016.
Moodle version 3.0 This document was accurate at time of printing.
Page 23 of 87
CRICOS Provider Number 00103D
15. When you have finished adding feedback, click the Save changes button.
The feedback filters through to the submission area.
Note: If you selected Notify students - Yes, a notification email will be sent to your
student alerting them that their assignment has been marked.
To quickly grade many assignments at once
You can quickly grade many assignments without having to go into each one
individually. This process is not recommended if you wish to provide lengthy
feedback as all information is discarded if your Moodle session times out before you
save your progress.
1. From the Options area, scroll to the bottom of the page, check the Quick
grading button.
The Grade and Comments fields become available for direct editing:
2. When you have finished, click Save all quick grading changes.

Module 3 – Assignments, Quizzes and the Gradebook in Moodle
Prepared by Kellie Macneil & Adam Barbary for CLIPP, version 13 updated Aug 2016.
Moodle version 3.0 This document was accurate at time of printing.
Page 24 of 87
CRICOS Provider Number 00103D
To access feedback as a student
As you haven’t really submitted as a student you won’t be able to follow this
procedure in your own course.
1. On the Moodle navigation bar, click My Classes, then select Dashboard.
2. A list of courses and their associated notifications appear.
3. Click the activity icon to reveal more about each notification.
4. Click the blue assignment link to access the assignment submission area.
5. Feedback appears at the bottom of the page.
In addition to the above method students can also access their feedback:
From their notification email
If you selected to send students a notification email, they would also
receive a link in the email:
Example course -> Assignments -> Essay 1
---------------------------------------------------------------------
Adam Barbary has posted some feedback on your
assignment submission for 'Essay 1'
You can see it appended to your assignment submission:
http://moodle.federation.edu.au/mod/assignment/view.php?id=3D6279
Through the assignment link in the course

Module 3 – Assignments, Quizzes and the Gradebook in Moodle
Prepared by Kellie Macneil & Adam Barbary for CLIPP, version 13 updated Aug 2016.
Moodle version 3.0 This document was accurate at time of printing.
Page 25 of 87
CRICOS Provider Number 00103D
Clicking any of these three links will take the students back into the
assignment from where they can now access their feedback.
Tip: You should inform students how they can access their feedback, a good way of
doing this would be to post a message in the news forum informing students that their
assignments have been marked and they can now access feedback by going back into
the assignment in Moodle.

Module 3 – Assignments, Quizzes and the Gradebook in Moodle
Prepared by Kellie Macneil & Adam Barbary for CLIPP, version 13 updated Aug 2016.
Moodle version 3.0 This document was accurate at time of printing.
Page 26 of 87
CRICOS Provider Number 00103D
Assignment for Exam/Presentation/etc.
The Assignment module can be configured to create gradebook and calendar entries
for assessment pieces that aren’t completed or submitted through Moodle, such as
exams, or classroom presentations.
Tip: If you do have these types of activities, but you don’t intend on entering grades for
them into the gradebook, you can just set up a calendar entry so students will see the
presentation or exam date in their calendar. It is a good idea to ensure that all important
due dates have corresponding calendar entries so students will be able to better manage
their time.
To add a placeholder assignment
1. In the course topic of your Moodle course, click the Add an activity or
Resource link list and choose Assignment.
2. In the Assignment name field, enter the name of the activity. E.g. Final
Exam.
3. In the Description field, enter information about the activity. E.g. where it will
take place, what they need to prepare and what the assignment is worth.
Assignment Settings
4. In the Due date field, enter the date and time of the exam. This will put an
entry for this assessment in the calendar for this date.
5. Make sure that Cut-off date is unchecked.
6. Make sure that all Submission types are unchecked.
7. In the Grade field, select the overall grade the Exam is marked from.
8. Click Save and Return to course. When students click on this assignment
they will see the relevant details, but have no area for submission:

Module 3 – Assignments, Quizzes and the Gradebook in Moodle
Prepared by Kellie Macneil & Adam Barbary for CLIPP, version 13 updated Aug 2016.
Moodle version 3.0 This document was accurate at time of printing.
Page 27 of 87
CRICOS Provider Number 00103D
This event will also appear in the student’s calendar

Module 3 – Assignments, Quizzes and the Gradebook in Moodle
Prepared by Kellie Macneil & Adam Barbary for CLIPP, version 13 updated Aug 2016.
Moodle version 3.0 This document was accurate at time of printing.
Page 28 of 87
CRICOS Provider Number 00103D
Turnitin submission
Turnitin provides students and staff an opportunity to check the original content of
submitted material. It does this by comparing the submitted work with that of
numerous online databases, journal articles and web content (both current and
archived). Turnitin then returns an originality report detailing how much of the content
is original and how much it determines matches information in its database.
Note: CLIPP provides comprehensive Turnitin training. The procedures below are simplified
instructions on how to set up the assignment. Staff are encourage to take Turnitin training or
seek assistance from CLIPP if they have not used Turnitin in the past.
For information on interpreting Turnitin results go to the Turnitin link located within
the Study Help drop down menu, under the Federation logo:
To create a Turnitin assessed assignment in your course:
1. Turn Editing on
2. Click
+Add an Activity or Resource, and choose Turnitin Assignment 2
from the drop-down menu.
3. Fill in the Assignment title box

Module 3 – Assignments, Quizzes and the Gradebook in Moodle
Prepared by Kellie Macneil & Adam Barbary for CLIPP, version 13 updated Aug 2016.
Moodle version 3.0 This document was accurate at time of printing.
Page 29 of 87
CRICOS Provider Number 00103D
4. Leave Submission type as Any.
5. Number of parts allows for multiple files. (This is not recommended as the
multipart upload uses tabs and grade calculations can be affected)
6. Maximum File Size can generally be left at the default 40MB.
7. Ensure that Allow submission of any file type is set to No. Should a non-
supported file type be lodged the student will receive an error.
8. Ensure Display Originality Report to Students is set to Yes
9. You may set the Grade Display (Whilst in Turnitin) to a fraction or
percentage.
10. Auto Refresh Grades/Scores will synchronise the results from Turnitin’s
Grademark tool with the Moodle gradebook.
11. Leave the grade Type as Point.
12. Set the Maximum points to what you wish to be displayed in the Moodle
Gradebook.
13. Grade Category and Grade to pass can be ignored.
14. For each part (single file upload) select the Start date, and Due date from
using the calendar tool provided. The Post date is the date the grade is
released to student. Set the Max marks that the submission will be marked
from.

Module 3 – Assignments, Quizzes and the Gradebook in Moodle
Prepared by Kellie Macneil & Adam Barbary for CLIPP, version 13 updated Aug 2016.
Moodle version 3.0 This document was accurate at time of printing.
Page 30 of 87
CRICOS Provider Number 00103D
15. Decide whether you will accept late submissions and configure that option.
Note that preventing late submissions may mean that students are unable to
submit at all because Turnitin will not allow them to upload after the due date.
16. It’s recommended that you allow Turnitin to generate reports immediately,
and allow students to submit up until the due date. Note, that the first
submission takes minutes to process, but all subsequent submissions have a
24hr delay.
17. The settings indicated above represent the usual defaults, and cover most
scenarios. When you are happy that the settings are configured correctly,
click the Save and return to course button.
18. To access documents submitted to Turnitin, click the assignment name.
19. Click the Similarity percentage to view the report.
20. Click the Pencil icon to grade the assignment using Grademark.
21. Click the cloud with down arrow icon to download a single assignment.
22. Check the small box at the top of the student list to reveal the Download link.
Click Download to download all assignments in bulk.

Module 3 – Assignments, Quizzes and the Gradebook in Moodle
Prepared by Kellie Macneil & Adam Barbary for CLIPP, version 13 updated Aug 2016.
Moodle version 3.0 This document was accurate at time of printing.
Page 31 of 87
CRICOS Provider Number 00103D
Note: You must NEVER import a Turnitin assignment from another course. Should
you accidentally do this, please delete the imported assignment immediately. You
may create a new Turnitin assignment within the course.
More information about interpreting reports and navigating the Turnitin screen
can be found at Turnitin.com. In particular, you may wish to view:
About Originality Check - http://www.turnitin.com/en_us/training/instructor-
training/about-originalitycheck
Viewing Originalist Reports - http://www.turnitin.com/en_us/training/instructor-
training/viewing-originality-reports

Module 3 – Assignments, Quizzes and the Gradebook in Moodle
Prepared by Kellie Macneil & Adam Barbary for CLIPP, version 13 updated Aug 2016.
Moodle version 3.0 This document was accurate at time of printing.
Page 32 of 87
CRICOS Provider Number 00103D
Quizzes
Online quizzes are useful for formative assessment, such as student self-
assessment, revision quizzes, or small graded assessments. The quiz tool allows
you to create large question banks organised into categories from which questions
can be drawn into quizzes. It also allows you to embed feedback in both the
individual question and the overall quiz as well as specify when and what feedback
should be released to students.
Categories
Each course has a default question bank to which you can add, edit and manage
questions that used in quizzes. In addition to the default course category it is
suggested that you create sub categories to better organise and enhance the utility of
your question bank.
Categories allow for complex hierarchies where subcategories can be nested inside
others. Organising your questions into categories not only helps you to better
manage your questions but also allows you to randomly select a given number of
questions from a particular category or sub category. This can assist with preventing
cheating and simplifies the exporting of questions when sharing with others.
Naming & organising categories
You should give your categories meaningful names and properly structure sub-
categories. This is especially important if you intend to share question banks
between courses.
For example, if you are running a first year SOSE course in which you had several
topics, such as Australian, European, American geography and society, etc. you
might create a hierarchical category structure like this:
Geography – First year
o Asian Geography
o European Geography
o American Geography
o Australian Geography
Sociology – First year
o Asian Sociology
o European Sociology
o American Sociology
o Australian Sociology
History – First year
o Asian History
o European History
o American History
o Australian History

Module 3 – Assignments, Quizzes and the Gradebook in Moodle
Prepared by Kellie Macneil & Adam Barbary for CLIPP, version 13 updated Aug 2016.
Moodle version 3.0 This document was accurate at time of printing.
Page 33 of 87
CRICOS Provider Number 00103D
To create question categories
1. Click Question bank from the Administration block, then select Categories.
2. A list of existing categories appears. This list shows the default category for
your course, as well as any categories that may have been added.
3. Locate the Add a Category area towards the bottom of the page.
4. Leave the Parent category as the default.
5. In the Name field, enter a meaningful name for your category, in this example
Geography.
Tip: If you intend sharing this category at a later date, you should also include information
about yourself and how you would like others to use your question banks, e.g.
These questions were developed for first year geography students on 15, October 2009 by
Joe Bloggs of Science. Feel free to use these questions. Feel free to contact me on 1234
or [email protected].au if you have any comments or suggestions.
6. Click Add category. Your new category is added to your course categories
area.
Change parent category to
create sub-categories

Module 3 – Assignments, Quizzes and the Gradebook in Moodle
Prepared by Kellie Macneil & Adam Barbary for CLIPP, version 13 updated Aug 2016.
Moodle version 3.0 This document was accurate at time of printing.
Page 34 of 87
CRICOS Provider Number 00103D
7. Repeat these steps to add two more course categories, for these categories
make Geography the parent category:
Asian Geography
European Geography
Your course categories area should look like the following:
Questions
Once you’ve created categories you can add questions to create question banks.
1. To access Questions, click Question bank from the Administration block,
then choose Questions.
Question types
Moodle offers a range of question types you can use. The following information on
question types has been taken from the Moodle online help:
Question
types
Explanation
Multiple
Choice
In response to a question (that may include media) the respondent
chooses from multiple answers. There are two types of multiple
choice questions - single answer and multiple answers.

Module 3 – Assignments, Quizzes and the Gradebook in Moodle
Prepared by Kellie Macneil & Adam Barbary for CLIPP, version 13 updated Aug 2016.
Moodle version 3.0 This document was accurate at time of printing.
Page 35 of 87
CRICOS Provider Number 00103D
True/False
In response to a question (that may include media), the respondent
selects from two options: True or False.
Short Answer
In response to a question (that may include media), the respondent
types a word or phrase. There may several possible correct answers,
with different grades. Answers may or may not be sensitive to case.
Numerical
From the student perspective, a numerical question looks just like a
short-answer question. The difference is that numerical answers are
allowed to have an accepted error. This allows a continuous range of
answers to be set.
Calculated
Calculated questions offer a way to create individual numerical
questions by the use of wildcards that are substituted with individual
values when the quiz is taken.
Essay
In response to a question (that may include media) the respondent
writes an answer in essay format. The question also supports the
ability to have an answer template and a marking notes for staff.
Essay questions MUST be manually graded before results are
returned to students.

Module 3 – Assignments, Quizzes and the Gradebook in Moodle
Prepared by Kellie Macneil & Adam Barbary for CLIPP, version 13 updated Aug 2016.
Moodle version 3.0 This document was accurate at time of printing.
Page 36 of 87
CRICOS Provider Number 00103D
Matching
A list of sub questions is provided, along with a list of answers. The
respondent must "match" the correct answers with each question.
Random Short-
Answer
Matching
From the student perspective, this question type looks just like a
Short-answer question. The difference is that the sub-questions are
drawn randomly from Short Answer questions in the current category.
Embedded
Answers
(Cloze)
These very flexible questions consist of a passage of text that has
various answers embedded within it, including multiple choice, short
answers and numerical answers.
This question is tricky to prepare. Please use the Select missing
words question type which has a similar appearance, but is much
simpler to configure.
Calculated
multichoice
Calculated multichoice questions are multichoice questions where the
choice elements are numeric values determined by formulas. The
values for the formulas are selected randomly from a set when the
quiz is taken, giving a unique question and distractors for each
participant.
Calculated
simple
A simpler version of calculated questions, which are like numerical
questions, but with the numbers used selected randomly from a set
when the quiz is taken. Appearance is identical to the Calculated
question type.
Drag and drop
into text
An easy to author question that allows for words to be dropped into
gaps in a sentence. The sentence can have a single drag and drop
space or many.

Module 3 – Assignments, Quizzes and the Gradebook in Moodle
Prepared by Kellie Macneil & Adam Barbary for CLIPP, version 13 updated Aug 2016.
Moodle version 3.0 This document was accurate at time of printing.
Page 37 of 87
CRICOS Provider Number 00103D
Drag and drop
markers
A very versatile question that allows regions on a background image
to be mapped as ‘drop zones’. Tags dropped in these zone are
considered to be correct. Slightly difficult to configure.
Drag and drop
onto image
Images and text can be dragged into place on a background image.
Easy to configure and supports multiple ‘sets’ of drop items.
Select
missing
words
Similar to Cloze, but much easier to configure. Supports multiple sets
of words.

Module 3 – Assignments, Quizzes and the Gradebook in Moodle
Prepared by Kellie Macneil & Adam Barbary for CLIPP, version 13 updated Aug 2016.
Moodle version 3.0 This document was accurate at time of printing.
Page 38 of 87
CRICOS Provider Number 00103D
Description
This is not a real question. It simply prints some text (and possibly
graphics) without requiring an answer. This can be used to provide
some information to be used by a following group of questions.

Module 3 – Assignments, Quizzes and the Gradebook in Moodle
Prepared by Kellie Macneil & Adam Barbary for CLIPP, version 13 updated Aug 2016.
Moodle version 3.0 This document was accurate at time of printing.
Page 39 of 87
CRICOS Provider Number 00103D
To create questions
In the following procedure you will practice creating five different types of
questions. To make data entry easier you can copy and paste question text from
the Word document Questions_Asian Geography.txt in the file provided.
1. To access Questions, click Question bank from the Settings block, then
choose Questions.
2. From the Category drop-down list select the category in which you want to
add questions, in this example Asian Geography.
3. Click Create a new question … a pop-up window will appear
4. Select the question type to add, then click Add.

Module 3 – Assignments, Quizzes and the Gradebook in Moodle
Prepared by Kellie Macneil & Adam Barbary for CLIPP, version 13 updated Aug 2016.
Moodle version 3.0 This document was accurate at time of printing.
Page 40 of 87
CRICOS Provider Number 00103D
To create a Multiple Choice question
Probably the most prevalent of all online quiz questions, the Multiple Choice
question is very versatile. Not only can questions contain video, images, text
and audio, so too can the responses. Multiple choice also supports partially
correct answers, and customised feedback for each response. The number of
answers is also completely configurable from two to however many you’d like.
When utilising the Multiple Choice question type, it’s important to avoid
‘gimme’ style answers and ensure that the answers require the student to
think and utilise knowledge gained in your course. Avoid relying on language
to trip up students with double meanings and focus on topic knowledge.
1. From the Create a new question … pop-up select Multiple Choice.
2. In the Question name field enter an appropriate name for your question, in
this case C
apital of North Korea
3. In the Question text box, enter the question:
4. Leave the Default mark as 1.
5. Leave General feedback blank. This feedback is provided to the students
regardless of the response being correct or incorrect.
6. It is best to leave the One or multiple answers as One answer only.
Tip - Multiple answers: Multiple answers are very tricky to calculate fairly. If you
were using multiple answers you will need to set partial % marks or negative % marks
for answers. For example, if you had a multiple answer question in which two of the
possible options were partially correct, you could set both to be 50% each, so
students need to select both answers to gain full marks. However, in this example, to
prevent students from just selecting all answers to get full marks you would also need
to set negative marks for the incorrect answers, e.g. if you had 4 options with 2 being
correct and 2 incorrect, you would also need to set -50% for both the incorrect
answers. This then leaves the issue of one correct and one incorrect amounting to 0.
7. Leave the Shuffle and Number the choices options as the default.
8. For Choice 1, enter the first option in the Answer field: Seoul
9. Leave the Grade as None as this is the incorrect answer.
10. In the Feedback field, enter feedback for this answer such as incorrect, or
more information as to why this option is incorrect:

Module 3 – Assignments, Quizzes and the Gradebook in Moodle
Prepared by Kellie Macneil & Adam Barbary for CLIPP, version 13 updated Aug 2016.
Moodle version 3.0 This document was accurate at time of printing.
Page 41 of 87
CRICOS Provider Number 00103D
11. Continue this process to enter the rest of the answer options. For the correct
answer ensure that the grade is set to 100%.
12. In the Combined feedback fields, you may amend the feedback for correct
and incorrect responses if you like. In the incorrect feedback you may wish
to include further revision tips.
Note: If you don’t have multiple answers with partial marks, changes to the partially
incorrect field are ignored.
13. For Multiple tries (Optional), leave the penalty for incorrect tries at 33.3333%.
Note: If you were setting a quiz to adaptive mode and wanted students to have marks
subtracted for each incorrect response, you would need to have a penalty. Typically the
quizzes you set will either be self-assessments, which you will allow students to do
multiple attempts without losing marks, or graded assessment quizzes for which you will
probably only allow a single attempt. Given these two scenarios, the penalty factor is
ignored. It is also possible to override the application of penalties in the quiz settings.
Tip: If you wanted to set up your quiz as something your students can do multiple times,
you can add hints to your questions. The student will be presented with a 'Check' button.
If the student enters their answer, then clicks check, and their answer is wrong, the hint
appears and they get another attempt.
14. If you wish to provide hints (only applicable for quizzes with multiple attempts)
fill in the hint fields and select whether to clear the original response.
15. When you have finished, click Save Changes.
To create a True/False question
True/False questions are used to test the validity of a statement. Although a
student has a 50-50 chance of guessing the correct answer, these types of
questions allow for a quicker response and hence allow a test to cover a

Module 3 – Assignments, Quizzes and the Gradebook in Moodle
Prepared by Kellie Macneil & Adam Barbary for CLIPP, version 13 updated Aug 2016.
Moodle version 3.0 This document was accurate at time of printing.
Page 42 of 87
CRICOS Provider Number 00103D
larger field of knowledge than multiple choice questions. Care should be taken
to ensure the statement is in fact 100% true or false.
1. From the Create a new question … pop-up select True/False.
2. In the Question name field enter an appropriate name for your question, in
this case AG5 - Capital of Vietnam
3. In the Question text field, enter the question written as a statement of fact.
4. Leave the Default mark as 1.
5. In the Correct answer drop-down, select whether the statement is True or
False, in this example it is False.
6. In the Feedback for the response fields, enter the appropriate feedback for
both True or False:
7. When you have finished, click Save changes.
To create a Short answer question
Short answer should really be called Key Word questions as the response
must be a100% match to set answers. Moodle cannot determine if a sentence
is equivalent only whether the response is an exact match. Therefore, you
should limit your questions to target a specific response. One benefit of the
Moodle quiz engine is that it allows for new information to be added to
questions, a new valid response or correction of an error. Quiz results can
then be recalculated based on this new information for all attempts.

Module 3 – Assignments, Quizzes and the Gradebook in Moodle
Prepared by Kellie Macneil & Adam Barbary for CLIPP, version 13 updated Aug 2016.
Moodle version 3.0 This document was accurate at time of printing.
Page 43 of 87
CRICOS Provider Number 00103D
1. From the Create a new question … pop-up select Short answer.
2. In the Question name field enter an appropriate name for your question, in
this case Country Beijing is capital of
3. Leave the Default mark as 1.
4. In the Case sensitivity field, change to YES, case must match.
5. In the Answer1 field, enter the short answer: China.
6. In the Grade field, enter 100%
7. In the Feedback field, enter Correct
Note: If you had alternate answers (e.g. usually different spellings or phrasings that you will
also accept) you would enter these in other answer fields, and also assign a grade.
8. Leave the Penalty for each incorrect try as 33.3333%.
9. When you have finished, click Save changes.
To create a Numerical question
1. From the Create a new question … pop-up select Numerical.
2. In the Question name field enter an appropriate name for your question, in
this case Distance from South Korea to Japan
3. In the Question text field, enter the question, remember the answer must be
numerical.

Module 3 – Assignments, Quizzes and the Gradebook in Moodle
Prepared by Kellie Macneil & Adam Barbary for CLIPP, version 13 updated Aug 2016.
Moodle version 3.0 This document was accurate at time of printing.
Page 44 of 87
CRICOS Provider Number 00103D
4. Leave the Default mark as 1.
5. Complete the answer, allowing for error if applicable. In this case we’ll accept
from 180 to 220kms, so enter 200 with an allowable error of 20
6. If units are required or optional, select the appropriate Unit handling option.
Typically units are located on the right, so leave the Units go setting as the
default. Fill in the applicable units
7. If multiple units are allowed, supply the unit and the multiplier from the answer
unit base. Eg, If the answer is in Kilometres, but Meters are allowed, then
enter the unit m and 1000 as the multiplier.
Note: The default unit cannot be multiplied.

Module 3 – Assignments, Quizzes and the Gradebook in Moodle
Prepared by Kellie Macneil & Adam Barbary for CLIPP, version 13 updated Aug 2016.
Moodle version 3.0 This document was accurate at time of printing.
Page 45 of 87
CRICOS Provider Number 00103D
8. Multiple tries settings can be left as the default.
9. When you have finished, click Save changes.
To create a Calculated question
Calculated questions allow for wildcards to take the place of numbers in a
mathematical calculation. The range of numbers can then be defined allowing
the difficulty of the question to be managed. Moodle will choose numbers from
the wildcard set, and calculate the expected answer. This allows for one
question to become a different question each time the quiz is taken.
Note: This question is not relevant to our Asian Geography theme and is only included as
an example.
1. From the Create a new question … pop-up select Calculated.
2. In the Question name field enter an appropriate name for your question, in
this case Circumference of a circle
3. In the Question text field, enter the question, substituting the number you
wish to change with a wildcard. A wildcard can be any letter or word between
curly braces. Eg. {radius}
4. Leave the Default mark as 1.
5. Complete the answer formula, using the wildcard(s) you used in the question,
and allowing for error if applicable.
6. If units are required, activate Unit handling and under Units specify the base
unit. If multiple units are allowed, Click the Blanks for 2 more units and

Module 3 – Assignments, Quizzes and the Gradebook in Moodle
Prepared by Kellie Macneil & Adam Barbary for CLIPP, version 13 updated Aug 2016.
Moodle version 3.0 This document was accurate at time of printing.
Page 46 of 87
CRICOS Provider Number 00103D
supply the unit and the multiplier for each. Eg, If the answer is in Meters, but
Centimetres are allowed, then enter the unit cm and 100 as the multiplier.
Note: The default unit cannot be multiplied.
7. Leave the Multiple tries items on their default settings.
8. When you have finished, click Save changes.
Note: Once saved, the question will progress to the Wild Card data set configuration.
9. Upon saving you will be directed to select or create a wildcard dataset.
Unless you wish to share an existing dataset, change the drop down to “Will
use a new dataset”
10. If you wish to share this dataset with other questions in this category, then
choose one of the Synchronised options. The prefix option can be helpful for
managing questions.
11. Click Next page.
12. In the Item to add area, enter a number that falls within your intended range,
the Range of values, low to high, and chose the number of decimal places.
13. You may add each wildcard individually if you require, however Moodle will
generate them for you. Select the number of sets, 20, and click Add.

Module 3 – Assignments, Quizzes and the Gradebook in Moodle
Prepared by Kellie Macneil & Adam Barbary for CLIPP, version 13 updated Aug 2016.
Moodle version 3.0 This document was accurate at time of printing.
Page 47 of 87
CRICOS Provider Number 00103D
14. The page will reload and the Shared wild cards will be updated at the top of
the page.
15. Scroll to the bottom and click Save changes.
Tip: You can view and delete the items in the set by scrolling to the bottom of the page
and clicking Display or Delete.
Note: The numbers in the set are randomly generated and so it is quite likely that there will
be duplicates, especially where the min and max ranges are close together.
Eg. The above settings produced these results: 4,2,6,6,2,7,9,3,6,6,4,10,6,7,3,8,3,4,4,4
To create a Matching question
Matching questions allow for two lists to be matched together. One list is
provided on the left hand side of the question, and a drop box with the second
list is provided on the other side allowing the user to choose which list item
matches with the item on the left. It is important that both lists do not contain
duplicates, as Moodle can potentially confuse the answers.
1. From the Create a new question … pop-up box select Matching and click
Next.
2. In the Question name field enter an appropriate name for your question, in
this case
Match capitals to countries.
Tip: You should include enough information in the question title to help you understand
what it is about when adding questions to a quiz.
3. In the Question text field, enter the question and instructions for completing the
question: e.g. Match the following capital cities with their country:
4. Leave the Default question grade, as the default, 1.

Module 3 – Assignments, Quizzes and the Gradebook in Moodle
Prepared by Kellie Macneil & Adam Barbary for CLIPP, version 13 updated Aug 2016.
Moodle version 3.0 This document was accurate at time of printing.
Page 48 of 87
CRICOS Provider Number 00103D
5. Leave the General feedback field blank.
Note: General feedback appears regardless of which answer the student supplies. This is
useful only if you wanted to give more background on the question. You can enter
response specific feedback in other fields.
6. Leave the shuffle checkbox marked. This will shuffle the order in which each
column will appear for each student.
7. In the Question and answer fields, enter the corresponding choices from
column A and column B, e.g.
Question Answer
Afghanistan Kabul
East Timor Dili
India New Delhi
Indonesia Jakarta
Japan Tokyo
Tip: if you want to enter in more options, click the Blanks for 3 More Choices button.
8. Combined feedback and multiple tries can be left at the default settings.
9. When you are finished, click Save changes. The question now appears in the
question bank for the selected category.
To create an Embedded answers (Cloze) question
Warning: Inclusion of this question type is purely for backward compatibility. Please use
the Select missing word or Drag and drop into text question types instead. Instructions
below are for reference only.
Cloze questions allow the student to select the appropriate word from a
predetermined list to populate a gap in a sentence. Each list can have several
possible responses and the text can have multiple gaps with its own list of
words. Unfortunately, this is a very difficult question to set up, and is by and
large obsolete now that Moodle has the Select missing word question type.
1. From the Create a new question … pop-up, select Embedded answers
(Cloze).
2. In the Question name field enter an appropriate name for your question, in
this case
Cambodia
3. In the Question text field, enter the question in Cloze text format: in this
example:
{1:MULTICHOICE:Hanoi#Incorrect~=Phnom Penh#Correct} is the capital of
Cambodia which used to be
called{1:MULTICHOICE:=Kampuchea#Correct~Siam#Incorrect }

Module 3 – Assignments, Quizzes and the Gradebook in Moodle
Prepared by Kellie Macneil & Adam Barbary for CLIPP, version 13 updated Aug 2016.
Moodle version 3.0 This document was accurate at time of printing.
Page 49 of 87
CRICOS Provider Number 00103D
Warning: In using these question types, spacing in the formula is critical and an extra
space in the wrong place will result in an error. It is not recommended to cut and paste
from Word.
4. Click Decode and Verify the question text. The questions should decode
without any errors and give the correct grade for the right answer.
5. When there are no errors showing, click Save changes.
Close text format
Questions require the following syntax
{points:QUESTIONTYPE:=Correct Answer #Feedback ~Incorrect Answer #Feedback ~Another Incorrect
Answer #Feedback}
NOTE: no space after the colons
Where:
Points = the total value of the points awarded
QUESTIONTYPE = MULTICHOICE, MULTICHOICE_V, MULTICHOICE_H
= Represents the correct answer
~ Represents an additional wrong answer
~= Is used where the first choice is incorrect, and the choice following ~= is the correct one
~%XX% is an additional choice worth XX% of the mark.
To create a Calculated Simple question
1. From the Create a new question … pop-up select Calculated Simple.
2. In the Question name field enter an appropriate name for your question, in
this case Area of a circle
3. In the Question text field, enter the question, substituting the number you
wish to change with a wildcard. A wildcard can be any letter or word between
curly braces. Eg. {circle}

Module 3 – Assignments, Quizzes and the Gradebook in Moodle
Prepared by Kellie Macneil & Adam Barbary for CLIPP, version 13 updated Aug 2016.
Moodle version 3.0 This document was accurate at time of printing.
Page 50 of 87
CRICOS Provider Number 00103D
4. Leave the Default mark as 1.
5. Complete the answer formula, using the wildcard(s) you used in the question,
and allowing for error if applicable.
6. If units are required, activate the appropriate unit settings and complete the
unit’s suffix. If multiple units are allowed, supply the unit and the multiplier
from the answer unit base. Eg, If the answer is in Meters, but Centimetres are
allowed, then enter the unit cm and 100 as the multiplier.
7. Leave the Penalty for each incorrect try as 33.33333%
8. Click Find the wild cards {x…}present in the correct answer formulas.
9. In Range of values, enter the lowest and highest values, and chose the
number of decimal places.
10. Choose the number of sets, and click Generate.
11. Scroll to the bottom and click Save changes.

Module 3 – Assignments, Quizzes and the Gradebook in Moodle
Prepared by Kellie Macneil & Adam Barbary for CLIPP, version 13 updated Aug 2016.
Moodle version 3.0 This document was accurate at time of printing.
Page 51 of 87
CRICOS Provider Number 00103D
To create a Calculated multichoice
This question type takes random values a little further. By specifying various
formulae for answers, the student is tested on a their understanding of a
particular concept, but allowing for random variables allowing the question to
provide a different answer each time it is attempted.
1. From the Create a new question … pop-up select Calculated multichoice.
2. In the Question name field enter an appropriate name for your question, in
this case Perimeter of a square
3. In the Question text field, enter the question, substituting the number you
wish to change with a wildcard. A wildcard can be any letter or word between
curly braces. Eg. {side} or in this case {radius}. We will reuse the wildcard set
created for the perimeter of a circle question generated previously.
4. Leave the Default mark as 1.
5. Multichoice requires that you write the formulae for the correct answer. Fill in
the choice, with the formula and wildcard. Each equation needs to begin with
{= and finish with } . Repeat for as many choices you require.
6. Leave the Combined feedback and Multiple tries as the default.
7. When you have finished, click Save changes.
8. As we have chosen the name of an existing data set, you will be presented
with the option to reuse this dataset.
9. Leave the setting as Do not synchronize and click Next page.
10. In the Item to add area, enter a number that falls within your intended range,
the Range of values, low to high, and chose the number of decimal places.
11. Scroll to the bottom and click Save changes.

Module 3 – Assignments, Quizzes and the Gradebook in Moodle
Prepared by Kellie Macneil & Adam Barbary for CLIPP, version 13 updated Aug 2016.
Moodle version 3.0 This document was accurate at time of printing.
Page 52 of 87
CRICOS Provider Number 00103D
Warning: You need to think very carefully about the formulae used for each distractor as
you need to avoid the possibility that the same answer occurring for multiple distractors.
In the example below, there is no way to determine whether a or b is the correct answer
and the student may inadvertently be denied marks.
To create a Drag and drop into text
Drag and drop into text allows a cloze style question. The student then drags
the correct item from a collection of selectable words into the blanks in the
text. This question allows for re-use of words and also for additional distractor
words that are not part of the solution.
1. From the Create a new question … pop-up box select Drag and drop into
text and click Add.
2. In the Question name field enter an appropriate name for your question, in
this case Taiwan Geography
3. In the Question text field, enter the question text, substituting the missing
words for the number of the choice (see below) within double square
brackets. Eg. [[1]] and [[2]] etc.
4. Leave the default mark as 1.
5. Enter the word(s) required for the drag-able text into each of the choices,
ensuring that the number matches the tags inserted in the text above. Any
choice not completed will be omitted.

Module 3 – Assignments, Quizzes and the Gradebook in Moodle
Prepared by Kellie Macneil & Adam Barbary for CLIPP, version 13 updated Aug 2016.
Moodle version 3.0 This document was accurate at time of printing.
Page 53 of 87
CRICOS Provider Number 00103D
Tip: Add more choices than what is required to increase the difficulty of the question.
6. Ensure the Shuffle box is ticked to prevent the words appearing in the same
order as those in the text.
7. Unless required, Combined feedback and Multiple tries can be left at the
default settings.
8. Click Save changes.
To create a Drag and drop markers
1. From the Create a new question … pop-up box select Drag and drop
markers and click Add.
2. In the Question name field enter an appropriate name for your question, in
this case Tag the Asian Countries
3. In the Question text field, enter the question text, describe carefully what you
require the students to do.
4. Leave the Default mark as 1.
5. With General feedback, you can leave this blank. If you wish the question to
show the incorrect drop zones after the question has been marked, check the
box for Highlight drop zones which have not had the correct marker
dropped on them.
6. In the preview window, upload the background image that will be used as a
reference to drop the markers on, by dragging the image to the upload box.
Once uploaded a preview of the background image will appear, complete with
mapping grid.
7. Give each marker a name in the box below. In this example it is the country
names that we intend to identify. The Number at the end designates how
many tags may be dropped for this resource. If you allow just one, then the
tag can only be used once.
8. Drop zones need to be configured for each item. This is time consuming but
produces some very good results. Each small green box on the background
image overlay is 10 x 10 in size. So each large box is 100 x 100. Use a
combination of circles, rectangles and polygons to highlight the drop zones.

Module 3 – Assignments, Quizzes and the Gradebook in Moodle
Prepared by Kellie Macneil & Adam Barbary for CLIPP, version 13 updated Aug 2016.
Moodle version 3.0 This document was accurate at time of printing.
Page 54 of 87
CRICOS Provider Number 00103D
Tip: Adding drop zones can be time consuming and tedious. If you word your questions
carefully and encourage central drop points this can limit the amount of work.
Eg. Polygon 100,40; 120,70; 210,100; 300,60; 310,15; 400,60; 321,125; 330,200;
250,280; 170,270; 150,200; 60,210; 0,130 or Circle 200,170;55
Pins must be dropped within the highlighted areas to be valid for that answer
Areas can be constructed from Polygons, rectangles or circles
9. When drop-zones are complete, select which tag will be accepted for this
zone.

Module 3 – Assignments, Quizzes and the Gradebook in Moodle
Prepared by Kellie Macneil & Adam Barbary for CLIPP, version 13 updated Aug 2016.
Moodle version 3.0 This document was accurate at time of printing.
Page 55 of 87
CRICOS Provider Number 00103D
Tip: Do not add the Marker to the drop zone until all have been completed as the names
can obscure the reference grid.
10. Leave Feedback and Multiple tries as the default settings.
11. Click Save changes.
To create a Drag and drop onto image
1. From the Create a new question … pop-up box select Drag and drop onto
image and click Add.
2. In the Question name field enter an appropriate name for your question, in
this case Place the Asian Landmarks
3. In the Question text field, enter the question text, Place the landmarks and
their names on the map.
4. Leave the Default mark as 1.
5. In the preview window, upload the background image that will be used as a
reference to drop the markers on, by dragging the image to the upload box.
Once uploaded a preview of the background image will appear.
6. For each of the draggable items, select either Draggable image, or
Draggable text.
For images, select Type: Draggable image. Drag the image to the
upload box. There is no need to complete the Text box for images.
For Text, select Type: Draggable text. Enter the text in the Text entry
box.

Module 3 – Assignments, Quizzes and the Gradebook in Moodle
Prepared by Kellie Macneil & Adam Barbary for CLIPP, version 13 updated Aug 2016.
Moodle version 3.0 This document was accurate at time of printing.
Page 56 of 87
CRICOS Provider Number 00103D
Tip: The draggable text items are all as big as the Largest item in the Group. Aim to limit
the text to a single word where possible and use separate groups for text and images.
7. Drop zones need to be configured for each item. Using the drop down list at
the end of each Drop zone configuration, assign all your items to a zone.
Note: There is no need to enter the Left, Top or Text fields.
8. Scroll down and click Save changes and continue editing.
9. Scroll to the Preview area and you will find your collection of images and text
(if applicable).
10. Drag the images and text onto the background area and place them where
you would like them. A student will need to match these positions in order to
receive marks. During an attempt, a shaded area will designate the possible
locations.
11. Leave Feedback and Multiple tries as the default settings.
12. Click Save changes.
To create a Select missing words
1. From the Create a new question … pop-up click Select missing words.
2. In the Question name field enter an appropriate name for your question, in
this case About Asia

Module 3 – Assignments, Quizzes and the Gradebook in Moodle
Prepared by Kellie Macneil & Adam Barbary for CLIPP, version 13 updated Aug 2016.
Moodle version 3.0 This document was accurate at time of printing.
Page 57 of 87
CRICOS Provider Number 00103D
3. In the Question text field, enter the text that you wish to use in its complete
state.
4. Leave the Default mark as 1.
5. Work through question text removing key words and placing them in the
Choice Answer boxes. Replace the missing word in the text with the
corresponding choice number contained between double square brackets.
E.g. [[1]].
6. To limit the length of drop down menus for each missing items, you may
create different drop down lists by placing words in different groups.
Tip: As with the example above, you do not need to use all of the items you have added
to the choices. (eg. Choice 2 and Choice 4 are not mentioned in the text) Extra choices
may be used to increase the difficulty of the question. Only those items utilised within the
question text are evaluated.
7. Leave Feedback and Multiple tries as the default settings.
8. Scroll to the bottom and click Save changes.

Module 3 – Assignments, Quizzes and the Gradebook in Moodle
Prepared by Kellie Macneil & Adam Barbary for CLIPP, version 13 updated Aug 2016.
Moodle version 3.0 This document was accurate at time of printing.
Page 58 of 87
CRICOS Provider Number 00103D
Importing Questions
If you already have questions created, you can import them directly into your Moodle
question bank. Moodle accepts a large range of question file formats:
If you have created questions in another question tool, for example Hot Potatoes or
Respondus you can import questions from that tool into Moodle directly. If, however,
you have a list of questions in a word document, then you will need to format them in
a specific way to be able to upload them. If you have many questions this will
probably save you time, however if you only have a few you may find it just as easy
to add them individually.
Note: Moodle exports questions in a standard XML format as easily as it imports them,
you can feel secure in creating questions in Moodle as they can be easily exported for
use in another program.
Formatting your questions in Aiken format
The Aiken file format is the simplest format for importing multiple choice questions.
The following information is taken from the Moodle online help for Importing Aiken
format files:
The Aiken format is a very simple way of creating multiple choice questions
using a clear human-readable format. Here is an example of the format:
What is the correct answer to this question?
A. Is it this one?
B. Maybe this answer?
C. Possibly this one?
D. Must be this one!
ANSWER: D
Which LMS has the most quiz import formats?
A) Moodle
B) ATutor
C) Claroline
D) Blackboard
E) WebCT
F) Ilias
ANSWER: A

Module 3 – Assignments, Quizzes and the Gradebook in Moodle
Prepared by Kellie Macneil & Adam Barbary for CLIPP, version 13 updated Aug 2016.
Moodle version 3.0 This document was accurate at time of printing.
Page 59 of 87
CRICOS Provider Number 00103D
The question must be all on one line, meaning you cannot use the <Enter>
key.
Each answer must commence on a new line, start with a single-letter
character, followed by a period '.' or a bracket ')', then a space.
The answer line must immediately follow, starting with "ANSWER:" and then
giving the appropriate letter.
Tip: use a blank Aiken form like this:
Question?
A)
B)
C)
D)
E)
F)
ANSWER: A
Repeat down the page, then fill in the question and answer text. There is no need to
change the correct distracter from A, as you can set Moodle is set to automatically shuffle
within questions meaning that the order of the answers will be shuffled for each attempt.
To import questions into your question bank
For the purposes of this training you have been supplied with a text document
of questions that have been formatted in Aiken format. Before you begin, open
this document to see how these questions are formatted.
Note: This document has been saved as a text file .txt to ensure no formatting will
interfere with the upload.
1. Click Questions Bank from the Settings block.
2. Click the Import link.
3. In the File Format list select the format you are importing, in this case Aiken
format.

Module 3 – Assignments, Quizzes and the Gradebook in Moodle
Prepared by Kellie Macneil & Adam Barbary for CLIPP, version 13 updated Aug 2016.
Moodle version 3.0 This document was accurate at time of printing.
Page 60 of 87
CRICOS Provider Number 00103D
4. Expand the General area and select the category in which you want to add
questions, in this example European Geography.
5. It is not necessary to clear the Get category from file and Get context from
file checkbox.
Note: Some file formats, such as the GIFT and XML format allow the category to be
specified inside the import file. If you were using one of these file formats with a file
containing this information you may keep or clear the Get category and Get context from
file checkboxes at your discretion.
6. In the Match Grades field the default is fine.
7. In the Stop on Error field, leave as Yes.
8. In the Import questions from file box, click Choose a file… or Drag and
drop the fil. For this training that should be
Questions_EuropeanGeography.txt then click Upload this file.
9. You will now be able to click the Import button.
When the file is uploaded a message will appear showing how many
questions were uploaded. You may need to do some tidying up as questions
do not always come across cleanly.
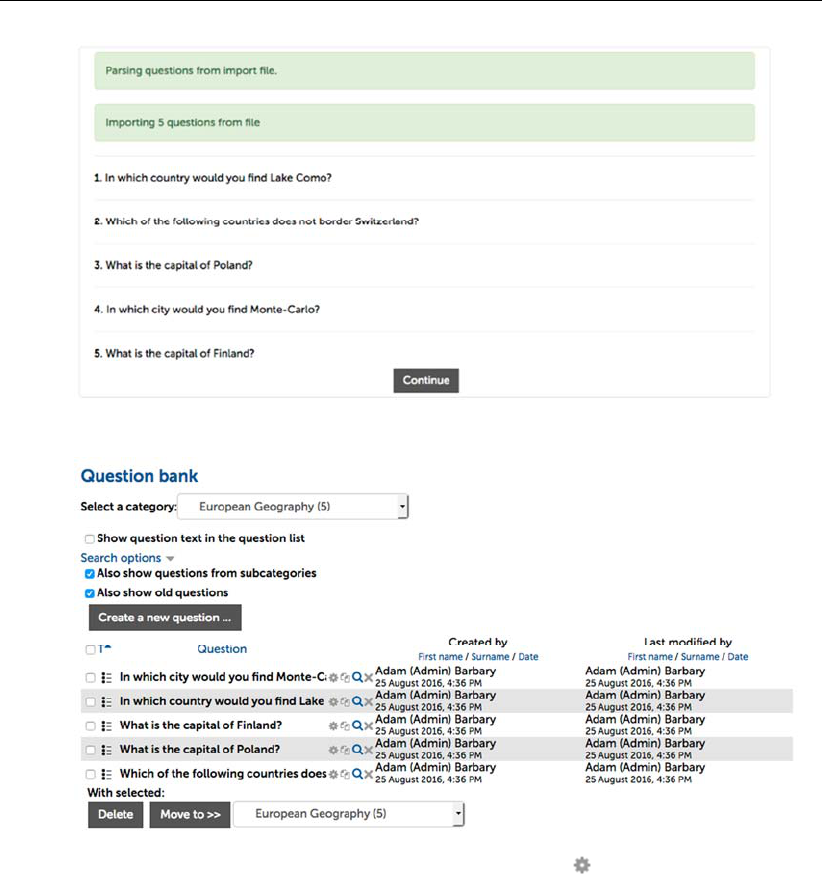
Module 3 – Assignments, Quizzes and the Gradebook in Moodle
Prepared by Kellie Macneil & Adam Barbary for CLIPP, version 13 updated Aug 2016.
Moodle version 3.0 This document was accurate at time of printing.
Page 61 of 87
CRICOS Provider Number 00103D
10. Click Continue. The questions now appear in your question bank.
11. If you need to edit any question, click the edit icon next to a question.
12. Check the question and add any feedback text.
13. Repeat these steps to edit the rest of the questions.

Module 3 – Assignments, Quizzes and the Gradebook in Moodle
Prepared by Kellie Macneil & Adam Barbary for CLIPP, version 13 updated Aug 2016.
Moodle version 3.0 This document was accurate at time of printing.
Page 62 of 87
CRICOS Provider Number 00103D
Creating a Quiz
Once you have added questions to your question bank you can create quizzes.
Quizzes can be set up for either student revision, including self-assessment, or as
graded assessments. There are only a couple of differences, in terms of set up,
between the two types of quizzes. These options are covered in the following
procedure.
Setting up a quiz is a two-step process:
Step 1 – Create the quiz
Step 2 – Add questions to the quiz
Step 1 - Creating the quiz
1. In the main course area, click the Add an activity or resource pop up and
choose Quiz. The Adding a new Quiz window appears.
Note: As this is an assessable quiz, it should be put this in the course Assessment topic
area along with all the other assessment information. You could include a label in the
relevant week to remind the student that the quiz is open in that week. For quizzes set to
open on a specific date a calendar event will also appear in the calendar.
2. In the Name field, enter a meaningful name for the quiz, in this example
Online exam – week 5.
3. In the Introduction field, enter information about the quiz.
Timing
4. For the Open the quiz options, mark the Enable checkbox. The date fields
now become available.

Module 3 – Assignments, Quizzes and the Gradebook in Moodle
Prepared by Kellie Macneil & Adam Barbary for CLIPP, version 13 updated Aug 2016.
Moodle version 3.0 This document was accurate at time of printing.
Page 63 of 87
CRICOS Provider Number 00103D
5. Enter the date the quiz will be open.
6. In the Close the quiz fields, mark the Enable checkbox then choose the date
you want the quiz to close.
7. Set the Time limit to 20 minutes.
8. In the When time expires drop-down, ensure Open attempts are submitted
automatically option is selected. This will save any partially completed
quizzes when the quiz closes.
Grade
9. Grades are assigned on a different screen. However, you may specify the
grade to pass. By default quizzes are allocated 10 marks and, as this is set
on a different screen, the maximum you can enter into the Grade to pass at
this stage is 10. Fortunately, this is 50% of the 20 marks that we’ll allocate
later, so this will work. If you need a value higher than 10, you must return to
this edit screen after adding the questions and setting the allocated marks.
10. In the Attempts allowed field, set the attempt to 1.
Note: If you were setting an assessable quiz in your own course you should set a specific
opening and closing date to control the duration over which the quiz is open, as well as a
time limit to control how long a student has to complete it once they begin. For example if
you set an opening date of 1
st
Oct a closing date of 7
th
Oct and a time limit of 30 minutes,
a student could open and attempt this quiz at any time between 1 – 7 October however
once they open it they will only have 30 minutes to complete the quiz.
Note: for revision self-assessment quizzes you could set the attempts to Unlimited to
enable students to be able to review the quiz as many times as they like during the
course.
11. Grading method allows you to set how you would like the grade recorded.
(This is only available for multiple attempts)
Note: if you were allowing multiple attempts in a graded quiz you would need to set how
you wanted grades to be recorded, for example as an average of all attempts, based on
the first attempt or last attempt. You would also need to set if you wanted penalties to
apply for any wrong attempts. Also note that if you were applying penalties you would
need to have the penalty mark set for each question
In most cases of graded quizzes you would only allow one attempt and therefore the
default settings are sufficient.

Module 3 – Assignments, Quizzes and the Gradebook in Moodle
Prepared by Kellie Macneil & Adam Barbary for CLIPP, version 13 updated Aug 2016.
Moodle version 3.0 This document was accurate at time of printing.
Page 64 of 87
CRICOS Provider Number 00103D
Layout
12. In the Layout field, if you would like all the questions on a single scrolling
screen, choose Never in the New page box. You can also set the navigation
method so that students cannot jump around the quiz and must progress from
start to finish.
Note: You can specify the number of questions to be displayed on each page. Separate
pages allow the student to save after every question. A single page is best for very short
quizzes.
Note: You must click Show advanced, to see the Navigation method. By default,
students can navigate to any question in the quiz.
Question Behaviour
13. In the Shuffle within question fields, select Yes.
Note: Shuffle within a question is a great feature, but needs to be backed up with answer
feedback, as reviewing in class later may confuse. Shuffling answers will only take effect
if the question is also configured for this. There is a checkbox in some question types to
allow for this.
14. In the How questions behave field, choose Deferred Feedback.
Note: The adaptive mode allows students to see feedback for questions and change their
answers within the one quiz attempt. Penalties can be set for adaptive mode, which
reduce a student’s mark for subsequent attempts. By setting this to Adaptive mode (no
penalties) students will be able to take multiple attempts without losing marks.. For more
information on question behaviours, see
https://docs.moodle.org/30/en/Quiz_settings#Question_behaviour
Review Options
It is really important to provide students with sufficient feedback for them to
understand their marks and be able to improve. This is particularly important for
any formative assessment during semester. As has been previously mentioned
inclusion of formative feedback is critical to student learning.
15. Clear all options for During the attempt and Immediately after the attempt,
leave all options set for column After the quiz is closed.

Module 3 – Assignments, Quizzes and the Gradebook in Moodle
Prepared by Kellie Macneil & Adam Barbary for CLIPP, version 13 updated Aug 2016.
Moodle version 3.0 This document was accurate at time of printing.
Page 65 of 87
CRICOS Provider Number 00103D
During the attempt – shows items as soon as the page/question is saved
Immediately after the attempt – shows items when the test as soon as the
attempt is submitted, but only for a couple of minutes
Later, while the quiz is still open – show items after the attempt is submitted
After the quiz is closed – shows items only after the quiz no longer accepts
attempts.
Important: For graded quizzes feedback should not be provided before the quiz is closed
as students could then share the correct answers with other students who have not yet
attempted the quiz. However, for self-assessment you would check all bar during the
attempt.
Note: the feedback the student receives will depend on what you include as feedback for
individual questions, answers and the overall quiz.
Appearance
16. The default settings for this item are generally fine. As most students do not
have a profile picture and the number of decimal places is usually irellevant.
Extra restrictions
17. In the Extra restrictions on attempts area, leave all options as the default.
Overall feedback (Optional)
In the overall feedback area you can optionally set feedback based on the overall
grade for the quiz. For example, you may wish to congratulate students if they got
above 80% but advise them to revise the topic if they got below this %.
18. In the first Feedback field enter a message for students who scored between
80% and 100%.
19. In the Grade boundary for this feedback, enter 80%.
20. In the second Feedback field, enter a message for students who scored less
than 80%.

Module 3 – Assignments, Quizzes and the Gradebook in Moodle
Prepared by Kellie Macneil & Adam Barbary for CLIPP, version 13 updated Aug 2016.
Moodle version 3.0 This document was accurate at time of printing.
Page 66 of 87
CRICOS Provider Number 00103D
21. Leave Common module settings, Restrict Access and Activity completion with
the default settings.
22. When you have finished reviewing your quiz setup click Save and display. A
window appears showing your question bank.

Module 3 – Assignments, Quizzes and the Gradebook in Moodle
Prepared by Kellie Macneil & Adam Barbary for CLIPP, version 13 updated Aug 2016.
Moodle version 3.0 This document was accurate at time of printing.
Page 67 of 87
CRICOS Provider Number 00103D
Step 2 - Adding questions to your quiz
Once you have set up the settings for your quiz you need to add questions to it.
1. To edit the questions, either click edit quiz from the Info area of the quiz. Or
go to the Administration block and choose Edit quiz. If you cannot see this
link, first make sure you have opened the quiz by clicking on its link.
2. Moodle now allows questions to be created locally for a quiz. To add
questions, click the Add button on the right hand side of the screen.
3. You have three choices when adding questions. As we have already created
questions and allocated them to categories, select, from question bank.
4. From the Select a category drop-down select The Category you want to get
questions from, in this example European Geography. The question bank

Module 3 – Assignments, Quizzes and the Gradebook in Moodle
Prepared by Kellie Macneil & Adam Barbary for CLIPP, version 13 updated Aug 2016.
Moodle version 3.0 This document was accurate at time of printing.
Page 68 of 87
CRICOS Provider Number 00103D
shows all questions in that category.
There are two methods for selecting questions:
Method 1 – adding questions individually
Method 2 – adding questions randomly
Method 1 – adding questions individually
For the purposes of this training, add all five questions from both the European
Geography category.
5. Mark the checkbox for each question you want to add, or click the top most
box to select all.
Click Add selected items to the quiz. The selected questions are added to
the quiz pane.
Method 2 – adding questions randomly
6. First click Add (step 2 above), then select a random question.
7. Select the category, in this case Asian Geography, and choose the number of
random questions to add, in this case 5.

Module 3 – Assignments, Quizzes and the Gradebook in Moodle
Prepared by Kellie Macneil & Adam Barbary for CLIPP, version 13 updated Aug 2016.
Moodle version 3.0 This document was accurate at time of printing.
Page 69 of 87
CRICOS Provider Number 00103D
8. Click Add random question.
The quiz pane shows that 5 random questions have been added to the finished quiz.
You may drag questions to re-order their appearance in the quiz, or you may check
the Shuffle box to randomise the order every time the quiz is displayed.
Tip: To remove questions from your quiz, click the remove icon.
Setting the maximum grade
9. Once you have finished adding questions, you should set the Maximum grade
at the top of the quiz screen. In the Maximum grade set the Maximum grade
awarded for the quiz, e.g. 20.
Note: In a graded assignment set the grade you want the quiz to be worth. The marks will
be scaled down or up to the quizzes maximum grade. For example, if there were 10

Module 3 – Assignments, Quizzes and the Gradebook in Moodle
Prepared by Kellie Macneil & Adam Barbary for CLIPP, version 13 updated Aug 2016.
Moodle version 3.0 This document was accurate at time of printing.
Page 70 of 87
CRICOS Provider Number 00103D
questions in the quiz, worth 1 mark each, but you wanted the quiz overall to be worth
20% of final marks, each question would be scaled up to be worth 2.
10. When you have finished making changes click Save.
11. To review the quiz, click the Preview link in the Settings block below the quiz.
Additional task: Add a graded quiz
Following steps 1 and 2 of the Creating a Quiz procedure, create a quiz based on the
following criteria (Note: where no criteria are specified leave fields as per the default):
Quiz settings
Location
In topic 1.
Name
Topic 1 – Revision Quiz
Introduction
This quiz is designed to test what you have learnt in topic 1. This
is a self-assessment revision quiz and will not count toward your
final marks, however it is strongly recommended that you do this
quiz for your own revision. You may do this quiz as many times as
you like.
Open the quiz
Leave as today’s date
Close the quiz /
Time limit
Leave as disabled *
Shuffle questions
/ within questions
Yes
Attempts allowed
Unlimited
Review Options
To allow students the maximum level of feedback, leave all the
review options marked as per the default
Overall
Feedback
80% - 100% - Congratulations you show a good understanding of
this topic!
Below 80% - You should review the information contained in this
topic before continuing.
Question bank
Category
European Geography - add 2 questions at random
Asian Geography – add all 3 questions at random
Maximum grade
5

Module 3 – Assignments, Quizzes and the Gradebook in Moodle
Prepared by Kellie Macneil & Adam Barbary for CLIPP, version 13 updated Aug 2016.
Moodle version 3.0 This document was accurate at time of printing.
Page 71 of 87
CRICOS Provider Number 00103D
Reviewing student attempts
You can review a student’s individual attempt, view how many students have
attempted the quiz, and export results.
To view student attempts
1. Click the Quiz link from the course view.
2. Either click on the Attempts X link, or the Results, Grades link in the
Administration block, to view results.
To view an individual student’s attempt
1. From the Grades view, click on the Review attempt link under the name of a
student to open their attempt.
Note: If you click on the student’s name you will be taken to their profile. Click the back
button to get back to the results screen.

Module 3 – Assignments, Quizzes and the Gradebook in Moodle
Prepared by Kellie Macneil & Adam Barbary for CLIPP, version 13 updated Aug 2016.
Moodle version 3.0 This document was accurate at time of printing.
Page 72 of 87
CRICOS Provider Number 00103D
Responses for each question attempted will be displayed, with full details of
how the student responded, whether they changed a response and the marks
allocated. As the teacher, you also have the ability to override the mark by
clicking the Make comment or override mark link.
To download results
From the Grade view, first select a format from the drop down box, then click the
Download table data as button to export all results.
To analyse individual questions
Moodle includes report views that will give you sufficient information to analyse
individual questions. This can be useful if, for example, a high percentage of
students were getting one particular question wrong this may indicate that this
information has not been covered sufficiently in the course or that the question
may be badly worded. This view gives you information on what questions
students got wrong, and which responses they were mostly giving. If students
were routinely giving the same incorrect response to a question this may indicate
that the question is misleadingly worded.

Module 3 – Assignments, Quizzes and the Gradebook in Moodle
Prepared by Kellie Macneil & Adam Barbary for CLIPP, version 13 updated Aug 2016.
Moodle version 3.0 This document was accurate at time of printing.
Page 73 of 87
CRICOS Provider Number 00103D
From the Administration Block, go to Results tab, click Statistics. The Quiz
information and Quiz structure analysis view is displayed.
For more information on interpreting the statistical parameters used in this table,
refer to Moodle.org link.

Module 3 – Assignments, Quizzes and the Gradebook in Moodle
Prepared by Kellie Macneil & Adam Barbary for CLIPP, version 13 updated Aug 2016.
Moodle version 3.0 This document was accurate at time of printing.
Page 74 of 87
CRICOS Provider Number 00103D
Special Conditions – Time extensions, re-tests etc.
Sometimes students may need special consideration for online quizzes. An outage or
other technical issue may occur, a student may have special needs that require time
extensions, or placements may mean that the timing of the quiz is not suitable.
Moodle now has User Overrides that allow individuals or groups to have alternative
settings to the class default.
Creating a User override
1. Click on the quiz link to enter the quiz.
2. Click on the User overrides link. A blank screen appears with a single button,
Add user override. Click button to continue.
3. Click Add user override
4. Select the student by clicking on their name. (Use CTRL click to select
multiples)
5. Change quiz Opening and Closing, Time limit and attempts as required.
6. Click save to apply overrides for the selected user(s).
Note: If creating an override for a student who has already attempted the quiz, remember
to set the attempts to one higher than the existing number. Eg. If your quiz normally has

Module 3 – Assignments, Quizzes and the Gradebook in Moodle
Prepared by Kellie Macneil & Adam Barbary for CLIPP, version 13 updated Aug 2016.
Moodle version 3.0 This document was accurate at time of printing.
Page 75 of 87
CRICOS Provider Number 00103D
two attempts, the override needs to be set to three, so the selected user gets one extra
attempt.
Editing quizzes
If students have already started completing the quiz, or you have switched roles to
student to see test the quiz, you will need to delete these attempts before you can
change anything.
To delete attempts
7. Click on the quiz link to enter the quiz.
8. Click on the Attempts link. The attempts area appears.
9. Mark the attempts you want to delete, in this case as you want to delete all
you could also click Select all.
10. Click Delete selected.

Module 3 – Assignments, Quizzes and the Gradebook in Moodle
Prepared by Kellie Macneil & Adam Barbary for CLIPP, version 13 updated Aug 2016.
Moodle version 3.0 This document was accurate at time of printing.
Page 76 of 87
CRICOS Provider Number 00103D
The Gradebook
The Gradebook in Moodle is a sophisticated tool that enables you to calculate, edit
and report on student grades. All assessment items that have been set up and
assigned a grade automatically appear as a column in the gradebook, and marks for
online quizzes, and assignments graded through the submission area also flow
through.
To open the Gradebook
1. From the Settings Block, click Grades.
The View area of the Grader report appears showing a separate column for each
assessable item that has been set up and student results that have flowed through.
Note: In this example there are four dummy students who have completed assessments. You
will not see this in your own course at this point.
Note: The tan coloured boxes indicate grades that have been overridden in the gradebook.
Note: Any hidden assessment item will appear as greyed out in the gradebook.
How the Gradebook calculates grades
The Gradebook in Moodle has been configured by CLIPP to produce a total by
summing all grades. As such teachers are advised to set up their assessments in
Moodle to be worth in grade terms, what the overall percentage of that assessment
item is worth, e.g. an assignment worth 40% should be given a max grade of 40. The
total of all graded assignments should therefore equal 100, or 100% of the student’s
grade.

Module 3 – Assignments, Quizzes and the Gradebook in Moodle
Prepared by Kellie Macneil & Adam Barbary for CLIPP, version 13 updated Aug 2016.
Moodle version 3.0 This document was accurate at time of printing.
Page 77 of 87
CRICOS Provider Number 00103D
This is the most logical way to set the gradebook up as the default, however you do
have the option to change this setting for your individual course gradebook should
you wish to.
Entering grades manually
To enter manual grades in the Gradebook
You can assign grades manually to all assessment items from within the
gradebook. However, doing this locks the assessment from being updated from
the assessment grading screen and is not recommended.
1. From the Grader report view, click Turn editing on located in the top right
hand corner of the gradebook screen. Grade and Feedback editing fields
become available.
There are two ways for you to edit grades manually in Moodle. You can enter
grades quickly by adding the mark to the grade field (solid box) and a
comment (dotted line box) in the main table, you can click on the cog icon to
open up a larger grading and feedback window, or you can open up the
editing window for each student’s entire grade history or the activity’s results
by clicking the pen icon next to the student or activity respectively.
Quick grade entry
2. To edit a grade, In the offline activity column, click in the grade field for a
student (the first box in the column) and enter the grade.
3. Click Save changes at the bottom of the screen to ensure your changes are
saved. When these marks are saved the overall average for that assessment
is also updated.
Individual student grade and feedback entry
4. In the offline activity column, click the edit icon for a student. The Edit
Grades window appears:

Module 3 – Assignments, Quizzes and the Gradebook in Moodle
Prepared by Kellie Macneil & Adam Barbary for CLIPP, version 13 updated Aug 2016.
Moodle version 3.0 This document was accurate at time of printing.
Page 78 of 87
CRICOS Provider Number 00103D
5. In the Final grade field, enter the grade.
6. In the Feedback field, enter the feedback for the student.
7. Click Save Changes.
Prevent quiz results from contributing to the overall grade.
The maximum grade set for a quiz will be the grade that will flow through to the
gradebook. This happens automatically and should be left for assessable quizzes.
For formative quizzes, where you do not want the result to contribute to the overall
grade, you will need to remove the quiz from the gradebook calculations.
You could set a quiz maximum grade to be 0, however if you do this students will not
see a score for their attempt and could miss out on overall feedback which is
dependent on a percentage.
A better alternative is to create a category that has a maximum value of 0 and add
the quiz(zes) to this category. This will effectively make all items within the category,
at the gradebook level, worth 0.
To set a quiz to not count towards the final grade
1. In the Settings Block, click Grades. The Grader report window appears.
2. Click the Setup tab, then click Add category.

Module 3 – Assignments, Quizzes and the Gradebook in Moodle
Prepared by Kellie Macneil & Adam Barbary for CLIPP, version 13 updated Aug 2016.
Moodle version 3.0 This document was accurate at time of printing.
Page 79 of 87
CRICOS Provider Number 00103D
3. Provide a Category name, for example, Weekly Quizzes.
4. Change the Aggregation to Weighted mean of grades.
5. Set the Maximum grade to 0.
6. Click Save changes.
7. Click the move icon next to the item you wish to move into the category.
8. Click the location box within the category.
9. Repeat for each item that you wish to exclude from the grade book total.

Module 3 – Assignments, Quizzes and the Gradebook in Moodle
Prepared by Kellie Macneil & Adam Barbary for CLIPP, version 13 updated Aug 2016.
Moodle version 3.0 This document was accurate at time of printing.
Page 80 of 87
CRICOS Provider Number 00103D
In the image above, you can see that the two quizzes, worth 10 marks each, are
effectively worth 0 marks as part of the Weekly Quizzes total. The course total
has also fallen by 20 marks.
10. Click Save changes
Exporting from the gradebook
Even if you won’t be entering grades into the Moodle gradebook as you are required
to use another gradebook system you may still have results that are automatically
entered into the Moodle gradebook that you need to transfer, for example online quiz
results. Rather than recreate these results, you can export them from Moodle in
Excel format and should be able to then import them into the other gradebook
system.
Note: at the time of creating this resource it has not been determined if the other gradebook
systems will accept Excel import. Hopefully this will be clarified in the future.
To export grades from the gradebook
1. In the Settings Block, click Grades. The Grader report window appears.
2. Click the Export tab.
3. Click the Excel spreadsheet option, the title will change to whatever is
selected.
4. In the Grades items to be included area select all the grades you want
exported, by default all are selected.

Module 3 – Assignments, Quizzes and the Gradebook in Moodle
Prepared by Kellie Macneil & Adam Barbary for CLIPP, version 13 updated Aug 2016.
Moodle version 3.0 This document was accurate at time of printing.
Page 81 of 87
CRICOS Provider Number 00103D
5. Click Download.
6. Save the file, and then browse to where the file is save on your computer
Tip: The file will be called, <your course name>.xlsx
7. Click Open to open the downloaded excel spreadsheet.

Module 3 – Assignments, Quizzes and the Gradebook in Moodle
Prepared by Kellie Macneil & Adam Barbary for CLIPP, version 13 updated Aug 2016.
Moodle version 3.0 This document was accurate at time of printing.
Page 82 of 87
CRICOS Provider Number 00103D
Appendix 1: Quiz FAQs
For a list of please refer to the documentation on the Moodle.org site
https://docs.moodle.org/30/en/Quiz_FAQ
If you have questions about the use or possibilities of the Quiz module, please refer
to the above FAQ, or contact CLIPP for assistance.

Module 3 – Assignments, Quizzes and the Gradebook in Moodle
Prepared by Kellie Macneil & Adam Barbary for CLIPP, version 13 updated Aug 2016.
Moodle version 3.0 This document was accurate at time of printing.
Page 83 of 87
CRICOS Provider Number 00103D
Appendix 2: Advanced Grading
Creating Rubrics
Rubrics provide students with more explicit marking criteria for their assignments,
and allows them to fully understand how marks will be allocated for their work.
To use rubrics, you need to first set up your assessment piece.
1. Follow the guide Creating an Assignment (Online submission) on page 8 to
create your assignment.
2. In the Grade area, instead of choosing Simple direct grading, select Rubric
from the drop down list.
3. Save the assignment by choosing Save and display
4. Moodle will detect that you have requested a rubric and will load the
Advanced grading page. Click Define new grading form from scratch.
5. Enter a name for your new rubric. You may also include a description,
although this is optional.
6. To edit the rubric, simply click the area you wish to add text to.
7. Click Add level to increase the levels, click Add criterion to add additional
criteria.
8. Ensure that you have assigned the correct criteria, levels and points.

Module 3 – Assignments, Quizzes and the Gradebook in Moodle
Prepared by Kellie Macneil & Adam Barbary for CLIPP, version 13 updated Aug 2016.
Moodle version 3.0 This document was accurate at time of printing.
Page 84 of 87
CRICOS Provider Number 00103D
9. The remaining options are self-explanatory.
10. If you are happy with your Rubric, click Save rubric and make it ready.
Marking with Rubrics
Marking with rubrics is incredibly simple. All the assessor needs to do is click the
appropriate descriptor, and Moodle does the rest. As per the previous settings, there
can be a comment field on each criterion as well as an overall feedback area.
Depending on assessment type, there may also be a response files area as well.
Tip: Due to limited screen real-estate, you may find it easier to provide a PDF version of
the rubric to students, then simply mark the levels to correspond to the template.

Module 3 – Assignments, Quizzes and the Gradebook in Moodle
Prepared by Kellie Macneil & Adam Barbary for CLIPP, version 13 updated Aug 2016.
Moodle version 3.0 This document was accurate at time of printing.
Page 85 of 87
CRICOS Provider Number 00103D
Creating Marking Guides
Marking guides provide students with less rigid marking criteria for their assignments,
and allows the lecturer some flexibility with point allocation whilst providing the
student with a guide to how marks for the assessment piece will be allocated.
To use marking guides, you need to first set up your assessment piece.
1. Follow the guide Creating an Assignment (Online submission) on page 8 to
create your assignment.
2. In the Grade area, instead of choosing Simple direct grading, select
Marking Guide from the drop down list.
3. When clicking Save and display.
4. Moodle will detect the use of a Marking guide and launch the Advanced
grading: Marking guide window. Click Define new grading form from
scratch.
5. Enter a name for your new marking guide. You may also include a
description, although this is optional.
6. To edit the marking guide, simply click the areas you wish to add text to.

Module 3 – Assignments, Quizzes and the Gradebook in Moodle
Prepared by Kellie Macneil & Adam Barbary for CLIPP, version 13 updated Aug 2016.
Moodle version 3.0 This document was accurate at time of printing.
Page 86 of 87
CRICOS Provider Number 00103D
Note: Marking guides can have different information displayed to students and markers.
7. Click Add criterion to add additional criteria.
8. You can also create a pool of frequently used comments that can then be
quickly added to the criteria responses during grating. Things like ‘Well done’,
‘Good argument, or ‘Very coherent’,
9. Ensure that you have assigned the correct criteria, levels and points.
10. The remaining options are self-explanatory.
11. . If you are happy with your Marking guide, click Save marking guide and
make it ready.
Marking with Marking Guides
Marking with a marking guide provides more consistency in grades. There is a
comment field on each criterion as well as an overall score. Graders can also choose
from the predetermined comments.
Depending on assessment type, there may also be an area for response files area as
well.

Module 3 – Assignments, Quizzes and the Gradebook in Moodle
Prepared by Kellie Macneil & Adam Barbary for CLIPP, version 13 updated Aug 2016.
Moodle version 3.0 This document was accurate at time of printing.
Page 87 of 87
CRICOS Provider Number 00103D
Appendix 3: Where to go for help
Moodle Support Forums
A Moodle Help menu has been added to the Moodle navigation bar containing links
to the student and staff support forums as well as online ‘how-to’ guides and the IT
Services Portal. Whilst CLIPP staff will be monitoring the forums and posting replies
to questions, it is hoped to foster a learning community that can support each other. If
you require urgent support, please log a request with ITS, or for emergency support
contact CLIPP directly
Note: To access the staff forum you will need an enrolment key: h3lp
Moodle.org Documentation and Support Forums
You can access teacher documentation, sample courses and participate in the
support forums through the official Moodle site, moodle.org
https://docs.moodle.org/30/en/Main_page
