
Quick Start Guide
Revision A
Release Version 1.9.0

Quick Start Guide Contents
Introduction 4
LogTag Mobile App 5
LogTag Online context-sensitive help 6
Logger Transit Data 7
Creating your account 9
Dashboard Overview 11
My Account, Activation Code & Messaging 12
Activation Code / Prepay 14
Messaging 16
Manage Team - User 17
Manage Team - Team 18
Manage Team - Signatures 19
Event Log 20
EventNoticationList 21
Support 22
Devices Overview 23
Registering a new device 25
Editing / Deleting devices 26
LogTag Drive Overview 27
Viewing a File - Chart 29

Quick Start Guide Contents (Continued)...
Viewing a File - Reports 30
Editing a File 32
Locations Overview 33
Areas 34
Editing/Deleting a Location 35
Inspecting a Location 36
Day Summary 37
Creating a Location 38
Troubleshooting Records 40
Creating a Record 41
Chart 43
Reports 44
Settings 47
RemoteLoggerConguration 48
Transit Overview 50
Creating Shipment 52
Shipment Info 54
Chart 55
Report 56
Map 58
Settings 59

Page 4
Introduction
Welcome to the Quick Start Guide for LogTag Online (LTO), the Cloud-based online
environmentalmanagementsystemprovidingalarmnotications,compliance,record
storage and reporting functions. Here, you can get all the information you need to
get your way around using LogTag Online, e.g. creating an account, registering your
devices, uploading data etc.
• A Wi-Fi enabled device to upload data. This can be a Wi-Fi enabled logger or a Wi-Fi
enabled interface combined with a non-USB logger.
• Access to a Wi-Fi network (WLAN) in the place where the Wi-Fi enabled device will
be deployed.
• A PC running a modern web browser (for example the latest versions of Chrome,
Firefox, Internet Explorer, Opera or Safari)*.
• A LogTag Online account. A valid email address that you can access from the
computer you will use for the setup is required to set up your account.
Onceyouhaveconguredyourdevice,younowneedtoregisteritonLogTagOnlineby
visiting https://logtagonline.com.
Creating an account is free and easy to do. Follow the Creating your Account section on
the next page to get started or if you need help.
*LogTag Online is highly recommended with the latest version of the Chrome web browser
To use LogTag Online you need:
Getting Started with LogTag Online

Page 5
LogTag Mobile App allows users to access LogTag Online (LTO) in an app instead of
the internet browser and can be used by new or any existing LTO users.
LogTag Online is a Cloud-based online environmental management system providing
alarmnotications,compliance,recordstorageandreportingfunctions.
The LogTag Mobile App also gives users the ability to view and download LogTag
data in the cloud, and allows the sharing and securing of the data using a permissions
system, all on a mobile device.
For more information about the LogTag Mobile App, please visit:
https://logtagrecorders.com/online/lt-mobile
Available on the App Store
Minimum operating system requirements:
iOS 14.0 or later. Android 9 (Pie) or later.
LogTag Mobile App
Google Play and the Google Play logo are trademarks of Google LLC.
Apple logo® and App Store are trademarks of Apple Inc.
Get it on Google Play

Page 6
LogTag Online context-sensitive help
You now have support readily available
with LogTag Online context-sensitive
help. LogTag Online context-sensitive
help provides you support content all in
one place, saving you time and giving
you the opportunity to learn your way
around LogTag Online quicker whilst
simultaneously using it.
Tip: Watch the video inside the context-sensitive help view pane or click read
more for more information. With LogTag Online context-sensitive help, it's only
one click away to videos, help articles, FAQ and more.
The content populated in the context-sensitive help is relevant and interactive to
the current screen/window you have open or are on. This help area always opens
on the right-side without interrupting your navigation in LogTag Online.
1. At the top right, select the question mark icon to view relevant help
and FAQ articles.
2. Select the cross icon at the top right to close.

Page 7
View Single-Use Logger Data without Account creation
Logger Transit Data
Data from single-use* loggers uploaded via LogTag Xpress (LTX) can now be viewed on
LogTag Online without creating an account. (This function is mainly intended for transit
users).
LogTag Xpress
1
can be downloaded and installed by going to https://logtagrecorders.
com/ltx/ of the LogTag website:
Once you have installed and opened LogTag Xpress, follow instructions on how to
upload your logger data to LogTag Online, by following the steps in LogTag Online
chapter of the LogTag Xpress manual.
1. Go to logtagonline.com, on the main
login page, scroll down to where
'Logger Transit Data' is and enter your
single-use* logger serial number (SN).
(This is the 10-12 digits).
2. Select the 'View' button.
3. ChartPDFreportandLTDle(s)**are
available to download as shown on the
left side bar.
All data are in UTC time zone. (see the
screenshot on the next page).
1
OnnewinstallationsofLTX(Version1.2.2onwards),uploadinglestoLTOsettingisenabledbydefault.
*Currently not compatible with humidity single-use loggers.
**DownloadLTDleandopeninLogTagAnalyzertoview/exportdataindierentformats.

Page 8
END OF SECTION
Logger Transit Data View
View and Download Single-Use Logger Data
Note: If you attempt to enter a SN of a single-use logger without uploading logger
datarstinLTX,anerrormessage“Currentlynoviewabledata-hasthedatabeen
uploaded?” will show up. If you see this message, please remember to follow instructions
outlined in the previous section, prior to using Logger Transit Data view.

Page 9
Creating your account
Onceyouhaveconguredyourdevice,
you now need to register it on LogTag
Online by visiting https://logtagonline.com
Creating an account is free and easy to
do.Simplyclick“CreateanAccount”to
begin the sign up process.
1
2
3
4
5
6
7
8
9
1. (Required)Yourrstname.
2. (Required) Your last name.
3. (Required) Your email address.
4. (Required) Provide a password that is at least 8
characters. Password must contain 1 lower case,
upper case, numeric and special character.
5. (Required) Repeat the password again to ensure it
was entered correctly.
6. Select between Celsius or Fahrenheit for your
account.
7. Select your local time zone from the drop-down.
8. SelectyourTeamProletypeasGeneral,Transitor
VFC user from the drop-down.
9. Basic accounts are free but, if you have been
given an Activation Code, you can enter it here
to activate any additional features you have
purchased. You can enter additional codes at a
later point.
10. IfyouwishtoreceiveSMSnotications,selectthe
country from the drop-down then enter your full
mobile number.
11. If you provided a US mobile number, please select
your mobile service provider from the list. If your
providerisnotlisted,pleaseselect“other”.
12. Check 'I grant Support full access to team' box
if you want to allow distributor access to your
account(s).
13. Check the Terms & Conditions box to proceed to
'Next Step'.
10
11
13
12

Page 10
Conrmyouraccountregistrationbyclickingthevalidationlink(within30minutes)sent
to your email used in the account sign up.
END OF SECTION
Creating your account (Continued)...
Once you have done this, sign in using the email address and password you provided.

Page 11
Dashboard Overview
1. The LogTag Online logo also acts as a link back to
the dashboard from any page.
2. The current selected team you are in. If you are
in more than one team, select the team from the
drop-down by clicking the arrow.
3. TheNoticationsmenu,whenclicked,displaysa
drop-down of any active events that require your
attention such as an alarm excursion detected
in one of your Locations or shipment. Clicking
thenoticationwilltakeyoutothatLocationor
Shipment for you to inspect/acknowledge the issue.
Thealarmicon'Notications'willberedifthereis
atleast1notication.Pleaserefertothe
'EventNoticationList'section for more information.
4. To open the LogTag Online context-sensitive help.
5. When clicked, the Account menu will display a
drop-down with various options for account details,
activation code, team management, event log,
support and signing out.
6. The top right of your Dashboard displays the
current usage as per your account restrictions.
7. “CreateLocation”isaneasy-accessshortcutto
creating a new Location for your account/team.
Whenyourstsignin,youarepresentedwiththeDashboard,youroverviewtoeachof
the key features available on your account.
8. When you create a Location, it will automatically be
pinned to your Dashboard. You can pin and unpin
Locations from the main Location page and clicking
the“plus”or“minus”sign.PinnedLocationswillonly
appear on your account and not anyone else part
of your team. If you have no Locations created or
pinned, an additional button to create a Location
will be displayed.
9. Hover over the current Location status area to see
morenoticationinformationwithunacknowledged
events.Thiscanbealarmnoticationyettobe
acknowledged, or additional information about the
typeofnotications.
10. IfyouareusingLogTagOnlineasanonlinele
storage or haven't attached a Logger to a Location
then the Loggers data will sit on the LogTag Drive
page. This table provides a list of the most recent
lesyou'veuploadedtoLogTagOnlinefromthose
Loggers not attached to a Location.
11. This table provides a list of your most recently
registered devices. This includes Loggers and
Interface Cradles. If no devices have been
registered, you can register a new device.
12. Present at all times, the bottom navigation bar is
your way of switching between the core features
of LogTag Online. The page you are currently on is
always highlighted.
1
2
3
4
6
7
10
119
5
12
8

Page 12
My Account, Activation Code & Messaging
To access your account details,
select “My Account” from the
top right drop-down menu which is
visible from any page.
Here you are able to immediately make any required changes. As soon as you have
changedoneoftheelds,the'SaveChanges'buttonwillbecomeavailable.Youcan
changeyouraccountpasswordbyselectingthe“ChangePassword”buttonthenfollow
the on-screen instructions.
If you want to leave a team, you can choose to leave team by clicking the 'Leave Team'
button. Please note, you cannot undo this action.
Account Details
ReceiveSMS/WhatsAppNoticationsviaMobilePhone
Warning: If the mobile number saved in your 'My Account' details failed to receive an
alert,thephonenumberwillbemarkedas“Unveried”andwillstopreceivinganyalerts
untilthe“SaveChanges”buttonhasbeenresubmitted,afterupdatingtothecorrect
mobilenumber.Thisistopreventunwantedconsumptionofnoticationunitsifaphone
number is not working.
Page 13
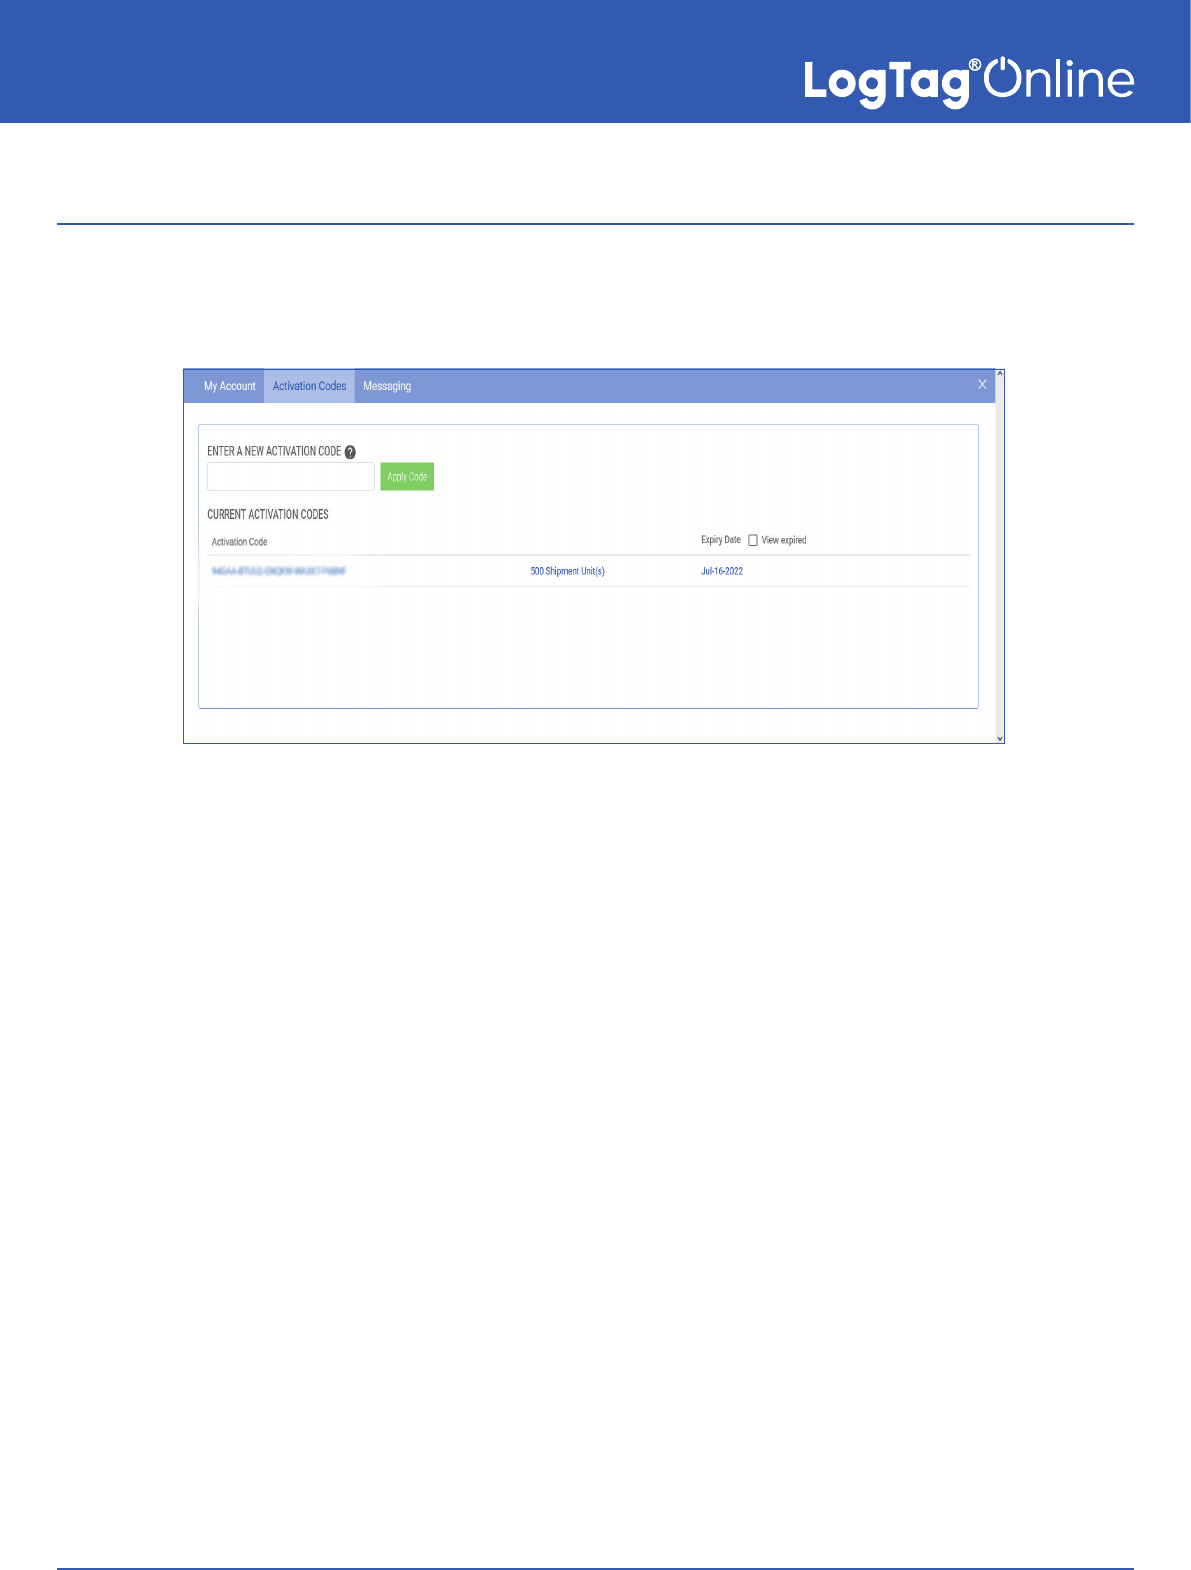
Activation Code
The“ActivationCodes”taballowsyoutoenternewActivationCodesorviewexisting
ones.
• Typeorpasteyourcodeintotheboxprovidedandclick“ApplyCode”.Youwillnow
see it in the list below. The list keeps a full historical record of all the Activation
Codes you have applied to your account along with useful identifying information
suchashowmanyLocations,shipmentandnoticationunit(s)weregrantedand
when the code is due to expire.
• Codes that have expired will still be visible on the list but greyed out. Location
Code(s) that are due to expire soon are highlighted in red with 'Expires Soon!'
reminder text next to the code nearing the expiration date. You are able to renew
nearly expiring Location code(s) by clicking the 'Renew' link and inputting your
replacement code(s) which are provided by the distributor(s).
Note: North American Customers who already have an activation code loaded
against their account can now purchase a replacement code directly online when it
expires - see the next section.
Reminder: If an activation code is entered incorrectly, this will come up invalid. Please
check that you have entered it correctly.
Activation Code(s) activates the paid-for-features in your LogTag Online account.

Page 14
Prepay
(Currently only available to North American customers)
The 'Prepay' tab allows permitted* North American customers, to purchase activation
codes directly online using a Credit Card, via a secure payment platform called Stripe.
*If you do not have this feature shown for your team and are interested in gaining
access, please contact your local distributor for more information.
1. Select the quantities you require for your team, then ensure to check and agree to
the Term's and Conditions before proceeding to checkout.
2. Continue to follow the on-screen prompts on a separate Stripe checkout page to
complete the payment process.
3. Oncethepaymenthasgonethroughsuccessfully,aconrmationreceiptemailwill
be sent to the email address inputted at the checkout page.
Activation Code / Prepay
North American Customers who already have an activation code loaded against their
account can now purchase a replacement code when it expires or add additional codes
to their team to expand the number of paid locations. This can now all be purchased
directly on LogTag Online using a Credit Card, via a secure payment platform called
Stripe.
Purchase Activation Codes online with Stripe
(Currently only available to North American customers)

Page 15
This is now auto-loaded in your LogTag Online account and the new balance is
updated.
Note: ShipmentUnitswillonlybedisplayedforTransitProleusers.
Activation Code / Prepay (Continued)...
End of Section

Page 16
WhatsApp messaging:
In order to receive messages via WhatsApp, please ensure you have the
WhatsApp application installed prior to using this feature.
If you would like to receive SMS message(s) via WhatsApp, the team admin/owner can
enable this option in the 'Manage Team' settings of the account or in the Team settings
wheneditingeachteammember/adminprole.Onceassigned,themembersgranted
permission to receive WhatsApp messages can activate this feature by individually
logging into their account, going into their 'My Account' settings, then checking the
'Receive SMS messages in WhatsApp' box.
Note: If this feature is disabled in 'My Account' settings, please notify your team owner/
admintobegrantedpermissionrst.
Important: Once the WhatsApp feature is enabled, the user will no longer receive alerts
as SMS messages but instead as WhatsApp messages.
1. The remaining current credit balance displays on
the top left of the Messaging table.
2. Click next to the column header to sort the column
in either ascending or descending order. This works
for all column headers.
3. The 'Export' button allows you to generate a CSV
leofthemessagingrecordlog.
4. Log of all messages sent by SMS/WhatsApp and/
or Email are displayed.
1
2
3
4
Messaging
Messaging
The“Messaging”tabshowsalogofallmessagessent(ifyouhavenoticationsettings
conguredtoreceivemessages).Usersreceiveanumberofnoticationcredits
when they sign up with a paid account. These credits are used each time an SMS or
WhatsApp message is sent. The event, date/time, recipient, and the name of contact
person the message was sent to is recorded.

Page 17
Manage Team - User
1. The current selected team name and the remaining
Messaging Balance.
2. List of all members belonging in your team type in
point (1).
3. The 'Users' tab allow Team Owner(s) and admin(s)
to invite someone to your team, all you need is their
email address. They don't require a LogTag Online
account prior to you inviting them. If they don't
have an account, they are prompted to create an
account as part of the invitation process.
4. Enter a valid email address to invite new user to the
team.
Note: By default, if the added user accepts the
invitation, the team's location(s) will be pinned
automatically to their dashboard.
5. Areas are a hierarchal way to both manage a
large number of Locations and also control who
in your team can see what. By default you have 1
1
2
5
3
4
6
7
8
Please Note: This setting is only viewable to Team owners or Administrators for the
selected team. Click next to the Team user name via the 'Edit' link if you wish to change
each team user details such as role type, Area, Mobile Number and allowing 'Receiving
SMS messages in WhatsApp'.
To manage your team's settings,
select “Manage Team” from the
top right drop-down menu which is
visible from any page.
Area which is the top level of your team. For more
information on Areas, view the Area setup part of
thisguideunder“Locations”.
6. In addition to Areas, you can select a role for the
person you are inviting to your team:
Team Owner - Full access to team features.
Responsible for subscriptions.
Administrator - Manage devices, locations and
team members. May assist with subscriptions.
Member - Manage devices, view and export data.
Acknowledge alarms & submit reports.
View only - Read only access to data and reports.
7. Once you have entered in all the details, click the
“Invite”buttontosendtheinvitationemail.
8. Pending invitations are listed here. Click 'Revoke
Invite' if you wish to cancel the invitation next to the
email address.

Page 18
Manage Team - Team
4. Selectfromthedropdowndierentteamprole
type(s) between General, VFC and Transit user.
5. Select CSV date format. This is the format that
appearsintheCSVlesexportedinLogTagOnline.
Please Note: All account dates by default is in the
US CSV format setting.
6. Check/Uncheck whether you would like distributors
to access to and/or allow support access to team
account.
7. Check/Uncheck 'Allow WhatsApp alert feature'
setting to enable receiving WhatsApp messages
8. Onceyouhaveupdateddetails,clickthe“Save
Changes' button to save changes.
5
4
1
2
3
6
7 8
1. If you are the Team owner or administrator, you
can edit user settings by clicking the 'Edit' link in
the 'Action' column next to the team member name
you would like to edit. In there, you can change role
type of the user*, select Location Area, change
mobile number and enable/disable 'receive SMS
messages in WhatsApp'. If you are the Team owner
or administrator, there is also an option to remove a
member from a team by clicking the 'Remove From
Team' link. A warning message will appear before
you proceed. If you are a member, then there an
option to 'Leave Team' in My Account settings.
2. Change Team name if you wish to identify between
multiple teams in your account.
3. Optionally provide your VFC Pin # or Custom ID #
dependingontheTeamProleselected.
The'Team'taballowsyoutoeditTeamsettingssuchasTeamName,Teamprole
type, select CSV/Date format and/or optionally provide your VFC Pin # or Custom ID #
(dependingontheTeamProleselected).
Please Note: This setting is only viewable to Team owners or Administrators for the
selected team.
*You can assign a dierent role type to a user. If you are the owner and assign the owner role to a
dierent user, the owner revokes its role privileges and rights. A warning message appears in yellow
text before you save any new changes. An administrator can also change role type for themselves or
for a member to a dierent role type.
Please note: There can only be one owner in a team at any one time.

Page 19
Manage Team - Signatures
2. Dierenttypeofsignaturesyoucanapplyonle(s)
and shipment(s)
3. Check/Uncheck the boxes to assign the right for
members to sign the selected type of signature(s)
4. Check/Uncheck the boxes to assign the right for
admins to sign the selected type of signature(s)
5. Once you have updated or changed any details,
clickthe“SaveChanges'buttontosavechanges.
1
5
2 3 4
Support for digital signatures is primarily provided for compliance with the US FDA 21
CFR Part 11 regulation - Electronic records and electronic signatures. Various industries,
however,mayndinclusionofdigitalsignaturesbenecialtowardstheirqualitycontrol
and assurance systems.
The 'Signatures' Tab allow Team Owner(s) and/or admin(s) to assign members and
adminsoftheteamtosignLogTagOnlinelesanddeliveredshipments.Theseappear
intheexportedLTDle(s)orindownloadedPDFdocuments.Formoreinformationon
how to apply signatures, please see LogTag Drive and Shipment chapters for more
information.
Please note:SignaturesonLTDlesareviewableinLogTagAnalyzer
version 3.1.10 onwards.
1. If you are the Team owner or administrator, you
can edit user settings by clicking the 'Edit' link in
the 'Action' column next to the team member name
you would like to edit. In there, you can change
role type of the user, select Location Area, change
mobile number and check/uncheck 'receive SMS
messages in WhatsApp'.
If you are the Team owner or administrator, there
is also an option to remove a member from a team
by clicking 'Remove From Team' link. A warning
message will appear before you proceed. If you are
a member, then there an option to 'Leave Team' in
My Account settings.
Forotherusersintheteamtoadddigitalsignaturestodatalesandshipments,the
teamownerandadminsmustrstlyenablethissettinginthe'Signatures'tabofthe
'Manage Team' settings area.

Page 20
Event Log
To view the event activity from your
team, select “Event Log” from the
top right drop-down menu which is
visible from any page.
1. The free form search bar allows you to search the
event log for the selected date and time range.
2. Tickthealarmtypeifyouarelookingforaspecic
alarmortolterthealarmtype(s)intheEventLog.
3. Select the date and time range for 'Date From' and
'Date to' and the 'Time From' and 'Time To' by using
the calendar selector icon.
4. The type of event is listed here such as
User Manual Inspection, Readings Not Displayed,
Alarm Acknowledged, Device Power Loss and/or
other events.
5. The name of the Area and/or Location where the
event occurred.
6. A time and date stamp is provided to record the
exact moment the event happened.
7. If the event involved a member of the team then
their name is recorded against the event.
8. Export a PDF version of the event log for the
selected date and time range.
9. The list of historical events are listed here;
according to the columns above.
10. Use the navigation arrows to switch between
dierentpagesifitdisplaysmorethanonepageof
eventnoticationresults.
The Event Log serves as a comprehensive audit trail for all user and system activity
within your team on LogTag Online.
1
4
2
5
6
7
9
10
8
3
Event Log

Page 21
Toviewthenoticationactivityforyourteam,
selecttheredNoticationsalarmbellfromthetop
banner menu. This is visible from any page.
Note: TheNoticationsalarmbellisclearlylabeled
inredwhenthereisatleast1notication.
1. Select the Alarm Types to view just the alarm you
wanted to see.
2. Event Time to show when the event happened.
3. Alarm type such as Upper/Lower Alarm detected,
Readings Not Displayed, Location Stopped etc.
4. TheAreaand/orLocation,Shipmentaectedwhere
the event occurred.
5. Device/Serial Number for the location or shipment
aected.
6. Click the 'Inspect or Acknowledge' link to inspect
oracknowledgeeventfortheaectedlocation/
shipment.
7. Use the navigation arrows to switch between
dierentpages.
TheEventNoticationListshowsallnoticationactivityoccurringinLocation(s)or
Shipment(s) such as an alarm excursion on LogTag Online.
2
1
3
4
5
6
7
EventNoticationList
Acknowledge or Inspect an alert notication
YouwillseeatableofAlarm(s)/Notication(s)thatneedtobeacknowledged(to
stopreceivingthealerts).ToAcknowledgeorinspectanalertnotication,selectthe
alert activity line then click 'Inspect' or 'Acknowledge' under the 'Action' column. Once
acknowledged, this activity will now appear in the Event Log.

Page 22
Support
To go to the support area, select
“Support” from the top right
drop-down menu which is visible
from any page.
1. Playlist of LogTag Online Tutorial videos.
2. Common FAQs are listed here. Click the plus icon on
the right to display the answer to each question. If
you click 'View all' on the bottom right corner, it will
take you to the main Support area of the LogTag
website.
3. View or download the latest LogTag Online Quick
Start Guide in PDF.
4. Click 'Contact Submit A Ticket' to raise and submit
inquiry requests to a LogTag distributor (based on
your last activated Activation Code).
Someeldsarealreadypopulatedasitobtains
current user name and registered email address
(cannotbechanged).Optionaleldsarecompany
name, logger serial number and 'preferred contact
time'.Fillinthelastmandatorydescriptioneldto
describe the issue you are facing, and if you would
like to provide distributor temporary access to your
account, check the box and then click 'Submit'.
5. The latest version of LogTag Online What's New
features in PDF.
6. 'About' shows the Third-Party Licenses for LogTag
Online.
7. Present at all times, the bottom navigation bar is
your way of switching between the core features of
LogTag Online.
The Support area holds all LogTag Online help and resources such as FAQs, tutorial
videos, quick start guide, as well as creating and submitting support inquiry tickets.
1
2
3
4 5
7
6

Page 23
Devices Overview
RegisteringyourdeviceistherststepforeachnewLoggerorInterfaceCradlethatyou
want to use with LogTag Online. Once registered, that device will now belong to your
teamandcanbeattachedtoaLocationor,usedtouploadlestoLogTagDrive,an
onlinelestorageforyourles,securelyhostedbyLogTag.
Browsetothe“Devices” page from the bottom navigation bar to register your device.
Registering your Device:
To Register your device, you need the 10 or 12-digit Serial Number
(located on the back or base of the device).
Clickthegreen“RegisterDevice”buttontoaddanewdevicetoyourteam.
1. Register a new device to your team.
2. The search bar allows you to look up individual
lesaccordingtoyoursearch.Itltersallcolumns
based on the text matching. There are labels which
canbeaddedthatallowlteringbasedonspecic
columns. Please remember to put quotation marks
to use multiple words in a label search.
Available labels are:
“name:”–DeviceNamecolumnmustcontain
“location:”-Locationcolumnmustcontain
“model:”-Modelcolumnmustcontain
“serial:”-Serialnumbercolumnmustcontain
“before:”–LastConnectioncolumnmustbe
beforethedatespeciedinMM/DD/YYYYor
MM-DD-YYYY format
“after:”–LastConnectioncolumnmustbe
afterthedatespeciedinMM/DD/YYYYor
MM-DD-YYYY format
e.g: LTI-WiFi “after: 06-20-2019”willshowyoules
matching any column containing 'LTI-WiFi' for
dates uploaded after 06-20-2019.
3. If you provided a name for your device, it will be
displayed here.
1
2
3
10
4
65
7
8
9

Page 24
4. The Serial Number of the device.
5. TheModelofthedevicee.g.“LTI-WiFi”.
6. If the device has been attached to a Location or a
Shipment, the Location/Shipment name will appear
here.
7. Displays the date & time of when the device was
last connected to LogTag Online.
8. Theactioncolumndisplaysthe“Edit”linkwhich
you can use to change the details or remove your
device.
9. All registered devices are listed in this table,
displaying the information from the column headers
above.
10. Click next to the column header to sort the column
in either ascending or descending order. This works
for all column headers except the 'Action' column.
Devices Overview (Continued)...
END OF SECTION
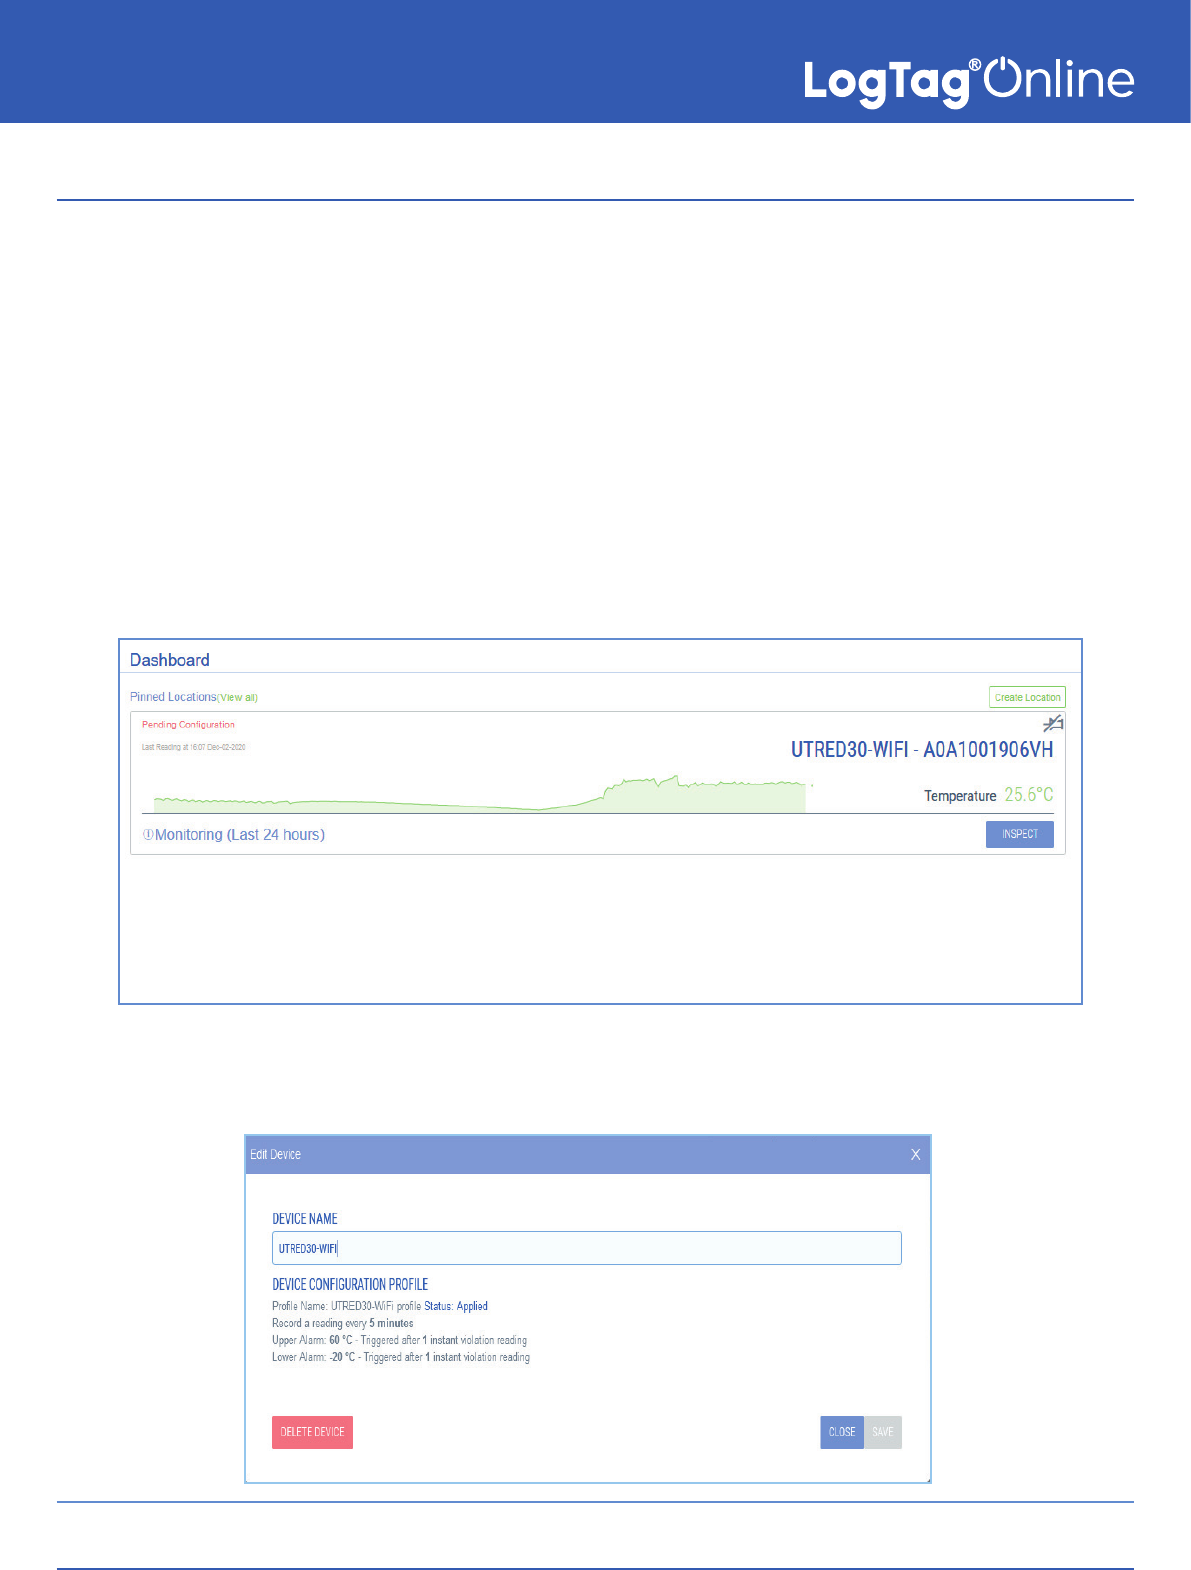
Note: Ifaregistereddevicehasaremotecongurationprole*assignedtothelogger
from the Location 'Settings', when you click the device name or the 'edit' link - in
point(3)and(8),thenitwillbringupawindowdisplayingthe“ProleName'','Device
CongurationProle'andthecurrentstatusoftheconguredprole.
*OnlyavailableonUTRED/UTREL30-WiFimodelswiththelatestrmware.If you want to
updatetothelatestrmware,pleaseconnectyourlogger(s)toyourPC,runthelatest
versionofLogTagAnalyzer,select'LogTag'then'Congure'toupdate.
Please refer to Location-Settings&RemoteLoggerConguration section for more
information.

Page 25
Registering a new device
Enter the Serial Number (found
on the base of your product).
Note: Serial Numbers can
include 0's and O's, review yours
carefully.
(Optional): You can provide a
user-friendly“DeviceName”to
identify the device with more
ease.
Click“RegisterDevice”whenyou
arenished.
Your device is now registered and will appear in the “Recently Registered
Devices” section of the main Dashboard or on the “Devices” page
You can repeat the process above and enter your Logger's Serial Number to register that
Logger to your team. However, using any of the LogTag WiFi Interface Cradles, you can
streamline this process by docking the Logger into the connected WiFi Interface Cradle.
After you have docked a logger into a WiFi interface cradle, it will automatically register the
logger with LogTag Online and show it in the 'Recently Registered Devices' section of the
dashboard or show in the 'Devices' page.
You can edit the Logger if you wish to give it a unique Device Name. Alternatively, you can
browseto“LogTag Drive” from the bottom navigation bar to view the data which will be
covered in the next section of this guide.
Registering your Logger(s) with a WiFi Interface Cradle.
Please note: If the Device is already registered, it cannot be registered, unless the
deviceisde-registeredrst.
If you accidentally entered an incorrect Serial Number, delete the device and
register it again with the correct Serial Number.

Page 26
Editing / Deleting devices
ClicktheDeviceNameorthe“Edit”linkoftheDeviceyouwishtoeditordelete.
ViewRemoteDeviceCongurationprole/status:
Alternatively,youcanviewtheremoteloggercongurationprolestatusaddedfrom
in the Location 'Settings' area. This is only available currently on the WiFi loggers:
UTRED30/UTREL30-WiFi(subjecttothemhavingthelatestrmware).Ifyouwanttouse
thisfeature,pleaseupdatetothelatestrmwarebyconnectingyourloggertoyourPC
andrunningthelatestversionofLogTagAnalyzer.Select'LogTag'then'Congure'to
update.
OnceyouhavemadeachangetotheDeviceName,clickthegreen“Save”buttonto
saveyourchangesand/orthenclick“Close”toclosethewindow.
Youcanselectthe“Delete”buttontoremovethedevicefromyouraccount.
Note: Whendeletingadevice-AnylesstoredinLogTagDrivefromthedevicewillnot
be deleted. If the device is a Logger currently attached to a Location, that Location will
no longer have a Logger attached to it.

Page 27
LogTag Drive Overview
LogTagDriveisanonlinecloudstorageforyourles.Similartomanyonlinelestorage
services,youhavetheabilitytoview,manageandexportyourles.
The LogTag Drive is used for Loggers that haven't been attached to a Location.
Note: Anewleentryisgeneratedeachtimeyouuploadaloggerwithoneofyourregistered
interfaces.Assoonasthepagerefreshesyouwillseeanewentryinthelistwithalename
composed from the Serial number and model number of the logger you uploaded.
In the event your device is powered but the WiFi is temporarily unavailable, data will be stored
inthedevice'sinternalmemoryandwillbeuploadedwhenitnextconnectstothecongured
WiFi network.
Upload data to LTO via LogTag Analyzer
If you are uploading data from a logger via the latest version of LogTag Analyzer, the uploaded
loggerlewillshowonthemaindashboardinthe'RecentlyUploadedFiles'sectionorasale
in LogTag Drive. Please refer to the LogTag Analyzer User Guide for more information.
With your device set up and registered with LogTag Online, connect your
WiFi Logger or WiFi Interface Cradle and dock a Logger in the cradle to
upload data to LogTag Online.
1. Thenumberoflesstoredonyourdriveandthe
limit based on your account limits are displayed
here.
2. The search bar allows you to look up individual
lesaccordingtoyoursearch.Itltersallcolumns
based on the text matching. There are labels which
canbeaddedthatallowlteringbasedonspecic
columns. Please remember to put quotation marks.
Available labels are:
“Label:”-Labelcolumnmustcontain
“le:”-Filenamecolumnmustcontain
“device:”-Devicecolumnmustcontain
“serial:”-Serialnumbercolumnmustcontain
1
2
3
4
5
6
7
8
9

Page 28
If you have the LogTag Drive page open when you upload data, the page will
refreshanddisplaytheuploadedleautomaticallyforyou.
“before:”-Dateuploadedcolumnmustbe
beforethedatespeciedinMM/DD/YYYYor
MM-DD-YYYY format
“after:”-Dateuploadedcolumnmustbeafter
thedatespeciedinMM/DD/YYYYorMM-DD-
YYYY format
e.g: TREL-8 “after: 06/01/2019”willshowyoules
matching any column containing 'TREL-8' for
dates uploaded after 06/01/2019. Refer to
'Editing a File' section of this guide.
3. Files can be organized by applying labels (point 8)
to them after they have been uploaded.
4. ThenameoftheleuploadedbytheLoggerwillbe
shown here.
LogTag Drive Overview (Continued)...
5. If you provided a device name for the Logger, it will
be displayed here.
6. The Serial Number of the Logger.
7. Atime/datestampisprovidedofwhenthelewas
uploaded to LogTag Online.
8. Theactioncolumnallowsyoutoeditlename,
assignoraddlabelsand/oroptiontomoveleto
location. You can also choose to share or download
theleinLTD&CSVformats.
9. Click next to the column header to sort the column
in either ascending or descending order. This works
for all column headers except the 'Action' column.
END OF SECTION

Page 29
Viewing a File
Selectingale'sSerialNumberwillopenapopupwindowanddisplaythechartby
default:
1
2
3
4
5
6
8
7
1. The Serial Number and Model of the Logger or
(Start/Date) you are viewing is displayed as the
Chart title.
2. Specify a start date and time to view data over an
earlier period of time.
3. Youcanalsospecifyanenddateandtimetolter
datatoandfromaspecicdateandtimerange.
4. Alternativelyyoucanlterthedaterangeby
4 pre-set date ranges from 1 day to 1 year.
5. This interactive chart displays the temperature/
humidity data from the Logger, just like our
traditional LogTag Analyzer software. Left-click
and drag either horizontal or vertical to make a
selection and release to zoom in. Simply double
left-click to reset the zoom.
The backgrounds are color-coded to match the
Loggers alarms. Temperature and Humidity
Thresholdsarereectedinthebackgroundcolors
(if you have a humidity logger).
Please Note: For the values inside the Non-Alarm
Area, the chart shading is green. For values above
the upper alarm threshold the chart shading is red.
Readings recorded in this area are hotter than
allowed. For values below the lower alarm threshold
the chart shading is blue which means readings
recorded in this area are colder than allowed.
6. The Y axis displays the temperature in either
Celsius or Fahrenheit based on your account
preferences. The temperature recordings will be
rounded to the nearest decimal place.
7. Thetimezonespeciedintheuserssettings.
8. The X axis displays the time in 24-hour format
followed by the date in MM/DD/YY format
Viewing a File - Chart

Page 30
Viewing a File - Reports
The'LoggerData'tabin“Reports”willallowyoutogenerateaPDFversionoftheLogger
Reportforthedateandtimerangeselected.Apreviewisshownbeneaththe“Download
PDF”and“Signatures”button.ThePDFreportprovidesatrip-formatstatisticssummary
ofthele(s),includinganimageofthechart.
Signatures: If you wish to apply a signature, select the 'Signatures' button, a 'Signed
Signature(s)' window will show up (as below). There if you have been granted
permission to apply signatures, select from the dropdown the applicable signature you
wishtosigntothelethenclick'Yes'or'No'buttonintheconrmationmessage.Once
applied, the signature will display as a record stamp in the signatures table and appear
intheentireleforexportedLTDle(s)aswellastheDownloadedPDF.

Page 31
Viewing a File - Reports (Continued)...
The 'Logger Data' tab shows all logger data in a table list format. By default, it displays
results from the beginning to the end of the current day and month.
1
2
3
6
4
1. Select a 'Data List From' date and time using the
calendar selector icon.
2. Selecta'DataListTo'dateandtimetoltertoa
specicdateandtimerangeusingthecalendar
selector icon.
3. TheExportbuttonallowsyoutogenerateaPDFle
of the logger data list for the date and time range
selected.
4. Data list range selected in point 1 and point 2.
If you have a humidity logger, then the humidity
column will also be displayed.
5. Navigation controls are provided in-case you have
more than one page of data, you can use these
buttons to swap between pages.
6. Thetimezonespeciedintheuserssettings.
5

Page 32
Editing a File
• “Edit”allowsyoutochangethelename,create
andassignlabel(s),deletetheleormoveleto
Location.
• “Share”allowsyoutocopyandpastealinkto
anyone outside of your team/LTO as either a CSV
orLTDle.
• “DownloadCSV”or“DownloadLTD”willprovidethe
option to download the data directly as either a
CSVorLTDle.
Note:ifasignaturehasbeenappliedtothele,
thenitwillvisibleinthedownloadedLTDle.
1. Youcaneditthelename.Thisisamandatory
eld.
2. If no existing Labels exist or you wish to create a
newLabel,clickthe“plus”iconontheright.Enterin
a Label name.
This should be something that can later be used
toidentifythisspecicle(s)viaasearch/lter
throughyourles.Onceyouarehappywiththat
Labelname,conrmitbyclickingthe“tick”icon
and it will now be selectable as an option from the
Label drop-down menu. You can assign multiple
labels as you like. You can delete the label by
Assigning Label(s) to your les:
Toremovethelefromyourteam(permanently),selectthe“delete”button.
hovering over the label you wish to delete then
once it turns red, click once to remove.
3. The selected label(s) will appear beneath the
drop-down.
4. Ifyouwishtomovealetoalocation,selectthe
locationfromthedrop-down.Ifyoudothis,thele
will be permanently deleted from LogTag Drive and
this cannot be reverted. Pre-start readings will not
be imported to location and will also be removed
fromthele.Awarningmessagewilldisplaybefore
you save any changes.
1
2
4
3
Click“Edit”fromtheActionarrowtoopentheEditFilewindow.Changingthelenameisnot
optional (Cannot be left blank).
Note: YoucanchangetheCSVdateformatfortheCSVlesfromthe'ManageTeam','Editteam'settings.

Page 33
Locations Overview
A Location represents a static site that you wish to monitor such as a refrigerator or
freezer. Locations are designed to make it easy for an individual or team to monitor,
document and audit that Location with a range of features that make it easy to comply
with most temperature storage regulations such as - daily Min/Max and AM/PM
inspections.
You can also swap out which Logger is being used to monitor that Location at any
time. This means you always have a full-historical record of the Temperature for that
Location, regardless of the Logger being used.
ALocationisauto-createdfortheUTRED30-WiFirstchanneluponregistrationofa
dual-channel logger. Each channel can be assigned to its location.
Notes: When registering dual-channel logger such as the UTRED30-WiFi Dual-Channel
logger,auto-creationofLocationfortherstchannelisonlypossiblewhenthe
Team has a Location slot available. Please refer to Activation Code section for more
information.
1
23
4
5
6
1. The name of your team, followed by an Area name
(if one is selected is displayed here). More on Areas
in the next section.
2. If you are the owner or administrator of the team,
the archive icon will be displayed, allowing you to
view or restore previously deleted Locations.
3. View locations in a table or list layout format.
4. Click“AddaLocation”buttontobringupthenew
Location window.
If you do not see the 'Add a Location' button, you
will need to purchase activation code(s) from your
LogTag distributor (or currently for North American
customers: purchase a new location license via
the Prepay tab made available then follow the
Activation Code / Prepay process in the quick start
guide.
5. The blue side menu is a tree view for your Areas.
By default your team name is the only Area in your
team. More on Areas in the next section.
6. Created Locations appear here.
Page 34
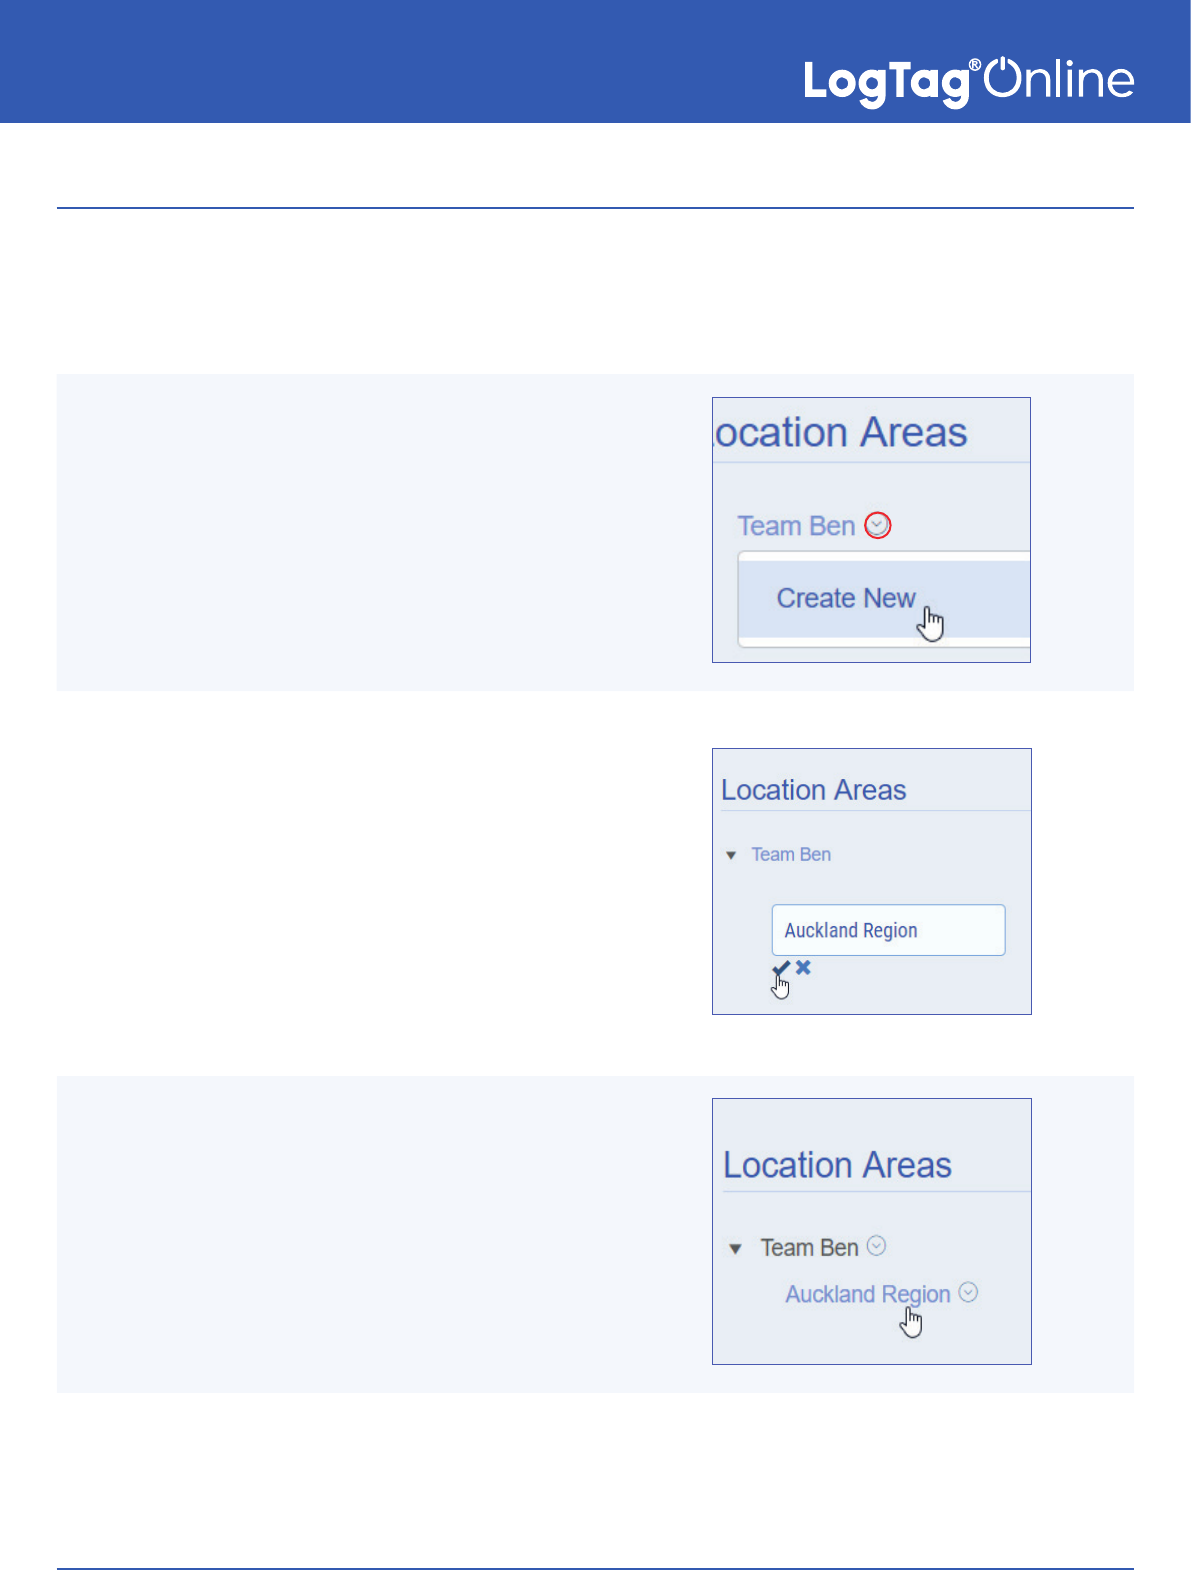
Areas
Areas are a hierarchal feature to manage a team with a large number of members and
Locations. Allowing Team owners or administrators to easily manage and control who
can&can'tseespecicLocationinformation.
Clicking an Area name from the
left-hand menu will display the
Locations belonging to that Area.
Clickingthesmalldownward“arrow”
icon will allow you to create a new
Areabyclicking“CreateNew”.
Enter the new Area name, followed
bythesmall“Tick”icontocreate
the Area.
Clickingthe“cross”iconwillcancel
creating that new Area.
Once created, the Area will become
a selectable option when browsing
the Area side menu or as an option
when inviting a new member to your
team and also when creating a new
Location.

Page 35
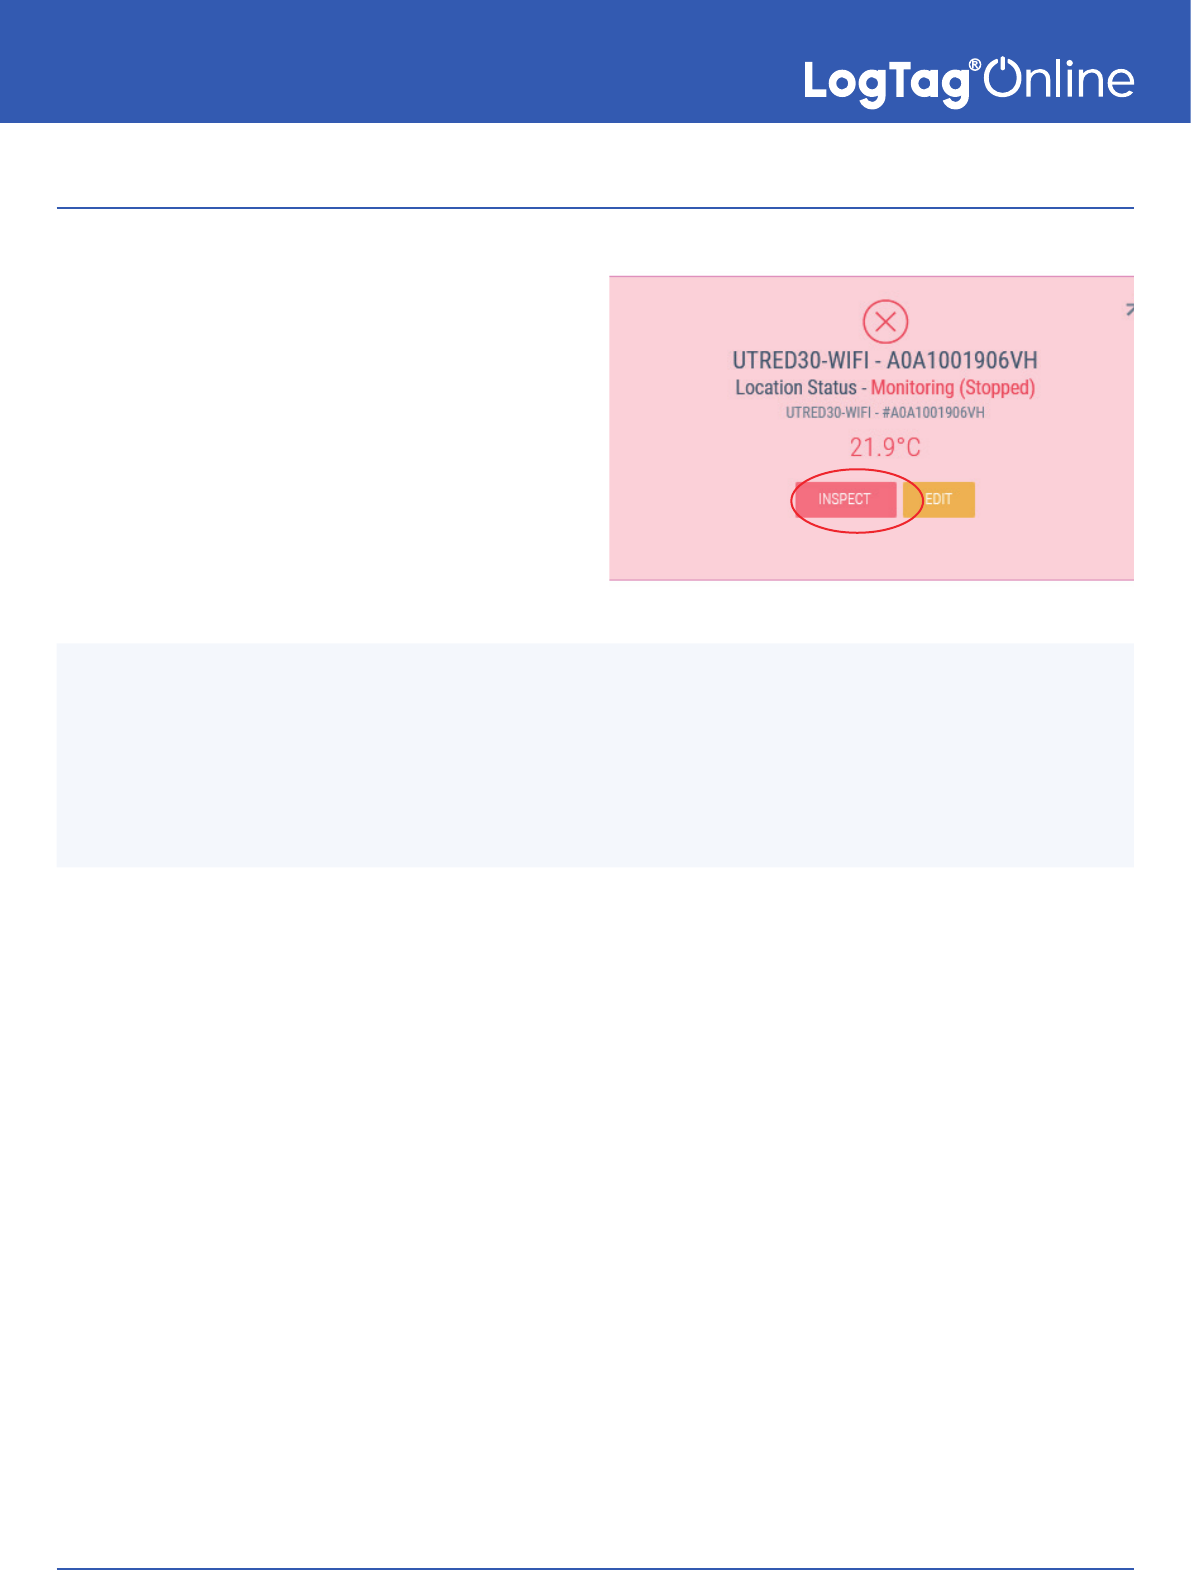
Editing/Deleting a Location
To Edit or Delete a Location, browse to the
“Locations”pagefromthebottommenu.
Your Location(s) will be displayed on the
page like the example in the picture to the
right.
Click“Edit”tobringuptheSettingstab
for that Location. There you can make
anyrequiredchangesandclick“Save”
afterwards.Alternatively,click“Delete”to
remove it from your account.
If you are an Owner or Administrator of
yourteam,youwillseethe“Archive” icon
in the top right corner of the Locations
page.(Ornexttothe“AddaLocation”
button if you haven't yet created a
Location).
Click the icon to bring up the Archived
Locationswindow.Thereyoucanndthe
Location you wish to restore by clicking
the“Restore” button. Click the 'View'
button if you wish to view the Location
details in read-only mode as settings
cannot be changed.
Note: You can only restore the Location if
you haven't reached the maximum number
of Locations.
Tip: You can pin/unpin a Location
to your dashboard by clicking the
small“pin”iconinthetopright
corner.
Restoring a deleted Location:
Page 36
Inspecting a Location
To Inspect a Location, browse to the
“Locations”pagefromthebottommenu.
Your Location(s) will be displayed on the
page like the example in the picture to the
right.
Click“Inspect” to bring up the Day
Summary.
The Day Summary is the activity summary for a Location presented in a
calendar-format. The at-a-glance calendar allows you to view the AM/PM and
Min/Max temperature for each day along with any incidents that have occurred
such as an upper/lower temperature alarm or a missed daily inspection.

Page 37
Day Summary
1. Dierenttabsareavailablewheninspectinga
Location. The Day Summary tab is selected by
default. Please Note: If you are the Team owner or
administrator for the location, the 'Settings' tab will
be made available.
2. The month you're viewing can be changed here via
the month selector icon and will display the current
month by default.
3. The selected day is shaded with a light blue
background, or a red background if you need to
'Create Troubleshooting Record' or 'Acknowledge
Event' on the Day Summary.
4. The little icon(s) on the top left corner shows if an
inspection was carried out. If it is in grey, the
AM/PM temperatures have not been acknowledged
by a team member (Point 7). Once the AM or PM
inspection has been acknowledged, the icon will
turn green.
5. Days with an incident such as a temperature alarm
are outlined in red. If the alarm was an upper alarm,
the Max temperature is displayed in red; if a lower
alarm, then the Min temperature is displayed in red.
6. The selected calendar log date information is
displayed on the left as Day/Month/Year and on
the right for the day selected.
7. The AM/PM temperatures are displayed along
with the time they were taken. To acknowledge the
temperature (for audit/record-keeping purposes),
clickthegreen“tick”nexttoeach.
8. Finally, the Minimum and Maximum temperature for
the selected day is shown.
9. 'Create Troubleshooting Record' and 'Acknowledge
Event' button will be available if there was a
temperature alarm event for that day.
1
2
3
5
6
7
4
8
9

Page 38
Creating a Location
To Create a Location, click the
green“AddaLocation”button
from the Locations page.
1. Provide a meaningful Location Name to help
anyone easily identify what the Location is
monitoring.
2. (Optional)descriptioneldifyouwishtoprovide
additional information to help team members
identify the Location.
3. Select the Logger that you wish to attach to this
Location. The drop-down will show all currently
registered devices belonging to your team.
4. SelectaLoggercongurationproleifyouwould
liketoremotelycongureyourlogger*prole.Ifthe
resellersentanyprole(s)totheteam,thenthe
proleswillshowuphere.
*Only compatible with UTRED30/UTREL30-WiFi
modelswiththelatestrmware
5. If you would like to add any comments for the
Location,lloutthecommentsbox.
6. For VFC users only, select if your Location is a
refrigerator or freezer, this will later be included in
partofthepopulatedeldswhenyou'generate
reports' in the inspect log tab under Location-
Reports.
7. If you added 1 or more Areas, you can specify
which Area this Location will belong to. This will
ensure only team members belonging to that Area
or above will have access to this Location.
8. Specify who is primarily responsible for the
inspection and maintenance of the Location.
9. (Optional) Select a secondary team member to be
responsible for this Location if the Primary person is
unavailable.
10. Select another team member who should be
notieduponanincidentsuchasaTemperature
Alarm.
11. Beforeclicking“Create”,youcancustomizewho
getsnotiedandwhichnoticationtypesfor
speciceventsbyclickingthe“EditNotications”
button. More on the next section.
12. Select the 'Close' button if you wish to close or
cancel Location creation.
13. Select the 'Create' button to save and create the
Location.
1
2
3
4
5
10
11
12 13
9
6
7
8

Page 39
Creating a Location (Continued)...
1
2
3
4
5
1. Alarm Detected: If an upper or lower alarm is
triggered by the logger attached to this location, as
pertheLogger'scongurationsettings.
If you have selected any of the primary/
secondary and/or Emergency contact to be
notied,immediatelythePrimaryandSecondary
coordinators are emailed
2. Connection Timeout: The timeout duration
since the logger last lost connection from taking a
reading with LogTag Online.
If LogTag Online isn't displaying current readings or
has 'Lost Connection' status in the pinned location
dashboard,LogTagOnlinecansendanotication.
Setthespeciedtimebyselectingatime-frame
fromthe“LostConnectionReminder”drop-down
menu.
3. Power Notication: WhentheLoggerrstreports
ithasalowbattery,youcangetnotiedvia
LogTag Online.
4. Daily Inspection:
“Daily Inspection” - Currently this setting is enabled
by default and cannot be disabled. This means the
Day Summary will be enabled which tracks daily
Min/Max and AM/PM inspection records.
“Remote Inspection” - By enabling this, it means you
can acknowledge an AM or PM inspection via
the Day Summary on LogTag Online. This is an
alternative method to traditionally pressing the
Inspection Mark button on the Logger itself.
“Allow Overdue Inspection” - With this enabled, you can
acknowledge an AM or PM inspection on previous
days otherwise the missing AM or PM inspection will
be missing on Reports.
5. Onceyouhavesetupthenoticationshowyou
requirethem,youcaneitherclickthe“GoBack”
button to double-check your Location settings or
click“Save”tosaveyoursettings.
Youcantriggernotication(s)viaEmailand/orSMS(requireactivationcode).You
canalsoselectwhothenoticationissenttobyselectingtheboxesnexttoeitherthe
Primary/Secondary Coordinator or the listed Emergency Contacts.

Page 40
Troubleshooting Records
IfaTemperatureexcursionhashappened,the“Records”tabwillshowrecordsforyouto
complete.
Click“Create Report”tobeginllingoutthe“TroubleshootingRecord”.
Alternatively, you can
select the day from the
Day Summary that is
showing a Temperature
Alarmthenclick“Create
Troubleshooting Record”
Page 41
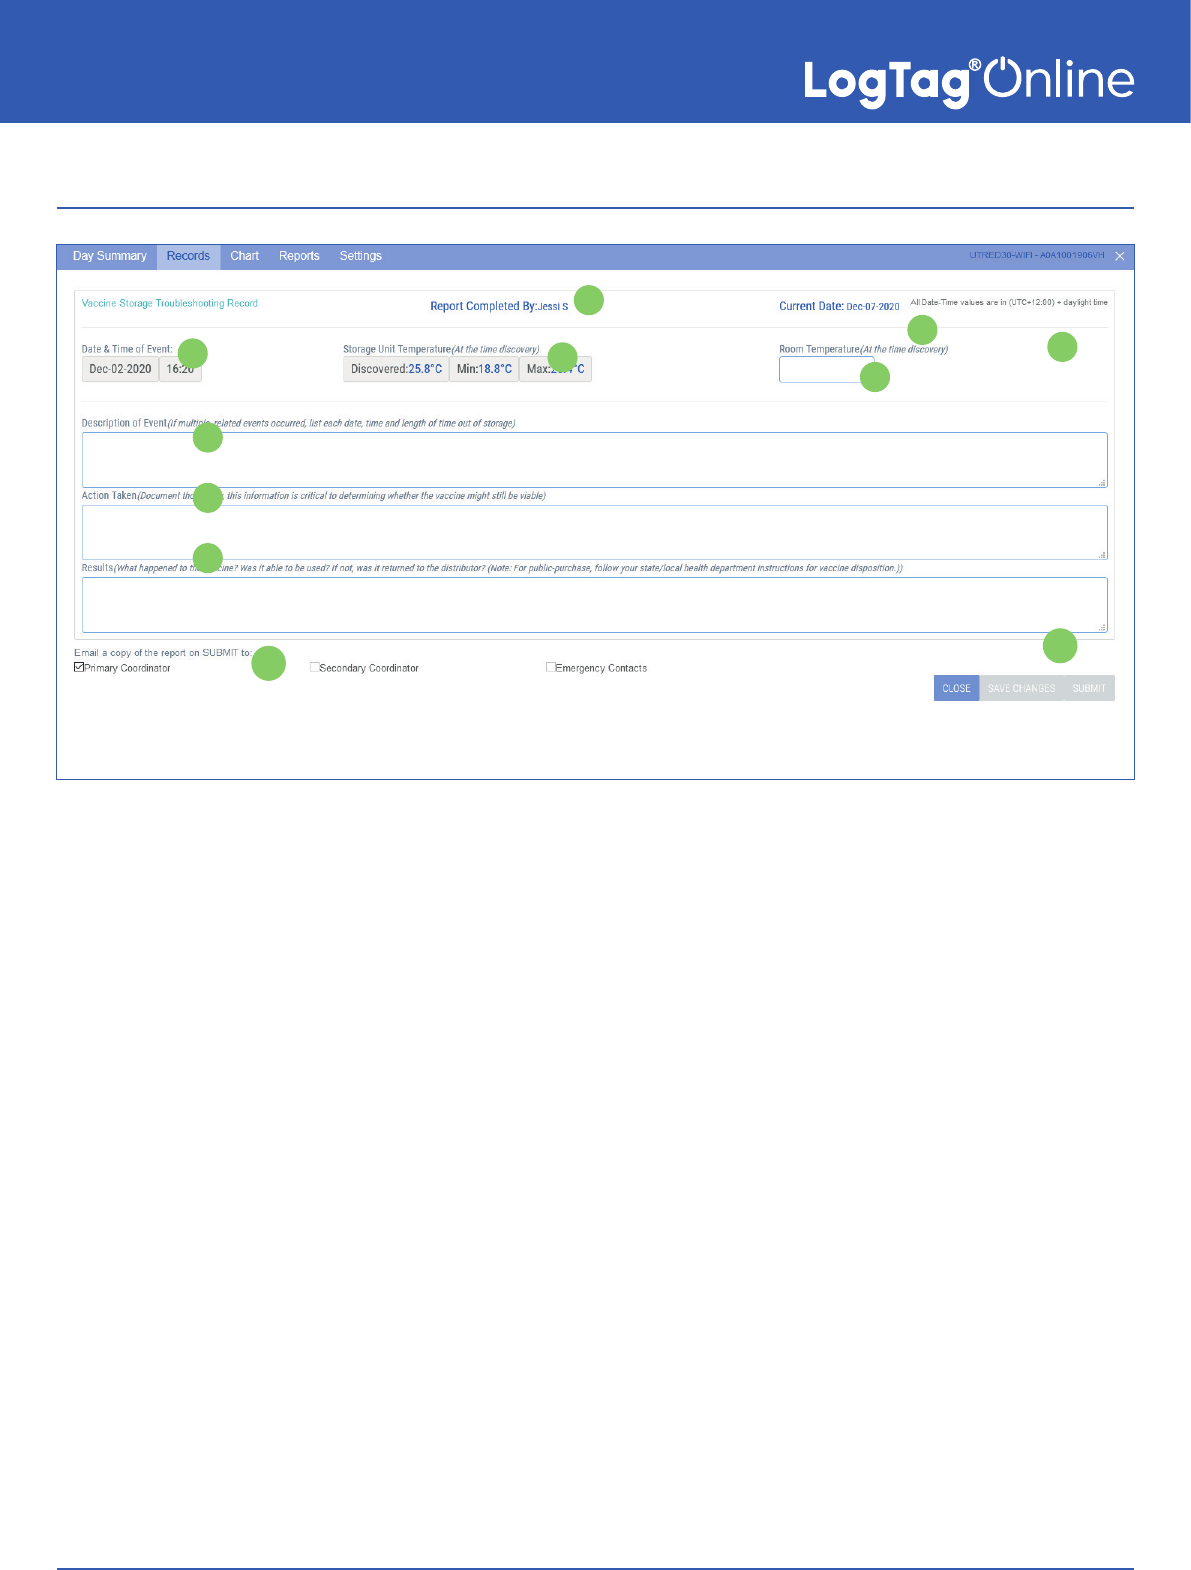
Creating a Record
1
2
4
5
6
7
8
9
10
11
1. Thereportwillpopulatethe“completedby”name
based on the user that is signed in and creating the
report.
2. The current date is also populated based on the
date of creating the report.
3. Thetimezonespeciedintheuserssettingsis
shown on the report.
4. The Date & Time of the temperature excursion is
taken from the Loggers readings.
5. The 'Discovered' temperature at the time of the
excursion started, along with excursions most
up-to-date Min/Max is populated in the record from
the Loggers readings.
6. If required, enter the room temperature at the time
of discovery.
7. Description of Event:
• General description (i.e. what happened?)
• Estimated length of time between event and last
documented reading of storage temperature in
acceptable range. For VFC users: (2°C to 8°C [36°F
to 46°F] for refrigerator; -50°C to -15°C [-58° to 5ºF]
for freezer)
• Inventoryofaectedproducts
• At the time of the event, what else was in the
storage unit? For example, were there water bottles
in the refrigerator and/or frozen coolant packs in
the freezer?
• Prior to this event, have there been any storage
problemswiththisunitand/orwiththeaected
product
• Include any other information you feel might be
relevant to understanding the event.
8. Action Taken:
• Whenweretheaectedproductsplacedinproper
storage conditions?
3

Page 42
Creating a Troubleshooting Record (Continued)...
• Who was contacted regarding the incident?
• For VFC users: (Document thoroughly, this
information is critical to determining whether the
vaccine might still be viable)
• IMPORTANT: What did you do to prevent a similar
problem from occurring in the future?
9. Results:
• What happened to the product? Was it able to be
used? If not, was it returned to the distributor?
• For VFC users: (What happened to the vaccine?
Was it able to be used? If not, was it returned to
the distributor? (Note: For public-purchase, follow
your state/local health department instructions for
vaccine disposition.)
10. Tick the boxes of those of whom you wish to send
a copy of the record to via email once you have
nishedenteringthedetailsandclick“Submit”.
11. If you make any changes or amendments to the
record, click 'Save Changes' before submitting, or
click 'Close' to close the record.
Once created, the Records tab will now display the Report you just created with the
option to edit it.
END OF SECTION

Page 43
Chart
Clickingthe“Chart”tabwilldisplaythechartforthatLocation,similartotheLogTag
Drive Chart.
1
2
3
4
5
6
7
8
9
1. The name of the Location you are viewing is
displayed as the Chart title.
2. Specify a start date and time to view data over an
earlier period of time using the calendar selector
icon.
3. Youcanalsospecifyanenddateandtimetolter
datatoandfromaspecicdaterange.
4. You can export the data to LTD and CSV based on
the dates and time you have selected.
Note: ForLTDles,aconrmationmessage
to show it has been emailed to your registered
account email address will display across the top.
5. Alternativelyyoucanlterthedaterangebyfour
pre-set date ranges from 1 day to 1 year.
6. This interactive chart displays the temperature/
humidity data from the Logger. Left-click and drag
either horizontal or vertical to make a selection and
release to zoom in. Simply double left-click to reset
the zoom. The backgrounds are colour-coded to
match the Loggers alarms. If there are any humidity
and temperature thresholds, the background
coloursarereectedhere.
Please Note: For the values inside the Non-Alarm
Area, the chart shading is green. For values above
the upper alarm threshold the chart shading is red.
Readings recorded in this area are hotter than
allowed. For values below the lower alarm threshold
the chart shading is blue which means readings
recorded in this area are colder than allowed.
7. The Y axis displays the temperature in either
Celsius or Fahrenheit based on your account
preferences.
8. The X axis displays the time in 24-hour format
followed by the date in M/DD/YY format.
9. Chartmarksareshownindierentcolourcodes.
Humidity and Temperature Threshold indicators are
also shown here (if you have a humidity logger).

Page 44
Reports
'LoggerReport'and'LoggerData'tabsarevisibletoallusersinthe“Reports”tab.
Please Note: The 'Inspection Log' tab is only available to VFC users (see screenshot
below). Click the 'Generate Report' button to generate the Inspection Report and view or
download as a PDF for the selected month.
The calendar-format summary of the AM/PM Inspections and Min/Max temperature for
eachdayisgeneratedfromtheloggersreadings.Someoftheeldsarealready
pre-populated in the Temperature Log.
Note: InspectionlogisonlyavailabletoviewinaLocationnotasleviewinLogTag
Drive.

Page 45
Reports (Continued)...
The 'Logger Report' provides a trip-format statistics summary of temperature/humidity
data for the date range selected. The report generates a PDF version which you can
see a preview of underneath or you can download it separately as a PDF by clicking the
'Download PDF' button.
2 1
1
1 1
1
3
4
1. Select a 'Chart From' date and time using the
calendar selector icon. The Time selector is in 24-
hour format.
2. Selecta'ChartTo'dateandtimetoltertoa
specicdateandtimerangeusingthecalendar
selector icon. The Time selector is in 24-hour
format.
3. View or download logger report as a PDF based on
the date and time you have selected.
4. Preview of the trip-format statistics summary and
the PDF logger report including an image of the
chart based on the date and time range selected.

Page 46
Reports (Continued)...
The 'Logger Data' tab shows all the logger temperature/humidity readings and events in
a table list format based on the date and time range selected.
1 2
3
5
4
1. Select a 'Data List From' date and time using the
calendar selector icon.
2. Selecta'DataListTo'dateandtimetoltertoa
specicdateandtimerangeusingthecalendar
selector icon.
3. The Export button allows you to generate a CSV or
PDFleoftheloggerdatalistforthedateandtime
range selected.
Please Note: When exporting to PDF, it will
generateleforupto14,000readings.Pleaseuse
CSV or a smaller date range if you wish to export
above that limit.
You can change the CSV date format in the
'Manage Team', 'Edit Team' settings.
4. Thetimezonespeciedintheuserssettings.
5. Use the navigation arrows to switch between
dierentpagesifitdisplaysmorethanonepageof
data results for the date range selected.

Page 47
Settings
The Location Settings tab allow team owner and administrators to make Location
setting changes and amendments.
Please Note: Members of a team cannot make any Location setting changes as the
'Settings' tab is not available to them.
1. 'LoggerCongurationProle'and'LoggerTimezone'
can be selected on current compatible loggers*
foraremoteconguration.Fornon-applicable
models,theloggercongurationprolewillbeset
as 'Custom' by default. Any logger set with the
'Custom'CongurationProleindicatesthatany
currentloggerprolesettingsloadedinthelogger
made in LogTag Analyzer remains the same and
won'thaveanyeect.
*Currently, only compatible on UTRED30/UTREL30-
WiFiloggerswiththelatestrmware
Note: Any newly selected remote Logger
CongurationProleotherthan'custom'will
overridetheexistingprole(s)inyourlogger.
2. For VFC users, there is an option to select whether
the 'Location type' is a Refrigerator or a Freezer.
3. Team owner(s) and/or administrator(s) are able
to add, edit and/or delete comments to keep a log
of changes to a location, e.g. for recording status
changesofthelogger,dierentconditionsetc.
Note: For VFC users, the comments section is not
available.
4. If you would like to update your Location
noticationsettings,selecttheyellow'Edit
Notications'button.Thenclick'Save'tosaveany
changes you have made or click the 'Go Back'
button to return to the previous Location Settings
window. You can click the 'Delete' button anytime if
you wish to delete the Location. A warning message
willappearbeforeyouconrmthisdeletion.
Please refer to 'Creating a Location' section in
the Quick Start Guide if you need help or more
information.
1 1
1
3 1
1
2
4

Page 48
RemoteLoggerConguration-Prole&Timezone
Pre-setprolesorprolesassigned/sentbyresellerscanbeconguredremotelyon
compatiblemodels(currentlyonUTRED30/UTREL30-WiFiwiththelatestrmware*).
Non-applicable loggers won't work with this feature and will automatically have the
prolesetas'custom'(whichwillholdanycurrentLogTagAnalyzercongurationprole
settings).
Pre-setprolesthatarecurrentlyavailableare:
• Generic Ambient: Lower: 15°C after 2 consecutive violation readings; Upper: 25°C
after 2 consecutive violation readings.
• Generic Fridge: 2°C after 2 consecutive violation readings; Upper: 8°C after 2
consecutive violation readings.
• Generic Freezer: Upper: -15°C - After 2 consecutive violation readings
*In order to use this remote feature properly, the UTRED/UTREL30-WiFi must have
thelatestrmware.Toupdatetothelatestrmware,runthelatestversionof
LogTagAnalyzer,select'LogTag'then'Congure'toupdate.
Note:Ifyouwouldlikemoreprolestobeaddedto'LoggerCongurationProle'(other
thanthepre-setproleslistedabove),pleaseenquirewithyourLogTagdistributor.
Tip: Tospeeduptheprocessofapplyingremotecongurationprole(s)andtimezone
settings on the logger, the user can manually perform a forced connection update
by pressing and holding both the 'FN' and 'Review/Mark' buttons simultaneously for
approximately 6 seconds on the device. For more information on how To initiate the
connection test, please refer to the UTRED30-WiFi product user manual.
Page 49
After any Location settings/changes have been made, when you click out/close
the window, the rainbow ball automatically rotates to indicate a change has been
submitted.
Pleasewaitforthecongurationproleand/orLoggerTimezonesetting(s)tobe
applied...
CongurationProle-Status
Oncetheselectedcongurationprolehasbeenapplied,therewillbea'Pending
Conguration'statusshowinginthepinned'Charts'sectionofthemaindashboard(if
your Location is pinned - as seen in red text below) or when you select the device, in the
devices window of the 'Edit Devices' area, you can also see the status there
Whentheprolecongurationhasbeensatisfactorilyapplied,'PendingConguration'
status will disappear from the main pinned Location dashboard and the 'Status Applied'
messagewilldisplayintheprolecongurationsettings,whenyouclickintothedevice.
RemoteLoggerConguration-Status
END OF SECTION

Page 50
Transit Overview
Shipments are created to make it easy for an individual or team to monitor, document
and audit shipment(s) using a wide range of features such as receiving Shipment
Notications,viewingshipmentstatusand/orreportsaswellasreviewingfull-historical
records.
If you are on a free account, you are unable to use any Shipment features. Pay-as-you-
go Shipment Features are available to purchase. Please inquire with your distributor to
purchase activation code(s).
Note: North American customers can now use the new 'Prepay' feature to purchase
directly online). Refer to Activation Code / Prepay section of the Quick Start Guide.
If you are the owner of a Team, to change
yourTeamProle,simplybrowseto
“Manage Team” from the top right
drop-down menu.
Next,click“EditTeam”inthetoprightof
the Team window.
Here you will see various options that
controldierentaspectsofhowLogTag
Online will operate for your team. One of
theseis“TeamProle”.
Select“TransitUser”fromthedrop-downmenu,thenclick“SaveChanges”.Youcan
close the Team window now.
Tip:FeaturesinLogTagOnlinecanbetoggleddependingonyourTeamProle.This
helps hide features and options that won't apply to your team to avoid potential
confusion.

Page 51
Transit Overview
SuccessfulactivationoftheTransitUserprolewill
reveal the 'Shipments' tab in your footer navigation.
Once you have selected the 'Shipments' page, this is
the main dashboard.
1
7
3
Transit Overview
4
2
5
6
9
11
10
8
1. You can create a single Shipment or bulk
shipments, depending on your requirements.
Please refer to Creating a single/bulk shipment in
the next section.
2. Shipment defaults allow you to set default Shipment
Noticationsettings,soitpopulatesthesesettings
each time you create a single or bulk shipment;
as well as adding additional information on the
shipment for references e.g. Load ID, etc.
Note: If shipment defaults were never created or
modied,thepersoncreatingtheshipmentwill
automatically become the primary coordinator by
default.
3. Thesidepanelcategorizesdierentstatus
types for each shipment. By default the 'All' tab
is selected. Filter the Shipments based on their
Activity status.
Please Note: If there is an alarm excursion event
that occurred in a delivered shipment, the row will
be shaded red and will also be recorded in the
'Event' status tab.
4. Select a 'Shipment From' date and time using the
calendar selector icon.
5. Selecta'ShipmentTo'dateandtimetoltertoa
specicdateandtimerange.
6. The free form search bar allows you to search or
lterthelistofShipmentsbasedonacustom
date-time range or serial numbers etc.
7. All the shipments; present or past are listed here in
the log. Select the shipment you would like to view
in more detail by clicking it, a separate 'Shipment'
window will appear. Refer to next sections for more
info.
8. Navigation controls are provided in case you have
more than one page of shipments, you can use
these buttons to swap between pages.
9. Click next to the column header to sort the column
in either ascending or descending order. This works
for all column headers.
10. Present at all times, the bottom navigation bar is
your way of switching between the core features of
LogTag Online.
11. Creating a Shipment requires Shipment Credit(s).
These can be purchased from your LogTag
Distributor.

Page 52
1. Added device S/N (from Point 3) appears here.
Click the pencil icon if you wish to add a device
label or a logger name, or click the trash bin icon if
you wish to remove the device from the shipment.
Please note: A maximum of 5 serial numbers can
be added per shipment.
2. The Shipment will be given a default name which
you can modify or leave.
3. Scroll through the table list of registered loggers
within the team, select the highlighted logger you
wish to attach, then click 'Add to Shipment'. If you
would like to add multiple loggers to a shipment
(max 5), hold the CTRL key and select multiple
loggers, then click 'Add to Shipment'.
4. Enter the device S/N here manually to add to the
logger list or select from the registered loggers
table list in (Point 3).
Please Note: If the logger is already registered
toadierentteamorashipmentalreadyexists
for the device, a warning message will appear and
won't allow you to add this S/N to the shipment. If
you manually enter in a device S/N that didn't exist
in the team, it will automatically register this in the
'Registered Devices' section.
5. If you entered any 'Additional Info' in 'Shipment
Defaults', the information will appear here
6. Select the 'Start Date' for the shipment using the
calendar selector icon.
7. Select the 'End Date' for the Shipment using the
calendar selector icon.
8. Select the 'From Origin' area from the
drop-down. The drop-down shows all the areas
already registered within the team. You can also
manuallytypetheareanameintheeld.
9. Select the 'To Destination' area from the
drop-down. The drop-down shows all the areas
already registered within the team. You can also
manuallytypetheareanameintheeld.
10. Select“EditNotications”tomodifyyour
noticationsettingsforthisShipment.Notications
work the same as Locations. If you have set
shipment defaults in the main Shipments
dashboard, those settings will be auto-populated in
here.
11. Click 'Create and Start' to create the shipment and
start shipment in 'In-Transit' mode.
12. Click 'Create' to create shipment and start this in
'Pending' mode.
13. Click' Cancel' to cancel shipment creation.
Creating a Shipment
2
1
3
13
1211
10
9
4
7
8
6
5
Your shipment is now created and will appear in the main Shipments Dashboard.

Page 53
Creating Bulk Shipments
You can create multiple shipments at once, using the 'Bulk Shipments' button in the
shipments tab, next to 'Create Shipment'.
Simply leave a blank line between serial numbers which indicates a separate shipment.
Therstlineofeachshipmentcanbeashipmentname.
Please note: Up to and including a maximum of 5 serial numbers may be added per
shipment. However, there is no limit in the number of bulk shipments you create.
If you have set shipment defaults in the main Shipments dashboard, those default
settings will be populated when a shipment or bulk shipment is created, without having to
repeatedly input this information.
Select the 'Create' button to start in 'Pending' mode or 'Create & Start' bulk shipments in
'In-Transit' mode. Click 'Cancel' if you wish to cancel shipment creation.

Page 54
Shipment Info
1. The name of the Shipment you are viewing is
displayed as the Shipment title. The shipment
status and the duration of the shipment is
displayed underneath.
2. Your shipment overview details are displayed here
including 'Additional Info' (if there is any)
3. The 'set delivered' button allows user to manually
set the logger to delivered. However, if there is no
uploaded logger data, the logger status will be
deemed 'Missing'.
4. Add any comments you want for this shipment by
putting your comments inside the comment box
then click 'Save' or 'Cancel' to proceed. You can
'edit' or 'delete' the comment by clicking the pencil
or the trash can icon next to the comment.
5. If there is no alarm event in the logger during the
shipment, the tick symbol will appear here; if there
was an alarm event that occurred for the logger
during the shipment, the cross symbol will display.
6. The device S/N attached to the shipment is
displayed here. If you have more than one serial
To view Shipment details, select a Shipment to open the Shipment window. By default,
the“ShipmentInfo”tabisselected.
5 9
1.1.2
4
1
6 7
8
10
number attached in the shipment, each one will be
listed here in this column.
7. Add a description to the serial number of the
shipment. You can edit and/or delete your own
comments by clicking the arrow in the action
column. Click the 'update' or 'cancel' button to
conrm.
8. Select where in the shipment the logger is exactly
located in the load.
9. The logger model for the S/N is displayed here.
10. The current status of the shipment for the attached
logger.
11. The Action column provides you the option to edit
Description, change shipment status and/or remove
logger from the shipment.
Please Note: If your shipment has been delivered,
you are no longer able to make any changes as
these settings will become disabled.
12. Click next to the column header to sort the column
in either ascending or descending order. This works
for all column headers except the 'Action' Column.
11
3
12

Page 55
Chart
Selectingthe“Chart”tabwilldisplaytheinteractivetemperature chart for the logger
attached to the Shipment, similar to the LogTag Drive and Location Chart.
1
2
6
7
1. The name of the Shipment you are viewing is
displayed as the Chart title.
2. Specify a start date and time to view data over an
earlier period of time using the calendar selector
icon.
3. Specifyanenddateandtimetolterdatatoand
fromaspecicdateandtimerange.
4. You may export a multi-logger shipment as a
zippedsetofLTDorCSVles,orindividualLTD
andCSVlesbasedonthedate(s)andtime(s)you
have selected.
Please note: Any signature(s) applied in the
'Report' tab for delivered shipments, will appear in
theexportedLTDlesinLogTagAnalyzerv3.1.10
onwards.
5. This interactive chart displays the temperature/
humidity data from the Logger. Left-click and drag
either horizontal or vertical to make a selection and
release to zoom in. Simply double left-click to reset
the zoom.
6. The Y axis displays the temperature in either
Celsius or Fahrenheit based on your account
preferences.
7. The X axis displays the time in 24-hour format
followed by the date in M/DD/YY format.
8. Check/Uncheck serial number(s) for the logger(s)
on the left side panel if you wish to view the chart
for selected serial numbers only.
Note:Onlyloggerswithastatusof“Delivered”are
displayed in the Shipment multi-chart.
1
2 3
4
5
7
8
6

Page 56
Report
The 'Logger Report' provides a trip-format statistics summary of temperature/humidity
data for the date and time range selected and allows you to preview or download it in
PDF. Please note: If there are multiple loggers in the shipment, it will show temperature
statistics for each logger with data in the shipment.
Signatures: If you wish to apply signature to delivered shipment(s), click the
'Signatures' button, a separate Signatures window will show up. There if you have
been granted permission to apply signature, select from the dropdown the applicable
signaturetothelethenclick'Yes'or'No'buttonintheconrmationmessage.Once
applied,thesignaturewilldisplayintherecordstableandontheentirelewhen
exportedasLTDle(s)inthe“Chart”taboftheShipmentwindow.
1. Select a 'Chart From' date and time using the
calendar selector icon.
2. Selecta'ChartTo'dateandtimetoltertoa
specicdateandtimerangeusingthecalendar
selector icon.
3. View or download logger report as exportable PDF
based on the date and time you have selected.
The PDF report provides a trip-format statistics
summaryofthele(s),includinganimageofthe
chart.
4. You are able to put signatures for delivered
shipmentsonlyifyouhavebeenrstgrantedthis
permission by the team owner and/or admin.
5. Preview of the trip-format statistics summary and
the PDF logger report including an image of the
chart, based on the date/time range selected. If
you have multiple loggers in the shipment, they all
appear here.
2 1
1
3 4
5
4

Page 57
Report (Continued)...
The 'Logger Data' tab shows all the logger temperature/humidity data and event(s) in a
table list format based on the date and time range selected.
1
2
3
4
5
6
1. Select a 'Chart From' date and time using the
calendar selector icon.
2. Selecta'ChartTo'dateandtimetoltertoa
specicdateandtimerangeusingthecalendar
selector icon.
3. TheExportbuttonallowsyoutogenerateaPDFle
of the logger data list for the date and time range
selected.
4. Click next to the column headers to sort the column
in either ascending or descending order. This works
for all column headers.
5. Click the Funnel icon in the Serial Number column if
youwishtolterdataforspecicserialnumbers(if
you have multiple serial numbers in the shipment).
A small separate window will give you the option
to type the serial number in the search bar, or by
selecting/deselecting serial number(s) in the table
list. Select 'Filter' to proceed or 'Clear button' if you
wish to close the window.
6. Thetimezonespeciedintheuserssettings.

Page 58
Map
The Map tab allows the user to view where the shipment is located in a map format. The
last known location is indicated with a pin (marker).
Note: This feature is only available for shipment with supported geolocation-capable
loggers.
1. Select the pin to display the following;
• logger serial number,
• the time and date of the last known location
(sent),
• last known temperature and when it was recorded.
2. Select the + - icons to zoom in and out of the map.
Alternatively, select anywhere on the map then use
your mouse scroll to do the same.
2
1
1

Page 59
Settings
IfyouwouldliketoupdateyourShipmentnoticationsettings,selecttheyellow'Edit
Notications'button.Thenclick'Save'tosaveanychangesyouhavemadeorclickthe
'Go Back' button to return to the previous Shipment Settings window.
The 'Settings' tab allows you to make any required changes to Shipment details and
the logger attached to the shipment. This tab is identical to the 'Creating a Shipment'
screen and allows you to edit existing information and save it against the Shipment you
are editing.
Please refer to 'Creating a Shipment' section in the Quick Start Guide if you need help or
more information.
Note: If your shipment is in 'Pending' or 'In Transit' status, you are still able to make
modicationsandchangesinyourshipmentsettings.
Please Note: If the shipment has already been delivered and is in
'Delivered' status, the settings become disabled which you are unable to
make any further changes.
END OF SECTION
