
Project Creation Setup for Milestones PM+
Step 1: Determine Template Creation Needs 1
Step 2: Project Creation Settings 2
Required Fields 2
Optional Fields 3
Configuration Examples 3
Step 3: Setup Button or Flow 5
Method 1 – Button or Link 5
Method 2 – Static Template Flow 6
Method 3 – Variable Template Flow 10
Method 4 – Variable Template Flow with Simple Criteria 13
Method 5 – Apex Trigger 17
Step 1: Determine Template Creation Needs
The first step is to determine the specific requirements for your project creation use case. This will
decide which method to follow in Step 3.
Scenario 1
In this scenario, Projects should be created by manually clicking a button or link. The template that
should be used for each Project should be manually selected. Follow Method 1 – Button or Link.
Scenario 2
In this scenario, Projects should be created automatically using the same template. Follow Method 2 –
Static Template Flow.
Scenario 3
In this scenario, Projects should be created automatically from a template that is indicated by a field on
the triggering record. Follow Method 3 – Variable Template Flow.
Scenario 4
In this scenario, Projects should be created automatically from a template that is chosen based on
simple record criteria. Follow Method 4 – Variable Template Flow with Simple Criteria.
Scenario 5
In this scenario, Projects should be created automatically from a template that is chosen based on
complex record criteria. Follow Method 5 – Apex Trigger.
Copyright 2024 – Passage Technology LLC – All Rights Reserved 1

Step 2: Project Creation Settings
Project Creation Settings tell the Milestones PM+ app which fields from the triggering record should be
used to create the new Project. These settings must be configured in order to automatically create
projects using Flows. To create these settings, navigate to Setup > Custom Settings > Project Creation
Settings > Manage > New.
By default, the Project object has an Account and Opportunity lookup field. To associate Projects to
non-Account or Opportunity objects, first create a new Project lookup field to that object.
Required Fields
There are a number of fields that must be populated on project creation settings. These fields tell
Milestones PM+ how to create and name the new Project, and how to relate it to the triggering record.
Name
This is the API name of the object that should trigger project creation, in all lowercase. For example, if a
Project should be created whenever an Opportunity’s Stage Name is set to Closed Won, the Name for
the relevant Project Creation Settings would be opportunity. If a Project should be created when a field
on a custom object Student_Info__c is updated, the Name for the Project Creation Settings would be
student_info__c.
Project Naming Convention Field
This is the API name of the field that is used to populate the Name of the new Project. This could be set
to any field on the triggering record, including formula fields and standard and custom text fields. For
example, if the new Project should have the same name as the triggering Opportunity, this field would
be set to Name. If the Project should be named using a custom formula field
Project_Name_Formula__c, this field would be set to Project_Name_Formula__c.
Project Creation Field
This is the API name of the field that contains the value representing the Project template that should
be used to create the new Project. This could be set to any field on the triggering record, including
formula fields, text fields, and picklist fields. For example, if the new Project should be created using a
template whose name is equal to the triggering Opportunity’s Stage Name, this field would be set to
StageName. If the Project should be created using a template whose name is equal to the value
selected in a custom picklist field Template_Picklist__c, this field would be set to Template_Picklist__c.
Project Lookup Field 1
This is the API name of the lookup field on the Project object that should relate the triggering record to
the new Project. For example, if the Project is created from an Account, this field could be set to
Account__c. If the Project is created from a custom object Student Info, this field could be set to a
custom lookup field on Project Student_Info__c.
Copyright 2024 – Passage Technology LLC – All Rights Reserved 2

Optional Fields
In addition to the required fields, there are some optional fields that can be used to enhance automatic
project creation.
Primary Lookup
This is the API name of the lookup field on the triggering record that should be used to populate the
new Project’s Project Lookup Field 1 field, if you do not want that field to be populated with the
triggering record’s Id. For example, if the Project is created from an Account and should be related to
the triggering Account’s parent record, this field should be populated with ParentId.
Project Lookup Field 2
This is the API name of an additional lookup field on the Project object that should be populated during
the creation process. For example, if the Project is created from an Opportunity and should be linked to
both the Opportunity and its related Account, this field should be populated with Account__c. If this field
is populated, a value must also be entered for the Secondary Lookup field.
Secondary Lookup
This is the API name for the field on the triggering record that should be used to populate the Project’s
Project Lookup Field 2 field. For example, if the Project is created from an Opportunity and should be
linked to both the Opportunity and its related Account, this field should be populated with AccountId.
This field only needs to be populated if Project Lookup FIeld 2 is populated.
Configuration Examples
Below are example Project Creation Setting configurations for the scenarios outlined in Step 1. Note
that the Project Creation Settings are not limited to the fields referenced in these scenarios - both
standard and custom fields of various types can be utilized in the Project creation process.
Methods 1 and 5
No Project Creation settings are needed for these. Skip to step 3.
Method 2 – Static Template Flow
In this example, Projects should be created automatically when the Stage Name of an Opportunity is
updated to “Closed Won.” The new Project should be created from the template referenced by a custom
text field Project_Template_Name__c, and the Project’s name should be based on a custom Opportunity
formula field Project_Name__c.
Copyright 2024 – Passage Technology LLC – All Rights Reserved 3

The project creation settings for this scenario would be configured as follows:
Method 3 – Variable Template Flow
In this example, Projects should be created automatically when a custom picklist field
Template_Picklist__c on Account is updated. The new Project should be created from the template
referenced by the picklist field, and the Project’s name should be the same as the triggering Account
record. The Projects’ OwnerId field should also be populated with the triggering record’s OwnerId.
The project creation settings for this scenario would be configured as follows:
Method 4 – Variable Template Flow with Simple Criteria
In this example, Projects should be created automatically when a custom Number field
Student_Year__c on a custom object Student_Info__c is updated. The Project should be created from
the template referenced by a custom picklist field Template_Picklist__c, which is automatically
populated based on the triggering record’s new Student_Year__c value. The Project’s name should be
based on a custom Student_Info__c formula field Project_Name__c. A lookup on Project to
Student_Info__c, Student_Info__c, has already been created.
Copyright 2024 – Passage Technology LLC – All Rights Reserved 4

The project settings for this scenario would be configured as follows:
Step 3: Setup Button or Flow
Follow the instructions below for the method indicated by your chosen scenario in Step 1.
Method 1 – Button or Link
1. Navigate to the object that should trigger Project creation.
a. Lightning: Setup > Object Manager > Chosen Object > Buttons, Links, and Actions, New
Button or Link
b. Classic, Standard Object: Setup > Build > Customize > Chosen Object > Buttons, Links,
and Actions > New Button or Link
c. Classic, Custom Object: Setup > Build > Create > Objects > Chosen Object > Buttons,
Links, and Actions > New Button or Link
2. Display Type: Select either “Detail Page Button” (recommended) or “Detail Page Link.”
3. Behavior: Select the value that matches your desired behavior.
4. Content Source: Select “URL.”
5. Value Input: Paste /apex/MPM4_BASE__Milestone1_Import_Project?&Id={!Object.Id}
Copyright 2024 – Passage Technology LLC – All Rights Reserved 5
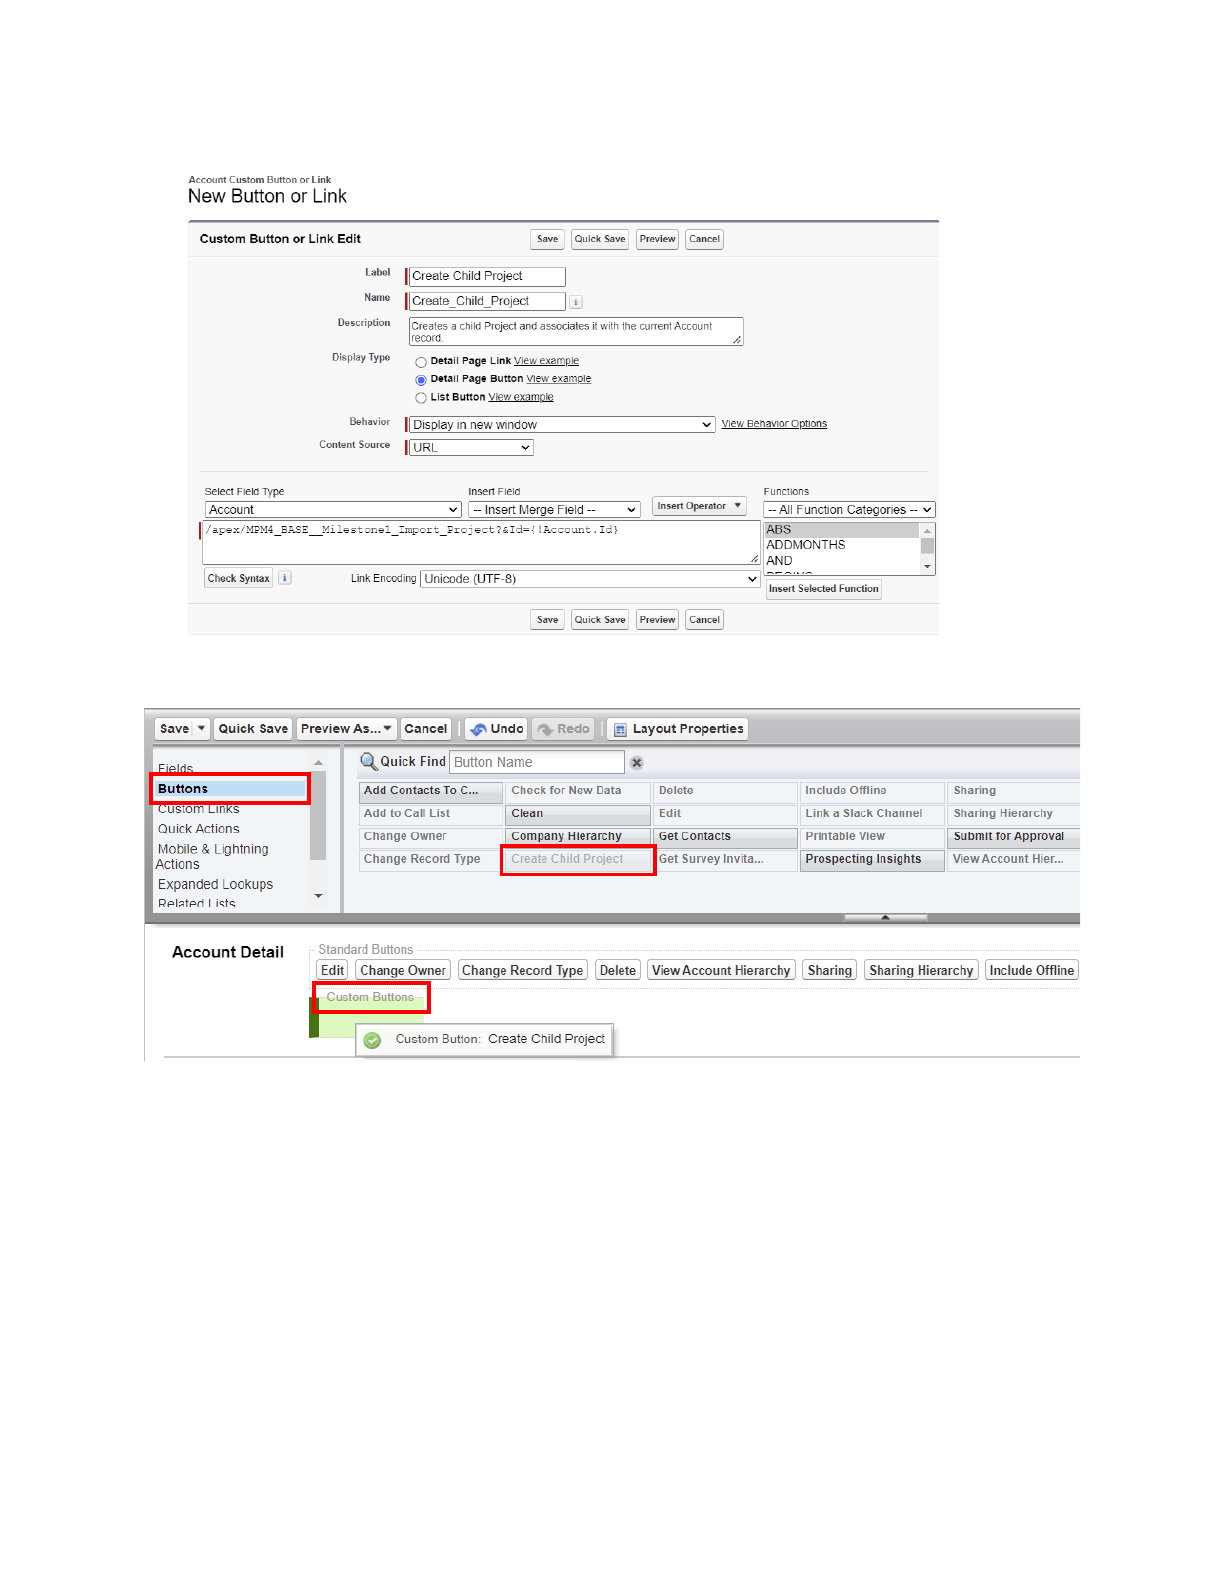
Ensure that Object is replaced with the API name of the object. The button or link should now be
configured as follows:
6. Click “Save.”
7. Navigate to Page Layouts and add the button or link to the page, as follows:
Method 2 – Static Template Flow
1. Create a new Flow by navigating to Setup > Flows and clicking “New Flow.”
2. New Flow: Select “Record-Triggered Flow.” Click “Create.”
3. Configure Start:
a. Object: Select the object that should trigger Project creation. Following the configuration
example in Step 2, the selected object would be “Opportunity.”
b. Configure Trigger: Select “A record is updated.”
c. Set Entry Conditions: Configure this section to specify when an Opportunity record
should trigger the Flow. Following the configuration example in Step 2, this section
would be configured as follows:
i. Condition Requirements: Select “All Conditions Are Met (AND).”
Copyright 2024 – Passage Technology LLC – All Rights Reserved 6

ii. Field: Select “StageName.”
iii. Operator: Select “Equals.”
iv. Value: Select “Closed Won.”
d. When to Run the Flow for Updated Records: Select “Only when a record is updated to
meet the condition requirements.”
e. Optimize the Flow for: Select “Actions and Related Records.”
f. Click “Done.” Your configuration should be set up as follows:
4. (If you would like the flow to update the triggering record’s template field if it is null, continue
with this step. If this validation is not required, continue to Step 5.) Click the plus button under
“Run Immediately ” to add an “Update Triggering Record” element:
a. Label: Enter the desired value, e.g. “Update Template Name Field.”
b. API Name: Enter the desired value, e.g. “Update_Template_Name_Field.”
c. Description: Enter the desired value, e.g. “This action updates the Template Name field
on the triggering record if it is null.”
Copyright 2024 – Passage Technology LLC – All Rights Reserved 7

d. How to Find Records to Update and Set Their Values: Select “Use the record that
triggered the flow.”
e. Set filter conditions: Configure this section to only update the field if it is currently null.
Following the configuration example in Step 2, this section would be configured as
follows:
i. Condition Requirements to Update Record: Select “All Conditions Are Met (AND).”
ii. Field: Select “Project_Template_Name__c.”
iii. Operator: Select “Is Null.”
iv. Value: Enter “{!$GlobalConstant.True}.”
f. Set Field Value for the Record
i. Field: Select “Project_Template_Name__c.”
ii. Value: Enter the name of the Project template that should be used, e.g. “Standard
Project Template.”
g. Click “Done.” The action should be configured as follows:
Copyright 2024 – Passage Technology LLC – All Rights Reserved 8

5. Click the plus button under “Update Triggering Record” (or “Run Immediately, if skipping step 4)
to add an “Action” element:
a. Action: Search for and select “Create Child Projects.”
b. Label: Enter the desired value, e.g. “Create Project.”
c. API Name: Enter the desired value, e.g. “Create_Project.”
d. Description: Enter the desired value, e.g. “This action creates a child Project and
associates it with the triggering record.”
e. Set Input Variables:
i. parentRecs: Toggle the switch to “Include.”
ii. Value: Enter “{!$Record.Id}.”
f. Click “Done.” The action should be configured as follows:
Copyright 2024 – Passage Technology LLC – All Rights Reserved 9

6. Once these actions are completed, your Flow should be configured as follows:
7. Click “Save” and enter the desired Label, API Name, and Description. Activate the Flow to
complete the configuration process.
Method 3 – Variable Template Flow
1. Create a new Flow by navigating to Setup > Flows and clicking “New Flow.”
2. New Flow: Select “Record-Triggered Flow.” Click “Create.”
3. Configure Start:
a. Object: Select the object that should trigger Project creation. Following the configuration
example in Step 2, the selected object would be “Account.”
b. Configure Trigger: Select “A record is updated.”
c. Set Entry Conditions: Configure this section to specify when an Opportunity record
should trigger the Flow. Following the configuration example in Step 2, this section
would be configured as follows:
i. Condition Requirements: Select “All Conditions are Met (AND).”
ii. Field: Select “Template_Picklist__c.”
iii. Operator: Select “Is Changed.”
iv. Value: Enter “{!$GlobalConstant.True}.”
d. When to Run the Flow for Updated Records: Following the configuration example in Step
2, this value should default to “Every time a record is updated and meets the condition
requirements.” If your specific use case does not cause this field to be defaulted, select
“Only when a record is updated to meet the condition requirements.”
e. Optimize the Flow for: Select “Actions and Related Records.”
Copyright 2024 – Passage Technology LLC – All Rights Reserved 10

f. Click “Done.” Your configuration should be set up as follows:
4. Click the plus button under “Run Immediately” to add an “Action” element:
a. Action: Search for and select “Create Child Projects.”
b. Label: Enter the desired value, e.g. “Create Project.”
c. API Name: Enter the desired value, e.g. “Create_Project.”
d. Description: Enter the desired value, e.g. “This action creates a child Project and
associates it with the triggering record.”
e. Set Input Variables:
i. parentRecs: Toggle the switch to “Include.”
ii. Value: Enter “{!$Record.Id}.”
Copyright 2024 – Passage Technology LLC – All Rights Reserved 11

f. Click “Done.” The action should be configured as follows:
5. Once these actions are completed, your Flow should be configured as follows:
6. Click “Save” and enter the desired Label, API Name, and Description. Activate the Flow to
complete the configuration process.
Copyright 2024 – Passage Technology LLC – All Rights Reserved 12

Method 4 – Variable Template Flow with Simple Criteria
1. Create a new Flow by navigating to Setup > Flows and clicking “New Flow.”
2. New Flow: Select “Record-Triggered Flow.” Click “Create.”
3. Configure Start:
a. Object: Select the object that should trigger Project creation. Following the configuration
example in Step 2, the selected object would be “Student Info.”
b. Configure Trigger: Select “A record is updated.”
c. Set Entry Conditions: Configure this section to specify when a Student Info record should
trigger the Flow. Following the configuration example in Step 2, this section would be
configured as follows:
i. Condition Requirements: Select “All Conditions Are Met (AND).”
ii. Field: Select “Student Year.”
iii. Operator: Select “Is Changed.”
iv. Value: Enter “{!$GlobalConstant.True}.”
d. When to Run the Flow for Updated Records: Following the configuration example in Step
2, this value should default to “Every time a record is updated and meets the condition
requirements.” If your specific use case does not cause this field to be defaulted, select
“Only when a record is updated to meet the condition requirements.”
e. Optimize the Flow for: Select “Actions and Related Records.”
f. Click “Done.” Your configuration should be set up as follows:
Copyright 2024 – Passage Technology LLC – All Rights Reserved 13

4. Click the plus button under “Run Immediately” to add a “Decision” element:
a. Create a new Outcome for each possible project template that could be selected. For
example, if the Template_Picklist__c field could reference one of four templates based
on Student Year values 9-12, the decision would have four outcomes configured in total.
Following the example configuration in Step 2, the Grade 9 outcome would be configured
as follows:
i. Label: Enter “Choose Grade 9 Template.”
ii. Outcome API Name: Enter “Choose_Grade_9_Template.”
iii. Condition Requirements to Execute Outcome: Select “All Conditions Are Met
(AND).”
iv. Resource: Select “$Record > Student Year.”
v. Operator: Select “Equals.”
vi. Value: Enter “9.”
vii. When to Execute Outcome: Select “Only if the record that triggered the flow to run
is updated to meet the condition requirements.”
b. When all desired outcomes have been configured, click “Done.” A decision with four
outcomes for grades 9-12 would be configured as follows:
5. For each outcome of the Decision, click the plus button under the Decision name to add an
“Update Triggering Record” element. Following the example configuration from Step 2, the
Update element for the Grade 9 outcome would be configured as follows:
a. Label: Enter “Select Grade 9 Template.”
b. API Name: Enter “Select_Grade_9_Template.”
c. Description: Enter “This action populates the Template Picklist field with the Grade 9
Project Template when the Student Year field is updated to Grade 9.”
d. How to Find Records to Update and Set Their Values: Select “Use the record that
triggered the flow.”
e. Condition Requirements to Update Record: Select “None - Always Update Record.”
Copyright 2024 – Passage Technology LLC – All Rights Reserved 14

f. Set Field Values for the Record:
i. Field: Select “Template_Picklist__c.”
ii. Value: Select “Grade 9 Project Template.”
g. Click “Done.” The action should be configured as follows:
6. Once a Record Update element has been created for each outcome, click the plus button above
“End” to add an “Action” element:
a. Action: Search for and enter “Create Child Projects.”
b. Label: Enter “Create Project.”
c. API Name: Enter “Create_Project.”
d. Description: Enter “This action creates a child Project and associates it with the
triggering record.”
e. Set Input Variables:
i. parentRecs: Toggle the switch to “Include.”
ii. Value: Enter “{!$Record.Id}.”
Copyright 2024 – Passage Technology LLC – All Rights Reserved 15

f. Click “Done.” The action should be configured as follows:
7. Once these actions are completed, your Flow should be configured as follows:
Copyright 2024 – Passage Technology LLC – All Rights Reserved 16
8. Click “Save” and enter the desired Label, API Name, and Description. Activate the Flow to
complete the configuration process.
Method 5 – Apex Trigger
In orgs with Milestones PM+ Premium Edition, the Project Creation Trigger page can assist you in
creating a custom trigger. For orgs with Milestones PM+ Free Edition, you can review Milestones PM+
Star ter Packs for implementation options, or follow the steps below to manually create a trigger.
Create a Trigger
To manually create a trigger, two main variables must be managed by either users or a workflow - the
template name (e.g. “New Client Onboarding”) and Project name (e.g. “Account Name - New Client
Onboarding”). In most implementations, users will either populate a custom text field or select a
template from a picklist field. If implementing a picklist field, make sure there is no default value;
otherwise, the trigger will not fire.
1. Log into your sandbox. Go to the Salesforce object that will create Projects.
2. Create a picklist field with values matching the Project template names (e.g. “New Client
Onboarding”) and note the API name for this field (e.g. “Project_Templates__c”).
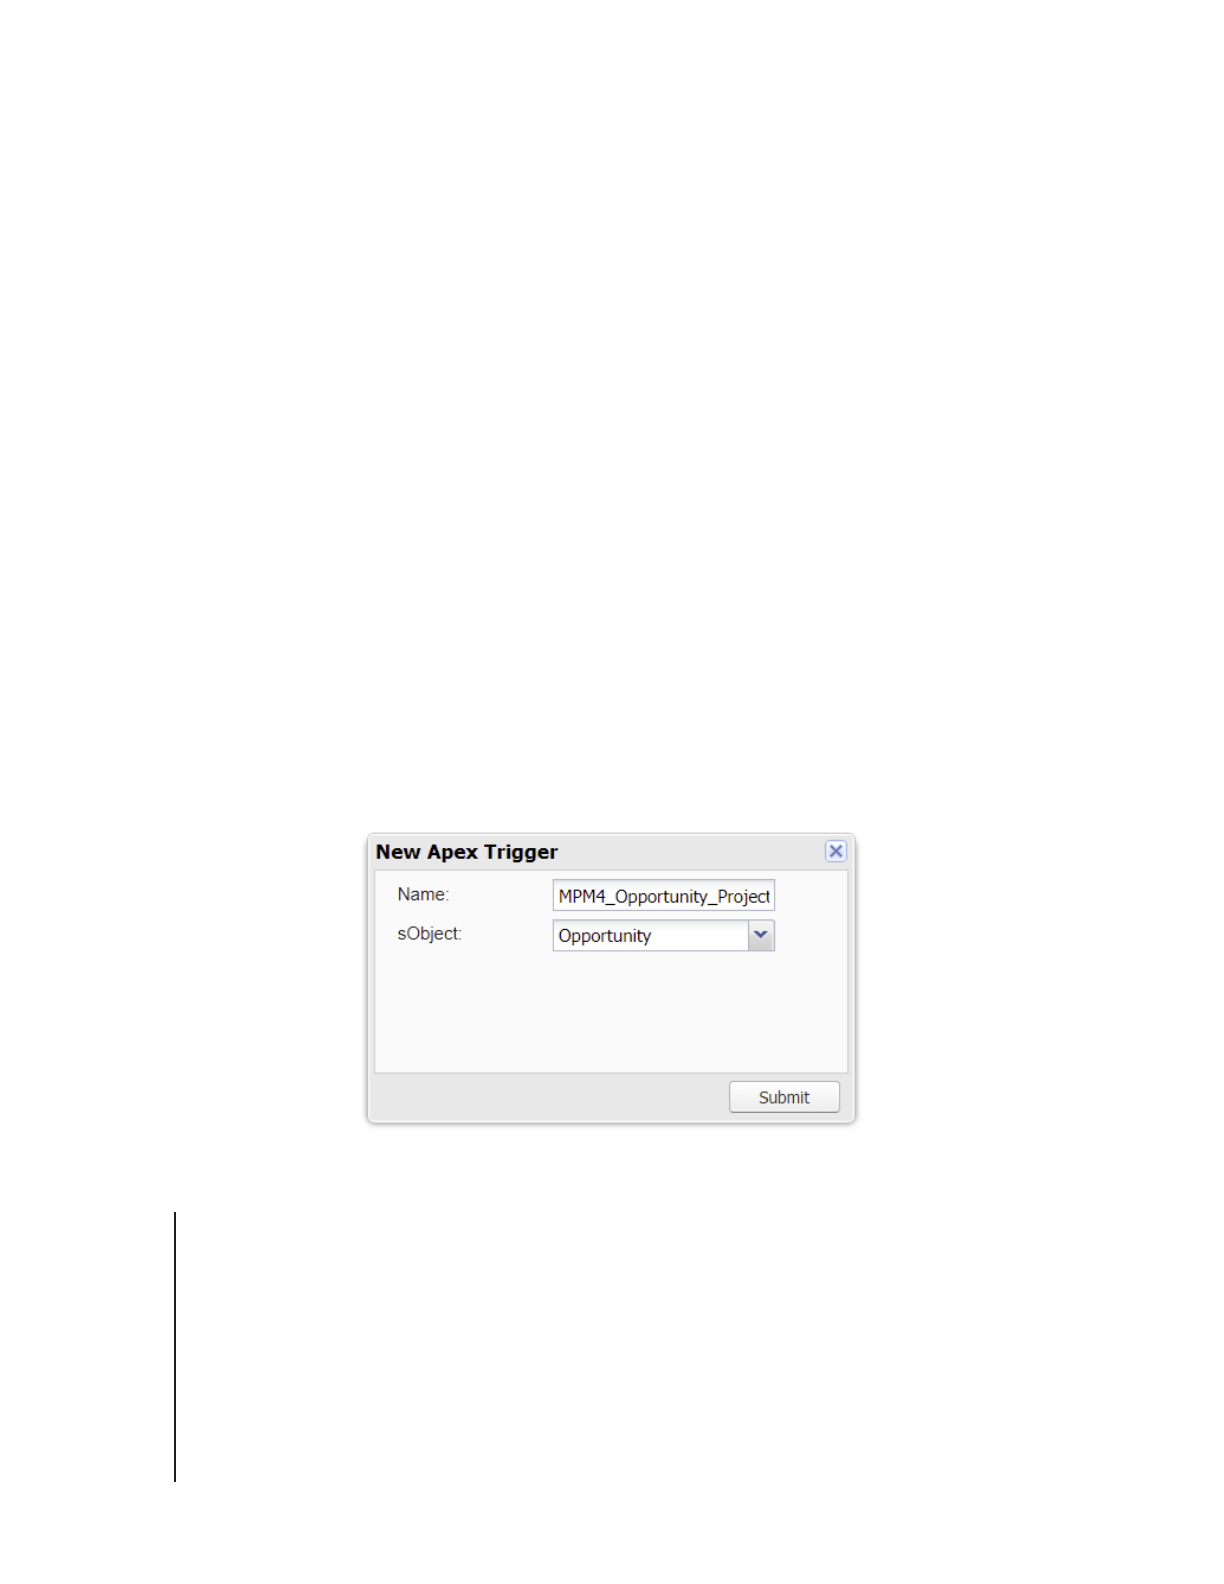
3. Go to the Developer Console (available in Salesforce Enterprise Edition and above unless an API
package has been purchased with Professional Edition). Click File > New > Apex Trigger.
4. Enter a trigger name (e.g. “MPM4_Opportunity_Project_Creation”) and select the target object,
e.g. “Opportunity.”
5. Copy and paste the template trigger code below, replacing variables accordingly. Make sure that
“after insert, after update” is included in the parenthesis.
trigger MPM4_ObjectName_Project_Creation on ObjectName(after insert, after
update) {
if (Trigger.isAfter) {
Type pcu = System.Type.forName('MPM4_BASE',
'Milestone1_Project_Creation_Utility');
if (pcu != null) {
MPM4_BASE.Milestone1_Project_Creation_Utility projCreationUtil =
(MPM4_BASE.Milestone1_Project_Creation_Utility) pcu.newInstance();
Copyright 2024 – Passage Technology LLC – All Rights Reserved 17

if (Trigger.isAfter) {
projCreationUtil.createChildProject(trigger.oldMap,
trigger.newMap, new Map<String, Object>{
'projectCreationField' => 'FieldName',
'projectLookupField1' => 'FieldName',
'projectLookupField2' => 'FieldName',
'secondaryLookup' => 'FieldName',
'projectNamingConventionField' => 'FieldName'
});
}
}
}
}
For explanations of the parameters in createChildProject, refer to Step 2: Project Creation Settings.
For assistance deploying this trigger or changing the setup of how Projects are automatically created,
review Milestones PM+ Starter Packs for trigger creation services, including implementation and
customization (e.g. an opportunity product can be used to select the template, a project can support
being tied to multiple child opportunities, etc.).
TIP: Use Rollup Helper for free to rollup the product(s) on an opportunity, and then use that rollup field
as part of a workflow that triggers project creation. If you have three or more lookups to set on the
Project object, use Lookup Helper for free.
Create a Test Class
To deploy the trigger into production, a test method class must be created. The code below can be used
to build your trigger. Note that if there are multiple required fields on the target object, values for those
fields must be provided in the constructor before inserting the record.
1. From your sandbox, go to the Developer Console (available in Salesforce Enterprise Edition and
above unless an API package has been purchased with Professional Edition). Click File > New >
Apex Class.
2. Enter the name of the new trigger, plus “_Test” as the Apex class name. Click “OK.”
Copyright 2024 – Passage Technology LLC – All Rights Reserved 18

3. Copy and paste the template test class code below, replacing variables accordingly. Note that
this test class may need some adjustments to function with the chosen target object.
// All test methods in this class can access all data.
@isTest(SeeAllData=true)
public class ObjectName_Project_Creation_Test {
static testmethod void ObjectName_Project_Trigger_Test() {
MPM4_BASE__Milestone1_Project__c testProj = new
MPM4_BASE__Milestone1_Project__c(Name = 'Test456');
Account testAcc = new Account(Name = 'Test321');
insert testAcc;
ObjectName testObj = new ObjectName(
Name = 'Test123',
AccountId = testAcc.Id
// Insert additional required fields here
);
Test.startTest();
insert testObj;
testObj.Name = 'Test1234';
update testObj;
Test.stopTest();
testProj = [SELECT Id, MPM4_BASE__ProjectLookupField1 FROM
MPM4_BASE__Milestone1_Project__c WHERE MPM4_BASE__ProjectLookupField1 =
:testObj.Id];
System.assert(testProj != null, 'Project not created');
}
}
Admin Guide
Support Resources
Starter Packs
Copyright 2024 – Passage Technology LLC – All Rights Reserved 19
