
he drop-leaf table is one of the
most versatile designs that I build.
I’ve made small, 30-in. square end
tables, 10 footers for major dinner parties,
tables with drawers, tables with one leaf,
and tables with leaves that hang almost to
the floor. The form can be used not just for
dining tables but also for side, end, serving
and couch tables.
Recently, I was commissioned to design
and construct a drop-leaf table and a set of
chairs to seat eight. The base should pro-
vide diners with adequate chair space, with
no one straddling a leg. Figuring 24 in. (or
more) per serving area, I came up with a
base that’s 28
1
⁄2 in. by 79 in.
For the top dimensions, I figured 31 in.
wide by 84 in. long. The top extends be-
yond the base so that the two 9-in. leaves
can hang below. When down, the leaves
allow for chairs to be slid under them. With
the leaves up, the total width of the table-
top becomes roughly 48 in. (because of the
rule-joint overlap). I made this tabletop
13
⁄16 in. thick, but
3
⁄4 in. is the minimum—less
than that and the quirk (or filet) on the leaf
rule joint becomes too thin or fragile.
Glue up the top and build the base
Start by gluing up the top and leaves from
7
⁄8-in.-thick stock. When flattened and sand-
ed, the finished product is
13
⁄16 in. thick, a
smidge more than minimum. Next, cut the
legs to 1
7
⁄8 in. square by 29
1
⁄4 in. long. Taper
the four legs to 1
3
⁄8 in. on the tablesaw us-
ing a jig, then clean them up on the jointer.
The mortises in the 4-in.-wide aprons are
3
⁄8 in. thick by 1
1
⁄8 in. deep by 3
1
⁄8 in. wide
(located
3
⁄4 in. from the top of the leg and
1
⁄8 in. from the apron bottom). I’m fortunate
enough to own a horizontal slot mortiser,
but this joint is easily cut by hand, with a
drill press and chisels or with a router.
The aprons are milled from
7
⁄8-in.-thick
62 FINE WOODWORKING
Harvest Table
This Shaker drop-leaf design can be built for two or for 20
BY CHRISTIAN BECKSVOORT
Photos, except where noted: Matthew Teague; this page: Dennis Griggs
T

stock: two pieces 4 in. by 28 in. and two
pieces 4
1
⁄4 in. by 79 in. (The long side
aprons are purposely oversize in both di-
mensions.) Before you cut and chop up the
long aprons to make the leaf supports, or
spinners, make a story stick. The stick
shows the location of the two legs, the
three spinners, the four hinges and the four
attachment points where the top will be
screwed to the base. With the story stick,
you can then make witness marks in the
appropriate locations on the aprons: two
short 3-in. ends, three 18-in. spinners and
two spacers between the spinners. Then
rip 1
1
⁄4-in.-wide strips the full length of both
aprons and joint the pieces. With the wit-
ness marks in place, cut the spinners and
the spacers to length with the miter gauge
set to 45° (for other leaf-support options,
see p. 65).
Now it’s time to reconstruct. Starting from
the center, line up the spinner with its wit-
ness marks. On either side, glue and tape
the two spacers onto the apron, place the
other two spinners and glue the two end
spacers. Then remove the spinners and
clamp the spacers. Drill
1
⁄8-in. holes through
the center points of each of the six spin-
ners. Once the glue has dried, attach the
spinners using 10d finish nails. Let the
NOVEMBER/DECEMBER 2002 63Drawings: Bob La Pointe
CHERRY DINING TABLE
28
1
⁄2 in.
79 in.
30
1
⁄16 in.
CORNER DETAIL
31 in.
9 in.
84 in.
Dowels,
1
⁄4 in. dia.
1
⁄8 in.
Side aprons,
7
⁄8 in. thick by 4 in.
wide by 24
3
⁄4 in.
long, shoulder to
shoulder
Front and rear aprons,
7
⁄8 in. thick by 4 in.
wide by 75
1
⁄4 in. long,
shoulder to shoulder
Spinners, 1
1
⁄8 in.
wide by 18 in. long
by
7
⁄8 in. thick
1
3
⁄8 in.
Spinner ends
are cut at 45°.
Inside faces
of each leg
are tapered
from apron
to floor.
Legs,
29
1
⁄4 in.
long
Corner
blocks
Ledger strips,
1
1
⁄2 in. wide
by 4 in. long
Shoulders at
top of tenons,
3
⁄4 in.
Each spinner pivots on
a 10d finish nail with
the head clipped off.
1
7
⁄8 in.
Leaves,
13
⁄16 in.
thick by 9 in. wide
by 84 in. long
Top,
13
⁄16 in. thick
by 31 in. wide by
84 in. long
This classic Shaker dining table features drop leaves that are
supported by spinners cut into the aprons. For two other leaf-
support options, see p. 65.
Apron tenons,
3
⁄8 in. thick by
3
1
⁄8 in. wide by
1
1
⁄8 in. deep
heads protrude about
1
⁄4 in. and nip them
off with pliers. Then sand the aprons, cut
them to length and cut all of the tenons.
Now glue the long aprons to the legs and
pin the joints with
1
⁄4-in.-dia. pins. When the
two long sides of the table are ready, glue
and pin the short aprons between them.
With the base assembled, make corner
blocks from 1
3
⁄4-in. by 3
1
⁄2-in. stock to
strengthen the joint. Screw each block into
both the aprons and leg. The aprons are
only
7
⁄8 in. thick, so add 1
1
⁄2-in.-wide ledger
strips to the top inside surfaces between
the spinners. These ledgers are drilled out
for a
1
⁄4-in. by
3
⁄8-in. slot to allow for move-
ment of the top. Near each leg, there is al-
so a similar slot in the corner blocks, as
well as a 1-in.-dia. access hole on the bot-
tom of the blocks. On the end aprons, add
a ledger strip with just a
1
⁄4-in.-dia. hole at
the center. These two holes anchor the
tabletop and ensure even wood movement
across the top.
Cut the rule joint
Once you’ve established the critical di-
mensions of the rule joint (see the story on
p. 66), it’s time to set up the router. I have
two, so I can have one set up for the
roundover cut (table edge) and the other
for the cove cut (leaf). That allows me to go
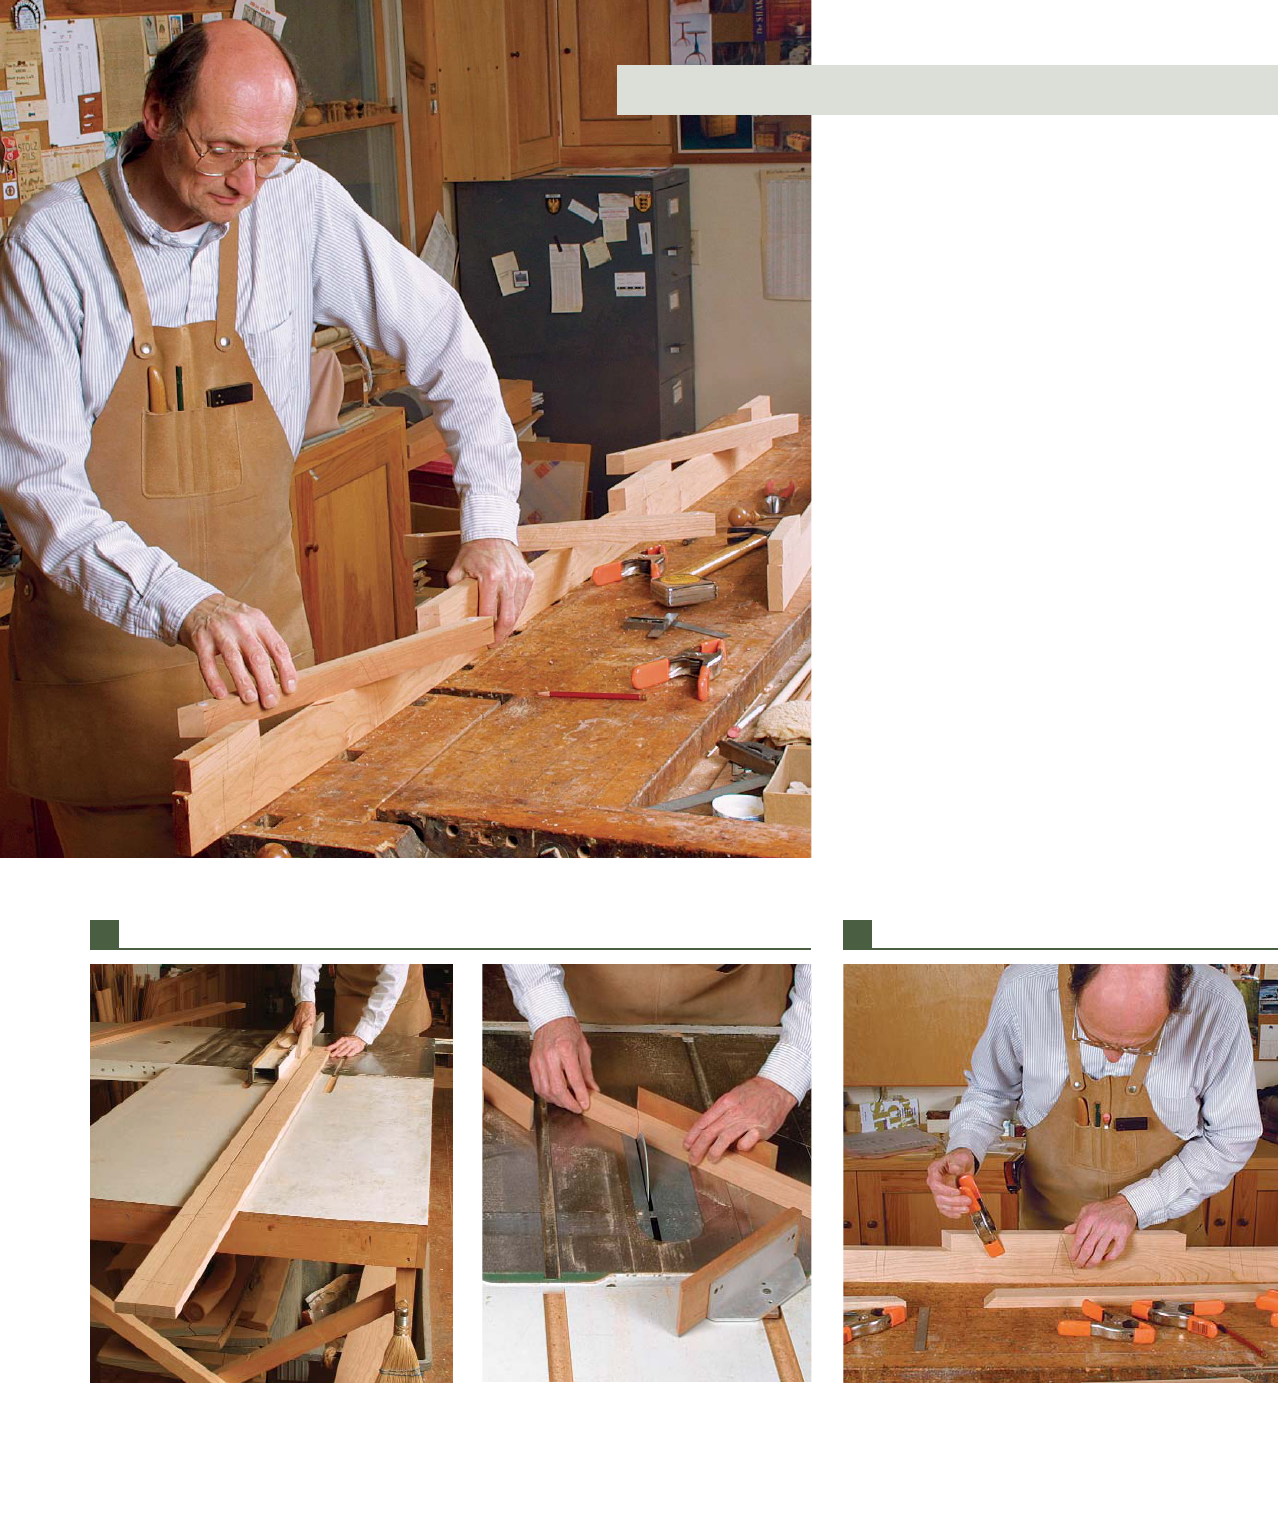
Cut apart the apron. At the tablesaw, rip the
spinner stock from the top edge of the apron.
Let it spin on a nail. Becksvoort uses nails to act as pivot pins, because they are stronger than
brass and can be let into a smaller hole.
Separate the spinner stock. Becksvoort
cuts the spinners using a 45° crosscut sled.
Position the spinners. Starting at the center
of the apron, clamp the first spinner in place.
SPINNERS SUPPORT THE DROP LEAVES
1 CUT THE SPINNERS FROM THE APRON 2 REASSEMBLE THE APRON
64
FINE WOODWORKING

NOVEMBER/DECEMBER 2002 65
back and recut either portion of the joint if
I’m not happy with the fit.
Make the roundover cuts first on the
tabletop. Three passes usually get me to
the appropriate depth. The router bit’s
bearing rides on just a sliver of edge on the
final pass, so you need to clamp an auxil-
iary wood fence to the router base for a
longer bearing surface.
Next, mount a cove bit in the router and
make three passes under each leaf. Now fit
each leaf next to the tabletop, and sight
down the joint. Differences in height will,
for the most part, be pulled together by the
four hinges. Differences in width or paral-
lelism will have to be adjusted. First use a
block plane to remove tight areas (usually
on the leaf, which is more prone to bow-
ing). Once the gap between leaf and table
is a constant width, flip over the leaf and
rerout the cove. Because the bearing rides
on the quirk that you’ve just planed to fit,
that’s where all of the routing takes place.
Once you’re satisfied with the fit of both
joints, you can install the hinges.
Attach leaves and fine-tune the fit
First, locate the hinges using the story stick.
Because the hinges are perfectly flush to
the underside (if properly installed), the lo-
cations can be altered if you have a severe
OTHER LEAF-SUPPORT OPTIONS
SWING ARMS
Swing arms involve a double apron along the leaf sides.
Knuckle joints on both ends of the short apron allow the ends
to swing out to support the leaves. With proper spacing and
planning, one or more swing arms can be used. With well-
made knuckle joints, this is arguably the strongest leaf-
support system because it does not involve cutting the apron.
SLIDING SUPPORTS
Although a bit more work
than making spinners,
sliding supports are a neat
and clean alternative. They
should be no more than a
third the height of the
aprons. They work best
where the leaves are less
than half the width of the
tabletop. For a complete
description, see FWW
#111, pp. 75-79.
Rebuild the apron. Reglue the parts of the apron, making
sure everything remains in the correct order. Keep things
tight, and work from the center toward the ends.
Don’t just drive a nail. With the spinner
clamped in place, drill a hole in the center
to accept a 10d finish nail.
Bumpers allow smooth spinning.
Before installing the spinners,
Becksvoort planes them slightly, then
sets nylon bumpers into place.
3 ATTACH THE SPINNERS

66 FINE WOODWORKING
warp in a leaf, for example. However, if
your table is narrow, and you have attach-
ment screws that go through the aprons,
the hinges cannot go in the same place as
the screws. Bring a line from the quirk on
the tabletop to the underside of the table.
Set a marking gauge
1
⁄64 in. closer to the
table’s edge and mark through all eight
hinge locations. Then center the hinge pins
over the scribe marks, with the long leaves
extending onto the table leaves. With a
pencil, mark the locations of the hinge bar-
rels and draw these lines parallel to the
scribe marks.
Using a
1
⁄4-in. bit, rout out for the hinge
barrel. This trough can be a bit deeper and
wider than the barrel, but no longer. Clean
the ends with a
1
⁄4-in. chisel. Clamp both
ends of the table and leaves right at the
joint. Place the hinge barrel into the trough,
keep the pin centered on the scribe line
and use a sharp knife to scribe all four sides
of the hinge. With the router set to the
thickness of the leaves, rout the mortise
and clean the corners with a chisel. The
hinge should be snug and flush. Drive in all
six screws (at least
1
⁄8 in. shorter than the
top thickness). Repeat for each hinge.
If the table and leaves are straight, fitted
and laid out accurately, fine-tuning the
joint is a minor chore. I fold down the leaf
and take a few passes with a block plane
along the bottom edge of the top. A bit of
hand-sanding, and that’s it. Frequently, it is
a bit more involved. When I fold the leaf
back up, it invariably rubs and squeaks. Of-
When hinging a rule joint, convention says to cen-
ter the hinge under the quirk, but I’ve found that
it’s better to offset the center of the hinge
1
⁄64 in.
closer to the edge of the tabletop. The center of
the hinge pin is buried
1
⁄8 in. above the bottom sur-
face, which is the rotating axis of the joint. Conse-
quently, the quirk height is the sum of the depth of
the hinge pin (
1
⁄8 in.) plus the radius of the
roundover bit (
1
⁄2 in.), which totals
5
⁄8 in., subtracted
from the total thickness of the top. To keep the
quirks substantial, I made this tabletop
13
⁄16 in.
thick, but
3
⁄4 in. is minimum. For a
13
⁄16-in.-thick top, that leaves a
3
⁄16-in. quirk
on the tabletop. On the leaf, a
1
⁄32-in. clearance is ideal between it and the
table, meaning that the leaf quirk is only
5
⁄32 in.
The rule joint: It all hinges on the barrel
Cut half a rule joint. Take several light passes before set-
ting the bit to final depth and cutting the roundover portion
of the rule joint (left). Then cut the leaf of the tabletop in
several passes with a cove bit.
Locate the hinge bar-
rel. Square a line up from
the quirk.
A SMOOTH-OPERATING RULE JOINT
1 ROUT THE TABLETOP AND LEAVES
RULE-JOINT DETAIL
Thickness,
13
⁄16 in.
(
3
⁄4 in. minimum)
Hinge center is
offset
1
⁄64 in.
from the quirk.
Tabletop
quirk
3
⁄16 in.
Leaf quirk,
5
⁄32 in.
Hinge pin
is inset
1
⁄8 in.
Long leaf
1
⁄2-in.
radius
Continue
roundover,
remove
with a
block
plane.

NOVEMBER/DECEMBER 2002 67
ten I can visually locate the points of con-
tact and eliminate them with a rabbet plane
and sandpaper. More often than not, I get
out my supply of ancient carbon paper and
slide it between the leaf and table, then
fold the leaf up and down a few times to lo-
cate the friction points. I do this along the
entire length, two or three times, planing
and sanding the dark spots each time.
When both leaves fold smoothly, mark
equal distances from the end hinges for an
84-in. length, square a line across both
ends and cut the assembly to length. I use a
circular saw with a fence clamped in place.
I belt-sand through to 320 grit, hand-sand
using 320 grit and then polish with 0000
steel wool.
Attach the top, open the spinners 90° and
mark under the tabletop for stops. A small
1
⁄2-in. by
1
⁄2-in. by 1-in. block glued to each
of the six marked locations allows the spin-
ners to open perpendicular to the table
aprons. If I detect any sag in the leaves, I
glue a small wedge-shaped shim in front of
the stop blocks to level the leaves.
My finish of choice is Tried & True var-
nish oil, four or five coats applied over a
three-week period. Rub with 0000 steel
wool after the first coat, and let subsequent
coats build to a satin sheen.
Christian Becksvoort is a contributing editor.
Mark the contact spots. Set the leaf in place,
and mark spots where the joint makes contact.
Trim the leaf, not the tabletop. A few passes with a handplane helps achieve an even re-
veal. Once the joint closes up, rerout the profile on the leaf and try another test fit.
Carbon paper still has a
use. Becksvoort holds
carbon paper between the
joint as he opens and closes
the leaf. Black marks are
left where the joint is too
tight. Those spots are
trimmed with sandpaper
or a block plane.
2 ADJUST THE REVEAL AND REROUT THE LEAVES
3 INSTALL THE HINGES AND CHECK THE FIT
