DE1005-33
CS SoftDent Scheduler Practice Management Software
Installation Guide for Client/Server
Configurations
Notice
© 2020 Carestream Dental LLC. No part of this publication may be reproduced, stored in a retrieval system, translated
to another language, or transmitted in any form by any means, electronic, mechanical, photocopied, recorded, or
otherwise, without prior written permission.
NEITHER CARESTREAM DENTAL LLC NOR ITS PARENTS, AFFILIATES, OR ANY OF ITS SUBSIDIARIES MAKE
ANY WARRANTY OF ANY KIND WITH RESPECT TO THIS MATERIAL, INCLUDING, BUT NOT LIMITED TO, THE
IMPLIED WARRANTIES OF MERCHANTABILITY, NONINFRINGEMENT, AND FITNESS FOR A PARTICULAR
PURPOSE, WHICH ARE HEREBY DISCLAIMED IN THEIR ENTIRETY.
The information in this document is subject to change. Neither Carestream Dental LLC nor its parents, affiliates, or any
of its subsidiaries shall be liable for errors contained herein, omissions herefrom, or for indirect, incidental,
consequential, or special damages (including, without limitation, lost profits or lost revenue) in conjunction with the
furnishing, performance, or use of this material.
SoftDent is a trademark of Carestream Dental Technology Topco Limited.
All other trademarks and registered trademarks are the property of their respective holders.
Manual Name: CS SoftDent Scheduler Practice Management Software Installation Guide for Client/Server
Configurations
Part Number: DE1005
Revision Number: 33
Print Date: December 2020
The names of persons and the data reflected in this guide are fictitious and are not intended to represent any real
individual, event, or condition. Any resemblance or similarity of the names of persons or data reflected in this guide to
any actual person’s name or any event or condition is purely coincidental and unintended.

CS SoftDent Scheduler Practice Management Software Installation Guide iii of iv
for Client/Server Configurations (DE1005-33)
Contents
Installing SoftDent Scheduler for Client/Server Configurations
Related Documentation . . . . . . . . . . . . . . . . . . . . . . . . 1
Getting Started . . . . . . . . . . . . . . . . . . . . . . . . . . . . . 1
Using Radiographic Images . . . . . . . . . . . . . . . . . . . . 1
Mapping a Network Drive . . . . . . . . . . . . . . . . . . . . . 1
Backing Up Data . . . . . . . . . . . . . . . . . . . . . . . . . . 1
Viewing What’s New . . . . . . . . . . . . . . . . . . . . . . . . . . 2
Installing SoftDent Scheduler . . . . . . . . . . . . . . . . . . . . . 3
Installing SoftDent Scheduler on the Server . . . . . . . . . . . 3
Installing SoftDent Scheduler on a Server Running
Windows 8 or Higher . . . . . . . . . . . . . . . . . . . . . 3
Installing SoftDent Scheduler on a Server Running
Windows Server 2012 or Windows Server 2016 . . . . . . 4
Installing SoftDent Scheduler on the Server . . . . . . . . . 5
Starting and Shutting Down the FairCom Server Software . . . 9
Activating the FairCom Server Software . . . . . . . . . . . 9
Starting the FairCom Server Software . . . . . . . . . . . 10
Shutting Down the FairCom Server Software . . . . . . . 10
Opening SoftDent Scheduler on the Server, Installing the
License File, and Registering the Software . . . . . . . . . . . 11
Installing SoftDent Scheduler on a Workstation . . . . . . . . 13
Installing SoftDent Scheduler on a Workstation Running
Windows 8 or Higher . . . . . . . . . . . . . . . . . . . . 13
Installing from the Downloaded ISO File . . . . . . . . . . 14
Installing Across Your Network . . . . . . . . . . . . . . . 17
Installing on a Workstation Running Windows 8
or Higher. . . . . . . . . . . . . . . . . . . . . . . . . . . 17
Opening SoftDent Scheduler on a Workstation . . . . . . . . 20
Upgrading SoftDent Scheduler . . . . . . . . . . . . . . . . . . . 21
Upgrading SoftDent Scheduler on the Server . . . . . . . . . 21
Upgrading SoftDent Scheduler on a Workstation . . . . . . . 25
Automatically Upgrading the Software . . . . . . . . . . . 25
Manually Upgrading the Software . . . . . . . . . . . . . 28

iv of iv CS SoftDent Scheduler Practice Management Software Installation Guide
for Client/Server Configurations (DE1005-33)
Upgrading SoftDent Scheduler on a Server—
Maintenance Release . . . . . . . . . . . . . . . . . . . . . . 31
Upgrading SoftDent Scheduler on a Workstation—
Maintenance Release . . . . . . . . . . . . . . . . . . . . . . 32
Automatically Upgrading the Software . . . . . . . . . . 32
Manually Upgrading the Software . . . . . . . . . . . . . 32
Installing and Activating the SoftDent Scheduler KIOSK
Check-In Module on a Workstation . . . . . . . . . . . . . . . . . 33
Installing the SoftDent Scheduler KIOSK Check-In Module
on a Workstation . . . . . . . . . . . . . . . . . . . . . . . . 33
Activating the SoftDent Scheduler KIOSK Check-In Module
on a Workstation . . . . . . . . . . . . . . . . . . . . . . . . 34
Using the CS Software Update Service . . . . . . . . . . . . . . 34
CS Software Update Service Benefits. . . . . . . . . . . . . 34
CS Software Update Service Features . . . . . . . . . . . . 35
Configuring the CS Software Update Service. . . . . . . . . 35
Authenticating an Existing SSO Account and Configuring the
CS Software Update Service. . . . . . . . . . . . . . . . . . 41
Adding Accounts . . . . . . . . . . . . . . . . . . . . . . . . 42
Removing Accounts . . . . . . . . . . . . . . . . . . . . . . 42
Updating Your Software Using the CS Software
Update Service . . . . . . . . . . . . . . . . . . . . . . . . . 43
Receiving and Viewing Alerts. . . . . . . . . . . . . . . . . . 45
Using the Database Extractor Utility . . . . . . . . . . . . . . . . 46
Setting Database Extractor Utility Window Preferences and
Extracting the Backup File . . . . . . . . . . . . . . . . . . . 46
Creating a Scheduled Task to Run the Database Extractor
Utility Automatically . . . . . . . . . . . . . . . . . . . . . . . 48
Restoring the Backup File . . . . . . . . . . . . . . . . . . . 52

CS SoftDent Scheduler Practice Management Software Installation Guide 1 of 54
for Client/Server Configurations (DE1005-33)
Installing SoftDent Scheduler for Client/Server
Configurations
This document describes the process for installing the client/server configuration of SoftDent Scheduler.
Read this document carefully before installing the new software.
A client/server configuration requires both server and workstation installations. The server is the host
computer on which the client/server software is installed and contains all of the software system data.
A workstation is a computer that has the software installed but must connect to the server to access
system data. A workstation must be mapped to the shared drive of the host computer on which the
client/server software resides.
Related Documentation
See the CS SoftDent Scheduler Practice Management Software Online Help for more information.
Getting Started
Before installing SoftDent Scheduler, make sure that each computer in your network meets the minimum
system requirements. For information about system requirements, see the System Requirements
documentation shipped with your software.
Using Radiographic Images
Mapping a Network Drive
Share the server’s hard drive and map a drive on each workstation running the software to the drive. For
information about sharing and mapping drives and folders, see the documentation and online help provided
with your Microsoft Windows operating system.
To access the Windows online help system, select Start > Help from the Windows taskbar.
Backing Up Data
Before you install SoftDent Scheduler, back up your data. For information about backing up your data, see
the documentation provided by your backup media vendor.
Important: Contact a Carestream Dental support representative before proceeding.
CAUTION: Radiographic images are not intended for diagnostic use when viewed
on displays or monitors that do not meet system specifications. For more
information, check the CS Imaging Software System Requirements.

2 of 54 CS SoftDent Scheduler Practice Management Software Installation Guide
for Client/Server Configurations (DE1005-33)
Viewing What’s New
To preview updates and enhancements in this version of SoftDent Scheduler, you can watch a video. To
hear the audio portion of the video, your computer must have a sound card and headphones or speakers.
To view the video:
1 Verify that all programs are closed, click the link in the provided email, and download the SoftDent
software.
2 Click the downloaded ISO file. The Directory window is displayed.
3 Double-click InstallMenu.exe.
The SoftDent Scheduler Installation window is displayed.
OR
If you are running Windows 7 or later, the AutoPlay window is displayed.
Click Run InstallMenu.exe. The User Account Control window is displayed.
Click Yes. The SoftDent Scheduler Installation window is displayed.
Figure 1 SoftDent Scheduler Installation Window
4 Select View What’s New Online.
5 After viewing the video, click Close.
Tip: If the Adobe Reader software is installed on your computer, you can access the
installation guide from the menu.

CS SoftDent Scheduler Practice Management Software Installation Guide 3 of 54
for Client/Server Configurations (DE1005-33)
Installing SoftDent Scheduler
To install SoftDent Scheduler for the first time:
Install the software on the server.
Activate and start the FairCom Server.
Open the software on the server.
Install the software on each workstation.
Installing SoftDent Scheduler on the Server
The server is the computer on which SoftDent Scheduler data resides and from which the FairCom Server
should always be started. A new installation copies all software files to the hard drive of the server.
Installing SoftDent Scheduler on a Server Running Windows 8 or Higher
If you are installing on a server running Windows 8 or higher, you must download .NET Framework 3.5
before you can install SoftDent Scheduler.
To install .NET Framework 3.5 on a server running Windows 8 or higher:
1 Right-click Start and select Control Panel > Programs and Features. The Uninstall or change a
program window is displayed.
2 Select Turn Windows features on or off. The Windows Features window is displayed.
3 Select .NET Framework 3.5 (includes .NET 2.0 and 3.0) and click OK. A window is displayed, stating
that Windows needs files from Windows Update to finish installing the feature. Click Download files
from Windows Update.
4 When the .NET Framework 3.5 download is finished, continue with the SoftDent Scheduler installation
instructions. See “Installing SoftDent Scheduler on the Server” on page 5 for more information.
Important: Before installing this software, back up data. Also, ensure that no flash
drives are installed in any USB ports.
Important: It is not recommended that you run the Microsoft Vista operating system
on the SoftDent Scheduler server. See the current System Requirements
documentation for more information.
Important: You must have an active Internet connection to download the required
software.

4 of 54 CS SoftDent Scheduler Practice Management Software Installation Guide
for Client/Server Configurations (DE1005-33)
Installing SoftDent Scheduler on a Server Running Windows Server 2012 or Windows Server 2016
If you are installing on a server running Windows Server 2012 or Windows Server 2016, you must
download .NET Framework 3.5 before you can install SoftDent Scheduler. You must also enable the
Desktop Experience feature in Windows Server 2012 or Windows Server 2016.
To install .NET Framework 3.5 on a server running Windows Server 2012 or Windows Server 2016:
1 Right-click Start and select Control Panel > Programs and Features. The Uninstall or change a
program window is displayed.
2 Select Turn Windows features on or off. The Server Manager window is displayed.
3 Select Manage > Add Roles and Features. The Before you begin window is displayed.
4 Click Next. The Installation Type window is displayed.
5 Role-based or feature-based installation is selected by default. Click Next. The Select destination
server window is displayed.
6 Select a server from the server pool is selected by default. Click Next. The Select Server Roles
window is displayed.
7 Click Next. The Select features window is displayed.
8 Select .NET Framework 3.5 Features and click Next. The Confirm installation selections window is
displayed.
9 Select Restart the destination server automatically if required. A prompt is displayed, asking if you
want to allow automatic restarts.
10 Click Yes.
11 Click Install.
12 When the .NET Framework 3.5 download is finished, continue with the SoftDent Scheduler installation
instructions. See “Installing SoftDent Scheduler on the Server” on page 5 for more information.
Important: You must have an active Internet connection to download the required
software.

CS SoftDent Scheduler Practice Management Software Installation Guide 5 of 54
for Client/Server Configurations (DE1005-33)
To enable the Desktop Experience feature in Windows Server 2012 or Windows Server 2016:
1 Launch Server Manager Dashboard.
2 Select Add roles and features. The Add Roles and Features Wizard is displayed.
3 Click Next three times. The Features option on the left side of the window is selected.
4 Scroll down to and expand the User Interfaces and Infrastructure option, and select Desktop
Experience.
5 Click Add Features on the next window that is displayed, and then click Next. The Confirm
installation selections window is displayed.
6 Click Install.
7 Click Close. You might be prompted to reboot the server.
Installing SoftDent Scheduler on the Server
To install SoftDent Scheduler on the server:
1 Verify that all other programs on the server are closed, click the link in the provided email, and
download the SoftDent software.
2 Click the downloaded ISO file. The Directory window is displayed.
3 Double-click InstallMenu.exe. The SoftDent Scheduler Installation window is displayed.
OR
If you are running Windows 7 or later, the AutoPlay window is displayed.
Click Run InstallMenu.exe. The User Account Control window is displayed.
Click Yes. The SoftDent Scheduler Installation window is displayed.
4 Select Install SoftDent v19.0.1, FairCom (tm). The Client Server Installation Confirmation window
is displayed.
Figure 2 Client Server Installation Confirmation Window

6 of 54 CS SoftDent Scheduler Practice Management Software Installation Guide
for Client/Server Configurations (DE1005-33)
5 Select I have recently purchased a Faircom license and am ready to install CS SoftDent
Client/Server, and click Continue installing Client Server. The Carestream SoftDent Application
Suite - InstallShield Wizard Welcome window is displayed.
6 Click Next. The Setup Type window is displayed.
OR
One of the following might occur:
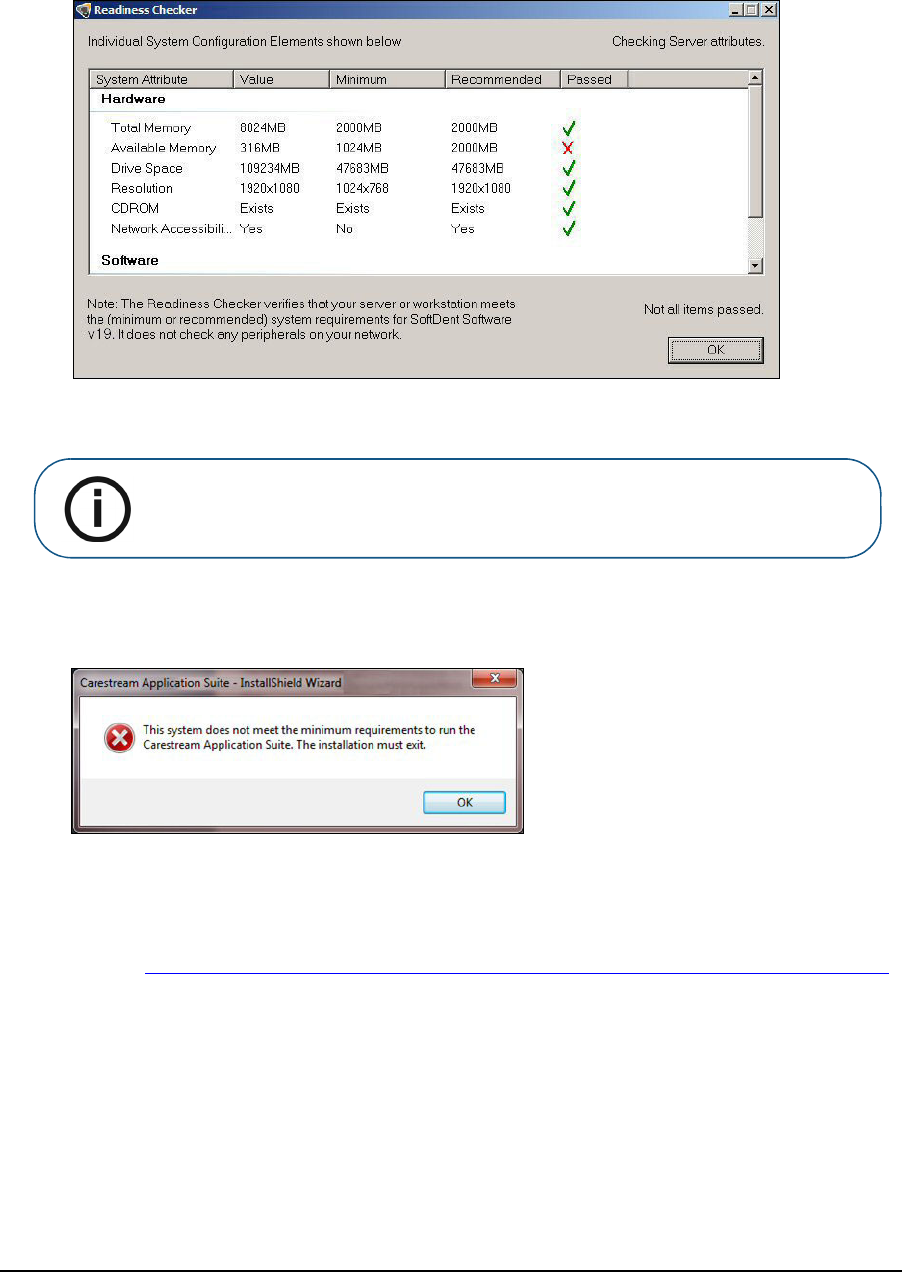
If the installer detects that the server does not meet the minimum requirements necessary to run
SoftDent Scheduler v19, the Readiness Checker window is displayed.
Figure 3 Readiness Checker Window
The red x indicates the area where the server does not meet the minimum requirements. Click OK.
The Carestream Application Suite—InstallShield Wizard window is displayed.
Figure 4 Carestream Application Suite—InstallShield Wizard Window
Click OK. The installation ends.
See the CS SoftDent Scheduler Practice Management Software v19.0.1 System Requirements
for more information.
Note: The Readiness Checker verifies that your server or workstation meets the
(minimum or recommended) system requirements for SoftDent Scheduler Software
v19. It does not check any peripherals on your network.

CS SoftDent Scheduler Practice Management Software Installation Guide 7 of 54
for Client/Server Configurations (DE1005-33)
If the installer detects that the server meets only the minimum requirements necessary to run
SoftDent Scheduler v19, the Readiness Checker window is displayed.
Figure 5 Readiness Checker Window
A yellow checkmark indicates the area where the server meets only the minimum requirements.
Click OK. The Question window is displayed.
Figure 6 Question Window
Do one of the following:
Click No to stop the installation. See the CS SoftDent Scheduler Practice Management
Software v19.0.1 System Requirements for more information.
Click Yes to continue with the installation. Your system performance may not be optimal.
The Setup Type window is displayed.
Note: The Readiness Checker verifies that your server or workstation meets the
(minimum or recommended) system requirements for SoftDent Scheduler Software
v19. It does not check any peripherals on your network.

8 of 54 CS SoftDent Scheduler Practice Management Software Installation Guide
for Client/Server Configurations (DE1005-33)
7 Select Complete. To install the application in the default directory, C:\Program Files (x86)
\Carestream\Carestream SoftDent Application Suite (64-bit machines) or C:\Program Files
\Carestream\Carestream SoftDent Application Suite (32-bit machines), click Next.
The Warning: Confirmation Required window is displayed.
8 Read the message, select This is my server machine; please continue installing, and click Next.
The Ready to Install the Program window is displayed.
9 Click Install. The Welcome window is displayed.
10 Read the welcome message, and click Next. The Choose Destination Location window is displayed.
11 To install the application in the default directory, C:\Server, click Next.
The Installing window is displayed while files are copied to your computer. After all files have been
installed, the InstallShield Wizard Complete window is displayed.
12 Select Yes, I want to restart my computer now, and click Finish.
Tip: To select a different directory, click Browse, select the directory, click OK, and click
Next.
Tip: To select a different directory, click Browse, select the directory, click OK, and click
Next.

CS SoftDent Scheduler Practice Management Software Installation Guide 9 of 54
for Client/Server Configurations (DE1005-33)
Starting and Shutting Down the FairCom Server Software
After you have successfully installed SoftDent Scheduler, you must activate and start the FairCom Server.
The FairCom Server software controls access to the SoftDent Scheduler database. The server software is
included in the installation and must be running to operate SoftDent Scheduler.
Activating the FairCom Server Software
To activate the FairCom Server software, you must use the activation key and serial number included in
your software package. Typically, the FairCom Server software is activated only once, but if you are
performing an upgrade installation, you must re-activate the server.
To activate the FairCom Server on the host computer:
1 After installing the software, select C:\Server\FCACTVAT.exe. The Fcactvat window is displayed.
Figure 7 Fcactvat Window
2 Type the first nine digits of the activation code in the first field, press Tab, and type the second nine
digits of the activation code in the second field. Do not type any information in the third field.
3 Type the last six digits of the serial number in the Enter the last 6 digits of the Serial Number: field
and click Activate. The Successful activation... window is displayed.
4 Click OK.
Note: To run the FairCom Server software, you must know the name of the host
computer. See the Microsoft Help system to locate the host computer name.
Note: If you installed the software in another directory, substitute the appropriate path to
find the FCACTVAT.exe file.

10 of 54 CS SoftDent Scheduler Practice Management Software Installation Guide
for Client/Server Configurations (DE1005-33)
Starting the FairCom Server Software
The FairCom Server software must be running while accessing SoftDent Scheduler and must be shut
down each evening.
To start the server software:
1 Select Start > All Programs > CS SoftDent Software > FairCom Server. The server software is
started, and the FairCom Server window is displayed.
2 Minimize the window to add it to the Windows software taskbar and remove it from the screen.
Shutting Down the FairCom Server Software
Shut down the FairCom Server software every evening after closing SoftDent Scheduler.
To shut down the server software:
1 Maximize the FairCom Server window and select Control > Shutdown. The FairCom Server
Shutdown window is displayed.
2 Type the password and click OK. The Confirmation window is displayed.
3 Click OK.
Important: Exit SoftDent Scheduler before shutting down the FairCom Server
software.
Note: The FairCom Server password is ADMIN. This password is case-sensitive and
cannot be changed.

CS SoftDent Scheduler Practice Management Software Installation Guide 11 of 54
for Client/Server Configurations (DE1005-33)
Opening SoftDent Scheduler on the Server, Installing the License File, and
Registering the Software
After you have installed SoftDent Scheduler, activated the FairCom Server, and started the FairCom
Server, you must open SoftDent Scheduler, install the license file, and register the software.
To open SoftDent Scheduler on the server:
1 Select Start > All Programs > CS SoftDent Scheduler Software > CS SoftDent Scheduler
Software. The SoftDent Scheduler Login window is displayed.
Figure 8 SoftDent Scheduler Login Window
2 Type your name and password and click OK. The Install License File window is displayed.
Figure 9 Install License File Window
3 Click the Browse button, navigate to the folder to which you previously saved the license file, and click
OK.
Note: You are prompted for a license file only if this is a new install or if you are
upgrading from version 9.8 or earlier.

12 of 54 CS SoftDent Scheduler Practice Management Software Installation Guide
for Client/Server Configurations (DE1005-33)
The Registration Reminder window is displayed.
Figure 10 Registration Reminder Window
4 Select Yes, I want to register now and click OK. The Registration window is displayed.
Figure 11 Registration Window
5 Obtain your registration code using one of the following methods:
To receive your registration code on the Internet, click Automatically via the Internet and follow
the instructions.
To receive your registration code over the telephone, select Contact support by telephone.
The Registration window is displayed.
Figure 12 Registration Window
6 After you have received a registration code, type it in the field and click OK. The software is started,
and the SERVER LOGIN window is displayed.

CS SoftDent Scheduler Practice Management Software Installation Guide 13 of 54
for Client/Server Configurations (DE1005-33)
7 Select an option:
To rename the FairCom Server, type the server name in the Server Name field and click OK.
To use the default name (FAIRCOMS), click OK.
Installing SoftDent Scheduler on a Workstation
The installation process centralizes data on the server and installs SoftDent Scheduler on each
workstation. You can install the software using the ISO file, or you can install it across your network.
Installing SoftDent Scheduler on a Workstation Running Windows 8 or Higher
If you are installing on a workstation running Windows 8 or higher, you must download .NET Framework
3.5 before you can install SoftDent Scheduler.
To install .NET Framework 3.5 on a workstation running Windows 8 or higher:
1 Right-click Start and select Control Panel > Programs and Features. The Uninstall or change a
program window is displayed.
2 Select Turn Windows features on or off. The Windows Features window is displayed.
3 Select .NET Framework 3.5 (includes .NET 2.0 and 3.0) and click OK. A window is displayed, stating
that Windows needs files from Windows Update to finish installing the feature. Click Download files
from Windows Update.
4 When the .NET Framework 3.5 download is finished, continue with the SoftDent Scheduler installation
instructions. See “Installing from the Downloaded ISO File” on page 14 for more information.
Important: You must have an active Internet connection to download the required
software.

14 of 54 CS SoftDent Scheduler Practice Management Software Installation Guide
for Client/Server Configurations (DE1005-33)
Installing from the Downloaded ISO File
To install the software on a workstation from the ISO file:
1 Verify that all programs on the workstation are closed, click the link in the provided email, and
download the SoftDent software.
2 Click the downloaded ISO file. The Directory window is displayed.
3 Double-click InstallMenu.exe. The SoftDent Scheduler Installation window is displayed.
OR
If you are running Windows Vista or later, the AutoPlay window is displayed.
Click Run InstallMenu.exe. The User Account Control window is displayed.
Click Yes. The SoftDent Scheduler Installation window is displayed.
4 Select Install SoftDent v19.0.1, FairCom (tm). The Carestream SoftDent Application Suite -
InstallShield Wizard Welcome window is displayed.
5 Click Next. The Ready to Install the Program window is displayed as the software is updated.
OR
One of the following might occur:
If the installer detects that the workstation does not meet the minimum requirements necessary to
run SoftDent Scheduler v19, the Readiness Checker window is displayed.
Figure 13 Readiness Checker Window
Note: The Readiness Checker verifies that your server or workstation meets the
(minimum or recommended) system requirements for SoftDent Scheduler Software
v19. It does not check any peripherals on your network.

CS SoftDent Scheduler Practice Management Software Installation Guide 15 of 54
for Client/Server Configurations (DE1005-33)
The red x indicates the area where the workstation does not meet the minimum requirements. Click
OK. The Carestream Application Suite—InstallShield Wizard window is displayed.
Figure 14 Carestream Application Suite—InstallShield Wizard Window
Click OK. The installation ends.
See the CS SoftDent Scheduler Practice Management Software v19.0.1 System Requirements
for more information.
If the installer detects that the workstation meets only the minimum requirements necessary to run
SoftDent Scheduler v19, the Readiness Checker window is displayed.
Figure 15 Readiness Checker Window
Note: The Readiness Checker verifies that your server or workstation meets the
(minimum or recommended) system requirements for SoftDent Scheduler Software
v19. It does not check any peripherals on your network.

16 of 54 CS SoftDent Scheduler Practice Management Software Installation Guide
for Client/Server Configurations (DE1005-33)
A yellow checkmark indicates the area where the workstation meets only the minimum
requirements. Click OK. The Question window is displayed.
Figure 16 Question Window
Do one of the following:
Click No to stop the installation. See the CS SoftDent Scheduler Practice Management
Software v19.0.1 System Requirements for more information.
Click Yes to continue with the installation. Your system performance may not be optimal.
The Ready to Install the Program window is displayed.
6 Click Install. The Welcome window is displayed.
7 Read the welcome message, and click Next. The Choose Destination Location window is displayed.
8 To install the application in the default directory, C:\SoftDent, click Next.
The Installing window is displayed while files are copied to your computer. The Open File - Security
Warning window is displayed.
9 Click Run. The Installing window is displayed while additional files are copied to your computer. After
the additional files have been installed, the InstallShield Wizard Complete window is displayed.
10 Select Yes, I want to restart my computer now, and click Finish.
Tip: To select a different directory, click Browse, select the directory, click OK, and click
Next.

CS SoftDent Scheduler Practice Management Software Installation Guide 17 of 54
for Client/Server Configurations (DE1005-33)
Installing Across Your Network
Installing on a Workstation Running Windows 8 or Higher
If you are installing on a workstation running Windows 8 or higher, you must download .NET Framework
3.5 before you can install SoftDent Scheduler.
To install .NET Framework 3.5 on a workstation running Windows 8 or higher:
1 Right-click Start and select Control Panel > Programs and Features. The Uninstall or change a
program window is displayed.
2 Select Turn Windows features on or off. The Windows Features window is displayed.
3 Select .NET Framework 3.5 (includes .NET 2.0 and 3.0) and click OK. A window is displayed, stating
that Windows needs files from Windows Update to finish installing the feature. Click Download files
from Windows Update.
4 When the .NET Framework 3.5 download is finished, continue with the SoftDent Scheduler installation
instructions below.
To install the software on a workstation across your network:
1 Verify that all programs on the workstation are closed. Using your mapped drive, navigate to
SoftDent\WSetup\WSETUPDVD on the server, and run the InstallMenu executable file. The
SoftDent Installation window is displayed.
OR
If you are running Windows 7 or later, the AutoPlay window is displayed.
Click Run InstallMenu.exe. The User Account Control window is displayed.
Click Yes. The SoftDent Scheduler Installation window is displayed.
2 Select Install SoftDent v19.0.1, FairCom (tm). The Carestream SoftDent Application Suite -
InstallShield Wizard Welcome window is displayed.
Important: Before you begin, share the server’s hard drive and map a network drive
from the workstation to the server. For more information, see “Getting Started” on
page 1.
Important: You must have an active Internet connection to download the required
software.

18 of 54 CS SoftDent Scheduler Practice Management Software Installation Guide
for Client/Server Configurations (DE1005-33)
3 Click Next. The Ready to Install the Program window is displayed.
OR
One of the following might occur:
If the installer detects that the workstation does not meet the minimum requirements necessary to
run SoftDent Scheduler v19, the Readiness Checker window is displayed.
Figure 17 Readiness Checker Window
The red x indicates the area where the workstation does not meet the minimum requirements. Click
OK. The Carestream Application Suite—InstallShield Wizard window is displayed.
Figure 18 Carestream Application Suite—InstallShield Wizard Window
Click OK. The installation ends.
See the CS SoftDent Scheduler Practice Management Software v19.0.1 System Requirements
for more information.
Note: The Readiness Checker verifies that your server or workstation meets the
(minimum or recommended) system requirements for SoftDent Scheduler Software
v19. It does not check any peripherals on your network.

CS SoftDent Scheduler Practice Management Software Installation Guide 19 of 54
for Client/Server Configurations (DE1005-33)
If the installer detects that the workstation meets only the minimum requirements necessary to run
SoftDent Scheduler v19, the Readiness Checker window is displayed.
Figure 19 Readiness Checker Window
A yellow checkmark indicates the area where the workstation meets only the minimum
requirements. Click OK. The Question window is displayed.
Figure 20 Question Window
Do one of the following:
Click No to stop the installation. See the CS SoftDent Scheduler Practice Management
Software v19.0.1 System Requirements for more information.
Click Yes to continue with the installation. Your system performance may not be optimal.
The Ready to Install the Program window is displayed.
4 Click Install. The Welcome window is displayed.
5 Read the welcome message, and click Next. The Choose Destination Location window is displayed.
Note: The Readiness Checker verifies that your server or workstation meets the
(minimum or recommended) system requirements for SoftDent Scheduler Software
v19. It does not check any peripherals on your network.

20 of 54 CS SoftDent Scheduler Practice Management Software Installation Guide
for Client/Server Configurations (DE1005-33)
6 To install the application in the default directory, C:\SoftDent, click Next.
The Installing window is displayed while files are copied to your computer. The Open File - Security
Warning window is displayed.
7 Click Run. The Installing window is displayed while additional files are copied to your computer. After
the additional files have been installed, the InstallShield Wizard Complete window is displayed.
8 Select Yes, I want to restart my computer now, and click Finish.
Opening SoftDent Scheduler on a Workstation
To open SoftDent Scheduler on a workstation:
1 Select Start > All Programs > CS SoftDent Scheduler Software > CS SoftDent Scheduler
Software. The SoftDent Scheduler Login window is displayed.
2 Type your user name and password, select the new database, and click OK. The software is started,
and the SERVER LOGIN window is displayed.
3 Type the server name, the @ symbol, and the name of the server machine in the Server Name field and
click OK.
Example: Your server name is FAIRCOMS and the server is located on a machine that is named
Server1, so type FAIRCOMS@Server1 in the Server Name field.
The software is displayed, and the client files on the workstation are updated to ensure that they are
synchronous with the server.
Tip: To select a different directory, click Browse, select the directory, click OK, and click
Next.

CS SoftDent Scheduler Practice Management Software Installation Guide 21 of 54
for Client/Server Configurations (DE1005-33)
Upgrading SoftDent Scheduler
An upgrade installation updates existing files, adds new files, and removes outdated SoftDent Scheduler
files on the server. An upgrade installation does not overwrite existing SoftDent Scheduler data.
To upgrade SoftDent Scheduler to version 19.0.1:
Upgrade the software on the server.
Upgrade the software on each workstation.
Upgrading SoftDent Scheduler on the Server
To upgrade your software to the client/server version:
1 Close SoftDent Scheduler on the server and all other computers on the network. Verify that all other
programs on the server are closed, click the link in the provided email, and download the SoftDent
software on the server.
2 Click the downloaded ISO file. The Directory window is displayed.
3 Double-click InstallMenu.exe. The SoftDent Scheduler Installation window is displayed.
OR
If you are upgrading a server running Windows 7 or later, the Autoplay window is displayed.
Click Run InstallMenu.exe. The User Account Control window is displayed.
Click Yes. The SoftDent Scheduler Installation window is displayed.
Important: If you are upgrading from a version prior to 15.0.10, contact a Carestream
Dental support representative.
Important: If you are upgrading the software to a new or different server computer, call
a Carestream Dental support representative before you begin. The process for moving
data and setting up the server can vary with new operating systems, and your
representative can help you make a smooth transition.
Important: Before installing this software, back up data.
Note: These instructions are for upgrading your software with an ISO file. For
instructions on upgrading using the CS Software Update Service, see “Updating Your
Software Using the CS Software Update Service” on page 43.

22 of 54 CS SoftDent Scheduler Practice Management Software Installation Guide
for Client/Server Configurations (DE1005-33)
4 Select Install SoftDent v19.0.1, FairCom (tm). The Carestream SoftDent Application Suite -
InstallShield Wizard Welcome window is displayed.
5 Click Next. The Setup Type window is displayed.
OR
One of the following might occur:
If the installer detects that the server does not meet the minimum requirements necessary to run
SoftDent Scheduler v19, the Readiness Checker window is displayed.
Figure 21 Readiness Checker Window
The red x indicates the area where the server does not meet the minimum requirements. Click OK.
The Carestream Application Suite—InstallShield Wizard window is displayed.
Figure 22 Carestream Application Suite—InstallShield Wizard Window
Click OK. The installation ends.
See the CS SoftDent Scheduler Practice Management Software v19.0.1 System Requirements
for more information.
Note: The Readiness Checker verifies that your server or workstation meets the
(minimum or recommended) system requirements for SoftDent Scheduler Software
v19. It does not check any peripherals on your network.

CS SoftDent Scheduler Practice Management Software Installation Guide 23 of 54
for Client/Server Configurations (DE1005-33)
If the installer detects that the server meets only the minimum requirements necessary to run
SoftDent Scheduler v19, the Readiness Checker window is displayed.
Figure 23 Readiness Checker Window
A yellow checkmark indicates the area where the server meets only the minimum requirements.
Click OK. The Question window is displayed.
Figure 24 Question Window
Do one of the following:
Click No to stop the installation. See the CS SoftDent Scheduler Practice Management
Software v19.0.1 System Requirements for more information.
Click Yes to continue with the installation. Your system performance may not be optimal.
The Setup Type window is displayed.
Note: The Readiness Checker verifies that your server or workstation meets the
(minimum or recommended) system requirements for SoftDent Scheduler Software
v19. It does not check any peripherals on your network.

24 of 54 CS SoftDent Scheduler Practice Management Software Installation Guide
for Client/Server Configurations (DE1005-33)
6 Select Complete. To install the application in the default directory, C:\Program Files (x86)
\Carestream\Carestream SoftDent Application Suite (64-bit machines) or C:\Program Files
\Carestream\Carestream SoftDent Application Suite (32-bit machines), click Next.
The Warning: Confirmation Required window is displayed.
7 Read the message, select This is my server machine; please continue installing, and click Next.
The Ready to Install the Program window is displayed.
8 Click Install. The Welcome window is displayed.
9 Click Next. The Existing Installation Found window is displayed.
10 Click Next to install the software in the existing directory. The Release Code window is displayed.
11 Obtain your release code using one of the following methods:
To receive your release code on the Internet, ensure you have a valid Internet connection, click
Automatically via the Internet, and click OK. The Release Code window is
displayed while the
code is being generated.
Figure 25 Release Code Window
To receive your release code over the telephone, select Contact support by telephone, click OK,
and call Carestream Dental Customer Support. The Release Code window is displayed. Read the
values in the Customer ID and Hardware ID fields to the representative. After the representative
gives you the registration code, type it in the Release Code field and click OK.
Tip: To select a different directory, click Browse, select the directory, click OK, and click
Next.

CS SoftDent Scheduler Practice Management Software Installation Guide 25 of 54
for Client/Server Configurations (DE1005-33)
Figure 26 Release Code Window
The Start Installation window is displayed.
12 Click Next. The Installing window is displayed while files are copied to your computer. After all files
are installed, the Installation Complete window is displayed.
13 Click Finish. Additional Carestream Application Suite files are installed. After the additional files have
been installed, the InstallShield Wizard Complete window is displayed.
14 Select Yes, I want to restart my computer now, and click Finish.
Upgrading SoftDent Scheduler on a Workstation
Automatically Upgrading the Software
To automatically upgrade the software on a workstation:
1 After you have upgraded the server, log in to SoftDent on the workstation. A message is displayed,
stating that an update has been detected and asking if you want to install the update.
2 Click Yes. Several Open File - Security Warning windows might display.
3 Click Run on each security window. The Carestream SoftDent Application Suite - InstallShield
Wizard Welcome window is displayed.
4 Click Next. The system scans the network, and the Ready to Install the Program window is
displayed.
5 Click Install, and the software is updated.
OR
One of the following might occur:
Note: These instructions are for upgrading your software with an ISO file. For
instructions on upgrading using the CS Software Update Service, see “Updating Your
Software Using the CS Software Update Service” on page 43.

26 of 54 CS SoftDent Scheduler Practice Management Software Installation Guide
for Client/Server Configurations (DE1005-33)
If the installer detects that the workstation does not meet the minimum requirements necessary to
run SoftDent Scheduler v19, the Readiness Checker window is displayed.
Figure 27 Readiness Checker Window
The red x indicates the area where the workstation does not meet the minimum requirements. Click
OK. The Carestream Application Suite—InstallShield Wizard window is displayed.
Figure 28 Carestream Application Suite—InstallShield Wizard Window
Click OK. The installation ends.
See the CS SoftDent Scheduler Practice Management Software v19.0.1 System Requirements
for more information.
Note: The Readiness Checker verifies that your server or workstation meets the
(minimum or recommended) system requirements for SoftDent Scheduler Software
v19. It does not check any peripherals on your network.

CS SoftDent Scheduler Practice Management Software Installation Guide 27 of 54
for Client/Server Configurations (DE1005-33)
If the installer detects that the workstation meets only the minimum requirements necessary to run
SoftDent Scheduler v19, the Readiness Checker window is displayed.
Figure 29 Readiness Checker Window
A yellow checkmark indicates the area where the workstation meets only the minimum
requirements. Click OK. The Question window is displayed.
Figure 30 Question Window
Do one of the following:
Click No to stop the installation. See the CS SoftDent Scheduler Practice Management
Software v19.0.1 System Requirements for more information.
Click Yes to continue with the installation. Your system performance may not be optimal.
The Installing window is displayed as the software is updated.
When the update is finished, the Update Complete window is displayed.
6 Select Yes, I want to restart my computer now, and click Finish.
7 Repeat these steps on each workstation in your network.
Note: The Readiness Checker verifies that your server or workstation meets the
(minimum or recommended) system requirements for SoftDent Scheduler Software
v19. It does not check any peripherals on your network.

28 of 54 CS SoftDent Scheduler Practice Management Software Installation Guide
for Client/Server Configurations (DE1005-33)
Manually Upgrading the Software
To upgrade the software on a workstation:
1 Select an option:
To install the software from the ISO file, verify that all programs on the workstation are closed, click
the link in the provided email, and download the SoftDent software. Click the downloaded ISO file.
The Directory window is displayed. Double-click InstallMenu.exe.
To install the software across the network, verify that all programs on the workstation are closed.
Using your mapped drive, navigate to SoftDent\WSetup\WSETUPDVD on the server, and run
the InstallMenu executable file.
The SoftDent Scheduler Installation window is displayed.
OR
If you are upgrading a workstation running Windows 7 or later, the Autoplay window is displayed.
Click Run InstallMenu.exe. The User Account Control window is displayed.
Click Yes. The SoftDent Scheduler Installation window is displayed.
2 Select Install SoftDent v19.0.1, FairCom (tm). The Carestream SoftDent Application Suite -
InstallShield Wizard Welcome window is displayed.
3 Click Next. The Installing window is displayed as the software is updated.
OR
One of the following might occur:
Important: Shut down the FairCom Server before upgrading the software.
CS SoftDent Scheduler Practice Management Software Installation Guide 29 of 54
for Client/Server Configurations (DE1005-33)
If the installer detects that the workstation does not meet the minimum requirements necessary to
run SoftDent Scheduler v19, the Readiness Checker window is displayed.
Figure 31 Readiness Checker Window
The red x indicates the area where the workstation does not meet the minimum requirements. Click
OK. The Carestream Application Suite—InstallShield Wizard window is displayed.
Figure 32 Carestream Application Suite—InstallShield Wizard Window
Click OK. The installation ends.
See the CS SoftDent Scheduler Practice Management Software v19.0.1 System Requirements
for more information.
Note: The Readiness Checker verifies that your server or workstation meets the
(minimum or recommended) system requirements for SoftDent Scheduler Software
v19. It does not check any peripherals on your network.

30 of 54 CS SoftDent Scheduler Practice Management Software Installation Guide
for Client/Server Configurations (DE1005-33)
If the installer detects that the workstation meets only the minimum requirements necessary to run
SoftDent Scheduler v19, the Readiness Checker window is displayed.
Figure 33 Readiness Checker Window
A yellow checkmark indicates the area where the workstation meets only the minimum
requirements. Click OK. The Question window is displayed.
Figure 34 Question Window
Do one of the following:
Click No to stop the installation. See the CS SoftDent Scheduler Practice Management
Software v19.0.1 System Requirements for more information.
Click Yes to continue with the installation. Your system performance may not be optimal.
The Installing window is displayed as the software is updated.
When the update is finished, the Update Complete window is displayed.
4 Select Yes, I want to restart my computer now, and click Finish.
5 Repeat these steps on each workstation in your network.
Note: The Readiness Checker verifies that your server or workstation meets the
(minimum or recommended) system requirements for SoftDent Scheduler Software
v19. It does not check any peripherals on your network.

CS SoftDent Scheduler Practice Management Software Installation Guide 31 of 54
for Client/Server Configurations (DE1005-33)
Upgrading SoftDent Scheduler on a Server—Maintenance Release
To upgrade SoftDent Scheduler on a server:
1 Close SoftDent Scheduler on the server and all other computers on the network. Verify that all other
programs on the server are closed, click the link in the provided email, and download the SoftDent
software.
2 Click the downloaded ISO file. The Directory window is displayed.
3 Double-click InstallMenu.exe. The SoftDent Scheduler Installation window is displayed.
OR
If you are upgrading a server running Windows 7 or later, the Autoplay window is displayed.
Click Run InstallMenu.exe. The User Account Control window is displayed.
Click Yes. The SoftDent Scheduler Installation window is displayed.
4 Select Install SoftDent v19.0.1, FairCom (tm). The Carestream SoftDent Application Suite -
InstallShield Wizard Welcome window is displayed.
5 Click Next. A number of progress windows are displayed as the software is updated.
6 When the upgrade is completed, the Update Complete window is displayed. Click Finish.
7 Click Exit.
Important: Back up data and shut down the FairCom Server before upgrading the
software.
Note: These instructions are for upgrading your software with an ISO file. For
instructions on upgrading using the CS Software Update Service, see “Updating Your
Software Using the CS Software Update Service” on page 43.
Important: Restart the server after upgrading the software.

32 of 54 CS SoftDent Scheduler Practice Management Software Installation Guide
for Client/Server Configurations (DE1005-33)
Upgrading SoftDent Scheduler on a Workstation—Maintenance Release
Automatically Upgrading the Software
To automatically upgrade the software on a workstation:
1 After you have upgraded the server, log in to SoftDent on the workstation. A message is displayed,
stating that an update has been detected and asking if you want to install the update.
2 Click Yes. Several Open File - Security Warning windows might display.
3 Click Run on each security window. The Carestream SoftDent Application Suite - InstallShield
Wizard Welcome window is displayed.
4 Click Next. The system scans the network, and the Ready to Install the Program window is
displayed.
5 Click Install. When the update is finished, the Update Complete window is displayed.
6 Select Yes, I want to restart my computer now, and click Finish.
7 Repeat these steps on each workstation in your network.
Manually Upgrading the Software
To manually upgrade the software on a workstation:
1 Select an option:
To install the software from the ISO file, verify that all programs on the workstation are closed, click
the link in the provided email, and download the SoftDent software. Click the downloaded ISO file.
The Directory window is displayed. Double-click InstallMenu.exe.
To install the software across the network, verify that all programs on the workstation are closed.
Using your mapped drive, navigate to SoftDent\WSetup\WSETUPDVD on the server, and run
the InstallMenu executable file.
The SoftDent Scheduler Installation window is displayed.
OR
If you are upgrading a workstation running Windows 7 or later, the Autoplay window is displayed.
Click Run InstallMenu.exe. The User Account Control window is displayed.
Click Yes. The SoftDent Scheduler Installation window is displayed.
2 Select Install SoftDent v19.0.1, FairCom (tm). The Carestream SoftDent Application Suite -
InstallShield Wizard Welcome window is displayed.
Note: These instructions are for upgrading your software with an ISO file. For
instructions on upgrading using the Software Update Service, see “Updating Your
Software Using the CS Software Update Service” on page 43.

CS SoftDent Scheduler Practice Management Software Installation Guide 33 of 54
for Client/Server Configurations (DE1005-33)
3 Click Next. A number of progress windows are displayed as the software is updated.
4 When the upgrade is completed, the Update Complete window is displayed. Click Finish.
5 Click Exit.
6 Repeat these steps on each workstation in your network.
Installing and Activating the SoftDent Scheduler KIOSK Check-In
Module on a Workstation
You must install and activate the KIOSK check-in module before you can use it.
Installing the SoftDent Scheduler KIOSK Check-In Module on a Workstation
A dedicated KIOSK workstation must be activated from the SoftDent Scheduler software on the SoftDent
Scheduler server. To accommodate this, you must share the KIOSK workstation’s hard drive. For more
information on sharing and mapping drives and folders, see the documentation and online help provided
with your Microsoft Windows operating system.
Before installing the KIOSK check-in module, verify that this feature is enabled in your license file. To
purchase the module or for additional information, contact your Carestream Dental representative.
To install the KIOSK check-in module on a computer:
1 Verify that all programs are closed, click the link in the provided email, and download the SoftDent
software.
2 Click the downloaded ISO file. The Directory window is displayed.
3 Double-click InstallMenu.exe. The SoftDent Scheduler Installation window is displayed.
OR
If you are running Windows 7 or later, the AutoPlay window is displayed. Click Run InstallMenu.exe.
The SoftDent Scheduler Installation window is displayed.
4 Select Install SoftDent KIOSK from the menu. The installer program is launched.
5 Follow the instructions in the installer.
Important: Restart the workstation after upgrading the software.
Important: The KIOSK setup files are placed in the C:\SoftDent\KSetup directory of
the SoftDent Scheduler server. If you update the software via the Internet, you must
share this directory so you can browse to this folder from the KIOSK workstation you
are setting up. Since non-employees access KIOSK workstations,
permissions for user
accounts on these computers should allow access to ONLY the KSetup subdirectory,
and not the main SoftDent directory above it.

34 of 54 CS SoftDent Scheduler Practice Management Software Installation Guide
for Client/Server Configurations (DE1005-33)
Activating the SoftDent Scheduler KIOSK Check-In Module on a Workstation
When the installer is finished, complete these steps from the SoftDent Scheduler server:
1 Select System > Change System Settings > KIOSK Configuration Options >
Activate/Deactivate KIOSK workstations. The KIOSK Workstations window is displayed.
Figure 35 KIOSK Workstations Window
2 Click Add. The Browse for Folder window is displayed.
3 Browse to the workstation you want to activate, and select the folder containing the SDKIOSK.EXE
file.
4 Click OK. The KIOSK workstation is displayed in the list of active workstations.
5 Click Close.
Using the CS Software Update Service
The CS Software Update Service (SUS) notifies you that a Carestream software update is available and
enables you to view, schedule, and start the installation of the updates.
CS Software Update Service Benefits
The SUS provides the following benefits:
Updates give you the latest features.
Updates are fast and efficient.
Updates are delivered automatically to your desktop.
Updates are securely downloaded and verified.
You can schedule updates during non-working hours.

CS SoftDent Scheduler Practice Management Software Installation Guide 35 of 54
for Client/Server Configurations (DE1005-33)
CS Software Update Service Features
Features of the SUS include:
The service provides additional information about each update; you decide if and when to update.
The service works behind the scenes and does not disrupt your workflow.
The service uses the same technology as Microsoft to deliver updates.
The service alerts you if there are issues.
The service utilizes a simple registration procedure that uses the same account details as other
Carestream Dental services.
The service collects only the information necessary to operate the service (email address, account
number, Carestream Dental software versions installed, and a number assigned to your site and
each PC).
You receive no additional or intrusive marketing information.
Configuring the CS Software Update Service
The update software is installed when you install the latest version of SoftDent Scheduler. After configuring
the service, you will receive notifications when updates are available.
Note: You need to configure the service only once, and it can be done on any machine,
including the server.
Tip: Have your account ID/CustomerID number handy, as you will be asked for this
information during the configuration process. If you don't know your account
ID/CustomerID number, before you start the configuration process, launch SoftDent
Scheduler (on another machine, if necessary). From the Help menu, click About
SoftDent Scheduler. Click Show License Details. Locate the CustomerID number.

36 of 54 CS SoftDent Scheduler Practice Management Software Installation Guide
for Client/Server Configurations (DE1005-33)
To configure the CS Software Update Service:
1 Do one of the following:
After installing the latest version of CS SoftDent Scheduler, double-click the CS SoftDent
Scheduler icon on your desktop.
Right-click the CS triangle logo and select Configure Update Service.
Double-click the orange triangle in your system tray.
Note: If you have already set up the update service, the SoftDent Scheduler Login
window is displayed.
Note: If you have already set up the update service, the CS Software Update Service
— Configure the Software Update Service window is displayed.

CS SoftDent Scheduler Practice Management Software Installation Guide 37 of 54
for Client/Server Configurations (DE1005-33)
The CS Software Update Service — Start Using the CS Software Update Service (SUS) window
is displayed.
Figure 36 CS Software Update Service — Start Using the CS Software Update Service (SUS)
Window
2 If you have a Carestream single-sign-on (SSO) account, type your email address and password, and
click OK. The CS Software Update Service — Account Details Accepted window is displayed.
3 Click OK.
Tip: Not sure if you have a single-sign-on (SSO) account?
— You might have created an SSO account for the Customer Portal.
— A Carestream Dental Institute representative might have created an SSO account for
you, in which case you would use your email address and the password mwonline
(unless you changed your password).
— Your email address is always the login for your SSO account.
Note: If your single-sign-on-account email address has not been verified, you will
receive an email and be instructed to verify the email address and activate your account.
Note: If you do not know your password and must reset it, the password is changed for
other services accessed with that SSO.

38 of 54 CS SoftDent Scheduler Practice Management Software Installation Guide
for Client/Server Configurations (DE1005-33)
OR
If you do not have a single-sign-on account:
Select I need to create a Single-Sign-On account and click OK. The CS Software Update
Service — Create Carestream Single-Sign-On Account message is displayed.
Figure 37 CS Software Update Service — Create Carestream Single-Sign-On Account
Message
Read the message and click OK. The Single-Sign-On web page is displayed.
Figure 38 Single-Sign-On Web Page Window
In the Register section of the web page, type your email address and a password, and
re-enter the information to confirm it. Click Register. The Account Information window is
displayed.

CS SoftDent Scheduler Practice Management Software Installation Guide 39 of 54
for Client/Server Configurations (DE1005-33)
Figure 39 Account Information Window
Select your region from the drop-down list and type your account ID (CustomerID) and zip code
and click OK. A message is displayed, stating that an email has been sent to you, and you must
click a link in the email to activate your account.
After you have clicked the link on the email verification page, close your web browser and return to
the CS Software Update Service — Start Using the CS Software Update Service (SUS)
window.
Tip: To find your account ID/CustomerID number, launch SoftDent. From the Help
menu, click About SoftDent Scheduler. Click Show License Details. Locate the
CustomerID number.

40 of 54 CS SoftDent Scheduler Practice Management Software Installation Guide
for Client/Server Configurations (DE1005-33)
Figure 40 CS Software Update Service — Start Using the CS Software Update Service
(SUS) Window
Type your email address and password, and click OK. The CS Software Update Service —
Account Details Accepted window is displayed.
Click OK.

CS SoftDent Scheduler Practice Management Software Installation Guide 41 of 54
for Client/Server Configurations (DE1005-33)
Authenticating an Existing SSO Account and Configuring the CS Software Update
Service
To get the full benefit of the CS Software Update Service, your SSO account must be authenticated and
associated with your account number/CustomerID. If you created an SSO account for a service that does
not require an account number or if you did not know your account ID at the time you created your SSO
account, your SSO account is not authenticated.
To authenticate an existing SSO account and configure the SUS:
1 Right-click the CS triangle logo and select Configure Update Service. The CS Software Update
Service — Configure the Software Update Service window is displayed. Note the [Authenticate]
notation in the Account No. section.
Figure 41 CS Software Update Service — Configure the Software Update Service Window
Important: You will receive only critical updates to your software until you authenticate
your SSO account.
Note: If you have multiple accounts, select an account from the list.

42 of 54 CS SoftDent Scheduler Practice Management Software Installation Guide
for Client/Server Configurations (DE1005-33)
2 Click Authenticate Account. The CS Software Update Service — Authenticate Account window is
displayed.
Figure 42 CS Software Update Service — Authenticate Account Window
3 Type your account number/CustomerID and your zip code, and click Authenticate. The CS Software
Update Service — Account Details Accepted window is displayed.
4 Click OK.
Adding Accounts
To add an account to the CS Software Update Service:
1 Right-click the triangle logo and select Configure CS Update Service. The CS Software Update
Service — Configure the Software Update Service window is displayed.
2 Click Add Account. The CS Software Update Service — Carestream Single-Sign-On window is
displayed.
3 Type the email address and password, and click Sign In.
4 Click OK.
Removing Accounts
To remove an account from the CS Software Update Service:
1 Right-click the triangle logo and select Configure CS Update Service. The CS Software Update
Service — Configure the Software Update Service window is displayed.
2 Select an account from the list and click Remove Account.
3 Click OK.
Note: If you remove all accounts from the list, online updates are disabled.

CS SoftDent Scheduler Practice Management Software Installation Guide 43 of 54
for Client/Server Configurations (DE1005-33)
Updating Your Software Using the CS Software Update Service
All workstations are notified about an update, but you must first install the update on the server using the
procedure below. Once you update the server, you are prompted to update the workstations when you
start SoftDent Scheduler.
To update SoftDent Scheduler:
1 Do one of the following:
Click the updates message.
Right-click the CS triangle logo in the system tray, and select View Updates.
Click the click here link if an update is available when you open SoftDent Scheduler.
Figure 43 Update Is Available Window
Tip: You can manually check for updates at any time. Right-click the CS triangle logo
and select Check for Updates.
Note: You must restart your computer after an update. You might be prompted to shut
down your computer before the update can take place.

44 of 54 CS SoftDent Scheduler Practice Management Software Installation Guide
for Client/Server Configurations (DE1005-33)
The CS Software Update Service — Carestream Software Updates window is displayed.
Figure 44 CS Software Update Service — Carestream Software Updates Window
2 Select the update you want to install, click Install, and follow the prompts.
OR
Click Schedule. The CS Software Update Service — Schedule Update Installation window is
displayed.
Figure 45 CS Software Update Service — Schedule Update Installation Window
Select a day and time for the update installation, and click OK.
Note: When you schedule an update, the SUS attempts to update all machines that are
running.

CS SoftDent Scheduler Practice Management Software Installation Guide 45 of 54
for Client/Server Configurations (DE1005-33)
Receiving and Viewing Alerts
You might receive an SUS alert containing information about the service; for example, a message about low
disk space or a server connection issue.
To view alerts:
1 Do one of the following:
Click the alerts message.
Right-click the CS triangle logo in the system tray, and select View Alerts.
The Carestream Alerts window is displayed.
Figure 46 Carestream Alerts Window
2 Read the alert and click Close.

46 of 54 CS SoftDent Scheduler Practice Management Software Installation Guide
for Client/Server Configurations (DE1005-33)
Using the Database Extractor Utility
Several SQL databases should be included among the databases backed up as part of your daily backup
routine. The Database Extractor Utility creates a file with a .bak extension that can be included with other
critical files which your third-party backup software captures. Using the utility, you can specify the location
where the .bak file is saved, as well as the number of archived backup files that are maintained. The utility
also enables you to restore a .bak file.
Setting Database Extractor Utility Window Preferences and Extracting the Backup
File
The Database Extractor Utility enables you to create an “on demand” backup of your CS SoftDent
Scheduler SQL databases. Using the Database Extractor Utility window requires that you manually run
the utility. For information on using the Windows Task Scheduler to automate this process, see “Creating a
Scheduled Task to Run the Database Extractor Utility Automatically.”
To set the Database Extractor Utility window preferences and extract the SQL backup file:
1 Select Start > All Programs > Carestream > Database Extractor Utility. The Database Extractor
Utility — SoftDent window is displayed.
Figure 47 Database Extractor Utility — SoftDent Window
Note: Ensure that the FairCom server is shut down and all users are logged out of CS
SoftDent Scheduler before running this utility.
Important: This process does not back up your data. It creates a .bak file of the SQL
databases so that it can be backed up by your third-party backup program. Consult
your local computer technician for information about using a backup program.

CS SoftDent Scheduler Practice Management Software Installation Guide 47 of 54
for Client/Server Configurations (DE1005-33)
2 If you do not want to use the default directory, click the ... button to browse to the directory where the
extracted file should be placed.
3 If necessary, change the default number of copies to archive by typing the number in the field.
4 Select Save settings on exit.
5 Click Extract.
A message about the success or failure of the extracted file is displayed.
6 Click OK.
7 Click Exit.
Note: If your backup is configured to capture the entire SoftDent folder, you can have
the Database Extractor Utility place the backup file in the same folder. If your backup is
configured to include only minimum files, then you must reconfigure the backup to
include files with the .bak file extension.
Note: All other applications must be closed before extracting the file.
Note: In the specified folder, the most recent backup file is named
PWBackup_SoftDent_DatabaseSet_SoftDent_YYYYMMDD_001.bak, where
YYYYMMDD indicates the year, month, and day the backup was created. Previous
backups have an Archived_ prefix in the name.

48 of 54 CS SoftDent Scheduler Practice Management Software Installation Guide
for Client/Server Configurations (DE1005-33)
Creating a Scheduled Task to Run the Database Extractor Utility Automatically
Using the Microsoft Windows Task Scheduler function, you can run the Database Extractor Utility
automatically, according to the frequency you select.
To create a scheduled task to run the Database Extractor Utility automatically:
1 Set up the Database Extractor Utility window preferences as described in “Setting Database
Extractor Utility Window Preferences and Extracting the Backup File.”
2 Select Start > All Programs > Accessories > System Tools > Task Scheduler. The Task
Scheduler window is displayed.
Figure 48 Task Scheduler Window

CS SoftDent Scheduler Practice Management Software Installation Guide 49 of 54
for Client/Server Configurations (DE1005-33)
3 Click Create Basic Task. The Create a Basic Task window is displayed.
Figure 49 Create Basic Task Wizard — Create a Basic Task Window
4 Type a name and description for the task, and click Next. The Task Trigger window is displayed.
Figure 50 Create Basic Task Wizard — Task Trigger Window

50 of 54 CS SoftDent Scheduler Practice Management Software Installation Guide
for Client/Server Configurations (DE1005-33)
5 Select when you want the task to start, and click Next. The Time and Frequency window is displayed.
Figure 51 Create Basic Task Wizard — Time and Frequency Window
6 Select a start date and time for the task and click Next. The Action window is displayed.
Figure 52 Create Basic Task Wizard — Action Window

CS SoftDent Scheduler Practice Management Software Installation Guide 51 of 54
for Client/Server Configurations (DE1005-33)
7 Select Start a program and click Next. The Start a Program window is displayed.
Figure 53 Create Basic Task Wizard — Start a Program Window
8 Click Browse and navigate to the DatabaseExtractor.exe file contained within C:\Program
Files\Carestream\DB Extractor and click Next. The Summary window is displayed.
Figure 54 Create Basic Task Wizard — Summary Window
9 Verify that all settings are correct and click Finish.

52 of 54 CS SoftDent Scheduler Practice Management Software Installation Guide
for Client/Server Configurations (DE1005-33)
Restoring the Backup File
To restore a previously extracted .bak file:
1 Select Start > All Programs > Carestream > Database Extractor Utility. The Database Extractor
Utility window is displayed.
Figure 55 Database Extractor Utility — SoftDent Window
2 Click Restore. The Open window is displayed.
Figure 56 Database Extractor Open Window
3 Select the folder containing the database file you want to restore, and click Open.

CS SoftDent Scheduler Practice Management Software Installation Guide 53 of 54
for Client/Server Configurations (DE1005-33)
4 Select the .bak file you want to restore and click Open. The Warning window is displayed.
Figure 57 Database Extractor Warning Window
5 Read the warning, and select I have read the above warning and understand the risks of using
this utility.
6 Click OK. A message about the success or failure of the backup is displayed.
7 Click Exit.

54 of 54 CS SoftDent Scheduler Practice Management Software Installation Guide
for Client/Server Configurations (DE1005-33)
