
***Unable to locate subtitle***
EnginFrame Administrator Guide
Copyright © 2024 Amazon Web Services, Inc. and/or its affiliates. All rights reserved.

EnginFrame Administrator Guide ***Unable to locate subtitle***
EnginFrame Administrator Guide: ***Unable to locate subtitle***
Copyright © 2024 Amazon Web Services, Inc. and/or its affiliates. All rights reserved.
Amazon's trademarks and trade dress may not be used in connection with any product or service
that is not Amazon's, in any manner that is likely to cause confusion among customers, or in any
manner that disparages or discredits Amazon. All other trademarks not owned by Amazon are
the property of their respective owners, who may or may not be affiliated with, connected to, or
sponsored by Amazon.
Copyright
Copyright © 2000-2021, NICE s.r.l.
All right reserved.
We'd Like to Hear from You
You can help us make this document better by telling us what you think of the
content, organization, and usefulness of the information. If you find an error or just
want to make a suggestion for improving this document, address your comments to
<[email protected]>. Send only comments regarding NICE
documentation.
For product support, contact <[email protected]>.
Although the information in this document has been carefully reviewed, NICE s.r.l. ("NICE")
doesn't warrant it to be free of errors or omissions. NICE reserves the right to make corrections,
updates, revisions, or changes to the information in this document.
UNLESS OTHERWISE EXPRESSLY STATED BY NICE, THE PROGRAM DESCRIBED IN THIS
DOCUMENT IS PROVIDED "AS IS" AND WITHOUT WARRANTY OF ANY KIND, EITHER
EXPRESSED OR IMPLIED, INCLUDING, BUT NOT LIMITED TO, THE IMPLIED WARRANTIES OF
MERCHANTABILITY AND FITNESS FOR A PARTICULAR PURPOSE. IN NO EVENT WILL NICE BE
LIABLE TO ANYONE FOR SPECIAL, COLLATERAL, INCIDENTAL, OR CONSEQUENTIAL DAMAGES,
INCLUDING WITHOUT LIMITATION ANY LOST PROFITS, DATA, OR SAVINGS, ARISING OUT OF
THE USE OF OR INABILITY TO USE THIS PROGRAM.
Document Redistribution and Translation
This document is protected by copyright and you may not redistribute or translate it into
another language, in part or in whole, without the express written permission of NICE s.r.l.

EnginFrame Administrator Guide ***Unable to locate subtitle***
Trademarks
EnginFrame, , Remote File Browsing, Service Definition File, EnginFrame Agent are registered
trademarks or trademarks of NICE s.r.l. in Italy and other countries.
Amazon™ is a registered trademark of Amazon.com, Inc.
Apache®, Apache Derby®, Tomcat® are either registered trademarks or trademarks of the
Apache Software Foundation in the United States and/or other countries.
Oracle®, Sun®, MySQL®, JavaScript® and Java™ are registered trademarks of Oracle and/or its
affiliates.
Unix is a registered trademark of The Open Group in the United States and other countries.
Linux® is the registered trademark of Linus Torvalds in the United States and other countries.
Microsoft®, Windows® and Internet Explorer® are either registered trademarks or trademarks of
Microsoft Corporation in the United States and other countries.
Firefox® and Mozilla® are trademarks or registered trademarks of the Mozilla Foundation in the
United States and/or other countries.
Apple®, Mac®, Mac® OS X® and Apple® Safari® are trademarks or registered trademarks of
Apple, Inc. in the United States and other countries.
IBM®, IBM® Platform™ LSF® are trademarks of International Business Machines Corp., registered
in many jurisdictions worldwide.
Altair® PBS Professional® is a trademark of Altair Engineering, Inc.
Univa® and Univa® Grid Engine® (UGE) are trademarks of Univa Corporation.
SLURM™ is a trademark of SchedMD LLC.
RealVNC® and VNC® are trademarks of RealVNC Limited and are protected by trademark
registrations and/or pending trademark applications in the European Union, United States of
America and other jurisdictions.
HP® is a registered trademark of HP Inc.
Google™ and Chrome™ are trademarks of Google Inc.


EnginFrame Administrator Guide ***Unable to locate subtitle***
Table of Contents
Welcome ........................................................................................................................................... 1
About this guide ........................................................................................................................................... 1
Who this guide is for ............................................................................................................................. 1
What you should know .......................................................................................................................... 1
Learn about NICE products ........................................................................................................................ 1
World Wide Web ..................................................................................................................................... 1
Get technical support .................................................................................................................................. 1
NICE support contacts ........................................................................................................................... 1
Collect support information ................................................................................................................. 2
Getting started ................................................................................................................................ 3
About NICE EnginFrame .............................................................................................................................. 3
Architectural overview ........................................................................................................................... 4
EnginFrame Enterprise ......................................................................................................................... 16
AWS HPC Connector ............................................................................................................................ 19
Obtaining NICE EnginFrame .................................................................................................................... 22
Downloading EnginFrame ................................................................................................................... 22
EnginFrame on Amazon EC2 .............................................................................................................. 23
EnginFrame on on-premises and other cloud-based servers ....................................................... 24
Planning a NICE EnginFrame deployment ............................................................................................ 25
Prerequisites ........................................................................................................................................... 26
Deployment strategies ......................................................................................................................... 42
Installation directories ......................................................................................................................... 43
Special users .......................................................................................................................................... 46
Authentication ....................................................................................................................................... 47
Digital Rights Management (DRM) configuration for Interactive Plugin ................................... 47
Installing NICE EnginFrame ...................................................................................................................... 53
Installing ................................................................................................................................................. 53
Fine-tuning your installation .............................................................................................................. 56
Installing EnginFrame Enterprise ....................................................................................................... 60
Configure EnginFrame to work behind a network proxy ............................................................. 68
Running NICE EnginFrame ....................................................................................................................... 69
Start or stop EnginFrame and check its status .............................................................................. 69
Accessing the portal ............................................................................................................................. 72
Demo sites .............................................................................................................................................. 73
v

EnginFrame Administrator Guide ***Unable to locate subtitle***
Operational Dashboard ....................................................................................................................... 73
Workspace ............................................................................................................................................... 75
Virtual Desktop ..................................................................................................................................... 76
Administration ............................................................................................................................... 78
Common administration tasks ................................................................................................................ 78
Main configuration files ....................................................................................................................... 79
Deploying a new plugin ...................................................................................................................... 81
Changing Java™ version ...................................................................................................................... 82
Changing the default agent ............................................................................................................... 83
Managing internet media types ......................................................................................................... 84
Customizing error page layout .......................................................................................................... 87
Limiting service output ........................................................................................................................ 88
Configuring agent ports ...................................................................................................................... 89
Customizing user switching ................................................................................................................ 90
Customizing user session timeout ..................................................................................................... 91
Apache®-Tomcat® connection ............................................................................................................ 91
Changing charts backend .................................................................................................................... 93
Interactive administration ................................................................................................................... 93
Views administration ......................................................................................................................... 111
Applications administration .............................................................................................................. 118
Managing spoolers ................................................................................................................................... 123
Spoolers requirements ...................................................................................................................... 124
Configuring EnginFrame spoolers ................................................................................................... 126
Spooler life cycle ................................................................................................................................ 129
Managing the sessions directory .......................................................................................................... 131
Sessions requirements ....................................................................................................................... 131
NICE DCV Session Manager ................................................................................................................... 132
How to set up NICE DCV Session Manager ................................................................................... 132
Add more NICE DCV Session Manager clusters ............................................................................ 134
Enable hosts monitoring for NICE DCV Session Manager .......................................................... 134
NICE DCV Session Manager secure connection configuration ................................................... 134
How to create a new remote desktop interactive service .......................................................... 135
Restarting NICE DCV Session Manager .......................................................................................... 138
Plugin limitations ............................................................................................................................... 138
Troubleshooting .................................................................................................................................. 138
Managing AWS HPC Connector ............................................................................................................ 139
vi

EnginFrame Administrator Guide ***Unable to locate subtitle***
Activating an AWS ParallelCluster virtual environment ............................................................. 140
Before installing EnginFrame with AWS HPC Connector ........................................................... 140
AWS credentials and profile ............................................................................................................. 141
Amazon S3 bucket for data transfer .............................................................................................. 141
HPC Connector IAM roles ................................................................................................................. 141
AWS ParallelCluster configuration requirements ......................................................................... 147
Customizing logging ............................................................................................................................... 156
Tomcat® logging ................................................................................................................................. 156
EnginFrame server and agent logging ........................................................................................... 157
EnginFrame scriptlet logging ........................................................................................................... 163
EnginFrame licenses ................................................................................................................................ 165
License file management .................................................................................................................. 165
License file format ............................................................................................................................. 166
License checking ................................................................................................................................. 167
Monitoring license usage .................................................................................................................. 170
Troubleshooting ....................................................................................................................................... 173
Common issues ................................................................................................................................... 173
Pushing metrics ........................................................................................................................................ 177
Supported monitoring tools ............................................................................................................ 177
Prerequisites ........................................................................................................................................ 177
Configuration ....................................................................................................................................... 177
Troubleshooting .................................................................................................................................. 178
Security ........................................................................................................................................ 179
Authentication framework ..................................................................................................................... 179
Standard EnginFrame authentication authorities ........................................................................ 179
Default authentication authority .................................................................................................... 179
User mapping ...................................................................................................................................... 180
Configuring the NICE EnginFrame authentication authorities .................................................. 182
Custom authentication authority .................................................................................................... 185
Authorization system .............................................................................................................................. 189
Configuring authorization ................................................................................................................. 189
Configuring HTTPS .................................................................................................................................. 197
Using signed certificates with EnginFrame ................................................................................... 197
Configuring SSL/TLS for Hazelcast ...................................................................................................... 198
Setup SSL/TLS communication with Hazelcast Enterprise ........................................................ 198
Document history ........................................................................................................................ 201
vii

EnginFrame Administrator Guide ***Unable to locate subtitle***
Welcome
About this guide
This guide describes how you can install, configure, and manage a NICE EnginFrame portal
instance.
Who this guide is for
This guide is intended for system administrators that install and manage one or more NICE
EnginFrame portal instances.
What you should know
This guide assumes the following:
• You're familiar with Unix system administration tasks such as creating user accounts, sharing and
mounting Network File System (NFS) partitions, backing up the system.
• You have a foundation in web-related technologies such as the HTTP protocol, the SSL protocol,
and the XML language.
Learn about NICE products
World Wide Web
You can find the latest information about NICE EnginFrame on its website: https://www.nice-
software.com.
For more information about other NICE products and about the professional services provided by
NICE, refer to the company's website: https://www.nice-software.com.
Get technical support
Contact NICE or your EnginFrame reseller for technical support.
NICE support contacts
Use one of the following to contact NICE technical support.
About this guide 1

EnginFrame Administrator Guide ***Unable to locate subtitle***
Email
World Wide Web
https://www.nice-software.com
Phone
+39 0141 901516
Mail
NICE Support
c/o NICE s.r.l.
Via Milliavacca, 9
14100 Asti
Italy
When contacting the NICE support team, include the full name of your company.
Collect support information
Use "Support/Collect support info" service that's described in Operational Dashboard to collect
some preliminary data to help NICE support process your support request.
The output of this service is a compressed archive that contains all the gathered information. Send
the compressed archive to NICE support team attached to your request.
Collect support information 2

EnginFrame Administrator Guide ***Unable to locate subtitle***
Getting started
Topics
• About NICE EnginFrame
• Obtaining NICE EnginFrame
• Planning a NICE EnginFrame deployment
• Installing NICE EnginFrame
• Running NICE EnginFrame
About NICE EnginFrame
EnginFrame is a grid-enabled application portal for user-friendly HPC job submission, control, and
monitoring. It includes sophisticated data management for all stages of job lifetime. It's integrated
with most important job schedulers and middleware tools to submit, monitor, and manage jobs.
EnginFrame provides a modular system where you can easily add new functionality, such as
application integrations, authentication sources, and license monitoring. It also features a
sophisticated web services interface that you can use to enhance existing applications and develop
custom solutions for your own environment.
EnginFrame is a computing portal that uses existing scripting solutions when available. This means
that, while using EnginFrame, you can avoid interacting with a command line interface in situations
where you might have not had that option before.
Based on the latest and most advanced Web 2.0 standards, it provides a flexible infrastructure to
support current and future computing needs. It's flexible in content presentation and in providing a
personalized experience for users according to their role or operational context.
Note
Starting March 31, 2022, NICE EnginFrame doesn't support VNC®, HP® RGS, VirtualGL, and
NICE DCV 2016 and previous versions.
About NICE EnginFrame 3

EnginFrame Administrator Guide ***Unable to locate subtitle***
Note
Starting August 5, 2022, NICE EnginFrame is bundled with an embedded version of
Tomcat® that doesn't provide any sample webapps. According to CVE-2022-34305, the
sample webapps are affected by a vulnerability. Without the sample webapps, EnginFrame
isn't affected by the CVE-2022-34305 vulnerability.
Architectural overview
EnginFrame has an architecture layered into three tiers, as shown in EnginFrame architecture:
• The Client Tier usually consists of the user's web browser. It provides an intuitive software
interface that uses established web standards such as XHTML and JavaScript®. This tier is
independent from the specific software and hardware environment that the end user uses. The
Client Tier can also integrate remote visualization technologies such as NICE DCV.
• The Server Tier consists of a Server that interacts with EnginFrame Agents and manages the
interaction with users.
• The Resource Tier consists of one or more Agents that are deployed on the back-end
infrastructure. Agents manage computing resources on user's behalf and interact with the
underlying operating system, job scheduler, or grid infrastructure to run EnginFrame services. For
example, they start jobs, move data, and retrieve cluster loads.
Topics
• EnginFrame architecture
• Basic workflow
• Deploying the service
• Distributed deployment
• File downloads
• Interactive session broker
• EnginFrame plugins
Architectural overview 4

EnginFrame Administrator Guide ***Unable to locate subtitle***
EnginFrame architecture
Architectural overview 5

EnginFrame Administrator Guide ***Unable to locate subtitle***
Basic workflow
EnginFrame abstracts computing resources and data management (Resource Tier) and exposes
services to users (Server Tier). Users access the services directly from their browsers (Client Tier).
The internal structure of EnginFrame reflects this high-level architecture and revolves around two
main software components: the EnginFrame Server and the EnginFrame Agent.
The EnginFrame Server
The EnginFrame Server is a Java™ web application. It must be deployed inside a Java Servlet
container. It exposes services to users. EnginFrame ships with Apache Tomcat® 9.0.64.
The EnginFrame Agent
The EnginFrame Agent is a stand-alone Java™ application that manages the computing
resources and run services on user's behalf when running as root.
EnginFrame Server receives incoming requests from a web browser. The web browser authenticates
and authorizes them, and then asks an EnginFrame Agent to run the required actions. For a visual
illustration, see Interaction diagram.
Agents can perform different kinds of actions. This includes running a command on the underlying
operating system and submitting a job on the grid infrastructure.
The results of the action that was run are gathered by the Agent and sent back to the Server.
The Server applies some post processing transformations, filters output according to defined
access control lists (ACL), and transforms the results into an HTML page.
Architectural overview 6

EnginFrame Administrator Guide ***Unable to locate subtitle***
Interaction diagram
EnginFrame creates or reuses a data area each time a new action is run. This area is called spooler.
The spooler is the working directory of the action. It contains files uploaded when the action is
submitted. Users can only download files from their spoolers.
The spooler is located on a file-system readable and writable by both Server and Agent. For more
information, see Managing spoolers.
Architectural overview 7

EnginFrame Administrator Guide ***Unable to locate subtitle***
Deploying the service
When EnginFrame Portal is installed on one host, it's called a basic installation. The Server Tier
contains the Agent that's used to access the Resource Tier. The efnobody user runs the Server
in this scenario. This is the default user that you choose when you install EnginFrame. The
EnginFrame Server contains a local Agent that's used when configured in your service description
and you are submitting a scriptlet. For a visual illustration, see EnginFrame deployed on one host.
In most cases, the Server contacts the default remote Agent that was configured during setup.
Usually, the remote Agent runs as root and can do the following:
• Authenticate users using PAM/NIS.
• Create or delete spoolers on the user's behalf.
• Run services on the user's behalf.
• Download files on the user's behalf.
The remote Agent can also run as a user without permission. However, you lose the main features
of an Agent running as root. All spoolers and services are created or run as this user without
permission. It also implies that EnginFrame has to use an authentication module that doesn't
require root privileges to check credentials, such as LDAP and Active Directory.
The Server communicates with the Remote Agent using Java™ RMI protocol. However, the local
Agent is reached directly because it's inside the Java Virtual Machine (JVM) space in the Server.
Architectural overview 8

EnginFrame Administrator Guide ***Unable to locate subtitle***
EnginFrame deployed on one host
Architectural overview 9

EnginFrame Administrator Guide ***Unable to locate subtitle***
Distributed deployment
EnginFrame Server can be deployed in a demilitarized zone (DMZ) that's accessible from your
intranet or the internet. The default EnginFrame Agent resides in your protected computing
environment. EnginFrame Server and EnginFrame Agent reside on different hosts in this scenario.
This is called a distributed deployment. For a visual illustration, see EnginFrame deployed on more
hosts.
In this scenario, the following requirements must be met:
• The Server host reaches the Agent host on ports that were specified during setup.
• The Agent host reaches the Server host by HTTP on a port that was specified during setup.
• Spoolers are stored on a shared file-system.
•
The Spooler shared file-system is readable and writable by both the efnobody and root users.
The Server must reach the Agent using RMI. Otherwise, the user's submissions fail.
The Agent must reach the Server using HTTP. Otherwise, the user's downloads fail.
Note
Spoolers must reside on a shared file-system for the following reasons. The Server saves
files that users send. A service run on an Agent must access them. Because files are written
by the Server, efnobody needs read access to traverse the directory structures when
creating new spoolers and write access to write files. Because services are run on the
user's behalf, root needs write permissions on the spoolers area to give directory and
files ownership to the user that's running the service. This ownership change is necessary
because the spooler and the files were created by efnobody.
Architectural overview 10

EnginFrame Administrator Guide ***Unable to locate subtitle***
EnginFrame deployed on more hosts
Architectural overview 11

EnginFrame Administrator Guide ***Unable to locate subtitle***
File downloads
Users can only download files that are contained in their spoolers. The following diagram explains
this process flow.
1. EnginFrame Server receives incoming requests from the Web Browser.
2. EnginFrame Server forwards the request to EnginFrame Agent, which then downloads the
remote file.
Architectural overview 12

EnginFrame Administrator Guide ***Unable to locate subtitle***
3. As a user, EnginFrame Agent forks a process which reads the file.
4. EnginFrame Agent connects back to EnginFrame Server using HTTP to send back the bytes that
were produced by the forked process.
5. EnginFrame Server sends the bytes back to the browser.
6. The browser displays the file or proposes to save it on disk depending on file mime-type and
browser settings. For more information, see Managing internet media types.
Step 4 highlights why it's important for EnginFrame Agent to reach EnginFrame Server using HTTP.
You can use EnginFrame to download files in streaming mode. File contents are displayed while
they're being downloaded. This is useful for files that grow when the service is running. The flow
is the same as the remote file download except that EnginFrame Server polls, at fixed intervals,
EnginFrame Agent for some fresh data. This feature mimics Unix tail that displays the last file
portion while it grows.
File download interaction
Interactive session broker
EnginFrame 2021.0 includes the interactive plugin, a session broker that's scalable and reliable. Its
main purpose is to ease application delivery and manage interactive sessions.
Deployment
The solution relies on the following systems:
• NICE EnginFrame. This is the kernel that Interactive Plugin is built on.
• A resource manager software that allocates and reserves resources according to the specified
resource sharing policy or a session broker.
• One or more remote visualization middleware platforms, such as NICE DCV.
For a complete list of the supported HPC workload managers, session brokers, and visualization
middleware, see Prerequisites.
The visualization farm can be Linux® or Windows®.
Architectural overview 13

EnginFrame Administrator Guide ***Unable to locate subtitle***
Workflow
The following picture represents a real-world example infrastructure, including nodes with NICE
DCV, HP® RGS, and RealVNC®. You can use this infrastructure to deliver 2D and 3D applications on
Windows® and Linux® through NICE DCV or VNC®.
Interactive Plugin Use Model
The following explains what happens at each step:
1. The user connects to Interactive Plugin to create a new session. Each session is a distinct job
of the underlying HPC workload scheduler or a distinct session in the underlying third-party
session broker.
2. The resource manager or the session broker schedules the new session on the most appropriate
node. This node complies with the application requirements and the resource sharing policies.
3. After the session is created, Interactive Plugin sends a file to the web browser. This file contains
information that allows the browser to start the correct visualization client. The client uses this
information to connect to the remote session.
Architectural overview 14

EnginFrame Administrator Guide ***Unable to locate subtitle***
EnginFrame plugins
A plugin is a piece of software that extends EnginFrame Portal. NICE sells and provides many of
these extensions at no cost.
The plugins can extend EnginFrame in many different areas:
• Bundle - a full-featured package containing other plug-ins.
• Kernel - an extension that enhances EnginFrame core system (for example, WebServices,
Interactive Plug-in).
• Auth - an extension that authenticates users against an authoritative source (for example, PAM
Plug-in).
• Data - an extension that helps display data inside EnginFrame Portal (for example, File Manager,
RSpooler Plug-in).
• Grid - an extension that connects EnginFrame Portal with a grid manager (for example, LSF Plug-
in).
• Util - additional utility components (for example, Demo Portal).
NICE ships many plugins according to these conventions:
• Certified extensions - are developed and supported by NICE. They're available and supported
as add-on products. Add-on products pass a quality assurance process at every new release of
EnginFrame. Each extension is individually certified to work on the latest release of EnginFrame.
The guidelines are provided to evaluate how different groups of extensions might interact. No
implicit commitment is taken about the compatibility between two different extensions.
• Qualified extensions - are developed or modified by NICE. This ensures a professional
development and good functionality under some specific EnginFrame configuration. Qualified
extensions are available as project-accelerator solutions, to facilitate integration of your
EnginFrame Portal in specific complex scenarios. Further support can be provided as Professional
Services.
• Contributed extensions - are developed by third parties and are made available by the
respective authors. They're provided as-is, and no additional endorsement is provided by NICE.
Further support on such modules might be sought from the contributing authors, if available.
Architectural overview 15

EnginFrame Administrator Guide ***Unable to locate subtitle***
EnginFrame Enterprise
This section describes the EnginFrame Enterprise version, the solution aimed at enterprise
environments where load balancing and fault tolerance are crucial requirements.
All the general concepts about EnginFrame explained in the previous sections apply also to
EnginFrame Enterprise version. The following sections illustrate the characteristics of the
Enterprise solution. They describe the architecture, highlight the differences with the architectures
described earlier, and suggest the best approach for deployment.
Topics
• Architecture
• Software distribution and license
• Deployment
Architecture
EnginFrame Enterprise architecture involves multiple EnginFrame Servers and multiple EnginFrame
Agents. All the Servers and the Agents maintain the same role and functionalities. However, they
do so in an EnginFrame Enterprise infrastructure and EnginFrame Servers are able to communicate
with each other over the network to share and manage the system status.
The shared system status involves the following resources:
• The users' spoolers and spoolers repository
• EnginFrame triggers
• Users that are logged in
• EnginFrame license tokens
Information is shared among EnginFrame Servers and managed in a distributed architecture where
there's no single point of failure in the system. Each of the servers alone can cover all the needed
functionalities and, at the occurrence, it can keep the whole system up and running, making the
system more robust and fault tolerant.
The EnginFrame Enterprise solution relies on a file-system that's not only shared between an
EnginFrame Server and an EnginFrame Agent. It's shared among all the Servers and Agents.
EnginFrame Enterprise 16

EnginFrame Administrator Guide ***Unable to locate subtitle***
The EnginFrame Agents need access to the spoolers area. However, EnginFrame Servers have
stronger requirements and need other file-system resources to be shared besides spoolers. These
include the EnginFrame repository files that contain server-side metadata about spoolers, the file
upload cache, and the plugins data directory tree. For more information about the suggested and
supported approach for file-system sharing, see Deployment.
Another important component to consider in the EnginFrame architecture is the Database
Management System (DBMS). In a standard EnginFrame installation, you can rely on the Apache
Derby® database distributed with EnginFrame. In the EnginFrame Enterprise solution, however, use
an external JDBC compliant DBMS. All the EnginFrame Servers must have access to the database.
For a list of the supported DBMS, see Database management systems.
To maintain a single point of access to EnginFrame, the architecture involves a front-end HTTP/
S network load balancer. This component isn't part of the EnginFrame Enterprise deployment.
Rather, it's a third-party solution, which might be either a software or hardware component. This
might be, for example, a Cisco router of the 6500 or 7600 series. The router, in this example, is
configured with the sticky session capability † that dispatches users' requests to the EnginFrame
Servers in a balanced way.
NICE can provide and set up the network load balancer based on third-party technology, such as
Apache® Web server, as professional services activity according to specific projects with customers.
† Sticky session refers to the feature of many commercial load balancing solutions for web-farms
to route the requests for a particular session to the same physical machine that serviced the first
request for that session. The balancing occurs on web sessions. It doesn't occur on the single
received web requests.
Software distribution and license
EnginFrame Enterprise is distributed with the same software package of EnginFrame. It's the
EnginFrame software license that specifically enables EnginFrame Enterprise capabilities.
EnginFrame doesn't need a license on an EC2 instance. For instructions on how to get the
EnginFrame software and license, see Obtaining NICE EnginFrame.
The following is an example of an EnginFrame Enterprise license.
<?xml version="1.0"?>
<ef-licenses>
<ef-license-group product="EnginFrame HPC ENT" release="2015.0" format="2">
EnginFrame Enterprise 17

EnginFrame Administrator Guide ***Unable to locate subtitle***
<ef-license
component="EF Base"
vendor="NICE"
expiration="2015-12-31"
ip="172.16.10.171,172.16.10.172"
licensee="NICE RnD Team"
type="DEMO"
units="100"
units-per-user="1"
license-hosts="false"
hosts-preemption="false"
signature="MC0CFQCGPmb31gpiGxxEr0DdyoYud..." <!-- Omitted -->
/>
</ef-license-group>
</ef-licenses>
The product attribute value is EnginFrame HPC ENT. This value defines an EnginFrame license
for HPC environments with the ENT string specifying the Enterprise version. The ip attribute of tag
ef-license with the list of the IP addresses of the licensed EnginFrame Servers nodes.
Deployment
Because of its distributed architecture, deployment scenarios of EnginFrame Enterprise might be
different and vary in complexity.
You can have each component (specifically EnginFrame Server and Agent) on a different node.
You can also decide to pick only the minimum number of parts of the file system to share on each
of the node. Remember that, in an EnginFrame Enterprise deployment, you also have file-system
resources to be shared among EnginFrame Servers. In many cases, even when resources don't
necessarily require sharing, make sure that they're replicated and maintained in alignment among
EnginFrame Servers.
Even if, in principle, it's possible to fine-tune the installation of EnginFrame Enterprise, consider
the different factors, such as networking and file-system sharing. It's common practice to go
for the comparatively fast and easy-to-maintain deployment approach that's described here. If
this one doesn't meet your specific requirements, you can use a different approach. Discuss your
requirements with NICE professional services to see what is the best approach for you.
The suggested approach to deploy EnginFrame Enterprise involves the following:
• One node for each pair of EnginFrame Server and Agent that you want to install.
EnginFrame Enterprise 18

EnginFrame Administrator Guide ***Unable to locate subtitle***
•
A shared file-system for the whole $EF_TOP directory tree.
•
$EF_TOP is the top EnginFrame installation directory.
For more information, see Installation directories.
With this approach, you can install and manage the software from one node. All the binaries and
data directories such as spoolers, sessions, and licenses are shared among the installation nodes.
For those resources that are expected to be local but might conflict in a shared environment,
EnginFrame provides a per-hostname directory tree. This directory tree includes a shared
environment like the logging directory where each Server and Agent writes log files with the same
names.
We recommend that you host an external database management system (DBMS) on different
nodes and configure them to be fault tolerant.
When you install EnginFrame Enterprise, you insert the JDBC URL in the EnginFrame database
instance together with the username and password that you use to access it. The EnginFrame
database instance must be previously created empty, EnginFramecreates all the needed tables the
first time you connect to it.
The details that specifically concern an EnginFrame Enterprise deployment, its requirements and
installation notes, are integrated where needed in the next chapters of this guide.
AWS HPC Connector
HPC Connector provides a straight-forward way for HPC customers to use the elastic infrastructure
that AWS ParallelCluster dynamically creates and manages on AWS. You can choose to install
EnginFrame on-premises and use HPC Connector to extend available HPC environments to AWS.
This installation scenario is suitable for use cases such as cloud bursting. Or, you can install
EnginFrame directly on an Amazon EC2 instance and use HPC Connector to run workflows entirely
on AWS. HPC Connector uses customer-defined cluster configurations for creating clusters in the
cloud that you can use for running jobs.
AWS HPC Connector 19

EnginFrame Administrator Guide ***Unable to locate subtitle***
You can use HPC Connector flexibly as your needs change over time. For example, you can use it to
experiment with running select workloads on AWS or to manage most or all of your workloads on
AWS. You can use HPC Connector to manage your HPC workloads from both your on-premises and
AWS environments in a centralized fashion. For example, you might be migrating your workloads
to AWS and need to manage and maintain both environments for some time. Or, you want to
burst some workloads to the cloud when on-premises resources are insufficient to meet your
requirements. Having access to elastic AWS resources can help to increase the productivity of your
researchers. Moreover, you can use HPC Connector to get started managing hybrid on-premises
and AWS environments in an more centralized manner.
Topics
• How HPC Connector works
• HPC Connector run requirements
• Cluster users
How HPC Connector works
HPC Connector works by using AWS ParallelCluster. AWS ParallelCluster is an open-source cluster
management tool on AWS that you can use to deploy and manage HPC clusters on AWS. It uses
a simple text file to model and provision all the resources needed for your HPC applications
in an automated and secure manner. With AWS ParallelCluster, the resources needed for your
applications are dynamically scaled in an automated and secure manner. After a burst of jobs is
completed, AWS ParallelCluster terminates the instances it created. This leaves only the head
AWS HPC Connector 20

EnginFrame Administrator Guide ***Unable to locate subtitle***
node and the minimum capacity defined active and ready to scale up new compute nodes when
required.
When submitting a job to a remote cluster hosted on AWS , HPC Connector relies on AWS Systems
Manager Session Manager for the job submission process, and uses Amazon S3 for transferring
data local to the node running EnginFrame server through and from the remote cluster. In order to
do that, HPC Connector requests temporary credentials to AWS Identity and Access Management
(IAM) for managing the resources on AWS . When you submit a job to a remote cluster, HPC
Connector performs the following activities.
• Creates an Amazon S3 folder for transferring data from the user’s local spooler.
• Generates a dynamic policy to restrict Amazon S3 access to the newly created Amazon S3 folder.
• Creates a new set of temporary credentials that use the generated policy.
• Launches a script for transferring the data that's in the local spooler to S3 using such credentials.
• Runs a remote script on the head node of the remote cluster that uses AWS SSM, which performs
the following actions.
• Retrieves the data from the S3 folder using a set of temporary credentials (using the same
mechanism described above). The data is then copied to the destination folder.
• Changes the files and folder permissions to give ownership of the files to the remote user.
• Submits the job as a remote user from within the destination folder, with the proper
environment variables and launching the job script associated to the EnginFrame service.
HPC Connector run requirements
For HPC Connector to work properly, you must have an AWS account and create and configure the
following items.
• An Amazon S3 bucket that's used by HPC Connector for transferring the data from the spooler
local to the node running the EnginFrame server to the remote clusters on AWS, or the other way
around. HPC Connector doesn't support Using Amazon S3 bucket keys.
• An IAM role for accessing the Amazon S3 bucket. This role is used by HPC Connector for
transferring the data back and forth the remote destination.
• An IAM role for managing AWS ParallelCluster in your account. This role is used by HPC
Connector for creating, starting, and stopping clusters.
• An IAM role for running jobs remotely using AWS SSM. This role is used for launching job scripts
remotely on the clusters.
AWS HPC Connector 21

EnginFrame Administrator Guide ***Unable to locate subtitle***
• For EnginFrame on-premises, an IAM user for allowing HPC Connector to assume the required
roles when managing clusters or launching remote jobs.
Cluster users
When launching a cluster from within HPC Connector, administrators must specify how to map
users within the cluster with respect to the user launching the job. HPC Connector supports the
following two different mechanisms for this.
• Single user mode – In this mode, any user connected to the EnginFrame portal and with access
to the cluster submits jobs to the cluster as a single predefined cluster user. This mode requires
administrators to specify the user name to use when creating the cluster (for example, ec2-user
or ubuntu).
• Multi-user 1:1 mode – In this mode, any user connected to the EnginFrame portal and with
access to the cluster submits jobs to the cluster as a remote cluster user with the same name.
HPC Connector does not provision or manage users on the cluster. This means that you're required
to have such users already present in the cluster before submitting any job. Additionally, you might
also need a mechanism to keep users in sync with your on-premises environment. HPC Connector
maps the on-premises and remote users with the chosen logic. However, if the chosen user isn't
available in the remote cluster, your job submissions will fail.
When requested to launch a job remotely, HPC Connector launches the job using AWS SSM. HPC
Connector assumes the role of a remote user on the cluster depending on the mode. This is either
the user specified when the cluster is created for single user mode or a user with the same name as
the one logged in to the EnginFrame portal for multi-user mode.
Obtaining NICE EnginFrame
If you didn't already receive your NICE EnginFrame package from NICE or your EnginFrame reseller,
download it from EnginFrame website.
Downloading EnginFrame
EnginFrame packages can be downloaded from the EnginFrame website.
https://www.enginframe.com
Obtaining NICE EnginFrame 22

EnginFrame Administrator Guide ***Unable to locate subtitle***
You need a valid account to access the download area. If you don't have one yet, contact
<[email protected]> or your EnginFrame reseller.
EnginFrame on Amazon EC2
You don't need a license server to install and use the EnginFrame server on an Amazon EC2
instance. The EnginFrame server automatically detects that it's running on an Amazon EC2
instance. It also periodically connects to an Amazon S3 bucket to determine if a valid license is
available. Make sure that your instance can do the following:
• It can reach the Amazon S3 endpoint. If it has access to the internet, it connects using the
Amazon S3 public endpoint. If your instance doesn't have access to the internet, configure a
gateway endpoint for your VPC with an outbound security group rule. Alternatively, configure it
with an access control list (ACL) policy that allows you to reach Amazon S3 through HTTPS. For
more information, see Gateway VPC Endpoints in the Amazon VPC User Guide. If you experience
any issues connecting to the S3 bucket, see Why can't I connect to an S3 bucket using a Gateway
VPC endpoint? in the AWS Knowledge Center.
• It has permission to access the required Amazon S3 object. Add the following Amazon S3 access
policy to the instance's IAM role and replace the Region placeholder (region) with your AWS
Region (for example, us-east-1). For more information, see Create IAM Role.
{
"Version": "2012-10-17",
"Statement": [
{
"Effect": "Allow",
"Action": "s3:GetObject",
"Resource": "arn:aws:s3:::enginframe-license.region/*"
}
]
}
Access to the instance metadata must be enabled. By default, it's enabled unless you might have
turned it off. You can turn it back on by using the modify-instance-metadata-options command.
If you're installing and using the EnginFrame server on an Amazon EC2 instance, you can skip the
rest of this chapter. The rest of this chapter only applies to using the EnginFrame server on an on-
premises server or one hosted in the cloud.
EnginFrame on Amazon EC2 23

EnginFrame Administrator Guide ***Unable to locate subtitle***
EnginFrame on on-premises and other cloud-based servers
When running on an on-premises server or one hosted in the cloud, you need a
valid license to install and run EnginFrame. If you don't already have one, contact
<[email protected]> or your EnginFrame reseller.
EnginFrame licenses are classified as one of the following types:
• Demo licenses — demo licenses aren't bound to any IP address and are valid for one month.
• Full licenses — full licenses have time-unlimited validity and are bound to one or more IP
addresses.
• Year licenses — year licenses have time-limited validity and are bound to one or more IP
addresses.
Contact <[email protected]> or your EnginFrame reseller to purchase, renew, or
update a license. They can also help you can change your license or obtain a demo license.
Licensed plug-ins
When running EnginFrame on Amazon EC2, a license plugin isn't required. When running
EnginFrame on an on-premises sever or one hosted in the cloud, plug-ins require a specific license
to work. The standard plug-ins that are included in the EnginFrame installation. This requires that a
license have the following characteristics:
• interactive — Enables basic functionalities for Interactive Session management.
• applications — Enables the Workspace.
• hpc-support — Enables the HPC functionalities
Additional plug-ins provided by NICE might also require a license.
The license file that's provided by your sales contact in most cases contains license components for
all the plug-ins that are included in your EnginFrame bundle.
For more information, check with your NICE sales contact or our support helpdesk@nice-
software.com.
If you have a specific license file, it must be copied under $EF_TOP/license folder, and have an
.ef extension.
EnginFrame on on-premises and other cloud-based servers 24

EnginFrame Administrator Guide ***Unable to locate subtitle***
It's automatically read by the portal. You don't need to restart EnginFrame.
Note
Remove from the $EF_TOP/license folder any older .ef license files that contain expired
licenses or licenses that aren't correct. You want to do this because EnginFrame doesn't
accept any license conflict.
The following is an example license for the Interactive component.
<?xml version="1.0"?>
<ef-licenses>
<ef-license-group product="EnginFrame PRO" format="1.0" release="2014.0">
<ef-license
component="interactive"
vendor="NICE"
expiration="2014-12-31"
ip="10.20.10.14"
licensee="Acme.com"
type="DEMO"
units="20"
signature="xxxxxx"
/>
</ef-license-group>
</ef-licenses>
For more information about EnginFrame licenses, see EnginFrame licenses.
Planning a NICE EnginFrame deployment
Setting up EnginFrame is a straightforward process. However, it's important to accurately plan your
EnginFrame Portal deployment to achieve seamless integration with your computing environment
and to meet the IT requirements of your organization.
Note
Starting March 31, 2022, NICE EnginFrame doesn't support VNC®, HP® RGS, VirtualGL, and
NICE DCV 2016 and previous versions.
Planning a NICE EnginFrame deployment 25

EnginFrame Administrator Guide ***Unable to locate subtitle***
Prerequisites
Before you deploy EnginFrame Portal, make sure that your system meets the following
requirements.
Topics
• System requirements
• Third-party software prerequisites
• Network requirements
• Supported browsers
• Interactive Plugin requirements
• EnginFrame Enterprise system requirements
System requirements
Topics
• Additional considerations for using SUSE Linux
NICE EnginFrame supports the following operating systems:
• Amazon™ Linux® release 2016.03 or later
• Red Hat® Enterprise Linux® 5.x, 6.x, 7.x, 8.x (x86-64)
• SUSE® Linux® Enterprise Server 11 SP2, 12 SP3 (x86-64)
SUSE® Linux® Enterprise Server 12 SP5 (x86-64)
SUSE® Linux® Enterprise Server 15 SP2 (x86-64)
Note
Other Linux® distributions and compatible Java™ versions might work but are not officially
supported. Contact <[email protected]> for more information.
Prerequisites 26

EnginFrame Administrator Guide ***Unable to locate subtitle***
The installation machine must have at least 3 GB of RAM and one or more IP addresses. For these
IP addresses, at least one of them must be reachable by each of the potential client machines. It
can be reached either directly or through proxies.
To install EnginFrame, minimally you need at least 200 MB of free disk space. However, we
recommend that you have as much as 2 GB or more. This is because EnginFrame while operating
saves important data and logging information.
Make sure you have enough space for the service data that's stored inside the EnginFrame
spoolers. By default, spoolers are located inside the EnginFrame installation directory ($EF_TOP/
spoolers).
Additional considerations for using SUSE Linux
EnginFrame PAM standard user authentication (system) expects to find the file system-auth in
the folder /etc/pam.d/. However, in SUSE® Linux® Enterprise Server, this file is called common-
auth. So, to make the standard authentication work, a symbolic link is required: ln -s /etc/
pam.d/common-auth /etc/pam.d/system-auth
Third-party software prerequisites
In addition to the standard packages that are installed with your operating system, NICE
EnginFrame also requires some additional third-party software. This topic describes the third-party
software that's required and how you can set it up.
Topics
• Java™ platform
• Database management systems
• Authentication methods
• Distributed resource managers
• Remote visualization technologies
Java™ platform
NICE EnginFrame requires the Linux® x64 version of Oracle® Java™ Platform Standard Edition
(Java™ SE) or the OpenJDK Runtime Environment . EnginFrame supports both versions 8 and 11 of
these packages.
Prerequisites 27

EnginFrame Administrator Guide ***Unable to locate subtitle***
Supported Java™ vendors:
• Oracle®
• Amazon Web Services
• Red Hat®
• IcedTea
In this topic, JAVA_HOME is referred to as the Java™ installation directory.
The same Java™ version must be used for both EnginFrame Server and EnginFrame Agent.
Database management systems
EnginFrame requires a JDBC-compliant database. EnginFrame uses a relational database
management system to manage Triggers, Job-Cache, and Applications and Views user groups.
EnginFrame Triggers rely on Quartz (http://www.quartz-scheduler.org) engine to schedule
EnginFrame services to run. Triggers are used internally to run periodic tasks as to check and
update Interactive sessions status. They're also used to collect EnginFrame usage statistics. The
Job-Cache feature is responsible for collecting and caching job statuses over time.
By default, Apache Derby® 10.14 database is installed together with EnginFrame Professional.
However, we don't recommend using Apache Derby® in a production installation.
Apache Derby® isn't supported for EnginFrame Enterprise installations. We recommend that
you use an external JDBC-compliant relational database management system (RDBMS). Because
EnginFrame Enterprise is part of a high availability solution, the RDBMS that you choose to use
must have its own high availability strategy. We recommend that you configure the external
RDBMS on a different node or nodes than the EnginFrame servers. If possible, we also recommend
that you configure it to be fault tolerant.
EnginFrame supports MySQL® Database 8.0.x and later with the InnoDB storage engine. You can
also use EnginFrame with other databases, such as Oracle® Database, SQL Server®, MariaDB®.
However, these databases aren't officially supported, so we don't recommend that you use them.
If you encounter issues with a supported relational database management system version, contact
EnginFrame provides the JDBC driver only for Apache Derby®. If a different DBMS is used, you must
add the JDBC driver to the $EF_TOP/<VERSION>/enginframe/WEBAPP/WEB-INF/lib directory
after you install EnginFrame.
Prerequisites 28

EnginFrame Administrator Guide ***Unable to locate subtitle***
For instructions on how to install and configure the JDBC driver, see Install and configure
EnginFrame.
Authentication methods
You can use a variety of authentication methods with EnginFrame. Some of them require third-
party software components.
We recommend that you consider a variety of factors when choosing an authentication method.
The following table details several relevant considerations including third-party software
prerequisites, if any exist. For more information, see also Supported authentication methods.
Supported authentication methods
Name Prerequisites Notes
PAM Linux® PAM must be
correctly configured
This is the most common authentication method.
As a system administrator, you can use it to add
new authentication methods by installing new PAM
modules. You can also use it to modify authentic
ation policies by editing the configuration files.
When you install it, you're asked to specify which
PAM service to use, system-auth is the default.
LDAP
Active
Directory
The ldapsearch
command must be
installed and working
appropriately on the
EnginFrame Agent host.
You can use these authentication methods to
authenticate users against an LDAP or Active
Directory server.
When you install these authentication methods,
the EnginFrame installer asks you to specify the
parameters that are required by ldapsearch to
contact and query your directory server.
HTTP
Authentication
External HTTP
authentication system
This authentication method relies on an external
authentication system to authenticate the users.
The external system then adds an HTTP authentic
ation header to the user requests. EnginFrame
trusts the HTTP authentication header.
Prerequisites 29

EnginFrame Administrator Guide ***Unable to locate subtitle***
Name Prerequisites Notes
Certificate SSL Certificates must be
installed and exchanged
between EnginFrame
Server and clients.
This authentication method is accomplished on
the web server, which requires the client authentic
ation through the use of SSL certificates.
The EnginFrame installer can optionally verify if you configured the selected authentication
method.
NICE EnginFrame can be easily extended to add support for custom authentication mechanisms.
Distributed resource managers
EnginFrame supports different distributed resource managers (DRM).
When you install EnginFrame, you must specify which distributed resource managers that you
want to use and provide the information that's required by EnginFrame to contact them. A single
EnginFrame instance can access more than one DRM at the same time.
Supported distributed resource managers
Name Version Notes
IBM® Platform™ LSF® 10.1.x The LSF client software must be installed on
the EnginFrame Agent host.
The installer asks you to specify the LSF
profile file.
AWS HPC Connector AWS HPC Connector
requires AWS
ParallelCluster
version 3.0.2 or later.
The installer asks you to specify the AWS
account ID, the AWS Region, the S3 bucket,
and the IAM roles to use.
Altair® PBS Professio
nal®, OpenPBS®
Altair® PBS Professio
nal®: 19.2.x -
2020.1.x OpenPBS®:
19.1.x - 20.0.x
The OpenPBS® or PBS Professional® client
software must be installed on the EnginFrame
Agent host.
Prerequisites 30

EnginFrame Administrator Guide ***Unable to locate subtitle***
Name Version Notes
The installer asks you to specify the directory
where the OpenPBS® or PBS Professional®
client software is installed.
SLURM™ 19.05.x - 21.0.x SLURM™ binaries must be installed on the
EnginFrame Server host.
SLURM™ master host must be reachable from
the EnginFrame Server host.
The installer asks you to specify the path
where binaries are installed.
For SLURM™ configuration, specifically related
to compute nodes that are dedicated to
interactive sessions, the Features: vnc,dcv,dcv2
and RealMemory parameters must be added
to every required node. 'dcv2' stands for DCV
since 2017.
Sun® Grid Engine
(SGE)
8.1.x
Univa® Grid Engine®
(UGE)
8.6.x
Son of Grid Engine
(SoGE)
8.1.x
The Grid Engine client software must be
installed on the EnginFrame Agent host.
The $SGE_ROOT/$SGE_CELL/common
must be shared from SGE master to EF nodes.
The installer asks you to specify the Grid
Engine shell settings file.
AWS Batch The AWS Batch
cluster must be
created with AWS
ParallelCluster 3.x
(3.0.0 or later) and
AWS ParallelCluster
Batch CLI 1.0.0 must
be installed.
The installer asks you to specify the AWS
ParallelCluster cluster name, the AWS Region,
the local AWS profile, and the IAM role to use
to interact with AWS.
Prerequisites 31

EnginFrame Administrator Guide ***Unable to locate subtitle***
By default, some schedulers such as PBS Professional® and Univa® Grid Engine® (UGE) 8.2.0 have
job history disabled. This means that a job disappears when finished. We recommend that you
configure these distributed resource managers to retain information about the finished jobs. For
more information, see Required DRM configuration.
Note
Starting March 31, 2022, NICE EnginFrame doesn't support VNC®, HP® RGS, VirtualGL, and
NICE DCV 2016 and previous versions.
Required DRM configuration
AWS HPC Connector
For information, see Requirements for running HPC Connector.
Altair® PBS Professional®
Applies to versions: 11, 12, 14
By default, Altair® PBS Professional® doesn't show finished jobs. To enable job history, a server
parameter must be changed: qmgr -c "set server job_history_enable = True"
After it's enabled, the default duration of the job history is 2 weeks.
Univa® Grid Engine® (UGE)
Applies to versions: 8.2.x.
Univa® Grid Engine® (UGE) by default does not show finished jobs. To enable job history, follow
these steps:
• (8.2.0 only) disable reader threads:
Edit file SGE_ROOT/SGE_CELL/common/bootstrap.
Set reader_threads to 0 instead of 2.
• Enable finished jobs:
Run the qconf -mconf command.
Set finished_jobs to a non-zero value according to the rate of finishing jobs.
Prerequisites 32

EnginFrame Administrator Guide ***Unable to locate subtitle***
The finished_jobs parameter defines the number of finished jobs stored. If this maximum
number is reached, the oldest finished job is discarded for every new job that's added to the
finished job list.
By default, EnginFrame grabs the scheduler jobs every minute. The finished_jobs
parameter must be tweaked so that a finished job stays in the job list for at least a minute.
Depending on the number of jobs that are running in the cluster a reasonable value is in
between the medium number of running jobs and the amount of jobs ending per minute.
•
Run the restart qmaster command.
SLURM™
Applies to versions: all.
SLURM™ shows finished jobs for a default period that's defined by the MinJobAge parameter
in the slurm.conf file. It's under /etc/slurm or the SLURM™ configuration directory. The
default value is 300 seconds (five minutes).
If you changed this parameter, ensure it's not set to a value lower than 300.
Check the MaxJobCount parameter isn't set.
After changing this parameter restart SLURM™ by running the /etc/init.d/slurm stop /
etc/init.d/slurm start command.
You must set this setting on all SLURM™ nodes.
IBM® Platform™ LSF®;
Applies to versions: all.
IBM® Platform™ LSF® shows finished jobs for a default period that's defined by the
CLEAN_PERIOD parameter in the lsb.params file. The default value is 3600 seconds (one
hour).
If you changed this parameter, ensure it's not set to a value lower than 300.
After changing this parameter, run the badmin reconfig command.
Prerequisites 33

EnginFrame Administrator Guide ***Unable to locate subtitle***
AWS Batch
To integrate EnginFrame with AWS Batch, create an AWS Batch cluster with AWS ParallelCluster
and give the user that's to run the EnginFrame server permission to interact with the cluster. To
do this, follow these steps.
• Install AWS ParallelCluster and configure it. For more information, see Setting up AWS
ParallelCluster in the AWS ParallelCluster User Guide.
As a part of the setup process, AWS CLI is installed as dependency of AWS ParallelCluster.
•
Install AWS ParallelCluster AWS Batch CLI 1.0.0. It's distributed on PyPi as aws-
parallelcluster-awsbatch-cli.
• Create a new cluster for the AWS Batch scheduler. Make sure that, when you create the
cluster, you take into account the network requirements for AWS ParallelCluster with AWS
Batch scheduler.
•
In the IAM console create a user MY_USER with the following policy:
{
"Version": "2012-10-17",
"Statement": [
{
"Effect": "Allow",
"Action": "sts:AssumeRole",
"Resource": "<MY_ROLE_ARN>"
}
]
}
For this policy, replace <MY_ROLE_ARN> with the ARN of the role that you create in the next
step. Keep note of the User credentials because you're going to use them later.
•
In the IAM console, create a role MY_ROLE that uses the policies "Base user policy" and
"Additional user policy" when using AWS Batch scheduler". For more information, see AWS
Identity and Access Management roles in AWS ParallelCluster in the AWS ParallelCluster User
Guide. In addition, also include the following trust relationship.
{
"Version":"2012-10-17",
"Statement":[
{
Prerequisites 34

EnginFrame Administrator Guide ***Unable to locate subtitle***
"Effect":"Allow",
"Action": "sts:AssumeRole",
"Principal": {
"AWS": "<MY_USER_ARN>"
}
}
]
}
Replace MY_USER_ARN with the ARN of the user that you created on the preceding step.
•
Create a dedicated AWS profile with name MY_PROFILE to use with the AWS CLI for the
user running the EnginFrame Server (for example, efnobody) and configure it to use the
credentials of MY_USER.
[efnobody]$ aws configure --profile MY_PROFILE
• Follow EnginFrame installer steps to configure AWS Batch EnginFrame plugin to contact the
created cluster.
•
When upgrading to EnginFrame 2021.x, add the following lines in $EF_CONF_ROOT/
plugins/awsbatch/ef.awsbatch.conf config file after it's upgraded the release with the
installer:
# AWS profile that the AWS Batch plugin should use to interact with AWS
AWSBATCH_PROFILE=<MY_PROFILE>
# AWS IAM role ARN that the AWS Batch plugin should use to interact with AWS
Batch
AWSBATCH_ROLE_ARN=<MY_ROLE_ARN>
Replace MY_PROFILE and MY_ROLE_ARN with the specific ones that you created in the
preceding steps.
Remote visualization technologies
EnginFrame supports different remote visualization technologies, and the same EnginFrame
instance can manage more than one of these visualization technologies. The following table lists
the supported ones.
Prerequisites 35

EnginFrame Administrator Guide ***Unable to locate subtitle***
Supported remote visualization technologies
Name Version Notes
NICE DCV 2017.x or
later
You can use it to share sessions both in full
access or view only mode.
NICE DCV Session Manager For more information, see the NICE DCV
Session Manager documentation
For instructions on how to install and configure these remote visualization technologies, see their
respective manuals.
Note
Starting March 2022, EnginFrame doesn't support TurboVNC, in favor of NICE DCV Session
Manager. Customers using versions of EnginFrame released after March 2022 will be unable
to use TurboVNC for accessing interactive sessions.
Remote visualization technologies configuration
NICE DCV 2017.0 or later on Linux
For Linux environments, the authentication configuration to use with NICE DCV must correspond to
the authentication system that's set on the NICE DCV server in the remote visualization hosts.
On EnginFrame, the authentication to use with NICE DCV on Linux can be set in the
INTERACTIVE_DEFAULT_DCV2_LINUX_AUTH configuration parameter that's in the $EF_TOP/
conf/plugins/interactive/interactive.efconf file.
The default value and documentation can be found in the static configuration file that's named
$EF_TOP/<VERSION>/enginframe/plugins/interactive/conf/interactive.efconf.
The auto authentication system provides seamless authentication with self-generated strong
passwords. It requires the following configuration on the visualization hosts that are running the
NICE DCV server.
• Make sure that the NICE DCV simple external authenticator that's provided with NICE DCV is
installed and running.
Prerequisites 36

EnginFrame Administrator Guide ***Unable to locate subtitle***
The simple external authenticator installation package is distributed as an rpm (for example,
nice-dcv-simple-external-authenticator-2017.x...x86_64.rpm).
After it's installed, you can manage the service as root user:
•
On systems using SystemD (for example, RedHat 7):
$ systemctl [start|stop|status] dcvsimpleextauth
•
On systems using SysVInit (for example, RedHat 6):
$ /etc/init.d/dcvsimpleextauth [start|stop|status]
• You must configure the NICE DCV server to use the simple external authenticator instance that's
named dcvsimpleextauth to run on the same host. For example, configure it to run by editing
the /etc/dcv/dcv.conf file, under the security section as follows:
[security]
auth-token-verifier="http://localhost:8444"
•
Restart the NICE DCV server after changes were made to the /etc/dcv/dcv.conf
configuration file.
NICE DCV 2017.0 or later on Windows
For Windows environments the authentication configuration used with NICE DCV must be
configured on EnginFrame in the INTERACTIVE_DEFAULT_DCV2_WINDOWS_AUTH configuration
parameter. This is in the $EF_TOP/conf/plugins/interactive/interactive.efconf file.
Default value and documentation can be found in the $EF_TOP/<VERSION>/enginframe/
plugins/interactive/conf/interactive.efconf static configuration file.
The auto authentication system provides seamless authentication with self-generated strong
passwords. It doesn't require any other configuration on the visualization hosts that are running
the DCV server.
The DCV server service is managed by the interactive session job landing on the node:
• If the NICE DCV server service is not running, it's started.
Prerequisites 37

EnginFrame Administrator Guide ***Unable to locate subtitle***
• If the NICE DCV server service is running but with different authentication configuration than the
one set on the EnginFrame side, the configuration is changed and the service restarted. This is
also the case if the DCV server is configured to launch the console session at system startup. This
setting is removed by the interactive session job.
• If the NICE DCV session is running but there's no logged user, the session is closed by the
interactive session job.
Network requirements
EnginFrame is a distributed system. Your network and firewall configuration must allow
EnginFrame components to communicate with each other and with user browsers.
The specific requirements depend on how EnginFrame is deployed on your system. The following
table summarizes network requirements for a basic EnginFrame deployment.
Network requirements
Port (default) Protocol From host To host Mandatory
8080/8443 HTTP/HTTPS User's clients EnginFrame
Server
Mandatory
9999 and 9998 RMI (TCP) EnginFrame
Server
EnginFrame
Agent
Optional
8080/8443 HTTP/HTTPS EnginFrame
Agent
EnginFrame
Server
Optional †
7800 TCP EnginFrame
Server
EnginFrame
Server
Mandatory only
for EnginFrame
Enterprise ‡
† Required if EnginFrame Agent and EnginFrame Server run on separate hosts
‡ EnginFrame Servers use the port to communicate with each other
Prerequisites 38

EnginFrame Administrator Guide ***Unable to locate subtitle***
Supported browsers
NICE EnginFrame produces HTML that can be viewed with most popular browsers. NICE
EnginFrame was tested with the browsers that are listed in Supported browsers.
Supported browsers
Name Version Notes
Microsoft® Edge 41 and 44
Microsoft® Internet Explorer® 10 and 11
(Will be
discontinued)
Mozilla Firefox® 3.6 and later
Apple® Safari® 6.0 and later
and iOS 6
version
Tested on Mac® OS X® and iPad® only.
Google™ Chrome™ 25 and later
JavaScript® and Cookies must be enabled on browsers.
By the end of December 2021, we will discontinue support for Internet Explorer 10. Then, at the
end of June 2022, we will discontinue support for Internet Explorer 11.
Interactive Plugin requirements
Interactive Plugin requires the following components to be successfully installed and configured:
• At least one supported resource manager software or a session manager. For more information,
see Distributed resource managers and Session Managers.
• At least one supported remote visualization middleware. For more information, see Remote
visualization technologies.
Prerequisites 39

EnginFrame Administrator Guide ***Unable to locate subtitle***
When running EnginFrame on an Amazon EC2 instance, you can use the Interactive Plugin without
a license. When running on an on-premises or alternative cloud-based server, you need a license
that's installed on the EnginFrame Server.
Make sure that each node that's running interactive sessions has all the necessary software
installed. On Linux®, this usually means the packages for the desired desktop environment, such as
gnome, kde, or xfce.
In addition, install the following software make it available in the system PATH on visualization
nodes. When you do this, the portal can show screen thumbnails in the session list.
•
Linux®: ImageMagick tool (http://www.imagemagick.org) and the xorg-x11-apps, xorg-
x11-utils packages
•
Windows®: NICE Shot tool (niceshot.exe, available under $EF_TOP/<VERSION>/
enginframe/plugins/interactive/tools/niceshot).
Session Managers
Starting from version 2020.0, EnginFrame supports NICE DCV Session Manager as Session Broker.
When you install EnginFrame, you can choose to use NICE DCV Session Manager as session broker.
Then, provide the configuration parameters that are required by EnginFrame to contact the remote
NICE DCV Session Manager Server.
Single application desktop requirements (Linux®)
In some workflows, you might want to run a minimal session on your interactive nodes consisting
in a minimal desktop and a single application running. For this use case, instead of installing a full
desktop environment such as GNOME or KDE, we recommend that you only install the required
tools. The required tools are a Window manager, a dock panel, and any of the applications that you
intend to use.
In this example scenario, you can configure the minimal.xstartup script to be a Window
Manager choice for the Applications and Views service editors.
Here is a reference list of the tools that the minimal.xstartup file uses. The file is provided by
EnginFrame under $EF_TOP/<VERSION>/enginframe/plugins/interactive/conf.
•
basic tools: bash, grep, cat, printf, gawk, xprop
Prerequisites 40

EnginFrame Administrator Guide ***Unable to locate subtitle***
•
window managers: metacity, kwin (usually provided by package kdebase), xfwm4
•
dock panels: tint2, fluxbox, blackbox, mwm (usually provided by package openmotif or
lesstif or motif)
Shared file system requirements
Depending on the deployment strategy, EnginFrame might require some directories to be shared
between the cluster and EnginFrame nodes. This guide covers a scenario where both EnginFrame
Server and EnginFrame Agent run on the same host. For more complex configurations or to
change the mount points of the shared directories, see the "Deployment Strategies" section in the
EnginFrame Administrator Guide.
In this scenario the EnginFrame Server, EnginFrame Agent and visualization nodes might require
the $EF_TOP/sessions directory to be shared. To check if you need to share this directory, see
the following table.
Shared File System Requirement
Distributed Resource Manager Linux® Windows®
IBM® Platform™ LSF® Not required -
SLURM™ Required -
Altair® PBS Professional® Required -
Grid Engine (SGE, SoGE, OGE, UGE) Required -
EnginFrame Enterprise system requirements
This topic lists the hardware and software prerequisites for an EnginFrame Enterprise installation.
Shared file system
The suggested and supported approach to EnginFrame Enterprise deployment involves a shared
file-system for the whole $EF_TOP directory tree. Using this approach, you can install and manage
the software from just one node, and all the binaries and data directories, such as the spoolers,
sessions, and license, are shared among the installation nodes. High-Availability of the Shared File
System is consistent with the overall HA/Disaster Recovery strategy.
Prerequisites 41

EnginFrame Administrator Guide ***Unable to locate subtitle***
The NFS no_root_squash or equivalent feature must be active to allow the correct management
of permissions and ownership of deployed files.
We recommend that you enable on the shared file system the NFS no_wdelay or equivalent
feature (server-side) to minimize the file writing delay between clients.
Network load balancing
To ensure automated load balancing and high availability for the EnginFrame services, it's
necessary to set up a network load balancer that dispatches users' requests to the EnginFrame
Servers in a balanced way.
EnginFrame requires the load balancer to implement a sticky session strategy. There are many
open-source and commercial solutions to implement a network load balancer.
For examples of Apache® frontend configurations, see Installing a third-party Load Balancer.
Deployment strategies
Decide how to deploy NICE EnginFrame on your system.
As described in Architectural overview, EnginFrame consists of two main software components: the
EnginFrame Server and the EnginFrame Agent.
You can deploy these two components on the same host or on different hosts that communicate
across the network. We recommend that you deploy them based on the specifics of your
computational resources organization, your network architecture, and your security and
performance requirements. In addition, before you deploy them, make sure that the following
requirements are met.
• EnginFrame Server host must be reachable by HTTP or HTTPS by the clients and the EnginFrame
Agents.
• EnginFrame Agent host must have access to your computational resources and your grid
infrastructure (for example, to submit jobs to your scheduler).
• EnginFrame Server and EnginFrame Agent must be installed on a shared storage area.
• For the interactive sessions, EnginFrame Server and EnginFrame Agent must have read and write
access to a storage area shared among them and with the visualization nodes.
If both EnginFrame Server and EnginFrame Agent run on the same host, communication between
the two is reliable and minimizes administration efforts. We recommend you use this deployment
Deployment strategies 42

EnginFrame Administrator Guide ***Unable to locate subtitle***
strategy if you have multiple EnginFrame installations on different hosts and on each of the
hosts you install both an EnginFrame Server and Agent. We recommend this deployment strategy
for enterprise-level deployments. For more information, see Deployment. Make sure that the
EnginFrame Servers can communicate with each other.
Depending on your specific use case, you might want to install EnginFrame Server and EnginFrame
Agent on separate hosts. For example, you can run the EnginFrame Server in DMZ and EnginFrame
Agent on the head node of your cluster. For this deployment scenario, make sure that the following
conditions are met.
• The Agent and Server must be able to communicate through a TCP connection using the Java™
RMI protocol. The relevant TCP ports that are 9999 for RMI Registry and 9998 for Remote
Object, must be free on the Agent's host and reachable from the Server host.
• The Agent and Server must be able to communicate through a TCP connection using the HTTP
or the HTTPS protocol. By default, the relevant TCP port is 8080/8443 for HTTP/HTTPS,
respectively, on the Server's host must be reachable from the Agent host.
• The Agent and Server must be installed on a shared storage area.
• The spoolers directory must reside on a storage area to meet the requirements that are
described in the "Spoolers Requirements" section of the EnginFrame Administrator Guide.
• The sessions directory must reside on a storage area to meet the requirements that are
described in EnginFrame System requirements.
If you need to access the system through a DMZ, you can use an Apache® web server as frontend
in the DMZ when EnginFrame is deployed on the intranet. With EnginFrame Enterprise, you can
additionally use an Apache® server as network load balancer in front of a battery of EnginFrame
Servers. Make sure that the EnginFrame Server is behind the Apache® Web Server that forwards
all the EnginFrame requests to the Tomcat® servlet container of the EnginFrame deployment. For
more information, see Apache®-Tomcat® connection.
By default, EnginFrame uses Java RMI over SSL between the Server and Agent. You can set up
Tomcat® when you install EnginFrame to use HTTPS. Alternatively, you can also enable HTTPS
after you install EnginFrame. For instructions, see Configuring HTTPS.
Installation directories
The installation directory is the location, hereafter referred to as $NICE_ROOT, where EnginFrame
binaries, configuration files, and logs are placed.
Installation directories 43

EnginFrame Administrator Guide ***Unable to locate subtitle***
When you install EnginFrame, the following directory structure is created under $NICE_ROOT.
NICE_ROOT
`-- enginframe
|-- 2021.0-rXXXXX
| `-- enginframe
|-- current-version
|-- bin
| `-- enginframe
|-- install
| `-- 2021.0-rXXXXX
|-- license
| `-- license.ef
|-- conf
| |-- enginframe.conf
| |-- enginframe
| | |-- certs
| | |-- server.conf
| | `-- agent.conf
| |-- tomcat
| | `-- conf
| | `-- certs
| |-- derby
| | |-- derby.properties
| | `-- server.policy
| `-- plugins
|-- data
| |-- cache
| |-- derby
| | `-- EnginFrameDB
| `-- plugins
|-- logs
| `-- <HOSTNAME>
| |-- *.log
| |-- tomcat
| `-- derby
|-- repository
|-- sessions
|-- spoolers
`-- temp
`-- <HOSTNAME>
|-- dumps
|-- errors
Installation directories 44

EnginFrame Administrator Guide ***Unable to locate subtitle***
`-- tomcat
The following names are used in this guide to refer to the different parts of the EnginFrame
installation tree.
NICE_ROOT
The directory that contains all the NICE products. By default, this directory is named /opt/
nice.
EF_TOP
The directory that contains the EnginFrame product. By default, this directory is named
NICE_ROOT/enginframe.
EF_LICENSE_PATH
The directory that contains the EnginFrame license files. By default, it's named EF_TOP/
license.
EF_CONF_ROOT
The directory that contains the EnginFrame configuration files. By default, it's named EF_TOP/
conf.
EF_DATA_ROOT
The directory that contains the data files. By default, it's named EF_TOP/data.
EF_LOGS_ROOT
The directory that contains the log files. By default, it's named EF_TOP/logs.
EF_TEMP_ROOT
The directory that contains the temporary files. By default, it's named EF_TOP/tmp.
Note
If you're using or planning to use the AWS HPC Connector plugin, make sure that
EF_TEMP_ROOT points to a folder on a file system that's shared among the EnginFrame
nodes.
Installation directories 45

EnginFrame Administrator Guide ***Unable to locate subtitle***
EF_REPOSITORYDIR
The directory that contains the EnginFrame repository files. By default, it's named EF_TOP/
repository.
EF_SPOOLERDIR
The directory that contains the EnginFrame spoolers. By default, it's named EF_TOP/
spoolers.
INTERACTIVE_SHARED_ROOT
The directory that contains the EnginFrame interactive sessions. By default, it's named EF_TOP/
sessions.
EF_ROOT
The directory that contains the EnginFrame binaries and system files. By default, it's named
EF_TOP/<VERSION>/enginframe.
The PAM based authentication method that's included with EnginFrame requires that some
binaries have the suid bit set to interact with the underlying system to authenticate users.
If you plan to use this authentication method, make sure that the file system that hosts
EnginFrame is mounted with nosuid flag unset.
The EF_SPOOLERDIR directory is used to hold all the data that's supplied as input and created as
output by EnginFrame services.
As already mentioned, the spooler directory must be accessible by both the EnginFrame Server
and EnginFrame Agent. It must be readable and writable by unprivileged users (described in the
following sections) and by the root user.
By default, the spooler directory is placed in a subdirectory of the installation directory.
Managing spoolers contains a detailed description of the system requirements for the spoolers
directory.
Special users
Choose which system accounts EnginFrame uses.
Special users 46

EnginFrame Administrator Guide ***Unable to locate subtitle***
The EnginFrame Administrator is a special system account that has some privileges, such as having
access to the EnginFrame Operational Dashboard and some of the configuration files. This account
is referred to as EF_ADMIN.
Another special account is used to run Tomcat®. This account is referred to as EF_NOBODY. Make
sure that all of the configuration files, along with files in the $EF_TOP/logs directory, are owned
by EF_NOBODY since they might contain sensitive information. Other users or groups should not be
granted permissions to these files.
Any existing system account excluding root can be specified. However, we recommend that you set
up two new dedicated users for these roles.
In most cases, efadmin and efnobody are respectively used for EF_ADMIN and EF_NOBODY.
EF_ADMIN and EF_NOBODY must be operating system valid accounts. That is, you must be
able to log in to the system with those accounts, and they must not be disabled.
Authentication
Last, before installing EnginFrame, select an authentication method to use.
EnginFrame can authenticate users using many different mechanisms, including PAM, LDAP,
ActiveDirectory, and HTTP Basic Authentication with certificates.
If the authentication methods included with EnginFrame don't meet your requirements, you can
create your own authentication module.
For more information about configuring authentication, see Authentication framework.
Digital Rights Management (DRM) configuration for Interactive Plugin
The following sections describe the additional requirements for the Interactive Portal.
Important
EnginFrame periodically checks the status of the interactive jobs using the EF_ADMIN user
account.
This account must be able to access information from all of the Digital Rights Management
(DRM) mechanisms, such as jobs, files and folder resources.
Authentication 47
EnginFrame Administrator Guide ***Unable to locate subtitle***
To make sure that this account can access this information, make sure that this account
serves as one of your resource manager administrators and has administrator permissions
granted.
If you don't configure this account accordingly, you might lose some interactive session
data.
Note
When the resource manager controls mixed Windows® clusters, Interactive Plugin submits
interactive session jobs on Windows® hosts as the user running EnginFrame Server
(efnobody by default). This user must be a valid Windows® user.
Note
Starting March 31, 2022, NICE EnginFrame doesn't support VNC®, HP® RGS, VirtualGL, and
NICE DCV 2016 and previous versions.
IBM® Platform™ LSF®
Interactive Plugin relies on the LSF® workload manager, to allocate and reserve resources to run
the interactive sessions. Interactive Plugin requires some specific LSF® settings.
The following is the configuration steps that are necessary to run Interactive Plugin sessions
on your LSF® cluster. If needed, they can be enhanced or combined with your existing LSF®
configuration to achieve more complex resource sharing policies.
Configuring Queues
Interactive Plugin uses resource manager's queues to submit and manage interactive sessions.
You can set up Interactive Plugin to use a default queue and set different services to use different
queues. However, it's important that the queues that are used for any visualization middleware or
target system have the following settings:
•
The EnginFrame Administrator account (usually efadmin) must be queue administrator of any
queue used by Interactive Plugin.
Digital Rights Management (DRM) configuration for Interactive Plugin 48

EnginFrame Administrator Guide ***Unable to locate subtitle***
•
Queues for HP® RGS sessions need to have HJOB_LIMIT set to one, since only one HP® RGS
session can run on each host.
•
Queues for HP® RGS Linux® sessions need to have PRE_EXEC and POST_EXEC respectively set
to the rgs.preexec.sh and rgs.postexec.sh scripts, located under $EF_TOP/<VERSION>/
enginframe/plugins/interactive/tools folder.
Here is a configuration snippet for these queues in lsb.queues. You might not need to have
all of these queues configured. You can adapt the parameters as you want, given the preceding
requirements.
Begin Queue
QUEUE_NAME = int_linux
PRIORITY = 50
EXCLUSIVE = y
NEW_JOB_SCHED_DELAY = 0
JOB_ACCEPT_INTERVAL = 0
ADMINISTRATORS = efadmin
HOSTS = viz1 vizlin01 vizlin02
DESCRIPTION = Queue for linux interactive applications
End Queue
Begin Queue
QUEUE_NAME = rgs_linux
PRIORITY = 50
EXCLUSIVE = y
NEW_JOB_SCHED_DELAY = 0
JOB_ACCEPT_INTERVAL = 0
HJOB_LIMIT = 1
ADMINISTRATORS = efadmin
HOSTS = viz2 vizlin03 vizlin04
PRE_EXEC = /opt/nice/enginframe/plugins/interactive/tools/rgs.preexec.sh
POST_EXEC = /opt/nice/enginframe/plugins/interactive/tools/rgs.postexec.sh
DESCRIPTION = Queue for RGS linux sessions
End Queue
Last, the pre-run and post-run scripts for HP® RGS Linux® sessions must run as root. This
means that the /etc/lsf.sudoers file on all the LSF® nodes must contain the following line:
LSB_PRE_POST_EXEC_USER=root
Digital Rights Management (DRM) configuration for Interactive Plugin 49

EnginFrame Administrator Guide ***Unable to locate subtitle***
Note
Make sure /etc/lsf.sudoers is owned by root and has permissions 600. Otherwise,
LSF® ignores its contents.
After you modify /etc/lsf.sudoers, you must run badmin hrestart all to restart
sbatchd on all nodes in the cluster.
Note
To specify the default rgs queues inside interactive, edit the $EF_TOP/conf/plugins/
interactive/interactive.efconf file and add the following two lines.
INTERACTIVE_DEFAULT_RGS_LINUX_QUEUE=rgs_linux
INTERACTIVE_DEFAULT_RGS_WINDOWS_QUEUE=rgs_windows
Important
By default, every pre-run and post-run script runs with the credentials of the owner of
the job. After this configuration is applied, all the pre-execution and post-execution
scripts configured in LSF® at queue level (lsb.queues) or at application level
(lsb.applications) run with the root account. The impact on security and functionality
must be analyzed case by case.
Alternatively, it's also possible to configure the sudo command to run pre-execution
and post-execution scripts as a normal user with privileges to run as root only specific
operations.
Requirements on scheduler tools
To operate with interactive sessions on the target operating systems, EnginFrame relies on some
tools provided by LSF®. The scheduler must then be properly configured to make these tools work
effectively on the hosts of the cluster.
The following is a list of LSF® tools that are required by EnginFrame.
•
Linux® sessions via LSF® require lsrun.
Digital Rights Management (DRM) configuration for Interactive Plugin 50

EnginFrame Administrator Guide ***Unable to locate subtitle***
Important
In the recent LSF® versions (specifically, 9.1 and later), the lsrun command is disabled
by default. This configuration can be changed by editing file LSF_TOP/conf/lsf.conf
and setting LSF_DISABLE_LSRUN=N. After this change, the LIM daemon must be asked
to reload the configuration, as scheduler administrator running the following command:
lsadmin reconfig
PBS Professional®
Interactive Plugin relies on the PBS Professional® workload manager, to allocate and reserve
resources to run the interactive sessions. Installation and configuration instructions for PBS
Professional® are out of the scope of this document. However, Interactive Plugin requires some
specific PBS Professional® settings.
Here is a minimal configuration needed to run Interactive Plugin sessions on your PBS
Professional® cluster. If needed they can be enhanced or combined with your existing PBS
Professional® configuration to achieve more complex resource sharing policies.
Configuring Queues
Interactive Plugin uses resource manager's queues to submit and manage interactive sessions.
You can set up Interactive Plugin to use a default queue and set different services to use different
queues. However, it's important that the queues used for any visualization middleware or target
system have the following settings:
•
The EnginFrame Administrator account (usually efadmin) must be able to see, start, and stop
jobs of any queue used by Interactive Plugin.
• You must force the limit of one job per host for HP® RGS queues, because only one HP® RGS
session can run on each host.
•
Queues for HP® RGS Linux® sessions must have prolog and an epilog respectively set to
the rgs.preexec.sh and rgs.postexec.sh scripts, located under $EF_TOP/<VERSION>/
enginframe/plugins/interactive/tools folder. So you might want to copy or link them
into ${PBS_HOME}/mom_priv of each execution host.
The following is an example configuration of the interactive queue.
Digital Rights Management (DRM) configuration for Interactive Plugin 51

EnginFrame Administrator Guide ***Unable to locate subtitle***
# qmgr
Max open servers: 49
Qmgr: create queue interactive
set queue interactive queue_type = Execution
set queue interactive resources_default.arch = linux
set queue interactive enabled = True
set queue interactive started = True
SGE, Son of Grid Engine (SoGE), or Univa® Grid Engine® (UGE)
Interactive Plugin relies on the SGE workload manager, to allocate and reserve resources to run the
interactive sessions. Installation and configuration instructions for SGE are out of the scope of this
document. However, Interactive Plugin requires some specific SGE settings.
Here is a minimal configuration needed to run Interactive Plugin sessions on your SGE cluster. If
needed they can be enhanced or combined with your existing SGE configuration to achieve more
complex resource sharing policies.
Configuring queues
Interactive Plugin uses resource manager's queues to submit and manage interactive sessions.
You can set up Interactive Plugin to use a default queue and set different services to use different
queues. However, it's important that the queues that are used for any visualization middleware or
target system have the following settings.
•
The EnginFrame Administrator account (usually efadmin) must be queue administrator of any
queue used by Interactive Plugin.
• To make the necessary system command line tools and environment available to Interactive
Plugin scripts, SGE queues must be configured as follows:
•
The shell_start_mode queue parameter has to be set to unix_behavior.
•
If the shell_start_mode parameter is set to posix_compliant, then the shell parameter
must be set to /bin/bash.
• You must force the limit of one job per host for HP® RGS queues, because only one HP® RGS
session can run on each host.
•
Queues for HP® RGS Linux® sessions must have prolog and an epilog respectively set to
the rgs.preexec.sh and rgs.postexec.sh scripts, located under $EF_TOP/<VERSION>/
enginframe/plugins/interactive/tools folder. They must also be run as root, because
HP® RGS must operate on runlevels. Therefore, you might want to have prolog root@/
Digital Rights Management (DRM) configuration for Interactive Plugin 52

EnginFrame Administrator Guide ***Unable to locate subtitle***
path/to/enginframe/plugins/interactive/tools/rgs.preexec.sh in the queue
configuration.
SLURM™
In this scenario, Interactive Plugin relies on SLURM™ Workload Manager to allocate and reserve
resources to run the interactive sessions.
Interactive Plugin requires that features vnc, dcv, dcv2 are defined in the SLURM™ configuration
and that every allowed user must be able to check the status and query all SLURM™ jobs and
partitions (alias queues). 'dcv2' stands for DCV since 2017.
Also, Interactive Plugin requires that the RealMemory (in MB units) parameter is defined in the
SLURM™ configuration for every execution node to show the correct maximum value of memory.
Installing NICE EnginFrame
Note
Starting March 31, 2022, NICE EnginFrame doesn't support VNC®, HP® RGS, VirtualGL, and
NICE DCV 2016 and previous versions.
EnginFrame is distributed with an installer that guides you through how to install it. The installer
is the EnginFrame package itself. For instruction on how to get your EnginFrame package, see
Downloading EnginFrame.
Installing
You can use a graphical and a text-based installer. If you're installing on machines where you don't
have access to an X Window System, we recommend that you use a text-based installer.
Unprivileged User Installation
In most cases, we recommend that you install EnginFrame as root user.
Installation as an unprivileged user is possible, but has the following limitations:
•
You can't use authentication mechanisms that require root privileges (for example,
PAM).
Installing NICE EnginFrame 53

EnginFrame Administrator Guide ***Unable to locate subtitle***
• After the installation, services are run by the user that installed EnginFrame Agent.
Make sure that the umask is 022 before launching the installation commands.
If Java™ is available in your PATH, start the graphical installer as root user:
# java -jar enginframe-2021.0.x.y.jar
The graphical installer guides you through the installation process. If the X Window System isn't
available, the installer falls back to the text-based one.
Start the user interface of the text-based installer by specifying text argument on the command
line interface:
# java -jar enginframe-2021.0.x.y.jar --text
The installer shows you the terms of the license agreement. If you aren't installing EnginFrame on
an Amazon EC2 instance, it also prompts you for a valid license file. If you don't have a valid license
file, see EnginFrame on on-premises and other cloud-based servers.
Note
The license file is used to determine if the product type of the EnginFrame installation is
PRO or ENT. Because EC2 EnginFrame doesn't use a license file, you can determine the
product type in one of two ways:
• If you're upgrading from an older installation that used a license file, that license is
checked. The check determines if the installation is PRO or ENT. It does this before
moving the license file to the backup directory.
• If it's a clean EnginFrame installation, then you're prompted to choose between a PRO
and ENT installation.
In either case, a field that's called ef.product with the value of PRO or ENT is written in the
$EF_TOP/conf/enginframe/server.conf config file.
The installer prompts you with some questions to tailor the EnginFrame deployment to your needs.
Installing 54
EnginFrame Administrator Guide ***Unable to locate subtitle***
After asking all the questions, the installer shows you a summary of your answers. This is when you
can change values before installing. After summary is accepted, the installer proceeds to set up
EnginFrame on current host.
Note
When installing using a Java™ Runtime Environment the following warning might appear
in the output: Unable to locate tools.jar. Expected to find it in [...]
This warning is harmless and can be safely ignored.
After installation finishes, you can begin to use EnginFrame. To learn how you can get started with
your EnginFrame Portal and test your installation, see Running NICE EnginFrame.
A file that's named efinstall.config is saved in the directory where you launched the installer
from. This file contains the options that you specified during installation. This file can be useful to
document how you installed EnginFrame. You can use this information to replicate installation in
batch mode without requiring user interactions.
Distributed Deployment
If you want to run Server and Agent on different hosts, launch the installer on the Server
host and select a shared installation directory. The installer asks if the Server and Agent run
on different hosts.
Batch Installation
When using batch installation, you can replicate an installation on different hosts taking as input
a configuration file that's created during a normal install. To run the EnginFrame installer in batch
mode, run the following command.
# java -jar enginframe-2021.0.x.y.jar --batch -f efinstall.config
If you didn't specify the -f option, the installer searches for a file that's named
efinstall.config in the current directory.
Unless errors occur, EnginFrame installer completes the installation procedure without requiring
further user input.
Installing 55

EnginFrame Administrator Guide ***Unable to locate subtitle***
Fine-tuning your installation
We recommend that you consider fine-tuning your installation. You can make adjustments to make
sure that your installation of EnginFrame is performing optimally on your system and meets your
specific requirements.
Topics
• Spooler download URL
• Optimizing JDK options
• Distributed resource manager options
• Interactive plugin
Spooler download URL
The EnginFrame Agent must communicate with EnginFrame Server when downloading a file from
a spooler. In some network configurations and architectures, when a Web Server is placed if front
of the EnginFrame Server, this callback URL must be explicitly configured.
If you can't download files from your EnginFrame Portal, see Configure download URL on agent for
configuring EnginFrame Agent callback URL.
Optimizing JDK options
To fine tune the JVM heap size used to launch the EnginFrame Server or the EnginFrame
Agent, you can modify settings in the $EF_TOP/conf/enginframe.conf file. You can set
SERVER_MIN_HEAP and SERVER_MAX_HEAP for the EnginFrame Server, and AGENT_MIN_HEAP
and AGENT_MAX_HEAP for the EnginFrame Agent.
If you want full control of the JVM options, you can set SERVER_JAVA_OPTIONS and
AGENT_JAVA_OPTIONS in the $EF_TOP/conf/enginframe.conf file. However, note that doing
so overrides all of the parameters, including the default ones.
In the following example, the heap size for Agent is set to 1024 MB.
# Initial heap memory size for the EnginFrame Agent
AGENT_MIN_HEAP='1024m'
# Max heap memory size for the EnginFrame Agent
Fine-tuning your installation 56

EnginFrame Administrator Guide ***Unable to locate subtitle***
AGENT_MAX_HEAP='1024m'
Distributed resource manager options
The EnginFrame installer configures the HPC Connector at installation time. You can modify the
HPC Connector parameters in the AWS HPC Connector (hpc) main configuration file. It's located at
$EF_TOP/conf/plugins/hpc/hpc.efconf. This is required as a preconfiguration step before
HPC Connector can be used within your EnginFrame environment.
•
HPCC_AWS_PROFILE_NAME — The AWS profile name that's used for creating the clusters.
•
HPCC_AWS_REGION — The AWS Region where the clusters will be created by default.
•
HPCC_AWS_BUCKET_ARN — The Amazon Resource Name (ARN) of the Amazon S3 bucket that's
used for data exchange.
•
HPCC_SSM_ROLE_ARN — The ARN of the IAM role that's used for invoking remote commands
using SSM.
•
HPCC_S3_ROLE_ARN — The ARN of the IAM role that's used for data exchange.
•
HPCC_PCLUSTER_ROLE_ARN — The ARN of the IAM role that's used for creating the clusters
using AWS ParallelCluster.
•
HPCC_USE_INSTANCE_PROFILE — Set this boolean parameter to true if EnginFrame is
installed on an Amazon EC2 instance and you want the HPC Connector to use an instance profile
instead of the profile mapped to the ef-iam-user. The default value for this parameter is
false. For information about how to set up an instance profile, see Using an IAM role to grant
permissions to applications running on Amazon EC2 instances in the AWS Identity and Access
Management User Guide.
•
HPCC_DELETED_CLUSTER_TTL the time to live after which a cluster in the deleted state will be
removed from the system. The time span must follow the ISO8601 duration syntax. The default
value for this parameter is one day.
•
HPCC_COMPLETED_APPLICATION_TTL the time to live after which a completed remote job is
removed from the system. The time span will need to follow the ISO8601 duration syntax. The
default value for this parameter is seven days.
Cluster name label
All the grid plug-ins in EnginFrame support the option to specify a custom label to be used by the
portal to show the name of the clusters.
Fine-tuning your installation 57

EnginFrame Administrator Guide ***Unable to locate subtitle***
Change the grid plug-in cluster name by specifying in the plug-in configuration file the [PLUGIN-
ID]_CLUSTER_LABEL options:
•
$EF_TOP/conf/plugins/lsf/ef.lsf.conf: LSF_CLUSTER_LABEL=...
•
$EF_TOP/conf/plugins/pbs/ef.pbs.conf: PBS_CLUSTER_LABEL=...
•
$EF_TOP/conf/plugins/sge/ef.sge.conf: SGE_CLUSTER_LABEL=...
•
$EF_TOP/conf/enginframe/plugins/slurm/ef.slurm.conf:
SLURM_CLUSTER_LABEL=...
Configuring multiple clusters for the same grid manager
Currently, EnginFrame supports the multi-cluster configuration only for the Slurm plug-in.
Configure multiple Slurm clusters by specifying following options in the plug-in configuration file
$EF_TOP/conf/enginframe/plugins/slurm/ef.slurm.conf:
•
SLURM_CLUSTER_IDS
Comma-separated list of IDs that are assigned to a cluster.
•
SLURM_CLUSTER_[CLUSTER-ID]_LABEL
(Optional) Label to display for the cluster that's identified by the CLUSTER-ID. CLUSTER-ID is
used if the label isn't set.
•
SLURM_CLUSTER_[CLUSTER-ID]_CONF
For each cluster, the path to the configuration file of the cluster is identified by CLUSTER-ID.
The following is an example.
# Optional configuration: if not set, only the default cluster will be used,
with following settings:
#SLURM_CLUSTER_LABEL
# (optional, cluster id will be used if not set)
SLURM_CLUSTER_IDS="SLURM1,SLURM2"
# First Cluster
SLURM_CLUSTER_SLURM1_LABEL="SLURM_FIRST"
Fine-tuning your installation 58

EnginFrame Administrator Guide ***Unable to locate subtitle***
SLURM_CLUSTER_SLURM1_CONF="/efs/slurm/slurm_121/etc/slurm.conf"
# Second Cluster
SLURM_CLUSTER_SLURM2_LABEL="SLURM_SECOND"
SLURM_CLUSTER_SLURM2_CONF="/efs/slurm/slurm_123/etc/slurm.conf"
Important
You can't specify SLURM_CLUSTER_LABEL option if multiple Slurm clusters are used.
You can only use clusters that are compatible with the Slurm client in the folder indicated
by the SLURM_BINDIR option.
Interactive plugin
Distributed resource manager
The EnginFrame installer configures the Interactive Plugin depending on the resource manager
selection when you install EnginFrame. If you want to change this setting, the related configuration
parameters are located in the Interactive Plugin main configuration file: $EF_TOP/conf/
plugins/interactive/interactive.efconf.
The parameters are named INTERACTIVE_DEFAULT_LINUX_JOBMANAGER and
INTERACTIVE_DEFAULT_WINDOWS_JOBMANAGER. You can set their values to the following:
•
lsf - Sessions are scheduled by LSF® (Linux®-only).
•
pbs - Sessions are scheduled by PBS Professional® (Linux®-only).
•
sge - Sessions are scheduled by Sun® Grid Engine, Univa® Grid Engine® (UGE) or Son of Grid
Engine (SoGE) (Linux®-only).
You can override this behavior on per-EnginFrame service basis by using --jobmanager option of
interactive.submit session starter script.
Remote visualization technology
By default, Interactive Plugin is set to use VNC® remote visualization technology. If you want to
change this setting, the related configuration parameter is located in the Interactive Plugin main
configuration file: $EF_TOP/conf/plugins/interactive/interactive.efconf.
Fine-tuning your installation 59

EnginFrame Administrator Guide ***Unable to locate subtitle***
The parameter is named INTERACTIVE_DEFAULT_REMOTE. You can set it to one of the following
values:
•
dcv2 - To manage NICE DCV (since 2017.0) 3D accelerated sessions.
You can override this behavior on a per-EnginFrame service basis by using the --remote option of
the interactive.submit session starter script.
Installing EnginFrame Enterprise
Topics
• Installing a third-party Load Balancer
• Setting up the database management system
• Configure the EnginFrame service
• Start EnginFrame
• Saving database credentials in a keystore
Installing a third-party Load Balancer
EnginFrame Enterprise requires a load balancer implementing the sticky session strategy.
The following sections describe how you can implement load balancing for EnginFrame Enterprise.
This implementation is based on AJP connector and Apache® Web Server frontend with
mod_proxy_balancer module.
Topics
• Configure the AJP connector
• Configure the Apache® Proxy
• Configure the Apache® mod_proxy_balancer
Configure the AJP connector
Enable the AJP connector on Tomcat®:
• Log in as root on the node of the EnginFrame server:
Installing EnginFrame Enterprise 60

EnginFrame Administrator Guide ***Unable to locate subtitle***
# cd $EF_TOP/conf/tomcat/conf
•
Open the server.xml file and add a section to define the AJP 1.3 connector.
<Connector
port="8009"
enableLookups="false"
redirectPort="8443"
protocol="AJP/1.3"
URIEncoding="utf-8" />
If port 8009 is used by another application, choose another port.
Configure the Apache® Proxy
To enable Reverse Proxy Support in Apache® append the following lines to the main Apache®
configuration file (APACHE_TOP/conf/httpd.conf) and reload the Apache® service.
<Location "/enginframe">
DefaultType None
ProxyPass ajp://127.0.0.1:8009/enginframe flushpackets=on
ProxyPassReverse ajp://127.0.0.1:8009/enginframe
</Location>
If your context isn’t enginframe, then change the <Location> and those two lines accordingly.
Configure the Apache® mod_proxy_balancer
This configuration is required to balance the traffic over many EnginFrame instances.
Create a specific file (for example, ef-ent.conf), and add to the Apache® configuration directory.
In most cases, it's /etc/httpd/conf.d.
The following is an example of the ef-ent.conf file content.
Header add Set-Cookie "ROUTEID=.%{BALANCER_WORKER_ROUTE}e;
path=/enginframe" env=BALANCER_ROUTE_CHANGED
<Proxy balancer://enterprise>
BalancerMember ajp://<ip of EnginFrame Server 1>:8009 route=1
Installing EnginFrame Enterprise 61

EnginFrame Administrator Guide ***Unable to locate subtitle***
BalancerMember ajp://<ip of EnginFrame Server 2>:8009 route=2
ProxySet lbmethod=bybusyness
ProxySet stickysession=ROUTEID
</Proxy>
<Location "/enginframe">
ProxyPass balancer://<enterprise hostname>/enginframe
ProxyPassReverse balancer://<enterprise hostname>/enginframe
</Location>
The enterprise alias is an internal parameter. If necessary, you can change the enginframe
context. You must set up the Header to store internally the route ID to pass it to stickysession
variable, useful for automatic management of cookies.
Setting up the database management system
An empty database instance that's named EnginFrameDB must be created before EnginFrame first
startup. EnginFrameDB is case sensitive. At the first startup, EnginFrame creates all the needed
tables.
The following sections describe the steps to create the EnginFrameDB database instance on the
supported database management system.
Note
Don't start an EnginFrame server or servers before the following steps are completed.
Topics
• Install and configure EnginFrame
• Configure the MySQL® database (version 5.1.x and higher)
• Configure the Oracle database (10 and higher)
• Configure the SQL Server® (2012, 2008)
Install and configure EnginFrame
When installing EnginFrame Enterprise, you're asked to insert the JDBC URL to the EnginFrame
database instance. You're also asked to add the username and password that you use to access it.
Installing EnginFrame Enterprise 62

EnginFrame Administrator Guide ***Unable to locate subtitle***
JDBC URL [default: jdbc:derby://localhost:1527/EnginFrameDB]
> jdbc:mysql://172.16.10.216:3306/EnginFrameDB
Username [default: dbadmin]
> enginframedb
Password
>
Configure the MySQL® database (version 5.1.x and higher)
1. Use the following command on the MySQL® server host to log in as root.
# mysql -p
2. Create a new database by running the following SQL query for MySQL 5.x.
# CREATE DATABASE EnginFrameDB;
For MySQL 8.x and later, you must define a character set that isn't UTF8 due to a limitation on
row length.
# CREATE DATABASE EnginFrameDB DEFAULT CHARACTER SET latin1;
3. Create a new user by running the following SQL queries, using single quotes.
# CREATE USER '<username>'@'<host>' IDENTIFIED BY '<password>';
Consider the following example.
# CREATE USER 'efdbadmin' IDENTIFIED BY 'efdbpassword';
# CREATE USER 'efdbadmin'@'%' IDENTIFIED BY 'efdbpassword';
The first statement allows access to localhost (for example, for maintenance actions). In the
second line, '%' functions as a wildcard that's used to allow all hosts. You can modify the latest
statement to restrict the access to the EnginFrame Servers only.
4. Grant privileges to the new user on the previously created DB by running the following SQL
query.
# GRANT ALL PRIVILEGES ON EnginFrameDB.* TO <username>
Installing EnginFrame Enterprise 63

EnginFrame Administrator Guide ***Unable to locate subtitle***
IDENTIFIED BY '<password>';
Consider the following example.
# GRANT ALL PRIVILEGES ON EnginFrameDB.* TO 'efdbadmin'
IDENTIFIED BY 'efdbpassword';
# GRANT ALL PRIVILEGES ON EnginFrameDB.* TO 'efdbadmin'@'%'
IDENTIFIED BY 'efdbpassword';
5. Flush privileges to activate them on the created database:
# flush privileges;
6. Test the connection to the EnginFrameDB database. From one of the servers where the
EnginFrame server instance is installed on, check the connection to the created database using
MySQL® client only.
# mysql -h <mysql server hostname/ip address>[:<port>]
-u <username>
-p <password>
Consider the following example.
# mysql -h mysqlserver -u efdbadmin -p efpassword
This message is returned.
Welcome to the MySQL monitor. Commands end with ; or \g.
Your MySQL connection id is 87653
Server version: 5.1.73 Source distribution
Copyright (c) 2000, 2013, Oracle and/or its affiliates. All rights reserved.
Oracle is a registered trademark of Oracle Corporation and/or its
affiliates. Other names may be trademarks of their respective
owners.
Type 'help;' or '\h' for help. Type '\c' to clear the current input statement.
mysql>
Installing EnginFrame Enterprise 64

EnginFrame Administrator Guide ***Unable to locate subtitle***
Configure the Oracle database (10 and higher)
• Log in to the database as admin using a SQL client such as the SQuirreL SQL client,
using the URI jdbc:oracle:thin:@<hostname>:<port>:XE (for example,
jdbc:oracle:thin:@efentserverdb:1521:XE).
• Create a new user by running the following SQL query.
# CREATE USER <username> IDENTIFIED BY <password>>
The following is an example.
# CREATE USER enginframedb IDENTIFIED BY efdbpassword
A new schema with name equals to the username is automatically created by the db engine.
Logging into the database with the new user, the user schema is automatically used for that user.
• Grant privileges to the new user by running the following SQL query.
# GRANT ALL PRIVILEGES TO <username>
The following is an example.
# GRANT ALL PRIVILEGES TO enginframedb
If you need to restrict some privileges for the new user, see the instructions in the Oracle
database documentation. Make sure that the user has both read and write permissions on their
schema.
• Change the database user profile to avoid automatic expiration, issuing the following SQL query.
# ALTER PROFILE DEFAULT LIMIT PASSWORD_LIFE_TIME UNLIMITED;
This sets the no password expiration for all the default user's profile.
Configure the SQL Server® (2012, 2008)
• Enable TCP/IP networking and remote connections.
• Run SQL Server Configuration Manager
Installing EnginFrame Enterprise 65

EnginFrame Administrator Guide ***Unable to locate subtitle***
•
Go to SQL Server Network Configuration > Protocols for SQLEXPRESS
• Make sure TCP/IP is enabled
• Open the context menu (Right-click) on TCP/IP and select Properties
• Verify that, under IP2, the IP address is set to the computer's IP address on the local subnet
• Scroll down to IPAll
• Make sure that TCP Dynamic Ports is blank
• Make sure that TCP Port is set to 1433
•
Create a new database that's named EnginFrameDB using the SQL Server Management Studio
with default settings.
• Create a user with SQL Server® authentication using the SQL Server Management Studio
(for example, create a user with a username that's enginframedb and a password that's
efdbpassword ).
•
Make sure the user has at least the db_owner role on the EnginFrameDB. Otherwise, it can't
read and create tables. Check this in the Object Explore. Go to Security > Logins, open a
content menu (right-click) on the username and choose Properties > User Mapping from
the left panel.
• Make sure that both the EnginFrameDB database option and the role membership option are
checked (for example, have both the db_owner and public options checked).
•
(optional) To set EnginFrameDB as the default database for the user, go to Security >
Logins, open a context menu (right-click) on the username and choose Properties >
General from the left panel.
• Allow SQL Server® to be accessed through "SQL Server and Windows Authentication mode" and
not only through "Windows authentication mode"
• Open a context menu (right-click) on the database server instance where EnginFrameDB was
created (for example, SQLEXPRESS).
• Choose Properties, then Security, Server authentication and choose "SQL Server and Windows
Authentication mode".
At this point, EnginFrame must be able to access SQL Server® database and to create tables.
Configure the EnginFrame service
The installer can configure the EnginFrame service to start at boot time on the node where it's run.
Installing EnginFrame Enterprise 66

EnginFrame Administrator Guide ***Unable to locate subtitle***
If the installation was performed on a shared file system, log in on each node and run the
following command to configure the EnginFrame service to start on all other dedicated nodes.
# $EF_TOP/bin/enginframe host-setup --roles=server,agent --boot=y
This configuration starts both server and agent components at node startup.
To learn about the host-setup options, run the following command.
# $EF_TOP/bin/enginframe host-setup --help
Start EnginFrame
After the EnginFrame service is installed, run the following command to manually start it on every
node.
# service enginframe start
Check if every database EnginFrameDB instance (MySQL®, Oracle® or SQL Server®) has been
populated with EnginFrame tables.
Saving database credentials in a keystore
By default, when you're configure an external database, the database credentials are
written to the server.conf configuration file. The option names ef.db.admin.name and
ef.db.admin.password are set to the database username and password. You can save the
database credentials in a keystore instead of the configuration file.
Setting up the keystore option requires that you edit the ${EF_ROOT}/enginframe/
server.conf file. The resulting file includes the following contents.
EF_DB_KEY_STORE_ENABLED=true
EF_DB_KEY_STORE=${EF_CONF_ROOT}/enginframe/certs/db.keystore
To migrate the credentials of your external database from the configuration file to the
keystore:
1.
Edit the ${EF_CONF_ROOT}/enginframe/server.conf file as follows.
Installing EnginFrame Enterprise 67

EnginFrame Administrator Guide ***Unable to locate subtitle***
1.
Remove the ef.db.admin.name and ef.db.admin.password entries.
Note
Before deleting these entries, make a note of the value that they are set to. You
need them for the following steps.
2.
Add or modify the EF_DB_KEY_STORE_ENABLED entry. Set it to true.
3.
Add an entry for EF_DB_KEY_STORE=${EF_CONF_ROOT}/enginframe/certs/
db.keystore.
2. Run the following command.
${EF_TOP}/bin/ef-db-credentials.sh --action setDBAdmin --name name --
password password
Set name and password to the values that ef.db.admin.name and
ef.db.admin.password were set to in the ${EF_CONF_ROOT}/enginframe/
server.conf file in Step 1.
3. Restart EnginFrame. For more information, see Running NICE EnginFrame.
Configure EnginFrame to work behind a network proxy
Learn how to provide the proxy information EnginFrame needs to route network calls correctly.
You'll use two java properties:
-Dhttp.proxyHost=PROXY HOST
-Dhttp.proxyPort=PROXY PORT
If the proxy is configured to work with HTTPS, use:
-Dhttps.proxyHost=PROXY HOST
-Dhttps.proxyPort=PROXY PORT
Set the properties in EnginFrame
1. Get the java properties that EnginFrame currently uses:
Configure EnginFrame to work behind a network proxy 68

EnginFrame Administrator Guide ***Unable to locate subtitle***
a.
Run ps -aux and locate the EnginFrame process that ends in
org.apache.catalina.startup.Bootstrap start.
b. Copy the line representing the command that launched EnginFrame and copy it to a local
bash variable, such as OPTIONS:
$ OPTIONS="content of copied line"
OPTIONS_UPDATED=`echo "$OPTIONS" | tr ' ' '\n' | egrep -e '^-D' | tr '\n' ' '`
The new variable OPTIONS_UPDATED has the content you need to use when you edit the
EnginFrame.conf file.
2.
Edit the EnginFrame.conf file by adding the variable name SERVER_JAVA_OPTIONS to the
end of the file and saving it:
# other variables defined
...
SERVER_JAVA_OPTIONS="<values copied from the content of OPTIONS_UPDATED> -
Dhttp.proxyHost=$PROXY_HOST -Dhttp.proxyPort=$PROXY_PORT"
PROXY_HOST and PROXY_PORT are placeholders for the proxy host and proxy port.
3. Restart the EnginFrame process.
Running NICE EnginFrame
This chapter describes how to start and stop EnginFrame Portal and check its status. It also covers
administration monitoring and self-check services.
Start or stop EnginFrame and check its status
You can control EnginFrame with the $EF_TOP/bin/enginframe command line script.
Run the following command to start EnginFrame:
# $EF_TOP/bin/enginframe start
Run the following command to stop EnginFrame:
# $EF_TOP/bin/enginframe stop
Running NICE EnginFrame 69

EnginFrame Administrator Guide ***Unable to locate subtitle***
Note
If EnginFrame Server and EnginFrame Agent are on separate hosts, run the following
command on the host that's running EnginFrame Server:
# $EF_TOP/bin/enginframe <start|stop> server
Run the following command on the host that's running EnginFrame Agent:
# $EF_TOP/bin/enginframe <start|stop> agent
Note
To start EnginFrame Enterprise, run the EnginFrame start (stop) command on each host of
the EnginFrame Enterprise infrastructure that's in your deployment. For more information,
see Deployment.
# $EF_TOP/bin/enginframe <start|stop>
This control script also checks EnginFrame's status:
# $EF_TOP/bin/enginframe status
The output of the previous command is as follows:
# /opt/nice/enginframe/bin/enginframe start
Reading EnginFrame version from: /opt/nice/enginframe/current-version
Current version: 2017.0-r41442
EnginFrame Control Script
Loading configuration from:
- "/opt/nice/enginframe/conf/enginframe.conf"
Using EnginFrame in "/opt/nice/enginframe/2017.0-r41442"
Tomcat started.
Start or stop EnginFrame and check its status 70

EnginFrame Administrator Guide ***Unable to locate subtitle***
[OK] EnginFrame Server started
[OK] EnginFrame Agent started
# /opt/nice/enginframe/bin/enginframe status
Reading EnginFrame version from: /opt/nice/enginframe/current-version
Current version: 2017.0-r41442
EnginFrame Control Script
Loading configuration from:
- "/opt/nice/enginframe/conf/enginframe.conf"
Using EnginFrame in "/opt/nice/enginframe/2017.0-r41442"
---- Server PID Information ----
USER PID PPID %CPU %MEM STIME TIME COMMAND
efnobody 1674 1 69.9 17.4 19:34 00:01:47 /usr/lib/jvm/jre/bin/java
-Xms1024m -Xmx1024m -XX:HeapDumpPath=/[...]/dumps/server.pid1549.hprof
-Djava.protocol.handler.pkgs=com.enginframe.common.utils.xml.handlers
-XX:ErrorFile=/[...]/dumps/server.hs_err_pid1549.log
-DjvmRoute=efserver1 -DEF_LICENSE_PATH=/opt/nice/enginframe/license
-DDERBY_DATA=/opt/nice/enginframe/data/derby -DEF_ERRORS_DIR=/opt/nice/
enginframe/data/errors -Def.repository.dir=/opt/nice/enginframe/repository
-XX:+HeapDumpOnOutOfMemoryError -DEF_ROOT=/opt/nice/enginframe/2017.0-r41442/
enginframe -DEF_DYNAMIC_ROOT=/opt/nice/enginframe/2017.0-r41442/enginframe
-DEF_CONF_ROOT=/opt/nice/enginframe/conf -DEF_DATA_ROOT=/opt/nice/enginframe/
data -Def.tmp.dir=/opt/nice/enginframe/tmp/efserver1 -DEF_SPOOLER_DIR=/opt/
nice/enginframe/spoolers -DEF_SESSION_SPOOLER_DIR=/opt/nice/enginframe/
spoolers -DEF_LOGDIR=/opt/nice/enginframe/logs/efserver1
-Dfile.encoding=UTF -classpath :/opt/nice/enginframe/2017.0-r41442/tomcat/lib/
sdftree-handler.jar:/opt/nice/enginframe/2017.0-r41442/tomcat/bin/
bootstrap.jar:/opt/nice/enginframe/2017.0-r41442/tomcat/bin/tomcat-juli.jar
[...] org.apache.catalina.startup.Bootstrap start
---- Server Port Information ----
INFO: Starting ProtocolHandler ["http-bio-8443"]
---- Agent PID Information ----
root 1677 1 6.5 5.2 19:34 00:00:10 /usr/lib/jvm/jre/bin/java
-Xms512m -Xmx512m -XX:HeapDumpPath=/[...]/dumps/agent.pid1549.hprof
-XX:ErrorFile=/[...]/dumps/agent.hs_err_pid1549.log
-DEF_ROOT=/opt/nice/enginframe/2017.0-r41442/enginframe -DEF_DYNAMIC_ROOT=
/opt/nice/enginframe/2017.0-r41442/enginframe -DEF_CONF_ROOT=/opt/nice/
enginframe/conf -DEF_DATA_ROOT=/opt/nice/enginframe/data -DEF_SPOOLER_DIR=
Start or stop EnginFrame and check its status 71

EnginFrame Administrator Guide ***Unable to locate subtitle***
/opt/nice/enginframe/spoolers -DEF_SESSION_SPOOLER_DIR=/opt/nice/enginframe/
spoolers -DEF_LOGDIR=/opt/nice/enginframe/logs/efserver1 -Dfile.encoding=UTF-8
-Djava.security.policy==/[...]/2017.0-r41442/enginframe/conf/ef_java.policy
[...] -jar /opt/nice/enginframe/2017.0-r41442/enginframe/agent/agent.jar
# /opt/nice/enginframe/bin/enginframe stop
Reading EnginFrame version from: /opt/nice/enginframe/current-version
Current version: 2017.0-r41442
EnginFrame Control Script
Loading configuration from:
- "/opt/nice/enginframe/conf/enginframe.conf"
Using EnginFrame in "/opt/nice/enginframe/2017.0-r41442"
Tomcat stopped.
[OK] EnginFrame Agent is down
Accessing the portal
After the EnginFrame daemons are running, you can access EnginFrame Portal in a browser
window. To do this, in the browser's address bar, enter the host name of your EnginFrame Server
followed by a colon (:) and your EnginFrame Server port number.
The EnginFrame Server port number was set during installation and can be viewed with the the
following command.
# $EF_TOP/bin/enginframe status
For example, if the EnginFrame Server host is named myhost, and EnginFrame Server port number
is 7070, type in your browser's address bar as follows:
http://myhost:7070
If your host name (in this example, myhost) isn't resolved by your DNS, you can specify the
corresponding IP address:
http://192.168.0.10:7070
Accessing the portal 72

EnginFrame Administrator Guide ***Unable to locate subtitle***
Note
If you encounter an issue related to the DNS name, domain resolution, or the IP address,
contact your network administrator for help.
If EnginFrame Server is installed successfully, the welcome page is displayed when you access the
portal. If your browser reports errors such as Cannot find the requested page, Server not
found, or Problem loading page, verify that EnginFrame is installed correctly by checking its
status as described in Start or stop EnginFrame and check its status.
Demo sites
If you installed the EnginFrame Developer's Documentation when you installed EnginFrame, the
welcome page, together with the production portal Applications, Views, and Operational
Dashboard, displays a link to the Technology Showcase, which points to a set of demo services.
These demo services provide an illustration of all of EnginFrame's service capabilities.
Important
By default, only the EF_ADMIN user can access administration and tutorial demo sites.
Operational Dashboard
In the EnginFrame Operational Dashboard view, administrators can monitor and manage
operations directly from a web browser.
The Operational Dashboard is linked from the EnginFrame welcome page. Otherwise, you can
reach it directly at:
http://host:port/context/admin
The Operational Dashboard offers a set of services that are divided into the following categories:
Topics
• Monitor
• Troubleshooting
Demo sites 73

EnginFrame Administrator Guide ***Unable to locate subtitle***
• EnginFrame statistics
These services are listed in the navigation pane of the dashboard.
Monitor
You can view and use the services listed in Monitor.
• Server Load shows CPU usage, Java™ Virtual Machine memory usage, repository and spoolers
file system size, and i-node usage.
• Usage Statistics shows current and historical data for the number of logged users, jobs with
status, and interactive sessions and spoolers.
• Installed Components displays the list of installed EnginFrame plugins and versions.
• Logged Users shows the users logged into the portal, including an option to force user logout.
• Triggers can be used view and manage scheduled triggers in EnginFrame.
•
ACL Actors shows EnginFrame ACL actors defined in the authorization.xconf files that are
loaded by the system.
Troubleshooting
With the services listed in Troubleshooting, you can check portal status and health.
• Run Self checks performs several operations to exercise different functions and aspects of
EnginFrame. Every test outputs a result and, in most cases, a quick hint to correct the problem.
• View Error Files can be used to display error files generated by EnginFrame when services
produce the wrong output. You can choose an error to view by entering the error file name, by
selecting errors from a list, or by entering an error number.
• Collect Support Info gathers a wide range of information about EnginFrame Portal and its
configuration. This service output is a compressed archive containing all gathered information.
Attach this package when sending your request to EnginFrame support.
EnginFrame statistics
To collect information about license usage, jobs usage, and others useful statistics, EnginFrame
uses RRD4J as round-robin database.
Operational Dashboard 74

EnginFrame Administrator Guide ***Unable to locate subtitle***
RRD4J is a high-performance data logging and graphing system for time series data, implementing
RRDTool's functionality in Java™. It follows much of the same logic and uses the same data sources,
archive types, and definitions that RRDTool uses.
EnginFrame creates a database for general usage information that's named
efstatistics.rrd and a database for each license file that's named
license_<component>_<expiration>_<maxToken>.rrd. A new database will be created
when a license file changes.
In the admin.statistics.efconf configuration file, you can configure some RRD4J specific
parameters to change archive time intervals or to configure historical charts. For more information,
see the RRD4J website.
When you run EnginFrame for the first time, database files are created and loaded with data, and
then they're updated every 60 seconds with new data.
Workspace
In the EnginFrame Workspace view, users can create, manage, and submit both batch and
interactive services.
The Workspace is linked from the EnginFrame welcome page or can be reached directly using the
following URL.
http://<host>:<port>/<context>/applications
The Workspace offers two interfaces for two different user roles: Admin View and User View.
Admin View
You can use the Admin View interface to monitor interactive sessions, jobs, hosts, and to manage
services, Workpsace users and portal appearance.
• Monitor » All Sessions can by used by the administrator to manage interactive sessions for all
Workpsace users.
• Monitor » All Jobs can be used by the administrator to monitor and manage DRM jobs for all
Workpsace users. To control the jobs of other users' Workpsace administrator must have the
proper rights in the underlying DRM.
• Monitor » Hosts can be used by the administrator to monitor the status of the hosts of the
configured DRMs.
Workspace 75

EnginFrame Administrator Guide ***Unable to locate subtitle***
• Manage » Services can be used by the administrator to create, delete, edit, or publish batch and
interactive services.
• Manage » Users service allows the administrator to register, import, or manage Workpsace users.
• Manage » Appearance service enables the administrator to change the company logo and the
Portal color theme.
User View
You can use User View to monitor user data, sessions, jobs and hosts, together with Batch and
Interactive services that are published by the Workspace administrators.
• Data » Spoolers shows the user's EnginFrame Spoolers and provides rename and delete
operations.
• Data » Files allows the user to browse and manage files in their home directory.
• Monitor » Sessions can be used by the user to monitor and manage their interactive sessions.
• Monitor » Jobs can be used by the user to monitor and manage their jobs.
• Monitor » Hosts can be used by the user to monitor the status of the hosts of the configured
DRMs.
Workspace administrators can create and publish new services through the Admin View. When they
publish a new service, administrators can make it available to all users or only to specific groups of
users.
Note
The Workspace requires a specific license. Contact <[email protected]> or
your EnginFrame reseller to purchase a license, perform a license change or obtain a demo
license. EnginFrame doesn't require a license on an EC2 instance. For more information
about licensing, see Obtaining NICE EnginFrame.
Virtual Desktop
EnginFrame includes the Virtual Desktop to create, manage, and submit Interactive services.
The Virtual Desktop is linked from the EnginFrame welcome page or can be reached directly at
Virtual Desktop 76

EnginFrame Administrator Guide ***Unable to locate subtitle***
: http://<host>:<port>/<context>/vdi
The Virtual Desktop offers two interfaces for two different users' roles: Admin's Portal and User
View.
Admin View
You can use the Admin View to monitor and manage interactive sessions, jobs, hosts, services, users
and portal appearance.
• Monitor » All Sessions can be used by the administrator to manage interactive sessions for all
Virtual Desktop users.
• Monitor » Hosts can be used by the administrator to monitor the status of the hosts of the
configured DRMs.
• Manage » Interactive Services can be used by the administrator to create, delete, edit, or publish
Interactive services.
• Manage » Users can be used by the administrator to register, import, and manage Virtual
Desktop users.
• Manage » Appearance can be used by the administrator to change the company logo and the
Portal color theme.
User View
You can use the User View to monitor user's sessions and cluster hosts, together with the
Interactive services published by Virtual Desktop administrators.
• Monitor » Sessions can be used by the user to monitor and manage their interactive sessions.
• Monitor » Hosts can be used by the user to monitor the status of the hosts of the configured
DRMs.
Virtual Desktop administrators can create and publish new services through the Admin View. They
can publish these services to specific users or groups of users.
Virtual Desktop 77

EnginFrame Administrator Guide ***Unable to locate subtitle***
Administration
Topics
• Common administration tasks
• Managing spoolers
• Managing the sessions directory
• NICE DCV Session Manager
• Managing AWS HPC Connector
• Customizing logging
• EnginFrame licenses
• Troubleshooting
• Pushing metrics to external monitoring tools
Common administration tasks
Most of the tasks an EnginFrame administrator has to perform involve editing configuration files.
This chapter provides an overview of the main EnginFrame configuration files and then focuses on
some common administration tasks, explaining in detail how to accomplish them.
This chapter describes the following tasks:
Topics
• Main configuration files
• Deploying a new plugin
• Changing Java™ version
• Changing the default agent
• Managing internet media types
• Customizing error page layout
• Limiting service output
• Configuring agent ports
• Customizing user switching
• Customizing user session timeout
Common administration tasks 78

EnginFrame Administrator Guide ***Unable to locate subtitle***
• Apache®-Tomcat® connection
• Changing charts backend
• Interactive administration
• Views administration
• Applications administration
Other important administration tasks regarding EnginFrame Portal's specific sub-components (like
spooler management, logging, etc.) are described in the next chapters.
Note
Starting March 31, 2022, NICE EnginFrame doesn't support VNC®, HP® RGS, VirtualGL, and
NICE DCV 2016 and previous versions.
Main configuration files
In this section the main EnginFrame configuration files are described. Further details can be found
throughout this guide.
Starting from EnginFrame 2015, configuration files are isolated from the rest of EnginFrame
installation in $EF_TOP/conf. Configuration files in $EF_TOP/conf are preserved during updates.
EnginFrame still uses internal configuration files located under $EF_TOP/<VERSION> and
organized according to the pre-EnginFrame 2015 directory-tree layout (i.e. $EF_TOP/<VERSION>/
enginframe/conf and $EF_TOP/<VERSION>/enginframe/plugins/<plug-in>/conf, ...).
Some of these files define default values which can be overridden using files with the same name
under the $EF_TOP/conf tree. Note any modifications to files under $EF_TOP/<VERSION>
are discouraged and the files under this directory are subject to change in the next EnginFrame
versions without notice.
enginframe.conf
It is located in $EF_TOP/conf directory.
As already seen in Fine-tuning your installation, this file configures the JDK running EnginFrame
Server and EnginFrame Agent and the execution options passed to the JVM. It also configures
Main configuration files 79

EnginFrame Administrator Guide ***Unable to locate subtitle***
other execution environment parameters like locale or user running Tomcat® (referred to as
EF_NOBODY).
server.conf
This is the server's main configuration file.
It is located in $EF_TOP/<VERSION>/enginframe/conf directory. Its contents are merged
with $EF_TOP/conf/enginframe/server.conf if present. In case the same property is
defined in both files the latter wins.
It also contains some parameters used by the local agent when executing services on
EnginFrame Server's host on EF_NOBODY's behalf.
agent.conf
This is the agent's main configuration file.
It is located in $EF_TOP/<VERSION>/enginframe/conf directory. Its contents are merged
with $EF_TOP/conf/enginframe/agent.conf if present. In case the same property is
defined in both files the latter wins.
mime-types.xml
It associates content types to files downloaded through the portal without requiring any change
to the JDK settings.
It is located in $EF_TOP/<VERSION>/enginframe/conf directory. Its contents are merged,
extended or overridden, with $EF_TOP/conf/enginframe/mime-types.xml if present. In
the case the same MIME type is defined in both files the latter overrides the mapping.
For more information, see Managing internet media types.
log.server.xconf
It configures EnginFrame Server's logging.
It is located in $EF_TOP/<VERSION>/enginframe/conf directory. Overridden by $EF_TOP/
conf/enginframe/log.server.xconf if present.
log.agent.xconf
It configures EnginFrame Agent's logging.
It is located in $EF_TOP/<VERSION>/enginframe/conf directory. Overridden by $EF_TOP/
conf/enginframe/log.agent.xconf if present.
Main configuration files 80
EnginFrame Administrator Guide ***Unable to locate subtitle***
authorization.xconf
It's a configuration file for the EnginFrame authorization system. It defines users' groups and
access control lists (ACLs).
Refer to Configuring authorization.
Deploying a new plugin
Two types of plugins exist from a deployment point-of-view: the official ones distributed by NICE
and the custom ones produced in-house or distributed by third parties.
Important
Plug-ins designed for pre-2015 EnginFrame versions cannot be installed on newer
EnginFrame. Please contact NICE and check if updated plug-ins are available.
Official NICE plugins
NICE's official plugins are distributed with an installer that sets up the plugin and deploys it inside
EnginFrame.
If NICE eftoken plugin (sold separately) were to be installed, it would be done by executing:
# java -jar eftoken-X.Y.Z.jar
The installer asks EnginFrame's root directory, plugin specific configuration options, and then
installs the code.
If EnginFrame Server and EnginFrame Agent are installed on two different hosts, unless otherwise
specified in plugin documentation, the plugin has to be installed on both hosts.
Unless stated otherwise in plugin documentation, once installed, the plugin is immediately
available through EnginFrame Portal without requiring a restart.
Custom plugins
If you have a custom plugin or are deploying a third party plugin that is not distributed with
an installer, a manual deployment is necessary. All EnginFrame plugins must be placed inside
$EF_TOP/<VERSION>/plugins and follow the internal structure described below.
Deploying a new plugin 81

EnginFrame Administrator Guide ***Unable to locate subtitle***
A plugin directory structure example is:
EnginFrame Plugin Structure
Some plugins may need additional setup operations to work properly. Read and follow the
instructions distributed with plugin documentation.
Changing Java™ version
In some cases, such as an important security fix is shipped by Java™ vendor, changing the Java™
Platform running EnginFrame Portal is necessary.
The Java™ Platform running EnginFrame Server and EnginFrame Agent is defined using
JAVA_HOME parameter inside $EF_TOP/conf/enginframe.conf. Changing this value is the only
step necessary to use a different Java™ version to run these components.
Using Java™ installed in the directory /opt/java is done as follows:
JAVA_HOME="/opt/java"
EnginFrame Server and EnginFrame Agent restart is necessary to make changes effective.
Refer to Java™ platform for further information on supported Java™ versions.
Changing Java™ version 82

EnginFrame Administrator Guide ***Unable to locate subtitle***
Changing the default agent
A single EnginFrame Server can connect to many EnginFrame Agents to execute services.
The remote default agent is specified during installation. When both server and agent are installed
on the same host, this agent automatically becomes the default one. When the server is installed
alone, the installer asks default agent hostname and TCP port.
The default agent is defined in server.conf with two properties:
•
EF_AGENT_HOST
Specifies default Agent hostname or IP address. The default value is localhost.
•
EF_AGENT_PORT
Specifies default TCP port where Agent listens for incoming connections (i.e. parameter
ef.agent.port in Agent configuration, see Configuring agent ports for more details). The
default value is 9999.
It is located in $EF_TOP/<VERSION>/enginframe/conf directory. Its contents are merged
with $EF_TOP/conf/enginframe/server.conf if present. In case the same property is
defined in both files the latter wins.
Service Definition Files use both properties.
So if an EnginFrame Server wants to set its default agent as agent1.nice listening on port 7777
the parameters mentioned above become:
EF_AGENT_HOST=agent1.nice
EF_AGENT_PORT=7777
EF_AGENT_HOST can also be set to an IP address, e.g. 192.168.1.16.
Changes to these parameters do not require EnginFrame Server's restart.
Important
You cannot remove EF_AGENT_HOST and EF_AGENT_PORT from server.conf. If those
properties are empty/missing, EnginFrame uses the default values.
Changing the default agent 83

EnginFrame Administrator Guide ***Unable to locate subtitle***
Managing internet media types
When a file is downloaded from EnginFrame Portal the browser tries to open it with the
application configured to manage its media type content. For example, if an image is downloaded
the browser displays it inline, while if a Word document is downloaded, it launches Office.
EnginFrame suggests to browsers the best method to handle files by sending the Internet media
type in the download response.
An Internet media type, originally called MIME type, is a two-part identifier for file formats on the
Internet. The identifiers were originally defined in RFC 2046 for use in e-mails sent through SMTP,
but their use has expanded to other protocols such as HTTP.
It is very useful to link uncommon file extensions to specific MIME types, so browsers can handle
them correctly. Not all browsers use MIME type information in the same way. Older Microsoft®
Internet Explorer® versions relies more on content type detection provided by Windows® operating
system than on MIME type specified by the server's response message, especially for some of the
most common file name extensions.
EnginFrame uses a built-in list of MIME types provided by the JDK. This list is defined in
JAVA_HOME/jre/lib/content-types.properties.
EnginFrame overrides and extends this list of MIME types with $EF_TOP/<VERSION>/
enginframe/conf/mime-types.xml in the static installation directory and with the optional
$EF_TOP/conf/enginframe/mime-types.xml in the EnginFrame custom configuration
directory tree. These files, owned by EnginFrame administrator, are used across the whole system
unless more specific settings are found.
Each plugin has the possibility to extend and overrides the EnginFrame MIME types settings,
by defining its own static $EF_TOP/<VERSION>/enginframe/plugins/plugin_name/
conf/mime-types.xml and the associated customizable version $EF_TOP/conf/
plugins/plugin_name/mime-types.xml in the EnginFrame configuration directory tree. MIME
types defined in the plugin mime-types.xml files are used when downloading files from spoolers
generated by services defined in the plugin_name plugin.
When EnginFrame receives a download request from the browser, it tries to associate a MIME type
to the file. It first looks in the plugin specific mime-types.xml file, then in EnginFrame mime-
types.xml. In the case it cannot associate a MIME type from its own configuration files, it uses the
default definitions specified in JDK's content-types.properties.
Managing internet media types 84

EnginFrame Administrator Guide ***Unable to locate subtitle***
More in details, when looking for a MIME type of a file EnginFrame checks resources in the
following order:
1.
Custom plug-in MIME types, $EF_TOP/conf/plugins/plugin_name/mime-types.xml
2.
Static plug-in MIME types, $EF_TOP/<VERSION>/enginframe/plugins/plugin_name/
conf/mime-types.xml
3.
Custom EnginFrame system-wide MIME types, $EF_TOP/conf/plugins/plugin_name/
mime-types.xml
4.
Static EnginFrame system-wide MIME types, $EF_TOP/<VERSION>/enginframe/conf/mime-
types.xml
5.
Default JDK MIME types, JAVA_HOME/jre/lib/content-types.properties
If this chain of lookup for a specific MIME type fails, the default MIME type, if defined, is returned,
otherwise an empty MIME type is sent back in the HTTP response by EnginFrame.
EnginFrame Server dynamically reloads the mime-types.xml files when they are modified, so no
restart is necessary.
EnginFrame ships this $EF_TOP/<VERSION>/enginframe/conf/mime-types.xml:
<?xml version="1.0"?>
<ef:mime-types xmlns:ef="http://www.enginframe.com/2000/EnginFrame">
<ef:default type="text/plain" />
<ef:mime-type>
<ef:type type="text/plain"/>
<ef:desc desc="ASCII Text File"/>
<ef:extensions>
<ef:extension ext=".log"/>
</ef:extensions>
<ef:match-list>
<ef:match expr="[A-Z0-9]*.ef" />
<ef:match expr="README" casesensitive="false" />
</ef:match-list>
</ef:mime-type>
<ef:mime-type>
<ef:type type="application/x-javascript"/>
<ef:desc desc="JavaScript File"/>
Managing internet media types 85

EnginFrame Administrator Guide ***Unable to locate subtitle***
<ef:match-list>
<ef:match expr="^.*[Jj][Ss]" />
</ef:match-list>
</ef:mime-type>
<ef:mime-type>
<ef:type type="application/json"/>
<ef:desc desc="JSON File"/>
<ef:match-list>
<ef:match expr="^.*\.[Jj][Ss][Oo][Nn]" />
</ef:match-list>
</ef:mime-type>
<ef:mime-type>
<ef:type type="text/css"/>
<ef:desc desc="CSS File"/>
<ef:match-list>
<ef:match expr="^.*[Cc][Ss][Ss]" />
</ef:match-list>
</ef:mime-type>
<ef:mime-type>
<ef:type type="image/vnd.microsoft.icon"/>
<ef:desc desc="ICO File"/>
<ef:match-list>
<ef:match expr="^.*[Ii][Cc][Oo]" />
</ef:match-list>
</ef:mime-type>
</ef:mime-types>
The <ef:extensions> section contains exact matches. Thus, in this example, EnginFrame
associates text/plain MIME type to any file ending with extension .log or .patch.
The <ef:match-list> section contains regular expressions for matching a file name. Thus, in
this example, EnginFrame associates text/plain MIME type to all files whose name contains only
alphanumeric characters and whose extension is .ef and to all files named README.
Since the casesensitive attribute is set to false in the first <ef:match> tag, a matching
is performed that is not case sensitive. This means, for example, that files named license.ef
or LICENSE.EF are matched. If casesensitive attribute is not explicitly set to false, a case
sensitive match is performed. So files named readme or ReadMe are not matched by the regular
expression defined in the second <ef:match> tag.
Managing internet media types 86

EnginFrame Administrator Guide ***Unable to locate subtitle***
<ef:default> is a child of <ef:mime-types> tag. It specifies a default MIME type
for those cases where a MIME type cannot be guessed. The syntax is: <ef:default
type="expected_mime_type" forward-guess="[true|false]" />
Attribute forward-guess set to true allows to interrupt MIME type lookup at the current mime-
types.xml file without considering upstream MIME type settings. Its default value is false.
The default value can be overridden following the same lookup order for mime-types.xml files as
reported in the list above.
Important
There are two settings concerning security and MIME types in
the server.conf configuration file that are important to be
described here: ef.download.mimetype.mapping.text and
ef.download.mimetype.mapping.octetstream.
ef.download.mimetype.mapping.text: a comma separated list of MIME types that,
for security reasons, are mapped to text/plain in the HTTP response to clients when
downloading a file. This further MIME type mapping prevents browsers from interpreting
and rendering the downloaded files protecting against malicious code that could be
executed on the client browser (cross-site scripting attack).
ef.download.mimetype.mapping.octetstream: a comma separated list of MIME
types that, for security reasons, are mapped to application/octet-stream in the HTTP
response to clients when downloading a file. This further MIME type mapping prevents
browsers from taking any action on the downloaded files protecting against malicious code
that could be executed on the client host.
For more information about these XML tags, see EnginFrame Administrator Reference.
Customizing error page layout
Whenever EnginFrame encounters an error during service execution, it displays an error message
on the browser using a well known layout. All errors that end up on browser are displayed with the
same look and feel.
Error page layout customization is achieved by changing ef.error.layout value inside
server.conf. This value must be an absolute path to an XSL file containing customized style
Customizing error page layout 87

EnginFrame Administrator Guide ***Unable to locate subtitle***
sheets. $EF_TOP/<VERSION>/enginframe/lib/xsl/com.enginframe.error.xsl is the
default value for ef.error.layout. This file can be used as a starting point to create customized
templates.
So, if $EF_TOP/<VERSION>/enginframe/plugins/mycompany/lib/xsl/
mycompany.error.xsl contains the customized XSL templates, ef.error.layout
is set as follows: ef.error.layout=${EF_ROOT}/plugins/mycompany/lib/xsl/
mycompany.error.xsl
Changes to ef.error.layout do not require a server restart.
Limiting service output
EnginFrame's usual client is a web browser. Limiting amount of data sent to browsers saves
resources on client-side. When a service execution produces a big amount of XML/HTML, the
browser could have trouble rendering the page.
To avoid overloading the clients (and server/agent that have to produce/process the data), the
maximum amount of data that services can produce is definable using ef.output.limit. If
the limit is exceeded, the service's output is truncated and an error message is displayed on the
browser.
ef.output.limit is specified as number of bytes and the default value is 52428800, i.e. 50 MB.
Since services are usually executed by a remote agent, this property is set inside the agent's
agent.conf.
The following example shows how to set this property to limit service's output to 2 KB (2048
bytes) of data: ef.output.limit=2048
However, since local agent can also execute services, ef.output.limit is also defined inside
server.conf.
EnginFrame Agent and/or the EnginFrame Server restart is not required when changing this
property.
Note
The service execution is not influenced in any way by the specified limit.
Limiting service output 88

EnginFrame Administrator Guide ***Unable to locate subtitle***
The service output is truncated on agent before sending it back to the server.
Configuring agent ports
EnginFrame Agent and EnginFrame Server communicate using Java™ RMI over SSL protocol.
Technically speaking, EnginFrame Agent is an RMI server that exposes a remote object whose
methods are invoked by EnginFrame Server.
For this reason, EnginFrame Agent needs to open two TCP ports on its host: one port is used
by an RMI Registry while the other one is used by an RMI server. These ports are chosen during
installation (by default they are respectively 9999 and 9998).
$EF_TOP/conf/enginframe/agent.conf contains the values specified during installation. Edit
this file to change these values:
•
ef.agent.port
Specifies TCP port on which RMI Registry is listening.
If this property is empty, the default port 9999 is used.
The specified value must be a valid TCP port that is not used by other processes on the same
host.
•
ef.agent.bind.port
Specifies TCP port on which RMI server is listening.
If this property is empty or is 0, a random free port is chosen at EnginFrame Agent startup.
The specified value must be 0 or a valid TCP port that is not used by other processes on the same
host. Furthermore, the specified value must be different from ef.agent.port.
For example, using port 7777 for RMI Registry and port 7778 for RMI server, the two parameters
must be set in the following way:
ef.agent.port=7777
ef.agent.bind.port=7778
EnginFrame Agent must be restarted to make changes effective.
Configuring agent ports 89

EnginFrame Administrator Guide ***Unable to locate subtitle***
Tip
If there is a firewall between EnginFrame Server and EnginFrame Agent then
ef.agent.bind.port has to be set to a value different from zero. The firewall has to
be configured to allow EnginFrame Server to open TCP connections towards EnginFrame
Agent using the ports specified by ef.agent.port and ef.agent.bind.port.
If ef.agent.port is changed, then all <ef:location>'s port attributes have to change
accordingly inside Service Definition Files.
Modify EF_AGENT_PORT inside $EF_TOP/conf/enginframe/server.conf if default agent's
ports changed. Refer to Changing the default agent for more details.
Customizing user switching
Unless EnginFrame was installed by an unprivileged user, every time EnginFrame Agent runs a
service it impersonates the system user associated to portal user requesting service execution.
This ensures service execution is performed as a regular system user (root is not allowed to run
services) and the files created/modified have proper ownerships and permissions.
EnginFrame allows modifying how user switching is done to affect service execution environment
and ultimately service execution itself.
EnginFrame Agent user switching mechanism is based on su shipped with every Linux®.
$EF_TOP/conf/enginframe/agent.conf configures ef.switch.user.params parameter
used to specify options passed to su. Multiple parameters must be separated by a space without
using quotes or double quotes like in the following example: ef.switch.user.params=-f -m
An empty ef.switch.user.params means no options are passed to su:
ef.switch.user.params=
A missing ef.switch.user.params is automatically set to - which results in the user's profile
being sourced when su is executed. By default, ef.switch.user.params property is not set.
Tip
If user profiles on EnginFrame Agent's host are complicated and sourcing them affects
service execution performance, it is suggested to set ef.switch.user.params to avoid
Customizing user switching 90

EnginFrame Administrator Guide ***Unable to locate subtitle***
sourcing them when su is executed. You can, for example, set ef.switch.user.params
to the empty string.
EnginFrame Agent does not have to be restarted when changing this parameter.
Customizing user session timeout
A session defines a user's working period within EnginFrame Portal. A session starts at user login
and ends either when user logs out or when EnginFrame Server invalidates it.
Session timeout specifies the number of minutes a user can remain idle before the portal
terminates the session automatically. If a user does not interact with EnginFrame within the
configured timeout, the session is automatically invalidated and user has to authenticate again to
access EnginFrame Portal.
The default session timeout, defined for all users, is set to 30 minutes.
Session timeout can be changed in EF_ROOT/WEBAPP/WEB-INF/web.xml by changing the
session-timeout value. This value is expressed in a whole number of minutes. If the timeout is 0
or less, the container ensures the default behaviour of sessions is never to time out.
Changing session timeout to two hours, can be achieved modifying session-timeout value in
the following way: <session-config> <session-timeout>120</session-timeout> </
session-config>
Changes to session timeout require EnginFrame Server's restart.
Apache®-Tomcat® connection
There are many reasons to integrate Tomcat® with Apache®. And there are reasons why it should
not be done too. Starting with newer Tomcat (EnginFrame ships version 9.0.64), performance
reasons are harder to justify. So here are the issues to discuss in integrating vs not:
• Encryption - The Apache HTTP Server module mod_ssl is an interface to the OpenSSL library,
which provides Strong Encryption using the Secure Sockets Layer and Transport Layer Security
protocols. Tomcat is able to provide a similar encryption using the JVM, which needs to be cross
platform, so it is somehow less efficient than Apache. Moreover, Apache has a longer experience
on this field.
Customizing user session timeout 91

EnginFrame Administrator Guide ***Unable to locate subtitle***
• Clustering - By using Apache as a front end you can let Apache act as a front door to your
content to multiple Tomcat instances. If one of your Tomcats fails, Apache ignores it and your
Sysadmin can sleep through the night. This point could be ignored if you use a hardware load
balancer and the clustering capabilities of EnginFrame Enterprise Edition.
• Clustering/Security - You can also use Apache as a front door to different Tomcats for different
URL namespaces (/app1/, /app2/, /app3/, or virtual hosts). The Tomcats can then be each in
a protected area and from a security point of view, you only need to worry about the Apache
server. Essentially, Apache becomes a smart proxy server.
• Security - This topic can sway one way or another. Java™ has the security manager while Apache
has a larger mindshare and more tricks with respect to security. Details will not be given here,
but let Google™ be your friend. Depending on your scenario, one might be better than the other.
But also keep in mind, if you run Apache with Tomcat you have two systems to defend, not one.
• Add-ons - Adding on CGI, Perl, PHP is natural to Apache. It's slower for Tomcat. Apache also has
hundreds of modules that can be plugged in at will. Tomcat can have this ability, but the code
has not been written yet.
• Decorators - With Apache in front of Tomcat, you can perform any number of decorators
that Tomcat does not support or does not have the immediate code support. For example,
mod_headers, mod_rewrite, and mod_alias could be written for Tomcat, but why reinvent
the wheel when Apache has done it so well?
• Speed - Apache is faster at serving static content than Tomcat. But unless you have a high
traffic site, this point is useless. But in some scenarios, Tomcat can be faster than Apache. So
benchmark your site.
• Socket handling/system stability - Apache has better socket handling with respect to error
conditions than Tomcat. The main reason is that Tomcat must perform all its socket handling via
the JVM which needs to be cross platform. The problem is that socket optimization is a platform
specific ordeal. Most of the time the Java™ code is fine, but when you are also bombarded with
dropped connections, invalid packets, invalid requests from invalid IPs, Apache does a better job
at dropping these error conditions than JVM based program. (YMMV)
[Source: Tomcat Wiki].
There are at least two ways to configure an Apache Web Server as a frontend to Tomcat according
to the protocol used:
• HTTP
• AJP [see Protocol Reference].
Apache®-Tomcat® connection 92

EnginFrame Administrator Guide ***Unable to locate subtitle***
The connection between Apache and Tomcat using protocol AJP can follow two different
strategies:
•
Apache Module mod_proxy_ajp (Apache version 2.2 or higher)
• Tomcat Connector JK
Changing charts backend
Charts can be embedded dynamically in EnginFrame web pages.
By default, the internal charts provider is used, but is possible to use any other service compatible
with Google™ Chart API.
The chart backend can be changed in two ways:
• Globally for all charts that EnginFrame produces.
• Locally for specific chart.
In the first case, edit $EF_TOP/conf/enginframe/server.conf specifying
ef.charts.base.url:
ef.charts.base.url=http://chart.apis.google.com/chart
In the second case, set base attribute inside chart root tag:
<ch:chart ... base="http://chart.apis.google.com/chart" ... >
Interactive administration
Topics
• Configuration files
Changing charts backend 93

EnginFrame Administrator Guide ***Unable to locate subtitle***
• Interactive Session Life-cycle Extension Points
• Session limits
• Log files
• Interactive Plugin Directory Structure
Configuration files
Most of the times the values defined during the Interactive Plugin installation provide all the
information necessary to have a working setup. However sometimes further configuration is
needed to tailor the session broker to specific system and network conditions or to change the
values defined during the installation.
All the Interactive Plugin configuration files are located in the conf subdirectory.
Note
All the parameters in the configuration files with extension different from .efconf comply
with the following format from Bourne shell: PARAMETER_NAME="parameter value" In
particular,
•
There are no spaces before and after the = (equals).
•
You can use shell variable references with the usual syntax $variable. Always enclose
variable names with curly braces, for example: ${HOME}.
• Bourne shell escaping and quoting syntax apply. Be sure to enclose values containing
spaces within the most appropriate quotes.
Important
Configuration parameters are automatically loaded upon saving. No need to restart
EnginFrame or logout.
Topics
• interactive.efconf
• interactive.<remote>.resolutions.conf
Interactive administration 94

EnginFrame Administrator Guide ***Unable to locate subtitle***
• authorization.xconf
• nat.conf
• proxy.conf
• url.mapping.conf
• xstartup files
• mime-types.xml
interactive.efconf
This file contains Interactive Plugin's main default configuration parameters, that can be usually
overridden by each portal service.
Default Parameters
INTERACTIVE_DEFAULT_OS
• value: required
• default: linux
By default, interactive session will be launched on the operating system stated by
INTERACTIVE_DEFAULT_OS parameter.
Available values:
•
linux - schedule on Linux® operating systems
•
windows - schedule on Windows® operating systems
This behavior can be overridden by each service itself by using --os <system> option of
interactive.submit
Example: INTERACTIVE_DEFAULT_OS=linux
INTERACTIVE_DEFAULT_JOBMANAGER
• value: optional
• default: lsf
Interactive administration 95

EnginFrame Administrator Guide ***Unable to locate subtitle***
Default job manager for submitting interactive session jobs. Each session will be scheduled as a
single job.
This behaviour can be overridden by each service itself by using --jobmanager <jobmanager>
option of interactive.submit
Note
Your EnginFrame installation requires the related grid middleware plugin to be installed
and configured. Interactive Plugin will use it to submit and manage interactive session jobs.
Example: INTERACTIVE_DEFAULT_JOBMANAGER=lsf
INTERACTIVE_DEFAULT_REMOTE
• value: optional
• default: dcv2
Default visualization middleware to use.
Available values:
•
dcv2 - use NICE DCV (since 2017.0) visualization middleware
Example: INTERACTIVE_DEFAULT_REMOTE=dcv2
INTERACTIVE_DEFAULT_VNC_QUEUE
• value: optional
• default: (not set)
Sets the default resource manager queue to use. Interactive session jobs will be submitted on that
queue.
This behaviour can be overridden by each service itself by using --queue <queue name> option
of interactive.submit
Example: INTERACTIVE_DEFAULT_VNC_QUEUE=int_windows
Interactive administration 96

EnginFrame Administrator Guide ***Unable to locate subtitle***
Limits
INTERACTIVE_DEFAULT_MAX_SESSIONS
• value: optional
• default: undefined (no limits)
The maximum number of interactive sessions per interactive class.
If you set this default limit to X, each user will be able to start up to X sessions of the same
interactive class.
For more informations about interactive classes and sessions limits, please refer to Session limits
Example: INTERACTIVE_DEFAULT_MAX_SESSIONS=3
interactive.<remote>.resolutions.conf
Inside this file you can specify some presets of the Remote Visualization Technology desktop
geometry as a four-valued colon-separated string plus a label. The label must separated by the
previous fields by one or more spaces widthxheight:fullscreen:allmonitors label
width and height are integers and express the size in pixels, fullscreen and allmonitors are
case-sensitive boolean flags {true|false} and label is a human readable string describing the
preset.
You can use the keyword auto to let the system guess the current screen resolution. If the list of
presets includes a line containing the string custom (no other content on the same line), the user
will be able to specify a custom resolution.
Note
Flag allmonitors is meaningful only when fullscreen is true. If you set
allmonitors=true while fullscreen=false, then allmonitors parameter will be
automatically converted to false.
Default content of the file:
auto Fullscreen on single monitor (autodect resolution)
5120x1600:true:true Fullscreen on two 30' monitors (5120x1600)
Interactive administration 97

EnginFrame Administrator Guide ***Unable to locate subtitle***
3840x1200:true:true Fullscreen on two 24' monitors (3840x1200)
2560x1600:true:false Fullscreen on single 30' monitor (2560x1600)
1920x1200:true:false Fullscreen on single 24' monitor (1920x1200)
1024x768:false:false Window-mode on singla XGA monitor (1024x768)
custom
authorization.xconf
This file contains the ACL (Access Control List) definitions specific to Interactive Plugin. It defines
some ACLs that are used in the demo portal to allow or deny access to the different visualization
middlewares to different users.
For more details on EnginFrame ACL system, general EnginFrame authorization and its
configuration, please refer to EnginFrame Administrator Guide, Security section, Authorization
System chapter.
nat.conf
If you set up NAT (Network Address Translation) so that the client machines connect to the cluster
nodes through a different IP:PORT pair, this file allows to map IP:PORT pairs for services running
on a node to the corresponding public IP:PORT pair.
Note
Some visualization middleware clients require that the actual port of the service equals the
NATted port
The syntax consists of a line made of two pairs: the real IP:PORT pair followed by the public
IP:PORT pair. It is possible to specify a group of ports using the fromPORT-toPORT syntax.
Example:
node01 mycompany.com
node01 10.100.0.101
node12:42976 mycompany.com:42976
node01:7900-7910 mycompany.com:5900-5910
node05:7900-7910 10.100.0.101:5900-5910
A session starting on host node01, port 7901 would be returned to the client as
mycompany.com:5901
Interactive administration 98

EnginFrame Administrator Guide ***Unable to locate subtitle***
proxy.conf
If you give access to cluster nodes through a proxy, you can configure this file to assign for each
connection a specific proxy server to use.
Note
This configuration applies only to DCV connections.
The default configuration is to have a direct connection from any client to any server, so no proxy
for all connections.
The syntax consists of a table, each line has the following columns: PRIORITY, CLIENT-FILTER,
SERVER-FILTER, PROXY-TYPE, PROXY-ADDRESS:
PRIORITY
a number to rank the proxy list, 0 is the highest priority
CLIENT-FILTER
the range of IP addresses in the format: NETWORK/PREFIX
Examples:
10.20.0.0/16
0.0.0.0/0 (matches any IP address)
SERVER-FILTER
a glob pattern matching the server hostname
Examples:
node* (matches any node starting with "node")
node0[1-9] (matches hosts from node01 to node09)
PROXY TYPE
the proxy type to use, can be:
Interactive administration 99

EnginFrame Administrator Guide ***Unable to locate subtitle***
HTTP
proxy must support HTTP Connect protocol
SOCKS
proxy must support SOCKS5 protocol
DIRECT
special value to specify no proxy
PROXY-ADDRESS
the proxy hostname and port in the format host:port (not used in case proxy type is DIRECT).
Examples:
squidproxy.domain:3128
danteproxy:80
10.20.1.1:3128
In case multiple proxies with the same priority match, one of them is selected using an internal
strategy.
In case no proxy for a priority matches, the proxies in the next priority are checked.
In case no proxy line matches, an error is returned to the client.
Example: no connection will receive a proxy configuration
99 0.0.0.0/0 * DIRECT
Example: only connections to node01 will pass through proxyserver:3128, all other
connections will be direct.
1 0.0.0.0/0 node01 SOCKS proxyserver:3128
99 0.0.0.0/0 * DIRECT
Example: connections from IP 10.20.3.20 to node01 will pass through proxyserver:80,
other connections to node01 will pass through proxyserver:3128, all other connections will get
an error.
Interactive administration 100

EnginFrame Administrator Guide ***Unable to locate subtitle***
0 10.20.3.20/32 node01 HTTP proxyserver:80
1 0.0.0.0/0 node01 SOCKS proxyserver:3128
url.mapping.conf
The new URL mapping configuration allows EnginFrame administrators to configure the target
endpoints that will be used by clients to connect to the NICE DCV (since 2017.0) remote servers.
The configuration file to define the target DCV servers URLs endpoints is ${EF_CONF_ROOT}/
plugins/interactive/url.mapping.conf.
In this configuration file the administrator can write multiple mappings each one defining a
matching rule and a target endpoint. Each rule can match one or more DCV servers as provided
upstream by the system by using a set of predefined variables and glob expression. For each match
the configuration provides a mapped endpoint that is a triple that includes the host, port and web
URL path that will be used by clients to connect to the target DCV server.
Inside the ${EF_CONF_ROOT}/plugins/interactive/url.mapping.conf configuration file
it is possible to use the usual set of EnginFrame environment variables available during a service
execution (e.g. EF_*, session variables) together with the interactive session metadata and a new
set of noteworthy variables:
•
${server_host} - the remote DCV server host as provided by the system in the upstream
process;
•
${server_port} - the remote DCV server port as configured on the DCV server node;
•
${server_web_url_path} - the DCV server web URL path as configured on the DCV server
node;
•
${session_id} - the DCV session ID;
•
${nat_server_host} - the value of the DCV server host coming from ${EF_CONF_ROOT}/
plugins/interactive/nat.conf;
•
${nat_server_port} - the value of the DCV server port coming from ${EF_CONF_ROOT}/
plugins/interactive/nat.conf;
•
${proxy_host} - the proxy host coming from ${EF_CONF_ROOT}/plugins/interactive/
proxy.conf;
•
${proxy_port} - the proxy port coming from ${EF_CONF_ROOT}/plugins/interactive/
proxy.conf;
Interactive administration 101

EnginFrame Administrator Guide ***Unable to locate subtitle***
Every single value of the tuple, target host, target port and target web URL path, is evaluated
separately. Variables are expanded and command substitution executed.
Important
Parameters evaluation is performed on behalf of the user running the Apache Tomcat®
server (e.g. efnobody), on the host where EnginFrame runs.
Note
The only supported protocol for the mapped URL is HTTPS and cannot be changed.
For further information and examples consult directly the ${EF_CONF_ROOT}/plugins/
interactive/url.mapping.conf configuration file.
xstartup files
The configuration directory also contains a collection of sample xstartup files named
*.xstartup that may be used in your service definitions to start a X session with the specified
Window Manager.
Common tasks for xstartup scripts are, e.g. launching dbus daemon, opening an xterm window or
setting specific Window Manager parameters.
An example xstartup script:
#!/bin/bash
[ -r $HOME/.Xresources ] && xrdb $HOME/.Xresources
xsetroot -solid grey
vncconfig -iconic &
xterm -geometry 80x24+10+10 -ls -title "$VNCDESKTOP Desktop" &
The xstartup files shipped with Interactive Plugin are:
•
gnome.xstartup, xstartup script for GNOME window manager.
•
icewm.xstartup, xstartup script for ICE window manager.
•
kde.xstartup, xstartup script for KDE window manager.
Interactive administration 102

EnginFrame Administrator Guide ***Unable to locate subtitle***
•
mate.xstartup, xstartup script for MATE window manager.
•
metacity.xstartup, xstartup script for Metacity window manager.
•
mwm.xstartup, xstartup script for Motif window manager.
•
xfce.xstartup, xstartup script for Xfce window manager.
•
xfwm4.xstartup, xstartup script for Xfwm4 window manager.
Default Xstartup are gnome.xstartup for desktop sessions and mwm.xstartup for standalone
interactive applications.
mime-types.xml
This file defines some mime-types useful for Interactive Plugin. Mime-types in this context are used
to associate client viewers like VNC® Viewer to files generated by Interactive Plugin with specific
extensions.
File extensions specified in this file are .dcv, .vnc, .efrgs, and .rgreceiver.
For more details on EnginFrame mime-types configuration and customization, refer to EnginFrame
Administrator Guide, Administration section, Common Administration Tasks chapter.
Interactive Session Life-cycle Extension Points
Interactive Session Dynamic Hooks
EnginFrame, starting from version 2017.2, adds two new extension points (hooks) to the
interactive session life cycle.
The first customizable hook, basically a shell script, it's called when the session has been
successfully setup on the remote host and it's ready to pass to the “Running” state. This hook is
meant to execute some simple setup operations at session startup, e.g. to dynamically configure a
gateway technology as the AWS Application Load Balancer (ALB) or an Nginx instance, enabling the
clients to access the underlying dynamic infrastructure.
The hook has also the capability to add custom metadata to the session and to configure the target
host, port and web URL path tuple to be used by the clients to connect to the session.
In order to set the connection parameters to be used by the clients to connect to the interactive
session, the hook script has to export the following variables in the environment:
Interactive administration 103

EnginFrame Administrator Guide ***Unable to locate subtitle***
•
INTERACTIVE_SESSION_TARGET_HOST
•
INTERACTIVE_SESSION_TARGET_PORT
•
INTERACTIVE_SESSION_TARGET_WEBURLPATH
These variables will be set as session metadata and used to forge the session URL and
connection .dcv file upon a client request through the EnginFrame portal. The configuration of
these interactive session settings will have the precedence over the static configuration files (e.g.
nat.conf, url.mapping.conf) in defining the connection parameter for the clients.
Inside the hook script, it is possible to use the usual EnginFrame environment variables together
with the session metadata variables. Noteworthy variables that can be useful to the hook logic are:
•
${INTERACTIVE_SESSION_REMOTE_SESSION_ID} - the ID for a DCV 2017 session;
•
${INTERACTIVE_SESSION_EXECUTION_HOST} - the execution host of the DCV session as
determined internally by the system;
•
${INTERACTIVE_SESSION_DCV2_WEBURLPATH} - the web URL path of the DCV server, as
configured in /etc/dcv/dcv.conf on the DCV server node;
•
${INTERACTIVE_DEFAULT_DCV2_WEB_PORT} - the web port of the DCV server, as configured
in ${EF_CONF_ROOT}/plugins/interactive/interactive.efconf;
The second customizable hook is executed when the session goes in the “Closed” or “Failed” state.
The locations of the starting and closing hooks are configured in ${EF_CONF_ROOT}/
plugins/interactive/interactive.efconf through the variables
INTERACTIVE_SESSION_STARTING_HOOK and INTERACTIVE_SESSION_CLOSING_HOOK
respectively.
Hooks execution is done by the user running the Apache Tomcat® server (e.g. efnobody), and their
standard output and standard error are logged in two log files in the interactive session spooler.
They are accessible via web from the session details view.
Important
In case of errors the starting hook will block the session startup avoiding the session to go
in the “Running” state. If the starting hook fails, it will keep the session in the “Starting”
status, and the session will be flagged with a warning message.
Interactive administration 104

EnginFrame Administrator Guide ***Unable to locate subtitle***
The result of the closing hook instead doesn't prevent the session to go in the terminal state. If the
closing hook fails the session will anyway terminate and it will be flagged with a warning message.
Warning
The execution of the hooks can be triggered either by a user action (e.g. submission or
closing operation) or by the EnginFrame internal process that updates the interactive
sessions status. At the moment there is no mutual-exclusion mechanism in place and hooks
may run concurrently on the same session. It's up to the hook scripts to be concurrency-
safe.
Hooks also allow to set custom metadata to the interactive session. Any environment exported
variable with prefix SESSION_ will be added as metadata to the interactive session. All the session
metadata are available to the hook scripts.
Sample Starting and Closing Hooks to Configure an AWS ALB
Sample starting and closing hooks to dynamically configure the AWS Application Load Balancer
(ALB) on session creation and session closing, are provided in:
•
${EF_ROOT}/plugins/interactive/bin/samples/
sample.alb.session.starting.hook.sh
•
${EF_ROOT}/plugins/interactive/bin/samples/
sample.alb.session.closing.hook.sh
It is suggested to copy the scripts under ${EF_DATA_ROOT}/plugins/interactive/bin before
configuring or modifying them.
These scripts configure an AWS ALB to enable a connection to a host where a NICE DCV (since
2017.0) interactive session is running.
The starting hook script creates a new Target Group containing the instance where the Session is
running and adds a new Listener Rule for the HTTPS listener of the ALB.
The Listener Rule has the role to associate the input URL path to the Target Group. This path must
be the web URL path of the DCV server running on the execution node.
Interactive administration 105

EnginFrame Administrator Guide ***Unable to locate subtitle***
Important
Since it not possible to do URL path translations with an ALB, every DCV server must have
an unique web URL path configured. It is suggested to use the hostname of the node as
web URL path for the DCV server running on that node.
The maximum number of Listener Rule(s) per ALB is 100, hence a single ALB can handle at most
100 interactive sessions running concurrently. To increase this limit, please consider to add more
ALBs in the infrastructure and to implement a rotation in the starting hook script.
Prerequisites for using the sample hook scripts provided:
• On EnginFrame node:
• AWS Command Line Interface (AWS CLI) must be installed;
• Since this script is going to be executed by the user running the EnginFrame Server, i.e.
the Apache Tomcat® user, an AWS CLI profile must be configured for that user, having
the permissions to list instances and to manage load balancers. (see CLI Getting Started).
Alternatively, if EnginFrame is installed in an EC2 instance, a valid AWS role to perform the
above mentioned operations should be added to this instance;
• On AWS account:
• An AWS Application Load Balancer with an HTTPS listener with a Default Target Group must
be already configured and running.
On DCV server nodes:
•
Each DCV server node must be configured with a unique web URL path (see /etc/dcv/
dcv.conf configuration file).
The following is an example of the steps to do in order to use the sample AWS ALB hook scripts
provided:
•
Copy the samples from ${EF_ROOT}/plugins/interactive/bin/samples to
${EF_DATA_ROOT}/plugins/interactive/bin and be sure that are executable.
•
Add the two configuration variables inside ${EF_CONF_ROOT}/plugins/interactive/
interactive.efconf:
Interactive administration 106

EnginFrame Administrator Guide ***Unable to locate subtitle***
•
INTERACTIVE_SESSION_STARTING_HOOK=${EF_DATA_ROOT}/plugins/interactive/
bin/sample.alb.session.starting.hook.sh
•
INTERACTIVE_SESSION_CLOSING_HOOK=${EF_DATA_ROOT}/plugins/interactive/
bin/sample.alb.session.closing.hook.sh
• Modify the hooks to change the value of the AWS ALB Public DNS name, through the variable
ALB_PUBLIC_DNS_NAME.
• Configure the AWS role to let the EC2 instance where EnginFrame is running to manage the ALB.
From the AWS EC2 Console, select EC2 instance -> Instance Settings -> Attach/Replace IAM Role.
The following is just an example, more restrictive rules can be used instead:
{
"Version": "2012-10-17",
"Statement": [
{
"Effect": "Allow",
"Action": [
"ec2:DescribeInstances",
"elasticloadbalancing:*"
],
"Resource": "*"
}
]
Common errors from the hook execution:
• “An error occurred (AccessDenied) when calling the <xyz> operation: User: <abc> is not
authorized to perform <xyz>”. The user running the hook (i.e. the user running the Apache
Tomcat® server) is not authorized to perform the required operation. The AWS CLI profile
must be configured for that user, having the permissions to list instances and to manage load
balancers (see CLI Getting Started) or alternatively, if EnginFrame is installed in an EC2 instance,
configure the correct AWS role for that instance.
• Getting "502 Bad Gateway" when connecting to the interactive session. It often means the Target
Group of the ALB listener rule is not yet initialized with the target instance. In this case the
system usually requires few more instants before establishing the connection with the instance.
Interactive administration 107

EnginFrame Administrator Guide ***Unable to locate subtitle***
Session limits
Number of sessions
The number of interactive sessions can be limited according to:
• the interactive session class. An interactive session class is a group of interactive services. Classes
defined and customizable by EnginFrame administrators. Interactive classes are defined by
setting the following metadata:
•
INTERACTIVE_CLASS - an unique identifier for the class.
•
INTERACTIVE_CLASS_LABEL - a label for the class (optional).
The maximum number of interactive sessions for each class is defined by setting
INTERACTIVE_MAX_SESSIONS parameter. The default value is defined in the interactive.efconf
configuration file.
• the interactive service. Each interactive service can be assigned to a certain class and can define
the INTERACTIVE_MAX_SESSIONS parameter within its code.
• the user or user group. With the use of EnginFrame ACLs (Access control lists) combined with
the first two items. For detailed documentation about ACLs, please refer to EnginFrame
Administrator Guide.
A full example follows:
<ef:service id="interactive.xterm">
<ef:name>XTerm</ef:name>
<ef:metadata attribute="INTERACTIVE_CLASS">xterm</ef:metadata>
<ef:metadata attribute="INTERACTIVE_CLASS_LABEL">Xterm</ef:metadata>
<ef:metadata attribute="INTERACTIVE_MAX_SESSIONS">3</ef:metadata>
<ef:option id="project" label="Project" type="text">Interactive</ef:option>
<ef:option id="jobmanager" label="Job Manager" type="list">
<ef:embed id="grid.plugins"/>
</ef:option>
<ef:action id="submit" label="Start" result="text/xml">
"${EF_ROOT}/plugins/interactive/bin/interactive.submit" \
--name "XTerm" \
--os "linux" \
--jobmanager "${jobmanager}" \
--project "${project}" \
--remote "vnc" \
--vnc-xstartup "${EF_ROOT}/plugins/interactive/conf/metacity.xstartup" \
Interactive administration 108

EnginFrame Administrator Guide ***Unable to locate subtitle***
--close-on-exit \
--command "xterm"
</ef:action>
</ef:service>
In the example above, the maximum number of sessions of the "xterm" class will be limited to 3 for
each user
Note
Interactive session name and interactive class are not dependent to each other.
Log files
Main interactive log file is located under EnginFrame log directory: ${EF_LOGDIR}/
interactive.log.
All others log files (session, debug, authentication) can be found inside each interactive session
spooler, and are available via the portal user interface, by reaching session details page.
Interactive Plugin Directory Structure
This section describes the directory structure. Please refer to the EnginFrame Administrator Guide
for details about the formats and the purpose of the files.
Interactive Plugin is installed in ${EF_ROOT}/plugins/interactive.
These are the most important contents of the folder:
interactive/
|-- WEBAPP
|-- bin
|-- conf
| |-- mappers
| | |-- interactive.duplicated.sessions.xconf
| | `-- interactive.list.sessions.xconf
| |-- dcv.gpu.balancer.conf
| |-- dcv2.gpu.balancer.conf
| |-- gnome.xstartup
| |-- icewm.xstartup
Interactive administration 109

EnginFrame Administrator Guide ***Unable to locate subtitle***
| |-- interactive.efconf
| |-- interactive.vnc.resolutions.conf
| |-- kde.xstartup
| |-- log.xconf
| |-- lxde.xstartup
| |-- mate.xstartup
| |-- metacity.xstartup
| |-- mime-types.xml
| |-- minimal.xstartup
| |-- mwm.xstartup
| |-- nat.conf
| |-- proxy.conf
| |-- template.dcv
| |-- template-dcv2.dcv
| |-- template.efrgs
| |-- template.rgreceiver
| |-- template.vnc
| |-- xfce.xstartup
| `-- xfwm4.xstartup
|-- etc
|-- lib
`-- tools
Interactive Plugin follows the conventional EnginFrame plug-in structure and in particular the
following directories contain Interactive Plugin system files:
•
WEBAPP - top level service definition files.
•
bin - scripts and executables.
•
conf - configuration files.
•
etc - Interactive Plugin metadata and EnginFrame descriptor files.
•
lib - internal files used by Interactive Plugin: XML support services and XSL files.
•
tools - Interactive Plugin integration and interface tools.
Each resource manager plugin supported by Interactive Plugin, includes an interactive subdirectory
which contains the related interface code with Interactive Plugin:
interactive/
|-- interactive.close
|-- interactive.is.session.ready
Interactive administration 110

EnginFrame Administrator Guide ***Unable to locate subtitle***
|-- interactive.log.data
|-- interactive.retrieve.screenshot
|-- interactive.submit
|-- linux.jobscript.functions
`-- services
`-- interactive.lsf.linux.xml
in particular:
•
interactive.submit - the session submission script.
•
interactive.close - the operations to be performed to close the session.
•
services - various service definitions.
Views administration
Virtual Desktop is implemented by the VDI plugin that defines all the services that interact with
the backend to provide the high level, user functionalities.
VDI plugin provides a front-end portal that gives EnginFrame administrators an easy way to create,
publish and manage Interactive services. End-users instead are provided with a portal to easily
access the company Interactive services.
This section explains the configuration files and settings of the VDI plugin.
Topics
• Configuration files
• Log files
• VDI Plugin Directory Structure
Configuration files
Most of the times the values defined during the VDI plugin installation provide all the information
necessary to have a working setup. However the administrator may have the need to change the
folders where services files are stored or to change other settings of the system.
All the VDI plugin configuration files are located in the $EF_TOP/<VERSION>/enginframe/
plugins/vdi/conf subdirectory.
Views administration 111

EnginFrame Administrator Guide ***Unable to locate subtitle***
Important
As for the other EnginFrame plugins, the correct way to change the default configuration
is to copy the target configuration file under the $EF_TOP/conf, to the $EF_TOP/conf/
plugins/vdi directory, if it doesn't already exist, and edit the copied file.
Note
Configuration parameters are automatically loaded upon saving. No need to restart
EnginFrame or logout.
Topics
• vdi.conf
• service-manager.efconf
• interactive.editor.efconf
vdi.conf
This file contains VDI main default configuration parameters.
Users Access Parameters
VDI_ALLOW_ALL_USERS
• value: required
• default: true
Enables Virtual Desktop access to all the users able to log into the system. If true, the users will be
added to the VDI default group at login time.
Available values:
•
true - all user are allowed to access to the Virtual Desktop, i.e. VDI plugin services
•
false - Virtual Desktop users should be explicitly added or imported by a Views administrator
Views administration 112

EnginFrame Administrator Guide ***Unable to locate subtitle***
Example: VDI_ALLOW_ALL_USERS=true
service-manager.efconf
This file contains VDI plugin configuration parameters useful for service management.
General Parameters
VDI_SERVICES_ROOT
• value: required
•
default: ${EF_DATA_ROOT}/plugins/vdi/services where EF_DATA_ROOT is $EF_TOP/
data
Sets the root folder where services files are stored. Changing this value, you have to change also
•
sdftree URL value inside href attribute of xi:include tags declared in vdi.xml, vdi.admin.xml
XML files.
•
load-conf value of ef:action tags in the services XML files
Example: VDI_SERVICES_ROOT=${EF_DATA_ROOT}/plugins/vdi/services
SM_TEMPLATES_ROOT
• value: required
•
default: ${EF_ROOT}/plugins/vdi/templates
Sets the root folder where templates files for service creation are stored.
Example: SM_TEMPLATES_ROOT=${EF_ROOT}/plugins/vdi/templates
Interactive Services Parameters
SM_CATALOG_INTERACTIVE
• value: required
• default: ${VDI_SERVICES_ROOT}/catalog
Sets the folder where unpublished interactive services files are stored.
Views administration 113

EnginFrame Administrator Guide ***Unable to locate subtitle***
Example: SM_CATALOG_INTERACTIVE=${VDI_SERVICES_ROOT}/catalog
SM_PUBLISHED
• value: required
• default: ${VDI_SERVICES_ROOT}/published
Sets the folder where published interactive services files are stored.
Example: SM_PUBLISHED=${VDI_SERVICES_ROOT}/published
interactive.editor.efconf
This file contains configuration parameters for the interactive service editor in the Virtual Desktop.
Note
In EnginFrame version 2015.0 this file was named vdi.editor.efconf and had a slightly
different set of configuration parameters.
During the installation of a newer version, EnginFrame makes a copy of the old
configuration file under $EF_TOP/conf/plugins/vdi directory, naming it as
vdi.editor.efconf.backup.
Interactive Editor Parameters
VDI_EDITOR_OS
• value: optional
• default: windows,linux
Sets supported operating systems for interactive sessions. Comma separated list without any blank
space.
Available values:
•
windows - Windows® Desktop
•
linux - Linux® Desktop
Views administration 114

EnginFrame Administrator Guide ***Unable to locate subtitle***
Example: VDI_EDITOR_OS=windows,linux
VDI_EDITOR_CLUSTERS
• value: optional
• default: Cluster ids retrieved from system
Sets cluster ids to list on service editor. Comma separated list without any spaces.
Example: VDI_EDITOR_CLUSTERS=clusterid1,clusterid2
VDI_EDITOR_CLUSTERS_ARCH_clusterId
• value: optional
• default: linux for all the clusters id
Sets supported operating systems for interactive sessions scheduled in a specific cluster.
Comma separated list without any spaces. clusterId is one of the cluster id defined in the
VDI_EDITOR_CLUSTERS list.
Available values:
•
windows - Windows® Desktop
•
linux - Linux® Desktop
Example:
VDI_EDITOR_CLUSTERS_ARCH_lsfCluster=linux
VDI_EDITOR_CLUSTERS_ARCH_myCluster=windows,linux
VDI_EDITOR_REMOTES
• value: optional
• default: dcv2
Sets the list of supported remote visualization technologies to display in the service editor. Comma
separated list without any spaces.
Views administration 115

EnginFrame Administrator Guide ***Unable to locate subtitle***
Available values:
•
dcv2 - NICE Desktop Cloud Visualization (since 2017.0)
Example: VDI_EDITOR_REMOTES=dcv2
VDI_EDITOR_REMOTES_ARCH_remoteId
• value: optional
•
default: linux, windows for vnc, dcv and dcv2, linux for virtualgl
Sets supported session types for a specific remote id. Comma separated list without any spaces.
remoteId is one of the remote id defined in the VDI_EDITOR_REMOTES list.
Available values:
•
windows - Windows® Desktop
•
linux - Linux® Desktop
•
linux-app - Linux® Desktop application
Example: VDI_EDITOR_REMOTES_ARCH_vnc=linux
VDI_EDITOR_DESKTOP_MANAGERS
• value: optional
• default: none
Sets the list of supported desktop manager ids to display on the service editor. Comma separated
list without any spaces.
For each desktop manager, the name to display could also be specified in the configuration
parameter VDI_EDITOR_DESKTOP_MANAGER_NAME_desktopManagerId. If omitted it will be
equal to the id.
For each desktop manager, the path to the xstartup file must be specified in the configuration
parameter VDI_EDITOR_DESKTOP_MANAGER_XSTARTUP_desktopManagerId. Interactive plugin
already provides a set of preconfigured xstartup files for supported desktop managers under
${EF_ROOT}/plugins/interactive/conf/ directory.
Views administration 116

EnginFrame Administrator Guide ***Unable to locate subtitle***
Example:
VDI_EDITOR_DESKTOP_MANAGERS=gnome,kde
VDI_EDITOR_DESKTOP_MANAGER_NAME_gnome=GNOME
VDI_EDITOR_DESKTOP_MANAGER_XSTARTUP_gnome=${EF_ROOT}/path_to_gnome_xstartup
VDI_EDITOR_DESKTOP_MANAGER_XSTARTUP_kde=/path_to_kde_xstartup
Log files
Main VDI log file is located under EnginFrame log directory, ${EF_LOGDIR}/vdi.log, where
EF_LOGDIR is $EF_TOP/logs/<hostname>.
VDI Plugin Directory Structure
This section describes the directory structure.
VDI plugin is installed in ${EF_ROOT}/plugins/vdi.
These are the most important contents of the folder:
vdi/
|-- WEBAPP
|-- bin
|-- conf
| |-- authorization.xconf
| |-- log.xconf
| |-- service-manager.efconf
| |-- interactive.editor.efconf
| `-- vdi.conf
|-- etc
|-- lib
`-- templates
VDI follows the conventional EnginFrame plug-in structure and in particular the following
directories contain VDI system files:
•
WEBAPP - top level service definition files and web resources.
•
bin - scripts and executables.
•
conf - configuration files.
Views administration 117

EnginFrame Administrator Guide ***Unable to locate subtitle***
•
etc - VDI plugin metadata and EnginFrame descriptor files.
•
lib - internal files used by VDI plugin: XML support services and XSL files.
•
templates - Interactive services templates.
Interactive services are installed in $EF_TOP/data/plugins/vdi/services.
These are the important contents of the folder:
services/
|-- catalog
|-- published
`-- extra
The following directories contain VDI plugin services files:
•
catalog - root folder for unpublished services
•
published - root folder for published services
•
extra - root folder for custom extra services to be included in the Virtual Desktop.
Applications administration
Applications plugin provides a front-end portal that gives EnginFrame administrators an easy way
to create, publish and manage batch and interactive services. End-users instead are provided with a
portal to easily access the company HPC services.
This section explains the configuration files and settings of the Applications plugin.
Important
The service examples provided by the Workspace make use of a JOB_WORKING_DIR and
assume it is mounted by both EnginFrame hosts and execution hosts.
By default the JOB_WORKING_DIR is set to the EF_SPOOLER directory of the submitted
service, so in order to use the examples the root spoolers directory should be shared with
the execution hosts.
This is not a requirement of EnginFrame Workspace but a simplification used by the
examples.
Applications administration 118

EnginFrame Administrator Guide ***Unable to locate subtitle***
Topics
• Configuration files
• Log files
• Applications Directory Structure
Configuration files
Most of the times the values of the settings collected during the Applications plugin installation
provide all the information necessary to have a working setup. However, the administrator may
have the need to change the folders where services files are stored or to change other settings of
the system.
All the Applications Plugin configuration files are located in the $EF_TOP/<VERSION>/
enginframe/plugins/applications/conf subdirectory.
Important
As for the other EnginFrame plugins the correct way to change default configuration is
to copy the target configuration file under the $EF_TOP/conf, to the $EF_TOP/conf/
plugins/applications directory, if it doesn't already exist, and edit the copied file.
Topics
• applications.conf
• service-manager.efconf
• interactive.editor.efconf
Note
Configuration parameters are automatically loaded upon saving. No need to restart
EnginFrame or logout.
applications.conf
This file contains the main default configuration parameters for Applications.
Applications administration 119

EnginFrame Administrator Guide ***Unable to locate subtitle***
Users Access Parameters
APPLICATIONS_ALLOW_ALL_USERS
• value: required
• default: true
Enables Workspace access to all the users able to log into the system. If true, the users will be
added to the Applications default group at login time.
Available values:
•
true - If this value is set, all users are allowed to access to the Workspace.
•
false - If this value is set, workspace users can be explicitly added or imported by an
Applications administrator.
Example: APPLICATIONS_ALLOW_ALL_USERS=true
service-manager.efconf
This file contains Applications plugin configuration parameters that you can use for service
management.
General Parameters
APPLICATIONS_SERVICES_ROOT
• value: required
•
default: ${EF_DATA_ROOT}/plugins/applications/services where EF_DATA_ROOT is $EF_TOP/
data
Sets the root folder where services files are stored. A change to this value requires that you also
make changes to the following:
•
sdftree URL value inside href attribute of xi:include tags declared in applications.xml,
applications.admin.xml XML files
•
load-conf value of ef:action tags in the services XML files
Applications administration 120

EnginFrame Administrator Guide ***Unable to locate subtitle***
Example: APPLICATIONS_SERVICES_ROOT=${EF_DATA_ROOT}/plugins/applications/
services
SM_TEMPLATES_ROOT
• value: required
• default: ${EF_ROOT}/plugins/applications/templates
Sets the root folder where service templates files are stored.
Example: SM_TEMPLATES_ROOT=${EF_ROOT}/plugins/applications/templates
SM_PUBLISHED
• value: required
• default: ${APPLICATIONS_SERVICES_ROOT}/published
Sets the root folder where Applications stores files for published services.
Example: SM_PUBLISHED=${APPLICATIONS_SERVICES_ROOT}/published
Batch Services Parameters
SM_CATALOG_BATCH
• value: required
• default: ${APPLICATIONS_SERVICES_ROOT}/catalog/batch
Sets the folder where unpublished batch services files are stored.
Example: SM_CATALOG_BATCH=${APPLICATIONS_SERVICES_ROOT}/catalog/batch
Interactive Services Parameters
SM_CATALOG_INTERACTIVE
• value: required
• default: ${APPLICATIONS_SERVICES_ROOT}/catalog/interactive
Applications administration 121

EnginFrame Administrator Guide ***Unable to locate subtitle***
Sets the folder where unpublished interactive services files are stored.
Example: SM_CATALOG_INTERACTIVE=${APPLICATIONS_SERVICES_ROOT}/catalog/
interactive
interactive.editor.efconf
This file contains configuration parameters for the interactive service editor in the Workspace.
The file syntax and parameters are the same as interactive.editor.efconf in the Views
Administration VDI plugin section.
Log files
The main Applications log file is located under EnginFrame log directory: ${EF_LOGDIR}/
applications.log, where EF_LOGDIR is $EF_TOP/logs/<hostname>.
Applications Directory Structure
This section describes the directory structure.
Applications is installed at this location: ${EF_ROOT}/plugins/applications.
The following are the most important contents of the folder:
applications/
|-- WEBAPP
|-- bin
|-- conf
| |-- authorization.xconf
| |-- log.xconf
| |-- service-manager.efconf
| |-- interactive.editor.efconf
| `-- applications.conf
|-- etc
|-- lib
`-- templates
Applications follows the conventional EnginFrame plug-in structure and, in particular, the
following directories contain Applications system files:
•
WEBAPP - top-level service definition files and web resources.
Applications administration 122

EnginFrame Administrator Guide ***Unable to locate subtitle***
•
bin - scripts and executables.
•
conf - configuration files.
•
etc - Applications plugin metadata and EnginFrame descriptor files.
•
lib - internal files that are used by the Applications plugin. They are XML support services and
XSL files.
•
templates - Services templates.
By default, both batch and interactive services are installed at this location: $EF_TOP/data/
plugins/applications/services.
The following are the most important contents of the folder:
services/
|-- catalog
| |-- batch
| `-- interactive
|-- published
`-- extra
The following directories contain Applications services files:
•
catalog - root folder for both batch and interactive unpublished services.
•
published - root folder for published services.
•
extra - root folder for custom extra services to be included in the Workspace.
Managing spoolers
This chapter provides an overview of the concepts that are related to EnginFrame spoolers and
their management.
A spooler is a dedicated data container that EnginFrame creates to host files that users provide (for
example, input files uploaded using a web browser) or files that are generated by the services (for
example, output or temporary files).
Every time the service is run (unless explicitly configured) causes EnginFrame to create a new
spooler with appropriate user permissions that allow services to read from and write to spooler's
directory.
Managing spoolers 123

EnginFrame Administrator Guide ***Unable to locate subtitle***
Under EF_SPOOLER_DIR, EnginFrame creates a directory for each user the first time that the
system is accessed. These directories are named using the user's names. Under each <username>
directory, EnginFrame creates its spoolers, one for each time the service is run.
The following image provides a visual overview of EnginFrame's spooler directory structure.
Spoolers directory structure
In the preceding image, Jane, Bob, Lucy each have their own spooler directories. tmp1.ef,
tmp2.ef, tmp3.ef, tmp4.ef, tmp5.ef are spooler directory names that EnginFrame created
dynamically.
Spoolers requirements
If agents that use the spoolers run on hosts other than the server hosts, the spoolers must reside
on a shared file system. This shared file system must be mounted from the EnginFrame Server's
host. Both the agents and server must be able to read and write to the shared file system. With
theEnginFrame's mapping mechanism, these file systems can be mounted with different paths on
server and agent hosts.
Note
If you're using multiple agents, the same mount point path must be used for all of them.
Spoolers requirements 124

EnginFrame Administrator Guide ***Unable to locate subtitle***
EF_SPOOLER_DIR directory must be owned by the user that's running EnginFrame Server (for
example, efnobody). The same userefnobody must have read and write permissions. This is
because EnginFrame Server initially creates spoolers for users. All other users must also have read
and run permissions for the spooler root directory. In other words, the spooler root directory must
have the following ownerships and permissions: rwx r-x r-x efnobody:efnogroup where
efnogroup is efnobody's primary group.
The spoolers area must be placed on a file system where the agent's owner has complete read
and write privileges. Depending on who runs agent daemon, this can be achieved by one of the
following tactics:
• Avoiding root squashing on NFS server when agent owner is root.
• Using same user running server when agent owner is a normal user.
Note
Distinct EnginFrame deployments can't share the same spooler area.
Spooler security permissions
EnginFrame Server starts with a user file creation mask, such as umask, set to 022. This means the
following happens:
•
Files are created with 644 rw-r--r-- permissions.
•
Directories are created with 755 rwxr-xr-x permissions.
This assures EnginFrame Server user can both read and write files in spoolers. This might lead
to a weak security environment because every user can read files from spoolers that are owned
by other user accounts. For this reason, EnginFrame Agent changes spooler permissions to 750
rwxr-x--- just before the service is run. In other words, the final spooler permissions are read,
write, and run for the spooler's owner and read and run for EnginFrame Server's owner. This occurs
because user efnobody with group efnogroup creates the spooler. EnginFrame Agent changes
spooler's owner by running chown <username> <spooler> and spooler ownership becomes
<username>:efnogroup. This allows the spooler's owner to perform whatever action is needed
inside spooler and that only efnogroup members are allowed to read data inside spoolers. A
security best practice is to have only efnobody as efnogroup group's member.
Spoolers requirements 125

EnginFrame Administrator Guide ***Unable to locate subtitle***
Configuring EnginFrame spoolers
This section describes how to customize basic spoolers settings concerning directory paths and file
download aspects.
Topics
• Configuring spoolers default root directory
• Download files from spoolers
Configuring spoolers default root directory
EF_SPOOLER_DIR directory is chosen during installation. All spoolers are created by EnginFrame
under this directory. The default value is $EF_TOP/spoolers.
Spoolers root directory can be changed by editing EF_SPOOLERDIR parameter inside $EF_TOP/
conf/enginframe.conf. The startup parameter name EF_SPOOLERDIR is slightly different from
the property EF_SPOOLER_DIR that's set and used inside EnginFrame.
Example Change the spooler default root directory
EF_SPOOLERDIR=/mnt/scratch/spoolers
After this change, all spoolers are created under /mnt/scratch/spoolers directory.
Note
Changes to this parameter require an EnginFrame Server restart.
Note
Spooler location is defined at creation time, so changing EF_SPOOLERDIR doesn't affect an
existing spooler's location. EnginFrame Agent retrieves old spoolers from the old location
and new spoolers from the new location.
Refer to Spoolers requirements when setting up a new spooler root directory.
Configuring EnginFrame spoolers 126

EnginFrame Administrator Guide ***Unable to locate subtitle***
Download files from spoolers
File are downloaded from spoolers on the user's behalf through the server and agent. EnginFrame
Server receives a download request and forwards it to the agent that accesses the file. The agent
posts the file back to server using HTTP or HTTPS.
This process implies EnginFrame Agent is able to connect back to server using HTTP or HTTPS for
sending data. As a result, make sure that you are careful with how you configure your network and
firewall.
Note
If EnginFrame Server is configured to accept requests through HTTP over SSL - HTTPS -
protocol, then refer to the Configuring HTTPS topic to configure the server and agent.
Consider setting a mime-type for downloaded files to let browsers identify the file's type. You can
customize and configure the mime-type that EnginFrame uses when downloading files. Managing
internet media types provides instructions on how to set up mime-type configurations.
Configure download URL on agent
The download process highlights how an agent has to connect back to the server for sending
downloaded data. Usually the server HTTP endpoint, that is, the host and port that the agent
connects to, is automatically detected from server's request.
There might be network configurations or architectural scenarios that require specific
configurations. For example, web access might be configured with an HTTP server in front of
EnginFrame Server. In this case, the agent must use a different host and port to connect to the
server. To enable this, you must explicitly configure the complete URL that the agent must use to
connect to the EnginFrame Server.
The ef.download.server.url parameter inside $EF_TOP/conf/enginframe/agent.conf
(or $EF_TOP/<VERSION>/enginframe/conf/agent.conf) sets the URL agent uses to connect
to server. It's defined as follows:
ef.download.server.url=http[s]://<host>:<port>/<web-context>/download
Replace the following elements with your specific details:
Configuring EnginFrame spoolers 127

EnginFrame Administrator Guide ***Unable to locate subtitle***
•
The host and port value identifies the EnginFrame Server network endpoint.
•
The web-context value is the root context that you chose when installing EnginFrame. By
default, it's enginframe.
The following is modified with example values for illustration purposes.
ef.download.server.url=http://localhost:8080/enginframe/download
Configure streaming download timeout
Streaming downloads have a timeout setting. If the file being streamed doesn't change during this
set interval of time, EnginFrame interrupts its stream that's being sent to a client. By default, this
value is set to 300 seconds.
This value is specified in $EF_TOP/conf/enginframe/server.conf (or $EF_TOP/
<VERSION>/enginframe/conf/server.conf). You change this value by editing
ef.download.stream.inactivity.timeout property inside $EF_TOP/conf/enginframe/
server.conf. The value is expressed in seconds.
In the following example, the timeout value is set to 600 seconds (10 minutes).
ef.download.stream.inactivity.timeout=600
Configure streaming download sleep time
The file streaming download feature of EnginFrame works using a pull model. The server
periodically queries an agent for available data.
You can set the specific interval of time between two subsequent checks. By default, it's set to 5
seconds. A lower interval time might improve the user experience but it might also increase system
load.
This value is specified in $EF_TOP/conf/enginframe/server.conf (or $EF_TOP/
<VERSION>/enginframe/conf/server.conf). You change this value by editing
ef.download.stream.sleep.time parameter inside $EF_TOP/conf/enginframe/
server.conf. The value is expressed in seconds.
For example, with ef.download.stream.sleep.time=20, the sleep time is set at 20 seconds.
Configuring EnginFrame spoolers 128

EnginFrame Administrator Guide ***Unable to locate subtitle***
Spooler life cycle
This section outlines EnginFrame's spooler lifecycle. Besides outlining spooler's lifecycle, each sub-
section describes common customizations that you can apply to EnginFrame Portal.
Overview
Spoolers are created for each service submission. More specifically, spoolers are created for all
those services whose spooler definition has a TTL different from -1.
Spoolers are initially created by EnginFrame Server with a defined time-to-live. Together with
spooler directory the server also creates an entry in EnginFrame's spooler database called
repository. The repository is file-system based and each entry is a file that contains all information
that's necessary to recreate a spooler.
• The owner
• The physical location path on both server and agent
• The display name
• And other properties
The server also has the responsibility to save user's files into a spooler before contacting an agent
for running a service. After the spooler setup tasks have been accomplished, the server contacts an
agent to run the service. The agent first changes the spooler's and its contents ownership and then
uses this spooler as the working directory for the service it runs.
EnginFrame removes a spooler when its life-time expires, deleting spooler's directory with its
content and its repository entry. An EnginFrame thread called reaper periodically checks if there are
expired spoolers ready to be removed.
Change repository location
The default EnginFrame repository path is $EF_TOP/repository. With EnginFrame, you can
change the location of where repository entries are stored.
For example, you might want to save repository entries on a high speed and reliable file-system
or on an area that has "dynamic" file-system paths (for example, a directory with contents that
change often) to conform to your company's policies.
Spooler life cycle 129

EnginFrame Administrator Guide ***Unable to locate subtitle***
The repository location is configured by EF_REPOSITORYDIR parameter inside the $EF_TOP/
conf/enginframe.conf file. It specifies an absolute path in the file system. You can use
other variables that are defined in enginframe.conf for path definition. For example,
EF_REPOSITORYDIR=$EF_TOP/repository defines repository location using $EF_TOP variable.
EF_REPOSITORYDIR=/mnt/nas/ef-repository sets an absolute path for repository directory.
Note
If you make changes to EF_REPOSITORYDIR, you must restart EnginFrame Server.
Configure reaper sleep time
The EnginFrame reaper is a thread that periodically wakes up to check if there are expired spoolers
in the system needing cleanup.
You can configure reaper's thread sleep interval to specify how frequently this check is performed.
This value is specified in $EF_TOP/conf/enginframe/server.conf (or $EF_TOP/
<VERSION>/enginframe/conf/server.conf). You change this value by editing the
ef.reaper.sleep.time property inside $EF_TOP/conf/enginframe/server.conf file. The
value is expressed in minutes. By default, it's set to 30 minutes.
In this example, ef.reaper.sleep.time=60, the sleep time is set to 60 minutes (1 hour)
between each thread's reap.
Spoolers removal: Dead spoolers
If for any reason spooler cleanup fails, spooler's directory is renamed with the DEAD_ prefix added
in front of its original name.
For example, if EnginFrame can't remove spooler tmp32062.ef, it's renamed to
DEAD_tmp32062.ef. You can remove dead spoolers from your system safely.
If you set up deadspooler logging target after a dead spooler was created, the event is logged to
the $EF_TOP/logs/DEAD_spoolers.{agent|server}.log depending on whether the server
or agent had an error.
Spooler life cycle 130

EnginFrame Administrator Guide ***Unable to locate subtitle***
Managing the sessions directory
This chapter illustrates the basic concepts that concern EnginFrame interactive session data and its
management.
The data of an interactive session is in a dedicated data container. This container is created by
EnginFrame to host the files that are required for the interactive session lifecycle. These include the
thumbnail of a screenshot, for example.
INTERACTIVE_SHARED_ROOT is organized in the same way as the EnginFrame spoolers. For more
information, see Managing spoolers. Under INTERACTIVE_SHARED_ROOT, EnginFrame creates a
directory for each user the first time an interactive session is created. These directories are named
with the user's names. Under each <username> directory, EnginFrame creates its session data
directory, one for each interactive session.
Sessions requirements
Sessions must reside on a shared file system that must be mounted from the EnginFrame Server's
host, EnginFrame Agent's host and visualization nodes. This area might not require to be shared
when submitting sessions to some Distributed Resource Managers. For more information, see
Shared file system requirements.
The INTERACTIVE_SHARED_ROOT directory must be owned by the user that's running
EnginFrame Server (for example, efnobody) and by efnobody's primary group. It must have
the 3777 permissions. To summarize, the following permissions are required: d rwx rws rwt
efnobody:efnogroup where efnogroup is efnobody's primary group.
The EnginFrame installer creates this directory with the proper permissions on your behalf. The
default location is $EF_TOP/sessions. You can change the INTERACTIVE_SHARED_ROOT value
in the $EF_TOP/conf/plugins/interactive/interactive.efconf file.
This shared area has to be readable and writable by EnginFrame nodes and visualization nodes.
EnginFrame provides a mapping mechanism that enables these file-systems to be mounted
with different paths on EnginFrame and visualization hosts. This configuration is specific to the
Distributed Resource Manager that's used for the session and can be configured in the specific
plugin configuration file:
•
On PBS Professional®, use PBS_INTERACTIVE_SHARED_ROOT_EXEC_HOST in the $EF_TOP/
conf/plugins/pbs/ef.pbs.conf file.
Managing the sessions directory 131

EnginFrame Administrator Guide ***Unable to locate subtitle***
•
On SLURM™, use SLURM_INTERACTIVE_SHARED_ROOT_EXEC_HOST in the $EF_TOP/conf/
plugins/slurm/ef.slurm.conf file.
•
On SGE, use SGE_INTERACTIVE_SHARED_ROOT_EXEC_HOST in the $EF_TOP/conf/plugins/
sge/ef.sge.conf file.
NICE DCV Session Manager
NICE DCV Session Manager is a set of installable software packages that includes an Agent and
a Broker. It also includes an API that you can use to build frontend applications that create and
manage the lifecycle of NICE DCV sessions across a fleet of NICE DCV servers.
The NICE DCV Session Manager integration is only supported with NICE DCV 2020.2 and later.
Node monitoring, Linux console sessions, autorun files, and sessions screenshots are new features
that were introduced in NICE DCV 2021.0. These features have been added in EnginFrame 2020.1
and are only supported by NICE DCV 2021.0 and later.
For more information, see What is NICE DCV Session Manager in the NICE DCV Session Manager
Administrator Guide.
How to set up NICE DCV Session Manager
When you install EnginFrame, you can choose to use NICE DCV Session Manager to manage DCV
sessions.
To allow EnginFrame to interact with NICE DCV Session Manager, register EnginFrame as a Session
Manager API client.
If you don't have a client ID and client password for EnginFrame, you must request these
credentials from your NICE DCV Session Manager Broker administrator. For more information about
registering your client API with the Broker and obtaining a client ID and password, see register-api-
client in the NICE DCV Administrator Guide.
To properly configure the NICE DCV Session Manager, the installer requires the following
information:
• The base URL of the remote NICE DCV Session Manager. This URL is used by EnginFrame to
manage DCV sessions.
NICE DCV Session Manager 132

EnginFrame Administrator Guide ***Unable to locate subtitle***
• The full URL, client ID, and client password that EnginFrame uses to authenticate with the
Broker.
The installer stores this information in the following locations:
•
$EF_CONF_ROOT/plugins/dcvsm/clusters.props.
This file contains sensitive information that's used to authenticate to remote NICE DCV Session
Managers. Because of the potential for abuse, this file must have strict permissions. We
recommend that you only grant read and write permissions for the user that is running the
Apache Tomcat® server. Do not make this file accessible to other users.
-rw------- efnobody efnobody.
•
$EF_CONF_ROOT/plugins/dcvsm/dcvsm.efconf.
This is the configuration file. It contains the configuration for the NICE DCV Session Manager
plugin integration and includes sensitive information.
The following is an example clusters.props file.
#
# This file has been created during EnginFrame installation.
# It contains only the installation specific settings.
#
# This file contains sensitive data and should be readable by the user running
# EnginFrame but not accessible by others (read/write/execute).
# EnginFrame will refuse to load this file if it is accessible by others.
# Configuration for cluster cl1
DCVSM_CLUSTER_dcvsm_cl1_AUTH_ID=clientID
DCVSM_CLUSTER_dcvsm_cl1_AUTH_PASSWORD=clientPassword
DCVSM_CLUSTER_dcvsm_cl1_AUTH_ENDPOINT=https://sm-hostname:sm-port/oauth2/token
DCVSM_CLUSTER_dcvsm_cl1_SESSION_MANAGER_ENDPOINT=https://sm-hostname:sm-port
DCVSM_CLUSTER_dcvsm_cl1_NO_STRICT_TLS=false
The following is an example of the dcvsm.efconf file.
How to set up NICE DCV Session Manager 133

EnginFrame Administrator Guide ***Unable to locate subtitle***
# This file has been created during EnginFrame installation.
# It contains only the installation specific settings.
#
DCVSM_CLUSTER_IDS=dcvsm_cl1
The name of the cluster that's reported in DCVSM_CLUSTER_IDS must match the name that's used
for the properties that are described in clusters.props. If this isn't the case, EnginFrame can't
retrieve the cluster configuration parameters.
Add more NICE DCV Session Manager clusters
To add more clusters, you can use the EnginFrame installer. It creates NICE DCV Session Manager
clusters that use a default configuration. You can change these settings after the cluster is created.
For each new cluster, the following is required:
•
A new clusterId must be added in DCVSM_CLUSTER_IDS (in a comma separated list) in
$EF_CONF_ROOT/plugins/dcvsm/dcvsm.efconf.
•
A new set of parameters must be added in $EF_CONF_ROOT/plugins/dcvsm/
clusters.props.
Enable hosts monitoring for NICE DCV Session Manager
By default, NICE DCV Session Manager hosts are not shown in the Hosts section of the portal. To
enable this feature, edit two configuration files to meet the following requirements:
•
The dcvsm string must be added in EF_GRID_MANAGERS (comma separated list) in
$EF_CONF_ROOT/plugins/grid/grid.conf.
•
The dcvsm string must be added in GRID_XML_PLUGINS (comma separated list) in $EF_ROOT/
plugins/grid/conf/jobcache.efconf.
After you change these properties, you must restart EnginFrame to apply the changes.
NICE DCV Session Manager secure connection configuration
By default, the installer configures a secure connection using strict TLS checking between
EnginFrame and the NICE DCV Session Manager Broker. We recommend that you use this default
configuration.
Add more NICE DCV Session Manager clusters 134

EnginFrame Administrator Guide ***Unable to locate subtitle***
If you so choose, you can disable this behavior by setting
DCVSM_CLUSTER_clusterID_NO_STRICT_TLS to true in the clusters.props configuration
file.
If a valid certificate is presented, EnginFrame trusts the DCV Session Manager Broker.
If the NICE DCV Session Manager Broker is configured to use self-signed certificates, make sure that
the root certificate is added to the Tomcat JVM KeyStore.
For instructions on how to add a root certificate to the Tomcat JVM KeyStore, see Configuring
HTTPS.
In the following example, the CA_ROOT.pem file that's provided by the NICE DCV Session Manager
Broker is used.
# 1. export the Session Manager CA Certificate in der format with openssl
openssl x509 -in CA_ROOT.pem -inform pem -out ca.der -outform der
# 2. Verify that Java Keytool is able to read the certificate
keytool -v -printcert -file ca.der
# 3. import Session Manager CA Certificate in JVM keytool
keytool -importcert -alias dcvsm \
-keystore $JAVA_HOME/lib/security/cacerts \
-storepass java_keystore_password \
-file ca.der
# 4. verify that the root certificate has been imported
keytool -keystore "$JAVA_HOME/lib/security/cacerts" \
-storepass java_keystore_password \
-list | grep dcvsm
How to create a new remote desktop interactive service
An Admin user can create a new remote interactive service using NICE DCV Session Manager from
the Virtual Desktop portal.
A NICE DCV Session Manager cluster supports both Windows and Linux hosts.
How to create a new remote desktop interactive service 135

EnginFrame Administrator Guide ***Unable to locate subtitle***
Session modes
The interactive plugin with NICE DCV Session Manager, creates VIRTUAL or CONSOLE sessions in
Linux hosts and CONSOLE sessions in Windows hosts. For more information about session types
and support, see NICE DCV Session Manager documentation.
CONSOLE sessions support one or more session per instance. This is the default for Windows hosts.
You can create a maximum of 3 Windows sessions because there only 3 instances deployed.
VIRTUAL sessions support only one sessions per instance. This is the default for Linux hosts.
Important
VIRTUAL and CONSOLE sessions can't be active on the same host at the same time.
Create a remote desktop interactive service
Create and publish a remote desktop interactive service
1. Open the EnginFrame portal and Login as Admin user.
2. Choose the Virtual Desktop.
3. Choose Switch to Admin View in the header navigation pane.
4. In the sidebar navigation pane, choose Manage and then Interactive Services.
5. Choose New to create an interactive service.
6. Select Create from Template and choose Create.
7. Choose Settings. Here you can customize your service. Choose Close to skip to the next step.
8. In the yellow box, type in a new name for your service, such as "MyService".
9. Choose Launch Session.
10. Review and keep the settings, including the Session Mode in the Execution Environment
section.
11. Choose Close, Save, and Close.
12. To modify or test the service, select your new service and choose Edit.
13. To publish the service, select your new service and choose Publish, then select All Users and
Publish.
How to create a new remote desktop interactive service 136

EnginFrame Administrator Guide ***Unable to locate subtitle***
14. Choose Switch to User View in the header navigation pane.
15. Your new remote interactive service is displayed under Services and available for use.
Using NICE DCV Session Manager, you can tag the host where the DCV Server is running with
custom values. You can also use these values to select which host the session is created on. For
more information, see the NICE DCV Session Manager documentation.
With EnginFrame session placement, you can create an interactive service that targets hosts with
specific characteristics. Using this feature, you don't need to recall specific details such as the
hostname or IP address and delegate their discovery to the remote NICE DCV Session Manager
Broker.
To specify a set of "tags" for targeting the host, add the submitopts option in the ActionScript
tab:
vdi.launch.session --submitopts " ram_gb='4' Software='My Software' "
• Multiple tags can be specified, separated by spaces.
• Each tag is a key-value pair that's in the format of "key=value". There can't be any spaces before
and after the equal sign (=) unless the keys and values are wrapped in single quotes (').
If no hosts are available, the session fails to be created. This can happen if there is no hosts or if all
the hosts are in use and aren't available to create the session.
EnginFrame 2020.1+ provides the possibility to specify a custom Autorun File to be run when a
session is created. The file must be present on the remote host within a reserved folder. For more
information about autorun files, see NICE DCV Session Manager documentation.
This feature is only compatible with NICE DCV Session Manager 2021.0+ on CONSOLE sessions on
Windows NICE DCV servers and VIRTUAL sessions on Linux NICE DCV servers. It is not supported
with CONSOLE sessions on Linux NICE DCV servers.
To specify the Autorun File, add the delegate-autorun-file option in the ActionScript
tab. You can do this by running the following command.
vdi.launch.session --delegate-autorun-file "autorun/relative/file/path.sh"
How to create a new remote desktop interactive service 137

EnginFrame Administrator Guide ***Unable to locate subtitle***
Restarting NICE DCV Session Manager
By default, the NICE DCV Session Manager Broker is configured with enable-
persistence=false in the session-manager-broker.properties configuration file. If
you restart the NICE DCV Session Manager with this default NICE DCV Session Manager Broker
setting, the list of sessions and servers are lost until all of the NICE DCV Session Manager agents
repopulate the information for the broker.
To avoid issues with EnginFrame while running, restart the NICE DCV Session Manager Broker by
taking the following steps.
1.
Stop the EnginFrame service and verify that the EnginFrame processes are killed: ps -f |
grep enginframe.
2. Restart the NICE DCV Session Manager Broker.
3. Wait at least 5 minutes and make sure that all of the agents have communicated with the NICE
DCV Session Manager Broker. Verify by running the dcvsm describe-servers and dcvsms
describe-sessions commands.
4. Restart the EnginFrame service.
You can also avoid this issue by setting enable-persistence=true in the session-manager-
broker.properties configuration file. For more information, see Configuring broker persistence
in the NICE DCV Session Manager Administrator Guide.
Plugin limitations
Custom Init Scripts aren't supported. Linux virtual sessions use the default scripts that are
provided by NICE DCV.
Sessions can be shared only with Collaborators. There is currently no support for sharing with
Viewers.
Troubleshooting
Compatibility with NICE DCV versions
EnginFrame 2020.1 added several new features. These included node monitoring, Linux console
sessions, autorun files, and session screenshots. These features only work with NICE DCV 2021.0
Restarting NICE DCV Session Manager 138

EnginFrame Administrator Guide ***Unable to locate subtitle***
and later. They do not work with earlier versions. To use these features and avoid issues of
incompatibility, upgrade to a compatible version.
If you try to use these features with an earlier version, an error like the following might occur.
SMClient.getSessionScreenshot: If you are not using DCVSM 2021.0+,
please be aware that getSessionScreenshot is not supported.
Protocol version: 2020.2
Log files
The main NICE DCV Session Manager plugin log file is located under the EnginFrame log directory
that's named ${EF_LOGDIR}/dcvsm.log.
Managing AWS HPC Connector
HPC Connector requires AWS CLI version 2 and AWS ParallelCluster 3.0.2 or later to be pre-
installed on the node that's running the EnginFrame server. This means that the user efnobody
running the EnginFrame Server must have access to the package and permissions to run the
pcluster command.
Before you install EnginFrame, make sure that AWS ParallelCluster is installed by running the
following command as the user efnobody that is running the EnginFrame server.
$ pcluster version
The output is as follows:
{
"version": "3.0.2"
}
For instructions on how to set up and configure AWS ParallelCluster, see the AWS ParallelCluster
guide. This setup includes setting up required dependencies. Among these dependencies, NodeJS
must be accessible to the user efnobody that's running the EnginFrame server.
We recommend that you install AWS ParallelCluster in a Python virtual environment. This avoids
requirement version conflicts with other Python packages.
Managing AWS HPC Connector 139

EnginFrame Administrator Guide ***Unable to locate subtitle***
Activating an AWS ParallelCluster virtual environment
You must reactivate the virtual environment with every restart. As a result, we recommended that
you add it in your init environment file (for example, ~/.bashrc) for the user.
source [YOUR_VIRT_ENV_PATH]/bin/activate
Before installing EnginFrame with AWS HPC Connector
To start HPC Connector, the EnginFrame installer requires the following parameters:
• An AWS Region where the cluster is created and managed.
• An Amazon S3 bucket to transfer data between EnginFrame and the remote clusters.
• Three IAM roles that are used to access data on the S3 bucket, submit jobs using SSM, and
manage clusters using AWS ParallelCluster.
• An AWS instance profile or an AWS profile name containing AWS credentials for an IAM user
(<ef-iam-user>) able to assume the roles.
To simplify the setup of these resources, you can use a deployment script to create the required
resources on your AWS account. Select one of the following links to bootstrap AWS HPC Connector.
• US East (N. Virginia) Region
• US East (Ohio) Region
• US West (N. California) Region
• US West (Oregon) Region
• Canada (Central) Region
• Europe (Frankfurt) Region
• Europe (Ireland) Region
• Europe (Stockholm) Region
• Europe (Milan) Region
• Asia Pacific (Tokyo) Region
• Asia Pacific (Seoul) Region
• Asia Pacific (Hong Kong) Region
• Asia Pacific (Mumbai) Region
Activating an AWS ParallelCluster virtual environment 140

EnginFrame Administrator Guide ***Unable to locate subtitle***
AWS credentials and profile
HPC Connector requires users to have a valid set of credentials for <ef-iam-user> that are stored
in the .aws/credentials file of the user efnobody that's running the EnginFrame server. Make
sure that the credential file has an entry that's similar to the following example.
[<profile-name>]
aws_access_key_id=<aws access key for the account>
aws_secret_access_key=<aws secret access for the account>
EnginFrame assumes that this credential file is already present at installation time, and that a
profile with the name that's provided during setup is already present. It asks for the profile name
that's used for creating the clusters, and performs a check on the credentials file. If no file is
present or if a profile with the given profile name is not present, the installer logs a warning and
continues its operation, assuming that the profile will be created at a later time.
Amazon S3 bucket for data transfer
When launching a job on a cluster running on AWS, HPC Connector uses an Amazon S3 bucket
to transfer input and output data to from the remote folder where the job is to run. To use the
Amazon S3 bucket, you must provide the Amazon resource name (ARN) of the S3 bucket when
using the EnginFrame installer.
Warning
• In general, the overall size of a file that's transferred for a single job doesn't need to
exceed 100MB. If the overall file size exceeds 100MB, the system might time out on
the transfer operation, and the job or copy might fail. If your jobs need to access larger
datasets, make sure that these are available to the cluster through a shared file system.
For more information about how to mount shared storage, see Shared storage in the
AWS ParallelCluster User Guide.
• HPC Connector doesn't support Using Amazon S3 bucket keys.
HPC Connector IAM roles
AWS HPC Connector uses AWS Identity and Access Management (IAM) roles to control permissions
that are associated with the AWS resources that are deployed to a selected AWS account. HPC
AWS credentials and profile 141

EnginFrame Administrator Guide ***Unable to locate subtitle***
Connector runs multiple operations on the selected AWS account. It creates and manages clusters
using AWS ParallelCluster commands. It also submits and manages jobs on remote clusters, and
transfers input and output data between clusters and the EnginFrame spoolers. HPC Connector
uses different roles to limit the scope to the minimum permissions required for each operation.
•
An IAM role for managing AWS ParallelCluster (ef-parallelcluster-role) in your account.
This role is used by HPC Connector for creating, starting, and stopping clusters. It must have AWS
ParallelCluster’s policies attached for managing the clusters.
•
An IAM role for accessing the Amazon S3 bucket (ef-s3-role). This is used by HPC Connector
for transferring the data back and forth from the remote destination. This role has a policy (ef-
s3-role-policy) that's attached for accessing the Amazon S3 bucket and reading or writing
objects.
•
An IAM role for running jobs remotely using SSM (ef-ssm-role). This is used for launching job
scripts remotely on the clusters. This role has a policy (ef-ssm-role-policy) that's attached
for sending commands to the remote instances.
You can create IAM policies and roles to control the permissions that are granted to HPC Connector
and to the users of the cluster. The following examples show the IAM policies and roles that are
required to use HPC Connector. In the policies, replace aws-account-id and similar strings with
the appropriate values.
Note
The following examples include Amazon Resource Names (ARNs) for the resources. If you're
working in the AWS GovCloud (US) or AWS China partitions, the ARNs must be changed.
Specifically, they must be changed from "arn:aws" to "arn:aws-us-gov" for the AWS
GovCloud (US) partition or "arn:aws-cn" for the AWS China partition. For more information,
see Amazon Resource Names (ARNs) in AWS GovCloud (US) Regions in the AWS GovCloud
(US) User Guide and ARNs for AWS services in China in Getting Started with AWS services in
China.
AWS ParallelCluster IAM policy and role
HPC Connector uses AWS ParallelCluster to provision clusters and must have access to both the
Base user policy required to invoke AWS ParallelCluster features and the policy for Privileged
IAM access mode.
HPC Connector IAM roles 142

EnginFrame Administrator Guide ***Unable to locate subtitle***
For more information how to create the policy, see AWS Identity and Access Management roles
in AWS ParallelCluster 3.x.
The AWS ParallelCluster IAM role then needs to be configured with the following trust
relationship to allow EnginFrame to use it:
{
"Version": "2012-10-17",
"Statement": [
{
"Effect": "Allow",
"Principal": {
"AWS": "arn:aws:iam::<aws-account-id>:user/<ef-iam-user>"
},
"Action": "sts:AssumeRole"
}
]
}
SSM IAM policy and role
The following policy shows the permissions that are required by HPC Connector to run SSM
commands for managing jobs.
{
"Version": "2012-10-17",
"Statement": [
{
"Effect": "Allow",
"Action": [
"ssm:SendCommand"
],
"Resource": [
"arn:aws:ec2::<aws-account-id>:instance/*"
],
"Condition": {
"StringLike": {
"ssm:resourceTag/parallelcluster:node-type": ["HeadNode"]
}
}
},
{
HPC Connector IAM roles 143

EnginFrame Administrator Guide ***Unable to locate subtitle***
"Effect": "Allow",
"Action": [
"ssm:SendCommand"
],
"Resource": [
"arn:aws:ssm:::document/AWS-RunShellScript"
]
},
{
"Action": [
"ssm:GetCommandInvocation"
],
"Effect": "Allow",
"Resource": "*"
}
]
}
Create the policy, assign it a name (ef-ssm-role-policy) and attach it to an IAM role (for
example, ef-ssm-role). The policy requires all the instances to have a specific tag that's
assigned automatically by AWS ParallelCluster to head nodes. This prevents arbitrary SSM
commands from running on instances that aren't head nodes. Then configure it with the
following trust relationship to allow EnginFrame to use it:
{
"Version": "2012-10-17",
"Statement": [
{
"Effect": "Allow",
"Principal": {
"AWS": "arn:aws:iam::<aws-account-id>:user/<ef-iam-user>"
},
"Action": "sts:AssumeRole"
}
]
}
Amazon S3 IAM policy and role
The following policy shows the permissions that are required by HPC Connector to move files
between the EnginFrame node and remote spoolers using Amazon S3. Replace <s3-bucket>
with the actual Amazon S3 bucket name.
HPC Connector IAM roles 144

EnginFrame Administrator Guide ***Unable to locate subtitle***
{
"Version": "2012-10-17",
"Statement": [
{
"Action": [
"s3:ListBucket"
],
"Resource": [
"arn:aws:s3:::<s3-bucket>"
],
"Effect": "Allow"
},
{
"Action": [
"s3:PutObject",
"s3:GetObject",
"s3:DeleteObject"
],
"Resource": [
"arn:aws:s3:::<s3-bucket>/*"
],
"Effect": "Allow"
}
]
}
Create the policy, assign it a name (for example, ef-s3-role-policy), and attach it to an IAM
Role (ef-s3-role). Then configure it with the following trust relationship to allow EnginFrame
to use it:
{
"Version": "2012-10-17",
"Statement": [
{
"Effect": "Allow",
"Principal": {
"AWS": "arn:aws:iam::<aws-account-id>:user/<ef-iam-user>"
},
"Action": "sts:AssumeRole"
}
]
}
HPC Connector IAM roles 145

EnginFrame Administrator Guide ***Unable to locate subtitle***
Access to the Amazon S3 bucket is required only by the head nodes of the remote clusters.
Therefore, you must add a condition that limits the access only to the instance policies that are
created by AWS ParallelCluster. This can be done by specifying a condition on the IAM role (ef-
s3-role).
{
"Version": "2012-10-17",
"Statement": [
{
"Effect": "Allow",
"Principal": {
"AWS": "arn:aws:iam::<aws-account-id>:root"
},
"Action": "sts:AssumeRole",
"Condition": {
"StringLike": {
"AWS:PrincipalArn": "arn:aws:iam::<aws-account-id>:role/parallelcluster/
*"
}
}
}
]
}
EnginFrame IAM user
An <ef-iam-user> must be configured with the following policy that allows it to assume the
previously defined AWS ParallelCluster, Amazon S3, and SSM roles.
{
"Version": "2012-10-17",
"Statement": [
{
"Action": "sts:AssumeRole",
"Resource": "arn:aws:iam::<aws-account-id>:role/<ef-parallelcluster-
role>",
"Effect": "Allow"
},
{
"Action": "sts:AssumeRole",
"Resource": "arn:aws:iam::<aws-account-id>:role/<ef-s3-role>",
"Effect": "Allow"
HPC Connector IAM roles 146

EnginFrame Administrator Guide ***Unable to locate subtitle***
},
{
"Action": "sts:AssumeRole",
"Resource": "arn:aws:iam::<aws-account-id>:role/<ef-ssm-role>",
"Effect": "Allow"
}
]
}
AWS ParallelCluster configuration requirements
Topics
• Required additional IAM policies
• AWS ParallelCluster head node policy
• Scoping down HPC Connector
• Managing clusters
• Managing jobs
Required additional IAM policies
AWS HPC Connector requires AWS ParallelCluster configurations to have specific additional policies
attached to the IAM role used for the head node. Most specifically, as the job submission uses SSM,
the AmazonSSMManagedInstanceCore must be attached to the additional policies. In addition to
SSM, the head node must also assume the role that's needed by HPC Connector to transfer the files
back and forth.
AWS ParallelCluster head node policy
AWS ParallelCluster configurations must include a role policy for the cluster head node
(parallelcluster-ef-instance-policy) to allow data transfer to and from the regional
Amazon S3 bucket. Be aware that the name of the policy must start with the parallelcluster prefix
in order for it to be attached to the head node.
{
"Version": "2012-10-17",
"Statement": [
{
AWS ParallelCluster configuration requirements 147

EnginFrame Administrator Guide ***Unable to locate subtitle***
"Action": "sts:AssumeRole",
"Resource": "arn:aws:iam::<AWS ACCOUT ID>:role/<ef-s3-role>",
"Effect": "Allow"
}
]
}
The policies (both the head node policy and the SSM managed instance core policy) must be
present in your configuration in order for the cluster to be managed by HPC Connector
HeadNode:
Iam:
AdditionalIamPolicies:
- Policy: arn:aws:iam::aws:policy/AmazonSSMManagedInstanceCore
- Policy: arn:aws:iam::<account-id>:policy/<parallelcluster-ef-instance-policy>
Scoping down HPC Connector
HPC Connector allows running SSM commands only to head nodes. It does this by using the
parallelcluster:node-type tag added automatically by AWS ParallelCluster when it
provisions a new head node instance. This restriction is specified in the SSM policy that is required
by HPC Connector to work properly. However, the default policy HPC Connector can access any
head node, even if it wasn't created specifically by HPC Connector itself. This can be further scoped
down by specifying a different tag name and value in the SSM policy (ef-ssm-role-policy)
and having AWS ParallelCluster set that tag on the head node by adding a Tags section in the
configuration file. For instance, for setting a tag named ef:instance to the remote value, the
following section can be added in AWS ParallelCluster’s configuration file.
Tags:
-Key: ef:instance
Value: remote
Managing clusters
The management of clusters in EnginFrame is performed within two distinct views that are
available in the Admin View section of EnginFrame.
• The AWS Cluster Configurations view, which manages AWS ParallelCluster configurations.
• The Clusters view, which shows all of the running clusters accessible by EnginFrame.
AWS ParallelCluster configuration requirements 148

EnginFrame Administrator Guide ***Unable to locate subtitle***
AWS Cluster Configurations page
The AWS Cluster Configurations page displays all the AWS ParallelCluster configurations that
administrators have imported in EnginFrame. The configurations define all the properties of a
cluster on AWS, including queues, compute resources, and shared storage. HPC Connector only
supports AWS ParallelCluster 3 template files as cluster configurations. In this view administrators
can register new cluster configurations, rename and delete them, and launch new clusters based on
that configuration. The following sections will provide instructions on how to operate on the AWS
Cluster Configurations page.
List the AWS Cluster Configurations
1. Log in to the Workspace as a user with administrator privileges.
2. To open the Admin view, on the top-right corner choose Switch to Admin View.
3. Under the Manage section in the left menu, select AWS Cluster Configurations.
Register an AWS Cluster Configuration
Note
Before registering an AWS ParallelCluster configuration, make sure it complies with the
HPC Connector requirements. For more information, see AWS ParallelCluster configuration
requirements.
1. Log in to the Workspace as a user with administrator privileges.
2. To open the Admin’s portal, on the top-right corner choose Switch to Admin View.
3. Under the Manage section in the left menu, select AWS Cluster Configurations.
The list of the cluster configurations is displayed in the table.
4. Choose Register at the top of the table.
5. In the Register Cluster Configuration box, fill in the fields:
• AWS ParallelCluster configuration — Choose between “Upload file” and “Paste text”
• Upload file — Select a valid AWS ParallelCluster configuration file
• Paste text — Enter a valid AWS ParallelCluster configuration file in the textbox.
6. Choose Register.
AWS ParallelCluster configuration requirements 149

EnginFrame Administrator Guide ***Unable to locate subtitle***
Rename an AWS Cluster Configuration
• Log in to the Workspace as a user with administrator privileges.
• To open the Admin’s portal, on the top-right corner choose Switch to Admin View.
• Under the Manage section in the left menu, select AWS Cluster Configurations.
The list of the cluster configurations is displayed in the table.
• Select the Actions drop-down menu on your chosen configuration.
• Choose Rename.
• Add the new configuration name.
• Choose Rename to submit the new name. The new name will be visible in the configuration list
after a few moments.
Delete an AWS Cluster Configuration
• Log in to the Workspace as a user with administrator privileges.
• To open the Admin’s portal, on the top-right corner choose Switch to Admin View.
• Under the Manage section in the left menu, select AWS Cluster Configurations.
The list of the cluster configurations is displayed in the table.
• Select the Actions menu on your chosen configuration.
• Choose Delete action from the dropdown.
• Choose OK to confirm deletion. The configuration will be removed from the configuration list
after a few moments.
Start a new cluster from an AWS Cluster Configuration
• Log in to the Workspace as a user with administrator privileges.
• To open the Admin’s portal, on the top-right corner choose Switch to Admin View.
• Under the Manage section in the left menu, select AWS Cluster Configurations.
The list of the cluster configurations is displayed in the table.
• Select the Actions menu on your chosen configuration.
• Choose Create Cluster action from the menu.
• Enter the Cluster Name field with your preferred cluster name.
AWS ParallelCluster configuration requirements 150

EnginFrame Administrator Guide ***Unable to locate subtitle***
• For User Mode, choose Single user or Multi User 1:1.
• Choose Create to submit the cluster creation.
• Creating the new cluster might require a few minutes. During that time, the state of the cluster
in the cluster list page will change upon refresh. When a cluster is ready to be used its status will
transition to Ready on the Clusters page.
Clusters page
The Clusters view contains all the clusters from all the grid managers that are linked to
EnginFrame. For each cluster, we show the name, the scheduler, the type (Local or AWS Cloud), the
list of available queues, and the cluster status. Only clusters with the status Ready can serve traffic
and be used for job submission.
By choosing the Actions arrow that appears hovering on a row, some functionalities are shown on
clusters with type AWS Cloud. Depending on the state of the cluster, you can choose one or more
actions between Start, Stop, Delete, Rename, and Share.
• The Start action is used to start the head node of a specific cluster.
• The Stop action is used to stop the head node of a specific cluster. A stopped cluster can't serve
traffic until it is started again.
• The Delete action is used to completely delete all the resources related to the cluster itself.
After a cluster is deleted, it isn't possible to recover it. A new cluster must be created from the
same configuration. Take extra caution when deleting a cluster, and ensure that data has been
appropriately synced prior to deleting a cluster.
• The Rename action is used to redefine the label associated with the cluster. This label is used
to refer to the cluster in other EnginFrame views, such as the Service Editor list. Changing the
cluster label doesn't affect the cluster operation or the related AWS CloudFormation stack.
Changing the label automatically updates any service that had previously referred to it as well.
• The Share action gives visibility of a cluster to a specific set of user or groups. By default, only
Administrators can see AWS Cloud clusters. When choosing Share, a dialog opens where you
can select which users can submit jobs on the cluster. After choosing Share, the previous share
settings are overridden. More specifically, you can choose one of the following options:
• Only Administrators
• All Users
• Selected groups (here you must select one or more of the groups that you see in the specific
area of the dialog.)
AWS ParallelCluster configuration requirements 151

EnginFrame Administrator Guide ***Unable to locate subtitle***
List the existing clusters
1. Log in to the Workspace portal as a user with administrator privileges.
2. In the menu, select Switch to Admin View.
3. In the navigation pane, under Infrastructure, select Clusters.
If the cluster is an AWS ParallelCluster cluster, its type is AWS Cloud. The allowed actions might
vary based on the type and current status of the cluster.
Start a cluster
• Log in to the Workspace portal as a user with administrator privileges.
• In the menu, select Switch to Admin View.
• In the navigation pane, under Infrastructure, select Clusters.
• Select the Actions menu on your chosen configuration.
• Choose Start.
After the Start action is selected, users can't see the cluster in their list until the cluster
transitions into the Ready state.
Stop a cluster
• Log in to the Workspace portal as a user with administrator privileges.
• In the menu, select Switch to Admin View.
• In the navigation pane, under Infrastructure, select Clusters.
• Select the Actions menu on your chosen configuration.
• Choose Stop.
The cluster isn't available to the users immediately. After a few moments, it transitions into the
Stopped state.
Delete a cluster
• Log in to the Workspace portal as a user with administrator privileges.
• In the menu, select Switch to Admin View.
AWS ParallelCluster configuration requirements 152

EnginFrame Administrator Guide ***Unable to locate subtitle***
• In the navigation pane, under Infrastructure, select Clusters.
• Select the Actions menu on your chosen configuration.
• Choose Delete.
Note
The cluster must be in a Stopped state before it's deleted.
• Choose Yes on the confirmation dialog.
• The selected cluster is deleted after a few minutes, and all its resources are removed. After this
is complete, the cluster transitions into the Deleted state. By default, the entry is removed from
the list after one day.
Share a cluster
• Log in to the Workspace portal as a user with administrator privileges.
• In the menu, select Switch to Admin View.
• In the navigation pane, under Infrastructure, select Clusters.
• Select the Actions menu on your chosen configuration.
• Choose Share.
A window opens where you can select users to share the cluster with.
• Specify the users to share the cluster with: Only Administrators, All Users, or Selected Groups.
• Choose Save.
When the dialog is closed, the new configuration is applied to the cluster, and it's visible to the
specified users or groups depending on its state.
Note
Only clusters in the Ready state are visible to the users.
Rename a cluster
• Log in to the Workspace portal as a user with administrator privileges.
AWS ParallelCluster configuration requirements 153

EnginFrame Administrator Guide ***Unable to locate subtitle***
• In the menu, select Switch to Admin View.
• In the navigation pane, under Infrastructure, select Clusters.
• Select the Actions menu on your chosen configuration.
• Choose Rename.
• Enter a new cluster name in the window.
• Choose Rename.
• The list of clusters is updated after a few moments with the new name chosen for the cluster.
• In the Rename Cluster box, enter the preferred name in the Cluster Name field.
• Choose Rename.
Current limitations
HPC Connector supports only jobs that are related to the same cluster in a spooler.
Managing jobs
To manage a job using HPC Connector, you must specify the cluster where you want to submit
a given job. For this purpose, the service editor allows users to select a cluster by means of the
cluster list component. The component shows the list of clusters that are shared with a given user.
On the action script part of your service, the usual application.submit action is required
to have a --cluster option where the selected cluster can be specified. For HPC Connector to
submit jobs remotely, the --jobmanager parameter must be set to the hpc value.
AWS ParallelCluster configuration requirements 154

EnginFrame Administrator Guide ***Unable to locate subtitle***
A cluster can be specified programmatically using the cluster ID rather than the name. The cluster
ID information is available in the details page of a cluster. This page is reachable by selecting the
name for a given cluster in the clusters page.
Validating a remote job submission
HPC Connector has a mechanism that copies the local data that's required to submit a job
remotely. However, this mechanism is limited to the use of small files, which can't exceed 100MB
overall.
If you run jobs with different requirements in terms of file size, a different approach is required
depending on the specific scenario. AWS provides several solutions for synchronizing data on-
premises remotely. Solutions such as AWS DataSync or AWS Storage GateWay, for example, can be
used for creating tailor made solutions.
Regardless of the synchronization approach adopted, it might happen that the content required
on the cloud isn't up to date with the equivalent content on-premises due to eventual consistency.
In these scenarios, it's useful for a service to fail fast upon a validation check performed before
submitting the job to a remote cluster.
The HPCC_VALIDATION_SCRIPT_PATH environment variable allows administrators to specify
the path of an executable that is launched before a job is submitted remotely. The executable has
access to all the environment set for the job and therefore can validate if a given job has all the
necessary resources for running properly: project files, users, permissions.
A validation script is required to return one of two states.
•
SUCCESS indicates that the validation succeeded and that the job is therefore allowed to
continue its submission process remotely.
•
FAILURE indicates an issue in the synchronization and cancels the job submission. A canceled job
can then be repeated by the user at a later time.
Any value that's returned different from SUCCESS or FAILURE is interpreted by HPC Connector as
a failure and HPC Connector cancels the job submission.
Note
The validation script is meant to perform only a validation of the requirements for job
submission. It's not meant as a way for transferring data from on-premises. Due to its
scope, it's meant to be run in a short timeframe that's no more than 10 seconds. Having a
AWS ParallelCluster configuration requirements 155

EnginFrame Administrator Guide ***Unable to locate subtitle***
validation script that takes near to the 10 second quota to run might cause performance
issue in EnginFrame that impacts the whole system.
Customizing logging
Logging is an integral component to any software development project. During the development
stages it offers a valuable source of debugging information for the developer. During deployment
it can provide valuable operational data that allows administrators to diagnose problems as they
arise.
Tomcat® logging
EnginFrame comes with Apache Tomcat® servlet container. Tomcat® log files are the first source
of information concerning EnginFrame's status. Log files are located on EnginFrame Server's host
under $EF_TOP/logs/<HOSTNAME>/tomcat.
These are the most interesting log files:
•
catalina.out
Contains Tomcat®'s Java™ process standard output and standard error. Tomcat® startup and
shutdown messages are written here.
•
catalina.[yyyy]-[mm]-[dd].log
Contains Tomcat®'s and its libraries logging information on a day-by-day basis.
•
localhost_access_log.[yyyy]-[mm]-[dd].txt
Contains all web accesses on a day-by-day basis. Any resource served by Tomcat is logged here
with information about the amount of transferred data. Also HTTP status codes like 404 Not
Found, 403 Forbidden are logged here.
•
enginframe.[yyyy]-[mm]-[dd].log
Contains Tomcat®'s error logs about EnginFrame Portal not caught by EnginFrame itself.
The standard Tomcat® configuration fits the most common installations. In case of specific needs
you can modify the default $EF_TOP/<VERSION>/enginframe/conf/logging.properties
configuration. Refer to the official Tomcat® documentation fore more details.
Customizing logging 156

EnginFrame Administrator Guide ***Unable to locate subtitle***
EnginFrame server and agent logging
Topics
• Configuration files
• Apache® Log4j2 log configuration
• Change log file locations
• Change log file size and the rotation policy
• Change log level
• Fine tune logging
Configuration files
The default logging configurations are located under $EF_TOP/<VERSION>/enginframe/conf:
•
log.server.xconf
Contains server's configuration.
•
log.agent.xconf
Contains agent's configuration.
Both are XML files with the same syntax.
In case you need to modify the defaults, you can specify a new configuration in the
log.server.xconf and log.agent.xconf files under the configuration directory $EF_TOP/
conf/enginframe.
In these files you can configure the location where you store log files, their verbosity level, and
rotation policies. By default, EnginFrame is configured to write only warning and error messages
and to keep a history of 4 log files with a 10 MB maximum size.
The log's default location is under $EF_TOP/logs/<HOSTNAME> on server and agent hosts:
•
ef.log
Contains the server's logging. It also contains the local agent's logs. It is located on server's host.
•
agent.remote.stdout
EnginFrame server and agent logging 157

EnginFrame Administrator Guide ***Unable to locate subtitle***
Contains the agent's process standard output. It is located on the agent's host.
•
agent.remote.stderr
Contains the agent's process standard error. It is located on the agent's host.
•
agent.remote.log
Contains the agent's process logging. It is located on the agent's host.
If you need to quickly switch the log configuration to produce verbose logging, you can use
log.server.verbose.xconf and log.agent.verbose.xconf files located in $EF_TOP/
<VERSION>/engifnrame/conf.
You need to backup the previous log.server.xconf and log.agent.xconf files and replace
them with the verbose configurations.
We don't recommend you use a verbose logging configuration when you're in a production
environment. The performance impact of logging can be significant, depending on the logging
threshold that is configured and especially if a large number of users are accessing the portal.
Apache® Log4j2 log configuration
EnginFrame is configured for Apache® Log4j2 logging as described in the following paragraphs.
EnginFrame server Log4j2 logging is configured in ${EF_TOP}/<VERSION>/enginframe/conf/
log4j2.server.xml. By default, logs are written to ${EF_LOGDIR}/ef.log.
EnginFrame agent Log4j2 logging is configured in ${EF_TOP}/<VERSION>/enginframe/conf/
log4j2.agent.xml. By default. logs are written to ${EF_LOGDIR}/agent.remote.log.
Log4j2 log configuration files apply to any EnginFrame internal dependency that uses Log4j2
logging, such as MyBatis or Quartz.
If you need to modify the defaults, you can specify a new configuration in the
log4j2.server.xml and log4j2.agent.xml files under the configuration directory $EF_TOP/
conf/enginframe.
EnginFrame server and agent logging 158

EnginFrame Administrator Guide ***Unable to locate subtitle***
Change log file locations
The EnginFrame logging system gives you complete flexibility on where to store log files. For
example you may want to move log files from their default location to store them on a high speed
file-system or to conform to your company's policies.
The location configuration is done in the <targets> section by setting the <filename> tag. The
text inside this tag represents the path to the log file.
For example this XML text sets ${EF_LOGDIR}/ef.log for the core components:
<targets>
<enginframe id="core">
<filename>${EF_LOGDIR}/ef.log</filename>
...
You can also decide whether to append or overwrite existing files by using the <append> tag.
In the following example the log file will be overwritten on every server restart:
<targets>
<enginframe id="core">
<filename>${EF_LOGDIR}/ef.log</filename>
<append>false</append>
...
Change log file size and the rotation policy
Each EnginFrame Server and EnginFrame Agent is configured to write log files up to 10 MB and
then to create another file to a maximum of 4 files. When a new log file is written the oldest one
is deleted. This configuration guarantees that each server and agent uses no more than 40 MB of
disk space for log files. You may want to change this rotation policy for example because you need
more history. A change may also be helpful if you have increased log verbosity.
Changing the <rotation> tag inside the <targets> section configures the rotation policy. The
max attribute defines the maximum number of files, while the <size> tag contains each file's size.
For example the following XML text defines a rotation of 5 files each one of 5 MB:
<rotation type="revolving" max="5">
<size>5m</size>
EnginFrame server and agent logging 159

EnginFrame Administrator Guide ***Unable to locate subtitle***
</rotation>
Change log level
EnginFrame logging allows to have a fine grain control over which statements are printed. In a
development environment, you might want to enable all logging statements while in a production
environment it is suggested to disable debug messages to avoid performance issues. You can
configure this behavior by setting the appropriate log level. A log level describes the urgency of a
message. Below is a list of log levels that are usable within the EnginFrame logging system:
•
NONE: No messages are emitted.
•
DEBUG: Developer-oriented messages, usually used during development of the product.
•
INFO: Useful information messages such as state changes, client connection, and user login.
•
WARN: A problem or conflict has occurred but it may be recoverable, then again it could be the
start of the system failing.
•
ERROR: A problem has occurred but it is not fatal. The system still functions.
•
FATAL_ERROR: Something caused whole system to fail. This indicates that an administrator
should restart the system and try to fix the problem that caused the failure.
Each logger instance is associated with a log level. This allows you to limit each logger so that
it only displays messages greater than a certain level. So if a DEBUG message occurred and the
logger's log level was WARN, the message would be suppressed.
Changing the log-level attribute of a <category> tag sets log verbosity for the associated
category.
For example, this XML tag defines a default category whose log-level is INFO:
<category name="" log-level="INFO">
<log-target id-ref="core"/>
</category>
Fine tune logging
Define new categories and targets
In a complex system, it's often not enough to suppress logging based on log-level. For
instance, you might want to log the network subsystem with DEBUG log-level while the
EnginFrame server and agent logging 160

EnginFrame Administrator Guide ***Unable to locate subtitle***
simulator subsystem with WARN log-level. To accomplish this EnginFrame uses categories. Each
category is a name, made up of name components separated by a ".". So a category named
"network.interceptor.connected" is made up of three name components "network", "interceptor"
and "connected", ordered from left to right. Every logger is associated with a category at
creation. The left-most name component is the most generic category while the right-most
name component is the most specific. So "network.interceptor.connected" is a child category of
"network.interceptor", which is in turn a child category of "network". There is also a root category
"" that is hidden. The main reason for structuring logging namespace in a hierarchical manner is
to allow inheritance. A logger will inherit its parent log-level if it has not been explicitly set. This
allows you to set the "network" logger to have INFO log-level and unless the "network.interceptor"
has had its log-level set it will inherit the INFO log-level.
Categories send messages to log targets. Decoupling log message generation from handling
allows developers to change destinations of log messages dynamically or via configuration files.
Possible destinations include writing to a database, a file, an IRC channel, a syslog server, an instant
messaging client, etc.
Adding a <category> tag inside the <categories> section defines a new category. You must
specify its name and log-target to which log messages are written. The name of the category
acts like a filter: all messages matching the category name are sent to the specified log-target.
For example, if you want more information from EnginFrame's download component you can use
the category named com.enginframe.server.download:
<category name="com.enginframe.server.download" log-level="DEBUG">
<log-target id-ref="core"/>
</category>
This configuration sends all download messages to the core target.
Another useful category is the deadspooler. The deadspooler category is used by EnginFrame to
write messages concerning spoolers that could not be deleted and were renamed as DEAD. NICE
support team recommends to turn this feature on. There is no overhead and it could be very useful
to know why an EnginFrame spooler could not be deleted. This category is activated by setting its
log-level to INFO:
<category name="deadspooler" log-level="INFO">
<log-target id-ref="deadspooler"/>
</category>
EnginFrame server and agent logging 161

EnginFrame Administrator Guide ***Unable to locate subtitle***
Refer to EnginFrame Administrator Reference for a complete list of categories EnginFrame uses.
Change message format
Log targets that write to a serial or unstructured store (i.e., file-system or network based targets)
need some method to serialize the log message before writing to the store. The most common way
to serialize the log message is to use a formatter.
The format specified consists of a string containing raw text combined with pattern elements. Each
pattern element has the generalized form:
%[+|-]#.#{field:subformat}
•
+|- indicates whether the pattern element should be left or right justified (defaults to left
justified if unspecified.)
•
#.# indicates the minimum and maximum size of output, if unspecified the output is neither
padded nor truncated.
•
field indicates the field to be written and must be one of category, context, user,
message, time, rtime (time relative to start of application), throwable or priority. This
parameter is mandatory.
•
subformat specifies which piece of field is interesting for log messages.
Use the <format> tag to set log message printing.
For example the following code shows format setting for the core target:
<enginframe id="core">
<filename>${EF_LOGDIR}/ef.log</filename>
<format type="enginframe">
%7.7{priority} %5.5{rtime} [%8.8{category}]:%{message}\n%{throwable}
</format>
...
A number of examples for format and actual output follows.
• Example
Format:
EnginFrame server and agent logging 162

EnginFrame Administrator Guide ***Unable to locate subtitle***
%7.7{priority} %5.5{rtime} [%8.8{category}]:%{message}\n%{throwable}
Output:
DEBUG 123 [network.]: This is a debug message
• Example
Format:
%7.7{priority} %5.5{rtime} [%{category}]:%{message}\n
Output:
DEBUG 123 [network.interceptor.connected]: This is a debug message
DEBUG 123 [network]: This is another debug message
• Example
Format:
%7.7{priority} %5.5{rtime} [%10.{category}]:%{message}\n
Output:
DEBUG 123 [network.interceptor.connected]: This is a debug message
DEBUG 123 [network ]: This is another debug message
EnginFrame scriptlet logging
EnginFrame modularity lets developers add new features by deploying their plugins. If your
plugin uses scriptlets, you have the same logging support on which EnginFrame is based. As an
administrator you must know how to set up scriptlet logging for both development and production
environments.
Creating $EF_TOP/<VERSION>/enginframe/plugins/<myplugin>/conf/log.xconf or
$EF_TOP/conf/plugins/<myplugin>/log.xconf on EnginFrame Server's host enables
EnginFrame scriptlet logging 163

EnginFrame Administrator Guide ***Unable to locate subtitle***
scriptlet logging. This file has the same syntax as the ones shipped by EnginFrame under
$EF_TOP/<VERSION>/enginframe/conf, so all the information in EnginFrame server and agent
logging applies here too.
The scriptlet code can emit logging messages with any category and log level.
This is an example configuration file:
<?xml version="1.0"?>
<logkit>
<factories>
<factory
type="enginframe"
class="com.enginframe.common.utils.log.EnginFrameTargetFactory"/>
</factories>
<targets>
<enginframe id="plugin">
<filename>
${EF_LOGDIR}/myplugin.log
</filename>
<format type="enginframe">
%7.7{priority} %5.5{rtime} [%{category}]:%{message}\n
</format>
</enginframe>
</targets>
<categories>
<category name="myplugin" log-level="DEBUG">
<log-target id-ref="plugin"/>
</category>
<category name="" log-level="WARN">
<log-target id-ref="plugin"/>
</category>
</categories>
</logkit>
${EF_LOGDIR}/<myplugin>.log contains the log messages for this configuration. It exposes
only two categories: myplugin and the root one (it is the one that has an empty name.) If your
code uses myplugin category, then it logs DEBUG messages; if your code uses a category that is
not defined, then it logs WARN messages.
EnginFrame scriptlet logging 164

EnginFrame Administrator Guide ***Unable to locate subtitle***
If the plugin log.xconf configuration files don't exist, then EnginFrame defaults to the core
log.server.xconf to define myplugin's logging categories.
EnginFrame licenses
This chapter describes how EnginFrame manages licenses, where license files are located, the
meaning of license fields, how license tokens are counted, and how to check EnginFrame's license
token usage. This information is relevant only when running EnginFrame on an on-premises or
non-EC2 cloud-based server. EnginFrame is licensed for free on EC2. For more information about
EnginFrame licensing, see Obtaining NICE EnginFrame.
License file management
EnginFrame loads its license files from $EF_TOP/license. All files ending with .ef extension are
loaded.
If you want to replace an EnginFrame license while still retaining your previous license,
rename your previous license by changing the .ef extension to something else (for
example, add .OLD extension to the original file). If you don't make this change,
EnginFrame loads the old license. Having two license for the same EnginFrame component
leads to a conflict issue.
The EnginFrame license management system reads licenses dynamically from the file-system, and
can detect any changes you apply to licenses even to recognize if the license files were added or
removed.
Configuring license files location
$EF_TOP/license is the default directory where EnginFrame loads licenses from. This directory
can be changed making EnginFrame load licenses from another location in your file-system.
You can modify EF_LICENSE_PATH parameter inside $EF_TOP/conf/enginframe/
server.conf, and then define an absolute file-system path. This changes the directory
EnginFrame uses to load licenses.
Example: EF_LICENSE_PATH=/mnt/server/ef-licenses
EnginFrame licenses 165

EnginFrame Administrator Guide ***Unable to locate subtitle***
License file format
An EnginFrame license is an XML file that describes one or more EnginFrame licensed components
or plugins. The main component of EnginFrame is EF Base. It activates the core functions of
EnginFrame.
The license fields are the following:
•
product: This field describes the item that's being licensed (for example, EnginFrame PRO)
•
release: A major release of EnginFrame (for example, 2021.0)
•
format: The license file format number (for example, 2.0)
•
component: The component that's being licensed. Example components include EF Base and
webservices.
•
expiration: The license expiration date. The value never indicates a perpetual license.
•
ip: The licensed IP addresses where EnginFrame can be deployed. It can be a single host IP
address, a range of IP addresses, or a list of IP addresses. The license is valid if EnginFrame is
running on one of the mentioned hosts IP addresses.
•
type: The type of license. Valid values are DEMO, YEAR, and FULL.
•
units: The number of license tokens.
•
units-per-user: The number of tokens that EnginFrame locks for each concurrent user.
•
license-hosts: If this value is set to truey, EnginFrame locks a token for each host in the
underlying grid infrastructure.
•
hosts-preemption: If this value is set to true, EnginFrame releases tokens that are received
by hosts for new users that are accessing the system. This happens when all tokens have been
used.
•
signature: The license signature that accounts for all the license fields values.
The following is an example EnginFrame license.
<?xml version="1.0"?>
<ef-licenses>
<ef-license-group product="EnginFrame PRO" release="2017.0" format="2.0">
<ef-license
component="EF Base"
vendor="NICE"
License file format 166

EnginFrame Administrator Guide ***Unable to locate subtitle***
expiration="2017-08-15"
ip="80.20.156.116"
licensee="RnD Team"
type="DEMO"
units="20"
units-per-user="1"
license-hosts="true"
hosts-preemption="true"
signature="..." <!-- Omitted for space -->
/>
</ef-license-group>
</ef-licenses>
License checking
The most important license fields are component, ip, expiration, and units. You can statically
verify the first three fields. These field values depend on your EnginFrame deployment setup:
•
In the following example of a valid license file format, component="EF Base" unlocks
the EnginFrame core. This component is required to unlock other components, such as
webservices, that can be enabled with a dedicated section in the licence file.
<ef-licenses>
<ef-license-group product="EnginFrame HPC PRO" release="2021" format="2.0">
<ef-license
component="EF Base"
vendor="NICE"
expiration="2023-03-31"
ip="*"
licensee="nice-enginframe-dev"
type="DEMO"
units="30"
units-per-user="1"
license-hosts="false"
hosts-preemption="false"
signature="------"
/>
<ef-license
component="webservices"
vendor="NICE"
expiration="2023-03-31"
ip="*"
License checking 167

EnginFrame Administrator Guide ***Unable to locate subtitle***
licensee="nice-enginframe-dev"
type="DEMO"
units="30"
signature="------"
/>
...
</-license-group>
</ef-licenses>
Send questions to <[email protected]> for your requirements and to get help on
understanding which components you actually need to satisfy your goals.
• The IP address depends on EnginFrame's host.
EnginFrame Server's Host IP Address
You must determine EnginFrame Server's host IP address for a valid license.
To verify which IP address is correct for the license request, run the ping `hostname`
command. This returns the hostname and the IP address information.
EnginFrame doesn't allow for loopback IP address, such as 127.0.0.1. If you run a
ping command and it returns a loopback address, you need to configure the host name
resolution for EnginFrame Server. You can configure it either by editing /etc/hosts or
by changing the DNS, NIS, or LDAP configurations.
• Expiration date states how long your license is valid. Evaluation licenses last one month.
However, NICE can release licenses with an validity period that meets your evaluation needs. You
can send a request form on the website where you download EnginFrame or send an email to
• The units field expresses the total number of license tokens.
License token count
Different scenarios have to be considered when EnginFrame counts license tokens. The scenarios
change according to different combinations of some license fields.
License tokens are dynamically used by EnginFrame on the base of system usage and load, such
as the number of concurrent users or the number of hosts in the grid environment accessed
through EnginFrame. When EnginFrame consumes a token, it subtracts it from the total number of
available tokens expressed by the units license field.
License checking 168

EnginFrame Administrator Guide ***Unable to locate subtitle***
Tokens that are acquired by a user are always released after the user logs out of the system or on
his working session expires. When a user logs out or when a session expires, the user's tokens are
released. Tokens acquired by hosts are released only on pre-emption (if expressed in the license, for
the needed amount) or when EnginFrame is restarted (all tokens are released).
The following scenarios depict how EnginFrame acquires and releases license tokens:
1.
license-hosts="true"
hosts-preemption="true"
EnginFrame acquires one token for each concurrent user accessing the system and one token for
each host in the underlying computing environment.
Because pre-emption on hosts tokens is switched on, when all the tokens are used, additional
users logging into system are granted access by reclaiming one token from those acquired by
hosts. The host whose token has been reclaimed is now unlicensed.
If all tokens are used and there are no more tokens to preempt, system access is denied.
Available tokens are dynamically acquired by users or hosts.
EnginFrame doesn't show unlicensed hosts details, such as the kind of host, status, and memory
consumption.
2.
license-hosts="true"
hosts-preemption="false"
As in the previous scenario, EnginFrame acquires one token for each concurrent user accessing
the system and one token for each host in the underlying computing environment.
Differently from the previous scenario, tokens that are used by hosts are never released. Only
restarting EnginFrame resets host's license token status.
When all the tokens are used, the system denies further accesses.
Available tokens are dynamically acquired by users or hosts.
Unlicensed hosts are managed as in the previous scenario.
3.
license-hosts="false"
License checking 169

EnginFrame Administrator Guide ***Unable to locate subtitle***
units-per-user="<n>"
In this scenario, EnginFrame acquires n tokens for each concurrent user where n is a positive
integer. No tokens are acquired by hosts meaning they are all licensed.
This kind of license fits all those cases where you deal with big or growing clusters and it is more
convenient to have a flat license for the number of hosts.
When all the tokens are used by users, the system denies further accesses. If this happens, no
token reclaim occurs because host can't acquire new tokens.
List of licensed hosts
An optional list of licensed hosts for the previous scenarios can be created. This list spares license
tokens though limiting cluster view through EnginFrame.
Create license.hostlist in EF_LICENSE_PATH to declare the list of licensed hosts. The file
must contain the host names, listed one per line. The host names must be reported in the same
way that they are reported by the job scheduler.
This following is a $EF_TOP/license/license.hostlist example.
host-linux1.nice
host-linux2.nice
host-linux3.nice
host-unix1.nice
host-win1.nice
host-win2.nice
Monitoring license usage
License token consumption is an important aspect for an EnginFrame administrator.
The EnginFrame Operational Dashboard provides administrators with an overview of installed
licenses and provide details for used license tokens. Loaded licenses with their field values are
shown as follows.
EnginFrame License Details
Monitoring license usage 170
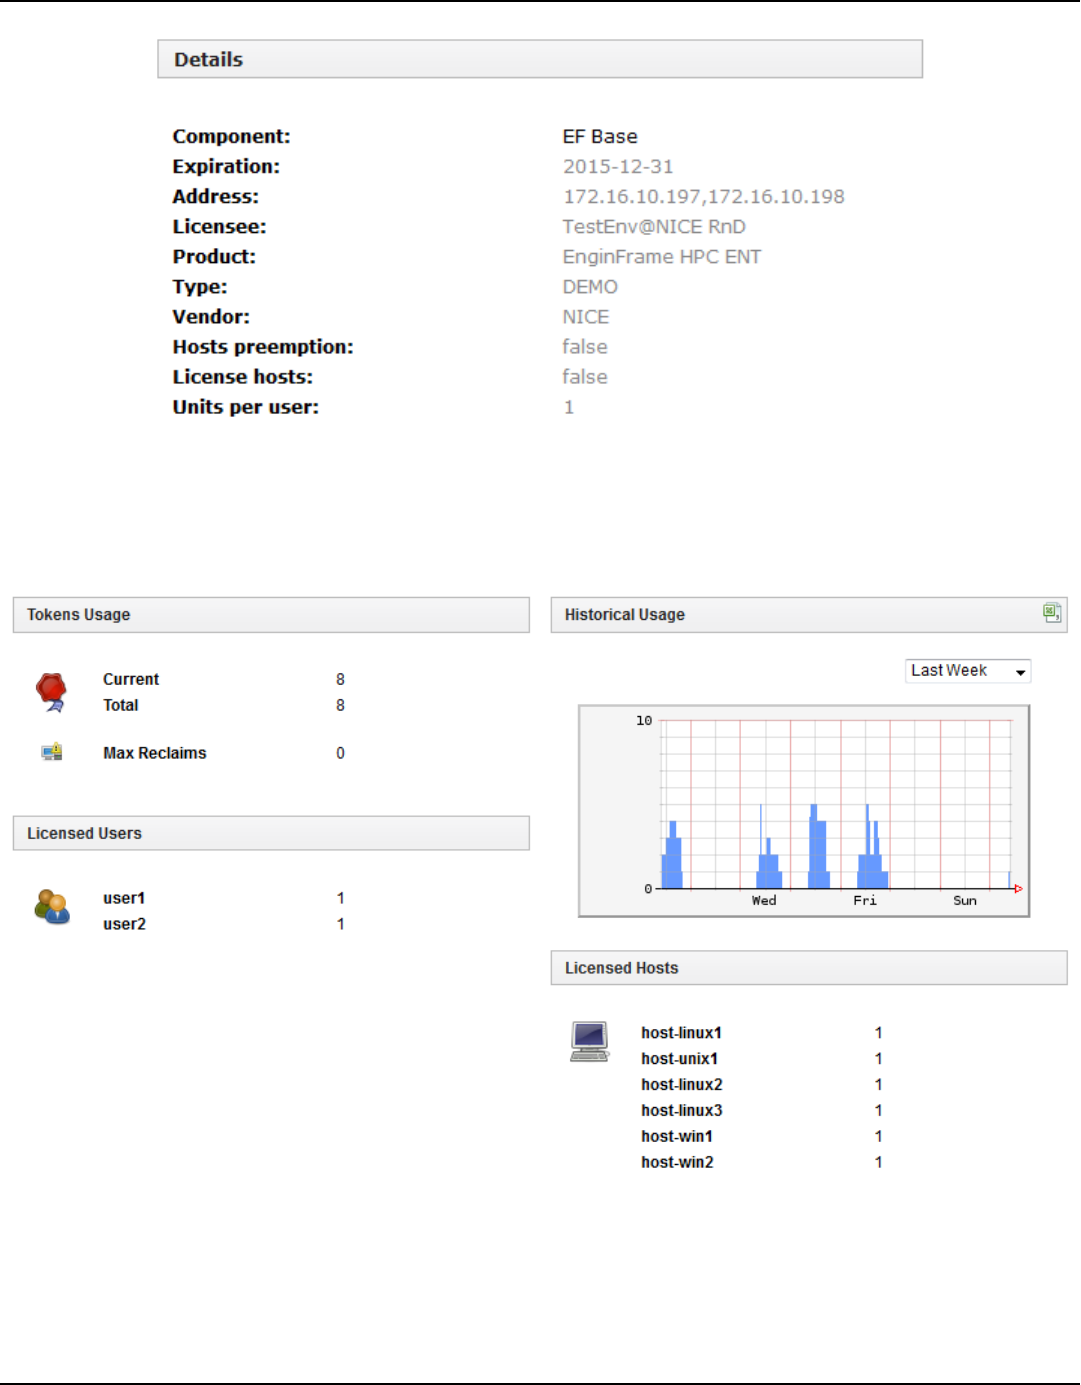
EnginFrame Administrator Guide ***Unable to locate subtitle***
The license token usage details are also provided.
EnginFrame License Tokens Status
You can monitor the total number of used tokens, which users have logged in, and which hosts are
currently licensed. In the preceding example, EnginFrame acquired a license token for all reported
users and hosts.
Monitoring license usage 171

EnginFrame Administrator Guide ***Unable to locate subtitle***
Note
If the same user name connects from two different workstations or browsers at the
same time, an extra token is used as a result. Tokens aren't acquired nominally but on a
concurrent user basis only.
You can also check if there were any token reclaims in the system previously. The value reported is
the maximum number of reclaimed tokens that occurred since EnginFrame's last restart.
EnginFrame License Tokens Status With Reclaims
In the preceding screenshot, there are two token reclaims. In all, there are eight tokens. All eight
tokens were used by six hosts and two users. The next two requests from paolo and aware were
satisfied but required two token reclaims from the hosts.
Enable debug log messages for licenses
If you're experiencing problems with the EnginFrame license system, require support from the NICE
Support Team, or want to check license management details, it is important to enable the license
management module's debug log level.
Monitoring license usage 172

EnginFrame Administrator Guide ***Unable to locate subtitle***
You can enable the license module's debug log level by adding a category to the
log.server.xconf file as shown in the following snippet.
<category name="com.enginframe.common.license" log-level="DEBUG">
<log-target id-ref="core"/>
</category>
Alternatively, use log.server.verbose.xconf. It already has the log level set to DEBUG.
For more information, see Customizing logging.
Troubleshooting
Common issues
This section lists some common issues and the steps to resolve them:
Topics
• Breaking change in AJP Connector configuration from EnginFrame 2019.0-1424
• Interactive service imports using Slurm before and after EnginFrame version 2020.1-r413
• Updating to EnginFrame version 2021.0-r1646 or later
• Updating to EnginFrame version 2021.0-r1653 or later
• Updating Log4j library in EnginFrame
Breaking change in AJP Connector configuration from EnginFrame 2019.0-1424
When updating to 2019.0-1424 or later from a previous version, if AJP Connector is enabled,
EnginFrame might fail to start after a successful upgrade. This is because of a breaking change in
Tomcat starting from version 7.0.100. From Tomcat CHANGELOG:
Rename the requiredSecret attribute of the AJP/1.3 Connector to secret and add a new attribute
secretRequired that defaults to true. When secretRequired is true the AJP/1.3 Connector will not start
unless the secret attribute is configured to a non-null, non-zero length String.
By default, Tomcat expects secret to be configured. If you set a requiredSecret, it's no
longer picked up because of the attribute name change. To confirm an EnginFrame installation
Troubleshooting 173

EnginFrame Administrator Guide ***Unable to locate subtitle***
is impacted by this issue, check the ${EF_LOGDIR}/tomcat/catalina.*.log files for the
presence of the following message:
The AJP Connector is configured with secretRequired="true" but the secret attribute is either null or "".
This combination is not valid.
Resolve the issue in the ${EF_CONF_ROOT}/tomcat/conf/server.xml file, in the AJP Connector
block. Make one of the following changes and then restart:
• If you have a non empty requiredSecret, rename it to secret
• Otherwise, add the parameter secretRequired="false"
Interactive service imports using Slurm before and after EnginFrame version
2020.1-r413
After the release of EnginFrame version 2020.1-r413, you can no longer import interactive services
using Slurm as a grid manager with EnginFrame versions that are earlier than 2020.1-r413. To
resolve this issue, you must create a new interactive service instead of importing one using Slurm.
In addition, after 2020.1-r413, the default interactive services "Linux Desktop" and "Windows
desktop" don't work as-is when using Slurm as a scheduler. To make them work, open them in edit
mode at least one time.
Updating to EnginFrame version 2021.0-r1646 or later
Because Hazelcast is updated by 2 major versions with EnginFrame version 2021.0-r1646, you must
take additional steps before you update EnginFrame to this and later versions.
If you have an EnginFrame Enterprise setup, you must first stop the EnginFrame service in all of the
instances to perform a successful update to EnginFrame versions 2021.0-r1646 or later.
Moreover, if you have a custom hazelcast.xml configuration (modified from the default
configuration), you must do the following before updating to EnginFrame versions 2021.0-r1646
or later:
•
Port the custom hazelcast.xml to the format used by Hazelcast 5 following the relevant
Hazelcast documentation.
•
Copy it over to the $EF_ROOT/conf folder, overwriting the default hazelcast.xml file.
Common issues 174

EnginFrame Administrator Guide ***Unable to locate subtitle***
Updating to EnginFrame version 2021.0-r1653 or later
When performing an update to this version from a previous installation of EnginFrame, you must
make sure that the server.xml file in the tomcat folder /opt/nice/enginframe/conf/
tomcat/conf/server.xml has this line removed since it breaks Tomcat 9:
<Listener className="org.apache.catalina.core.JasperListener"/>
If Tomcat is configured to use HTTPS, make sure you remove the protocol parameter from the
Connector section in the server.xml config file:
<Connector port="{$httpsd_port}" protocol="org.apache.coyote.http11.Http11Protocol"
maxThreads="150" SSLEnabled="true" scheme="https" secure="true"
clientAuth="true" sslProtocol="TLS"
should be:
<Connector port="{$httpsd_port}"
maxThreads="150" SSLEnabled="true" scheme="https" secure="true"
clientAuth="true" sslProtocol="TLS"
Updating Log4j library in EnginFrame
Due to an issue in the Apache Log4j library (CVE: https://www.randori.com/blog/cve-2021-44228)
included in EnginFrame from version 2019.0-r1424 to 2021.0-r1307, NICE recommends that
you upgrade to the latest EnginFrame version available on https://download.enginframe.com or
update the Log4j library in your EnginFrame installation as described in the following instructions:
1.
Identify the EF_TOP and EF_ROOT folder of your EnginFrame installation. For more
information, see Installation directories.
2. Identify the log4j files:
$ find "$EF_TOP" -name log4j*.jar
<EF_ROOT>/agent/log4j-
core-<OLD_VERSION>.jar
<EF_ROOT>/agent/log4j-
api-<OLD_VERSION>.jar
<EF_ROOT>/agent/log4j-1.2-
Common issues 175

EnginFrame Administrator Guide ***Unable to locate subtitle***
api-<OLD_VERSION>.jar
<EF_ROOT>/WEBAPP/WEB-INF/lib/log4j-
core-<OLD_VERSION>.jar
<EF_ROOT>/WEBAPP/WEB-INF/lib/log4j-
api-<OLD_VERSION>.jar
<EF_ROOT>/WEBAPP/WEB-INF/lib/log4j-1.2-api-<OLD_VERSION>.jar
Items highlighted in red represent your values.
3. Stop EnginFrame. For more information, see Running NICE EnginFrame:
$ EF_TOP/bin/enginframe stop
4. Backup the old log4j files to a backup directory of your choice:
$ EF_ROOT=...
BACKUP_AGENT_DIR=/tmp/backup/agent
BACKUP_SERVER_DIR=/tmp/backup/server
mkdir -p $BACKUP_AGENT_DIR
mkdir -p $BACKUP_SERVER_DIR
mv $EF_ROOT/agent/log4j-core-<OLD_VERSION>.jar $BACKUP_AGENT_DIR
mv $EF_ROOT/agent/log4j-api-<OLD_VERSION>.jar $BACKUP_AGENT_DIR
mv $EF_ROOT/agent/log4j-1.2-api-<OLD_VERSION>.jar $BACKUP_AGENT_DIR
mv $EF_ROOT/WEBAPP/WEB-INF/lib/log4j-core-<OLD_VERSION>.jar $BACKUP_SERVER_DIR
mv $EF_ROOT/WEBAPP/WEB-INF/lib/log4j-api-<OLD_VERSION>.jar $BACKUP_SERVER_DIR
mv $EF_ROOT/WEBAPP/WEB-INF/lib/log4j-1.2-api-<OLD_VERSION>.jar $BACKUP_SERVER_DIR
5.
Download and expand the Log4j tar.gz you want to update to from https://
logging.apache.org/log4j/2.x/download.html. It's essential that you verify the integrity of the
downloaded files using the PGP and SHA512 signatures, as suggested by the download page
of Apache Log4j.
6. Copy the following jar files from the downloaded package to the EnginFrame folder:
$ DOWNLOADED=apache-log4j-<NEW_VERSION>.0-bin
cp $DOWNLOADED/log4j-core-<NEW_VERSION>.jar $EF_ROOT/agent/
cp $DOWNLOADED/log4j-api-<NEW_VERSION>.jar $EF_ROOT/agent/
cp $DOWNLOADED/log4j-1.2-api-<NEW_VERSION>.jar $EF_ROOT/agent/
cp $DOWNLOADED/log4j-core-<NEW_VERSION>.jar $EF_ROOT/WEBAPP/WEB-INF/lib/
cp $DOWNLOADED/log4j-api-<NEW_VERSION>.jar $EF_ROOT/WEBAPP/WEB-INF/lib/
cp $DOWNLOADED/log4j-1.2-api-<NEW_VERSION>.jar $EF_ROOT/WEBAPP/WEB-INF/lib/
7. Start EnginFrame. For more information, see Running NICE EnginFrame:
Common issues 176

EnginFrame Administrator Guide ***Unable to locate subtitle***
$ EF_TOP/bin/enginframe start
Pushing metrics to external monitoring tools
EnginFrame can push its metrics to external monitoring tools through StatsD. StatsD is a network
daemon that runs on the Node.js platform and listens for statistics that are provided by tools such
as counters and timers. StatsD sends aggregates to one or more pluggable backend services, such
as Amazon™ CloudWatch.
Supported monitoring tools
We support every monitoring tool that implements the StatsD backend service to forward metrics.
For more information about available StatsD backend services, see Supported Backends in the
StatsD README on the GitHub website.
Prerequisites
The following are required to configure EnginFrame to use StatsD to push metrics to an external
monitoring tool.
• A monitoring tool that StatsD supports.
• A running StatsD instance that's configured to forward metrics to the monitoring tools in use.
StatsD must be configured to use User Datagram Protocol (UDP). This is the default option. For
more information about configuring StatsD, see Installation and Configuration in the StatsD
README on the GitHub website.
Configuration
To configure EnginFrame to push metrics to a StatsD instance, you must configure the
STATSD_ADDR and STATSD_PORT variables. These are located in the following configuration file:
$EF_ROOT/plugins/admin/conf/admin.statistics.efconf.
In the following example configuration, StatsD is run locally on port 8125.
##########################################################################
# StatsD Server Configuration
Pushing metrics 177

EnginFrame Administrator Guide ***Unable to locate subtitle***
##########################################################################
STATSD_ADDR=localhost
STATSD_PORT=8125
Troubleshooting
EnginFrame provides the $EF_LOGDIR/admin.log log file. You can use it to troubleshoot and
diagnose errors.
Troubleshooting 178

EnginFrame Administrator Guide ***Unable to locate subtitle***
Security
Topics
• Authentication framework
• Authorization system
• Configuring HTTPS
• Configuring SSL/TLS for Hazelcast
Authentication framework
The EnginFrame authentication framework supports a variety of different authentication methods.
You can easily write your own custom mechanism to authenticate users when standard methods
don't meet your specific requirements.
Standard EnginFrame authentication authorities
When you install EnginFrame, the following built-in authentication mechanisms are available:
• Pluggable authentication modules (PAM)
• Lightweight Delivery Access Protocol (LDAP)
• HTTP authentication
• Active Directory (AD) authentication
• Certificate-based authentication
Default authentication authority
When you install EnginFrame, you choose what authentication method you want to be the default
authentication method that's used to access services. You can change this setting later on. To
change it, change the EF_DEFAULT_AUTHORITY property setting in the server.conf config file.
For example, to set the default authentication method to PAM, change the relevant line to the
following: EF_DEFAULT_AUTHORITY=pam.
The default authentication method that you set when you installed EnginFrame is used by all the
services that have the ef:agent's authority attribute set to ${EF_DEFAULT_AUTHORITY}. This is
shown in the following example.
Authentication framework 179

EnginFrame Administrator Guide ***Unable to locate subtitle***
<ef:agent xmlns:ef="http://www.enginframe.com/2000/EnginFrame"
id="tutorial"
authority="${EF_DEFAULT_AUTHORITY}">
You can set the authentication authority at the ef:service level to override the default
authentication method that you chose when you installed EnginFrame. The default authentication
authority that you chose is defined in the root ef:agent tag.
User mapping
Users can log in to the EnginFrame portal with a username that's different from that of their
account in the underlying computing environment, when you configure EnginFrame user mapping.
User mapping works by mapping usernames provided at login time to usernames in the underlying
operating system.
For example, the user John Smith can log into the EnginFrame Portal using by entering John
Smith and submit a job that's run as the user jsmith on the underlying Unix computing
environment.
In some cases, user mapping can also be used to map different users of the portal to the same
system account, or to map the same user to different accounts on separate systems.
Mapping root Account
You can't map users to the root account.
All of the authentication modules that are built-in and available when you install EnginFrame
support user mapping.
To enable user mapping, complete the following steps:
1.
In the $EF_TOP/conf/plugins/<authority>/ef.auth.conf config file, set the
EFAUTH_USERMAPPING parameter to true.
2.
In the EF_ROOT/plugins/<authority>/bin directory of the authentication module, add a
script that's named ef.user.mapping.
3.
Set the ownership of the ef.user.mapping file to root:root and its permissions to 755
(rwxr-xr-x).
User mapping 180

EnginFrame Administrator Guide ***Unable to locate subtitle***
The ef.user.mapping script must output the mapped username for the user that's being
authenticated.
In the following example, ef.user.mapping maps all the portal users to the unique jsmith user.
#!/bin/sh
echo “jsmith”
In the following example, user mapping involves reading a file where each line specifies a mapping
using the Login Name=username format.
For example, a file that's named EF_ROOT/plugins/<authority>/conf/user.mapping
contains the following.
# simple mapping file
#
# Syntax: loginname=unixaccount
#
Lucy Johnson=ljohnson
John Smith=jsmith
In this example, the ef.user.mapping script attempts to match the name that's provided by
the user during login with the ones that are present on the left-hand side of the equal sign in
the user.mapping file. Then, as shown in the following output, it maps it to the corresponding
account name on the right-hand side of the equal sign.
#!/bin/sh
# read login name from command line
_loginname="$1"
# mapping file
_mappingfile=`dirname "$0"`"/../conf/user.mapping"
# transform login name so it can be used by sed in a safe way
_happysed=`echo "${_loginname}" | sed \
-e 's#\\\\#\\\\\\\\#g' \
-e 's#/#\\\\/#g' \
User mapping 181

EnginFrame Administrator Guide ***Unable to locate subtitle***
-e 's/\\./\\\\./g' \
-e 's/\\[/\\\\[/g'
`
# extract mapped unix account
_mapping=`sed -n 's/^'"${_happysed}"'=\(.*\)$/\1/p' "${_mappingfile}"`
# check with case insensitive flag if necessary
if [ -z "${_mapping}" ] ; then
_mapping=`sed -n 's/^'"${_happysed}"'=\(.*\)$/\1/pi' "${_mappingfile}"`
fi
# print first result
if [ -n "${_mapping}" ] ; then
echo "${_mapping}" | sed 'q'
else
exit 1
fi
With user mapping, an administrator can log in as an emulated user that's experiencing issues
in a running production environment for testing purposes. This can be accomplished without
compromising other accounts. With the following simple example ef.user.mapping file, a user
named user1 takes on the identity of user2 without impacting other user accounts.
#!/bin/bash
if [["$1"==user1]] ; then
echo "user2"
else
echo "$1"
fi
Configuring the NICE EnginFrame authentication authorities
Besides the user mapping feature that's described in the previous section, the authentication
authorities that are provided when you install EnginFrame have additional configuration
parameters that can be changed to tailor the authentication process to your environment.
Topics
• PAM authentication
• LDAP authentication
• Active Directory authentication
Configuring the NICE EnginFrame authentication authorities 182

EnginFrame Administrator Guide ***Unable to locate subtitle***
• Using signed certificates with EnginFrame
• Certificate authentication
PAM authentication
The pluggable authentication modules (PAM) authority authenticates a user using the PAM method
of the Operating System.
The PAM_SERVICE parameter in the $EF_TOP/conf/plugins/pam/ef.auth.conf file on your
Agent host specifies which PAM service is used for the authentication.
LDAP authentication
This authority authenticates users querying a LDAP database. You can configure the settings in the
$EF_TOP/conf/plugins/ldap/ef.auth.conf config file on your Agent host. You can specify
the location of the LDAP server to use and customize database access.
The following parameters are available:
•
LDAP_LDAPSEARCH: the absolute path to the ldapsearch executable
•
LDAP_SERVER: LDAP Server name or IP address
•
LDAP_PORT: LDAP Server port
•
LDAP_BASE: the base DN (Distinguished Name) that's used for the search operation in the LDAP
database
Active Directory authentication
This authentication authority authenticates users querying an Active Directory database. You can
configure the settings in the $EF_TOP/conf/plugins/activedirectory/ef.auth.conf
config file on your Agent host. You can specify the location of the Active Directory server to use
and customize database access.
The following parameters are available:
•
AD_LDAPSEARCH: the absolute path to the ldapsearch executable
•
AD_SERVER: LDAP Server name or IP address
•
AD_PORT: LDAP Server port
Configuring the NICE EnginFrame authentication authorities 183

EnginFrame Administrator Guide ***Unable to locate subtitle***
•
AD_BASE: the base DN (Distinguished Name) for the search operation in the Active Directory
database
•
AD_BINDAS: the user that has permissions to bind to an Active Directory Server for queries
•
AD_BINDPWD: the password for a user binding to an Active Directory Server
Using signed certificates with EnginFrame
HTTP authentication is different from the other EnginFrame authentication methods: HTTP
authentication is accomplished by the Web Server.
After the user is authenticated by the Web Server, the EnginFrame HTTP authentication authority
allows you to perform some initialization steps. Specifically, it allows you to use the EnginFrame
user mapping feature that was mentioned in the User mapping section. You can use this feature to
map the EnginFrame Portal users to the underlying operating system usernames.
Tip
When using HTTP authentication, in the case that you need to configure a user mapping
that retrieves information from an LDAP Server, we recommend that you use the openldap
software.
Certificate authentication
The certificate authority (CA) relies on X.509 certificates to encrypt the channel, check the client's
identity, and authenticate users.
The EnginFrame web server must be configured to use X.509 certificates for HTTPS channel
encryption and client authentication. EnginFrame uses a certificate authority to authenticate a
user. You can configure either the Apache Tomcat® web server provided with EnginFrame, or an
external web server such as Apache® Web Server connected to NICE EnginFrame Tomcat® with AJP
connector to use certificates. For more information, see Configuring HTTPS.
For a client to authenticate to EnginFrame, the client must provide a valid certificate the web
server recognizes and trusts, and a username to be used by EnginFrame to log in with.
EnginFrame can be configured to retrieve the username from the first Common Name (CN) field
of the Distinguished Name (DN) certificate property or from the HTTP request parameter named
_username.
Configuring the NICE EnginFrame authentication authorities 184

EnginFrame Administrator Guide ***Unable to locate subtitle***
authorization.certificate.userCertificate is that parameter that's used to configure
where EnginFrame looks for the client username. It's in the server.conf config file. If this
parameter is set true, the username is retrieved from the CN field of the DN in the client
certificate. If this parameter is set to false, the username is retrieved from the client HTTP
authentication request.
With the Certificate authority, like other authentication authorities, it's possible to use the user
mapping feature that was mentioned in the User mapping section. This allows EnginFrame
Portalusers to be mapped to underlying operating system usernames.
Custom authentication authority
If none of the standard mechanisms included in EnginFrame meet your specific requirements, you
can create your own authentication algorithm.
The process of writing a custom EnginFrame authentication module involves the development of
the following components:
•
The EF_ROOT/plugins/<authority>/etc/<authority>.login file. This file is used to
specify the fields the users enter for authentication. Afterwards, the field values are passed to
the following authentication module at login time.
•
The EF_ROOT/plugins/<authority>/bin/ef.auth authentication module script. It receives
the authentication field values that the user entered as input and completes the authentication.
After the new authority is ready, it can be used in the authority attribute for ef:agent and
ef:service tags in the service definition file (SDF).
Warning
If one of the authentication authorities that's included in EnginFrame doesn't quite meet
your specific requirements, do not modify EnginFrame system files. Rather, create your own
authority. You can use the authentication authorities that are provided with EnginFrame as
a starting point.
It's important to note that modifying one or more of the EnginFrame system files might
corrupt the system. We strongly recommend that you do not modify EnginFrame system
files. Only modify EnginFrame system files at your own risk. NICE and its partners do not
respond for EnginFrame unresponsiveness if a system file has been modified. Understand
also that a future EnginFrame update might override your modifications without warning.
Custom authentication authority 185

EnginFrame Administrator Guide ***Unable to locate subtitle***
The <authority>.login file
This XML file defines the authentication parameters that are required by the authentication script
to check user credentials.
This file specifies the information (including the username, token, and password) and prompts for
the logon pages that are associated with the authentication module.
The login file must match the authority name, that is, the name that will be used in the
EnginFrame SDF. It must also be located under the EF_ROOT/plugins/<authority>/etc
directory. For security reasons, the file ownership must be set to root:root and its permissions
must be 644 (rw-r--r--).
For example, the login file for authority PAM must be: EF_ROOT/plugins/pam/etc/pam.login
The <authority>.login file has the following structure:
<ef:login title="login_form_title"
xmlns:ef="http://www.enginframe.com/2000/EnginFrame">;
<ef:signature label="login_field_label"
type="text|password"
id="authentication_parameter_name" />;
<!-- [<ef:signature ... />] -->
</ef:login>
The following example is taken from the PAM authority:
<ef:login title="Login to EnginFrame">
<ef:signature label="Username: "
type="text"
id="_username"/>
<ef:signature label="Password: "
type="password"
id="_password"/>
</ef:login>
The ef:login entry corresponds to an authentication HTML page. Referring to the example, the
HTML logon page asks users to enter a text token (the username) and a password.
Custom authentication authority 186

EnginFrame Administrator Guide ***Unable to locate subtitle***
Note
We strongly recommend that you use the authentication parameters <ef:signature>
with id=_username and id=_password (the <ef:signature> tags of the pam.login
example). Otherwise, you must include <ef:user-mapping> in the <authority>.login
file to provide the outputs that EnginFrame needs retrieve the username.
For more information about the XML format that's used by the <authority>.login file, see
EnginFrame Administrator Reference.
The ef.auth File
The script ef.auth actually implements the authentication procedure.
It must reside under the directory EF_ROOT/plugins/<authority>/bin. The <authority> must
match the authority name that will be used in the EnginFrame SDF. For security reasons, the file
ownership must be set to root:root and its permissions must be set to 755 (rwxr-xr-x).
For example, the authentication script for the LDAP authority is EF_ROOT/plugins/ldap/bin/
ef.auth.
The authentication script receives as input the login form parameters values that the user entered.
Such values, separated by '\0' character (ASCII code 0), are directly passed to the ef.auth script in
the same order that they're defined in the <authority>.login file.
Consider the PAM authentication authority as an example. When a user that's named demo with a
password secret logs into EnginFrame, the string demo\0secret\0 is passed to the ef.auth
script.
The authentication script checks the credentials passed as input and writes the response to the
standard output. If the credential check was successful, the response is as follows:
<?xml version="1.0"?>
<ef:auth xmlns:ef="http://www.enginframe.com/2000/EnginFrame">
<ef:result>
<ef:grant />
</ef:result>
</ef:auth>
Custom authentication authority 187

EnginFrame Administrator Guide ***Unable to locate subtitle***
If it isn't successful, the response is as follows:
<?xml version="1.0"?>
<ef:auth xmlns:ef="http://www.enginframe.com/2000/EnginFrame">
<ef:result>
<ef:deny />
</ef:result>
<ef:error> <!-- Not mandatory -->
<ef:message>error_message</ef:message>
</ef:error>
</ef:auth>
If the credential check was successful and you have configured user mapping for your custom
authentication authority, the ef:user-mapping tag is included in the ef.auth script output:
<?xml version="1.0"?>
<ef:auth xmlns:ef="http://www.enginframe.com/2000/EnginFrame">
<ef:result>
<ef:grant />
<ef:user-mapping name="target_username"
</ef:result>
</ef:auth>
target_username is the username that's used on the underlying operating system.
We recommend that you move the user mapping logic to a separate script that can be changed
without editing ef.auth itself. The authentication modules that are built into EnginFrame follow
the convention of using the EF_ROOT/plugins/<authority>/bin/ef.user.mapping script.
For more information, see User mapping.
If you move the user mapping logic to a separate script, your ef.auth script has the following
structure:
[Get credentials]
[Verify credentials]
Custom authentication authority 188

EnginFrame Administrator Guide ***Unable to locate subtitle***
[If User is authenticated]
ACTUAL_USERID=[Custom User Mapping procedure]
[Emit]
<?xml version="1.0"?>
<ef:auth xmlns:ef="http://www.enginframe.com/2000/EnginFrame">
<ef:grant/>
<ef:user-mapping name="$ACTUAL_USERID"/>
</ef:auth>
[end]
[end]
Authorization system
You can use the EnginFrame Authorization System to control which users can access the
EnginFrame resources based on policies that you set. Through these policies, you can grant or deny
a user access to specific resources or to do specific operations.
In the EnginFrame Authorization System, users and groups are called Actors, resources are divided
into EnginFrame service definition files (SDF) folders, services, service options, service actions and
service output, and the policies define the permissions that are specified using access control lists
(ACL).
The authorization framework defines who can do what on which resources. By configuring the
authorization system, you can give different views of the EnginFrame Portal to different users and
user groups.
Configuring authorization
EnginFrame authorization settings are specified in the following configuration files. The ACLs and
Actors that are defined in all of them are merged. If there are multiple definitions of the same ACLs
or Actors, the following file priority is used to resolve conflicts, from highest to lowest priority.
•
$EF_TOP/conf/enginframe/authorization.xconf (highest priority)
•
$EF_TOP/<VERSION>/enginframe/conf/authorization.xconf (medium priority)
•
$EF_TOP/conf/plugins/<plug-in>/authorization.xconf (low priority)
•
$EF_TOP/<VERSION>/enginframe/plugins/<plug-in>/conf/authorization.xconf
(lowest priority)
Authorization system 189

EnginFrame Administrator Guide ***Unable to locate subtitle***
Modifications to these files are automatically picked up by a running EnginFrame Server, without
requiring a restart.
The authorization.xconf file is an XML file consisting of two sections:
•
An Actors section that's introduced with the tag <ef:acl-actor-list>
•
An Access Control Lists section that starts with the tag <ef:acl-list>
<ef:authorization>
<!-- EnginFrame Authorization Actors section -->
<ef:acl-actor-list>
...
</ef:acl-actor-list>
<!-- EnginFrame Authorization ACL section -->
<ef:acl-list>
...
</ef:acl-list>
</ef:authorization>
Topics
• Defining Actors
• Defining access control lists
• Condition based ACL
Defining Actors
Actors are entities that can perform actions on resources. In the EnginFrame infrastructure an Actor
can be a user, a group of users, or a group of groups of users.
Because an Actor can be a single user or a group, we refer to each component using the term
member.
There are three ways to define an Actor:
• efgroup Actor is an explicit list of members. It can contain one or more users or even other Actors
already defined.
• osgroup Actor is a list of members that includes the users that belong to the Operating System
group that also has the same ID as the Actors associated with it.
Configuring authorization 190

EnginFrame Administrator Guide ***Unable to locate subtitle***
• user Actor is an actor for a single EnginFrame user. It exists just for "renaming" purposes because
usually there's no need to wrap an EnginFrame user ID in an Actor.
The XML syntax that's used to define Actors inside authorization.xconf config file is as
follows:
<ef:acl-actor id="unique_id” type="efgroup|osgroup">
An Actor of type efgroup must include members defined with the following:
<ef:acl-member type="efuser|acl-actor">...</ef:acl-member>
Note
When using a member of the acl-actor type, the Actor must be defined in the
authorization.xconf config file.
The following is an Actors section example:
...
<!-- EnginFrame Authorization Actors section -->
<ef:acl-actor-list>
<!-- Actor made up of two simple users and two Actors -->
<ef:acl-actor id="nice" type="efgroup">
<ef:info>NICE people</ef:info>
<ef:acl-member type="efuser">andrea</ef:acl-member>
<ef:acl-member type="efuser">beppe</ef:acl-member>
<ef:acl-member type="acl-actor">
developers
</ef:acl-member>
<ef:acl-member type="acl-actor">efadmin</ef:acl-member>
</ef:acl-actor>
<ef:acl-actor id="developers" type="efgroup">
<ef:info>EnginFrame Developers</ef:info>
<ef:acl-member type="efuser">antonio</ef:acl-member>
<ef:acl-member type="efuser">mauri</ef:acl-member>
<ef:acl-member type="acl-actor">goldrake</ef:acl-member>
</ef:acl-actor>
<!--
Configuring authorization 191

EnginFrame Administrator Guide ***Unable to locate subtitle***
Member of this Actor are dynamically loaded from the
Operating system group “efadmin” using the script:
NICE_ROOT/enginframe/plugins/myplugin/bin/ef.load.users
-->
<ef:acl-actor id="efadmin" type="osgroup" plugin="myplugin"/>
</ef:acl-actor-list>
...
Defining access control lists
Access control lists (ACL) define policies that are applied to Actors when they try to perform actions
on resources.
The purpose of an access control list (ACL) is to grant or deny permissions on actions that an
EnginFrame Actor can perform without reference to a specific resource.
An ACL consists of three main parts. The first section is used to "bias" the ACL towards the allow
or the deny directive. The following two parts define the allow and deny directives where Actors
are bound with the actions they can or cannot perform.
The ACL structure explanation follows
• ACL priority, defines if the allow or deny directive has priority for this ACL:
•
allow priority: By default, access is allowed. The deny directives are evaluated before the
allow ones. Any Actor that doesn't match a deny directive or matches an allow directive is
allowed access to the resource.
•
deny priority: By default, access is denied. The allow directives are evaluated before the deny
ones. Any Actor that doesn't match an allow directive or matches a deny directive is denied
access to the resource.
• ACL allow, contains the allow directives, a list of Actors where a set of actions specifies the
operations that the Actor can actually perform on a generic resource guarded by this ACL.
• ACL deny, contains the deny directives, a list of Actors where a set of actions specifies the
operations that the Actor can't perform on a generic resource guarded by this ACL.
The definition of an ACL adheres to this XML structure:
...
<ef:acl id="unique_id”>
<ef:acl-priority>allow | deny</ef:acl-priority>
Configuring authorization 192

EnginFrame Administrator Guide ***Unable to locate subtitle***
<ef:acl-allow>
<ef:actor id=”actor_id”>
<ef:action-list>
<ef:read/>
<ef:execute/>
...
</ef:action-list>
</ef:actor>
</ef:acl-allow>
<ef:acl-deny>
<ef:actor id=”actor_id”>
<ef:action-list>
<ef:read/>
<ef:execute/>
...
</ef:action-list>
</ef:actor>
</ef:acl-deny>
</ef:acl>
...
The id attribute of an ef:actor can refer to a predefined ef:acl-actor or directly to an
EnginFrame user ID.
There are four kinds of actions EnginFrame can accept. The action meaning and the consequent
EnginFrame behavior depends on the type of the resource that the ACL is applied to. The four kinds
of actions are the following:
•
<ef:read/>
•
<ef:write/>
•
<ef:execute/>
•
<ef:delete/>
Here an example of an ACL definition follows:
...
<ef:acl-list>
...
<ef:acl id="priv-exec">
<ef:info>Privileged permissions for Admins</ef:info>
<ef:acl-priority>deny</ef:acl-priority>
Configuring authorization 193

EnginFrame Administrator Guide ***Unable to locate subtitle***
<ef:acl-allow>
<ef:actor id="efadmin">
<ef:action-list>
<ef:read/>
<ef:write/>
<ef:execute/>
<ef:delete/>
</ef:action-list>
</ef:actor>
</ef:acl-allow>
</ef:acl>
...
</ef:acl-list>
...
Condition based ACL
An ACL can include some extra conditions on granting access to a resource.
These conditions can take into account the value of session variables, system properties, and
xpath expressions and be combined using the logical operators: or, and, not, and equals.
This is illustrated in the following example.
...
<ef:acl-list>
...
<ef:acl id="project-acme">
<ef:info>
Privileged permissions for Project ACME
</ef:info>
<ef:acl-priority>deny</ef:acl-priority>
<ef:acl-allow>
<ef:actor id="company-users">
<ef:condition>
<ef:or>
<ef:and>
<ef:equals type=”session”
id=”project”
value=”acme”
casesensitive=”true”/>
<ef:equals type=”session”
id=”${project}_responsible”
Configuring authorization 194

EnginFrame Administrator Guide ***Unable to locate subtitle***
value=”true”
casesensitive=”false”/>
</ef:and>
<ef:and>
<ef:equals type=”session”
id=”administrator”
value=”true”
casesensitive=”false”/>
<ef:not>
<ef:equals type=”property”
id=”${EF_USER}”
value=”jack”
casesensitive=”true”/>
</ef:not>
</ef:and>
</ef:or>
</ef:condition>
<ef:action-list>
<ef:read/>
<ef:write/>
<ef:execute/>
<ef:delete/>
</ef:action-list>
</ef:actor>
</ef:acl-allow>
</ef:acl>
...
</ef:acl-list>
A user can access resources guarded by the "project-acme" ACL only if one of the following
conditions is true:
•
The user belongs to "company-users", the session variable "project" is present and its value
is "acme", and the session variable "acme_responsible" is set to "true" independently from
the case of letters.
•
The session variable "administrator" is “true” independently from case of letters, and it isn't
named "jack".
The ef:and and ef:or tags are condition containers. ef:and evaluates to true when all of the
included conditions evaluate to true. ef:or evaluates to true when at least one of its conditions
evaluates to true.
Configuring authorization 195

EnginFrame Administrator Guide ***Unable to locate subtitle***
The ef:not might contain only one condition and it negates the result of its evaluation.
The ef:equals tag checks two arguments for equality. The arguments to check are defined by the
type and by the id attributes. The casesensitive attribute specifies if the letter case matching
is taken into account.
The type can refer to three different kinds of values:
Session variables
The value to be checked is a session variable with the specified id.
The following is the session variable from the preceding example.
<ef:equals type=”session”
id=”administrator”
value=”true”
casesensitive=”false”/>
EnginFrame checks if a session variable named administrator is defined and its value is
true.
System properties
The value to be checked is a system property with the specified id. EnginFrame system
properties are loaded by the JVM, passed to the JVM using the command line (for example, –
Dname=value), and loaded from the EnginFrame configuration files.
<ef:equals type=”property”
id=”${EF_USER}”
value=”mary”
casesensitive=”true”/>
EnginFrame checks if the system property named ${EF_USER} has the value mary.
XPath expressions
The value to be checked is the one extracted from the current DOM by the XPath expression
specified in the id attribute.
<ef:equals type=”xpath”
id=”starts-with(//ef:profile/ef:user/., ‘br’)”
value=”true”
Configuring authorization 196
EnginFrame Administrator Guide ***Unable to locate subtitle***
casesensitive=”true”/>
EnginFrame checks if the HTML DOM element //ef:profile/ef:user/text() starts with
br.
Configuring HTTPS
HTTPS, Hypertext Transfer Protocol over Secure Socket Layer, is a URI scheme used for secure
HTTP connections.
HTTPS is a protocol that adds a layer of encryption to security-sensitive communication such as
payment transactions and corporate logons.
During the installation process, EnginFrame installer has an option for Apache Tomcat® to use
HTTPS instead of HTTP. By default, EnginFrame installs with the option to use HTTP protocol in the
Apache Tomcat® web server.
If you choose the HTTPS option, the installer automatically creates self-signed certificates under
the $EF_TOP/conf/tomcat/conf/certs directory. It also configures the Apache Tomcat®
connector to use HTTPS.
Using signed certificates with EnginFrame
If self-signed certificates aren't suitable for your needs or you already have valid certificates
setup for an HTTPS web server, we recommend that you refer to the Apache Tomcat® official
documentation when configuring your web server to use your certificates.
Apache Tomcat® provides different setup procedures depending on the specific format of the
available certificate.
For example, if using a PEM private key and PEM certificate, the key and certificate must be
converted before they are handled by Java™ keytool and keystores. This is the best practice that's
recommended in the Apache Tomcat® documentation.
First, convert PEM key and certificate into PKCS12 format:
$ openssl pkcs12 -export -in <your_CA_signed_PEM_cert>
-inkey <your_PEM_private.key> -out <your_certificate_name>.p12
-name tomcat -chain -CAFile <your_root_CA_certificate>
Configuring HTTPS 197

EnginFrame Administrator Guide ***Unable to locate subtitle***
Next, import the newly created PKCS12 certificate into a Java™ keystore file:
$ $JAVA_HOME/bin/keytool -importkeystore -deststorepass <password>
-destkeypass <password> -destkeystore tomcat.keystore
-srckeystore <exported_private_key_and_cert.p12> -srcstoretype PKCS12
-srcstorepass <password> -alias tomcat
If your certificate authority (CA) has intermediate certificates, import them into the keystore file.
It's likely that your CA provides instructions on how to do this and how to name certificates. For
example, if a CA intermediate certificate is already in a format that's supported by Java™ keytool,
you can import it this way:
$ $JAVA_HOME/bin/keytool -import -alias intermed -keystore tomcat.keystore
-trustcacerts -file gd_intermediate.crt
You might also need to import the root CA certificate into the keystore if it doesn't come from one
of the CAs whose root certificates are pre-configured in the Java™ system.
For more information about how to use the keytool and openssl commands, in the Oracle Java SE
Documentation.
Configuring SSL/TLS for Hazelcast
Transport Layer Security (TLS) is a cryptographic protocol designed to provide communications
security over a computer network.
With Hazelcast you can encrypt socket level communication between Hazelcast members and
between Hazelcast clients and members, for end to end encryption.
EnginFrame ships with Hazelcast Open Source which doesn't support the security suite that
includes SSL/TLS asymmetric encryption.
Setup SSL/TLS communication with Hazelcast Enterprise
1. To learn how to set up SSL/TLS communication with Hazelcast Enterprise, you need:
Configuring SSL/TLS for Hazelcast 198

EnginFrame Administrator Guide ***Unable to locate subtitle***
• A valid Hazelcast Enterprise license.
• The Hazelcast Enterprise jar (current version 5.1.1.
2.
To begin, replace ${EF_ROOT}/WEBAPP/WEB-INF/lib/hazelcast-5.1.1.jar with the
downloaded Hazelcast Enterprise jar.
3.
After the jar is replaced, update the Hazelcast configuration file ${EF_ROOT}/conf/
hazelcast.xml with the license key that you already obtained by following this guide.
4.
Implement com.hazelcast.nio.ssl.SSLContextFactory and configure the SSL
section in the network configuration. Hazelcast provides a default SSLContextFactory,
com.hazelcast.nio.ssl.BasicSSLContextFactory, that uses the keystore to initialize
SSLContext. An example configuration for TLS/SSL follows:
<hazelcast>
...
<network>
...
<ssl enabled="true">
<factory-class-name>
com.hazelcast.nio.ssl.BasicSSLContextFactory
</factory-class-name>
<properties>
<property name="protocol">TLSv1.2</property>
<property name="mutualAuthentication">REQUIRED</property>
<property name="keyStore">/efs/KeyStore.jks</property>
<property name="keyStorePassword">passphrase</property>
<property name="keyStoreType">JKS</property>
<property name="trustStore">/efs/truststore.jks</property>
<property name="trustStorePassword">passphrase</property>
<property name="trustStoreType">JKS</property>
</properties>
</ssl>
</network>
...
</hazelcast>
Property descriptions:
• keyStore: Path of your keystore file.
• keyStorePassword: Password to access the key from your keystore file.
Setup SSL/TLS communication with Hazelcast Enterprise 199

EnginFrame Administrator Guide ***Unable to locate subtitle***
• keyManagerAlgorithm: Name of the algorithm based on the provided authentication keys.
• keyStoreType: Type of the keystore. Its default value is JKS. Another commonly used type is
the PKCS12. Available keystore/truststore types depend on your operating system and Java
runtime.
• trustStore: Path of your truststore file. The truststore file is a keystore file that contains a
collection of certificates trusted by your application.
• trustStorePassword: Password to unlock the truststore file.
• trustStoreType: Type of the truststore. Its default value is JKS. Another commonly used type
is the PKCS12. Available keystore/truststore types depend on your operating system and
Java runtime.
• mutualAuthentication: Mutual authentication configuration. It’s empty by default which
means the client side of connection is not authenticated. Available values are:
• REQUIRED - server forces usage of a trusted client certificate.
• OPTIONAL - server asks for a client certificate, but doesn’t require it.
For more information, see the Hazelcast documentation.
5. Follow the next example to properly configure a Keystore and a Truststore that leverages both
keytool and openssl .
$ keytool cd /efs
keytool -genkey -alias bmc -keyalg RSA -keystore KeyStore.jks -keysize 2048
openssl req -new -x509 -keyout ca-key -out ca-cert
keytool -keystore KeyStore.jks -alias bmc -certreq -file cert-file
openssl x509 -req -CA ca-cert -CAkey ca-key -in cert-file -out cert-signed -days
365 -CAcreateserial -passin pass:passphrase
keytool -keystore KeyStore.jks -alias CARoot -import -file ca-cert
keytool -keystore KeyStore.jks -alias bmc -import -file cert-signed
keytool -keystore truststore.jks -alias bmc -import -file ca-cert
With this example, you create a custom CA with openssl that's used to sign the Hazelcast
certificate. We recommend that you use a publicly available CA for production and reserve the
use of custom CA certificates for testing purposes.
6. Restart EnginFrame to leverage SSL/TLS for Hazelcast members and clients communications.
Setup SSL/TLS communication with Hazelcast Enterprise 200

EnginFrame Administrator Guide ***Unable to locate subtitle***
Document history
The following table describes the major updates and new features for the EnginFrame
Administrator Guide. We also update the documentation frequently to address the feedback that
you send us.
Change Description Date
NICE EnginFrame version
2021.0 (revision 1667)
released
NICE EnginFrame version
2021.0 (revision 1667)
released.
Changes:
• EnginFrame now ships
with Tomcat® 9.0.78 (from
9.0.64).
• EnginFrame now ships with
Apache® Commons Text
1.10.0 (from 1.9).
• EnginFrame now ships with
Gson 2.8.9 (from 2.8.x).
• EnginFrame documentation
added: Restarting NICE DCV
Session Manager.
August 3, 2023
NICE EnginFrame version
2021.0 (revision 1657)
released
NICE EnginFrame version
2021.0 (revision 1657)
released.
Changes:
• If updating from a previous
EnginFrame instance,
August 9, 2022
201

EnginFrame Administrator Guide ***Unable to locate subtitle***
you must change the
server.xml file as
described in Updating
to EnginFrame version
2021.0-r1653 or later.
• Fixed a bug to prevent
Tomcat use of HTTPS.
Bug fixes:
• Fixed a bug to prevent
Tomcat use of HTTPS.
• Fixed a bug that occurred
with the use of AWS
Cognito as the authentic
ation server for DCVSM.
NICE EnginFrame version
2021.0 (revision 1653)
released
NICE EnginFrame version
2021.0 (revision 1653)
released.
Enhancements:
• EnginFrame now ships with
Tomcat® 9.0.64.
Bug fixes:
• Fixed a bug that caused
global actions not to be
shown in spooler view in
some cases.
August 5, 2022
202

EnginFrame Administrator Guide ***Unable to locate subtitle***
NICE EnginFrame version
2021.0 (revision 1646)
released
NICE EnginFrame version
2021.0 (revision 1646)
released.
Enhancements:
• EnginFrame can now be
used with Java11.
• Added support for the
log4j configuration to
be overridden by the top
folder configurations.
• HPC Connector enables
updates to the configura
tion of a previously created
cluster.
Discontinued Integrations:
• Discontinued support for
the Neutro plugin.
Changes:
• Updated log4j to version
2.17.2.
• Updated Hazelcast to
version 5.1.1.
• HPC Connector doesn't run
any activations (triggers)
when disabled.
Bug fixes:
June 30, 2022
203

EnginFrame Administrator Guide ***Unable to locate subtitle***
• Fixed the loading of
the jobs list view when
ef_ajax is enabled.
• Fixed the loading of the
jobs inside a spooler when
ef_ajax is enabled.
• Fixed incorrect menu
highlighting when custom
menu items are added to
the existing ones.
• Fixed jobs global actions
not being shown inside a
spooler created with LSF.
• The multi file upload
widget used in services now
stretches to the configured
height.
• Removed the action menu
from the Remote File
Browsing widget which was
shown erroneously.
204

EnginFrame Administrator Guide ***Unable to locate subtitle***
NICE EnginFrame version
2021.0 (revision 1592)
released
NICE EnginFrame version
2021.0 (revision 1592)
released.
Enhancements:
•
Timeout for checking xdcv
and dcvagent process-
id is now configurable.
Bug fixes:
• Fixed a bug introduced in
version 2021.0 (revision
1566) preventing access
to the portal if updating
NICE EnginFrame from a
previous version.
• Fixed a bug showing an
error while loading AWS
HPC Connector SDF.
• Fixed a bug that kept
dcvsm sessions stuck in a
Closing status.
April 20, 2022
205

EnginFrame Administrator Guide ***Unable to locate subtitle***
NICE EnginFrame version
2021.0 (revision 1566)
released
NICE EnginFrame version
2021.0 (revision 1566)
released.
Enhancements:
• Added support for SLURM™
21.x.
• Added Document history
to the NICE EnginFrame
Administrator Guide.
Discontinued integrations:
• Discontinued support for
VNC® and NICE DCV 2016
and previous versions.
Changes:
• Changed default output
limit for job scheduler
xml output from 10MB to
50MB.
• Changed default log level
for AWS HPC Connector to
INFO rather than DEBUG.
Bug fixes:
• Fixed NICE EnginFrame logo
not showing up in Firefox®
browser.
•
Fixed NullPoint
erException thrown
April 11, 2022
206

EnginFrame Administrator Guide ***Unable to locate subtitle***
when DCVSM host is
stopped.
• Fixed a bug preventing the
use of rounded parenthes
es in NICE DCV sessions
names.
• Fixed cursor disappearing
when hovering on an active
link.
• Fixed clusters not showing
up when DCVSM was
configured.
• Fixed cluster details not
showing up for DCVSM
clusters.
• Fixed AWS HPC Connector
creating redundant
spoolers.
•
Fixed bjobs line wrapping
in LSF®.
207

EnginFrame Administrator Guide ***Unable to locate subtitle***
NICE EnginFrame version
2021.0 (revision 1388)
released
NICE EnginFrame version
2021.0 (revision 1388)
released.
Enhancements:
• Only hosts of clusters in
READY state are listed.
• Clusters that are in the
process of being created are
not listed.
• The cluster ID in the cluster
page links to the associate
d AWS ParallelCluster
CloudFormation stack.
•
ef-hpcc is now used as
prefix for session IDs.
• Added sorting and
searching for clusters and
cluster configurations.
• Added sorting by name,
size and modified columns
in the remote spooler page.
• Added support for filtering
jobs by cluster ID.
• Removed limitation on
the length of queue and
instance names (before, the
combined length could not
be more than 20 character
s).
Changes:
January 31, 2022
208

EnginFrame Administrator Guide ***Unable to locate subtitle***
• Removed HPC and AWS
Batch clusters from session
cluster list (for interactive
sessions).
• HPC cluster job retention
is equal to the application
TTL.
Bug fixes:
• Fixed NICE DCV Session
Manager resolution
selection widget, however
note that this widget is not
yet usable because NICE
DCV Session Manager does
not support setting the
session resolution.
NICE EnginFrame version
2021.0 (revision 1345)
released
NICE EnginFrame version
2021.0 (revision 1345)
released.
Changes:
• Upgraded Log4j to version
2.17.0.
December 21, 2021
209

EnginFrame Administrator Guide ***Unable to locate subtitle***
NICE EnginFrame version
2021.0 (revision 1332)
released
NICE EnginFrame version
2021.0 (revision 1332)
released.
Changes:
• Upgraded Log4j to version
2.17.0.
December 17, 2021
NICE EnginFrame version
2021.0 (revision 1315)
released
NICE EnginFrame version
2021.0 (revision 1315)
released.
Changes:
• Upgraded Log4j to version
2.16.0.
December 10, 2021
210

EnginFrame Administrator Guide ***Unable to locate subtitle***
NICE EnginFrame version
2021.0 (revision 1307)
released
NICE EnginFrame version
2021.0 (revision 1307)
released.
Enhancements:
• The NICE EnginFrame
Administrator Guide is
available on AWS.
• New AWS HPC Connector
plugin adds support
for hybrid infrastru
ctures enabling launch
of HPC Applications on
clusters created through
ParallelCluster 3 using AWS
resources.
• Metrics can now be
published to external
monitoring tools (such
as Graphite, Grafana,
CloudWatch) through
StatsD.
• A keystore can now be used
to store DB admin credentia
ls.
Changes:
• Upgraded to AWS ParallelC
luster 3.0.0 and AWS
ParallelCluster Batch
CLI 1.0.0. Refer to the
EnginFrame Administr
ator Guide for a smoother
December 6, 2021
211

EnginFrame Administrator Guide ***Unable to locate subtitle***
upgrade than previous
releases.
• Applications Portal
has been renamed to
Workspace.
• Views Portal has been
renamed to Virtual
Desktops.
• Administration Portal has
been renamed to Operation
al Dashboard.
Discontinued Integrations:
• Discontinued support for
Neutro.
Bug fixes:
• Fixed an issue that
prevented the host setup
script to work correctly
when selecting the start at
boot option.
Known Issues:
• AWS HPC Connector allows
a maximum length of 20
characters for the queue
name and instance name
combined. In order to
overcome this limitation
it is currently required to
disable the job cache.
212

EnginFrame Administrator Guide ***Unable to locate subtitle***
NICE EnginFrame version
2020.1 (revision 762) released
NICE EnginFrame version
2021.0 (revision 762)
released.
Enhancements:
• TurboVNC sessions now
require TLS 1.2 connections
in order to be established.
Changes:
• Upgraded JQuery-UI to
1.12.1 version.
• Miscellaneous security
improvements.
Discontinued Integrations:
• Discontinued support for
RealVNC®.
• Discontinued support for
TigerVNC.
• Discontinued support for
HP® RGS.
• Discontinued support for
NICE DCV prior 2017.0
version.
• Discontinued support for
Torque.
• Discontinued support for
LSF® prior 10.1.x version.
August 13, 2021
213

EnginFrame Administrator Guide ***Unable to locate subtitle***
• Discontinued support for
PBS Professional® versions
7.x - 14.x.
• Discontinued support for
Son of Grid Engine (SoGE)
version 6.2.
• Discontinued support for
Open Grid Scheduler.
• Discontinued support for
Oracle® Grid Engine.
Bug fixes:
• Fixed display of multiple
uploaded files.
• Fixed an issue with sessions
disappearing on some rare
circumstances.
• Fixed an issue when a
service under ACL was not
shown or denied access by
error.
NICE EnginFrame version
2020.1 (revision 492) released
NICE EnginFrame version
2021.0 (revision 492)
released.
Bug fixes:
• Fixed an issue in NICE DCV
Session Manager plugin not
working on some on-premis
es scenarios.
June 3, 2021
214

EnginFrame Administrator Guide ***Unable to locate subtitle***
NICE EnginFrame version
2020.1 (revision 413) released
NICE EnginFrame version
2021.0 (revision 413)
released.
Bug fixes:
• Fixed an issue in the service
editor which prevented
services from being saved.
• Fixed an issue in SLURM™
showing sessions as closed
on some circumstances.
May 6, 2021
215

EnginFrame Administrator Guide ***Unable to locate subtitle***
NICE EnginFrame version
2020.1 (revision 385) released
NICE EnginFrame version
2021.0 (revision 385)
released.
Changes:
• Upgraded NICE DCV
Session Manager client to
the latest version (2021-04-
06).
Enhancements:
• Added support for SUSE®
Linux® Enterprise Server 12
SP 5.
• Added support for SUSE®
Linux® Enterprise Server 15
SP 2.
• Added support for Red Hat®
Enterprise Linux® 8.
• Added support for multiple
SLURM™ clusters.
• Added support for node
monitoring in NICE DCV
Session Manager.
•
Added support for auto-
run file in NICE DCV
Session Manager.
• Added the possibility to
choose between Console
and Virtual Linux® sessions
in NICE DCV Session
Manager.
April 28, 2021
216

EnginFrame Administrator Guide ***Unable to locate subtitle***
• Added session screensho
t as session thumbnail in
NICE DCV Session Manager.
• Improved performances of
Spoolers listing.
Bug fixes:
• Fixed an issue introduce
d in 2020.0-r197 which
prevents triggers from
running correctly and
interactive sessions to
get updated. If you are
using 2020.0-r197 and
experience issues with
either triggers or interacti
ve sessions, please contact
us via https://support.nice-
software.com.
• Fixed an issue in SLURM™
showing sessions as closed
on some circumstances.
217

EnginFrame Administrator Guide ***Unable to locate subtitle***
NICE EnginFrame version
2020.0 (revision 197) released
NICE EnginFrame version
2020.0 (revision 197)
released.
Changes:
• When running on Amazon
EC2, the NICE EnginFrame
server periodically connects
to an Amazon S3 bucket to
determine whether a valid
license is available. Please
see the documentation for
more details.
• Added support for Red Hat®
and Corretto JDKs.
• Miscellaneous security
improvements.
Bug fixes:
• Fixed lock bug on service
editor.
• Fixed bug on color theme
editor.
February 16, 2021
218

EnginFrame Administrator Guide ***Unable to locate subtitle***
NICE EnginFrame version
2020.0 (revision 91) released
NICE EnginFrame version
2020.0 (revision 91) released.
Changes:
•
The SpoolerDetails
class included in
ef.scriptlets.jar has
been transformed into an
interface. In case you are
using SpoolerDetails
in compiled code, you need
to recompile your integrati
on.
• Miscellaneous security
improvements.
Bug fixes:
• Fixed forward slash bug in
NICE DCV Session Manager
broker endpoint configura
tion.
December 14, 2020
219

EnginFrame Administrator Guide ***Unable to locate subtitle***
NICE EnginFrame version
2020.0 (revision 58) released
NICE EnginFrame version
2020.0 (revision 58) released.
Enhancements:
• Refreshed user interface
! New typography, layout,
color and iconography.
• Running NICE EnginFrame
on Amazon EC2 no longer
requires a license.
• New support for NICE DCV
Session Manager (requires
NICE DCV 2020.2+).
• Updated MySQL® support
to version 8.0.x.
• Added OpenPBS® support
for versions 19.1.x and
20.0.x.
• Updated Altair® PBS
Professional® support to
19.2.x and 2020.1.x.
• Updated SLURM™ support
to 19.05.x and 20.02.x
versions.
Deprecated integrations:
• Deprecated support for
LSF® versions 9.x and
earlier.
• No longer supporting LSF®
version 6.x and earlier.
November 17, 2020
220

EnginFrame Administrator Guide ***Unable to locate subtitle***
• Deprecated support for
Altair® PBS Professional®
versions 17.x and earlier.
• Deprecated support for
Torque versions 6.x.
• No longer supporting
SLURM™ 17.x and earlier.
• Deprecated support for Son
of Grid Engine (SoGE).
• Deprecated support for
Oracle® Grid Engine.
• Deprecated support for
Open Grid Scheduler.
• Deprecated support for
RealVNC®, TigerVNC and
HP® RGS.
• Deprecated support for
TurboVNC versions 2.1.x
and earlier.
• Deprecated support for
NICE DCV versions 2016.x
and earlier.
• Deprecated support for
Neutro.
• Removed support for Moab
Web Services.
• Removed support for
XenDesktop and Citrix
Receiver.
Bug fixes:
• Fixed File Manager SSH
backend.
221

EnginFrame Administrator Guide ***Unable to locate subtitle***
• Fixed a problem when
updating and specifying the
currently used license file.
NICE EnginFrame version
2019.0 (revision 1537)
released
NICE EnginFrame version
2019.0 (revision 1537)
released.
Changes:
• Updated Apache Tomcat®
to version 7.0.105.
• Updated Apache® Derby to
version 10.14.2.0.
• Upgraded Web Services
framework from Apache®
Axis1 1.4 to Axis2 1.7.9.
Bug fixes:
• Fixed a regression in the
update of the Apache
Derby® policies.
• Fixed a regression that
prevent using IDN character
s in service submission.
• Several UI and minor bug
fixes and improvements.
July 17, 2020
222


EnginFrame Administrator Guide ***Unable to locate subtitle***
NICE EnginFrame version
2019.0 (revision 1424)
released
NICE EnginFrame version
2019.0 (revision 1424)
released.
Enhancements:
• Added configuration
parameter to limit file
upload size (default is 4GB)
in the server.conf file.
• Added configuration
parameter to set auto-refr
esh period for list.jobs
and list.all.jobs
services in the ui.hydrog
en.conf file.
• Added configuration
parameters for screenshot
and logs refresh rate.
• Extended job history to 14
days in job details page for
PBS and TORQUE.
• Added Microsoft® Edge
support.
Changes:
• Updated Apache Tomcat®
to version 7.0.100.
• Updated Apache Derby® to
version 10.12.1.1.
• Dropped Java7 support.
• Miscellaneous security
improvements.
April 3, 2020
224

EnginFrame Administrator Guide ***Unable to locate subtitle***
Bug fixes:
• Fix support of file manager
subfolders when using
EnginFrame WebServices
client.
• Fix usage of NICE DCV
commands to be compatibl
e with all the NICE DCV
2017+ versions.
•
Fix dcv create-se
ssion command
composition to support
paths with spaces.
• Fix update credentials when
removing sharing permissio
n from a previously shared
session (NICE DCV 2016).
• Fix pids list retrieval.
• Fix host parsing to correctly
map the IDLE+DRAIN
state (SLURM™).
•
Unset SQUEUE_USERS
to avoid jobs filtering
during retrieval of all jobs
information (SLURM™).
225

EnginFrame Administrator Guide ***Unable to locate subtitle***
NICE EnginFrame version
2019.0 (revision 915) released
NICE EnginFrame version
2019.0 (revision 915)
released.
Enhancements:
• Added support for MySQL®
5.7 and MariaDB® 5.5.
Changes:
• Removed "Create New
Plugin" service from the
Administration portal.
• Miscellaneous security
improvements.
Bug fixes:
• Fix vroot management for
folders containing regex-res
erved characters.
•
Fix vroot creation for HOME
folder.
• Fix retrieval of NICE
DCV agent pid when the
username is numeric (NICE
DCV 2017).
• Fix the job id parsing (LSF®).
• Support the LSF® option to
specify the login shell for
the interactive session job.
March 1, 2019
226

EnginFrame Administrator Guide ***Unable to locate subtitle***
• Fix job name parsing when
containing the percent sign
(SGE).
•
Added -X option to the
sacct command to avoid to
parse job steps (SLURM™).
• Fix host information
parsing (Torque).
227

EnginFrame Administrator Guide ***Unable to locate subtitle***
NICE EnginFrame version
2019.0 (revision 848) released
NICE EnginFrame version
2019.0 (revision 848)
released.
Enhancements:
• Added AWS Batch as
supported AWS native job
scheduler.
• Added Amazon S3 file
manager backend used with
AWS Batch workflows.
•
Use dcv describe-
session to get the NICE
DCV display.
• Miscellaneous security
improvements.
Changes:
• Updated Apache Tomcat®
to version 7.0.92.
Bug fixes:
• Fix job arrays filtering.
• Fix job actions in multi-sch
eduler environment.
• Fix sample compress job
service in multi-scheduler
environment.
• Avoid duplicate job records
when using Oracle® DBMS.
January 23, 2019
228

EnginFrame Administrator Guide ***Unable to locate subtitle***
• Fix output path parsing
(PBS Professional®).
NICE EnginFrame version
2017.2 (revision 641) released
NICE EnginFrame version
2017.2 (revision 641)
released.
Enhancements:
• Improve execution-host
presentation to show
number of cores and avoid
host duplication.
• Improved visualization and
internal representation of
parallel jobs (LSF®).
• Speed up array job
management (SGE).
Bug fixes:
• Avoid to save reuse-spooler
information in the Service
Profile.
• Fix Oracle® 12 DBMS
support when autocommit
is enabled.
• Fix a regression in HTTP
authentication process
that prevented the user
mapping at login time.
• Fix queue name parsing
(SGE).
September 21, 2018
229


EnginFrame Administrator Guide ***Unable to locate subtitle***
NICE EnginFrame version
2017.2 (revision 520) released
NICE EnginFrame version
2017.2 (revision 520)
released.
Enhancements:
• New configuration file to
customize the generation of
URL tuples (host, port, web
URL path) for NICE DCV
2017 sessions.
• Added two new extension
points (hooks) to the
interactive session life
cycle. One hook is called
when the session is ready to
pass to the 'Running' state
while the other when the
session terminates. Added
sample hook scripts for the
dynamic configuration of
the AWS Application Load
Balancer for NICE DCV 2017
sessions.
• NICE DCV 2017 web
URL path configuration
parameter is retrieved
dynamically from the NICE
DCV server configuration.
• Enable folder tree upload
through drag and drop to
the Multiple File Upload
(MFU) widget. Currently
working on Firefox®,
Chrome™, Microsoft® Edge
April 17, 2018
231

EnginFrame Administrator Guide ***Unable to locate subtitle***
but not on Microsoft®
Internet Explorer®.
• Improved management of
the web browser pop-up
blocker when connecting
to NICE DCV 2017 sessions.
* Added support for --
storage-root /--max-
concurrent-clients
parameters when launching
NICE DCV 2017 session.
• Improved NICE DCV
session scheduling process
robustness and logging.
• Applications/VDI: improved
the import of a set of users
from a CSV file.
• Updated the parsing of
hosts features for SLURM™
versions 16 and 17.
Bug fixes:
• Applications/VDI:
Fix service editor layout
that was broken when
zooming in and out.
Fix issue with service editor
for interactive services,
disappearing unsaved
changes.
• Applications: fix the
selection of the value for
"List of Queues" and "List
232

EnginFrame Administrator Guide ***Unable to locate subtitle***
of Hosts" input fields on
service resubmit.
• Admin portal: fix "Run
Self Checks" and "Collect
Support Info" services.
• Fix dynamic spooler feature
that allows to use session
variables in the spooler
directory path.
• Fix the support for custom
GPU load balancer script for
NICE DCV 2017 sessions.
• Fix interactive screenshot
thumbnail with ImageMagi
ck 7.07 / Sles 12.3.
• Added missing fullscree
n and use-all-monitors
parameters to the NICE
DCV 2017 connection file
used by the NICE DCV
desktop client.
• UI: preserve job ordering
field in the table for a job
array.
• Fix job parsing for User
Group and Project fields
(LSF®).
•
Fix PBS qstat error
management for unknown
jobs.
• Several UI and minor bug
fixes and improvements.
233

EnginFrame Administrator Guide ***Unable to locate subtitle***
NICE EnginFrame version
2017.1 (revision 313) released
NICE EnginFrame version
2017.1(revision 313) released.
Enhancements:
• Enable NICE DCV 2017
session sharing on Linux®.
• Set initial display resolution
for NICE DCV 2017 sessions
on Linux®.
• Add the possibility to
configure the port used by
the NICE DCV 2017 Server.
• Add support for OpenGL
optimizations option "--
dcv2-gl on|off" at NICE DCV
2017 sessions submission
time.
• Avoid to disclose Apache
Tomcat® server info in the
HTTP responses.
Bug fixes:
• Correctly handle the
xstartup initialization
scripts for NICE DCV 2017
sessions.
• Fix bug that prevented NICE
DCV 2017 sessions to start
on an EnginFrame 2017.1
installed as an update from
a previous version.
April 17, 2018
234

EnginFrame Administrator Guide ***Unable to locate subtitle***
• Fix parameter passing for
NICE DCV 2017 sessions.
• For NICE DCV 2017
connections apply both
nat.conf and proxy.con
f as it works for VNC® /
NICE DCV 2016.
• Correctly handle a large
number of jobs (PBS
Professional®).
• Fixed job name that had an
extra _ character (LSF®).
NICE EnginFrame version
2017.1 (revision 291) released
NICE EnginFrame version
2017.1(revision 291) released.
Bug fixes:
• Actions on Triggers view in
the Administration portal.
• Fix support for JDK 7.
• Session sharing on NICE
DCV 2016.
November 13, 2017
235

EnginFrame Administrator Guide ***Unable to locate subtitle***
NICE EnginFrame version
2017.1 (revision 285) released
NICE EnginFrame version
2017.1(revision 285) released.
Enhancements:
• Support for NICE DCV 2017
on Linux® and Windows®
platforms.
• Updated EF-on-AWS
deployment solution to
CfnCluster 1.3.2.
• Added support for Son of
Grid Engine (SoGE).
Changes:
• Updated Apache Tomcat®
to version 7.0.82.
• EF-on-AWS trial deploymen
t solution has been
extended to Asia Pacific
(Sydney) region (ap-south
east-2).
Bug fixes:
• Applications/VDI: 'list of
queues' widget shows the
correct queues allowed to
the current user.
• Correctly handle multiple
SGE flavors:
November 7, 2017
236

EnginFrame Administrator Guide ***Unable to locate subtitle***
Job name sanitization that
changes accordingly to the
flavor.
Son of Grid Engine (SoGE)
job submission, the
scheduler returns exit code
1 when jobs go pending.
• Fix for jobs with single
digit id that now correctly
appear in NICE EnginFrame
(PBS Professional®).
• NICE EnginFrame Jobcache
'cluster' field has been
extended in order to
support longer cluster id
as in the case of PBS and
Torque that use the fqdn by
default.
• NICE EnginFrame with
HTTPS installation: set the
hostname into the CN of
the EnginFrame Server
self-signed certificate.
Otherwise IE11 couldn't
trust the certificate.
• Several UI and minor bug
fixes and improvements.
237

EnginFrame Administrator Guide ***Unable to locate subtitle***
NICE EnginFrame version
2017.0 (revision 41570)
released
NICE EnginFrame version
2017.0 (revision 41570)
released.
Enhancements:
• Amazon Linux support:
NICE EnginFrame installs
and works on Amazon
Linux.
• New NICE EnginFrame
license type to support
AWS test environments.
• New HTML5/JS multiple/
single file upload widget for
NICE EnginFrame service
options to replace Java™
Applet implementation
with support for server-side
file caching.
• Support for Citrix(R)
XenDesktop(R) as interacti
ve back-end to launch
and manage sessions
for published interactive
applications.
• New authentication
mechanism based on
X509 certificates. This
applies to HTTPS protocol
as authenticated and
encrypted communica
tion channel and user's
March 27, 2017
238

EnginFrame Administrator Guide ***Unable to locate subtitle***
authentication into NICE
EnginFrame.
• Input option validation with
regex pattern (feature not
yet exposed in the Applicati
ons/VDI service editor). All
NICE EnginFrame system
services now apply built-in
input validation patterns.
• Interactive plugin renews
VNC® session credentia
ls when changing the set
of collaborators. It also
supports VNC® password
expiration through a
configurable time-to-l
ive .
• Improved Showcase demo
portal with new examples
for service re-submission
and ef:action functiona
lities.
• Improved configuration of
the default mime-type
for file download.
• Spooler area adapts its size
to the number of items to
display.
• Applications/VDI:
Service editor allows to
create new actions on
files using services. Newly
created actions appear in
the drop down list when
239

EnginFrame Administrator Guide ***Unable to locate subtitle***
users select files in the file
manager or spooler views.
New Unzip file service to
demonstrate file action
feature.
Per service custom CSS and
JavaScript®.
New service to export users
and groups into a csv file.
It's possible to customize
the set of services in Data
and Monitor folders (top
menu services) for both the
User and Admin portals.
Added help tooltips in the
Service Editor.
• Installer allows to enable
HTTPS protocol for
EnginFrame Server /
Tomcat®.
• EnginFrame Server and
Agent communicate with
RMI over SSL.
• New account lockout
feature after a configura
ble number of failed login
attempts.
• File system hardening:
improved ownership and
permissions for directories
containing sensitive data.
240

EnginFrame Administrator Guide ***Unable to locate subtitle***
• Miscellaneous security
improvements.
• New client API to submit
and manage interacti
ve sessions with Java™
EnginFrame WebServices
client library.
Changes:
• Updated Apache Tomcat®
to version 7.0.75.
• Java™ Applet widgets for
multiple/single file upload
options and multiple file
download functionality
have been disabled by
default.
• Vertical demo sites bio,
eda and mda have been
removed.
Bug fixes:
• EnginFrame license check
during installation.
• Lock management in
Applications/VDI service
editor.
• Fixed statistics informati
on when EnginFrame is
deployed on Amazon Elastic
File System file system.
• Error management with
remote file browsing.
241

EnginFrame Administrator Guide ***Unable to locate subtitle***
• IBM® Platform™ LSF®
version retrieval on
Windows®.
• Fixed cpu and jobname
management (SLURM™).
• Fixed host info details.
(SLURM™).
• Fixed job arrays
management. (SGE).
• Set umask value to 022 at
EnginFrame process startup
so the newly created
directory have proper
permissions.
• Fixed a minor issue
reported in EnginFrame
log files concerning expired
connections to the DBMS
after idle time.
• Several UI aspects have
been fixed and improved.
• Java™ EnginFrame
WebServices client library:
Fixed management of
client logout and re-authen
tication.
Fixed input option setting
when preparing a service
submission.
242
