
Commerce Portal User Guide

2
Contents
What is the Commerce Portal .................................................................................................. 4
Benefits of Using the Commerce Portal .................................................................................. 5
Commerce Portal Offerings ..................................................................................................... 5
Before You Begin ...................................................................................................................... 6
Logging into the Commerce Portal ......................................................................................... 7
Getting Started with the Commerce Portal ............................................................................ 8
Simple Checkout Workflow ............................................................................................. 10
Standard Purchase Through Distribution Workflow ........................................................ 11
Customer Creates Quote ................................................................................................ 11
Distributor Creates Quote ............................................................................................... 12
Customer Direct Order Workflow ..................................................................................... 13
Commerce Portal Roles .......................................................................................................... 17
Customer Roles ............................................................................................................... 17
Contract Owner and Assigned Owner ............................................................................. 17
Software User .................................................................................................................. 18
Software Administrator .................................................................................................... 18
Distributor Role ................................................................................................................ 18
Commerce Portal Overview ................................................................................................... 19
Creating a Quote ..................................................................................................................... 23
Configure Transaction Settings ....................................................................................... 23
Software Selection .......................................................................................................... 27
Choose Your Package ..................................................................................................... 27
Recommended Products ................................................................................................. 29
Complete Checkout ......................................................................................................... 30
Quote Confirmation and Assign Quote ............................................................................ 32
How to Submit Order from an Assigned Owner Email .................................................... 34
Checkout Online .............................................................................................................. 34
Initiate Manual Checkout ................................................................................................. 35
Customer Order Acknowledgement ................................................................................. 35
Welcome Kits .......................................................................................................................... 36

3
My Subscriptions .................................................................................................................... 37
Filter and Search ............................................................................................................. 37
Order Status Tracker ....................................................................................................... 39
Manage Licenses .................................................................................................................... 43
Assign Users to a Software License ............................................................................... 44
View Users ............................................................................................................................... 49
View Addresses (Contract Email Notifications) ................................................................... 50
Cancel an Order Request ....................................................................................................... 50
Activating your Software ....................................................................................................... 51
Buy More and Upgrade .......................................................................................................... 52
Volume Discounts (Step-In Pricing) ...................................................................................... 52
Assign Contract ...................................................................................................................... 54
Renewals ................................................................................................................................. 56
Merging Contracts ........................................................................................................... 56
Renewal Quote Notifications ........................................................................................... 57
Automatic Renewals ....................................................................................................... 57
Disabling Automatic Renewal ......................................................................................... 59
Manual renewal ............................................................................................................... 60
License Activation Renewals ................................................................................................ 62
Viewing and Validating User License Renewal Status .................................................... 62
Notification Email ............................................................................................................ 62
Software Support & Maintenance .......................................................................................... 64
OEM & SI Software Contract Management Options ............................................................. 67
FactoryTalk® Software runtime activations ..................................................................... 67
Contract Management Options ........................................................................................ 67
Commerce Portal Help & Support Page ............................................................................... 68
Ticketing Submittal and Incident Management ............................................................... 68
Viewing your Help Tickets ............................................................................................... 70
Appendix A .............................................................................................................................. 71
Multi-Site and Multi-Start Contracts ................................................................................ 71
Contract Numbers ........................................................................................................... 71

4
What is the Commerce Portal
The Commerce Portal is part of the Rockwell Automation e-commerce environment and
serves as a software ordering, registration, and license management platform.
It is a platform to enable you to have visibility and management of all your software
contracts and licenses.
The Commerce Portal is a web-based platform where you can shop and purchase
software products that are all bundled with 1 year of technical maintenance and support.
1.
2.
3.

5
Benefits of Using the Commerce Portal
Purchasing software through the Commerce Portal provides a single location from which to
purchase, manage, upgrade, and renew your software contracts with Rockwell Automation.
When using the Commerce Portal, you have these great benefits:
• Software is downloaded, installed, and activated on your computer (or on those you
designate as software users)
• Visibility to all your software licenses being used (by whom and where)
• Flexibility to change/modify your software package on each activation at renewal
• Flexibility in the length and start date of the contract and billing methods
• Automatic renewal
Commerce Portal Offerings
• FactoryTalk Design, Operation and
Maintenance suite software offerings
• 1
st
year technical support and
maintenance included with all software
as well as options for upgrading your
support
• Subscription and Software as a Service
(SaaS) offerings available

6
Before You Begin
The Commerce Portal is used by Rockwell Automation customers, distributors, and Rockwell
Automation salespeople to create quotes, place software orders, add users to licenses, and to
view order status. Certain functions may be limited based upon who is logging into the
Commerce Portal and what function they are performing.
What to Know
1. The Commerce Portal requires registration to the Rockwell Automation Knowledgebase
and you must have a valid “sold-to” BPID (Business Product ID) with Rockwell
Automation.
2. You must accept the supplemental License Agreement prior to your software order being
fulfilled. Note- for Simple Checkout transactions, your Order Request Confirmation email
will contain a link to the terms and conditions that you are agreeing to when clicking the
Completing Order Request button.
3. You can purchase through your local distributor or order directly with Rockwell
Automation. You do have an option for a “hands-off” approach to purchasing software in
the Commerce Portal.
4. All purchases through the Commerce Portal have maintenance and support included for
the first term. Your maintenance and support can be renewed from the 120 Day
Renewal Notification email or the Commerce Portal.
5. Software cannot be ordered in bulk and split into separate serial numbers. Quantities are
consolidated into a single serial number on a single contract.
6. Software and Maintenance contract ownership can be transferred using the Commerce
Portal. Activation License transfer must be done via Manage Licenses in the Commerce
Portal.
7
Logging into the Commerce Portal
Log in to Commerce Portal at commerce.rockwellautomation.com.
A Knowledgebase login is required for entry - available at:
https://rockwellautomation.custhelp.com/.
Click Sign In to log into your Rockwell Automation Knowledgebase credentials or select Create
an Account to create a new account. Your account will be created automatically, and you will
be able to log in and place an order or submit an existing quote.
If you have a quote that has been assigned to you before you have created a login for the
Rockwell Automation Knowledgebase, your account will be synchronized when your login is
created, and you will be able to view your quotes in My Subscriptions.
8
Getting Started with the Commerce Portal
This chapter provides a quick overview of how to quickly get started with the Commerce Portal
to complete an order request, allocate activation licenses and download and activate software.
More detailed steps are included in later chapters.
Creating quotations and submitting them for purchase in the Commerce Portal is completed in
a few easy steps. From within the Commerce Portal, select the software you need and place
your orders through your local distributor or make your purchase direct to Rockwell
Automation. A Welcome Kit email will be sent to you with instructions for downloading,
activating and allocating activation licenses to software users.
If you prefer a “hands off” approach to using the Commerce Portal, use our Simple Checkout
Workflow process.
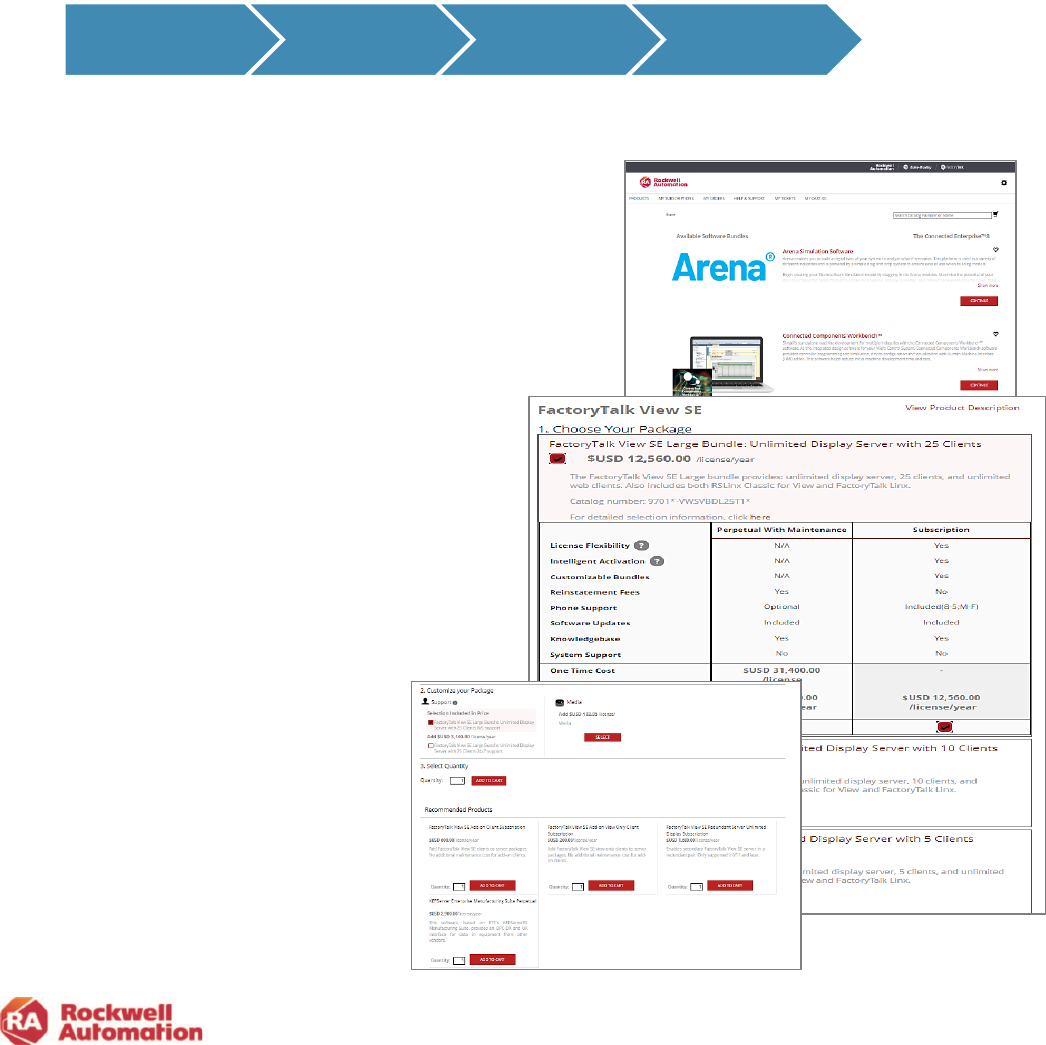
Select Software and Create a Quote
1. Login to the Commerce Portal and on the Products
page, choose the software brand you want to
purchase by clicking the Continue button
OR
Type the desired catalog directly into the field
located at the top right of the screen.
2. Select the type of software package you want
to purchase, optional add-ons, customizations,
quantity and recommended products
3. Select ADD to CART
1. Select Software &
Create a Quote
2. Complete the
Order (Checkout)
3. Allocate
Licenses
4. Download and
Activate Software

9
4. Choose CHECKOUT or click the CART icon
when completed shopping
5. Review your CART and click CHECKOUT
6. Review the details of your quote and choose
EDIT to change any of the settings
7. Enter your PO only if you wish to checkout
and submit and order request otherwise leave
empty for your quote
8. Check the boxes regarding purchasing through
distribution and that you agree to the End User
License Agreement
9. Click GENERATE QUOTE

10
2. Complete the Order
Use the Simple Checkout Workflow- if you prefer to have a “hands-off” approach and allow
your distributor to complete the order request for you.
OR
Use the Purchase through Distribution Workflow- if you prefer to submit your own order
request in the Commerce Portal and the transaction be purchased through distribution.
OR
Use the Purchase Direct Workflow- if you prefer to submit your own order request in the
Commerce Portal and the transaction be purchased directly with Rockwell Automation.
Simple Checkout Workflow
1. Your distributor creates a quote on your
behalf within the Commerce Portal. You
will receive a quote confirmation email
with details to review.
2. When you are ready to purchase,
provide your PO to your distributor. They
will add your PO to the quote and assign
you as the owner of the contract. This
action will initiate an order request and
an email confirmation will be sent to you.
3. Simply, click the Complete Order Request button
from within the email confirmation you receive. You will only
need to click this button once, on your first transaction with
Rockwell Automation. If you are a returning customer, a
Simple Checkout order will be placed automatically, so you
do not need to take any additional actions. An order
confirmation email will be sent to you with the order details.
4. On the contract start date, you will receive a Welcome Kit
email with instructions on downloading and activating
software and how to assign licenses to software users.
5. Your distributor can allocate licenses to software users for you in the Commerce Portal. On
the contract start date, Welcome Kit emails will be sent to those users with instructions on
activating their software.

11
Standard Purchase Through Distribution Workflow
Customer Creates Quote
1. Create a quote in the Commerce Portal by selecting a
product.
2. Click the gear icon to set the Transaction Settings for your
quote. Select the shipping and billing addresses, distributor
to purchase through, and any special price agreements you
may have with Rockwell Automation. You will receive a
quote confirmation email with details to review.
3. Complete the checkout in the Commerce Portal by
entering your PO and other information needed and
click the SUBMIT ORDER button. Review your order
confirmation email that will be sent to you with details.
4. Send a copy of your PO to your local distributor as
they will need this confirmation to complete the order
processing of your transaction.
5. On the contract start date, you will receive a Welcome
Kit email with instructions on downloading and
activating software and how to assign licenses to
software users.

12
Distributor Creates Quote
1. A quote is created in the Commerce Portal by your distributor.
If the distributor creates the quote, they will need to assign you
as the contract owner for you to complete checkout. A quote
confirmation to be emailed to you.
2. Click the Check Out Now button in the email to navigate to
your quote in the Commerce Portal and complete the checkout.
3. Enter your PO and other information into to the checkout
screen and click SUBMIT ORDER
4. Send a copy of your PO to your local distributor as they
will need this confirmation to complete the order
processing of your transaction.
5. On the contract start date, you will receive a Welcome Kit email with instructions on
downloading and activating software and how to assign licenses to software users.

13
Customer Direct Order Workflow
1. Create a quote in the Commerce Portal by selecting a
product.
2. Click the gear icon to set the Transaction Settings for
your quote.
• Select the shipping and billing addresses and any
special price agreements you may have with Rockwell
Automation.
• Choose No Distributor for the distributor field in a
direct order. You will receive a quote confirmation
email with details to review.
3. Complete the checkout in the Commerce Portal by
entering and attaching your PO and completing
information needed.
4. Click the SUBMIT ORDER button. Review your
order confirmation email that will be sent to you
with details.
5. On the contract start date, you will receive a
Welcome Kit email with instructions on
downloading and activating software and how to
assign licenses to software users.

14
3. Allocate Licenses to Software Users
The Manage Licenses page of the Commerce Portal provides a dashboard of your quotes and
contracts, software products purchased and license allocation information. Contract owners,
those assigned as Commerce Portal software administrators, and distributor administrators can
allocate licenses to software users.
1. Access Manage Licenses by clicking the Manage
Licenses button from within your Welcome Kit email.
or
Log in to the Commerce Portal, choose My
Subscriptions from the top menu and then select
Manage Licenses from the left pane.
2. Click the blue quote or contact link that
contains the software products and
activation licenses you wish to allocate to
software users.
3. You will navigate down a level in the
contract to the product page. Here
you can view the software products on
this contract, serial numbers, and
licenses allocation. Click the Add Users
link.
15
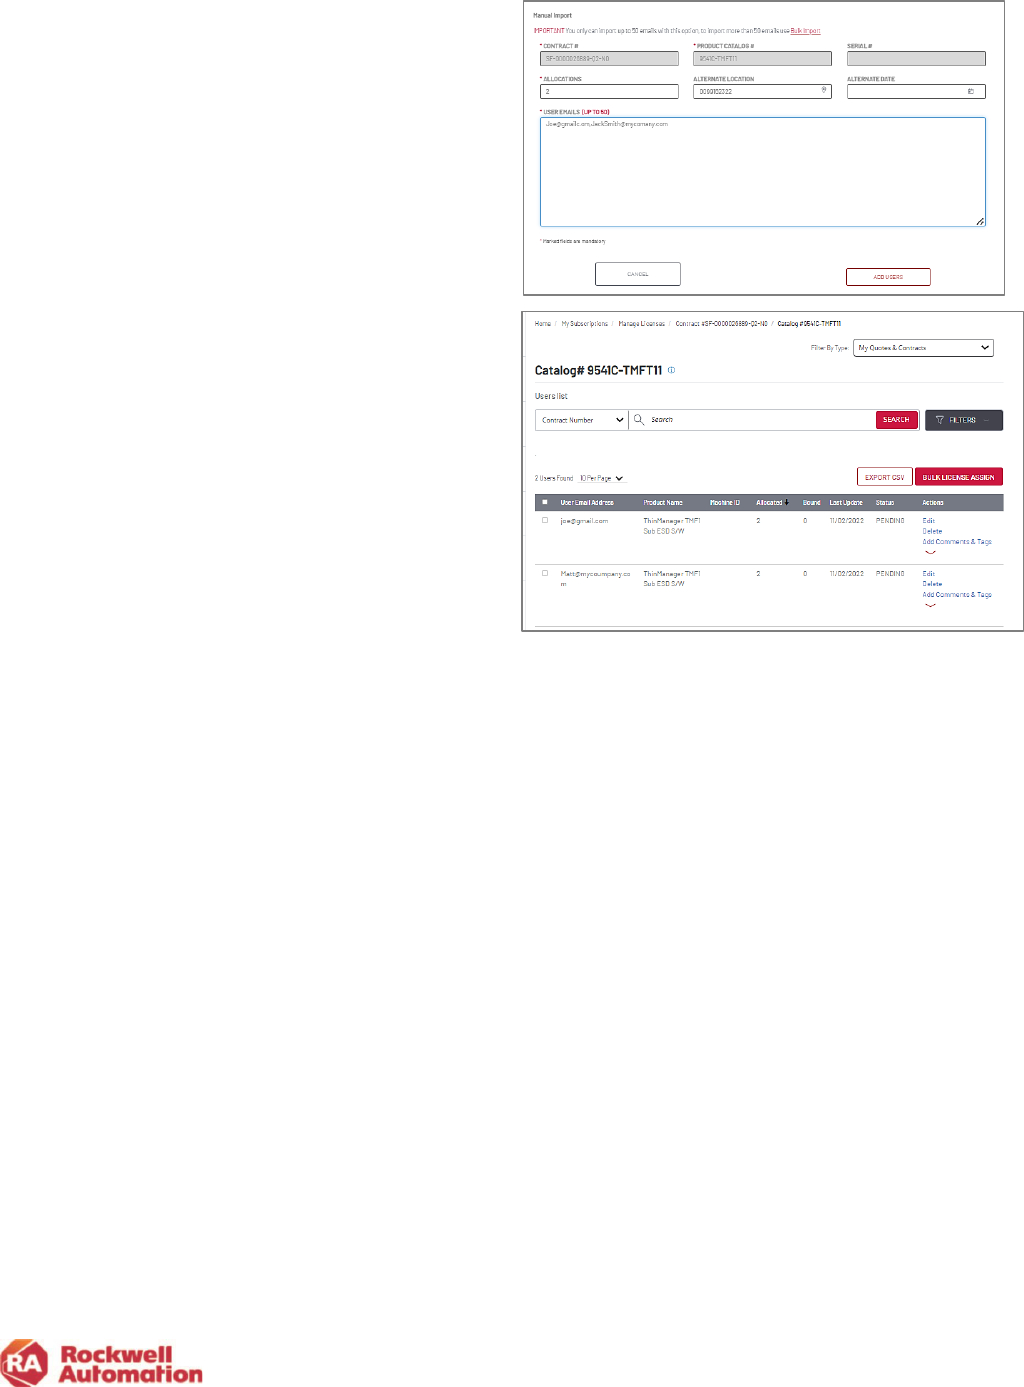
4. The fields required to be filled in are marked
with asterisk *. Type in the allocation number
and the email address of the software user to
whom the license will be allocated to. Multiple
emails (up to 15) can be assigned and
separated with a comma. Click ADD USERS
when complete.
5. The software users and the allocated licenses
will appear in your user view located under
the product catalog view. The licenses will
show as Pending until the software users
activate their software.
Use the breadcrumbs at the top of the page to
track and navigate back up levels to product
catalog and to the contract.

16
4. Download and Activate Software
Welcome Kit emails, sent on the contract start date to
those allocated licensed in the Manage License page,
contain links for downloading and activating software.
1. Click the Download My Software button in your
Welcome Kit emails to download your software.
2. Click the Active My Software button to activate
your software.
Links are also available to the contract
owner in My Subscriptions of the
Commerce Portal to download and
activate software.

17
Commerce Portal Roles
Access to the Commerce Portal is available to all Rockwell Automation customers, distributors,
and Rockwell Automation employees. The portal functions differently for each type of user. The
functions that a user will be able to access will vary depending on the type of user and this
access in limited to the Commerce Portal, no other business systems.
Customer Roles
There are three role types that can be assigned to customers accessing the Commerce Portal.
All roles allow access into the Commerce Portal to view products and create quotes.
Contract Owner and Assigned Owner
• The role of owner is assigned to any customer who creates a quote or is assigned a
quote. They will have the ability to submit an order or “checkout”. The owner can assign
the contract (or quote) to another person within their company to be added as an
additional owner and manage the contract. Additionally, the owner can transfer the
contract to a new owner at a new company, as in the case of an OEM or systems
integrator.
• Owners receive a Welcome Kit email with software download and license information,
and they will automatically be set up as a software user to have licenses allocated to
them if so desired.
• The owner can allocate activation licenses to software users by using the Manage
Licenses functionality in the Commerce Portal.
• The owner will receive renewal notification emails when their contract is within 120 days
of expiration and can manually renew a contract.

18
Software User
• Software users are persons that need software licenses (activations). Software users are
assigned licenses (activations) from a contract owner using the Manage Licenses page in
the Commerce Portal. Software users receive activation and software download
information from the Software User Welcome Kit emails. If you are an OEM or Systems
integrator, you can assign licenses to your end customer.
Software Administrator
• It is recommended as a best practice to assign a person as an administrator. The software
administrator role can be assigned to help manage licenses and users, and optionally be
notified of upcoming renewals.
• The software administrator has visibility to all contract activities in a region and a software
enterprise administrator role can have visibility across multiple regions.
• Software administrator roles can be created by the owner, via the View Users page in My
Subscriptions or by submitting a ticket request via the Incident Management and Ticketing
system in the Commerce Portal Help & Support page, and requesting a user be added as
a Software Administrator or Software Enterprise Administrator.
Distributor Role
• Distributors can create and assign quotes to customers as well as assign software users
licenses on behalf of their customer within Manage Licenses.

19
Commerce Portal Overview
This section provides a brief overview of the pages within the Commerce Portal. Links to the
pages are located at the top of the page.
Begin a quote by selecting your software
from the Products page. The Products page
lists the software available for purchase in
the Commerce Portal.
Click the CONTINUE button to begin to
build your customized software bundle.
Alternatively, if you know the catalog of the
software you would like to purchase, type it
directly into the catalog field at the top of the
page.
Click the heart shape icon below the
product descriptions to add commonly used
products to the Favorites list at the top of
the Products page.
My Subscriptions provides visibility and
access to the contracts assigned to you and
your company. All contracts are identified by
the contract number.
Note: The cross reference for your
Purchase Order number to the contract
number is found in your Owner Welcome Kit
email.
This page also provides multiple navigation
links for advanced functionality to manage
licenses and activations, check order status,
and manage contracts. The functionality
visible on this page is dependent on the role
of the user who
signs in. Owners, administrators, and users
will have slightly different options and actions
available to them when viewing this page.
Products
My Subscriptions

20
The Order History page shows a
history of all your past orders and
quotations you have generated.
To find a contract originated by
someone who is no longer at your
company, use the Archived Quotes
filter to search for the contract.
The Help & Support menu provides
links to several video tutorials, answers
the most common questions, and
enables you to submit inquires directly
to the Commerce Portal support team.
Use the Category and Subcategories to
help define your issue to receive timely
support. Include additional emails of
those to be copied on responses and
any attachments as necessary to your
support ticket.
Order History
Help &Support

21
When you click My Tickets, a new
window for the Rockwell Automation
customer support page will open. Here
you will see active Service tickets for
your account.
Service Tickets are created when you
submit questions through the customer
support question submission on the
Help & Support page.
My Cart breaks the cost down into
annual cost and one-time costs.
Annual costs include subscription
licenses and maintenance and support
costs to stay in support. These items
are then renewed at the end of the
contract term.
One-time costs include perpetual
software licenses. Since they are a
one-time buy, you own the license
forever. (Note- the associated 1
st
year
software maintenance & support for the
perpetual license is an annual cost that
needs to be renewed yearly to stay in
support.)
*List Prices shown are for demonstration only.
My Tickets
My Cart

22
Transaction Settings allows you to set
basic settings for your contract that will
be saved and applied to your transactions
each time you create a new quote or
order.
These settings include language, country
of transaction, shipping and billing
address, billing options, agreement terms,
special pricing agreements and if your
purchase will be direct to Rockwell
Automation or purchased through a
distributor.
The first time you log into the Commerce
Portal, it is recommended that you
configure your Transaction Settings.
The Transaction Settings need to be
configured once and when saved will be
applied to your transactions.
Transaction Settings

23
Creating a Quote
The quote process is completed by following these steps:
Configure Transaction
Settings
Click the gear icon on the top right of the
Commerce Portal menu to display
Transaction Settings.
Set basic settings for your contracts
including language, country of transaction,
shipping and billing
address, billing options, agreement terms,
special pricing agreements and
choose if your purchase will be direct to
Rockwell Automation or purchased
through a distributor.
Language and Country
Select the desired language
Complete
Order
OR
Assign Quote
to someone to
complete the
order
3. Complete
the checkout
page and
choose the
Create Quote
button
2. Select your
software
including add-
ons and
recommended
products
1. Configure
Transaction
Settings

24
Shipping and Billing
1. Select your shipping address by clicking the
Add icon (pencil).
2. Enter the customer information into the
Customer and City fields
3. Click the search icon to find and guarantee
that primary accounts are being used.
4. Click the address for your location that
appears.
5. When choosing your billing address, you
can simply click the Billing Address is the
same as Shipping Address box
or
click the CHOOSE BILLING ADDRESS
button to bill a different address.
• When choosing to search for a different
company billing address, it is
recommended that you use the built-in
search feature. Type in the company
name and city and click the search icon.
The Primary address locations for
companies that are setup with Rockwell
Automation will appear.

25
If the searched address is not found, you can use
the +ADD NEW ADDRESS link to search for an
address using a BPID.
Note-The +ADD NEW ADDRESS does not
guarantee that the BPID and address is a primary
account, it may be a secondary account. Please
send a help ticket using the categories
Account>Address Book/BPID Issues.
Enter Contract Details
In this section, you can set the date for when your contract will start, how often to be billed, the
billing terms, and whether the order will be purchased through a distributor or direct with
Rockwell Automation.
Billing Options
Multiple billing options are available for your contract:
• Quarterly
• Annual
• Single Billing (One-time Multi-Year)
• Monthly
• Bi-Annual
Distributor Option
The distributor field is pre-populated with the in-APR
distributor closest to your company based on the billing
address. You may select another distributor in the
dropdown list.
For direct orders uncheck the Complete transaction
through Distributor checkbox and select No Distributor
Note- If your distributor does not appear, use Authorized Distributor TBD and enter the
distributor name and address in the notes field of the checkout page. The Rockwell Automation
Customer Care team will follow up with you before processing your order.

26
Agreement Start Date Options
The Agreement Start Date is when your
software contract begins along with the
following:
• Invoicing is applied
• Maintenance and support begin
• Owner and User Welcome Kits
containing software download and
• activation information will be emailed
Agreement Term
There are three contract term options to select:
• 1–5-year term agreement
• Contract Anniversary - If you have a TechConnect
agreement with Rockwell Automation, the
agreement term will default to the TechConnect
anniversary date. Your contract will be prorated
based on the number of days in the contract
period. The agreement start-date defaults to
today’s date. The start date can be changed to a
future date.
• Align to a previous order- Select from the list of
past orders to align your new contract date to.
Delaying the Start Date of a Contract
If you would like to delay the start of the contract, select the date in the future and the contract
will start on that date. You can also choose to use the start date to align with the ship date of
materials.
.
If the contract start date is more than 90 days out and the contract start date needs to be
extended further into the future, you may request a start date adjustment by submitting a
request through the support ticket on the Help & Support page.

27
Select Available Pricing Agreements
The Commerce Portal will automatically search for any pricing
agreements that you have negotiated with Rockwell Automation.
If applicable, select the Agreement Type and/or choose the radio
button next to the agreement that applies.
Only one agreement at a time can be applied.
Click SAVE to store all your Transaction Settings for future portal
orders.
Software Selection
The Products page at the top of the Commerce Portal screen lists the software brands available
for purchase. Once you select a brand, the Commerce Portal will display the specific software
offerings, additional technical support options, add-on products options and any recommended
products if applicable.
Alternatively, you can search for a product simply by typing the catalog numbers directly into
the search bar for a quick look up.
To add a product to your quote:
• type in the catalog number
in the search bar
• click the product brand in
the listing
• click the Continue button
next to the brand name.
Choose Your Package
Rockwell Automation offers flexible subscription-based licenses as well as the traditional
perpetual software licenses for most products.
The Subscription option provides flexibility to upgrade and change your licenses over time as
needed. The cost of the subscription includes maintenance and technical support and is
renewed annually. You own both the license and maintenance and support for the term of the
contract. At renewal, you have the option of modifying your contract and licenses as needed.

28
The Perpetual with Maintenance option is a one-time cost for the software license and
includes 1st year maintenance and technical support (annual cost). With this option, you own
the software license forever, but will be required to renew the Software Maintenance &
Support contract each year to continue support.
1. Selecting the type of software license you want to use,
Perpetual with Maintenance or Subscription.
2. Customize your package by choosing
Support Options and Media. Some products,
such as Studio 5000, offer additional “Add On”
functionality that can be included in your
software package.
3. Select the Quantity of licenses to add to add
to your quote and click ADD TO CART.
*List Prices shown are for demonstration only.

29
You will be prompted to checkout your order or to continue shopping to add additional items to
your cart.
o To add other software or recommended products
that are available for your software package,
click CONTINUE SHOPPING
o Click on CHECKOUT, if you are ready to create
your quote/order.
Recommended Products
Recommended products are optional software products that can be added to your quote or
order. They will appear as a separate line item in your CART and will not be combined into
any previous software bundle items you were previously building for your quote or order
4. Select any of the
recommended products to
accompany your purchase.
Note: Not all software offerings
have recommended products
to choose from.
*List Prices shown are for demonstration only.
To complete a quote, you will need to complete the checkout page and click the CREATE
QUOTE button located on that page.
5. After all products have been added, select CHECKOUT.

30
Complete Checkout
The checkout process will navigate you to your CART where you review your software
selection. Adjust the quantity of licenses or remove items.
If pricing in Your Cart does not
match what you are expecting,
check your Transaction
Settings to see if any expected
agreements should be selected.
If a distributor created the
quote, check and apply the
same agreement number as the
one the distributor applied.
6. After a review of your
shopping cart, click on the
CHECKOUT button.
*List Prices shown are for demonstration only.
This checkout action navigates you to the Checkout page where you can complete a final
review of your order and enter your purchase order information. The page will
automatically prepopulate the shipping, billing address, and contract details that were
configured in the Transaction Settings.

31
• To edit any of the settings, use EDIT
(pencil icon) to open Transaction
Settings and make changes. The
changes will be reflected in the checkout
page.
• To change the number licenses, click
the UPDATE CART link at the top of the
page. This will navigate you back to
your CART where you adjust the
quantity as needed.
7. Click the checkbox at the bottom of the
page to agree to the License
Agreement.
8. Click GENERATE QUOTE to create a
quote.
*List Prices shown are for demonstration only.
To complete an order request:
1. Enter your Purchase Order number (and attach PO is order is direct with Rockwell
Automation).
2. Apply any promotional discounts you may have.
3. If you have Incentive Dollars, a field will be available for you to enter the amount to
apply to your order.
4. Check the License Agreement and other applicable boxes located at the bottom of the
page.
5. Click SUBMIT ORDER.
It is recommended that you add your purchase order number to your quotes. You have the
option of entering your PO when you create your own quote or when you are assigned a quote
from a distributor. An order will not be fully submitted until a purchase order has been added
to the transaction. Note-The Purchase Order number you enter will also be used at time of
renewal. You will receive a renewal notification indicating that you can keep the same PO or
choose to enter a new PO at that time.
Your PO number will appear in your order acknowledgement email and renewal notices along
with your order number.

32
Quote Confirmation and Assign Quote
Once your quote has been generated, you will receive a quote confirmation and a confirmation
email with an attached quote and bill of materials in a .pdf document.
The quote confirmation and email both provide links to complete the checkout process, as well
as an option to assign the quote to another person to be the quote/contract owner.
Assigning the quote to another person allows that
person to check out the quote. This person will
have access to software downloads, activations
and will receive renewal notifications.
1. Click ASSIGN A QUOTE OWNER directly
from either the Commerce Portal or email
confirmation, or use the Assign Contract action
in My Subscriptions, to assign the quote to the
individual who will be the new contract owner.
2. Enter the person’s email address and click on
ASSIGN.
Note- Distributors will use the Assign Quote function to assign Commerce Portal quotes they
create to their end customers.

33
3. Click on YES to confirm you want to send the email.
The new owner will receive an email once the quote has
been assigned to them.
When you assign the quote to another person, the pricing
and proration will not change. The new owner can click
Check Out Now to submit an order request.
Pricing Holds
All software quotes have a 90-day pricing hold. Contracts that have terms longer than 1 year
will have prices locked in for the entire term.

34
How to Submit Order from an Assigned Owner Email
If your distributor has created a quote for you and does not have your
purchase order entered into the quotation, or if this your first order
request transaction in the Commerce Portal, you will need to take steps
to complete the order request from your Assigned Owner email like the
one shown here.
This email will provide you two options for submitting your order:
1. Checkout Online - Navigates you into the Commerce Portal to
review your order and complete the checkout, including
entering your PO.
2. Initiate Manual Checkout - Provides a method to check out
your order without logging into the Commerce Portal.
Checkout Online
Clicking this link in the email will navigate you to the Commerce Portal Checkout page.
To complete the checkout and submit your order, you
will need to:
1. Enter your PO number (and attach your PO if a
direct order).
2. Check the boxes at the bottom of the screen.
To modify your order and make any changes, click the
Requote action located at the top left of the page.
To edit your Ship To address in the Transaction
Settings, click the gear icon at the top of the page .

35
Initiate Manual Checkout
Clicking this link will initiate the manual checkout
process. This process does not require the
quote/contract owner to log into the Commerce
Portal to complete the order.
The quote/contract owner should expect to be
contacted by Rockwell Automation Customer
Care via email requesting required purchase
order information to complete the purchase
process.
Note: Manual checkout may add additional time for the order creation to be completed.
Customer Order Acknowledgement
Once you have completed the checkout, you will receive an
email with the order confirmation.
Note- If you are purchasing through a distributor, please
send a copy of your purchase order to them for them to
complete the order process.
All software contracts are set up for Auto-Renew. The
contract owner has the option to “opt out” of Auto-Renew by
clicking the link in the email, or by selecting the Auto Renew
action in the My Subscriptions page at any time.
36
Welcome Kits
Once an order has been completed and submitted, on the agreement start date an Owner
Welcome Kit email with the license and software information is generated and sent to the
contract owner.
Users allocated software licenses will receive their own User
Welcome Kit email with activation and license information on the
agreement start date, or when they are added to an active
contract by an owner. An owner will also receive a User
Welcome Kit email since they are automatically assigned one
license.
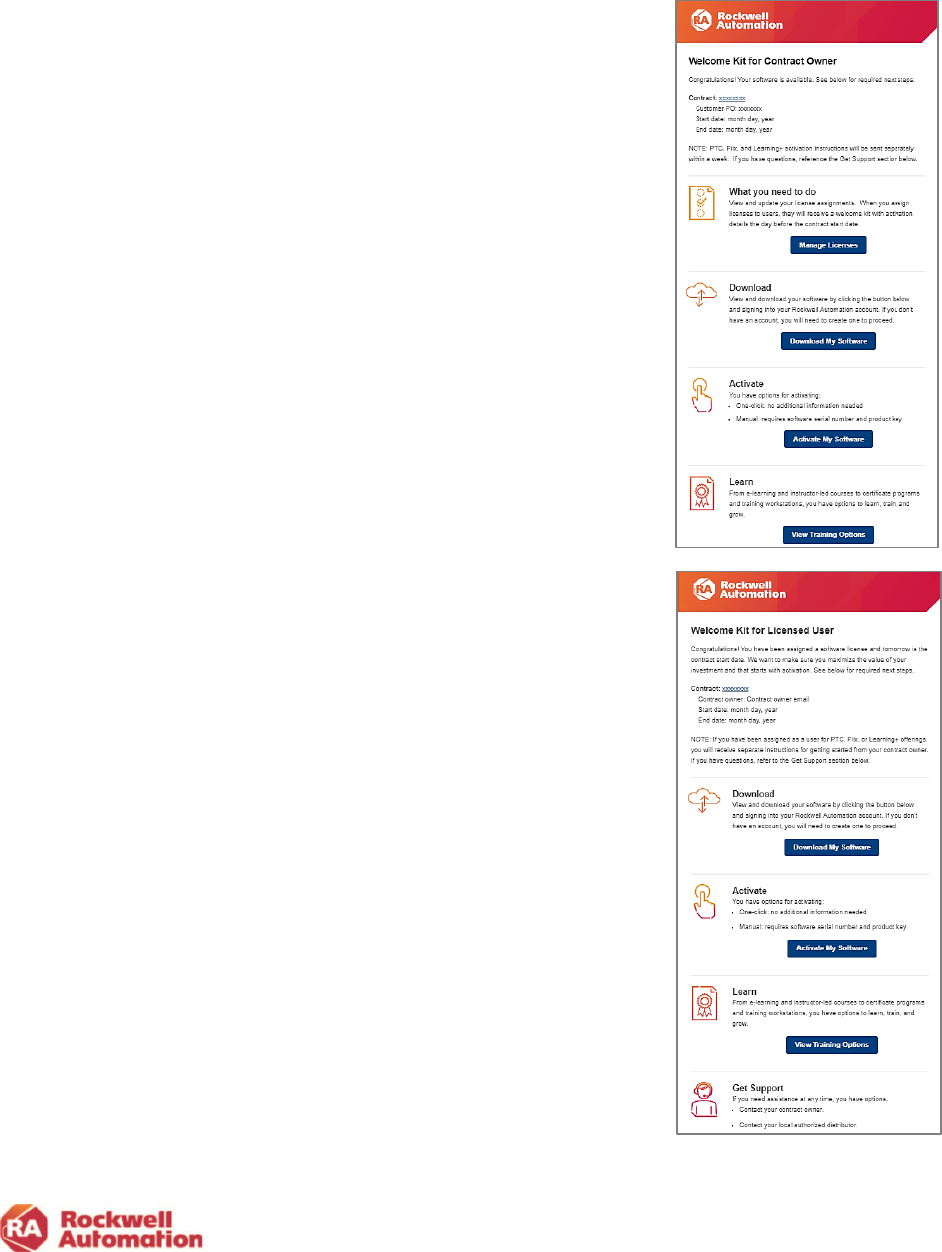
The Owner Welcome Kit email contains:
Your contract details
• software product name
• serial number
• number of licenses
• authorization number for technical support
• your purchase order number and subscription contract
ID
Includes links to
• download your software
• activate licenses
• manage Licenses page to allocate software licenses
The User Welcome Kit email contains:
Your license details:
• software catalog number
• contract ID
• authorization numbers for technical support
Includes links to
• download software
• activate licenses
• additional training information
The contract owner does not need to use their software license and
it will not count against the maximum license count. The unused
license will show as Pending in the Manage Licenses page and is
fine to be left in this state.

37
My Subscriptions
The My Subscriptions page allows you to view and manage your accounts, contracts, and
licenses.
Here you will have access to a variety of
actions you can take on your quotes and
contracts, including:
• buying and downloading software
• upgrading, or purchasing additional
licenses
• renewing contracts
• transferring your contract
• viewing your order status.
Use the advanced search and filtering
options to locate contracts based on serial
numbers, POs, project tags, and a wide
variety of other factors. Save can be
saved for quick and easy reuse.
Tabs on the left side of the page to
navigate to other functions in the
Commerce Portal.
Filter and Search
Filter by Type, choose:
• My Quotes & Contracts - allows you to
see the quotes and contracts that only
you are the owner of
• My Company Quotes & Contracts-
allows you to see the quotes and
contracts of your entire company if you
have Software Administrator privileges
Search for a contract based on:
• Contract PO Number
• Catalog Number
• Brand
• Software Part Number
• Serial Number
• Assigned User
• Distributor PO
• Tags
Partial searches and multiple searches are supported by separating search criteria with
commas.

38
Additional search filters include:
• Date range to search contracts based on:
o Contract creation date
o Contract start date
o Contract end date
• Previous and Next 30, 60, 90, 120-day
date selection
• Ship To or Sold To - BPID Address
selection
• Contract status
• User license status:
o All
o Pending
o Bound
o Expired
o Renewed Error
• Quote Type
• Payment Type
o Quotation
o Purchase Through Distribution
o Enterprise Order
o Lab Use Only Order
o Billing Reference Direct with Rockwell Automation
Saved Searches
Filters and search criteria can be saved using the SAVE SEARCH button.
• Click the SAVE SEARCH button
• Enter a name to save the search and click SAVE
SEARCH
• Use the pulldown to reuse the saved search in
the future

39
Manage Subscriptions
The Manage Subscriptions page allows you to manage your quotes and contracts in the
Commerce Portal. This is done by using the functions under ACTION next to the contract you
are managing.
Click the left expansion arrow
to display the product catalog
and quantity for that contract.
Actions will vary depending
on which status your contract
is in.
Contract Status
The status of your contracts can be
viewed using the Manage Subscriptions
page in My Subscriptions. Additional
details can be viewed by clicking on the
status that appears next to any of your
contracts.
The contract can be in any one of the
following states:
• Quote
• Assigned
• Approved (for Purchase Thru Distribution only)
• Submitted
• Active
• Expired On Hold Cancelled
Order Status Tracker
Click on the Contract Status
text to open the Order Status
Tracker to see where in the
transaction cycle the
contract is.

40
The Order Status Tracker will display a red checked circle for the completed stages of the
transaction.
There are 5 transaction stages for a Purchase Through Distributor transaction.
There are 4 transaction stages for a Customer Direct transaction.
Status
Description
Actions Available
Quote
This status indicates the contract is still in the quote stage and is
ready to be submitted for checkout by the customer.
Checkout
Requote
View PDF
Delete
Assign Quote
Assign Contract
Assigned
This status indicates the quote has been assigned for customer
review via email and is pending to be Approved for order request
by customer.
Checkout
Requote
View PDF
Delete
Assign Quote
Assign Contract
Approved
This status is for Purchase through Distribution transactions only.
After a quote is submitted for checkout by the customer it will be
in the Approved status. The local distributor will be notified via
email that your contract is now Approved.
When the distributor receives your PO and submits it into the
Commerce Portal with their PO, the status will change to
Submitted. Once an order is changed to the Submitted status it is
automatically routed to become Active. No further action is
needed by the customer or distributor when both POs are
entered.
View Owners
Assign Contract

41
Submitted
This status indicates the order has been submitted with POs
through the Commerce Portal and is actively being processed by
Rockwell Automation for release. The next stage is Active.
View Owners
Assign Contract
Active
This status indicates the contract is now Active. Owner and User
Welcome Kit emails will be sent on the agreement start date to
owners and any software users assigned licenses. Owners can
continue to assign software users licenses using the Manage
Licenses page.
Buy More
Assign Contract
Auto-Renew
Auto-Approve Users
View Owners
Download
Activation Certificates
Upgrade
Renew (available at
120 days before
expiration)
On Hold
This status indicates the order has been submitted and is On
Hold. It is actively being reviewed for approval by the website
support team. The customer will be contacted if any further action
is required.
View Owners
Expired
This status indicates the contract end date has been reached and
the contract is now expired. The contract can be re-quoted by
selecting the Buy More action or by choosing Renew in the
expanded Products window.
Buy More
Renew
Reinstate
Cancelled
This status indicates the contract has been canceled. The owner
can choose to repurchase this product on a new contract by
clicking the Buy More action.
Buy More
Assign Contract
View Owners
Requote
*Note- Cancelled on a quote indicates the pricing has been cancelled and is no longer valid.

42
Action descriptions are listed below.
Actions
Use to:
Checkout
Submit a quote for order processing
Requote
Adjust quantity, special pricing agreement selection or to add additional
products to a quote
View PDF
Display a PDF file of the quote for print, email or other forms of viewing
Delete
Removes the quote from the Commerce Portal
Assign Quote
Assign a new owner for the quote
View Owners
View the owners assigned to the quote/contract
Assign Contract
Assign a new owner of the contract
Buy More
Add additional licenses to your active contract. In some instances, a
new contract is created as in the case of Toolkits
Upgrade
Upgrade the support the level or applicable product options
Renew
Manually renew your contract
Auto-Renew
Enable/Disable automatic renewal
Auto-Approve Users
Automatically approve software users assigned to Manage Licenses
Download
Navigates to the software download page
Activation Certificates
View license and activation information and activation links
Reinstate
Restore an expired contract, which may be subject to back-dating rules

43
Manage Licenses
Click the Manage Licenses tab to view or assign license allocations to software users. A link to
Manage Licenses can also be found in the Owner Welcome Kit email.
The Manage License page provides:
• Visibility to users, licenses, software downloads in
an organized and accessible environment
• License management including software
deployment, viewing activation usage and filtering
activation records
• Comments and project/reference tagging allows
specific information and sort fields to be added to
contract and user record data
• Flexibility to deploy software using automated
workflows for connected users and support for
disconnected legacy workflows
• Streamlined software downloads and
activations provided from user Welcome Kit email
License Activation Status
The Manage Licenses page provides status on the activation licenses allocated within your
contracts. In addition, you can sort your view of the license allocation based on these statuses.
Licenses will have one of the following
statuses:
Pending- A software license was
allocated and a User Welcome Kit
email was sent to the user. The user
did not activate their license.
There is no limit on the number of
pending licenses. These are not
deleted and can be hidden by filtering
in Manage Licenses.
Bound - The user activated their license successfully.
Expired - The license activation has expired and is no longer available to use.
Pending Renew - The license has been selected to be renewed as part of a new contract
and is waiting activation. (This status will be displayed in the new renewed contract).
Renewed - The activation has been renewed and the license has been assigned to a new
contract.
Error - The license has an error and is not active. For support, contact Rockwell
Automation at: https://activate.rockwellautomation.com.

44
Assign Users to a Software License
1. Choose the Manage Licenses located in
the left pane of the My Subscription page
2. Navigate to the contract containing
the licenses you wish to allocate.
Click the blue contract number link to
navigate into the contract to view the
Product List page
3. Find the product catalog in your
contract that you will allocate licenses
from and click the Add User link
under Actions column
Note- Use the breadcrumbs at top of page to
navigate back to Manage Licenses or My
Subscriptions.
Licenses can be assigned to software users while the contract is in the quote stage or after the
contract has become active. Software users can assign other software users to contracts in the
quote stage only.
4. Enter the number of activations to
be allocated to a user
5. Add the email(s) of the software
user(s) to an assign activation to
• Up to 50 emails can be entered.
• Optionally, you can assign an
alternate location BPID if the
software user is at a different
address
• Optionally, you can add
different date for the software
user to receive their activation
6. Click ADD USERS when complete

45
Software users will appear in the table with the
allocated amount assigned to them.
Allocations are Pending until the user activates their
software using their user Welcome Kit email.
Licenses will then be displayed as Bound.
Additional links are available to:
• edit or delete software user information
• add comments or project tagging
information associated to the user and
activation
Use the arrow under Actions to display
alternate start dates and addresses
Note- If a license is not used and shows
Pending, it will not count towards the total license count. There is no limit to the number of users
that can be allocated licenses as Pending.
Note- Once a user has been added to the Manage License page, they cannot be removed.
However, they can remain in the “Pending” status with their activation unbound with no issues.
Note- On transfer of the contract, these licenses will be maintained to the software users
assigned in the Manage Licenses page. If you are an OEM, you can allocate licenses to your
end-customer here.
Licenses can be assigned to users outside of your company, as in the case of an OEM and end
user. When assigning licenses to software users with different locations and alternate start
dates, use the help ticketing system and select Complex quotations or special pricing
Deleting Software Users Assigned Licenses
Once a user is assigned a license by email, the entry remains on record and cannot be edited or
deleted. To return or unbind a user-activated license, the assigned user of the license must use
the Rehost function in the FactoryTalk® Activation Manager. The total allocations will be
updated to reflect the returned activation.
Unknown User
An Unknown user will appear under the USER column in Manage Licenses when a software
user manually activates their software using FactoryTalk Activation Manager versus using the
automatic activation feature in their User Welcome Kit email. The owner can edit this entry by
choosing Edit. The owner can type in a valid email address for the Unknown user.
Project Tagging and Comments

46
Use the Add Comments & Tags action
to document your project with specific
comments or add tags at the contract,
product and user levels that can be used
in your search and filters.
• The large comment box supports up to 1000
characters.
• Tags are searchable and can be included in
export file
• Tags are entered as single word, comma
separated text
• An icon will display if a comment or tag has been
added
Bulk Add Users
To allocate licenses in bulk to large quantities of users, use the Bulk Add Users button to add
email and allocation information into a .csv file that can be imported into the Commerce Portal.
1. Click the ADD BULK USERS button
in Manage Licenses
2. In the Bulk Add Users dialog, download
the Instructions and CSV Template file

47
3. Edit the CSV Template file by entering
the required user and contract
information into the columns and save
4. Click the UPLOAD CSV File button
5. Once the file is uploaded, click the
ADD USERS button
6. In the Add Bulk Users dialog edit or correct
any items that are flagged red or yellow as
an error or warning
7. Click the SAVE & CONTINUE button to
complete the import
8. Upon import complete, choose to view the
users added to the contract in Manage
Licenses or continue to add additional users

48
Export
Use the EXPORT CSV button to export software
user email addresses, license allocations, serial
number, tags BPIDs and much more.
1. Click the EXPORT CSV button in
Manage Licenses or My Subscriptions
2. In the Export Data to CSV popup select
fields you would like to include in the
exported csv file
3. Click the CONTINUE button
4. When the export has completed, you will
receive an email indicating the export was
successful along with a link to download the
csv file
5. Click the Download link in the email
6. View and save your export file

49
View Users
The View Users page in My Subscriptions will display people who have been assigned
contracts located in the same business locations. The contract owner can change the role of
users that appear there.
To add additional persons to this View Users page and/or assign them roles, contact the
Software Webmaster team by submitting a ticket request via the Incident Management and
Ticketing page in the help menu.
1. In the My Subscriptions page,
select the View Users page
(only Owner roles will see a
link to this page).
2. Click the Edit button next to
the user’s name to edit.
3. Select the role to be assigned and click
Save.
• Software User
• Software Subscription Administrator
• Software Subscription Owner

50
View Addresses (Contract Email Notifications)
Contract owners can set up email notifications on activities related to their contracts. They also
have the option to opt out of receiving renewal email notifications.
1. Select the View Addresses page in My Subscriptions to view addresses and BPIDs
assigned to your company.
2. Click the Email
Notification box for
any of the addresses
to receive email
notifications for
orders, user requests
and renewals.
3. Click the Renewal
Notification Opt Out
box to stop renewal
notification emails
from being sent.
Cancel an Order Request
To cancel a quote or order request for a new contract before you receive the Owner Welcome
Kit, (submit a ticket request using the Ticketing System in the Help menu.
1. Select Subject: Order/Invoice
2. Select sub-category: Cancel
order request
3. Provide the quote/order
request number to cancel

51
Activating your Software
The software User Welcome Kit email includes all the
information needed to get you up and running with your
software.
Download and activate your software by clicking the
buttons in the email. This low touch functionality
automatically activates your license for you and binds your
serial number and machine ID to your license.
When the Activate My Software button is clicked, a pop-
up will appear. Depending on your browser you may be
asked to Run, Save or Save As.
• Use Run to activate to the local computer.
• Save is used to download the executable and to
activate.
• Save As is used to download the executable to
another computer. All options require the activated
computer to be connected to the internet.
Note: After the Activate My Software button is used, it
cannot be used again. It is inactive.
If you do not have the User Welcome Kits
email on hand to download and activate
your license, the same license activation
information is also available in the Manage
Subscriptions page in the Commerce Portal
under the Activation Certificates link.
You will be navigated to the Rockwell
Automation Activation web page, where you will
need to sign in using your Rockwell Automation
login.
The activation license information includes all
the products supported by the activation license,
including Add-on items that have been added to
the contract.
Note- Manual activation via the FactoryTalk®
Activation Manager can be used for remote or
disconnected devices.

52
Buy More and Upgrade
While the contract is Active, the owner can add additional licenses using the Buy More action or
add upgrades (if available for the product) by selecting the Upgrade action.
Buy More will amend your
contract with the additional
licenses you wish to purchase.
Clicking this action will navigate to
the Cart page where product
quantities can be adjusted, and
checkout completed.
New serial numbers will be created
and amended to the original contract.
The contract number will display a
suffix of “A1” for the amendment after
checkout. Refer to the table at the
end of this section for an explanation
of the changes to the Buy More
action.
*List Prices shown are for demonstration only.
Note- Buy-More is not available in the last 151 days of an existing contract.
Note- Buy More for Toolkits and transactions processed by Rockwell Automation Customer
Care will not amend your current contract. A new contract will be created.
Volume Discounts (Step-In Pricing)
The Commerce Portal Provides a cumulative (step-in) volume pricing discount when performing
a Buy More action on software products with volume discounting.
• Items that have volume discounts available will be shown with the Information icon.
• To be eligible for Step-In Volume Pricing, both the original and new contracts end dates
must align.
▪ Selecting Buy More will pass the previous volume discount total forward from an existing
contract to the new order being created.
▪ After selecting Buy More and completing a checkout on a new order, the Buy More link
will no longer be viewable in Manage Subscriptions on the contract. Choose the new
contract to perform any additional Buy More actions.

53
The Commerce Portal will provide indicators
that Step-In Volume Pricing is applied:
▪ CART will display a Volume Discount
Applied indicator
▪ Order summary of the
checkout page will have a
Volume Discount Message
explaining the discount
*List Prices shown are for demonstration only.
Note- Updates to the end date of the contract will invalidate the discounted pricing and may
lead to the renewal being unaligned.
Note- Updates made in Transaction Settings will prompt the user with a blue box message
stating that any changes related to volume discounting may impact the ability to consolidate the
contract at time of renewal.
Upgrade
This action allows you to add available options to your existing contract, such as upgraded
support or Add-ons, which may not have been initially purchased. Upgrade will add items to
your existing contract. Your costs will be prorated over the contract period. Upgrades are not
available for all products.
Click the down arrow on your
contract to view any products that
may have the Upgrade action

54
Assign Contract
Use the Assign Contract action to:
• Assign the contract to a new or additional owner in your company to help manage and
renew the contract
• Transfer the license registration and support contract to a new owner at a different
company on the agreement’s start date.
The Assign Contract action is
available for quotations and active
contracts. For a quote, the assignment
changes will only take effect on the
contract start date.
Assign Contract
To assign the contract to a new owner within
your company to manage the contract, enter the
email address of the new owner and click the
Assign button.
• The new owner is added to the contract
and can manage the current subscription
and renewal process.
• The new owner receives an Assigned
Contract email to notify them they have
been added as an owner to the contract.
• The original owner will also maintain
visibility to the contract.
Transfer License and Support Contract
To assign the license registration and support
contract to a new user at a different company,
click the checkbox to assign and transfer
the contract on the start date of the
contract.
The end user will be responsible for management of the contract and will receive the contract
renewal notices. This option will remove you from contract ownership on the start date
and you will lose all visibility to the contract.
Note- When transferring the license registration and software and support contract to a new
owner, individuals assigned licenses in Manage Licenses do not lose their license allocation.

55
Upon clicking the checkbox, the dialog will expand to allow
details of the new owner and their company to be entered.
• Enter the email address of the new owner and address
information.
o The user can use the Address Book to select a
new customer address for the contract.
o The address will be added as both the Ship To
Address and Billing Address. If the transaction
is direct with Rockwell Automation, then the
customer billing address will be the Sold To on
the transaction. If the transaction is purchased
through distribution, then the customer billing
address will not be part of the transaction.
• On the start date of the contract:
o The new owner is added to the contract and
can manage the current subscription and
renewal process.
o The new owner receives an email to notify
them they are the new owner of the contract
and that they will be responsible for the
contract renewal.
If your end customer does not have a valid BPID setup in the system, please send a ticket
request via the Ticket System in the Commerce Portal help.
1. Select Subject:
Account
2. Select sub-category:
Account
creation, update, login or rest
issue
3. Provide details in the Question
field regarding the end
customer to be added and their
contact information.

56
Renewals
As a software owner or administrator, you will receive renewal notifications when a contract is
approaching its expiration date. You will have the option to either let the contract automatically
renew to your prior purchase order, or if needed, take action to manually modify the renewal
contract with a new purchase order or any other changes.
With a perpetual with maintenance and support contract, you own the license (activation), and it
will not expire. The maintenance & support contract should be renewed prior to expiration to
avoid reinstatement fees and backdating of a new contract to the prior expiration contract end
date.
If software subscriptions are included and still required, they should be renewed prior to
expiration. The subscription renewal includes both the license (activation) and maintenance &
support contract for the subscription.
Renewal notices including your current contract information and a quote are emailed via the
Commerce Portal.
• Pricing in the renewal quote is valid for 120 days. After 120 days the pricing will show as
expired.
Note: Invoicing does not take place until the start date of the new renewed contract. If an order
is cancelled before the start date of the new contract, no invoicing will take place. The start date
of the new contract is set to the current expiration date plus 1 day.
Merging Contracts
Aligning end dates at time of purchase or renewal to other software contracts you have allows for
contracts to be merged at the next renewal, simplifying your contract management.
During contract renewals, the portal will
automatically default to align end dates to a
common anniversary date if you have one.
Previously aligned contracts can be merged at
the next renewal.

57
Renewal Quote Notifications
A notification about active renewal quotes will display when
updating the shipping address in Transaction Settings if a
renewal quote exists. The notification displayed will provide
options to consider reviewing the renewal quote or to
continue in Transaction Settings without review.
• The Review renewal quote button will navigate the
user to My Subscriptions and all renewal quotes will
be displayed.
Automatic Renewals
Software subscriptions and perpetual
with maintenance licenses are set to
Auto-Renew by default.
• No additional actions for renewal need to be taken by the contract owner unless they
want to update their PO or modify or cancel the contract. Your existing PO will be
used in the auto renewal unless you take steps to change it.
• If you make no changes to your renewal, the serial/part numbers stay the same.
There is no added administrative work on your part.
• If you do not receive a renewal notice but would like to renew, you can simply go to
My Subscriptions, select the contract, and select Renew.
• Your previous PO is referenced in your 120-day renewal quote. If you wish to change
or update your PO, select the Modify Renewal link in your quote.

58
With Auto Renewal set, you will only receive one renewal notice, at 120
days. The system will assume you are going to renew whatever you
bought last year and at 90 days prior to the expiration the system will
create an order request. If purchased through distribution, your
distributor will review and finalize the renewal contract with you and
process it in their system. The new contract will have a start date of
“expiration date plus 1”.
• 120 Days Prior to Renewal: An auto renewal email notice will be
sent out. At this time, you can take action to change the PO,
modify or cancel the contract.
• 90 Days Prior to Renewal: If no response has been made to the
120-day renewal notice, a renewal order confirmation email will
be sent out to you and the contract will be ready for renewal.
o If purchasing through distribution, your distributor will
receive a renewal order confirmation email. Once your
distributor has validated your order with you and
submitted their PO, your distributor will renew your order
with Rockwell Automation.
o Your contract in My Subscriptions will display a
“Renewed” status.
Once the order is created it cannot be modified. That means the PO, the activation count, the
incentive dollars (none will be applied) or the pricing discount (based on discounts already in
place) are all based on the original order from last year.
If you would like to modify the quote, use the Modify Renewal link provided in the renewal
notification email, or you can click the Requote action on the My Subscriptions page in the
Commerce Portal. This will allow you to create a new quote that can be submitted as a new
contract.
If you would like to cancel the renewal quote or order before the existing contract expiration
date, contact your distributor or send a request to Rockwell Automation by submitting a ticket
request via the Incident Management and Ticketing page to cancel the order request.
Purchase Through Distribution Transactions
For purchase through distribution renewal orders, your distributor will receive an email to add
their distributor PO to the renewal order. Once it is entered, the order will progress to Rockwell
Automation and the renewal order will be created. If your distributor does not submit a PO, the
order will not be submitted to Rockwell Automation and the renewal order will terminate 45 days
after the expiration date.

59
Your distributor has additional options on managing your renewals:
• They can choose to receive renewal notification emails on your contracts by selecting
to receive email notifications in View Addresses in My Subscriptions
• They can choose to turn on/off auto-renewal on your behalf by selecting the contract in
their My Subscriptions and clicking the Auto-Renew action.
• They can create a renewal quote for you by selecting the contract in their My
Subscriptions and clicking the Requote action. If you choose, they can also enter your
PO at that time so that no further steps would be required for you to renew. You will
then receive an email with notification that an order has been placed on your behalf.
Disabling Automatic Renewal
Click the Auto-Renew link in Manage
Subscriptions to toggle the automatic renewal
on or off as desired for your contracts.
Options to opt out are also provided in
renewal emails to the contract owner.
If you opt out of Auto Renewal, you will receive renewal notices as outlined below. When a
renewal notice is sent a quote will be generated and you have an opportunity to adjust the quote
to meet your needs moving forward. This includes the number of activations, PO you intend to
assign to the order, as well as leveraging any incentive dollars that may be available at the time
the quote is converted to an order.
Renewal Email Notices
• 120 Days Prior to Renewal: An auto renewal email notice will be sent out. At this time,
you can take action to change the PO, modify or cancel the contract.
• 45 Days Prior to Renewal: If you have elected not to auto renew and no action has been
taken from the prior renewal notifications, a renewal notice email will be sent out with
suggested actions to change the PO, modify or cancel the contract.
• 10 Days Prior to Renewal: If you have elected not to auto renew and no action has been
taken from the prior renewal notifications, a final renewal notice email will be sent out
with suggested actions to change the PO or to cancel the contract.
• The contract will expire at the end of the contract term if no action is taken.
To opt out of receiving renewal email
notifications:
1. click the View Addresses in the
left pane in My Subscriptions
2. Click the box for Renewal
Notification Opt Out.

60
This will stop email notifications only; your orders will still be set for automatic renewal unless
you have selected to turn of auto renew in Manage Subscriptions.
Manual renewal
If you have opted out of automatic renewal, you will need to manually
renew your order in Manage Subscriptions.
When a contract is within the 120, 45 and 10 days of expiration, a renewal
email will be sent to the contract owner notifying them of the upcoming
expiration. It includes a copy of the quote attached and a link to navigate
them to the Commerce Portal to modify and renew their contract.
Note- The start date for the new contract is set to the current
expiration date plus 1 day, regardless of when you choose to renew
your contract.
In Manage Subscriptions, the Renew Contract action will be available
within the 120-day expiration of your contract.
1. Click the Renew Contract
action.
2. In the Renew Products –
Merge Contracts page,
select the software
products you wish to
renew.
3. You can also select other
products that are part of a
different contract but have
the same end date and
add them to the new
contract being created for
renewal.
All selected items will be added to the new contract being created during this renewal.

61
4. Click NEXT to continue.
During renewal, the contract owner can add additional users and update the total licenses to
the contract.
5. Click ADD USERS.
6. Enter the email address of the
user you wish to assign a license
to and click SUBMIT.
7. Select UPDATE TOTAL LICENSES to increase the
quantity of a license. Enter the quantity desired and click
SUBMIT.
8. Review your selections and click ADD TO CART.
9. Complete the Renewal by selecting Checkout.
The contract owner will receive an order acknowledgement email regarding the renewal.
Note: Distributors do not have access to the Renew Contract link and cannot complete a renewal
or merge contracts. They can assist with aligning contract end dates so contracts can be merged
in the next renewal cycle.

62
License Activation Renewals
Viewing and Validating User License Renewal Status
Use the Manage Licenses page in My Subscriptions to view the status of your current licenses.
For bound licenses that have been assigned to an email address and activated via the Activate
Software button in the user Welcome Kit emails, those licenses will be aligned in Manage
Licenses with their bound machine name. On the renewal start date the user will receive an
email notification which will include instructions for automatic, manual, and disconnected
activation.
For any licenses that are assigned as Unknown and bound in Manage Licenses to a machine
name, they will not automatically receive the email notification with instructions for activation.
• Unknown is displayed when a software user activated their software using
FactoryTalk
®
Activation Manager.
• Before contract expiration, the contract owner or administrator can populate the
Unknown licenses with a user email to align and enable a renewal email. On the
renewal start date the user will receive an Existing User Notification which has
instructions on automatic, manual activation and disconnect activation
• If no email is provided for Unknown, the email notification will not be sent.
Note: If CodeMeter® and FactoryTalk
®
Activation Manager version is less than 4.04, “130-xxx“
will display instead of Unknown.
Notification Email
The notification email contains a Renew Activation link that will
navigate the software user to the Rockwell Automation Activation
page with information on their current activations and information
to renew their current activations.
1. Click the Renew Activation link.
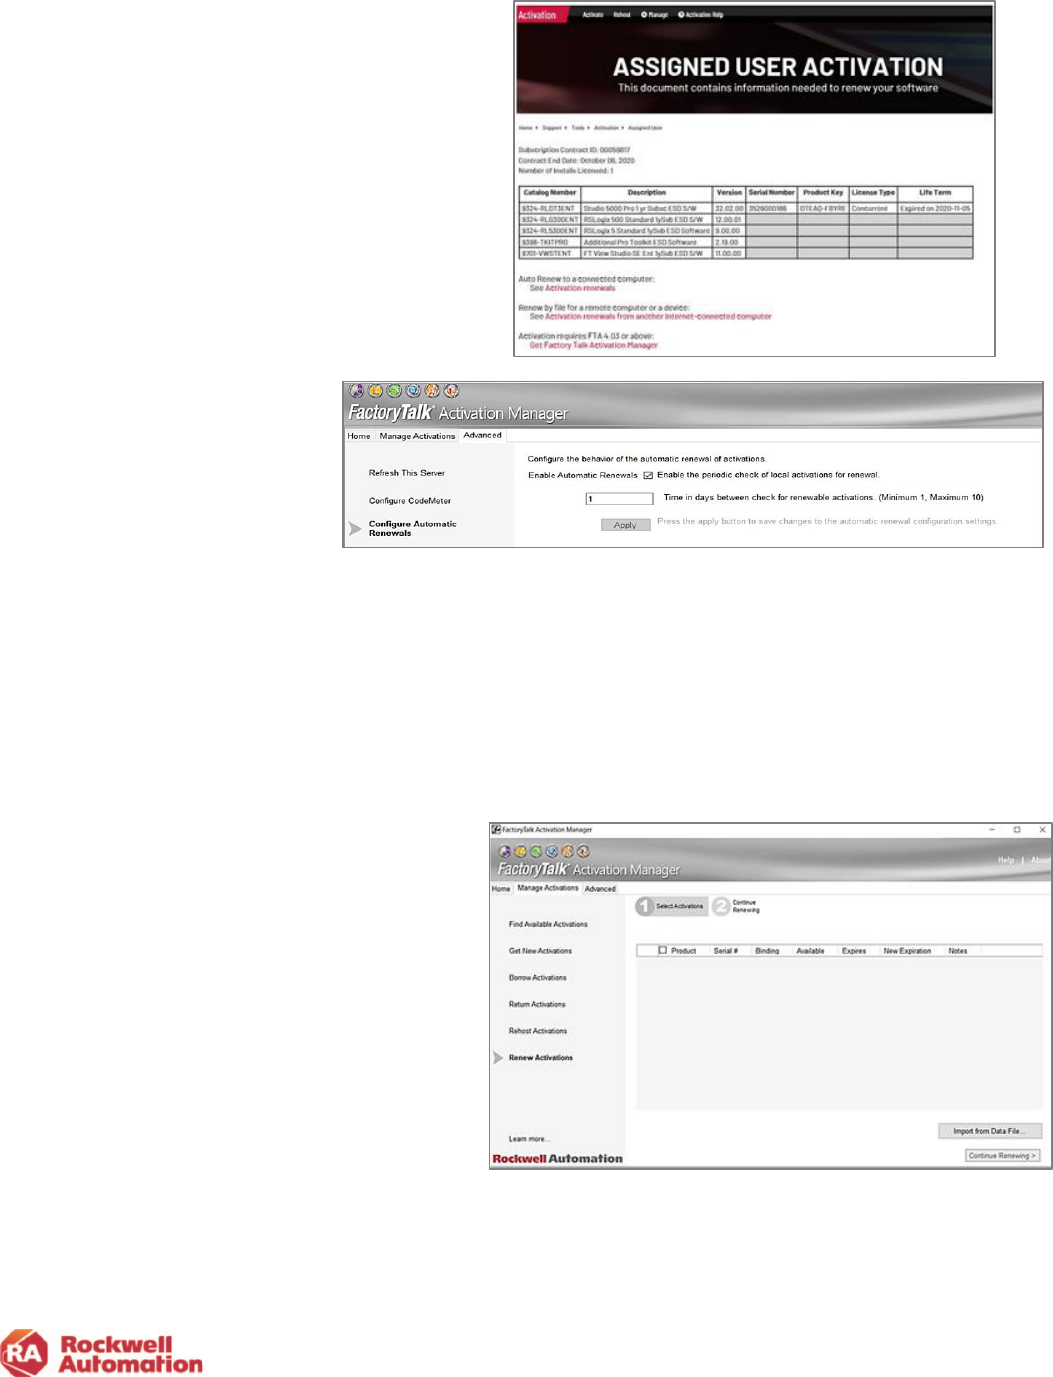
63
2. Click the red link that applies to your renewal
scenario. Each scenario will provide
instructions for activation in FactoryTalk
®
Activation Manager. (See Scenario
descriptions below.)
3. Use the Advanced tab in
FactoryTalk
®
Activation
Manager to configure
automatic renewals. By
default, automatic renewal
is enabled.
If automatic renewal is enabled, a computer with a time limited activation and a connection to
the internet will periodically check for updates. Renewals are downloaded to the computer and
a notice displays information about the renewed activations. FactoryTalk
®
Activation Manager
checks every 24hours for renewed activations.
Scenario Options:
1. If the software user in the plant is connected to the internet and has automatic renewal
configured in FactoryTalk
®
Activation Manager, no action is needed, activation will be
automatic.
2. If the software user in the plant is
connected to the internet and does not
have automatic renewal configured in
FactoryTalk
®
Activation Manager, select
Renew Activations on the Manage
Activations tab to activate the license.
3. If the software user is disconnected
from the internet, use a removable
storage device to move the activation to
the device. Follow the instructions on
the activation page.
Once the activation is renewed, it will retain the same serial number and a new expiration
date will be displayed in FactoryTalk
®
Activation Manager.

64
Software Support & Maintenance
Software purchased through the Commerce Portal includes Software Maintenance & Support.
Subscription based software will have support automatically included over the term of the
contract, while perpetual with maintenance will have the first year of support and maintenance
included, with the level of support chosen during product selection.
The lowest cost selection for Perpetual with Maintenance is the Self Assist option. The upgrade
to 8x5 support or 24x7 will include chat and other phone support options.
The table below lists the Software Maintenance & Support options along with the site based
TechConnect support option.
Included with a standard software Subscription:
•
8x5 phone support: Real-time product phone support and remote desktop troubleshooting, available
in 20 languages.
•
Chat support: Real-time mobile-friendly chat support through our Online Support Center
(Knowledgebase). Chat is available 24x7 for select product families.
•
Submit a question: Submit a question through our Online Support Center (Knowledgebase) and an
expert engineer will respond within one business day.
•
Software updates: Access to software update downloads. Access our Rockwell Automation Support
Center for downloads and software replacements. In addition to downloading software, you can set
alerts for new software updates including firmware, release notes, associated software, drivers, tools
and utilities.
•
Knowledgebase: Search the Knowledgebase for answers to your questions, interact with peers
through forums, bookmark information, request notifications of upgrades and chat with Rockwell
Automation engineers.
•
Optional Upgrade to 24x7 phone support: Receive coverage around the clock, including weekends
and holidays, by upgrading to our 24x7 support option.

65
Support options are shown in the Commerce Portal
when selecting your subscription.
Your CART will display
support and maintenance
for subscriptions is part of
the annual cost.

66
Included with Perpetual Software with Maintenance (choose one option when ordering):
•
Self-Assist
•
Software updates - ability to get software updates, permits the user to go to the latest
release.
•
Knowledgebase access.
•
Email support - ability to contact technical support by submitting a question.
•
8x5 Phone Support- includes all the self-assist options and provides chat and talking to live person.
•
24x7 Phone Support- includes all the self-assist options and provides chat and talking to live person.
Support options are shown in the Commerce Portal
when selecting your perpetual license. The support
level of 8x5 is selected as the default.
At checkout, Cart will show the
perpetual software as a one-
time cost, while the support
and maintenance are
displayed as an annual cost.
*List Prices shown are for demonstration only.

67
OEM & SI Software Contract Management Options
Know these key points to ensure a smooth transaction:
1. Either you or your distributor can create a quote for the software you wish to purchase
in the Commerce Portal.
2. At time of purchase, the Commerce Portal quote will be assigned to you, not your end
user. You will be the initial owner of the quote and/or contract.
3. Complete your order by clicking the “Complete Order” button in your Order Request
email. If you are a repeat customer, and have transacted through the Commerce
Portal previously, no action is required. An email acknowledgement is sent that the
order was placed on your behalf.
FactoryTalk® Software runtime activations
Rockwell Automation understands you need time to get software up and running on PC/HMI
equipment. Therefore, FactoryTalk® View runtime software activations have a pre-contract start
date “grace period” of 90 days. Therefore, nninety (90) days before the contract start date, owner
Welcome Kit emails with FactoryTalk® View runtime software download and activation links are
sent to owners.
Example: If June 1st is the agreement
start date in the Commerce Portal for
a FactoryTalk® View runtime
software, the download and activation
will be available 90 days earlier on
March 1st.
The support and invoice are aligned
with the agreement date of June 1st.
Contract Management Options
After the initial purchase of your software licenses, you have 3 options for managing the
software contract:
1. Maintain Contract: You will initially purchase software and maintenance and assign the
end user’s names to licenses in Manage Licenses. The end user will be a software user
only and you still maintain the contract. This option will retain you as the contract owner
and you will receive the contract renewal notices.
2. Assign and Transfer Contract on Start Date: You will purchase software and
maintenance and transfer ownership of the contract and licenses to the end user on the
contract start date. The end user will be responsible for management of the contract and
receive the contract renewal notices. This option will remove you from contract ownership
on the start date and you will lose all visibility to the contract.
3. Opt Out of Contract: You will initially purchase software and maintenance but will not be
renewing the maintenance at contract end date, you will let the maintenance contract
expire. This option will remove you from contract ownership at the time of renewal.
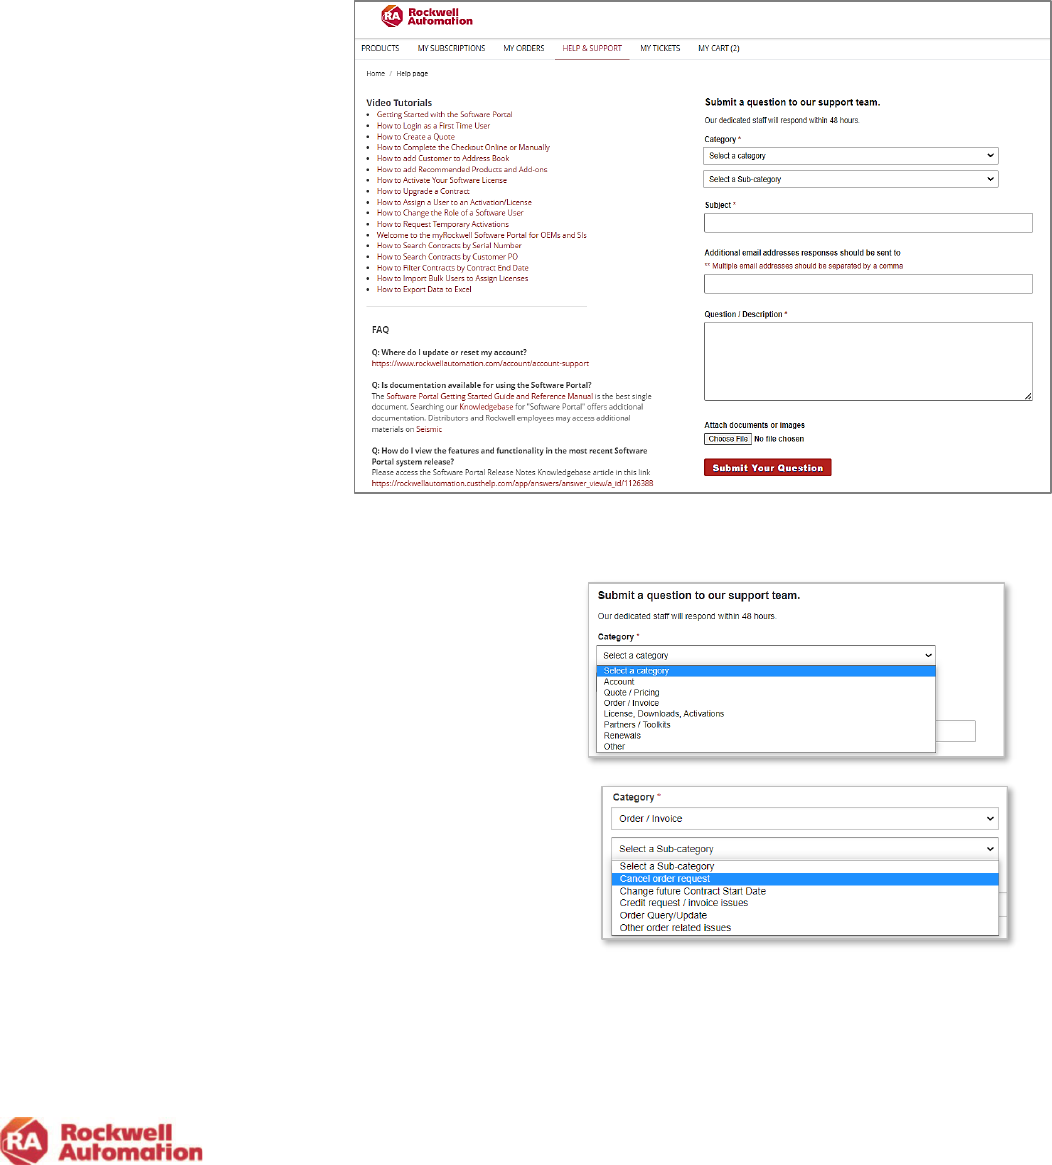
68
Commerce Portal Help & Support Page
Selecting Help & Support in the Commerce Portal menu launches the Incident Management
and Ticketing page.
The page provides several areas to request or receive help:
• Video tutorials provide a quick
overview of the most common
functionality in the Commerce
Portal
• Incident/ticketing submittal and
management
• Email addresses field to allow
for additional emails of those
to be copied in the responses
• Ability to attach files or images
with ticket
• Link to the Commerce Portal
Getting Started and Reference
Manual in Literature Library
• FAQ section provides links to
answers of the most common
questions asked
Ticketing Submittal and Incident Management
To ask a question or submit an incident to the support
team:
1. Select a category and a sub-category
2. Enter a subject to describe your issue
3. Type your question or issue in the box provided
4. Attach any files as needed to support your issue
5. Enter emails of those whou should be copied on the
response from the Rockwell support team
6. Click Submit Your Question

69
Help Category and Sub-category Selections
Category
Sub-category
Account
Account Creation, update, login or reset issue
Add or modify TechConnect/anniversary date for alignment
Address Book/ BPID Issues
Update account addresses and territories
Update my role to administrator
Other account issues
Quote/Pricing
Complex quote inquires
Currency Issues
Implementing approved concession request
Pricing issues
Unable to find location in Transaction Settings or Address
Book
Unable to see customer agreements
Other quote and pricing issues
Order/Invoice
Cancel order request
Change future contract start date
Credit request/invoice issues
Order query/update
Other order related issues
License,
Downloads,
Activations
Deactivate or rehost license
Extend subscription date on user’s computer
License or subscription certification issues
Product download and activation issues
Registration transfer related issues
Request “Lock User” (Lock serial number to named user)
Resend Welcome Kit/user activation
Software image download issues
Other license, download and activations issues
Partners/Toolkits
Distributor Goldmaster
Partner benefits/incentives
Partner status/level
Request product Temporary Activation
Toolkit pricing issues
Toolkit product questions
Other partner or Toolkit issue
Renewals
Align and merge contracts
Opt-out of all automatic renewals for customer site
Pricing issues
Other renewal issue
Other
Report an anomaly/defect
Report site performance issue
Submit suggestions
User training
Other

70
Once you submit your ticket you will receive
both an automatic acknowledgement on the
page and an email providing an incident
number for tracking purposes.
You should expect to receive a resolution
response within 48 hours.
Viewing your Help Tickets
View your submitted incidents, ticket
history and resolution details by clicking
My TICKETS from the Commerce Portal
menu.
Current users using Rockwell Automation
hardware services and products that have a
Knowledgebase account will see all their
tickets/incidents in one place
To add attachments, more information or
updates as needed to your ticket, click the
incident number link.
.

71
Appendix A
Multi-Site and Multi-Start Contracts
Use the Help & Support page to create a ticket request. Select the category Quote/Pricing
and sub-category Complex quote inquires. This will route the request to the Rockwell
Automation Complex Deal team who will be able to assist you in the process.
Contract Numbers
Transactions created after the December 10
th
,2021 release use a new pervasive contract
number format. The pervasive contract number is maintained throughout the agreement cycle
with version information throughout your transaction and will be displayed in Commerce Portal
pages, documents, invoices, and emails.
In My Subscriptions your transactions will be displayed with either the old contract number
style or the new pervasive number.
The pervasive contract number format contains an auto- generated number field and two
versioning fields. The first field is the quote version, and the second field identifies if the
transactions is an order, amendment, or renewal. An amendment is an upgrade or change to
an existing order.
SF-0000000001-Qx-Nx (Contract number with Quote and Order Version)
SF-0000000001-Qx-Ax (Contract number with Quote and Amendment Version)
SF-0000000001-Qx-Rx (Contract number with Quote and Renewal Version)
Where:
SF - xxxxxxxxxx - The ten-digit contract number is auto generated and will not change until a renewal
quote is created
Qx - The quote version x can continuously increment with the transaction as requotes and amendments
are performed
Ax - The amendment version x can continuously increment with the transaction as amendments are
performed
Nx - The order version x is either 0 (no order) or 1(order created)
Rx - The renewal version x is either 0 (no renewal order) or 1(renewal order created)
Note: Toolkits and transactions placed by RA support groups (i.e., superseded transactions)
do not have pervasive contract numbers. The original contract style will be displayed.

AMERICAS: Rockwell Automation, 1201 South Second Street, Milwaukee, WI 53204-2496 USA, Tel: (1) 414.382.2000, Fax: (1) 414.382.4444
EUROPE/MIDDLE EAST/AFRICA: Rockwell Automation NV, Pegasus Park, De Kleetlaan 12a, 1831 Diegem, Belgium, Tel: (32) 2663 0600, Fax: (32) 2 663 0640
ASIA PACIFIC: Rockwell Automation, Level 14, Core F, Cyberport 3, 100 Cyberport Road, Hong Kong, Tel: (852) 2887 4788, Fax: (852) 2508 1846 UNITED
KINGDOM: Rockwell Automation Ltd., Pitfield, Kiln Farm, Milton Keynes, MK11 3DR, United Kingdom, Tel: (44) (1908) 838-800, Fax: (44) (1908) 261-917
Allen-Bradley, expanding human possibility, and Rockwell Automation are trademarks of Rockwell Automation, Inc.
Trademarks not belonging to Rockwell Automation are property of their respective companies.
Publication GMSG-RM002A-EN-P - February 2023
Copyright © 2023 Rockwell Automation, Inc. All Rights Reserved. Printed in USA.
Connect with us
