
Big
Idea
Investigation 5 T95
2
Cellular Processes:
Energy and Communication
investigation 5
PHotosYntHesis
What factors affect the rate of photosynthesis in living leaves?
■ BACKGROUND
Living systems require free energy and matter to maintain order, to grow, and to
reproduce. Energy deciencies are not only detrimental to individual organisms, but
they cause disruptions at the population and ecosystem levels. Organisms employ
various strategies that have been conserved through evolution to capture, use, and store
free energy. Autotrophic organisms capture free energy from the environment through
photosynthesis and chemosynthesis, whereas heterotrophic organisms harvest free
energy from carbon compounds produced by other organisms. In multicellular plants,
photosynthesis occurs in the chloroplasts within cells.
e process of photosynthesis occurs in a series of enzyme-mediated steps that
capture light energy to build energy-rich carbohydrates. e process is summarized by
the following reaction:
2 H
2
O + CO
2
+ light → carbohydrate (CH
2
O) + O
2
+ H
2
O
To determine the net rate of photosynthesis, one could measure one of the following:
• Production of O
2
• Consumption of CO
2
e diculty related to measuring the production of oxygen is compounded by the
complementary process of aerobic respiration consuming oxygen as it is produced.
erefore, measuring oxygen production is equivalent to measuring net photosynthesis.
A measurement of respiration in the same system allows one also to estimate the gross
production.
Generally, the rate of photosynthesis is calculated by measuring the consumption of
carbon dioxide. However, equipment and procedures to do this are generally beyond the
reach of most introductory laboratories.
In Getting Started, students conduct prelab research on the process of photosynthesis
and review concepts they may have studied previously — particularly concepts about the
properties of light.
In the rst part of the lab, students learn how to measure the rate of photosynthesis
indirectly by using the oating leaf disk procedure to measure oxygen production.
Alternatively, they could explore how to measure the rate of photosynthesis using
various probes interfaced to computers.
In the oating leaf disk procedure, a vacuum is used to remove trapped air and
inltrate the interior of plant (leaf) disk samples with a solution containing bicarbonate
ions that serve as a carbon source for photosynthesis. e inltrated leaves sink in the

T96 Investigation 5
bicarbonate solution. When placed in sucient light, the photosynthetic processes then
produce oxygen bubbles that change the buoyancy of the disk, eventually causing them
to rise.
Students should develop the skills necessary to implement the selected procedure
so that they can explore their own questions about photosynthesis in Designing and
Conducting Your Investigation. Procedure serves as a structured inquiry that is a
prerequisite for open inquiry into the variables that may aect photosynthesis.
First, during class discussions, students consider a number of variables that might
aect the rate of photosynthesis in plants — both physical variables and biotic variables.
Likewise, students consider variables that might aect the oating disk procedure itself.
ese variables are compiled and categorized to serve as a guide for student questions
and experimental design, as illustrated in Table 1.
Table 1. Variables Affecting Rate of Photosynthesis
Environmental Variables Plant or Leaf Variables Method Variables
(These variables may not
affect photosynthesis but are
still important to investigate.)
• Light intensity
(brightness)
• Light color (How can
students explain that
plants are green and that
chlorophyll does not
absorb green light?)
• Temperature
• Bicarbonate concentration
(CO
2
source)
• Direction of incoming
light
• pH of solution
• Leaf color (chlorophyll
amount)
• Leaf size
• Stomata density
• Stomata distribution
• Light-starved leaves vs.
leaves kept in bright light
• Type of plant
• Leaf age
• Leaf variegation
• Role of respiration
in plants along with
photosynthesis —
measuring gross
photosynthesis
• Size of leaf disk
• Depth of bicarbonate
solution
• Methods of cutting disks
• Leaf disk overlap
• Soap amount
• How many times can the
procedure be repeated
with the same disks?
• How long can the disks
remain sunk in the
solution — can they be
stored overnight?
• Method of collecting data
Once students learn how to measure the rate of photosynthesis and have discussed a
number of variables that might be measured, questions should emerge about the process
that leads to independent student investigations.
One advantage of the oating disk technique is that the equipment and supplies
required are inexpensive, so nearly every classroom environment can provide ample
supplies for individual student investigations.
Finally, students design and conduct an experiment(s) to investigate one or more
questions that they raised in Procedure. eir exploration will likely generate even more
questions about photosynthesis.

Investigation 5 T97
Big idea 2: Cellular ProCesses: energY and CommuniCation
For students who try but are unable to develop questions of their own, consider the
following supplemental prompts:
• What makes plants stop growing? Could any of these aect photosynthesis?
• Do all leaves look the same? What is dierent? Could these dierences aect
photosynthesis?
e lab also provides an opportunity for students to apply, review, and/or scaold
concepts that they have studied previously, including the relationship between
cell structure and function (chloroplast); enzymatic activity (especially rubisco, if
temperature as a variable is explored); strategies for capture, storage, and use of free
energy; diusion of gases across cell membranes; behavior of gases in solution; evolution
of plants and photosynthesis (including an explanation of why plants don’t absorb green
light); and the physical laws pertaining to the properties of buoyancy.
Note About Light Sources: A strong light source is necessary for success in this
procedure. Some of the best results have been obtained when placing the cups of leaf
disks on the bed of an overhead projector. Another inexpensive light source is the “work
spotlights” that you can purchase from various retail stores, coupled with 100-watt
equivalent compact uorescent bulbs.
■ PREPARATION
Materials and Equipment
• Baking soda (sodium bicarbonate)
• Liquid soap (approximately 5 mL of
dishwashing liquid or similar soap in
250 mL of water)
• 2 plastic syringes without needles (10
mL or larger), available from biological
and scientic supply companies
or rather cheaply at large chain
drugstores (ask for 10 mL oral medicine
dispensers). It is a good idea to have
extra syringes on hand, as some students
may need more than two for their
independent investigations.
• Living leaves [spinach, especially baby
spinach from the produce section of
the grocery story, or ivy (Hedera helix),
which is perennially green and
naturalized throughout the country]
• Hole punch
• 2 clear plastic cups
• Timer
• Light source (Inexpensive light sources
include the clamp lights purchased at
big-box stores coupled with 100-watt
equivalent compact uorescent bulbs.
ese lights do a great job of producing
the low-heat, high-intensity light needed
for this work.)
• Students invariably underestimate
the various light parameters in this
procedure. An important piece of
equipment to include in any classroom
when studying photosynthesis is a
PAR meter (photosynthetically active
radiation). A PAR meter counts photons
in the PAR spectrum. A PAR meter will
greatly facilitate experimental design.
e sample graphs included in this lab
investigation measured light intensity
with an outdated measurement, the foot
candle, which is a subjective measure
of luminance not closely related to PAR
ux.

T98 Investigation 5
■ Timing and Length of Lab
e prelab questions and online preparation and review activities suggested in Getting
Started can be assigned for homework.
e rst part of the investigation requires one lab period of about 45 minutes to
introduce the methods of either procedure. e second part, Designing and Conducting
Your Investigation, requires approximately two lab periods of about 45 minutes each
for students to conduct their own investigations. If interfaced sensors are available and
students know how to use them, students can begin working on the procedure outlined
in the rst part. Another suggestion is to have students design their experiment(s) as a
homework assignment; lab groups can communicate through various social networking
sites or by email. Teachers also should dedicate a third lab period for students to share
their results and conclusions with the class by appropriate means, such as a mini-poster
session, an oral presentation, or a traditional lab report.
Students can work as pairs, trios, or small groups to accommodate dierent class sizes
and equipment availability.
■ Safety and Housekeeping
e primary safety issues in this lab have to do with solutions near electric lights.
Caution students to observe proper care with solutions near lights. Because students will
be working in close proximity to exposed lightbulbs, be sure to require eye protection
in the form of safety goggles. Moreover, some high-intensity light sources get extremely
hot. If you are using these, advise students not to drip water on them (shatter hazard)
or to lean against a light (burn hazard). Most but not all syringes are capable of
withstanding the vacuum created in this procedure without failure. However, you should
test the syringes beforehand.
■ ALIGNMENT TO THE AP BIOLOGY CURRICULUM FRAMEWORK
is investigation can be conducted during the study of concepts pertaining to cellular
processes (big idea 2), specically, the capture, use, and storage of free energy, or
interactions (big idea 4). In addition, some questions students are likely to raise connect
to evolution (big idea 1). As always, it is important to make connections between big
ideas and enduring understandings, regardless of where in the curriculum the lab is
taught. e concepts align with the enduring understandings and learning objectives
from the AP Biology Curriculum Framework, as indicated below.
■ Enduring Understandings
• 1B1: Organisms share many conserved core processes and features that evolved and
are widely distributed among organisms today.
• 2A1: All living systems require constant input of free energy.
• 2A2: Organisms capture and store free energy for use in biological processes.

Investigation 5 T99
Big idea 2: Cellular ProCesses: energY and CommuniCation
• 2B3: Eukaryotic cells maintain internal membranes that partition the cell into
specialized regions (e.g., chloroplasts).
• 4A2: e structure and function of subcellular components, and their interactions,
provide essential cellular processes.
• 4A6: Interactions among living systems and with their environment result in the
movement of matter and energy.
■ Learning Objectives
• e student is able to describe specic examples of conserved core biological
processes and features shared by all domains or within one domain of life, and how
these shared, conserved core processes and features support the concept of common
ancestry for all organisms (1B1 & SP 7.2).
• e student is able to justify the scientic claim that organisms share many conserved
core processes and features that evolved and are widely distributed among organisms
today (1B1 & SP 6.1).
• e student is able to justify the scientic claim that free energy is required for
living systems to maintain organization, to grow, or to reproduce, but that multiple
strategies exist in dierent living systems (2A1 & SP 6.1).
• e student is able to use representations to pose scientic questions about what
mechanisms and structural features allow organisms to capture, store, and use free
energy (2A2 & SP 1.4, SP 3.1).
• e student is able to use representations and models to describe dierences in
prokaryotic and eukaryotic cells (2B3 & SP 1.4).
• e student is able to construct explanations based on scientic evidence as to how
interactions of subcellular structures provide essential functions (4A2 & SP 6.2).
• e student is able to apply mathematical routines to quantities that describe
interactions among living systems and their environment, which result in the
movement of matter and energy (4A6 & SP 2.2).
■ ARE STUDENTS READY TO COMPLETE A SUCCESSFUL INQUIRY-
BASED, STUDENT-DIRECTED INVESTIGATION?
Before students investigate photosynthesis, they should demonstrate an understanding
of the following concepts related to the physical properties of light. e concepts may be
scaolded according to level of skills and conceptual understanding.
• Measuring light intensity
• e inverse square law
• e wave nature of light (visible light spectrum, i.e., colors)
• Light as energy

T100 Investigation 5
is investigation reinforces the following skills:
• Preparing solutions
• Preparing a serial dilution
• Measuring light intensity
• Developing and applying indices to represent the relationship between two
quantitative values (e.g., an ET
50
Index)
• Using reciprocals to modify graphical presentations
• Utilizing medians as a measure of central tendencies
• Constructing data tables and graphs
• Communicating results and conclusions
■ Skills Development
Students will develop the following skills:
• Applying the oating disk assay procedure to study photosynthesis or dissolved
oxygen or carbon dioxide sensors with computer interface
• Measuring/calculating rates of photosynthesis
■ Potential Challenges
Students oen come to biology with the misconception that plants undergo
photosynthesis (only) and animals undergo cellular respiration. Students oen forget
that most plant cells also possess mitochondria and respire. In the nal part of this
investigation, students can explore the combined role of respiration and photosynthesis
with experiments of their own design. For example, if a student places disks that have
oated under light into a dark environment, plant respiration will consume the oxygen
bubbles causing the disks to re-sink.
Students have a dicult time understanding the properties of light and how these
properties can aect photosynthesis. e instructor may want to include a quick
demonstration of the inverse square law and another quick demonstration on light
absorbance.
If students have a solid understanding of the aforementioned concepts, they should
be able to pose scientic questions about photosynthesis and design an experiment(s)
around the eects of variables on the rate of photosynthesis. e skills and concepts
may be taught through a variety of methods in an open-inquiry investigation, and
photosynthetic rates may be measured by several means. Only the oating disk
technique is described in the Student Manual, and alternative procedures may be equally
and successfully substituted. For example, in the procedures outlined in the Student
Manual, production of O
2
gas in photosynthesis is measured, but students also can
measure the production of CO
2
, or even simultaneous changes in volumes of both gases,
depending on available equipment (e.g., gas sensor probes with computer interface).

Investigation 5 T101
Big idea 2: Cellular ProCesses: energY and CommuniCation
Measuring the rate of photosynthesis is a challenge in a high school laboratory.
Because the purchase of appropriate sensors or instrumentation is expensive, the
oating disk system described in the Student Manual provides an easier, cheaper,
and more reliable method to study both photosynthetic rates as well as rates of
respiration. e cost of materials and equipment is under $0.50 per student
(exclusive of light sources or meters). A video outlining the method can be found at
http://www.kabt.org/2008/09/29/video-on-sinking-disks-for-the-oating-leaf-
disk-lab/.
e steps in the rst part of the lab require teacher direction to familiarize
students with the oating disk system or computer-based sensors. e nal part of
the investigation requires less teacher direction and instruction, the degree to which
depends on conceptual understanding and the skill level of the students.
If students are to be successful in the nal part, in which they design and conduct
their own investigations, it is essential that they have success in sinking their leaf disks.
Attention to this task generally is the deciding variable that points to positive student
outcomes.
■ THE INVESTIGATIONS
■ Getting Started: Prelab Assessment
Investigating biology requires a variety of skills. e skills reinforced and introduced
vary across the laboratories in this manual. e skills emphasized in a laboratory dictate
whether a prelab assessment is appropriate.
is particular investigation provides a lab environment, guidance, and a problem
designed to help students explore various parameters that can aect the rate of
photosynthesis along with aspects of experimental design. Very little background
knowledge is required to begin this work, but exploring some parameters deeply
might require further research. For example, when students begin this procedure, they
generally are not familiar with either the properties of light or the chemistry of dissolved
carbon dioxide and bicarbonate ions. Students can begin asking and answering their
own questions without this knowledge. As they work through the lab, students may be
motivated to do additional research on photosynthesis.
■ Data Tables
e analysis and presentation of data are dicult challenges for most students. Following
is an example of a graph of results that a student might present:

T102 Investigation 5
Disks Floating
12
10
0
2
4
6
8
0 5 10 15
Time in Minutes
Number of Disks
Disks oating
Figure 1. Disks Floating
e following method of data collection is suggested for students, although others
work as well. In this case, the disks oating are counted at the end of each time interval.
e median is chosen over the mean as the summary statistic. For most student work,
the median will generally provide a better estimate of the central tendency of the data
because, on occasion, a disk fails to rise or takes a very long time to do so. Consequently,
for this sample, the median time for ve disks to rise is somewhere between 11 and 12
minutes. A term coined by G. L Steucek and R. J Hill (1985) for this relationship is ET
50
,
the estimated time for 50% of the disks to rise. at is, rate is a change in a variable over
time. e time required for 50% of the leaf disks to oat is represented as Eective Time
= ET
50
.
Figure 2 is a sample graph of a photosynthesis light response curve utilizing the ET
50
concept.
Photosynthesis vs. Light Intensity
50
20
15
10
5
0
0 200 400 600 800 1000 1200 1400
Light Intensity (FT-C)
Rate of Photosynthesis ET
50
Figure 2. Photosynthesis vs. Light Intensity [Source: Steucek and Hill, 1985]
Note that the shape of this curve is not the expected curve that rises and levels o. is
is because the times to oat are the inverse of the rate of photosynthesis. Taking the
reciprocal of ET
50
, 1/ ET
50
allows the graphic presentation to more closely express the
physical phenomenon, as shown in Figure 3.

Investigation 5 T103
Big idea 2: Cellular ProCesses: energY and CommuniCation
Photosynthesis vs. Light Intensity
0.14
0.12
0.08
0.06
0.04
0.02
0.1
0
0
Light Intensity (FT-C)
Rate of Photosynthesis (1/ET
50
)
140012001000800600400200
Figure 3. Photosynthesis vs. Light Intensity (1/ ET
50
) [Source: Steucek and Hill, 1985]
is procedure is particularly useful for comparing photosynthetic rates between C4
and C3 plants. is procedure is also very useful for exploring the connection between
photosynthesis and cellular respiration. Once the inltrated disks have oated because of
photosynthesis, the rate of cellular respiration can be determined by placing the systems
in a dark environment. If the disks are still swirled aer each minute, the process of
cellular respiration will consume the oxygen bubbles in the mesophyll spaces, causing
the disks to sink again. is phenomenon is illustrated in Figure 4.
Disks Floating
10
12
8
6
4
2
0
0 5 10 15 20
Time in Minutes
Disks oating
Number of Disks
25 30 35 40 45
Figure 4. Disks Floating
(In this case, the cup with oating disks was placed under a cardboard box with no light
at the 14-minute mark. Note that the slope of the sinking rate is less than that of the
oating rate.)
ere are many research papers on the Internet that explore photosynthesis. ese
studies can serve as guides to the kinds of questions that students can ask. For example,
if you put the terms “photosynthesis light response curve” into your search engine, you
will nd myriad ideas for student questions and experimental designs.
Figure 5 shows a sample light response curve as an example of the type of work
students can do with this technique. e total time required was about one hour of
laboratory work per student. e plant is deep shade English Ivy grown at 25° C, with

T104 Investigation 5
excess bicarbonate solution. All of the leaf disks came from a single leaf. e technique
was modied by placing the inltrated disks in petri dishes with 30 mL of bicarbonate
solution each. is created a very shallow solution depth in which the leaf disks rose
more quickly.
Photosynthesis Response Curve
(Shade-Grown Ivy)
0
1
2
3
4
5
6
7
8
0 100 200 300 400 500 600
PAR in Micromoles per Square Meter per Second
Error bars = + or - 2 S.E.
1/Seconds to Rise Times 1000
Figure 5. Photosynthesis Response Curve
In this example, the time for each disk to rise was measured in seconds (dicult to do
accurately by oneself but relatively easy to do and much more precise with a digital video
camera or a group of students). In this case, a PAR meter was used to measure PAR ux,
and a shop light with an 8-inch reector and a 100-watt equivalent compact uorescent
bulb created the light source. Since the rise of each disk was measured (not the ET
50
method), an estimated Standard Error could be calculated, although the reciprocal of
time for each leaf disk to rise was still plotted.
ere is one data point that was excluded — for very bright light (>1,000 micromoles
per square meter per second). e disks were so close to the bulb that the temperature of
the water rose, aecting the results. To avoid this problem, consider introducing the idea
of a water heat lter to students investigating similar variables.
■ Designing and Conducting Independent Investigations
Once students have mastered the oating disk technique, they will design an experiment
to test another variable that might aect the rate of photosynthesis. Possible questions
generated from students’ observations include the following. However, it is suggested
that students generate their own questions to explore.
• What environmental variables might aect the net rate of photosynthesis? Why do
you think they would aect it? How do you predict they would aect it?
• What features or variables of the plant leaves might aect the net rate of
photosynthesis? How and why?

Investigation 5 T105
Big idea 2: Cellular ProCesses: energY and CommuniCation
• Could the way you perform the procedure aect the outcome? If the outcome
changes, does it mean the net rate of photosynthesis has changed? Why do you think
that?
If students are truly stumped, you can give them some guidance. Tell students that leaves
with hairy surfaces should be avoided and that ivy and spinach are among the plants
that work well. Dierences between plants may be one of the ideas that students want to
investigate.
■ Summative Assessment
A particularly eective method of assessment involves the use of peer-reviewed
laboratory notebooks and mini-posters (described in Chapter 6). With an appropriate
lab investigation rubric, students can deliver feedback to each other that is not
graded, providing valuable formative feedback during and aer their investigations.
e advantage of peer-review is that revisions can be encouraged before a grade is
determined.
For this investigation the mini-poster has proven to be a very eective tool to evaluate
individual or group work. e following are suggested as guidelines to assess students’
understanding of the concepts presented in the investigation, but you are encouraged to
develop your own methods of postlab assessment:
1. Revisit the learning objectives. Based on students’ answers to the analysis questions,
do you think students have met the objectives of the laboratory investigation?
2. Have students develop a list of common misconceptions or concepts that they had
diculty understanding about the process of photosynthesis before conducting their
investigations.
3. Did students have sucient mathematical skills to calculate the rate(s) of
photosynthesis?
4. Released AP Exams have several multiple-choice and essay questions based on the
concepts studied in this investigation. ese could be used to assess your students’
understanding.
■ SUPPLEMENTAL RESOURES
■ Prelab Activities
http://mw2.concord.org/tmp.jnlp?address=http://mw2.concord.org/public/part2/photosynthesis/index.cml
is resource provides an interactive tutorial on the process of photosynthesis and the
interaction with light.

T106 Investigation 5
■ Procedural Resources
AP Biology Lab Manual, Lab 4: Plant Pigments and Photosynthesis, e College Board,
2001.
Although this laboratory protocol is teacher directed, students can use the resource to
glean information about the process of photosynthesis as they design experiments to
investigate factors that aect photosynthesis.
http://www.kabt.org/2008/09/29/video-on-sinking-disks-for-the-oating-
leaf-disk-lab/
is video demonstrates the oating leaf disk technique.
http://www.elbiology.com/labtools/Leafdisk.html
is resource describes the leaf disk technique.
e following resources either oer variations of the oating disk technique or used the
technique to provide evidence for research. All oer good ideas that can be adapted
for student research. Try to obtain a copy of the Wickli and Chasson (1964) paper. It
is the earliest paper of which this author is aware that describes this technique, and it
is perhaps the best. ere are many ideas that can lead to good student projects.
W. K. Vencill and C. L. Foy, “Distribution of triazine-resistant smooth pigweed
(Amaranthus hybridus) and common lambsquarters (Chenopodium album) in
Virginia,” Weed Science 36, no. 4 (1988): 497–499.
F. Juliao and H. C. Butcher IV, “Further Improvements to the Steucek & Hill Assay of
Photosynthesis,” e American Biology Teacher (1989): 174–176.
J. L. Wickli and R. M. Chasson, “Measurement of photosynthesis in plant tissues using
bicarbonate solutions,” BioScience 14, no. 3 (1964): 32–33.
G. L. Steucek and R. J. Hill, “Photosynthesis: I: An Assay Utilizing Leaf Disks,” e
American Biology Teacher (1985): 96–99.
R. J. Hill and G. L. Steucek, “Photosynthesis: II. An Assay for Herbicide Resistance in
Weeds,” e American Biology Teacher 47, no. 2 (1985): 99–102.

Big
Idea
Investigation 5 S61
2
Cellular Processes:
Energy and Communication
investigation 5
PHotosYntHesis
What factors affect the rate of photosynthesis in
living leaves?
■■ BACKGROUND
Photosynthesis fuels ecosystems and replenishes the Earth’s atmosphere with oxygen.
Like all enzyme-driven reactions, the rate of photosynthesis can be measured by either
the disappearance of substrate or the accumulation of product (or by-products).
e general summary equation for photosynthesis is
2 H
2
O + CO
2
+ light → carbohydrate (CH
2
O) + O
2
+ H
2
O
What could you measure to determine the rate of photosynthesis?
• Production of O
2
(How many moles of O
2
are produced for one mole of sugar
synthesized?)
or
• Consumption of CO
2
(How many moles of CO
2
are consumed for every mole of
sugar synthesized?)
In this investigation, you will use a system that measures the accumulation of oxygen.

S62■■Investigation 5
Bio_S_Lab05_01
Stoma
Palisade layer
Spongy mesophyll
Air space
Figure■1.■Leaf■Anatomy
Because the spongy mesophyll layer of leaves (shown in Figure 1) is normally infused
with gases (O
2
and CO
2
), leaves — or disks cut from leaves — normally oat in water.
What would you predict about the density of the leaf disk if the gases are drawn from
the spongy mesophyll layer by using a vacuum and replaced with water? How will
that aect whether or not the leaf oats? If the leaf disk is placed in a solution with an
alternate source of carbon dioxide in the form of bicarbonate ions, then photosynthesis
can occur in a sunken leaf disk. As photosynthesis proceeds, oxygen accumulates in the
air spaces of the spongy mesophyll, and the leaf disk will once again become buoyant
and rise in a column of water. erefore, the rate of photosynthesis can be indirectly
measured by the rate of rise of the leaf disks. However, there’s more going on in the leaf
than that! You must also remember that cellular respiration is taking place at the same
time as photosynthesis in plant leaves. (Remember that plant cells have mitochondria,
too!) What else could be going on that might aect this process? Aerobic respiration
will consume oxygen that has accumulated in spongy mesophyll. Consequently, the
two processes counter each other with respect to the accumulation of oxygen in the
air spaces of the spongy mesophyll. So now you have a more robust measurement tool
— the buoyancy of the leaf disks is actually an indirect measurement of the net rate of
photosynthesis occurring in the leaf tissue.
■■ Learning■Objectives
• To design and conduct an experiment to explore the eect of certain factors,
including dierent environmental variables, on the rate of cellular photosynthesis

Investigation 5 S63
big idea 2: Cellular ProCesses: energY and CommuniCation
• To connect and apply concepts, including the relationship between cell structure
and function (chloroplasts); strategies for capture, storage, and use of free energy;
diusion of gases across cell membranes; and the physical laws pertaining to the
properties and behaviors of gases
■■ General■Safety■Precautions
You must wear safety goggles or glasses, aprons, and gloves because you will be working
in close proximity to exposed lightbulbs that can easily shatter.
Be careful to keep your solutions away from the electrical cord of your light source.
Follow your teacher’s instructions.
If you investigate temperature as a variable in Designing and Conducting Your
Investigation, there is no need to heat any solution beyond 50–60°C.
Most but not all syringes are capable of withstanding the vacuum created in this
procedure without failure. However, you should test the syringes beforehand.
■■ THE■INVESTIGATIONS
■■ Getting■Started
To study photosynthesis, review the properties of light and how it interacts with matter.
In addition to your textbook, the Concord Consortium has a Java-based Web activity
that will review the properties of light and the ways in which visible light interacts with
matter in the process of photosynthesis. is multistep activity uses visualizations,
animations, and a molecular modeling engine that does an excellent job of making
abstract concepts understandable. To explore this activity, enter these terms in your
search engine: “concord consortium molecular workbench photosynthesis.”
While going through this activity, record any questions in your laboratory notebook.
ese questions and others that occur to you while working through the steps in
Procedure can serve as a basis for your own investigation in Designing and Conducting
Your Investigation.
■■ Procedure■
In this part of the lab, you will learn how the oating leaf disk technique can measure
the rate of photosynthesis by testing a variable that you know aects photosynthesis.
Later, you will apply this technique (or computer-based probes) to test a variable
that you choose. It is important for you to develop a few skills during this part of
the investigation in order to carry out your own investigation. For the oating disk
technique, the most challenging skill is getting the disks to sink. Don’t just watch
someone do this; make sure you can get the disks to sink as well.

S64■■Investigation 5
Materials
• Baking soda (sodium bicarbonate)
• Liquid soap (approximately 5 mL of
dishwashing soap in 250 mL of water)
• 2 plastic syringes without needle (10 mL
or larger)
• Living leaves (spinach, ivy, etc.)
• Hole punch
• 2 clear plastic cups
• Timer
• Light source
Figure■2.■Materials
When immersed in water, oxygen bubbles are usually trapped in the air spaces of
the spongy mesophyll in the plant leaf. By creating a vacuum in this experimental
procedure, the air bubbles can be drawn out of the spongy mesophyll, and the
space is relled by the surrounding solution. is allows the leaf disks to sink in the
experimental solution. If the solution has bicarbonate ions and enough light, the leaf
disk will begin to produce sugars and oxygen through the process of photosynthesis.
Oxygen collects in the leaf as photosynthesis progresses, causing the leaf disks to oat
again. e length of time it takes for leaf disks to oat again is a measure of the net rate
of photosynthesis. is process is shown in Figure 3.

Investigation 5 S65
big idea 2: Cellular ProCesses: energY and CommuniCation
Bio_S_Lab05_03
CO
2
in solution
Solution
Bubbles of O
2
forming
1 2
Figure■3.■Photosynthesis■at■Work■
Question: If the leaf disks are treated in a way you know increases the net rate of
photosynthesis, should they start to oat faster or slower? Why?
Step■1 Prepare 300 mL of 0.2% bicarbonate solution for each experiment. e bicarbonate
will serve as a source of carbon dioxide for the leaf disks while they are in the solution.
Step■2 Pour the bicarbonate solution into a clear plastic cup to a depth of about 3 cm.
Label this cup “With CO
2
.” Fill a second cup with only water to be used as a control
group. Label this cup “Without CO
2
.” roughout the rest of the procedure you will be
preparing material for both cups, so do everything for both cups simultaneously.
Step■3 Using a pipette, add one drop of a dilute liquid soap solution to the solution in each
cup. It is critical to avoid suds. If either solution generates suds, then dilute it with more
bicarbonate or water solution. e soap acts as a surfactant or “wetting agent” — it wets
the hydrophobic surface of the leaf, allowing the solution to be drawn into the leaf and
enabling the leaf disks to sink in the uid.
Figure■4.■Dilute■Liquid■Soap■Solution■Added■to■Cup
Step■4 Using a hole punch, cut 10 or more uniform leaf disks for each cup. Avoid major
leaf veins. (e choice of plant material is perhaps the most critical aspect of this
procedure. e leaf surface should be smooth and not too thick.)

S66■■Investigation 5
Figure■5.■Leaf■Disks
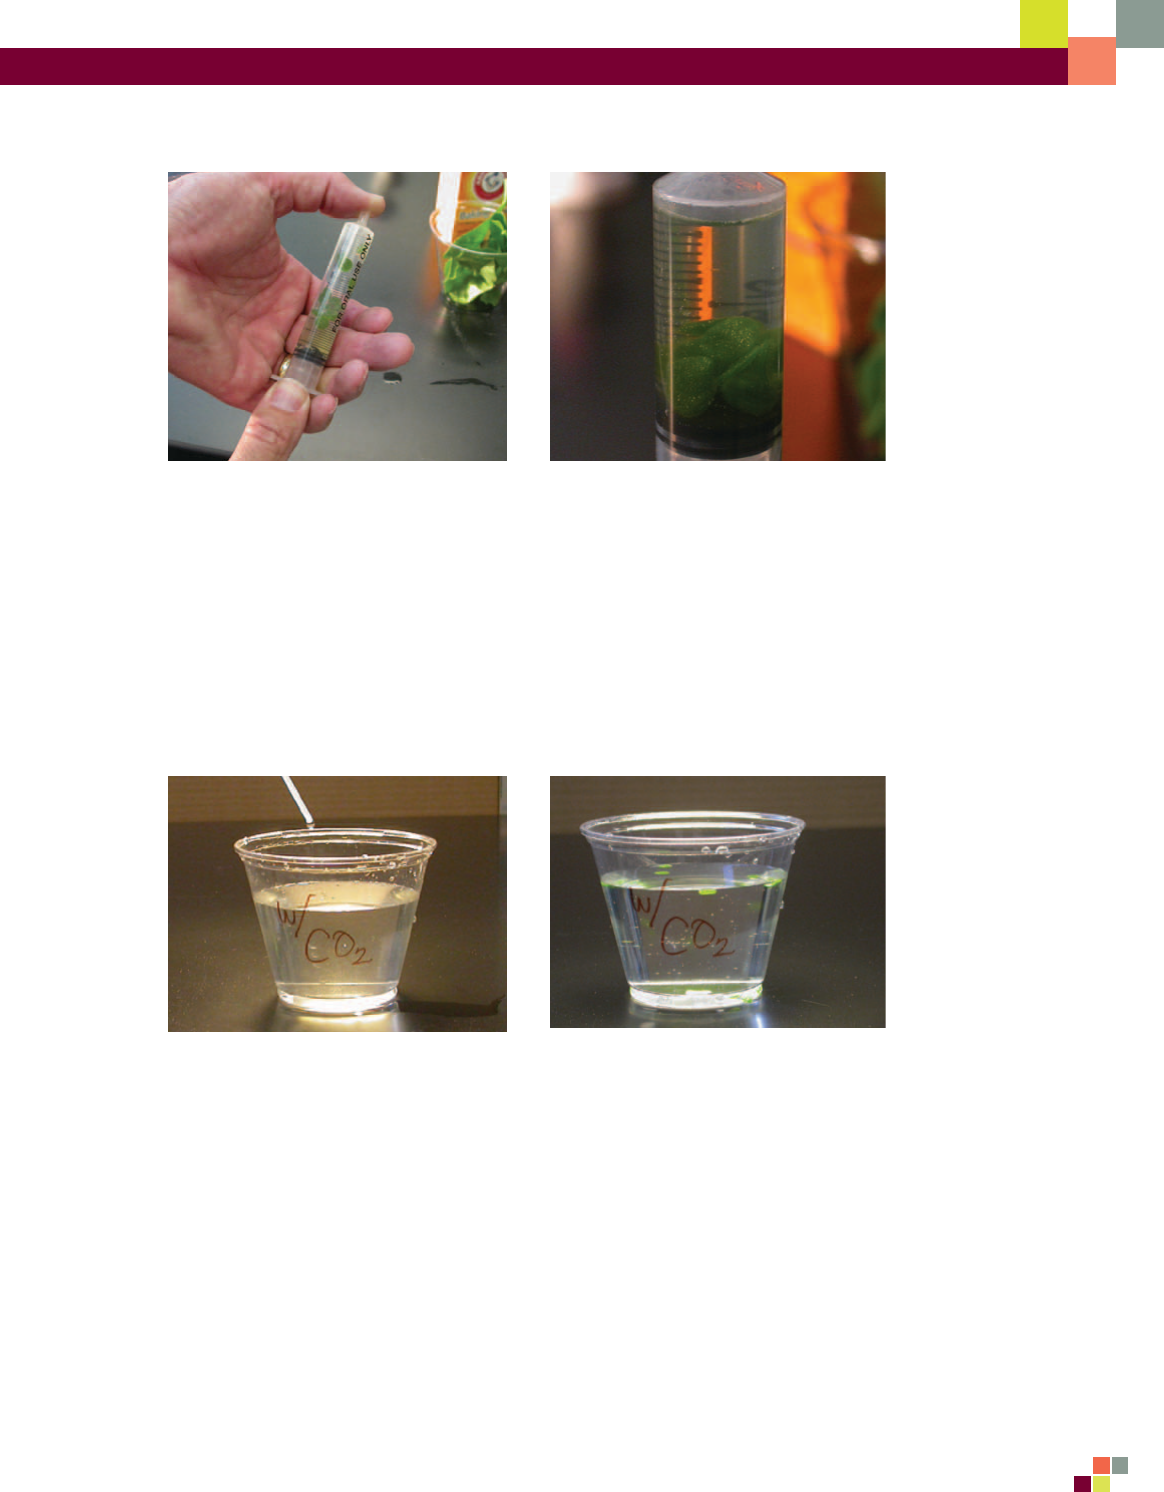
Step■5 Draw the gases out of the spongy mesophyll tissue and inltrate the leaves with the
sodium bicarbonate solution by performing the following steps:
a. Remove the piston or plunger from both syringes. Place the 10 leaf disks into each
syringe barrel.
b. Replace the plunger, but be careful not to crush the leaf disks. Push in the plunger
until only a small volume of air and leaf disk remain in the barrel (<10%).
c. Pull a small volume (5 cc) of sodium bicarbonate plus soap solution from your
prepared cup into one syringe and a small volume of water plus soap into the
other syringe. Tap each syringe to suspend the leaf disks in the solution. Make
sure that, with the plunger inverted, the disks are suspended in the solution. Make
sure no air remains. Move the plunger to get rid of air from the plunger before
you attempt Step d.
d. You now want to create a vacuum in the plunger to draw the air out of the leaf
tissue. is is the most dicult step to master. Once you learn to do this, you will
be able to complete the entire exercise successfully. Create the vacuum by holding
a nger over the narrow syringe opening while drawing back the plunger (see
Figure 6a). Hold this vacuum for about 10 seconds. While holding the vacuum,
swirl the leaf disks to suspend them in the solution. Now release the vacuum
by letting the plunger spring back. e solution will inltrate the air spaces in
the leaf disk, causing the leaf disks to sink in the syringe. If the plunger does
not spring back, you did not have a good vacuum, and you may need a dierent
syringe. You may have to repeat this procedure two to three times in order to
get the disks to sink. (If you have any diculty getting your disks to sink aer
three tries, it is usually because there is not enough soap in the solution. Try
adding a few more drops of soap to the cup and replacing the liquid in the
syringe.) Placing the disks under vacuum more than three times can damage the
disks.
Investigation 5 S67
big idea 2: Cellular ProCesses: energY and CommuniCation
Figure■6a.■Creating■a■Vacuum■in■the■
Plunger
Figure■6b.■Sinking■Leaf■Disks
Step■6 Pour the disks and the solution from the syringe into the appropriate clear plastic
cup. Disks inltrated with the bicarbonate solution go in the “With CO
2
” cup, and disks
inltrated with the water go in the “Without CO
2
” cup.
Step■7 Place both cups under the light source and start the timer. At the end of each
minute, record the number of oating disks. en swirl the disks to dislodge any that
stuck against the side of the cups. Continue until all of the disks are oating in the cup
with the bicarbonate solution.
Figure■7a.■Cup■Under■Light■Source
Figure■7b.■Disks■Floating■in■Cup■with■
Bicarbonate■Solution
Step■8 To make comparisons between experiments, a standard point of reference is
needed. Repeated testing of this procedure has shown that the point at which 50% of the
leaf disks are oating (the median or ET
50
, the Estimated Time it takes 50% of the disks
to oat) is a reliable and repeatable point of reference for this procedure.
Step■9 Record or report ndings.

S68■■Investigation 5
■■ Designing■and■Conducting■Your■Investigation
What factors aect the rate of photosynthesis in living plants?
1. Once you have mastered the oating disk technique, you will design an experiment
to test another variable that might aect the rate of photosynthesis. Some ideas
include the following, but don’t limit yourself to just these:
• What environmental variables might aect the net rate of photosynthesis? Why do
you think they would aect it? How do you predict they would aect it?
• What features or variables of the plant leaves might aect the net rate of
photosynthesis? How and why?
• Could the way you perform the procedure aect the outcome? If the outcome
changes, does it mean the net rate of photosynthesis has changed? Why do you think
that?
Note: If you are truly stumped, your instructor can give you some guidance. Keep in
mind that leaves with hairy surfaces should be avoided. Ivy and spinach work well, but
many others do as well. Dierences between plants may be one of the ideas that you
want to investigate.
2. Use your results to prepare a lab report/mini-poster for a classroom peer review
presentation. See Chapter 2 for guidance on this.
■■ Additional■Guidelines
1. Consider combining variables as a way to describe dierences between dierent
plants. For instance, if you investigate how light intensity aects the rate of
photosynthesis, you might generate a “photosynthesis light response curve”—the
rate of photosynthesis at dierent light intensities. e shape of this curve may
change for dierent plants or plants in dierent light environments. e “light
response curve” is a form of measurement itself. How do you think a light response
curve (the rst variable) for a shade-grown leaf compares to that of a sun-grown
leaf? In this situation, sun versus shade is the second variable. Comparing light
response curves is a standard research technique in plant physiological ecology.
2. When you compare the ET
50
across treatments, you will discover that there is an
inverse relationship between ET
50
and the rate of photosynthesis — ET
50
goes down
as rate of photosynthesis goes up, which plots a graph with a negative slope. is
creates a seemingly backward graph when plotting your ET
50
data across treatments,
as shown in Figure 8a. To correct this representation and make a graph that
shows increasing rates of photosynthesis with a positive slope, the ET
50
term can
be modied by taking its inverse, or 1/ET
50
. is creates a more traditional direct
relationship graph, as shown in Figure 8b.

Investigation 5 S69
big idea 2: Cellular ProCesses: energY and CommuniCation
Rate of Photosynthesis
ET
50
1/ET
50
Rate of Photosynthesis
■■■■■■Figure■8a.■Inverse■Relationship ■■■■■■■■■■■■■■■■■■■Figure■8b.■Direct■Relationship
3. Don’t forget to include other appropriate data analyses as you prepare and study
your discussion and conclusions. In particular for this investigation, you should
somehow indicate the variability in your data. e ET
50
measurement is calculated
from the median. To indicate the spread of your data, you could use error bars
around the ET
50
point that express that variation, or you might consider using “box
and whisker” plots.
This page is intentionally left blank.
