
Elastic Load Balancing
Developer Guide
API Version 2012-06-01

Elastic Load Balancing: Developer Guide
Copyright © 2014 Amazon Web Services, Inc. and/or its affiliates. All rights reserved.
All trademarks not owned by Amazon are the property of their respective owners, who may or may not be affiliated with, connected
to, or sponsored by Amazon.
AWS services or capabilities described in AWS Documentation may vary by region/location. Click Getting Started with Amazon AWS
to see specific differences applicable to the China (Beijing) Region.
Elastic Load Balancing Developer Guide

Table of Contents
What Is Elastic Load Balancing? ...................................................................................................... 1
How Elastic Load Balancing Works ........................................................................................... 2
Architectural Overview of Elastic Load Balancing ................................................................ 3
Supported Platforms .............................................................................................................. 4
Concepts ............................................................................................................................. 4
Load Balancer .............................................................................................................. 5
Availability Zones and Regions ........................................................................................ 5
Request Routing ........................................................................................................... 6
Configuring EC2 Instances for Load Balancing ................................................................... 7
Health Check ................................................................................................................ 7
Connection Draining ...................................................................................................... 9
Idle Connection Timeout ............................................................................................... 10
Sticky Sessions ........................................................................................................... 10
HTTP Methods ............................................................................................................ 11
HTTPS Support ........................................................................................................... 11
Proxy Protocol ............................................................................................................. 11
Tagging ...................................................................................................................... 12
X-Forwarded Headers .................................................................................................. 13
Interfaces ........................................................................................................................... 14
Regions and Endpoints ......................................................................................................... 15
Limits ................................................................................................................................ 15
Related Services ................................................................................................................. 16
Next Steps ................................................................................................................. 17
Setting Up .................................................................................................................................. 18
Sign Up ............................................................................................................................. 18
AWS Management Console ................................................................................................... 19
AWS Command Line Interface ............................................................................................... 20
Query Requests .................................................................................................................. 21
Signing Query Requests ............................................................................................... 21
AWS SDKs ......................................................................................................................... 22
Next Steps ......................................................................................................................... 22
Getting Started ............................................................................................................................ 23
Create a Basic Load Balancer in EC2-Classic ........................................................................... 23
Configure Listeners for Your Load Balancer ...................................................................... 24
Configure Health Check for Your Amazon EC2 Instances .................................................... 26
Register Amazon EC2 Instances .................................................................................... 27
Review Settings and Create Your Load Balancer ............................................................... 28
Verify the Creation of Your Load Balancer ......................................................................... 28
Delete Your Load Balancer ............................................................................................ 30
Create a Basic Load Balancer in EC2-VPC .............................................................................. 31
Configure Listeners for Your Load Balancer ...................................................................... 32
Configure Health Check for Your Amazon EC2 Instances .................................................... 34
Select a Subnet for Your Back-end Instance ...................................................................... 35
Assign a Security Group to Your Load Balancer ................................................................. 36
Register Your Amazon EC2 Instances ............................................................................. 36
Review Settings and Create Your Load Balancer ............................................................... 37
Verify Creation of Your Load Balancer ............................................................................. 38
Delete Your Load Balancer ............................................................................................ 39
Create a Basic Load Balancer in Default VPC ........................................................................... 41
Configure Listeners for Your Load Balancer ...................................................................... 42
Configure Health Check for Your Amazon EC2 Instances .................................................... 43
Assign a Security Group to Your Load Balancer ................................................................. 44
Register Your Amazon EC2 Instances ............................................................................. 45
Review Settings and Create Your Load Balancer ............................................................... 45
Verify Creation of Your Load Balancer ............................................................................. 46
API Version 2012-06-01
iii
Elastic Load Balancing Developer Guide

Delete Your Load Balancer ............................................................................................ 48
Listener Configurations ................................................................................................................. 49
Listeners ............................................................................................................................ 49
Using TCP/SSL Protocol with Elastic Load Balancing ................................................................. 50
Using HTTP/HTTPS Protocol with Elastic Load Balancing .......................................................... 50
SSL Server Certificates ........................................................................................................ 51
SSL Negotiation ................................................................................................................. 51
Using Back-End Server Authentication with Elastic Load Balancing .............................................. 51
Listener Configurations Quick Reference ................................................................................. 52
Next Steps ......................................................................................................................... 54
SSL Negotiation Configurations ...................................................................................................... 55
SSL Security Policies ........................................................................................................... 56
SSL Security Policy Table ...................................................................................................... 56
SSL Certificates .......................................................................................................................... 61
Prerequisite: Install and Configure OpenSSL ............................................................................ 62
Generate Private Key and Certificate Signing Request ............................................................... 63
Create a Private Key .................................................................................................... 63
Create a Certificate Signing Request .............................................................................. 64
Submit CSR to Certificate Authority ................................................................................ 65
Upload the Signed Certificate ................................................................................................ 65
Verify Server Certificate ........................................................................................................ 67
Sample Certificates .............................................................................................................. 68
Elastic Load Balancing in Amazon EC2-Classic ................................................................................ 70
Create HTTPS/SSL Load Balancer ......................................................................................... 72
Using the AWS Management Console ............................................................................. 72
Using the AWS Command Line Interface ......................................................................... 82
Add or Remove Availability Zones ........................................................................................... 96
Add Availability Zone ................................................................................................... 96
Remove Availability Zone .............................................................................................. 99
Security Groups ................................................................................................................. 101
Locking down traffic between Elastic Load Balancing and back-end Amazon EC2 instance ..... 101
Internet Protocol version 6 (IPv6) .......................................................................................... 111
IPv6 and CNAME records for Elastic Load Balancing ....................................................... 111
IPv6 and Hosted Zones for Elastic Load Balancing .......................................................... 112
Elastic Load Balancing in Amazon VPC ......................................................................................... 113
Understanding Public and Private Subnets ............................................................................. 114
Security for Your Load Balancers and Instances in Amazon VPC ................................................ 115
Default VPC ...................................................................................................................... 115
Internet-facing and Internal Load Balancers ............................................................................ 116
Configure Amazon VPC for Elastic Load Balancing .................................................................. 118
Create an Internal Load Balancer ......................................................................................... 119
Using the AWS Management Console ........................................................................... 120
Using the AWS Command Line Interface ........................................................................ 124
Using the Query API ................................................................................................... 127
Attach Subnets .................................................................................................................. 129
Using AWS Management Console ................................................................................ 129
Using the AWS Command Line Interface ........................................................................ 130
Using the Query API ................................................................................................... 130
Detach Subnet .................................................................................................................. 131
Using AWS Management Console ................................................................................ 131
Using the AWS Command Line Interface ........................................................................ 131
Using the Query API ................................................................................................... 132
Security Groups ................................................................................................................. 133
Using the AWS Management Console ........................................................................... 133
Using the AWS Command Line Interface ........................................................................ 133
Using the Query API ................................................................................................... 134
Managing Load Balancers ........................................................................................................... 135
Add Listener ..................................................................................................................... 136
API Version 2012-06-01
iv
Elastic Load Balancing Developer Guide

Using the AWS Management Console ........................................................................... 136
Using the AWS Command Line Interface ........................................................................ 138
Using the Query API ................................................................................................... 140
Delete Listener .................................................................................................................. 142
Using the AWS Management Console ........................................................................... 142
Using the AWS Command Line Interface ........................................................................ 142
Using the Query API ................................................................................................... 143
Deregister and Register Instances ........................................................................................ 145
De-Registering Your Amazon EC2 Instances from Your Load Balancer ................................ 145
Registering Your Amazon EC2 Instances with Your Load Balancer ...................................... 146
Update SSL Certificate ....................................................................................................... 147
Using the AWS Management Console ........................................................................... 148
Using the AWS Command Line Interface ........................................................................ 149
Using the Query API ................................................................................................... 149
Update SSL Negotiation Configuration ................................................................................... 151
Using the AWS Management Console ........................................................................... 151
Using the AWS Command Line Interface ........................................................................ 152
Using the Query API ................................................................................................... 156
Custom Domain Names ...................................................................................................... 158
Associating Your Custom Domain Name with Your Load Balancer Name .............................. 158
Disassociating Your Custom Domain Name From Your Load Balancer Name ........................ 162
Cross-Zone Load Balancing ................................................................................................. 163
Enable Cross-Zone Load Balancing .............................................................................. 163
Disable Cross-Zone Load Balancing .............................................................................. 166
Connection Draining ........................................................................................................... 170
Enable Connection Draining ......................................................................................... 170
Disable Connection Draining ........................................................................................ 173
Idle Timeout ...................................................................................................................... 177
Using the AWS Management Console ........................................................................... 177
Using the AWS Command Line Interface ........................................................................ 177
Using the Query API ................................................................................................... 179
Proxy Protocol ................................................................................................................... 181
Enable Proxy Protocol Using the AWS Command Line Interface ......................................... 182
Enable Proxy Protocol Using the Query API .................................................................... 188
DNS Failover ..................................................................................................................... 194
Prerequisites ............................................................................................................. 194
Use the Console to Configure DNS Failover for Your Load Balancers ................................... 194
Sticky Sessions ................................................................................................................. 198
Duration-Based Session Stickiness ............................................................................... 198
Application-Controlled Session Stickiness ...................................................................... 203
Tags ................................................................................................................................ 208
Add Tags .................................................................................................................. 208
Remove Tags ............................................................................................................ 211
Delete Your Load Balancer ................................................................................................... 215
Using the AWS Management Console .......................................................................... 215
Using the Query API .................................................................................................. 215
Using the AWS Command Line Interface ........................................................................ 215
Monitoring and Logging ............................................................................................................... 217
Monitoring Load Balancers .................................................................................................. 218
Available Metrics ........................................................................................................ 218
View Metrics ............................................................................................................ 225
Create Alarms ........................................................................................................... 226
Access Logs ..................................................................................................................... 228
Access Log File ......................................................................................................... 228
Access Log Entry ....................................................................................................... 229
Log Processing .......................................................................................................... 231
Enable Access Logs ................................................................................................... 231
Disable Access Logs ................................................................................................. 237
API Version 2012-06-01
v
Elastic Load Balancing Developer Guide

Configure an Amazon S3 Bucket for Storing Access Logs ................................................. 241
Elastic Load Balancing API Call Logs .................................................................................... 245
Configure CloudTrail Event Logging ............................................................................... 245
Elastic Load Balancing Event Entries in CloudTrail Log Files .............................................. 245
Controlling User Access to Your Load Balancer ............................................................................... 248
Using IAM Policy to Grant Permissions ................................................................................. 248
IAM Policy Syntax ...................................................................................................... 248
Allow or Deny Permissions in an IAM Policy .................................................................... 249
Specifying ELB Actions in an IAM Policy ........................................................................ 249
Specifying ELB Resources in an IAM Policy .................................................................... 250
Specifying Condition Keys in an IAM Policy ..................................................................... 251
Example IAM Policies for Elastic Load Balancing ............................................................. 252
Troubleshooting ......................................................................................................................... 255
API Response ................................................................................................................... 256
CertificateNotFound: undefined .................................................................................... 256
OutofService: A Transient Error Occurred ....................................................................... 257
Error Messages ................................................................................................................. 257
HTTP 400: BAD_REQUEST ........................................................................................ 257
HTTP 405: METHOD_NOT_ALLOWED ......................................................................... 257
HTTP 408: Request Timeout ........................................................................................ 257
HTTP 502: Bad Gateway ............................................................................................. 257
HTTP 503: Service Unavailable or HTTP 504 Gateway Timeout ......................................... 257
Response Codes ............................................................................................................... 258
What is Response Code Metrics? ................................................................................. 258
HTTPCode_ELB_4XX ................................................................................................ 258
HTTPCode_ELB_5XX ................................................................................................ 258
HTTPCode_Backend_2XX .......................................................................................... 259
HTTPCode_Backend_3XX .......................................................................................... 259
HTTPCode_Backend_4XX .......................................................................................... 259
HTTPCode_Backend_5XX .......................................................................................... 259
Health Check .................................................................................................................... 259
Connection to the instances has timed out ...................................................................... 260
Health check target page error ..................................................................................... 260
Public key authentication is failing ................................................................................. 261
Stopped and started instances failing load balancer health check ....................................... 261
Instance is not receiving traffic from the load balancer. ..................................................... 261
Ports on instance are not open ..................................................................................... 262
Instances in the Auto Scaling group are failing load balancer health check ........................... 262
Registering Instances ......................................................................................................... 262
Taking too long to register back-end instances. ................................................................ 262
Unable to register instance launched from a paid AMI. ...................................................... 263
Resources ................................................................................................................................ 264
Document History ...................................................................................................................... 265
Appendices ............................................................................................................................... 272
Appendix A: Using the Elastic Load Balancing Command Line Interface ...................................... 272
Task 1: Download the Command Line Interface ............................................................... 273
Task 2: Set the JAVA_HOME Environment Variable .......................................................... 273
Task 3: Set the AWS_ELB_HOME Environment Variable ................................................... 274
Task 4: Set the AWS_CREDENTIAL_FILE Environment Variable ........................................ 275
Task 5: Set the Region ................................................................................................ 276
Verify if Elastic Load Balancing Command Line Interface(CLI) is Installed ............................ 276
Appendix B: Using the SOAP API ......................................................................................... 279
Endpoints ................................................................................................................. 279
WSDL and Schema Definitions ..................................................................................... 279
Programming Language Support .................................................................................. 279
Request Authentication ............................................................................................... 279
The Response Structure ............................................................................................. 281
Web Services References ........................................................................................... 282
API Version 2012-06-01
vi
Elastic Load Balancing Developer Guide


What Is Elastic Load Balancing?
Amazon Web Services (AWS) provides Elastic Load Balancing to automatically distribute incoming web
traffic across multiple Amazon Elastic Compute Cloud (Amazon EC2) instances.With Elastic Load Bal-
ancing, you can add and remove EC2 instances as your needs change without disrupting the overall flow
of information. If one EC2 instance fails, Elastic Load Balancing automatically reroutes the traffic to the
remaining running EC2 instances. If the failed EC2 instance is restored, Elastic Load Balancing restores
the traffic to that instance. Elastic Load Balancing offers clients a single point of contact, and it can also
serve as the first line of defense against attacks on your network.You can offload the work of encryption
and decryption to Elastic Load Balancing, so your servers can focus on their main task.
When you use Elastic Load Balancing to manage traffic to your application, you get the following benefits:
• Distribution of requests to Amazon EC2 instances (servers) in multiple Availability Zones so that the
risk of overloading one single instance is minimized. And if an entire Availability Zone goes offline,
Elastic Load Balancing routes traffic to instances in other Availability Zones.
• Continuous monitoring of the health of Amazon EC2 instances registered with the load balancer so
that requests are sent only to the healthy instances. If an instance becomes unhealthy, Elastic Load
Balancing stops sending traffic to that instance and spreads the load across the remaining healthy in-
stances.
• Support for end-to-end traffic encryption on those networks that use secure (HTTPS/SSL) connections.
• The ability to take over the encryption and decryption work from the Amazon EC2 instances, and
manage it centrally on the load balancer.
• Support for the sticky session feature, which is the ability to "stick" user sessions to specific Amazon
EC2 instances.
• Association of the load balancer with your domain name. Because the load balancer is the only computer
that is exposed to the Internet, you don’t have to create and manage public domain names for the in-
stances that the load balancer manages.You can point the instance's domain records at the load bal-
ancer instead and scale as needed (either adding or removing capacity) without having to update the
records with each scaling activity.
• When used in an Amazon Virtual Private Cloud (Amazon VPC), support for creation and management
of security groups associated with your load balancer to provide additional networking and security
options.
• Supports use of both the Internet Protocol version 4 (IPv4) and Internet Protocol version 6 (IPv6).
Pricing
As with all Amazon Web Services, you pay only for what you use. For Elastic Load Balancing, you pay
for each hour or portion of an hour that the service is running, and you pay for each gigabyte of data that
API Version 2012-06-01
1
Elastic Load Balancing Developer Guide

is transferred through your load balancer. For current pricing information for Elastic Load Balancing, go
to Elastic Load Balancing Pricing.
Free Tier
If you are a new AWS customer, you are eligible to use the free usage tier for twelve months following
your AWS sign-up date.The free tier includes 750 hours per month of Amazon EC2 Micro Instance usage,
and 750 hours per month of Elastic Load Balancing, plus 15 GB of data processing. For information about
the free usage tier, go to AWS Free Usage Tier.
How Elastic Load Balancing Works
Elastic Load Balancing (ELB) consists of two components: the load balancers and the controller service.
The load balancers monitor the traffic and handle requests that come in through the Internet.The controller
service monitors the load balancers, adding and removing load balancers as needed and verifying that
the load balancers are functioning properly.
You have to create your load balancer before you can start using it. Elastic Load Balancing automatically
generates a unique Domain Name System (DNS) name for each load balancer instance you create. For
example, if you create a load balancer named myLB in the us-east-1a, your load balancer might have a
DNS name such as myLB-1234567890.us-east-1.elb.amazonaws.com. Clients can request access
your load balancer by using the ELB generated DNS name.
If you'd rather use a user-friendly domain name, such as www.example.com, instead of the load balancer
DNS name, you can create a custom domain name and then associate the custom domain name with
the load balancer DNS name.When a request is placed to your load balancer using the custom domain
name that you created, it resolves to the load balancer DNS name.
When a client makes a request to your application using either your load balancer's DNS name or the
custom domain name, the DNS server returns one or more IP addresses.The client then makes a con-
nection to your load balancer at the provided IP address.When Elastic Load Balancing scales, it updates
the DNS record for the load balancer.The DNS record for the load balancer has the time-to-live (TTL)
set to 60 seconds.This setting ensures that IP addresses can be re-mapped quickly to respond to events
that cause Elastic Load Balancing to scale up or down.
When you create a load balancer, you must configure it to accept incoming traffic and route requests to
your EC2 instances.The controller ensures that load balancers are operating with the correct configuration.
After you create your load balancer, you have to register the EC2 instances that you want to load balance
with the load balancer.Your load balancer monitors and routes the incoming traffic to the registered in-
stances.The instances are registered with the load balancer using the IP addresses associated with the
instances.
Your load balancer also monitors the health of the registered instances and ensures that the traffic goes
to healthy instances.When the load balancer detects an unhealthy instance, it stops routing the traffic to
that instance and resumes the routing when the instance has been restored to a healthy state. Elastic
Load Balancing performs health checks on all your registered instances using the configuration you
provide, regardless of whether the instance is in a healthy or unhealthy state.
Amazon Elastic Compute Cloud (Amazon EC2) provides the ability to launch your instances in multiple
Availability Zones.You can configure your load balancer to load balance incoming application traffic
across multiple instances in a single Availability Zone or across multiple instances in several Availability
Zones in the same region. For example, if you choose to load balance multiple instances across two
Availability Zones, and all the instances in the first Availability Zone become unhealthy, the load balancer
will route traffic to the healthy instances in the other Availability Zone. When you use multiple Availability
Zones, it is important to keep approximately the same capacity in each Availability Zone registered with
the load balancer.
API Version 2012-06-01
2
Elastic Load Balancing Developer Guide
How Elastic Load Balancing Works

Using Auto Scaling with Elastic Load Balancing makes it easy to increase or decrease your back-end
capacity to meet varying traffic levels. For example, you could set a condition declaring that when the
number of healthy instances behind a load balancer goes down to two, two or more instances are launched.
Or, you could set a condition to monitor the latency of the load balancer, and when the latency exceeds
certain time period, such as three seconds, capacity is increased.You can also use the AWS Management
Console to register or deregister instances used by the load balancer as the capacity requirements of
your application change over time.
Amazon Route 53 is AWS's highly available and cost-effective DNS service.You can use Amazon Route
53 to associate the custom domain name of your load balancer with the load balancer DNS name. Using
Amazon Route 53's Alias records will provide performance improvements because the clients will need
only to make a single request to resolve the domain name. Also, queries to Alias records are free of
charge.
Architectural Overview of Elastic Load Balancing
The following diagram shows how the various components of the Elastic Load Balancing work together.
The remainder of this section provides a step-by-step view of the flow of events that take place when a
client requests a URL served by your applications.
This example assumes that you have created a load balancer, created a custom domain name and asso-
ciated your load balancer with the domain name using a CNAME entry in DNS, and have registered your
instances with it.
1. The client sends a URL request to DNS servers to access your application.The DNS server responds
with a DNS name. For example, myLB-1234567890.us-east-1.elb.amazonaws.com.
2. The client looks for the resolution of the DNS name sent by the DNS server. The DNS entry is con-
trolled by Amazon because your application instances are under the amazonaws.com domain.The
Amazon DNS servers return one or more IP addresses.
3. The client then opens a connection to the machine at the provided IP address. The instance at this
address is the load balancer you created.
4. The load balancer checks the health states of all the registered EC2 application instances within the
selected Availability Zones and will begin routing traffic to instances that have met the healthy threshold
defined in the health check configuration.
5. The load balancer routes the client request to the healthy EC2 application instance identified in the
previous step. At this point, the client is communicating with one of your EC2 instances through your
API Version 2012-06-01
3
Elastic Load Balancing Developer Guide
Architectural Overview of Elastic Load Balancing

load balancer.The load balancer listeners can be configured to use either HTTP, HTTPS, TCP, or
SSL protocols for both front-end connection (client to load balancer) and back-end connection (load
balancer to back-end instance).
Supported Platforms
Elastic Load Balancing supports load balancing your Amazon EC2 instances launched within the following
platforms:
• EC2-Classic — Instances launched in EC2-Classic run in a flat network that you share with other
customers.To load balance your EC2 instances launched in EC2-Classic, you must create your load
balancer in EC2-Classic. For more information about Amazon EC2, see What is Amazon EC2? in the
Amazon Elastic Compute Cloud User Guide.
• EC2-VPC — Instances launched in EC2-VPC run in an virtual private cloud (VPC) that is logically
isolated from other virtual networks in the AWS cloud.You create your VPC by assigning classless
inter-domain routing (CIDR) range of your choice (for example, 10.0.0.0/16).To load balance your EC2
instances launched in a VPC, you must create your load balancer in the same VPC as your EC2 in-
stances. For more information about Amazon VPC, see What is Amazon VPC in the Amazon Virtual
Private Cloud User Guide.
If your AWS account comes with a default virtual private cloud (default VPC), your EC2 instances and
load balancer are launched within the default VPC, by default. For more information on default VPCs
and subnets, see Your Default VPC and Subnets.
For information about how you can tell which platform your AWS account supports, see Supported Platforms
in the Amazon Compute Cloud User Guide.
Elastic Load Balancing Concepts
Topics
• Load Balancer (p. 5)
• Availability Zones and Regions (p. 5)
• Request Routing (p. 6)
• Configuring EC2 Instances for Load Balancing (p. 7)
• Health Check (p. 7)
• Connection Draining (p. 9)
• Idle Connection Timeout (p. 10)
• Sticky Sessions (p. 10)
• HTTP Methods (p. 11)
• HTTPS Support (p. 11)
• Proxy Protocol (p. 11)
• Tagging (p. 12)
• X-Forwarded Headers (p. 13)
This topic introduces you to Elastic Load Balancing basics you need to understand before you create
your load balancer.
API Version 2012-06-01
4
Elastic Load Balancing Developer Guide
Supported Platforms

Load Balancer
A load balancer is the destination to which all requests intended for your load balanced application should
be directed. Each load balancer can distribute requests to multiple EC2 instances. A load balancer is
represented by a DNS name and a set of ports. Load balancers can span multiple Availability Zones
within an EC2 Region, but they cannot span multiple regions.
To create or work with a load balancer in a specific region, use the corresponding regional service endpoint.
For information about regions and endpoints supported by Elastic Load Balancing, go to Regions and
Endpoints.
Elastic Load Balancing automatically generates a DNS name for each load balancer instance you create.
Typically, the DNS name includes the name of the AWS region in which the load balancer is created. For
example, if you create a load balancer named myLB in the us-east-1a, your load balancer might have a
DNS name such as myLB-1234567890.us-east-1.elb.amazonaws.com.You use the DNS name
generated by Elastic Load Balancing to connect with your load balancer. To connect, paste the DNS
name of your load balancer into the address field of an Internet-connected web browser.
If you'd rather use a user-friendly domain name for your load balancer, such as www.example.com, instead
of the load balancer DNS name, you can create a custom domain name and then associate the custom
domain name with the load balancer DNS name.When a request is placed to your load balancer using
the custom domain name that you created, it resolves to the load balancer DNS name.
For more information on creating and using a custom domain name for your load balancer, see Configure
Custom Domain Name for Your Load Balancer (p. 158).
When you create your load balancer, you must configure it to accept incoming traffic by specifying the
configurations for your load balancer listeners. A listener is a process that listens for connections from
incoming requests. It is configured with a protocol and a port number for front-end (load balancer) and
back-end (back-end instance) connections. For more information on the ports and protocols supported
by Elastic Load Balancing, see Listener Configurations for Elastic Load Balancing (p. 49).
Availability Zones and Regions
You can set up your Elastic Load Balancing to distribute incoming requests across EC2 instances in a
single Availability Zone or multiple Availability Zones within a region.Your load balancer does not distribute
traffic across regions.
For critical applications, we recommend that you distribute incoming traffic across more than one Avail-
ability Zone.To distribute traffic across multiple Availability Zones, launch your Amazon EC2 instances
in all the Availability Zones you plan to use and then register the instances with your load balancer.
When you register your EC2 instances, Elastic Load Balancing provisions load balancer nodes in all the
Availability Zones that has the registered instances.The load balancer node continuously monitors the
health of all the registered instances and routes traffic to the healthy instances. If a load balancer node
detects unhealthy or de-registered instances, it stops routing traffic to those instances. Instead, it sends
requests to the remaining healthy instances.
You can always expand or shrink the availability of your instances after your initial set up.To expand the
availability of your application, launch instances in an additional Availability Zone, register the new instances
with your load balancer, and then add the new Availability Zone. After you've added the new Availability
Zone, the load balancer begins to route traffic equally amongst all the enabled Availability Zones.To
shrink the availability of your instances, remove an Availability Zone that was enabled for your load bal-
ancer. After you've removed the Availability Zone, the load balancer will stop routing the traffic to the
disabled Availability Zone and continue to route traffic to the registered and healthy instances in the enabled
Availability Zones.
For information see Add or Remove Availability Zones for Your Load Balanced Application (p. 96).
API Version 2012-06-01
5
Elastic Load Balancing Developer Guide
Load Balancer

Request Routing
Before a client sends a request to your load balancer, it first resolves the load balancer's domain name
with the Domain Name System (DNS) servers.The DNS server resolves the load balancer's domain
name by returning one or more IP addresses to the client. The client then uses DNS round robin to de-
termine which load balancer node in a specific Availability Zone will receive the request.
The selected load balancer node then sends the request to instances within the same Availability Zone.
To determine the instances, the load balancer node uses either the round robin (for TCP connections)
or the least outstanding request (for HTTP/HTTPS connections) routing algorithm. The least outstanding
request routing algorithm favors back-end instances with the fewest outstanding requests.
By default, the load balancer node routes traffic to back-end instances within the same Availability Zone.
To ensure that your back-end instances are able to handle the request load in each Availability Zone, it
is important to have approximately equivalent numbers of instances in each zone. For example, if you
have ten instances in Availability Zone us-east-1a and two instances in us-east-1b, the traffic will still be
equally distributed between the two Availability Zones. As a result, the two instances in us-east-1b will
have to serve the same amount of traffic as the ten instances in us-east-1a. As a best practice, we recom-
mend that you keep an equivalent or nearly equivalent number of instances in each of your Availability
Zones. So in the example, rather than having ten instances in us-east-1a and two in us-east-1b, you
could distribute your instances so that you have six instances in each Availability Zone.
If you want the request traffic to be routed evenly across all back-end instances, regardless of the Avail-
ability Zone that they may be in, enable cross-zone load balancing on your load balancer. Cross-zone
load balancing allows each load balancer node to route requests across multiple Availability Zones, en-
suring that all zones receive an equal amount of request traffic. Cross-zone load balancing reduces the
need to maintain equivalent numbers of back-end instances in each zone, and improves the application's
ability to handle the loss of one or more back-end instances. However, we still recommend that you
maintain approximately equivalent numbers of instances in each Availability Zone for higher fault tolerance.
The traffic between Elastic Load Balancing and your EC2 instances in another Availability Zone will not
incur any EC2 data transfer charges.
For environments where clients cache DNS lookups, incoming requests may prefer one of the Availability
Zones. Using cross-zone load balancing, this imbalance in request load will be spread across all available
back-end instances in the region, reducing the impact of misbehaving clients on the application.
Routing traffic to EC2 instances in EC2-Classic
To allow communication between Elastic Load Balancing and your back-end instances launched in EC2-
Classic, create a security group ingress rule that applies to all of your back-end instances.The security
group rule can either allow ingress traffic from all IP addresses (the 0.0.0.0/0 CIDR range) or allow ingress
traffic only from Elastic Load Balancing.To ensure that your back-end EC2 instances can receive traffic
only from Elastic Load Balancing, enable network ingress for the Elastic Load Balancing security group
on all of your back-end EC2 instances. For more information about configuring security groups for EC2
instances launched in EC2-Classic, see Manage Security Groups in Amazon EC2-Classic (p. 101).
Routing traffic to EC2 instances in Amazon VPC
If you are planning on deploying your load balancer within Amazon Virtual Private Cloud (Amazon VPC),
be sure to configure the security group rules and network ACLs to allow traffic to be routed between the
subnets in your VPC. If your rules are not configured correctly, instances in other subnets may not be
reachable by load balancer nodes in a different subnet. For more information on deploying load balancer
within Amazon VPC, see Elastic Load Balancing in Amazon VPC (p. 113). For information on configuring
security groups for your load balancer deployed in VPC, see Manage Security Groups in Amazon
VPC (p. 133).
For a procedure on enabling or disabling cross-zone load balancing for your load balancer, see Enable
or Disable Cross-Zone Load Balancing for Your Load Balancer (p. 163)
API Version 2012-06-01
6
Elastic Load Balancing Developer Guide
Request Routing

Configuring EC2 Instances for Load Balancing
After you've created your load balancer, you have to register your EC2 instances with the load balancer.
Your EC2 instances can be within a single Availability Zone or span multiple Availability Zones within a
region. Elastic Load Balancing routinely performs health check on all the registered EC2 instances and
automatically distributes all incoming requests to the DNS name of your load balancer across your re-
gistered, healthy EC2 instances. For more information on the health check of your EC2 instances, see
Health Check (p. 7).
Make sure to install webserver, such as Apache or Internet Information Services (IIS), on all the EC2 in-
stances you plan to register with your load balancer.
Stop and Start EC2 Instances
The instances are registered with the load balancer using the IP addresses associated with the instances.
When an instance is stopped and then started, the IP address associated with your instance changes.
This prevents the load balancer from routing traffic to your restarted instance.When you stop and then
start your registered EC2 instances, we recommend that you de-register your stopped instance from your
load balancer, and then register the restarted instance. Failure to do so may prevent the load balancer
from performing health checks and routing the traffic to the restarted instance. For procedures associated
with de-registering and then registering your instances with your load balancer, see Deregister and Register
Amazon EC2 Instances (p. 145).
Setting Keepalive On Your EC2 Instances
For HTTP and HTTPS listeners, we recommend that you enable the keep-alive option in your EC2 in-
stances.This may be done in your web server settings and/or in the kernel settings for your back-end
instance. Keep-alive option will allow the load balancer to re-use connections to your backend for multiple
client requests.This reduces the load on your web server and improves the throughput of the load balancer.
The keep-alive timeout should be at least 60 seconds to ensure that the load balancer is responsible for
closing the connection to your instance.
Health Check
To discover the availability of your EC2 instances, the load balancer periodically sends pings, attempts
connections, or sends requests to test the EC2 instances.These tests are called health checks. Instances
that are healthy at the time of the health check are marked as "InService" and the instances that are un-
healthy at the time of the health check are marked as "OutOfService".The load balancer performs health
checks on all registered instances, regardless of whether the instance is in a healthy or unhealthy state.
The load balancer routes traffic only to the healthy instances.When the load balancer determines that
an instance is unhealthy, it stops routing traffic to that instance.The load balancer resumes routing traffic
to the instance when it has been restored to a healthy state.
The load balancer checks the health of the registered instances using either the default health check
configuration provided by Elastic Load Balancing (ELB) or a health check configuration that you specify.
Health Check Configuration
A health configuration contains the information that a load balancer uses to determine the health state
of the registered instances.The following table describes the health check configuration fields:
Default ValueDescriptionField
Console: HTTP
CLI/API/SDK: TCP
The protocol to use to connect with the
instance.The protocol can be TCP,
HTTP, HTTPS, or SSL.
Ping Protocol
API Version 2012-06-01
7
Elastic Load Balancing Developer Guide
Configuring EC2 Instances for Load Balancing

Default ValueDescriptionField
Console: HTTP:80
CLI/API/SDK: TCP:80
The port to use to connect with the
instance.The ping port can be within the
range of one (1) through 65535.
Specified as a protocol:port pair.
If you specify a TCP or SSL protocol, you
only have to include the protocol and the
port, such as TCP:80.
The load balancer attempts to open a
TCP connection to the instance on the
specified port. If the load balancer fails to
connect with the instance at the specified
port within the configured response
timeout period, the instance is considered
unhealthy.
Ping Port
HTTP:80/index.htmlThe destination for sending the
HTTP/HTTPS request.
If you specify an HTTP or HTTPS
protocol, you have to include a ping port
and a ping path, such as
HTTP:80/index.html. An HTTP GET
request or an HTTPS GET request is
issued to the instance on the ping port
and the ping path. If the load balancer
receives any response other than "200
OK" within the response timeout period,
the instance is considered unhealthy. If
the response includes a body, then your
application must either set the
Content-Length header to a value greater
than or equal to zero, or specify
Transfer-Encoding with a value set to
'chunked'.
Ping Path
5 secondsTime to wait when receiving a response
from the health check (2 sec - 60 sec).
Response Timeout
30 secondsAmount of time between health checks
(5 sec - 300 sec).
HealthCheck Interval
2Number of consecutive health check
failures before declaring an EC2 instance
unhealthy.
Unhealthy Threshold
10Number of consecutive health check
successes before declaring an EC2
instance healthy.
Healthy Threshold
Here is an example of a customized health check configuration:
• Ping Protocol = HTTP
• Ping Port = 80
API Version 2012-06-01
8
Elastic Load Balancing Developer Guide
Health Check

• Ping Path = HTTP:80/welcome.html
• Response Timeout = 5 seconds
• Health Check Interval = 30 seconds
• Unhealthy Threshold = 2
• Healthy Threshold = 5
The load balancer interprets the health check configuration as follows: Send a request to registered instance
at the ping port and ping path, http://EC2InstanceIPaddress:80/welcome.html, every 30 seconds.
Allow a response timeout period of 5 seconds for the instance to respond. If the load balancer gets 2
consecutive failures, take the instance out of service. If the load balancer gets 5 consecutive successful
responses, put the instance back in service.
You can update your health check configuration at any time using the AWS Management Console, the
configure-health-check AWS CLI command, or the ConfigureHealthCheck action.
You can check the health state of your registered instances using the AWS Management Console, the
describe-instance-health command, or the DescribeInstanceHealth action.
Health Checks and Auto Scaling Groups
If you have associated your Auto Scaling group with a load balancer, you can use the load balancer health
check to determine the health state of instances in your Auto Scaling group. By default, an Auto Scaling
group periodically makes calls to the Amazon Elastic Compute Cloud (EC2) DescribeInstanceStatus action
to determine the health state of each instance. If the Auto Scaling group is registered with a load balancer
and associated with the load balancer health check, Auto Scaling will make calls to both the Amazon
EC2 DescribeInstanceStatus action and the ELB DescribeInstanceHealth action to determine the health
state of the instances. For more information, see Add an Elastic Load Balancing Health Check to your
Auto Scaling Group in the Auto Scaling Developer Guide.
Troubleshooting Health Check
Your registered instances can fail the load balancer health check for several reasons.The most common
reasons for failing a health check are where EC2 instances close connections to your load balancer or
where the response from the EC2 instances times out. For information on potential causes and steps
you can take to resolve failed health check issues, see Troubleshooting Elastic Load Balancing: Health
Check Configuration (p. 259).
Connection Draining
Connection draining causes the ELB load balancer to stop sending new requests to a deregistering instance
or an unhealthy instance, while keeping the existing connections open. This allows the load balancer to
complete in-flight requests made to the deregistering or unhealthy instances.
Connection draining is a load balancer attribute and applies to all listeners for the load balancer.You can
enable or disable connection draining for your load balancer at any time.You can check if connection
draining is enabled for your load balancer by using the DescribeLoadBalancerAtrributes action, the elb-
describe-lb-attributes command, or by using the AWS Management Console and clicking the In-
stances tab in the bottom pane of the selected load balancer.
When you enable connection draining for your load balancer, you can set a maximum time for the load
balancer to continue serving in-flight requests to the deregistering instance before the load balancer
closes the connection.The load balancer forcibly closes connections to the deregistering instance when
the maximum time limit is reached.
While the in-flight requests are being served, the load balancer reports the instance state of the deregis-
tering instance as InService: Instance deregistration currently in progress. The load
balancer reports the instance state as OutOfService: Instance is not currently registered
API Version 2012-06-01
9
Elastic Load Balancing Developer Guide
Connection Draining

with the LoadBalancer when the deregistering instance has completed serving all in-flight requests
or when the maximum timeout limit is reached, whichever comes first.
When an instance becomes unhealthy the load balancer reports the instance state as OutOfService.
If there are in-flight requests made to the unhealthy instance, they get completed.The maximum timeout
limit does not apply for the connections to the unhealthy instance.
You can check the instance state of a deregistering instance or an unhealthy instance by using the De-
scribeInstanceHealth action, or the elb-describe-instance-health command.
If your instances are part of an Auto Scaling group and if connection draining is enabled for your load
balancer, Auto Scaling will wait for the in-flight requests to complete or for the maximum timeout to expire,
whichever comes first, before terminating instances due to a scaling event or health check replacement.
For information about using Elastic Load Balancing with Auto Scaling, see Use Elastic Load Balancing
to Load Balance Your Auto Scaling Group.
For tutorials on how to enable or disable connection draining attribute for your load balancer, see Enable
or Disable Connection Draining for Your Load Balancer (p. 170).
Idle Connection Timeout
For each request a client makes through a load balancer, the load balancer maintains two connections.
One connection is with the client and the other connection is to the back-end instance. For each connection,
the load balancer manages an idle timeout that is triggered when no data is sent over the connection for
a specified time period. After this time period has elapsed, if no data has been sent or received, the load
balancer closes the connection.
By default, Elastic Load Balancing maintains a 60-second idle timeout setting for the connections to the
client and the back-end instance.You can change the idle timeout setting for your load balancer at any
time.
If you use HTTP and HTTPS listeners, we recommend that you enable the keep-alive option for your
EC2 instances.You can enable keep-alive in your web server settings and/or in the kernel settings for
your EC2 instance. Keep-alive, when enabled, allows the load balancer to re-use connections to your
back-end instance, which reduces the CPU utilization on your instances.To ensure that the load balancer
is responsible for closing the connections to your back-end instance, make sure that the value set on
your instance for the keep-alive time is greater than the idle timeout setting on your load balancer.
For a tutorial on configuring the idle timeout settings for your load balancer, see Configure Idle Connection
Timeout (p. 177).
Sticky Sessions
By default, a load balancer routes each request independently to the application instance with the smallest
load. However, you can use the sticky session feature (also known as session affinity), which enables
the load balancer to bind a user's session to a specific application instance.This ensures that all requests
coming from the user during the session will be sent to the same application instance.
The key to managing the sticky session is determining how long your load balancer should consistently
route the user's request to the same application instance. If your application has its own session cookie,
then you can set Elastic Load Balancing to create the session cookie to follow the duration specified by
the application's session cookie. If your application does not have its own session cookie, then you can
set Elastic Load Balancing to create a session cookie by specifying your own stickiness duration.You
can associate stickiness duration for only HTTP/HTTPS load balancer listeners.
• For more information about creating cookies that allow duration-based session stickiness, see Duration-
Based Session Stickiness (p. 198).
API Version 2012-06-01
10
Elastic Load Balancing Developer Guide
Idle Connection Timeout

• For more information about creating cookies that allow application-specific session stickiness, see
Application-Controlled Session Stickiness (p. 203).
An application instance must always receive and send two cookies: A cookie that defines the stickiness
duration and a special Elastic Load Balancing cookie named AWSELB, that has the mapping to the ap-
plication instance.
HTTP Methods
The HTTP method (also called the verb) specifies the action to be performed on the resource receiving
an HTTP request.The standard methods for HTTP requests are defined in RFC 2616, Hypertext
Transfer Protocol-HTTP/1.1. Standard methods include GET, POST, PUT, HEAD, and OPTIONS. Some
web applications require (and sometimes also introduce) new methods that are extensions of HTTP/1.1
methods.These HTTP extensions can be non-standard. Some common examples of HTTP extended
methods include (but are not limited to) PATCH, REPORT, MKCOL, PROPFIND, MOVE, and LOCK.
Elastic Load Balancing accepts all standard and non-standard HTTP methods.
When a load balancer receives an HTTP request, it performs checks for malformed requests and for the
length of the method.The total method length in an HTTP request to a load balancer must not exceed
127 characters. If the HTTP request passes both the checks, the load balancer sends the request to the
back-end EC2 instance. If the method field in the request is malformed, the load balancer responds with
a HTTP 400: BAD_REQUEST (p. 257) error message. If the length of the method in the request exceeds
127 characters, the load balancer responds with a HTTP 405: METHOD_NOT_ALLOWED (p. 257) error
message.
The back-end EC2 instance processes a valid request by implementing the method contained in the request
and then sending a response back to the client.Your back-end instance must be configured to handle
both supported and unsupported methods.
HTTPS Support
HTTPS Support is a feature that allows you to use the SSL/TLS protocol for encrypted connections (also
known as SSL offload).This feature enables traffic encryption between the clients that initiate HTTPS
sessions with your load balancer and also for connections between the load balancer and your back-end
instances.
To enable HTTPS support for your load balancer, you'll have to install an SSL server certificate on your
load balancer.The load balancer uses the certificate to terminate and then decrypt requests before
sending them to the back-end instances.
For more information, see Using HTTP/HTTPS Protocol with Elastic Load Balancing (p. 50). For inform-
ation about creating a load balancer that uses HTTPS, see Create a HTTPS/SSL Load Balancer (p. 72).
Proxy Protocol
The Proxy Protocol header helps you identify the IP address of a client when you use a load balancer
configured for TCP/SSL connections. Because load balancers intercept traffic between clients and your
back-end instances, the access logs from your back-end instance contain the IP address of the load
balancer instead of the originating client.When Proxy Protocol is enabled, the load balancer adds a human-
readable format header that contains the connection information, such as the source IP address, destin-
ation IP address, and port numbers of the client. The header is then sent to the back-end instance as a
part of the request.You can parse the first line of the request to retrieve your client's IP address and the
port number.
The Proxy Protocol line is a single line that ends with a carriage return and line feed ("\r\n"). It takes
the following form:
API Version 2012-06-01
11
Elastic Load Balancing Developer Guide
HTTP Methods
PROXY_STRING + single space + INET_PROTOCOL + single space + CLIENT_IP + single
space + PROXY_IP + single space + CLIENT_PORT + single space + PROXY_PORT +
"\r\n"
The following is an example of the IPv4 Proxy Protocol.
PROXY TCP4 198.51.100.22 203.0.113.7 35646 80\r\n
The Proxy Protocol line for IPv6 takes an identical form, except it begins with TCP6 and the address is in
IPv6 format.
The following is an example of the IPv6 Proxy Protocol.
PROXY TCP6 2001:DB8::21f:5bff:febf:ce22:8a2e 2001:DB8::12f:8baa:eafc:ce29:6b2e
35646 80\r\n
If the client connects with IPv6, the address of the proxy in the header will be the public IPv6 address of
your load balancer.This IPv6 address matches the IP address that is resolved from your load balancer's
DNS name that is prefixed with either ipv6 or dualstack. If the client connects with IPv4, the address
of the proxy in the header will be the private IPv4 address of the load balancer and will therefore not be
resolvable through a DNS lookup outside the Amazon Elastic Compute Cloud (Amazon EC2) network.
For information about enabling the Proxy Protocol header, see Enable or Disable Proxy Protocol Sup-
port (p. 181).
Tagging
You can categorize and track your Amazon Web Services resources, such as EC2 instances, load balan-
cers, or Auto Scaling groups by using tags.To categorize your load balancers in Elastic Load Balancing
you assign a tag to each load balancer. Tags contain metadata that describes useful categories, such
as a purpose, owner, or environment. A tag consists of a key and a value, both of which you define. For
example, you could define a key=value pair, such as “department=digital-media” or “project=lima,” and
assign it to a load balancer.You can then use the tags to track the load balancers designated for project
lima or for your digital-media department.We recommend that you use a consistent set of tag keys to
make it easier to track metadata associated with your load balancers.
You can tag your load balancers to organize your AWS bill and see how costs are allocated.To do this,
sign up to get your AWS account bill with tag key values included.Then, to see the cost of running your
load balancers, organize your billing information according to load balancers with the same tag key values.
For example, if you use the "department=digital-media" tag, you can track the cost of running load balancers
assigned to the digital-media department. For more information about cost allocation, see Use Cost Al-
location Tags for Custom Billing Reports in the AWS Account Billing and Cost Management User Guide.
Tag Restrictions
The following basic restrictions apply to tags:
• Maximum number of tags per load balancer—10.
• Maximum key length—128 Unicode characters.
• Maximum value length—256 Unicode characters.
• Tag keys and values are case sensitive. Allowed characters are letters, space, and numbers represent-
able in UTF-8, plus the following special characters: + - = . _ : / @
API Version 2012-06-01
12
Elastic Load Balancing Developer Guide
Tagging

Note
If you need to use characters outside this set, you can standard base-64 encode your tag.
• Tag keys and values must not contain leading or trailing spaces.
• Do not use aws: as a prefix in your tag names because it is reserved for AWS use.
Note
Tags containing the prefix aws: have been created by AWS.These tags cannot be edited or
deleted, and they do not count toward your limit of 10 tags per load balancer.
You can create a load balancer with tags, or you can add tags to an existing load balancer.You can remove
load balancer tags at any time. When you delete your load balancer, the tags assigned to that load bal-
ancer are deleted.
For information on creating load balancer with tags, see Create a HTTPS/SSL Load Balancer (p. 72).
For information on adding tags to or removing tags from an existing load balancer, see Add or Remove
Tags (p. 208).
X-Forwarded Headers
The HTTP requests and HTTP responses use header fields to send information about the HTTP message.
Header fields are colon-separated name-value pairs that are separated by a carriage return (CR) and a
line feed (LF). A standard set of HTTP header fields is defined in RFC 2616, Message Headers.There
are also non-standard HTTP headers available that are widely used by the applications. Some of the
non-standard HTTP headers have a X-Forwarded prefix. Elastic Load Balancing supports the following
X-Forwarded headers:
X-Forwarded-For
The X-Forwarded-For request header helps you identify the IP address of a client when you use HT-
TP/HTTPS load balancer. Because load balancers intercept traffic between clients and servers, your
server access logs contain only the IP address of the load balancer.To see the IP address of the client,
use the X-Forwarded-For request header. Elastic Load Balancing stores the IP address of the client
in the X-Forwarded-For request header and passes the header along to your server.
The X-Forwarded-For request header takes the following form:
X-Forwarded-For: clientIPAddress
The following example is an X-Forwarded-For request header for a client with an IP address of
203.0.113.7.
X-Forwarded-For: 203.0.113.7
The following example is an X-Forwarded-For request header for a client with an IPv6 address of
2001:DB8::21f:5bff:febf:ce22:8a2e.
X-Forwarded-For: 2001:DB8::21f:5bff:febf:ce22:8a2e
If the request goes through multiple proxies, then the clientIPAddress in the X-Forwarded-For request
header is followed by IP addresses of each successive proxy that passes along the request before the
request reaches your load balancer.Thus, the right-most value is the IP address of the most recent proxy
API Version 2012-06-01
13
Elastic Load Balancing Developer Guide
X-Forwarded Headers

(for your load balancer) and the left-most value is the IP address of the originating client. In such cases,
the X-Forwarded-For request header takes the following form:
X-Forwarded-For: OriginatingClientIPAddress, proxy1-IPAddress, proxy2-IPAddress
X-Forwarded-Proto
The X-Forwarded-Proto request header helps you identify the protocol (HTTP or HTTPS) that a client
used to connect to your server.Your server access logs contain only the protocol used between the
server and the load balancer; they contain no information about the protocol used between the client and
the load balancer.To determine the protocol used between the client and the load balancer, use the X-
Forwarded-Proto request header. Elastic Load Balancing stores the protocol used between the client
and the load balancer in the X-Forwarded-Proto request header and passes the header along to your
server.
Your application or website can use the protocol stored in the X-Forwarded-Proto request header to
render a response that redirects to the appropriate URL.
The X-Forwarded-Proto request header takes the following form:
X-Forwarded-Proto: originatingProtocol
The following example contains an X-Forwarded-Proto request header for a request that originated
from the client as an HTTPS request:
X-Forwarded-Proto: https
X-Forwarded-Port
The X-Forwarded-Port request header helps you identify the port a HTTP/HTTPS load balancer uses
to connect to the client.
Accessing Elastic Load Balancing
You can create, access and manage your load balancer using any one of the following Elastic Load Bal-
ancing interfaces:
• AWS Management Console— The AWS Management Console provides a web-based interface you
can use to access Elastic Load Balancing.You can use the console to make requests to an API.
• AWS Command Line Interface—Amazon Web Services (AWS) provides a command line interface
that support the broader set of AWS services, including Elastic Load Balancing. The AWS Command
Line Interface (AWS CLI) can be used to control and automate AWS services on Windows, Mac, and
Linux. AWS also offers the AWS Tools for Windows PowerShell for those who script in the PowerShell
environment.
• Query API— Elastic Load Balancing provides a Query API you can use to programmatically access
Elastic Load Balancing functionality. Query requests are HTTP or HTTPS requests that use the HTTP
verbs GET or POST and a Query parameter named Action or Operation. Calling an API using a Query
request is the most direct way to access a web service, but requires that your application handle low-
level details such as generating the hash to sign the request, and error handling.The benefit of using
a Query request is that you have access to the complete functionality of an API.
• AWS SDKs— The AWS SDKs provide functions that wrap an API and take care of many of the con-
nection details, such as calculating signatures, handling request retries, and error handling.With AWS
API Version 2012-06-01
14
Elastic Load Balancing Developer Guide
Interfaces

SDKs, you can get started in minutes with a single, downloadable package that includes the library,
code samples, and reference documentation.You can access Elastic Load Balancing programmatically
using the SDKs in Java, .NET, PHP, or Ruby.
• SOAP API— You can access the Elastic Load Balancing web service using the SOAP web services
messaging protocol.This interface is described by a Web Services Description Language (WSDL)
document that defines the operations and security model for the particular service.The WSDL references
an XML schema document, which strictly defines the data types that might appear in SOAP requests
and responses. For information on using the SOAP API, see Appendix B: Using the SOAP API (p. 279)
For information about installing and configuring Elastic Load Balancing interfaces, see Setting Up Elastic
Load Balancing Interfaces (p. 18)
Regions and Endpoints for Elastic Load Balan-
cing
By default, the AWS SDKs and console for Elastic Load Balancing reference the US West (Oregon) region
and the Elastic Load Balancing Query requests reference the US East (N.Virginia) region.You can
change the default region for the AWS SDK, the console, and the Elastic Load Balancing Query requests
and set it to the region of your choice at any time.You must specify a region when using the AWS Com-
mand Line Interface (AWS CLI). For information on configuring the default region for Elastic Load Balancing,
see Setting Up Elastic Load Balancing Interfaces (p.18) and follow the instructions for changing the default
region for your interface.
As Elastic Load Balancing expands availability to new regions, new endpoints for these regions are also
available to use in your own HTTP requests, the AWS SDKs, the AWS CLI, and the console. For a current
list of supported regions and endpoints, see Regions and Endpoints.
Elastic Load Balancing Limits
Your AWS account comes with default limits on resources for Elastic Load Balancing and other Amazon
Web Services. Unless otherwise noted, each limit is per region.There is a default limit of 20 load balancers
per region per account.You can go to AWS Service Limits and select Elastic Load Balancing
Limits or any other service listed on the page to see its default limits.
You can request an increase for the number of load balancers for your account by performing the following
steps:
1. Go to AWS Support Center page, sign in, if necessary, and click Open a new case.
2. Under Regarding, select Service Limit Increase.
3. Under Limit Type, select Elastic Load Balancers, fill in all of the necessary fields in the form,
and click the button at the bottom of the page for your desired method of contact.
API Version 2012-06-01
15
Elastic Load Balancing Developer Guide
Regions and Endpoints

Related Services
Elastic Load Balancing works with the following AWS products to provide solutions to help your load
balancer improve availability and scalability of your applications.
SolutionsAWS Product
Runs your back-end application instances.Amazon EC2
Creates capacity groups of instances that can grow or shrink on demand.
For more information, see Auto Scaling Developer Guide.
Auto Scaling
Collects the data provided by your load balancer and presents it as
readable, near real-time metrics.These metrics can be used to monitor
the health state of your instances.You can create an Amazon
CloudWatch alarm to send notification to an Auto Scaling policy if an
individual metric goes outside of what you consider an acceptable range.
For more information on using Amazon CloudWatch with your load
balancer, see Monitor Your Load Balancer Using Amazon
CloudWatch (p. 218). For information on Amazon CloudWatch, see
Amazon CloudWatch Developer Guide.
Amazon CloudWatch
Provides secure and reliable routing to your application instances. Route
53 automatically routes queries to the nearest DNS server in a global
network of DNS servers, resulting in low latency.You can use Route 53
to translate friendly domain names like www.example.com into IP
addresses like 192.0.2.1. For information on using Amazon Route 53
to create a custom domain name for your load balancer, see Configure
Custom Domain Name for Your Load Balancer (p. 158). For information
on Amazon Route 53, see Amazon Route 53 Developer Guide.
Amazon Route 53
Manages digital server certificates to use with your load balancer.Your
load balancer uses server certificates to terminate and then decrypt
requests before sending them to the back-end instances. Use IAM to
upload the server certificate to your load balancer. For information on
creating and uploading server certificate, see Creating and Uploading
Server Certificates.
Manages users and user permissions in AWS. IAM provides central
control over users and security credentials. Use IAM to create multiple
users who can use AWS products, each with individual security
credentials, all controlled by a single AWS account. For information on
specifying user permissions for Elastic Load Balancing resources, see
Controlling User Access to Your Load Balancer (p.248). For information
on AWS Identity and Access Management, see Using IAM.
AWS Identity and Access
Management (IAM)
The following diagram shows how the various services in AWS integrate with Elastic Load Balancing.
API Version 2012-06-01
16
Elastic Load Balancing Developer Guide
Related Services

Next Steps
• You might want to test drive Elastic Load Balancing by creating a basic load balancer and registering
your EC2 instances with the newly created load balancer.Get Started with Elastic Load Balancing (p.23)
provides information on creating a basic load balancer using the AWS Management Console.
• You might want to explore some common user scenarios for Elastic Load Balancing. Before you do
this, you must install the tools and interfaces that you plan to use to access your load balancer. For
information on installing the command line interfaces and using the Query API, go to Get Set Up with
Elastic Load Balancing Interfaces.
• For detailed instructions on using Elastic Load Balancing in Amazon EC2, see Elastic Load Balancing
in Amazon EC2-Classic (p. 70).
• For detailed instructions on using Elastic Load Balancing in Amazon Virtual Private Cloud(VPC), see
Elastic Load Balancing in Amazon VPC (p. 113).
API Version 2012-06-01
17
Elastic Load Balancing Developer Guide
Next Steps

Setting Up Elastic Load Balancing
Interfaces
You can create, access, and manage your load balancers using any one of the Elastic Load Balancing
interfaces: the AWS Management Console, the AWS Command Line Interface, the Query API, the SOAP
API, or the SDK for Elastic Load Balancing.
Before you can use Elastic Load Balancing, you'll need to sign up for Amazon Web Services (AWS) ac-
count. Signing up allows you to access Elastic Load Balancing and other services in AWS that you might
need, such as Amazon EC2, Amazon CloudWatch, Amazon Route 53, AWS Identity and Access Man-
agement (IAM), and Auto Scaling.
After signing up, you'll need to install and configure the Elastic Load Balancing interface you want to use
to create, access, and manage your Elastic Load Balancing resources.
Topics
• Sign Up for Amazon Web Services(AWS) (p. 18)
• Sign in to Elastic Load Balancing Using the AWS Management Console (p. 19)
• Use the AWS Command Line Interface (p. 20)
• Use Query Requests to Call Elastic Load Balancing APIs (p. 21)
• Use the AWS SDKs (p. 22)
• Next Steps (p. 22)
Sign Up for Amazon Web Services(AWS)
When you create an AWS account, we automatically sign up your account for all AWS services.You pay
only for the services that you use.
If you already have an AWS account, skip this step. If you don't have an AWS account, use the following
procedure to create one.
To sign up for an AWS account
1. Go to http://amazonaws.cn and click the Sign Up button.
2. Follow the on-screen instructions.
API Version 2012-06-01
18
Elastic Load Balancing Developer Guide
Sign Up

Part of the sign-up procedure involves receiving a phone call and entering a PIN using the phone
keypad.
Sign in to Elastic Load Balancing Using the AWS
Management Console
The AWS Management Console is a point-and-click web-based interface you can use to access Elastic
Load Balancing and other AWS products.You can use the console to make requests to Elastic Load
Balancing and other AWS APIs.
Elastic Load Balancing resources can be accessed using the EC2 console in the AWS Management
Console.
To sign in to the Elastic Load Balancing using the EC2 console
1. Sign in to the AWS Management Console and open the Amazon EC2 console at https://con-
sole.amazonaws.cn/ec2/.
2. On the Amazon EC2 console Resources page, in the left navigation pane, under NETWORK &
SECURITY, click Load Balancers.
3. If this is the first time you are accessing Elastic Load Balancing or you do not have any load balancers
in the selected region, your load balancer page might look something like the following:
4. The load balancers you create is tied to a region you specify and are not replicated across regions.
For more information, see Regions and Endpoints for Elastic Load Balancing (p. 15).
API Version 2012-06-01
19
Elastic Load Balancing Developer Guide
AWS Management Console

The AWS Management Console selects a region for you by default. The default region is displayed
in the navigation bar. If necessary, change the region. From the navigation bar, select the region that
meets your needs.
To create your load balancer using the AWS Management Console, see Get Started with Elastic Load
Balancing (p. 23)
Use the AWS Command Line Interface
Amazon Web Services (AWS) provides a command line interface (CLI) that supports the broader set of
AWS services, including Elastic Load Balancing. The AWS Command Line Interface (AWS CLI) can be
used to control and automate AWS services on Windows, Mac, and Linux.
The AWS CLI is the recommended CLI tool for Elastic Load Balancing.
For more information about AWS CLI and for instructions on installing the AWS CLI tools, step through
the following sections in the AWS Command Line Interface User Guide.
• What Is the AWS Command Line Interface? provides introduction to the AWS CLI.
• Getting Set Up with the AWS Command Line Interface provides instructions on installing and configuring
the AWS CLI.
For details about the AWS CLI commands for Elastic Load Balancing, see AWS CLI elb.
Note
The prior Elastic Load Balancing Command Line Interface (ELB CLI) is still available, but not
recommended. New features released after ELB CLI version 1.0.35.0 (dated 7/24/14) will be
included in the AWS CLI only.
For a list of the ELB CLI versions and the functionality the ELB CLI versions support, see Elastic
Load Balancing API Tools.
API Version 2012-06-01
20
Elastic Load Balancing Developer Guide
AWS Command Line Interface

Use Query Requests to Call Elastic Load Balan-
cing APIs
Elastic Load Balancing provides APIs that you can call by submitting a Query Request. Query requests
are HTTP or HTTPS requests that use the HTTP verb GET or POST and a Query parameter named
Action or Operation that specifies the API you are calling. Action is used throughout this documentation,
although Operation is also supported for backward compatibility with other Amazon Web Services (AWS)
Query APIs.
Calling the API using a Query request is the most direct way to access the web service, but requires that
your application handle low-level details such as generating the hash to sign the request, and error
handling.The benefit of calling the service using a Query request is that you are assured of having access
to the complete functionality of the API.
Note
The Query interface used by AWS is similar to REST, but does not adhere completely to the
REST principles.
Signing Query Requests
Query requests travel over the Internet using either HTTP or HTTPS, and are vulnerable to being inter-
cepted and altered in transit.To prevent this and ensure that the incoming request is both from a valid
AWS account and unaltered, AWS requires all requests to be signed.
To sign a Query request, you calculate a digital signature using a cryptographic hash function over the
text of the request and your AWS secret key. A cryptographic hash is a one-way function that returns
unique results based on the input.The input to the hash function includes the text of your request and
your secret access key. The hash function returns a hash value that you include in the request as your
signature.
When Elastic Load Balancing receives the request, it re-calculates the signature using the request text
and the secret key that matches the AWS access key in the request. If the two signatures match, Elastic
Load Balancing knows that the query has not been altered and that the request originated from your ac-
count.This is one reason why it is important to safeguard your private key. Any malicious user who obtains
it would be able to make AWS calls, and incur charges, on your account.
For additional security, you should transmit your requests using Secure Sockets Layer (SSL) by using
HTTPS. SSL encrypts the transmission, protecting your request or the response from being viewed in
transit. For more information about securing your Query requests, see Making Secure Requests to Amazon
Web Services.
The signature format that AWS uses has been refined over time to increase security and ease of use.
Elastic Load Balancing supports Signature Version 2 and Signature Version 4. If you are creating new
applications that use Elastic Load Balancing, then we recommend using Signature Version 4 for signing
your query requests.
For information about how to create the signature using Signature Version 4, see Signature Version 4
Signing Process in the AWS General Reference.
For information about how to create the signature using Signature Version 2, see Signature Version 2
Signing Process in the AWS General Reference.
API Version 2012-06-01
21
Elastic Load Balancing Developer Guide
Query Requests

Use the AWS SDKs
AWS SDKs make it easier for developers to build applications that tap into cost-effective, scalable, and
reliable AWS infrastructure services.With AWS SDKs, you can get started in minutes with a single,
downloadable package that includes the library, code samples, and reference documentation.You can
access Elastic Load Balancing programmatically using the SDKs in Java, .NET, PHP, or Ruby.
The following table lists the available SDKs and third-party libraries you can use to access Elastic Load
Balancing programmatically.
DescriptionType of Access
AWS provides the following SDKs:
• AWS SDK for Java Documentation
• AWS SDK for .NET Documentation
• AWS SDK for PHP Documentation
• AWS SDK for Ruby Documentation
AWS SDKs
Developers in the AWS developer community also provide their own libraries,
which you can find at the following AWS developer centers:
• AWS Java Developer Center
• AWS PHP Developer Center
• AWS Python Developer Center
• AWS Ruby Developer Center
• AWS Windows and .NET Developer Center
Third-Party Libraries
Next Steps
To get a hands-on introduction to creating your load balancer, see Get Started with Elastic Load Balan-
cing (p. 23).
For information on scenarios specific to load balancers in Amazon EC2, see Elastic Load Balancing in
Amazon EC2-Classic (p. 70).
For information on scenarios specific to load balancers in Amazon VPC, see Elastic Load Balancing in
Amazon VPC (p. 113).
For information on using the various features supported by Elastic Load Balancing, see Managing Load
Balancers (p. 135).
API Version 2012-06-01
22
Elastic Load Balancing Developer Guide
AWS SDKs

Get Started with Elastic Load
Balancing
After you have read What Is Elastic Load Balancing? (p. 1), and you have decided to load balance your
Amazon Elastic Compute Cloud (Amazon EC2) instances, it's time to get started with basic load balancing
tasks.Your first task will be to create a load balancer.
You can create your load balancer in EC2-Classic or Amazon VPC platforms. For more information, see
Supported Platforms (p. 4).
If you are creating a load balancer in EC2-Classic, see Create a Basic Load Balancer in EC2-Clas-
sic (p. 23).
If you are creating a load balancer in EC2-VPC, see Create a Basic Load Balancer in EC2-VPC (p. 31).
If you are creating your load balancer in default VPC, see Create a Basic Load Balancer in Default
VPC (p. 41).
Create a Basic Load Balancer in EC2-Classic
This getting started tutorial walks you through the process for creating a basic ELB load balancer to load
balance your EC2 instances that are launched in EC2-Classic platform.
The following step-by-step instructions will help you create a basic load balancer using the AWS Manage-
ment Console, a point-and-click web-based interface. Before you get started with the console, be sure
you've done the following:
• Sign up for Amazon Web Services (AWS). If you haven't signed up for AWS yet, complete the steps
listed in Sign Up for Amazon Web Services(AWS) (p. 18).
Note
If you are a new AWS customer, you are eligible to use the free usage tier for twelve months
following your AWS sign-up date.The free tier includes 750 hours per month of Amazon EC2
Micro Instance usage, and 750 hours per month Elastic Load Balancing plus 15GB of data
processing. For more information on what is available on the free tier, go to AWS Free Usage
Tier.
API Version 2012-06-01
23
Elastic Load Balancing Developer Guide
Create a Basic Load Balancer in EC2-Classic

• Launch Amazon EC2 instances with HTTP access on port 80.You'll be registering these instances
with your load balancer. For more information about launching Amazon EC2 instances, see Launching
and Using Instances in the Amazon Cloud Compute User Guide.
• Install a webserver, such as Apache or Internet Information Services (IIS), on the EC2 instances you
plan to register with the load balancer.
Make sure to create your load balancer in the same region your EC2 instances are launched in.
The following steps outline how to create a basic load balancer in EC2-Classic.
1. Configure the listeners for your load balancer by specifying the ports and protocols to use for the front-
end connection (client to load balancer) and the back-end connection (load balancer to back-end in-
stance).
2. Configure a health check for your Amazon EC2 back-end instances.
3. Register your Amazon EC2 instances with the load balancer.
4. Review settings and create your load balancer.
5. Verify that your load balancer is created.
6. [Optional] Delete your load balancer.
Important
The load balancer you're about to create will be live (and not running in a sandbox). If you are
not signed up for free usage tier, you will incur the standard Elastic Load Balancing usage fees
for the load balancer until you terminate it. The total charges will be minimal (typically less than
a dollar), if you complete the Getting Started in one sitting and delete your load balancer when
you are finished. For more information about Elastic Load Balancing usage rates, go to the
Elastic Load Balancing Pricing page.
Configure Listeners for Your Load Balancer
To configure listeners for your load balancer
1. Sign in to the AWS Management Console and open the Amazon EC2 console at https://con-
sole.amazonaws.cn/ec2/.
2. Start the Create Load Balancer wizard:
a. On the Amazon EC2 console Resources page, in the EC2 Dashboard pane, under NETWORK
& SECURITY, click Load Balancers.
API Version 2012-06-01
24
Elastic Load Balancing Developer Guide
Configure Listeners for Your Load Balancer

b. On the Load Balancers page, click Create Load Balancer.
3. On the Define Load Balancer page, make the following selections:
a. In the Load Balancer name: field, enter a name for your load balancer (e.g., my-test-load-
balancer).
The load balancer name you choose must be unique within your set of load balancers, must
have a maximum of 32 characters, and must only contain alphanumeric characters or hyphens.
b. Leave Create LB inside: field set to EC2-Classic for this tutorial.
Note
In this tutorial, you are creating a load balancer for your EC2 instances launched within
Amazon EC2. If you want to create a load balancer for your EC2 instances inside
Amazon Virtual Private Cloud (Amazon VPC), see Create a Basic Load Balancer in
EC2-VPC (p. 31)
c. Leave Listener Configuration: fields set to the default values for this example.
Important
The default settings require that your Amazon EC2 HTTP servers are active and accept-
ing requests on port 80.
API Version 2012-06-01
25
Elastic Load Balancing Developer Guide
Configure Listeners for Your Load Balancer

4. Click Continue to configure health check for your Amazon EC2 instances.
Configure Health Check for Your Amazon EC2 In-
stances
Elastic Load Balancing routinely checks the health of each load-balanced Amazon EC2 instance based
on the configurations that you specify. If Elastic Load Balancing finds an unhealthy instance, it stops
sending traffic to the instance and reroutes traffic to healthy instances.
To configure a health check for your Amazon EC2 instances
1. On the Configure Health Check page of the Create Load Balancer wizard, set the following con-
figurations:
a. Leave Ping Protocol set to its default value of HTTP.
b. Leave Ping Port set to its default value of 80.
Elastic Load Balancing pings the port you choose (in this example, port 80) to send health check
queries to your Amazon EC2 instances.
Important
Your Amazon EC2 instances must accept incoming traffic on the ping port.This example
assumes that each of your instances has a working webserver that accepts incoming
traffic on port 80.
c. In the Ping Path field, replace the default value with a single forward slash ("/").
Elastic Load Balancing sends health check queries to the path you specify in Ping Path. This
example uses a single forward slash so that Elastic Load Balancing sends the query to your
webserver's default home page, whether that default page is named index.html, de-
fault.html, or a different name.
d. Leave the fields in the Advanced Details pane set to their default values.
API Version 2012-06-01
26
Elastic Load Balancing Developer Guide
Configure Health Check for Your Amazon EC2 Instances

2. Click Continue to register your Amazon EC2 instances with your load balancer.
Register Amazon EC2 Instances
Now that you've made your configuration choices you're ready to register your EC2 instances.
To register your Amazon EC2 instances
1. On the Add EC2 Instances page, in the Add Instances to Load Balancer table, select the boxes
in the Instance column to register instances with your load balancer.
2. Keep Enable Cross-Zone Load Balancing and Enable Connection Draining boxes set to the
default settings for this tutorial.
API Version 2012-06-01
27
Elastic Load Balancing Developer Guide
Register Amazon EC2 Instances

3. Click Continue.
4. For this tutorial, skip the step for adding tags and click Continue to review your settings and then
create your load balancer.
Review Settings and Create Your Load Balancer
Now that you've registered your EC2 instances with your load balancer it's time to review the settings
you have selected.
To review your settings
1. On the Review page of the Create Load Balancer wizard, check your settings.You can make
changes by clicking the edit link for each setting.
Note
You can modify some of the settings even after you've created your load balancer. For ex-
ample, you can modify the port configurations, health check configurations, and add or re-
move EC2 instances from your load balancer. For more information, see Managing Load
Balancers (p. 135).
2. Click Create to create your load balancer.
Verify the Creation of Your Load Balancer
Now that you've created your load balancer, you're ready to verify its settings.
To verify creation of your load balancer
1. The Create Load Balancer wizard displays the status of your newly created load balancer. Click
Close after confirming that your load balancer was successfully created.
2. Your new load balancer now appears in the load balancer list page. Select your load balancer.
API Version 2012-06-01
28
Elastic Load Balancing Developer Guide
Review Settings and Create Your Load Balancer

3. The bottom pane displays the details of your load balancer. Verify that the descriptions match your
specifications.
If the description in the Status row indicates that some of your instances are not in service, its
probably because your instances are still in the registration process. For more information, see
Troubleshooting Elastic Load Balancing: Registering Instances (p. 262).
4. You can test your load balancer after you've verified that at least one of your EC2 instances is InSer-
vice.To test your load balancer, copy the DNS Name value that is listed in the Description tab and
paste it into the address field of an Internet-connected web browser. If your load balancer is working,
you will see the default page of your HTTP server.
Congratulations! You've successfully created a basic load balancer. The load balancer is live and has
started incurring the standard Elastic Load Balancing usage fees.You can either delete the load balancer
now and incur minimal hourly (typically less than a dollar) charges, or you can continue using the load
balancer.
Note
If you are a new AWS customer and are using the free usage tier, you can continue using the
load balancer. Go to AWS Free Usage Tier to check the number of hours available to you.
• For information on deleting your load balancer, see the following section.
• Elastic Load Balancing supports the load balancing of applications using HTTP, HTTPS (Secure HTTP),
TCP, and SSL (Secure TCP) listener protocols. For a quick overview of the different configurations
available for your load balancer, see Elastic Load Balancing Listener Configurations Quick Refer-
ence (p. 52).
• For information on some common Elastic Load Balancing user scenarios, and the tasks needed to
accomplish efficient distribution of application loads among your Amazon EC2 instances, see Managing
Load Balancers (p. 135).
• For information about Elastic Load Balancing usage rates, go to the Elastic Load Balancing product
page.
API Version 2012-06-01
29
Elastic Load Balancing Developer Guide
Verify the Creation of Your Load Balancer

Delete Your Load Balancer
As soon as your load balancer becomes available, you are billed for each hour or partial hour that you
keep the load balancer running. After you've decided that you no longer need the load balancer, you can
delete it.
To delete your load balancer
1. On the Amazon EC2 console Resources page, in the EC2 Dashboard pane, under NETWORK &
SECURITY, click Load Balancers.
2. On the Create Load Balancer page, click the box next to the load balancer you want to delete.
3. Click Actions and in the Actions drop-down box, click Delete.
4. In the Delete Load Balancer dialog box, click Yes, Delete.
Elastic Load Balancing deletes the load balancer. As soon as the load balancer is deleted, you stop
incurring charges for that load balancer.
Note
Even after you delete a load balancer, the Amazon EC2 instances associated with the load
balancer continue to run.You will continue to incur charges on the Amazon EC2 instances
while they are running. For information on stopping your EC2 instances, go to Stopping and
Starting Instances in the Amazon EC2 User Guide. For information on terminating your EC2
instances, go to Terminate Your Instance.
API Version 2012-06-01
30
Elastic Load Balancing Developer Guide
Delete Your Load Balancer

Create a Basic Load Balancer in EC2-VPC
Amazon Virtual Private Cloud (Amazon VPC) enables you to launch Amazon Web Services (AWS) re-
sources, such as, ELB load balancers and Amazon EC2 instances, into a virtual network that you've
defined.You can use a load balancer deployed in Amazon EC2-VPC to monitor and route traffic to your
EC2 instances launched within a the same VPC.
This getting started tutorial walks you through the process for creating a basic ELB load balancer for your
EC2 instances that are launched in EC2-VPC platform.The load balancer you create in this tutorial will
be launched in the same VPC where your EC2 instances are launched.
Before you create your load balancer in a VPC, you must define your VPC by specifying IP addresses in
the classless inter-domain routing (CIDR) range of your choice (for example, 10.0.0.0/16).Within this
VPC, you launch your load balancer (and EC2 instances) that have private IP addresses from private IP
address range of the VPC.Your VPC spans multiple Availability Zones within the region it is created.
You can also create subnets within your VPC. A subnet is a range of IP addresses in your VPC.You can
use subnets to group your resources based on your security and operational needs. A subnet resides
entirely within the Availability Zone and cannot span zones.
After you create your VPC and define your subnets, you can optionally add an Internet gateway to your
subnet. An Internet gateway enables your resources to connect to the Internet through the Amazon EC2
network edge. If a subnet's traffic is routed to an Internet gateway, the subnet is known as a public subnet.
If a subnet's traffic is not routed to an Internet gateway, the subnet is known as a private subnet. Use a
public subnet for resources that must be connected to the Internet, and a private subnet for resources
that need not be connected to the Internet.
If your AWS account comes with a default VPC, your Amazon EC2 instances will be launched in default
VPC, by default.To load balance your EC2 instances launched in default VPC, you must create your
load balancer in default VPC. For information on how you can tell whether your AWS account comes with
default VPC, see Detecting Your Supported Platforms and Whether You Have a Default VPC. For inform-
ation on creating a basic load balancer within a default VPC, see Create a Basic Load Balancer in Default
VPC (p. 41).
The following step-by-step instructions will help you create a basic load balancer in EC2-VPC using the
AWS Management Console, a point-and-click web-based interface. Before you get started with the console,
be sure you've done the following:
• Sign up for Amazon Web Services (AWS). If you haven't signed up for AWS yet, go to http://amazon-
aws.cn and click the Sign Up Now button.
Note
If you are a new AWS customer, you are eligible to use the free usage tier for twelve months
following your AWS sign-up date.The free tier includes 750 hours per month of Amazon EC2
Micro Instance usage, and 750 hours per month Elastic Load Balancing plus 15GB of data
processing. For more information on what is available on the free tier, go to AWS Free Usage
Tier.
• This tutorial uses a VPC with one public subnet to create a load balancer in a VPC public subnet that
is connected to the Internet.
Create an Amazon VPC and then create one public subnet in the VPC. If you haven't yet created a
VPC and a public subnet, see Getting Started with Amazon VPC for step-by-step instructions for using
VPC wizard to create a VPC with a single public subnet.
Note
You can skip Step 4: Assign an Elastic IP Address to Your Instance for this tutorial.
• Make a note of the VPC ID, subnet ID, and the security group associated with the VPC.You will need
them later when you create your load balancer.
API Version 2012-06-01
31
Elastic Load Balancing Developer Guide
Create a Basic Load Balancer in EC2-VPC

• If you have not already done so, launch Amazon EC2 instances with HTTP access on port 80 into your
newly created VPC. For more information about launching Amazon EC2 instances, see Launching and
Using Instances in the Amazon Cloud Compute User Guide.
• Install a webserver, such as Apache or Internet Information Services (IIS), on the EC2 instances you
plan to register with the load balancer.
The following steps outline how to create a basic load balancer in EC2-VPC.
1. Configure the listeners for your load balancer by specifying the ports and protocols to use for the front-
end connection (client to load balancer) and the back-end connection (load balancer to back-end in-
stance).
Specify the VPC in which you want to launch your load balancer.
2. Configure a health check for your Amazon EC2 back-end instances.
3. Select the subnet for your back-end instances.
4. Assign a security group to your load balancer.
5. Register your Amazon EC2 instances with the load balancer.
6. Review settings and create your load balancer.
7. Verify that your load balancer is created.
8. [Optional] Delete your load balancer.
Important
The load balancer you're about to create will be live (and not running in a sandbox). If you are
not signed up for the free usage tier, you will incur the standard Elastic Load Balancing usage
fees for the load balancer until you terminate it. The total charges will be minimal (typically less
than a dollar), if you complete the Getting Started in one sitting and delete your load balancer
when you are finished. For more information about Elastic Load Balancing usage rates, go to
the Elastic Load Balancing product page.
Configure Listeners for Your Load Balancer
To configure listeners for your load balancer
1. Sign in to the AWS Management Console and open the Amazon EC2 console at https://con-
sole.amazonaws.cn/ec2/.
2. Start the Create Load Balancer wizard:
a. On the Amazon EC2 console Resources page, in the EC2 Dashboard pane, under NETWORK
& SECURITY, click Load Balancers.
API Version 2012-06-01
32
Elastic Load Balancing Developer Guide
Configure Listeners for Your Load Balancer

b. Click Create Load Balancer.
3. On the Define Load Balancer page, make the following selections:
a. Enter a name for your load balancer (e.g., my-vpc-loadbalancer).
The load balancer name you choose must be unique within your set of load balancers, must
have a maximum of 32 characters, and must only contain alphanumeric characters or hyphens.
b. Click the arrow in the Create LB Inside drop-down box and select the VPC ID you saved after
you created your VPC.
c. Leave the Create an internal load balancer box blank for this tutorial.
Note
In this tutorial, you are creating an Internet-facing load balancer in a public subnet. For
more information about internal load balancer, see Internet-facing and Internal Load
Balancers (p. 116)
d. Leave Listener Configuration set to the default value for this tutorial.
Important
The default settings require that your Amazon EC2 webservers are active and accepting
requests on port 80.
API Version 2012-06-01
33
Elastic Load Balancing Developer Guide
Configure Listeners for Your Load Balancer

4. Click Continue to configure health check for your Amazon EC2 instances.
Configure Health Check for Your Amazon EC2 In-
stances
Elastic Load Balancing routinely checks the health of each load-balanced Amazon EC2 instance based
on the configurations that you specify. If Elastic Load Balancing finds an unhealthy instance, it stops
sending traffic to the instance and reroutes traffic to healthy instances.
To configure a health check for your Amazon EC2 instances
1. On the Configure Health Check page of the Create a New Load Balancer wizard, set the following
configurations:
a. Leave Ping Protocol set to its default value of HTTP.
b. Leave Ping Port set to its default value of 80.
Elastic Load Balancing pings the port you choose (in this example, port 80) to send health check
queries to your Amazon EC2 instances.
Important
Your Amazon EC2 instances must accept incoming traffic on the ping port.This example
assumes that each of your instances has a working webserver that accepts incoming
traffic on port 80.
c. In the Ping Path field, replace the default value with a single forward slash ("/").
Elastic Load Balancing sends health check queries to the path you specify in Ping Path. This
example uses a single forward slash so that Elastic Load Balancing sends the query to your
webserver's default home page, whether that default page is named index.html, de-
fault.html, or a different name.
d. Leave the Advanced Options set to their default values.
API Version 2012-06-01
34
Elastic Load Balancing Developer Guide
Configure Health Check for Your Amazon EC2 Instances

2. Click Continue to select the subnet in which you want to launch your load balancer instance.
Select a Subnet for Your Back-end Instance
In this step, you select the subnet for your back-end instance.
To select your VPC subnet
• On the Select Subnets page, in the Available Subnets table, Click the button in the Action column
to select the subnet ID you saved.
Your selected subnet is displayed in the Selected Subnets table.
API Version 2012-06-01
35
Elastic Load Balancing Developer Guide
Select a Subnet for Your Back-end Instance

Assign a Security Group to Your Load Balancer
To select security group for your load balancer
1. You can either use a pre-existing security group or create a new security group. The security group
you assign to your load balancer must allow ingress to the ports that you configured the load balancer
to use. If you create a security group in this step, the console will define ports to be open for you. If
the defined port is different from the port specified in your health check configuration, edit the security
group to add the port specified in your health check configuration.This tutorial uses the default VPC
security group that allows ingress to port 80, the port specified for the health check.
On the Assign Security Groups page, select Select an existing Security Groups, and then select
the default VPC security group.
2. Click Continue to register EC2 instances with your load balancer.
Register Your Amazon EC2 Instances
Now that you've made your configuration choices you're ready to register your EC2 instances.
To register your EC2 instances launched within VPC with your load balancer
1. On the Add EC2 Instances page, in the Add Instances to Load Balancer table, select the boxes
in the Instance column to register instances with your load balancer.
2. Keep Enable Cross-Zone Load Balancing and Enable Connection Draining boxes set to the
default settings for this tutorial.
API Version 2012-06-01
36
Elastic Load Balancing Developer Guide
Assign a Security Group to Your Load Balancer

Note
When you register a multi-homed instance (an instance that has an elastic network interface
(ENI) attached) with your load balancer, the load balancer will route traffic to the primary IP
address of the instance (eth0). For more information on using ENIs, go to Elastic Network
Interfaces.
3. Click Continue.
4. For this tutorial, skip the step for adding tags. Click Continue to review your settings and then create
your load balancer.
Review Settings and Create Your Load Balancer
Now that you've registered your EC2 instances with your load balancer it's time to review the settings
you have selected.
To review your settings
1. On the Review page of the Create Load Balancer wizard, check your settings.You can make
changes by clicking the edit link for each setting.
The description in the Scheme row indicates that the load balancer is internet-facing.This
means that your load balancer is created in a public subnet.
Note
You can modify some of the settings even after you've created your load balancer. For ex-
ample, you can modify the port configurations, health check configurations, and add or re-
move EC2 instances from your load balancer. For more information, see Managing Load
Balancers (p. 135).
API Version 2012-06-01
37
Elastic Load Balancing Developer Guide
Review Settings and Create Your Load Balancer

2. Click Create to create your load balancer.
Verify Creation of Your Load Balancer
Now that you've created your load balancer, you're ready to verify its settings.
To verify creation of your load balancer
1. The Create Load Balancer wizard displays the status of your newly created load balancer. Click
Close after confirming that your load balancer was successfully created.
2. Your new load balancer now appears in the list. Select the check box next to your load balancer.
3. The bottom pane displays the description of your load balancer.Verify that the descriptions match
your specifications.
API Version 2012-06-01
38
Elastic Load Balancing Developer Guide
Verify Creation of Your Load Balancer

If the description in the Status row indicates that some of your instances are not in service, its
probably because your instances are still in the registration process. For more information, see
Troubleshooting Elastic Load Balancing: Registering Instances (p. 262).
4. You can test your load balancer after you've verified that at least one of your EC2 instances is InSer-
vice.To test your load balancer, copy the DNS Name value that is listed in the Description tab and
paste it into the address field of an Internet-connected web browser. If your load balancer is working,
you will see the default page of your webserver.
Congratulations! You've successfully created a basic load balancer. The load balancer is live and has
started incurring the standard Elastic Load Balancing usage fees.You can either delete the load balancer
now and incur minimal hourly (typically less than a dollar) charges, or you can continue using the load
balancer.
Note
If you are a new AWS customer and are using the free usage tier, you can continue using the
load balancer. Go to AWS Free Usage Tier to check the number of hours available to you.
• For information on deleting your load balancer, see the following section.
• Elastic Load Balancing supports the load balancing of applications using HTTP, HTTPS (Secure HTTP),
TCP, and SSL (Secure TCP) listener protocols. For a quick overview of the different configurations
available for your load balancer, see Elastic Load Balancing Listener Configurations Quick Refer-
ence (p. 52).
• For information on some common Elastic Load Balancing user scenarios for Amazon VPC, and the
tasks needed to accomplish efficient distribution of application loads among your Amazon EC2 instances
in Amazon VPC, see Elastic Load Balancing in Amazon VPC (p. 113).
• For information about Elastic Load Balancing usage rates, go to the Elastic Load Balancing product
page.
Delete Your Load Balancer
As soon as your load balancer becomes available, you are billed for each hour or partial hour that you
keep the load balancer running. After you've decided that you no longer need the load balancer, you can
delete it.
API Version 2012-06-01
39
Elastic Load Balancing Developer Guide
Delete Your Load Balancer

To delete your load balancer
1. On the Amazon EC2 console Resources page, in the EC2 Dashboard pane, under NETWORK &
SECURITY, click Load Balancers.
2. On the Create Load Balancer page, click the box next to the load balancer you want to delete.
3. Click Actions and in the Actions drop-down box, click Delete.
4. In the Delete Load Balancer confirmation window, click Yes, Delete.
Elastic Load Balancing deletes the load balancer. As soon as the load balancer is deleted, you stop
incurring charges for that load balancer.
Note
Even after you delete a load balancer, the Amazon EC2 instances associated with the load
balancer continue to run.You will continue to incur charges on the Amazon EC2 instances
while they are running. For information on stopping your EC2 instances, go to Stopping and
Starting Instances in the Amazon EC2 User Guide. For information on terminating your EC2
instances, go to Terminate Your Instance.
API Version 2012-06-01
40
Elastic Load Balancing Developer Guide
Delete Your Load Balancer

Create a Basic Load Balancer in Default VPC
An Amazon Virtual Private Cloud (Amazon VPC) is defined by specifying IP addresses in the classless
inter-domain routing (CIDR) range (for example, 10.0.0.0/16).Within this VPC, you can create your AWS
resources, such as ELB load balancers and EC2 instances. The load balancers created within the VPC
have private IP addresses from private IP address range of the VPC.The VPC spans multiple Availability
Zones within the region it is created.
You can also create subnets within a VPC. A subnet is a range of IP addresses in your VPC.You can
use subnets to group your instances based on your security and operational needs. A subnet resides
entirely within the Availability Zone and cannot span zones.
If your AWS account comes with a default VPC, by default, all your AWS resources, such as EC2 instances,
will be created within the default VPC. For information on how you can tell whether your AWS account
comes with a default VPC, see Detecting Your Supported Platforms and Whether You Have a Default
VPC.
Your default VPC automatically creates a VPC and default subnets in each Availability Zone, among
other components. For more information on default VPC set up, see Your Default VPC and Subnets.To
load balance your EC2 instances launched in default VPC, you must create your load balancer in default
VPC.
This getting started tutorial walks you through the process for creating a basic load balancer in default
VPC.
The following step-by-step instructions will help you create a basic load balancer in default VPC using
the AWS Management Console, a point-and-click web-based interface. Before you get started with the
console, be sure you've done the following:
• Sign in to the AWS Management Console and open the Amazon EC2 console at https://console.amazon-
aws.cn/ec2/.
Note
If you are a new AWS customer, you are eligible to use the free usage tier for twelve months
following your AWS sign-up date.The free tier includes 750 hours per month of Amazon EC2
Micro Instance usage, and 750 hours per month Elastic Load Balancing plus 15GB of data
processing. For more information on what is available on the free tier, go to AWS Free Usage
Tier.
• If you have not already done so, launch your Amazon EC2 instances with HTTP access on port 80 into
your default VPC using default subnets and default security group. For more information, see Launching
an EC2 Instance into Your Default VPC.
• Install a webserver, such as Apache or Internet Information Services (IIS), on the EC2 instances you
plan to register with the load balancer.
The following steps outline how to create a basic load balancer in default VPC.
1. Configure the listeners for your load balancer by specifying the ports and protocols to use for the front-
end connection (client to load balancer) and the back-end connection (load balancer to back-end in-
stance).
2. Configure a health check for your Amazon EC2 back-end instances.
3. Assign security groups to your load balancer.
4. Register your Amazon EC2 instances with the load balancer.
5. Review settings and create your load balancer.
6. Verify the creation of your load balancer.
7. [Optional] Delete your load balancer.
API Version 2012-06-01
41
Elastic Load Balancing Developer Guide
Create a Basic Load Balancer in Default VPC

Important
The load balancer you're about to create will be live (and not running in a sandbox). If you are
not signed up for the free usage tier, you will incur the standard Elastic Load Balancing usage
fees for the load balancer until you terminate it. The total charges will be minimal (typically less
than a dollar), if you complete the Getting Started in one sitting and delete your load balancer
when you are finished. For more information about Elastic Load Balancing usage rates, go to
the Elastic Load Balancing Pricing page.
Configure Listeners for Your Load Balancer
To configure listeners for your load balancer
1. Sign in to the AWS Management Console and open the Amazon EC2 console at https://con-
sole.amazonaws.cn/ec2/.
2. Start the Create Load Balancer wizard:
a. On the Amazon EC2 console Resources page, in the EC2 Dashboard pane, under NETWORK
& SECURITY, click Load Balancers.
b. Click Create Load Balancer.
3. On the Define Load Balancer page, make the following selections:
a. Enter a name for your load balancer (e.g., my-test-loadbalancer).
The load balancer name you choose must be unique within your set of load balancers, must
have a maximum of 32 characters, and must only contain alphanumeric characters or hyphens.
b. Leave the entry in the Create LB inside: box set to the default VPC for this tutorial.
c. Leave Create an internal load balancer box blank for this tutorial.
Note
In this tutorial, you are creating an Internet-facing load balancer in a public subnet. For
more information about internal load balancer, see Internet-facing and Internal Load
Balancers (p. 116)
d. Leave the Enable advanced VPC configuration: box blank for this tutorial.
API Version 2012-06-01
42
Elastic Load Balancing Developer Guide
Configure Listeners for Your Load Balancer

Note
Advanced VPC configuration option allows you to specify your own subnets. Select
this option if you have created your own subnets and want to use them instead of the
default subnets.
e. Leave Listener Configuration set to the default value for this tutorial.
Important
The default settings require that your Amazon EC2 HTTP servers are active and accept-
ing requests on port 80.
4. Click Continue to configure the health check for your instances.
Configure Health Check for Your Amazon EC2 In-
stances
Elastic Load Balancing routinely checks the health of each load-balanced Amazon EC2 instance based
on the configurations that you specify. If Elastic Load Balancing finds an unhealthy instance, it stops
sending traffic to the instance and reroutes traffic to healthy instances.
To configure a health check for your Amazon EC2 instances
1. On the Configure Health Check page of the Create Load Balancer wizard, set the following con-
figurations:
a. Leave Ping Protocol set to its default value of HTTP.
b. Leave Ping Port set to its default value of 80.
Elastic Load Balancing pings the port you choose (in this example, port 80) to send health check
queries to your Amazon EC2 instances.
Important
Your Amazon EC2 instances must accept incoming traffic on the ping port.This example
assumes that each of your instances has a webserver installed and accepts incoming
traffic on port 80.
c. In the Ping Path field, replace the default value with a single forward slash ("/").
API Version 2012-06-01
43
Elastic Load Balancing Developer Guide
Configure Health Check for Your Amazon EC2 Instances

Elastic Load Balancing sends health check queries to the path you specify in Ping Path. This
example uses a single forward slash so that Elastic Load Balancing sends the query to your
webserver's default home page, whether that default page is named index.html, de-
fault.html, or a different name.
d. Leave the Advanced Options set to their default values.
2. Click Continue to select security groups to assign to your load balancer.
Assign a Security Group to Your Load Balancer
To select a security group for your load balancer
1. This tutorial uses the default VPC security group associated with your default VPC.
On the Assign Security Groups page, select Choose from your existing Security Groups and
then select the default VPC security group.
If you choose a non-default pre-existing security group, ensure that it allows ingress to the ports that
you configured the load balancer to use. If you create a security group in this step, the console will
define these ports to be open for you.
API Version 2012-06-01
44
Elastic Load Balancing Developer Guide
Assign a Security Group to Your Load Balancer

2. Click Continue to register your Amazon EC2 instances with your load balancer.
Register Your Amazon EC2 Instances
Now that you've made your configuration choices you're ready to register your EC2 instances with your
load balancer.
To register your EC2 instances launched within the default VPC
1. On the Add EC2 Instances page, in the Add Instances to Load Balancer table, check the boxes
in the Instance column to register instances to your load balancer.
2. Keep Enable Cross-Zone Load Balancing and Enable Connection Draining boxes set to the
default settings for this tutorial.
Note
When you register a multi-homed instance (an instance that has an elastic network interface
(ENI) attached) with your load balancer, the load balancer will route traffic to the primary IP
address of the instance (eth0). For more information on using ENIs, go to Elastic Network
Interfaces.
3. Click Continue.
4. For this tutorial, skip the step for adding tags. Click Continue to review your settings and then create
your load balancer.
Review Settings and Create Your Load Balancer
Now that you've registered your EC2 instances with your load balancer it's time to review the settings
you have selected.
API Version 2012-06-01
45
Elastic Load Balancing Developer Guide
Register Your Amazon EC2 Instances

To review your settings
1. On the Review page of the Create Load Balancer wizard, check your settings.You can make
changes by clicking the edit link for each setting.
The description in the Scheme row indicates that the load balancer is internet-facing.This
means that your load balancer has a publicly resolvable DNS name that resolves to public IP ad-
dresses.
The VPC and subnets listed under VPC Information are the default VPC and default subnets auto-
matically created for your AWS account.
Note
You can modify some of the settings even after you've created your load balancer. For ex-
ample, you can modify the port configurations, health check configurations, and add or re-
move EC2 instances from your load balancer. For more information, see Elastic Load Bal-
ancing in Amazon VPC (p. 113).
2. Click Create to create your load balancer.
Verify Creation of Your Load Balancer
Now that you've created your load balancer, you're ready to verify its settings.
To verify your load balancer is created
1. The Create Load Balancer wizard displays the status of your newly created load balancer. Click
Close after confirming that your load balancer was successfully created.
2. Your new load balancer now appears in the load balancer list. Select the check box next to your load
balancer.
API Version 2012-06-01
46
Elastic Load Balancing Developer Guide
Verify Creation of Your Load Balancer

3. The bottom pane displays the description of the selected load balancer.Verify that the descriptions
match your specifications.
If the description in the Status row indicates that some of your instances are not in service, its
probably because your instances are still in the registration process. For more information, see
Troubleshooting Elastic Load Balancing: Registering Instances (p. 262).
4. You can test your load balancer after you've verified that at least one of your EC2 instances is InSer-
vice.To test your load balancer, copy the DNS Name value that is listed in the Description tab and
paste it into the address field of an Internet-connected web browser. If your load balancer is working,
you will see the default page of your HTTP server.
Congratulations! You've successfully created a basic load balancer in default VPC.The load balancer is
live and has started incurring the standard Elastic Load Balancing usage fees.You can either delete the
load balancer now and incur minimal hourly (typically less than a dollar) charges, or continue using the
load balancer.
Note
If you are a new AWS customer and are using the free usage tier, you can continue using the
load balancer. Go to AWS Free Usage Tier to check the number of hours available to you.
• For information on deleting your load balancer, see the following section.
• Elastic Load Balancing supports the load balancing of applications using HTTP, HTTPS (Secure HTTP),
TCP, and SSL (Secure TCP) listener protocols. For a quick overview of the different configurations
available for your load balancer, see Elastic Load Balancing Listener Configurations Quick Refer-
ence (p. 52).
• For information on some common Elastic Load Balancing user scenarios, and the tasks needed to
accomplish efficient distribution of application loads among your Amazon EC2 instances in Amazon
VPC, see Elastic Load Balancing in Amazon VPC (p. 113).
• For information about Elastic Load Balancing usage rates, go to the Elastic Load Balancing product
page.
API Version 2012-06-01
47
Elastic Load Balancing Developer Guide
Verify Creation of Your Load Balancer
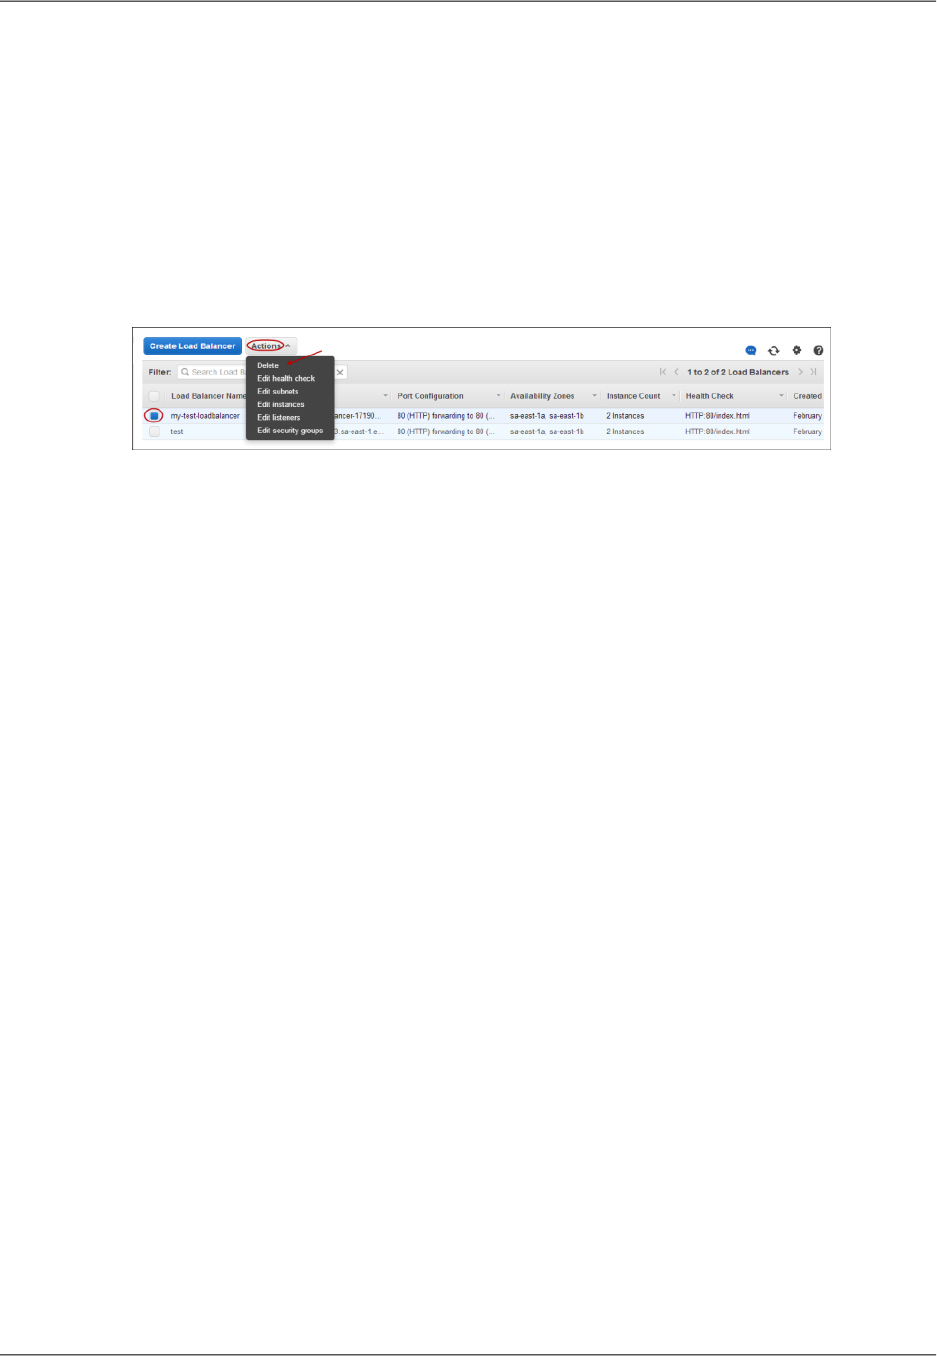
Delete Your Load Balancer
As soon as your load balancer becomes available, you are billed for each hour or partial hour that you
keep the load balancer running. After you've decided that you no longer need the load balancer, you can
delete it.
To delete your load balancer
1. On the Amazon EC2 console Getting Started page, in the EC2 Dashboard pane, under NETWORK
& SECURITY, click Load Balancers.
2. Select the check box next to the load balancer you want to delete, and then click Delete.
3. In the Delete Load Balancer window, click Yes, Delete.
Elastic Load Balancing deletes the load balancer. As soon as the load balancer is deleted, you stop
incurring charges for that load balancer.
Note
Even after you delete a load balancer, the Amazon EC2 instances associated with the load
balancer continue to run.You will continue to incur charges on the Amazon EC2 instances
while they are running. For information on stopping your EC2 instances, go to Stopping and
Starting Instances in the Amazon EC2 User Guide. For information on terminating your EC2
instances, go to Terminate Your Instance.
API Version 2012-06-01
48
Elastic Load Balancing Developer Guide
Delete Your Load Balancer

Listener Configurations for Elastic
Load Balancing
A typical web application communication goes through layers of hardware and software. Each layer
provides a specific communication function.The control over the communication function is passed from
one layer to the next, in sequence.The Open System Interconnection (OSI) defines a model framework
for implementing a standard format for communication, called a protocol, in these layers. For detailed
information about the layers of the OSI model, go to http://en.wikipedia.org/wiki/OSI_model.
When you use Elastic Load Balancing, you need to have a basic understanding of two layers: layer 4 and
layer 7. Layer 4 is the transport layer that describes the Transmission Control Protocol (TCP) connection
between the client and your back-end instance, through the load balancer. Layer 4 is the lowest level that
is configurable for your load balancer. Layer 7 is the application layer that describes the use of Hypertext
Transfer Protocol (HTTP) and HTTPS (secure HTTP) connections from clients to the load balancer and
from the load balancer to your back-end instance.
You also need to have an understanding of the Secure Sockets Layer (SSL) protocol. The SSL protocol
is primarily used to encrypt confidential data over insecure networks such as the Internet.The SSL protocol
establishes a secure connection between a client and the back-end server and ensures that all the data
passed between your client and your server is private and integral.
Listeners
Before you start using Elastic Load Balancing, you have to configure the listeners for your load balancer.
A listener is a process that listens for connection requests. It is configured with a protocol and a port
number for front-end (client to load balancer) and back-end (load balancer to back-end instance) connec-
tions.
Elastic Load Balancing supports the load balancing of applications using HTTP, HTTPS (secure HTTP),
TCP, and SSL (secure TCP) protocols.The HTTPS uses the SSL protocol to establish secure connections
over the HTTP layer.You can also use SSL protocol to establish secure connections over the TCP layer.
The acceptable ports for both HTTPS/SSL and HTTP/TCP connections are 25, 80, 443, 465, 587, and
1024-65535.
You can specify the protocols for the front-end connections (client to load balancer) and the back-end
connections (load balancer to back-end instance) independently.The front-end connection and the back-
API Version 2012-06-01
49
Elastic Load Balancing Developer Guide
Listeners

end connection must be from the same layer. For example, if your front-end connection is using the TCP
or SSL protocol then your back-end connection can either be TCP or SSL. If the front-end connection of
your load balancer is using HTTP or HTTPS then your back-end connections can either be HTTP or
HTTPS.
By default, your load balancer is set to use the HTTP protocol with port 80 for the front-end connection
and the back-end connection.The default settings can be changed using the AWS Management Console,
the Query API, the command line interface (CLI), or the SDKs.
Using TCP/SSL Protocol with Elastic Load Bal-
ancing
When you use TCP (layer 4) for both front-end and back-end connections, your load balancer forwards
the request to the back-end instances without modification to the headers. After getting the request, your
load balancer attempts to open a TCP connection to the back-end instance on the port specified in the
health check configuration. If the load balancer fails to connect with the instance at the specified port
within the configured response timeout period, the instance is considered unhealthy.
Because load balancers intercept traffic between clients and your back-end instances, the access logs
from your back-end instance contain the IP address of the load balancer instead of the originating client.
You can enable Proxy Protocol, which adds a header containing the connection information, such as the
source IP address, the destination IP address, and the port numbers of the client.The header is then
sent to the back-end instance as a part of the request.You can parse the first line in the request to retrieve
the connection information. For information about enabling Proxy Protocol, see Enable or Disable Proxy
Protocol Support (p. 181).
This configuration will not insert cookies for session stickiness or the X-Forwarded-* headers.
Using HTTP/HTTPS Protocol with Elastic Load
Balancing
When you use HTTP (layer 7) for both front-end and back-end connections, your load balancer parses
the headers in the request and terminates the connection before re-sending the request to the back-end
instance(s).This is the default configuration provided by Elastic Load Balancing.
To connect with the back-end instances, an HTTP GET request or an HTTPS GET request is issued to
the instance on the ping port and the ping path specified in the health check configuration. If the load
balancer receives any response other than "200 OK" within the response timeout period, the instance is
considered unhealthy.
For every registered and healthy instance behind a HTTP/HTTPS load balancer, Elastic Load Balancing
opens and maintains one or more TCP connections.The pre-opened connections ensure that there is
always an established connection ready to receive HTTP/HTTPS requests.
The HTTP requests and HTTP responses use header fields to send information about HTTP message.
Elastic Load Balancing supports X-Forwarded-For headers. Because load balancers intercept traffic
between clients and servers, your server access logs contain only the IP address of the load balancer.
To see the IP address of the client, use the X-Forwarded-For request header. For more information,
see X-Forwarded-For (p. 13).
When you use HTTP/HTTPS, you can enable sticky sessions on your load balancer. A sticky session
binds a user’s session to a specific back-end instance.This ensures that all requests coming from the
API Version 2012-06-01
50
Elastic Load Balancing Developer Guide
Using TCP/SSL Protocol with Elastic Load Balancing

user during the session will be sent to the same back-end instance. For more information on sticky sessions,
see Sticky Sessions (p. 10).
Not all HTTP extensions are supported in the load balancer. In some cases you will need to use a TCP
listener if the load balancer is not able to terminate the request due to unexpected methods, response
codes, or other non-standard HTTP 1.0/1.1 implementations.
SSL Server Certificates
If you use HTTPS or SSL for your front-end listener, you must install an SSL certificate on your load bal-
ancer.The load balancer uses the certificate to terminate the connection and then decrypt requests from
clients before sending them to the back-end instances.
The SSL protocol uses an X.509 certificate (SSL server certificate) to authenticate both the client and
the back-end instance.The X.509 certificate is a digital form of identification issued by a certificate authority
(CA) and contains identification information, a validity period, a public key, a serial number, and the digital
signature of the issuer.
Before you can install the SSL certificate on your load balancer, you must create the certificate, get the
certificate signed by a CA, and then upload the certificate using the AWS Identity and Access Management
(AWS IAM) service.
The SSL certificate comes with a validity period.You must replace the certificate before its validity period
ends. For information on creating SSL certificate see SSL Certificate for Elastic Load Balancing (p. 61).
For procedure related to replacing your existing certificate, see Update an SSL Certificate for a Load
Balancer (p. 147).
SSL Negotiation
Elastic Load Balancing provides security policies that have predefined SSL negotiation configurations.
These configurations are used for SSL negotiation when a connection is established between a client
and your load balancer. The SSL negotiation configurations provide compatibility with a broad range of
clients and use high-strength cryptographic algorithms called ciphers. However, some use cases might
require all data on the network to be encrypted and allow only specific ciphers. Some security compliance
standards (such as PCI, SOX, and so on) might require a specific set of protocols and ciphers from clients
to ensure that the security standards are met. In such cases, Elastic Load Balancing provides options for
selecting different configurations for protocols and ciphers, based on your specific requirements. Depending
on the number of nodes, your ciphers and protocols should take effect within 30 seconds.
If you use SSL/HTTPS protocol for your front-end connection, you can either use one of the predefined
security policies or create a custom security policy.For information about the predefined SSL negotiation
configurations used by Elastic Load Balancing, see SSL Negotiation Configurations for Elastic Load
Balancing (p. 55). For information on how to configure the ciphers and protocols, see Step 2: Configure
SSL Security Policy (p. 75).
Using Back-End Server Authentication with
Elastic Load Balancing
If want to use an SSL protocol but do not want to terminate the connection on your load balancer, you
can use a TCP protocol for connection from the client to your load balancer, use the SSL protocol for
API Version 2012-06-01
51
Elastic Load Balancing Developer Guide
SSL Server Certificates

connection from the load balancer to your back-end application, and install certificates on all the back-
end instances handling requests.
If you choose to use an HTTPS/SSL connection for your back end, you can enable authentication on
your back-end instance.This authentication can be used to ensure that back-end instances accept only
encrypted communication and to ensure that the back-end instance has the correct certificates.
You can install any certificate you want on your back-end instances, including a self-signed certificate.
For a quick reference to the listener configurations supported by Elastic Load Balancing, see Elastic Load
Balancing Listener Configurations Quick Reference (p. 52).
Elastic Load Balancing Listener Configurations
Quick Reference
The following table summarizes the listener settings that you can use to configure your load balancer.
HTTP/HTTPS Load Balancing
NotesBack-End
Optional
Configuration
Back-End
Protocol
Front-End
Optional
Configuration
Front-End
Protocol
Use Case
• Default
setting.
• Supports
X-Forwarded-For (p.13)
header.
• Supports
Sticky
Sessions (p.10).
NAHTTPNAHTTPBasic HTTP
load balancer.
• Supports
Sticky
Sessions (p.10).
• Supports
X-Forwarded-For (p.13)
header.
• Requires SSL
Certificate (p.61)
installed on
the load
balancer.
NAHTTPSSL
Negotiation
Configurations (p.55)
HTTPSSecure
website or
application
using Elastic
Load
Balancing to
offload SSL
decryption.
API Version 2012-06-01
52
Elastic Load Balancing Developer Guide
Listener Configurations Quick Reference

NotesBack-End
Optional
Configuration
Back-End
Protocol
Front-End
Optional
Configuration
Front-End
Protocol
Use Case
• Supports
Sticky
Sessions (p.10).
• Supports
X-Forwarded-For (p.13)
header.
• Requires SSL
Certificate (p.61)
installed on
the load
balancer and
on the
registered
instances.
Back-end
authentication
HTTPSSSL
Negotiation
Configurations (p.55)
HTTPSSecure
website or
application
using
end-to-end
encryption with
Elastic Load
Balancing
providing
X-Forward
headers and
sticky
sessions.
The following quick reference table shows you the listener configuration options for typical TCP/SSL load
balancer use cases.
TCP/SSL Load Balancing
NotesBack-End
Optional
Configuration
Back-End
Protocol
Front-End
Optional
Configuration
Front-End
Protocol
Use Case
• Basic TCP
load
balancing.
• Supports
Proxy
Protocol (p.11)
header.
NATCPNATCPBasic TCP
load balancer.
• Supports
Proxy
Protocol (p.11)
header.
• Requires SSL
Certificate (p.61)
installed on
the load
balancer.
NATCPSSL
Negotiation
Configurations (p.55)
SSLSecure
website or
application
using Elastic
Load
Balancing to
offload SSL
decryption.
API Version 2012-06-01
53
Elastic Load Balancing Developer Guide
Listener Configurations Quick Reference

NotesBack-End
Optional
Configuration
Back-End
Protocol
Front-End
Optional
Configuration
Front-End
Protocol
Use Case
• Supports
Proxy
Protocol (p.11)
header.
• Requires SSL
Certificate (p.61)
installed on
the load
balancer and
on the
registered
instances.
Back-end
authentication
SSLSSL
Negotiation
Configurations (p.55)
SSLSecure
website or
application
using
end-to-end
encryption with
Elastic Load
Balancing.
Next Steps
For configuring listeners:
• To learn how to set up a basic HTTP/TCP load balancer using the AWS Management Console, see
Get Started with Elastic Load Balancing (p. 23).
• For information on how to set up an HTTPS/SSL load balancer with cipher settings and back-end au-
thentication, see Create a HTTPS/SSL Load Balancer (p. 72).
• For information on how to set up a basic HTTP/TCP load balancer within Amazon VPC, see Elastic
Load Balancing in Amazon VPC (p. 113).
• For information on adding a listener to an existing load balancer, see Adding a Listener to your Load
Balancer (p. 136).
• For information on deleting a listener from an existing load balancer, see Delete a Listener from Your
Load Balancer (p. 142).
For performing Elastic Load Balancing tasks:
• If you haven't already, install the tools you plan to use for performing Elastic Load Balancing tasks. For
information on installing the command line interface or the Query API, see Setting Up Elastic Load
Balancing Interfaces (p. 18).
• For information on using the various features supported by Elastic Load Balancing, see Managing Load
Balancers (p. 135).
• For detailed descriptions of the Elastic Load Balancing API operations, see the Elastic Load Balancing
API Reference.
• For detailed descriptions of the Elastic Load Balancing commands, see the Elastic Load Balancing
Quick Reference Card.
API Version 2012-06-01
54
Elastic Load Balancing Developer Guide
Next Steps

SSL Negotiation Configurations for
Elastic Load Balancing
Elastic Load Balancing uses an Secure Socket Layer (SSL) negotiation configuration, known as a Security
Policy, to negotiate SSL connections between a client and the load balancer. A security policy is a com-
bination of SSL Protocols, SSL Ciphers, and the Server Order Preference option. For more information
about configuring SSL connection for your load balancer, see Listener Configurations for Elastic Load
Balancing (p. 49).
SSL Protocols
Secure Sockets Layer (SSL) and Transport Layer Security (TLS) are cryptographic protocols that are
used to encrypt confidential data over insecure networks such as the Internet. The TLS protocol is the
newer version of the SSL protocol. In this section, we refer to both SSL and TLS protocols as SSL protocol.
The SSL protocol establishes a secure connection between a client and a server and ensures that all the
data passed between the client and your load balancer is private.
Elastic Load Balancing supports the following versions of the SSL protocol:
• TLS 1.2
• TLS 1.1
• TLS 1.0
• SSL 3.0
• SSL 2.0
SSL Ciphers
SSL cipher is an encryption algorithm that uses encryption keys to create a coded message. SSL protocols
use several cipher algorithms to encrypt data over the Internet. For information about SSL ciphers and
SSL protocols supported by Elastic Load Balancing, see SSL Security Policy Table (p. 56).
Server Order Preference
Elastic Load Balancing supports the Server Order Preference for negotiating connections between the
client and the load balancer. During the SSL connection negotiation process, the client and the load bal-
ancer present a list of ciphers and protocols that they each support, in order of preference. Normally, the
first cipher on the client's list that matches any one of the load balancer's ciphers is selected for the SSL
API Version 2012-06-01
55
Elastic Load Balancing Developer Guide

connection. If the load balancer is configured to support the Server Order Preference, then the load bal-
ancer gets to select the first cipher in its list that matches any one of the ciphers in the client's list. Server
Order Preference ensures that the load balancer determines which cipher is used for SSL connection.
For information about the order of ciphers used by Elastic Load Balancing, see SSL Security Policy
Table (p. 56).
• SSL Security Policies (p. 56)
• SSL Security Policy Table (p. 56)
SSL Security Policies
Elastic Load Balancing provides you with the following Security Policy options to configure settings for
SSL negotiations for your load balancer:
• Predefined Security Policy—A list of predefined SSL negotiation configurations with enabled ciphers
and protocols.The naming convention of the predefined security policy includes version information
based on the year and month that the predefined security policy was released. For example, the pre-
defined security policy ELBSecurityPolicy-2014-10 indicates that this policy was released in the
tenth (10) month of the year 2014. Some older policies do not follow the versioned naming convention.
As new configurations become available, Elastic Load Balancing will release the newer versions of
predefined policies.You can use the latest version of the predefined security policy and then update
your configuration whenever a new version is released.
Elastic Load Balancing currently provides you with the following predefined security policies:
• ELBSecurityPolicy-2014-10
• ELBSecurityPolicy-2014-01
• ELBSecurityPolicy-2011-08
• ELBSample-ELBDefaultNegotiationPolicy or ELBSample-ELBDefaultCipherPolicy
• ELBSample-OpenSSLDefaultNegotiationPolicy or ELBSample-OpenSSLDefaultCipherPolicy
For information about the SSL protocols, SSL ciphers, and SSL option enabled for the predefined se-
curity policies, see SSL Security Policy Table (p. 56).
• Custom Security Policy—A list of ciphers and protocols that you specify to create a custom negotiation
configuration. Some security compliance standards (such as PCI, SOX, and so on) might require a
specific set of protocols and ciphers to ensure that the security standards are met. In such cases, create
a custom security policy to meet those standards. If you enable Server Order Preference option in your
custom security policy, the order of ciphers listed in the following section will be used to negotiate
connections between client and the load balancer. If you do not enable Server Order Preference option
in your custom security policy, the order of ciphers presented by the client will be used to negotiate
connections between the client and the load balancer. For information about the protocols and ciphers
supported by Elastic Load Balancing, see SSL Security Policy Table (p. 56).
You can choose an SSL Security Policy for your load balancer using the AWS Management Console,
the command line interface (CLI), the Query API, or the SDKs. For information on choosing a security
policy or creating a custom security policy, see Configure SSL Security Policy (p. 75).
SSL Security Policy Table
The following table lists the predefined security policies, descriptions of each policy, SSL Protocols, SSL
Ciphers, and the Server Order Preference that are enabled for that policy.The SSL Ciphers in the following
table are listed in the order of preference that the load balancer will use to negotiate SSL connections.
API Version 2012-06-01
56
Elastic Load Balancing Developer Guide
SSL Security Policies

The order of ciphers used by the load balancer cannot be changed. If the policy is enabled for Server
Order Preference, the load balancer will use the order of ciphers specified in the table to negotiate con-
nections between the client and load balancer. If the policy is not enabled for Server Order Preference,
the load balancer will use the order presented by the client to negotiate connection between the client
and the load balancer.
Note
The RSA and DSA based ciphers are specific to the signing algorithm used to create SSL certi-
ficate. Make sure to create your SSL certificate using the signing algorithm that is based on
ciphers enabled for your security policy.
The table does not list the following deprecated predefined security policies:
• ELBSample-ELBDefault Negotiation Policy or ELBSample-ELBDefault Cipher Policy
• ELBSample-OpenSSLDefault Cipher Policy or ELBSample-OpenSSLDefault Negotiation Policy
We recommend that you use the latest version of the predefined security policy. However, if you want to
see the descriptions of the deprecated predefined security policies, use either the DescribeLoadBalancer-
Policies action or the describe-load-balancer-policies command.
The ' ♦' in the following table indicates that the protocol, server order preference, or the cipher is enabled
for the policy.
ELBSecurity
Policy-2011-08
ELBSecurity
Policy-2014-01
ELBSecurity
Policy-2014-10
Security Policy
SSL negotiation
configurations for
SSL/HTTP listeners
as of 2011-08.
SSL negotiation
configurations for
SSL/HTTP listeners
as of 2014-01.
Default configuration.
Recommended.
Policy Description
SSL Protocols
Protocol-SSLv2
♦♦Protocol-SSLv3
♦♦♦Protocol-TLSv1
♦♦Protocol-TLSv1.1
♦♦Protocol-TLSv1.2
SSL Options
♦♦Server Order Preference
SSL Ciphers
♦♦ECDHE-ECDSA-AES128-
GCM-SHA256
♦♦ECDHE-RSA-AES128-
GCM-SHA256
♦♦ECDHE-ECDSA-AES128-SHA256
♦♦ECDHE-RSA-AES128-SHA256
♦♦ECDHE-ECDSA-AES128-SHA
API Version 2012-06-01
57
Elastic Load Balancing Developer Guide
SSL Security Policy Table

ELBSecurity
Policy-2011-08
ELBSecurity
Policy-2014-01
ELBSecurity
Policy-2014-10
Security Policy
♦♦ECDHE-RSA-AES128-SHA
♦♦♦DHE-RSA-AES128-SHA
♦♦ECDHE-ECDSA-AES256-
GCM-SHA384
♦♦ECDHE-RSA-AES256-
GCM-SHA384
♦♦ECDHE-ECDSA-AES256-SHA384
♦♦ECDHE-RSA-AES256-SHA384
♦♦ECDHE-RSA-AES256-SHA
♦♦ECDHE-ECDSA-AES256-SHA
♦♦AES128-GCM-SHA256
♦♦AES128-SHA256
♦♦♦AES128-SHA
♦♦AES256-GCM-SHA384
♦♦AES256-SHA256
♦♦♦AES256-SHA
♦♦♦DHE-DSS-AES128-SHA
♦CAMELLIA128-SHA
♦EDH-RSA-DES-CBC3-SHA
♦DES-CBC3-SHA
♦♦ECDHE-RSA-RC4-SHA
♦♦♦RC4-SHA
ECDHE-ECDSA-RC4-SHA
DHE-DSS-AES256-GCM-SHA384
DHE-RSA-AES256-GCM-SHA384
DHE-RSA-AES256-SHA256
DHE-DSS-AES256-SHA256
♦DHE-RSA-AES256-SHA
♦DHE-DSS-AES256-SHA
♦DHE-RSA-CAMELLIA256-SHA
♦DHE-DSS-CAMELLIA256-SHA
♦CAMELLIA256-SHA
API Version 2012-06-01
58
Elastic Load Balancing Developer Guide
SSL Security Policy Table

ELBSecurity
Policy-2011-08
ELBSecurity
Policy-2014-01
ELBSecurity
Policy-2014-10
Security Policy
♦EDH-DSS-DES-CBC3-SHA
DHE-DSS-AES128-GCM-SHA256
DHE-RSA-AES128-GCM-SHA256
DHE-RSA-AES128-SHA256
DHE-DSS-AES128-SHA256
♦DHE-RSA-CAMELLIA128-SHA
♦DHE-DSS-CAMELLIA128-SHA
ADH-AES128-GCM-SHA256
ADH-AES128-SHA
ADH-AES128-SHA256
ADH-AES256-GCM-SHA384
ADH-AES256-SHA
ADH-AES256-SHA256
ADH-CAMELLIA128-SHA
ADH-CAMELLIA256-SHA
ADH-DES-CBC3-SHA
ADH-DES-CBC-SHA
ADH-RC4-MD5
ADH-SEED-SHA
DES-CBC-SHA
DHE-DSS-SEED-SHA
DHE-RSA-SEED-SHA
EDH-DSS-DES-CBC-SHA
EDH-RSA-DES-CBC-SHA
IDEA-CBC-SHA
RC4-MD5
SEED-SHA
DES-CBC3-MD5
DES-CBC-MD5
Deprecated SSL Ciphers
RC2-CBC-MD5
API Version 2012-06-01
59
Elastic Load Balancing Developer Guide
SSL Security Policy Table

ELBSecurity
Policy-2011-08
ELBSecurity
Policy-2014-01
ELBSecurity
Policy-2014-10
Security Policy
PSK-AES256-CBC-SHA
PSK-3DES-EDE-CBC-SHA
KRB5-DES-CBC3-SHA
KRB5-DES-CBC3-MD5
PSK-AES128-CBC-SHA
PSK-RC4-SHA
KRB5-RC4-SHA
KRB5-RC4-MD5
KRB5-DES-CBC-SHA
KRB5-DES-CBC-MD5
EXP-EDH-RSA-DES-CBC-SHA
EXP-EDH-DSS-DES-CBC-SHA
EXP-ADH-DES-CBC-SHA
EXP-DES-CBC-SHA
EXP-RC2-CBC-MD5
EXP-KRB5-RC2-CBC-SHA
EXP-KRB5-DES-CBC-SHA
EXP-KRB5-RC2-CBC-MD5
EXP-KRB5-DES-CBC-MD5
EXP-ADH-RC4-MD5
EXP-RC4-MD5
EXP-KRB5-RC4-SHA
EXP-KRB5-RC4-MD5
Note
Deprecated SSL Ciphers: If you had previously enabled these ciphers in a custom policy or
the ELBSample-OpenSSLDefaultCipherPolicy, we recommend that you update your security
policy to the latest version.
For procedures for updating the SSL negotiation configuration for your HTTPS/SSL listener, see Update
SSL Negotiation Configuration of Your Load Balancer (p. 151).
API Version 2012-06-01
60
Elastic Load Balancing Developer Guide
SSL Security Policy Table

SSL Certificate for Elastic Load
Balancing
If you use HTTPS or SSL for your front-end listener, you must install an SSL certificate on your load bal-
ancer.The load balancer uses the certificate to terminate the connection and then decrypt requests from
clients before sending them to the back-end instances.
The SSL protocol uses an X.509 certificate (SSL server certificate) to authenticate both the client and
the back-end application.The X.509 certificate is a digital form of identification issued by a certificate
authority (CA) and contains identification information, a validity period, a public key, a serial number, and
the digital signature of the issuer.
Before you can install the SSL certificate on your load balancer, you must create the certificate, get the
certificate signed by a CA, and then upload the certificate using the AWS Identity and Access Management
(IAM) service.
The SSL certificate comes with a validity period.You must replace the certificate before its validity period
ends.To replace the certificate you must create and upload the new certificate by following the same
steps you used when you created your certificate for the first time.
All your SSL certificates are managed by IAM. By default, IAM allows 10 SSL server certificates per AWS
account. If you try to upload a new server certificate after reaching this limit, you'll get an error.You can
request for more certificates using this form - IAM Limit Increase Contact Us Form.
In this section we walk you through the following steps for creating SSL server certificate and then uploading
the SSL certificate using the AWS IAM service. By the end of this section your SSL certificate will be
ready to be installed on your load balancer.
Topics
• Prerequisite: Install and Configure OpenSSL (p. 62)
• Generate Private Key and Certificate Signing Request (p. 63)
• Upload the Signed Certificate (p. 65)
• Verify Server Certificate (p. 67)
• Sample Certificates (p. 68)
API Version 2012-06-01
61
Elastic Load Balancing Developer Guide

Prerequisite: Install and Configure OpenSSL
Creating and uploading a certificate requires a tool that supports the SSL and TLS protocols. OpenSSL
is an open-source tool that provides extensive cryptographis functions. For more information, go to
OpenSSL. If you don't already have OpenSSL installed, follow the instructions in this section. If you
already have OpenSSL installed, skip this step and go to Generate Private Key and Certificate Signing
Request (p. 63).
To install and configure OpenSSL on LINUX and UNIX
1. Go to OpenSSL: Source, Tarballs (http://www.openssl.org/source/).
2. Download the latest source and build the package. At the command line use the commands as in
the following example:
$ wget https://www.openssl.org/source/openssl-1.0.1i.tar.gz
$ ./config -prefix=/etc/openssl -openssldir=/etc/openssl
$ make
$ sudo make install
3. Before you use OpenSSL commands, you must configure the operating system so that it has inform-
ation about the location of the OpenSSL install point.
At the command line, set the OpenSSL_HOME variable to the location of the OpenSSL installation:
export OpenSSL_HOME = path-to-your-OpenSSL-installation
4. Set the path to the OpenSSL installation:
export PATH=$PATH:$OpenSSL_HOME/bin
To install and configure OpenSSL on Windows
1. Go to OpenSSL: Binary Distributions (http://www.openssl.org/related/binaries.html).
2. Click OpenSSL for Windows.
A new page displays with links to the Windows downloads.
3. If it is not already installed on your system, select the Microsoft Visual C++ 2008 Redistributables
link appropriate for your environment and click Download. Follow the instructions provided by the
Microsoft Visual C++ 2008 Redistributable Setup Wizard.
4. After you have installed the Microsoft Visual C++ 2008 Redistributables, select the appropriate version
of the OpenSSL binaries for your environment and save the file locally.The OpenSSL Setup Wizard
launches.
5. Follow the instructions described in the OpenSSL Setup Wizard. Save the OpenSSL binaries to a
folder in your working directory.
6. Before you use OpenSSL commands, you must configure the operating system so that it has inform-
ation about the location of the OpenSSL install point.
Open a Command Prompt window.
7. Set the OpenSSL_HOME variable to the location of the OpenSSL installation:
API Version 2012-06-01
62
Elastic Load Balancing Developer Guide
Prerequisite: Install and Configure OpenSSL

set OpenSSL_HOME=path-to-your-OpenSSL-installation
8. Set the OpenSSL_CONF variable to the location of the configuration file in your OpenSSL installation:
set OpenSSL_CONF=path-to-your-OpenSSL-installation\bin\openssl.cfg
9. Set the path to the OpenSSL installation:
set Path=%Path%;%OpenSSL_HOME%\bin
Note
Any changes you make to Windows environment variables in a Command Prompt window
are valid only for the current command line session.You can make persistent changes to
the environment variables by setting them as system properties.The exact procedures de-
pend on what version of Windows you're using. (For example, in Windows 7, open Control
Panel > System and Security > System. Then choose Advanced system settings >
Advanced tab > Environment Variables). For more information, see the Windows docu-
mentation.
Generate Private Key and Certificate Signing
Request
This section walks you through the steps for creating a private key, creating a certificate signing request
(CSR), and for submitting the CSR to a Certificate Authority (CA).
If you are using Internet Information Service version 7 (IIS7), you have an option to use the IIS7 built-in
tool to generate a CSR. For more information, see Configuring Internet Server Certificates (IIS7). If you
use the IIS7 built-in tool to generate your CSR, skip the following steps and go to Submit CSR to Certificate
Authority (p. 65).
Create a Private Key
You need a unique private key to create your Certificate Signing Request (CSR). Private keys are created
using standard key algorithms.You must choose the algorithm based on the ciphers you plan to use for
negotiating SSL connections from the client to your load balancer. For example, if you plan to use RSA
based ciphers, make sure to use the algorithm specific to creating RSA based key.
To create a private key
1. For RSA based ciphers
Use the genrsa command and the following syntax:
openssl genrsa 2048 -out your-private-key-filename.pem
For private-key-filename, specify your own file name.The default RSA key length for OpenSSL
is 512 bits. In the example, 2048 represents 2048-bit RSA key length. AWS also supports 1024-bit
and 4096-bit key lengths.We recommend you create an RSA key that is 2048 bits.
For ECDHE-ECDSA based ciphers
API Version 2012-06-01
63
Elastic Load Balancing Developer Guide
Generate Private Key and Certificate Signing Request

Use the ecparam command and the following syntax:
openssl ecparam -name primev256v1 -out your-private-key-filename.pem -
genkey
For private-key-filename, specify your own file name.
2. Save the private key in a secure place. There is no way to get back your private key if it is lost.
Create a Certificate Signing Request
The next step is to create a Certificate Signing Request (CSR).This is a file that you send to a certificate
authority (CA) to apply for a server certificate.
To create a CSR
Use the openssl req command to create a CSR and the following syntax:
openssl req -sha256 -new -key your-private-key-filename.pem -out csr.pem
The output will look similar to the following example:
You are about to be asked to enter information that will be incorporated
into your certificate request.
What you are about to enter is what is called a Distinguished Name or a DN.
There are quite a few fields but you can leave some blank.
For some fields there will be a default value.
If you enter '.', the field will be left blank.
The following table can help you create your certificate request.
ExampleDescriptionName
US = United StatesThe two-letter ISO abbreviation
for your country.
Country Name
WashingtonThe name of the state or
province where your organization
is located.This name cannot be
abbreviated.
State or Province
SeattleThe name of the city where your
organization is located.
Locality Name
Example CorpThe full legal name of your
organization. Do not abbreviate
your organization name.
Organization Name
MarketingOptional, for additional
organization information.
Organizational Unit
www.yourdomain.comThe fully qualified domain name
for your CNAME.You will receive
a certificate name check warning
if this is not an exact match.
Common Name
API Version 2012-06-01
64
Elastic Load Balancing Developer Guide
Create a Certificate Signing Request
ExampleDescriptionName
[email protected]The server administrator's email
address
Email address
Note
The Common Name field is often misunderstood and is completed incorrectly.The common
name is typically your host plus domain name. It will look like "www.company.com" or "com-
pany.com".You need to create a CSR using your correct common name.
Use the following command to verify that the information provided in the CSR file is correct:
openssl> req -text -in csr.pem -noout
Submit CSR to Certificate Authority
Your CSR contains information identifying you.To apply for a server certificate, send your CSR to a cer-
tificate authority (CA). The CA might require other credentials or proofs of identity.
If the request for a certificate is successful, the CA returns a public (identity) certificate and possibly a
chain certificate that is digitally signed.
AWS does not recommend a specific CA. For a partial listing of available CAs, see Third-Party Certificate
Authorities.
Upload the Signed Certificate
When you receive your server certificate from the certificate authority (CA), it might be in a format that is
not supported by IAM.Typically you receive a public certificate, one or more intermediate certificates and
a root certificate.The intermediate certificates and the root certificate can come bundled in a file or as
separate files.The file names may vary depending on the type of SSL certificate you purchase and the
certificate authority.
To upload your certificate using AWS IAM, you need the following three files in the PEM format. For more
information about pem format, go to pem DESCRIPTION.
Use the following command for converting private key generated for RSA based ciphers:
openssl rsa -in your-private-key-filename -outform PEM
Use the following command for converting private key generated for ECDSA-ECDHE based ciphers:
openssl ecparam -in your-private-key-filename -outform PEM
Your PEM formatted private key must look similar to the sample private key in Sample Certificates (p.68).
2. Public certificate in PEM format
This is the certificate you receive from the CA.Your public certificate is the domain-specific file.Your
public certificate also must be in PEM format. If it is not, use the following OpenSSL command to convert
your public certificate to PEM format:
API Version 2012-06-01
65
Elastic Load Balancing Developer Guide
Submit CSR to Certificate Authority

openssl x509 -inform PEM -in your-public-certificate-filename
Your PEM formatted public certificate must look similar to the sample public certificate in Sample Certific-
ates (p. 68).
3. Certificate chain in PEM Format
This file is a concatenation of all the intermediate certificates and the root certificate one after the other.
The certificate chain lets an end user's browser build a certificate chain to a root certificate it trusts. As a
result, the browser can implicitly trust your certificate.
If you are uploading a self-signed certificate and it's not important that browsers implicitly accept the
certificate, you can skip this step and upload just the public certificate and private key.
Typically, both intermediate and root certificates are provided by a CA in a bundled file with the proper
chained order. If a certificate bundle is not available or not available in the required order, you can create
your own certificate chain file.
To create your own certificate chain file, include the intermediate certificates and optionally, the root cer-
tificate, one after the other without any blank lines. If you are including the root certificate, your certificate
chain must start with intermediate certificates and end with the root certificate. Use the intermediate cer-
tificates that were provided by your CA. Any intermediaries that are not involved in the chain of trust path
must not be included.
Your certificate chain must be in PEM format. If it is not, use the following OpenSSL command to convert
your certificate chain to PEM format:
openssl x509 -inform PEM -in your-certificate-chain-filename
Your PEM formatted certificate chain must look similar to the sample certificate chain in Sample Certific-
ates (p. 68).
After you have all your files in the X.509 PEM format, you use the AWS command line interface for IAM
to upload it. For more information, see the AWS Command Line Interface User Guide.
To upload a server certificate
• Use the aws iam upload-server-certificate command by specifying the following options:
• server-certificate-name = name-of-your-server-certificate
You cannot use the name of an expired certificate.
• certificate-body = encoded-certificate-body
The contents of the public certificate in PEM-encoded format
• private-key = encoded-private-key
The contents of the private key in PEM-encoded format.
Note
The private key cannot be retrieved after you are finished uploading it.
• [optional] certificate-chain = concatenation of the intermediate and root cer-
tificates
The contents of the certificate chain in PEM-encoded format.
• [optional] path = /
API Version 2012-06-01
66
Elastic Load Balancing Developer Guide
Upload the Signed Certificate

Note
The path is optional. If it is not included, the path defaults to /. For more information about
paths, go to Identifiers for IAM Entities in Using IAM.
Your command looks similar to the following example:
aws iam upload-server-certificate --server-certificate-name >name-of-your-
server-certificate --certificate-body file://encoded-public-certificate
file --private-key file://encoded-private-key file --certificate-chain
file://encoded-certificate-chain
Note
When you specify a file as a parameter (for example, for the certificate-body, private-
key, and the certificate-chain parameters), you must include file:// as part of the
file name.
When you upload your certificates, IAM validates the certificates with the following criteria:
• Certificates must follow the X.509 PEM format.
• The current date must be between the certificate’s start and end date.
• Public and private certificate files must contain only a single certificate.
• The private key must match the public key that is in the certificate.
• The private key must be an RSA private key in PEM format, where the PEM header is BEGIN RSA
PRIVATE KEY and the footer is END RSA PRIVATE KEY (as shown in Sample Certificates (p. 68)
).
• The private key cannot be encrypted with a password.
• The certificate chain must include all of your CA’s intermediary certificates that lead to the root
certificate, and optionally ends with your CA’s root certificate.Typically, both intermediary and root
certificates are provided by a CA in a bundled file with the proper chained order. If a certificate
bundle is not available or not available in the required order, you can create your own file similar
to the sample certificate chain in Sample Certificates (p. 68). Use the intermediary certificates that
were provided by your CA. Any intermediaries that are not involved in the chain of trust path must
not be included.
After you upload your certificate chain to AWS, you can use SSL Checker to verify it.
Note
o The order of intermediate certificates should be documented by the CA. AWS does not
recommend any one CA. For a listing of some CAs, see Third-Party Certificate Authorities.
o Although the root certificate is optional, you can include it so that you can run full chain
of trust verifications, such as SSL Checker.
If you have certificates that result in an error when you upload them, ensure that they meet the criteria,
and then try uploading them again.
Verify Server Certificate
After the server certificate is uploaded, you can verify that the information is stored in IAM. Each certificate
object has a unique Amazon Resource Name (ARN) and ID.You can request these details for a specific
certificate object by referencing the name of the certificate object.
API Version 2012-06-01
67
Elastic Load Balancing Developer Guide
Verify Server Certificate

To view the certificate object's ARN and ID
Use the aws iam get-server-certificate command to verify the certificate object:
aws iam get-server-certificate --server-certificate-name name-of-your-server-
certificate
The response includes the server certificate Amazon Resource Name (ARN) and GUID.
arn:aws:iam::55555555555:server-certificate/production/myCert
ASCACexampleKEZUQ4K
The first line is the Amazon Resource Name (ARN) and the second line is the GUID. Make a note of the
ARN.You need it to install the certificate on your load balancer.
Next Step
• To install SSL certificate on your new load balancer using the AWS Management Console, see Configure
Listeners (p. 73).
• To install SSL certificate on your new load balancer using the AWS Command Line Interface, see
Configure Listeners (p. 82).
• To update SSL certificate on your existing load balancer, see Update an SSL Certificate for a Load
Balancer (p. 147).
Sample Certificates
The following certificates show the valid format that IAM accepts for server certificates and their associated
private key and certificate chain.
The server certificate associates your public key with your identity. When you submit your Certificate
Signing Request (CSR) to a certificate authority (CA), a server certificate is returned to you by the CA.
The following is a sample server certificate:
Sample server certificate
-----BEGIN CERTIFICATE-----
MIIE+TCCA+GgAwIBAgIQU306HIX4KsioTW1s2A2krTANBgkqhkiG9w0BAQUFADCB
tTELMAkGA1UEBhMCVVMxFzAVBgNVBAoTDlZlcmlTaWduLCBJbmMuMR8wHQYDVQQL
ExZWZXJpU2lnbiBUcnVzdCBOZXR3b3JrMTswOQYDVQQLEzJUZXJtcyBvZiB1c2Ug
YXQgaHR0cHM6Ly93d3cudmVyaXNpZ24uY29tL3JwYSoAYykwOTEvMC0GA1UEAxMm
VmVyaVNpZ24gQ2xhc3MgMyBTZWN1cmUgU2VydmVyIENBIC0gRzIwHhcNMTAxMDA4
MDAwMDAwWhcNMTMxMDA3MjM1OTU5WjBqMQswCQYDVQQGEwJVUzETMBEGA1UECBMK
V2FzaGluZ3RvbjEQMA4GA1UEBxQHU2VhdHRsZTEYMBYGA1UEChQPQW1hem9uLmNv
bSBJbmMuMRowGAYDVQQDFBFpYW0uYW1hem9uYXdzLmNvbTCBnzANBgkqhkiG9w0B
AQEFAAOBjQAwgYkCgYEA3Xb0EGea2dB8QGEUwLcEpwvGawEkUdLZmGL1rQJZdeeN
3vaF+ZTm8Qw5Adk2Gr/RwYXtpx04xvQXmNm+9YmksHmCZdruCrW1eN/P9wBfqMMZ
X964CjVov3NrF5AuxU8jgtw0yu//C3hWnOuIVGdg76626ggOoJSaj48R2n0MnVcC
AwEAAaOCAdEwggHNMAkGA1UdEwQCMAAwCwYDVR0PBAQDAgWgMEUGA1UdHwQ+MDww
OqA4oDaGNGh0dHA6Ly9TVlJTZWN1cmUtRzItY3JsLnZlcmlzaWduLmNvbS9TVlJT
ZWN1cmVHMi5jcmwwRAYDVR0gBD0wOzA5BgtghkgBhvhFAQcXAzAqMCgGCCsGAQUF
BwIBFhxodHRwczovL3d3dy52ZXJpc2lnbi5jb20vcnBhMB0GA1UdJQQWMBQGCCsG
AQUFBwMBBggrBgEFBQcDAjAfBgNVHSMEGDAWgBSl7wsRzsBBA6NKZZBIshzgVy19
RzB2BggrBgEFBQcBAQRqMGgwJAYIKwYBBQUHMAGGGGh0dHA6Ly9vY3NwLnZlcmlz
aWduLmNvbTBABggrBgEFBQcwAoY0aHR0cDovL1NWUlNlY3VyZS1HMi1haWEudmVy
API Version 2012-06-01
68
Elastic Load Balancing Developer Guide
Sample Certificates

aXNpZ24uY29tL1NWUlNlY3VyZUcyLmNlcjBuBggrBgEFBQcBDARiMGChXqBcMFow
WDBWFglpbWFnZS9naWYwITAfMAcGBSsOAwIaBBRLa7kolgYMu9BSOJsprEsHiyEF
GDAmFiRodHRwOi8vbG9nby52ZXJpc2lnbi5jb20vdnNsb2dvMS5naWYwDQYJKoZI
hvcNAQEFBQADggEBALpFBXeG782QsTtGwEE9zBcVCuKjrsl3dWK1dFiq3OP4y/Bi
ZBYEywBt8zNuYFUE25Ub/zmvmpe7p0G76tmQ8bRp/4qkJoiSesHJvFgJ1mksr3IQ
3gaE1aN2BSUIHxGLn9N4F09hYwwbeEZaCxfgBiLdEIodNwzcvGJ+2LlDWGJOGrNI
NM856xjqhJCPxYzk9buuCl1B4Kzu0CTbexz/iEgYV+DiuTxcfA4uhwMDSe0nynbn
1qiwRk450mCOnqH4ly4P4lXo02t4A/DI1I8ZNct/Qfl69a2Lf6vc9rF7BELT0e5Y
R7CKx7fc5xRaeQdyGj/dJevm9BF/mSdnclS5vas=
-----END CERTIFICATE-----
The private key allows you to decrypt messages that are encrypted with your public key.The following
figure is a sample private key:
Sample private key
Sample certificate chain
The certificate chain includes all intermediary certificates that lead to the root certificate, as shown in the
following example. Intermediaries that are not involved in the trust path must not be included. If included,
the chain must end with your CA’s root certificate.Typically, both intermediary and root certificates are
provided by a CA in a bundled file with the proper chained order.
-----BEGIN CERTIFICATE-----
Intermediate certificate 2
-----END CERTIFICATE-----
-----BEGIN CERTIFICATE-----
Intermediate certificate 1
-----END CERTIFICATE-----
-----BEGIN CERTIFICATE-----
Optional: Root certificate
-----END CERTIFICATE-----
API Version 2012-06-01
69
Elastic Load Balancing Developer Guide
Sample Certificates

Elastic Load Balancing in Amazon
EC2-Classic
Amazon Web Services (AWS) lets you launch your instances in either Amazon EC2-Classic or Amazon
Virtual Private Cloud (Amazon VPC). If want to load balance your EC2 instances launched in EC2-Classic,
you must create your load balancer in EC2-classic platform.
This section covers information that is specific to your instances and load balancers launched in EC2-
Classic and provides procedural instruction and examples. For information on your load balancers and
instances created within Amazon VPC, see Elastic Load Balancing in Amazon VPC (p. 113).
Before you can start using a load balancer, you must create one.You create your load balancer by con-
figuring listeners, configuring the health check, and by registering your back-end instances with your load
balancer.You configure a listener by specifying the protocol and the port number for front-end (client to
load balancer) and back-end (load balancer to back-end instances) connections.You can configure
multiple listeners for your load balancer. For more information about the listener configurations supported
by Elastic Load balancing, see Listener Configurations for Elastic Load Balancing (p. 49).
When you create your load balancer, by default, your load balancer is set to use the HTTP protocol with
port 80 for the front-end connection and the back-end connection. If you want to create a load balancer
using the default setting, see Create a Basic Load Balancer in EC2-Classic (p. 23).
Elastic Load Balancing provides Secure Sockets Layer (SSL) negotiation configurations, known as Se-
curity Policy, to negotiate connections between the clients and the load balancer. If you choose HTTPS/SSL
for your front-end connection, you can either use the predefined security policy or use custom security
policy.When you use HTTPS or SSL for your front-end connection, you must install SSL certificate on
your load balancer. The load balancer uses the certificate to terminate the connection and then decrypt
requests from clients before sending them to the back-end instances.You can optionally choose to enable
authentication on your back-end instance. For detailed instructions on creating a HTTPS/SSL load balancer
in Amazon EC2, see Create a HTTPS/SSL Load Balancer (p. 72).
As the traffic to your instances increases, you might consider expanding your EC2 instances to run in an
additional Availability Zone. For detailed instructions on expanding to additional Availability Zones, see
Add Availability Zone (p. 96).
When the traffic to your instances decreases, you might consider scaling down the availability of your
instances by disabling some Availability Zones. For detailed instructions on disabling your Availability
Zones, see Remove Availability Zone (p. 99).
API Version 2012-06-01
70
Elastic Load Balancing Developer Guide

Elastic Load Balancing provides a special Amazon EC2 source security group that you can use to ensure
that a back-end Amazon EC2 instance receives traffic only from Elastic Load Balancing. For information
on locking the incoming traffic between your load balancer and your back-end instances , see Manage
Security Groups in Amazon EC2-Classic (p. 101).
After you create your load balancer, Elastic Load Balancing returns a public DNS name that combines
your load balancer's name and region.This base public DNS name returns only IPv4 records.
Elastic Load Balancing supports both Internet Protocol version 6 (IPv6) and Internet Protocol version 4
(IPv4).
Note
IPv6 support is currently not available for load balancers in Amazon VPC (EC2-VPC).
Clients can connect to your load balancer using either IPv4 or IPv6 (in EC2-Classic). However, commu-
nication between the load balancer and its back-end instances uses only IPv4.You might want to use
the dualstack-prefixed DNS name to enable IPv6 support for communications between client and the
load balancers so that clients are able to access the load balancer using either IPv4 or IPv6 as their indi-
vidual connectivity needs dictate. For more information on enabling IPv6 support, see Use IPv6 with
Elastic Load Balancing (p. 111).
API Version 2012-06-01
71
Elastic Load Balancing Developer Guide

Create a HTTPS/SSL Load Balancer
This example walks you through the process of creating a HTTPS load balancer with SSL negotiation
configurations and with back-end application instance authentication.You can optionally add tags.
Before you get started, be sure you've met the following preconditions:
• Sign up for Amazon Web Services (AWS). If you haven't signed up for AWS yet, complete the steps
listed in Sign Up for Amazon Web Services(AWS) (p. 18).
• For this example, we use Availability Zone us-east-1a. In Availability Zone us-east-1a, launch the in-
stances you intend to register with your load balancer. For more information about launching Amazon
EC2 instances, see Launching and Using Instances.
• The instances that you intend to register with your load balancer must be configured to receive requests
from the Internet.
• The instances to be registered with your load balancer must respond to the target of the health check
with an HTTP status code 200. For information about Elastic Load Balancing health check, see Health
Check (p. 7).
• If you plan to enable the keep-alive option on your EC2 instances, we recommend that you set the
keep-alive settings to at least the idle timeout settings of your load balancer. If you want to ensure that
the load balancer is responsible for closing the connections to your back-end instance, make sure that
the value set on your instance for the keep-alive time is greater than the idle timeout setting on your
load balancer. For information about load balancer idle timeout, see Idle Connection Timeout (p. 10).
• To enable HTTPS support for our listeners, you must first create an SSL certificate and then install it
on your load balancer. The load balancer uses the certificate to terminate and then decrypt requests
before sending them to the back-end instances. For information on how to create an SSL certificate,
see SSL Certificate for Elastic Load Balancing (p. 61).
All your SSL server certificates are managed by IAM. By default, IAM allows 10 SSL server certificates
per AWS account. If you try to upload a new server certificate after reaching this limit, you'll get an error.
You can request for more certificates using this form - IAM Limit Increase Contact Us Form.
The following sections include instructions for creating an HTTPS/SSL load balancer using the AWS
Management Console or the AWS Command Line Interface (AWS CLI).
• Using the AWS Management Console (p. 72)
• Using the AWS Command Line Interface (p. 82)
Important: Elastic Load Balancing CLI has been replaced by AWS Command Line Interface (AWS
CLI), a unified tool to manage multiple AWS services. New features released after ELB CLI version
1.0.35.0 (dated 7/24/14) will be included in the AWS CLI only. We recommend that you start using the
AWS CLI.
For a list of the functionality supported in previous ELB CLI versions, see Elastic Load Balancing API
Tools.
Using the AWS Management Console
The following step-by-step instructions will help you create an HTTPS/SSL load balancer using the AWS
Management Console. Before you begin, make sure to:
Sign in to the AWS Management Console and open the Amazon EC2 console at https://console.amazon-
aws.cn/ec2/.
Topics
API Version 2012-06-01
72
Elastic Load Balancing Developer Guide
Create HTTPS/SSL Load Balancer

• Step 1: Configure Listeners (p. 73)
• Step 2: Configure SSL Security Policy (p. 75)
• Step 3: Configure Back-end Server Authentication (p. 77)
• Step 4: Configure Health Check Settings (p. 78)
• Step 5: Register Amazon EC2 Instances (p. 78)
• Step 6: Add Tags (p. 79)
• Step 7: Verify the Details of Your Load Balancer (p. 80)
Step 1: Configure Listeners
A listener is a process that listens for connection requests. It is configured with a protocol and a port
number for front-end (client to load balancer) and back-end (load balancer to back-end instance) connec-
tions. For information about the ports, protocols and the listener configurations supported by Elastic Load
Balancing, see Listener Configurations for Elastic Load Balancing (p. 49).
In this example, you configure two listeners for your load balancer by specifying the ports and protocols
to use for front-end connection (client to load balancer) and back-end connection (load balancer to back-
end instance).The first listener accepts HTTP requests on port 80 and sends the request to the back-
end application instances on port 80 using HTTP.The second listener accepts HTTPS requests on port
443 and sends the request to back-end application instances using HTTPS on port 443.
Since the second listener uses HTTPS for the front-end connection, you will have to install SSL sever
certificate on your load balancer. The load balancer uses the certificate to terminate and then decrypt
requests before sending them to the back-end instances. Before you can install the SSL certificate on
your load balancer, you must create the certificate, get the certificate signed by a Certificate Authority
(CA), and then upload the certificate using the AWS Identity and Access Management (AWS IAM) service.
For information about creating and uploading SSL certificates, see SSL Certificate for Elastic Load Bal-
ancing (p. 61)
To configure listeners for your load balancer
1. Start the Create Load Balancer wizard:
a. On the Amazon EC2 console Resources page, in the EC2 Dashboard pane, under NETWORK
& SECURITY, click Load Balancers.
b. On the Load Balancers page, click Create Load Balancer.
API Version 2012-06-01
73
Elastic Load Balancing Developer Guide
Using the AWS Management Console

2. On the Define Load Balancer page, enter a name for your load balancer (e.g., my-test-loadbal-
ancer).
The load balancer name you choose must be unique within your set of load balancers, must have a
maximum of 32 characters, and must only contain alphanumeric characters or hyphens.
3. Leave the Listener Configuration set to the default value for the first listener.
4. Leave the Create LB Inside: box set to EC2-Classic for this tutorial.
5. Click Add to add a second listener.
6. Select HTTPS (Secure HTTP) from the drop-down box in the Load Balancer Protocol box. This
populates the Load Balancer Port box. Select HTTPS (Secure HTTP) from the drop-down box in
the Instance Protocol box.This populates the Instance Port box.
7. Click Continue to upload your SSL certificate.
8. To use a previously uploaded certificate
a. On the Select Certificate page, in the Certificate Type: field, select Choose from an existing
SSL Certificate.
b. Click the Certificate Name: dialog box and select your certificate.
c. Click Continue.
d. Skip the next step and see Step 2: Configure SSL Security Policy (p. 75) for instructions on
configuring SSL ciphers.
9. To upload a signed certificate
On the Select Certificate page, in the Certificate Type: field, select Upload a new SSL Certificate.
Before you upload, check if your certificate meets the criteria described in Upload the Signed Certi-
ficate (p. 65)
Note
If your certificate does not meet the criteria, you might get an error when you upload it.
Create a new SSL certificate and upload the certificate using IAM. For instructions on creating
and uploading the SSL certificate, see SSL Certificate for Elastic Load Balancing (p. 61).
If your certificate meets the criteria, step through the following instructions to continue uploading your
SSL certificate.
a. Enter the name of the certificate to upload.
API Version 2012-06-01
74
Elastic Load Balancing Developer Guide
Using the AWS Management Console

b. Copy and paste the contents of the private key file (PEM-encoded) in the Private Key box.
Note
The private key cannot be retrieved after you are finished uploading it.
c. Copy and paste the contents of the public key certificate file (PEM-encoded) in the Public Key
Certificate box.
d. Copy and paste the contents of the certificate chain file (PEM-encoded) in the Certificate Chain
box.
Note
You can skip this step if you are using a self-signed certificate and it's not important
that browsers implicitly accept the certificate.
10. Click Continue to configure SSL ciphers for the HTTPS/SSL listeners.
11. See Step 2: Configure SSL Security Policy (p. 75) for instructions on configuring SSL ciphers.
Step 2: Configure SSL Security Policy
Elastic Load Balancing provides you with security policies that have predefined SSL negotiation configur-
ations you can use for your load balancer.You can either select one of the predefined security policies,
or you can create your own custom security policy by specifying the SSL protocols, ciphers, and, optionally,
enabling the server order preference.
Note
If you do not associate any security policy with your load balancer, Elastic Load Balancing will,
by default, associate the latest version of the predefined security policy with your load balancer.
For more information about the security policies, see SSL Negotiation Configurations for Elastic Load
Balancing (p.55). For information about the current configuration for all security policies, see SSL Security
Policy Table (p. 56).
API Version 2012-06-01
75
Elastic Load Balancing Developer Guide
Using the AWS Management Console
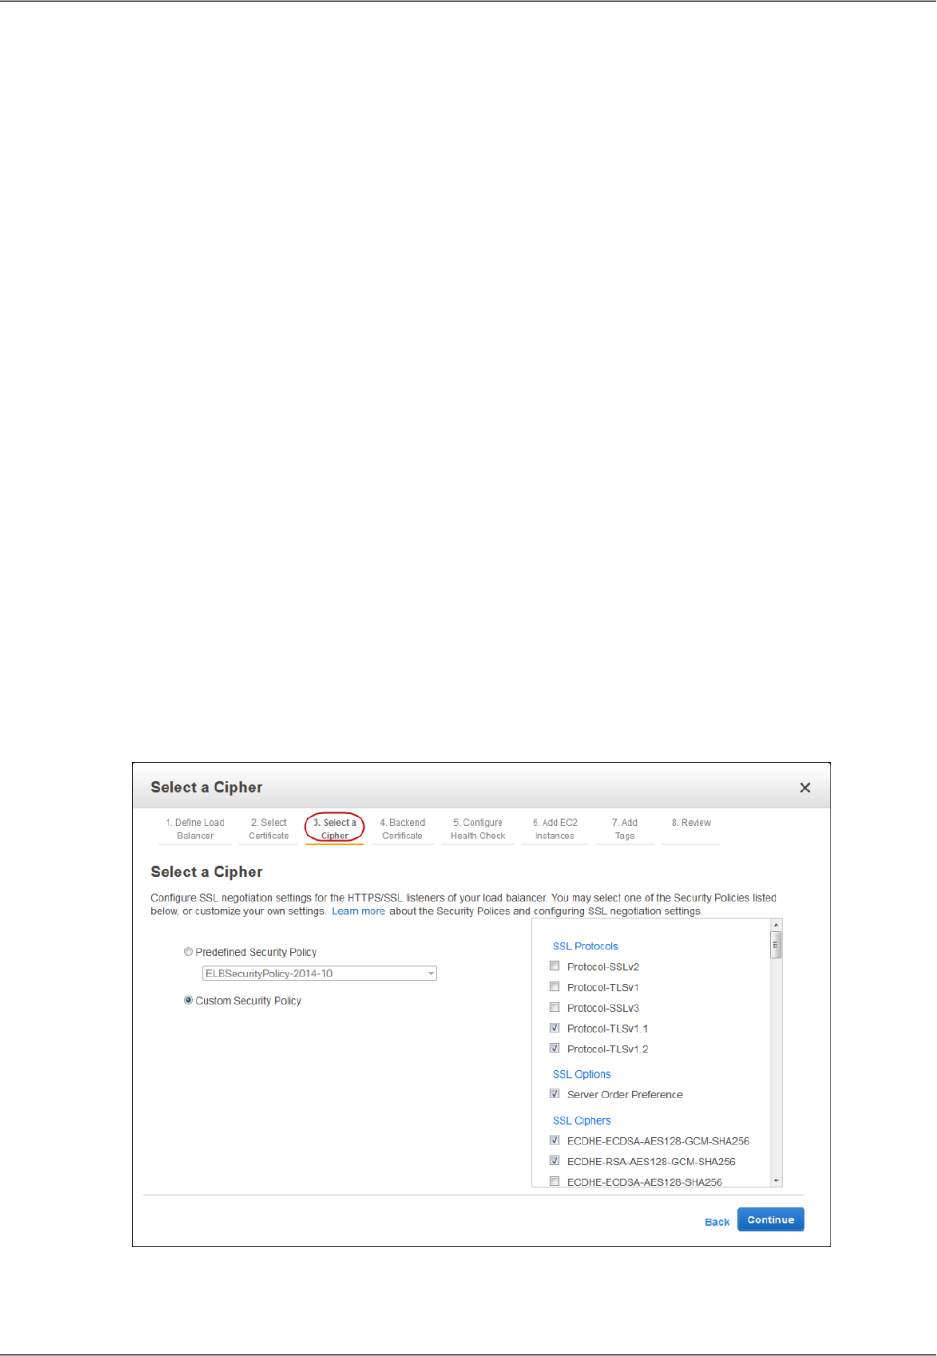
On the Select a Cipher page, the predefined security policy ELBSecurityPolicy-2014-10 is selected by
default for your SSL/HTTPS listener.This is the recommended setting. This policy uses server order
preference (the order listed in the SSL Security Policy Table (p. 56)) to negotiate SSL connections.
To keep the recommended predefined security policy
• On the Select a Cipher page, make sure that ELBSecurity-Policy-2014-10 is selected, and click
Continue to configure back-end server authentication.
To select a different policy from the predefined security policy list
1. On the Select a Cipher page, select Predefined Security Policy.
2. In the security policy drop-down list, select a policy.
3. Click Continue to configure back-end server authentication.
To create your own security policy
1. On the Select a Cipher page, select Custom Security Policy.
2. Under SSL Protocols, select one or more protocols to enable.
3. Under SSL Options, select Server Order Preference if you want to use the order listed in the SSL
Security Policy Table (p. 56) for SSL negotiation.
4. Under SSL Ciphers, select one or more ciphers to enable.
Note
You must enable at least one protocol and one cipher for SSL negotiation to take place.
The DSA and RSA ciphers are specific to the signing algorithm and are used to create the
SSL certificate. If you already have your SSL certificate, make sure to enable the cipher
that was used to create your certificate.
The following screen shot shows a custom configuration with Server Order Preference enabled.
5. Click Continue to configure back-end server authentication.
API Version 2012-06-01
76
Elastic Load Balancing Developer Guide
Using the AWS Management Console

6. See Step 3: Configure Back-end Server Authentication (p. 77) for instructions on configuring back-
end server authentication.
Step 3: Configure Back-end Server Authentication
If you have HTTPS/SSL on the back-end connection, you can choose to enable authentication on your
back-end instance. This authentication can be used to ensure that back-end instances accept only en-
crypted communication and to ensure that the back-end instance has the correct certificates.
On the Backend Certificate page, select from the following options:
To not configure back-end server authentication
• Select Proceed without backend authentication and go to step 2.
To configure back-end server authentication
1. Select Enable backend authentication.
a. Enter the name of the public key certificate in the Certificate Name box, and then copy and
paste the contents of the certificate (PEM-encoded) in the Certificate body box.
b. Click Add another Backend Certificate to add multiple certificates.
2. Click Continue to configure health check for your backend server.
3. See Step 4: Configure Health Check Settings (p. 78) for instructions on configuring health check for
your back-end servers.
API Version 2012-06-01
77
Elastic Load Balancing Developer Guide
Using the AWS Management Console

Step 4: Configure Health Check Settings
Elastic Load Balancing routinely checks the health of each registered Amazon EC2 instance based on
the configurations that you specify. If Elastic Load Balancing finds an unhealthy instance, it stops sending
traffic to the instance and reroutes traffic to healthy instances. For more information on configuring health
check, see Health Check (p. 7).
To configure the health check
1. On the Configure Health Check page, configure the health check settings that your application re-
quires.
Elastic Load Balancing sends health check queries to the specified ping port and the ping path. Make
sure that your EC2 instances accept traffic on the ping port you specify here.
This example uses a single forward slash in the ping path field so that Elastic Load Balancing sends
the query to your webserver's default home page, whether that default page is named index.html,
default.html, or a different name.
2. Click Continue to register your Amazon EC2 instances.
3. See Step 5: Register Amazon EC2 Instances (p. 78) for instructions to register your EC2 instances.
Step 5: Register Amazon EC2 Instances
After you create your load balancer, you have to register your EC2 instances with the load balancer.Your
EC2 instances can be within a single Availability Zone or span multiple Availability Zones within a region.
For more information on configuring EC2 instances you plan to register with your load balancer, see
Configuring EC2 Instances for Load Balancing (p. 7).
When you register EC2 instances using the console, the cross-zone load balancing and connection
draining options are enabled by default. If you do not want either or both the options for your load balancer,
you can disable them. If you are using the CLI or the Query API to register your instances, and you want
to enable either or both these options, you must explicitly do so.
API Version 2012-06-01
78
Elastic Load Balancing Developer Guide
Using the AWS Management Console

If cross-zone load balancing is enabled for your load balancer, Elastic Load Balancing routes the traffic
evenly across all your registered EC2 instances. If connection draining is enabled for your load balancer,
the load balancer allows all in-flight requests to instances to complete while the instances are deregistering.
For more information about cross-zone load balancing see Request Routing (p. 6). For more information
about connection draining, see Connection Draining (p. 9).
To add Amazon EC2 instances
1. On the Add EC2 Instances page, in the Add Instances to Load Balancer table, select the boxes
in the Instance column to register instances with your load balancer.
2. Click the Enable Cross-Zone Load Balancing box if you want to change the default setting.
3. Click the Enable Connection Draining box if you want to change the default setting.
4. Click Continue to add tags.
5. See Step 6: Add Tags (p. 79) for instructions on adding tags.
Step 6: Add Tags
You can optionally set tags for your load balancer.Tags help you to categorize your load balancers in
different ways, for example, by purpose, owner, or environment. For more information, see Tagging (p.12).
To add tags
If you do not want to assign tags to your load balancer at this time, click Continue to skip this step and
go to step 4.
1. On the Add Tags page, specify a key and a value for the tag.
2. To add multiple tags, click Create Tag and continue to specify a key and a value for each tag.
API Version 2012-06-01
79
Elastic Load Balancing Developer Guide
Using the AWS Management Console

3. When you are done, click Continue to review the details of your load balancer.
4. On the Review page, check your settings.You can make changes by clicking the edit link for each
setting. After you've reviewed your load balancer settings, click Create to create your load balancer.
5. The Create Load Balancer wizard displays the status of your newly created load balancer. Click
Close after confirming that your load balancer was successfully created.
6. See Step 7: Verify the Details of Your Load Balancer (p. 80) to verify that the load balancer is
launched.
Step 7:Verify the Details of Your Load Balancer
Your newly created load balancer now appears in the load balancer page.
To verify the details of your load balancer,
1. Select the check box next to your load balancer.
The bottom pane displays the description of your load balancer.Verify that the descriptions match
your specifications.
API Version 2012-06-01
80
Elastic Load Balancing Developer Guide
Using the AWS Management Console

If the description in the Status row indicates that some of your instances are not in service, it's
probably because your instances are still registering. For more information, see Troubleshooting
Elastic Load Balancing: Registering Instances (p. 262).
2. You can test your load balancer after you've verified that at least one of your EC2 instances is InSer-
vice.To test your load balancer, copy the DNS Name value that is listed in the Description tab and
paste it into the address field of an Internet-connected web browser. If your load balancer is working,
you will see the default page of your HTTP server.
API Version 2012-06-01
81
Elastic Load Balancing Developer Guide
Using the AWS Management Console

Using the AWS Command Line Interface
The following step-by-step instructions will help you create an HTTPS/SSL load balancer using the AWS
Command line Interface (AWS CLI).
Important
Elastic Load Balancing CLI has been replaced by AWS Command Line Interface (AWS CLI), a
unified tool to manage multiple AWS services. New features released after ELB CLI version
1.0.35.0 (dated 7/24/14) will be included in the AWS CLI only. We recommend that you start
using the AWS CLI.
For a list of the functionality supported in previous ELB CLI versions, see Elastic Load Balancing
API Tools.
Before you get started make sure that you have installed and configured your AWS CLI environment. For
more information, see Getting Set Up with the AWS Command Line Interface.
Topics
• Step 1: Configure Listeners (p. 82)
• Step 2: Configure SSL Security Policy (p. 85)
• Step 3: Configure Backend Server Authentication (p. 91)
• Step 4: Configure Health Check (p. 93)
• Step 5: Register EC2 Instances (p. 94)
• Step 6: Verify Instances (p. 95)
Step 1: Configure Listeners
A listener is a process that listens for connection requests. It is configured with a protocol and a port
number for front-end (client to load balancer) and back-end (load balancer to back-end instance) connec-
tions. For information about the ports, protocols and the listener configurations supported by Elastic Load
Balancing, see Listener Configurations for Elastic Load Balancing (p. 49).
In this example, you configure two listeners for your load balancer by specifying the ports and protocols
to use for front-end connection (client to load balancer) and back-end connection (load balancer to back-
end instance).The first listener accepts HTTP requests on port 80 and sends the request to the back-
end application instances on port 80 using HTTP.The second listener accepts HTTPS requests on port
443 and sends the request to back-end application instances using HTTPS on port 443.
Since the second listener uses HTTPS for the front-end connection, you will have to install SSL sever
certificate on your load balancer. The load balancer uses the certificate to terminate and then decrypt
requests before sending them to the back-end instances. Before you can install the SSL certificate on
your load balancer, you must create the certificate, get the certificate signed by a Certificate Authority
(CA), and then upload the certificate using the AWS Identity and Access Management (AWS IAM) service.
For information about creating and uploading SSL certificates, see SSL Certificate for Elastic Load Bal-
ancing (p. 61)
You can optionally set tags for your load balancer.Tags help you to categorize your load balancers in
different ways, for example, by purpose, owner, or environment. For more information, see Tagging (p.12).
To configure listeners and optionally set tags for your load balancer
1. Get the Amazon Resource Name (ARN) of your SSL server certificate
If you have not yet created and uploaded the SSL server certificate, see SSL Certificate for Elastic
Load Balancing (p. 61), for instructions to do so. Make a note of the ARN of the certificate, and then
go to step 2.
API Version 2012-06-01
82
Elastic Load Balancing Developer Guide
Using the AWS Command Line Interface

If you already have an SSL certificate and have uploaded it using IAM, use the AWS CLI command
get-server-certificate to get the ARN of the certificate.
2. Configure listeners and optionally add tags.
Enter the create-load-balancer command by specifying the following options:
• --listeners
• LoadBalancerPort = 80
• Protocol = http
• InstancePort = 80
• InstanceProtocol = http
• LoadbalancerPort = 443
• Protocol = https
• InstancePort = 443
• InstanceProtocol = https
• SSLCertificateId = arn:aws:iam::55555555555:server-certificate/produc-
tion/myservercert
• --availability-zones = us-east-1a
• [optional] --tag
• Key=department
• Value=digital-media
• load-balancer-name = my-test-loadbalancer
Your command should look as in the following example.
aws elb create-load-balancer --load-balancer-name my-test-loadbalancer -
-listeners "Protocol=http,LoadBalancerPort=80,InstanceProtocol=http,Instan
cePort=80" "Protocol=https,LoadBalancerPort=443,InstanceProtocol=https,In
stancePort=443, SSLCertificateId=arn:aws:iam::55555555555:server-certific
ate/production/myservercert" --tags Key=department,Value=digital-media --
availability-zones us-east-1a
Note
Multiple values (listeners or tags) must be specified in the following format separated by a
space:
--tags "Key=key1,Value=value1" "Key=key2,Value=value2"
Elastic Load Balancing returns the DNS name of your load balancer.
{
"DNSName": "my-test-loadbalancer-012345678.us-east-1a.elb.amazonaws.com"
}
3. Copy the DNS name in a safe place.You'll be using the DNS name to connect to the load balancer
later in the procedure.You can also later map any other domain name (such as www.example.com)
to your load balancer's DNS name using CNAME or some other technique.
4. If you have assigned the tags, verify that the tags are set for your load balancer.
Enter the describe-tags command by specifying following option:
• load-balancer-name = my-test-loadbalancer
API Version 2012-06-01
83
Elastic Load Balancing Developer Guide
Using the AWS Command Line Interface

Your command should look like the following example:
aws elb describe-tags --load-balancer-name my-test-loadbalancer
Elastic Load Balancing responds with the description of the tags set for your load balancer as in the
following example:
{
"TagDescriptions": [
{
"Tags": [
{
"Value": "digital-media",
"Key": "department"
}
],
"LoadBalancerName": "my-test-loadbalancer"
}
]
}
5. See Step 2: Configure SSL Security Policy (p. 85) for instructions on configuring SSL ciphers.
API Version 2012-06-01
84
Elastic Load Balancing Developer Guide
Using the AWS Command Line Interface

Step 2: Configure SSL Security Policy
Elastic Load Balancing provides you with security policies that have predefined SSL negotiation configur-
ations you can use for your load balancer.You can either select one of the predefined security policies,
or you can create your own custom security policy by specifying the SSL protocols, ciphers, and, optionally,
enabling the server order preference. For more information about the security policies, see SSL Negotiation
Configurations for Elastic Load Balancing (p. 55).
Note
When you create your load balancer, by default, Elastic Load Balancing associates the latest
version of the predefined security policy with your load balancer.We highly recommend that you
use the default setting provided by Elastic Load Balancing to negotiate SSL connection.
To verify that your newly created load balancer is associated with the predefined security
policy
• Enter the describe-load-balancers command with the following option:
• load-balancer-name = my-test-loadbalancer
Your command should look like in the following example.
aws elb describe-load-balancers --load-balancer-name my-test-loadbalancer
Elastic Load Balancing responds as in the following example.
{
"LoadBalancerDescriptions": [
{
"Subnets": [],
"CanonicalHostedZoneNameID": "Z3DZXE0Q79N41H",
"CanonicalHostedZoneName": "my-test-loadbalancer-012345678.us-
east-1.elb.amazonaws.com",
"ListenerDescriptions": [
{
"Listener": {
"InstancePort": 443,
"SSLCertificateId": "arn:aws:iam::55555555555:server-
certificate/production/myservercert",
"LoadBalancerPort": 443,
"Protocol": "HTTPS",
"InstanceProtocol": "HTTPS"
},
"PolicyNames": [
"ELBSecurityPolicy-2014-10"
]
},
{
"Listener": {
"InstancePort": 80,
"LoadBalancerPort": 80,
"Protocol": "HTTP",
"InstanceProtocol": "HTTP"
},
"PolicyNames": []
}
API Version 2012-06-01
85
Elastic Load Balancing Developer Guide
Using the AWS Command Line Interface

],
"HealthCheck": {
"HealthyThreshold": 10,
"Interval": 30,
"Target": "HTTP:80/",
"Timeout": 5,
"UnhealthyThreshold": 2
},
"BackendServerDescriptions": [],
"Instances": [],
"DNSName": "my-test-loadbalancer-012345678.us-east-
1.elb.amazonaws.com",
"SecurityGroups": [],
"Policies": {
"LBCookieStickinessPolicies": [],
"AppCookieStickinessPolicies": [],
"OtherPolicies": [
"ELBSecurityPolicy-2014-10"
]
},
"LoadBalancerName": "my-test-loadbalancer",
"CreatedTime": "2014-10-19T03:24:02.650Z",
"AvailabilityZones": [
"us-east-1a"
],
"Scheme": "internet-facing",
"SourceSecurityGroup": {
"OwnerAlias": "amazon-elb",
"GroupName": "amazon-elb-sg"
}
}
]
}
You can see that ELBSecurityPolicy-2014-10 is enabled for the load balancer port 443. This is the
latest version of the predefined security policy provided by Elastic Load Balancing. For information about
the current configuration of the predefined security policy associated with your load balancer and of all
the other security policies, see SSL Security Policy Table (p. 56).
This section walks you through the process of changing the default setting and associating your newly
created load balancer with either one of the other predefined security policies or a custom security policy.
Skip this step if you want your load balancer to be associated with the latest version of the predefined
security policy.
The following steps outline how to configure SSL security policy for your load balancer:
1. Get the list of predefined security policies provided by Elastic Load Balancing.
2. Create a SSL negotiation policy either by specifying one of the listed security policies or by creating a
custom security policy by specifying SSL protocols, ciphers and option.
3. Verify that the policy is created.
4. Enable the policy by setting the policy for the load balancer port.
5. Verify that the policy is set for the load balancer port.
API Version 2012-06-01
86
Elastic Load Balancing Developer Guide
Using the AWS Command Line Interface

This example walks you through the process of creating a SSLNegotiationPolicyType policy to use
ELBSecurityPolicy-2014-01.
This example also includes instruction for creating a custom security policy.You can skip step 1 if you
want to create a custom security policy.
To configure SSL security policy
1. Enter the describe-load-balancer-policies command, as in the following example, to list all the security
policies provided by Elastic Load Balancing.
aws elb describe-load-balancer-policies
The response includes the names of all the security policies provided by Elastic Load Balancing. All
the security policy types are SSLNegotiationPolicyType and are used for SSL/HTTPS listeners.
The ELBSecurityPolicy-2014-01 policy uses Server Order Preference to negotiate SSL connections.
For information about the current configuration for all the listed Security Policies, see SSL Security
Policy Table (p. 56).
2. Enter the create-load-balancer-policy command using the following options to create a SSL negotiation
policy either using the predefined security policy ELBSecurityPolicy-2014-01, or the custom security
policy.
In this example, you create a MySSLNegotiationPolicy of the type SSLNegotiationPolicyType
for your load balancer my-test-loadbalancer.
Use the following options to create a SSL negotiation policy using the security policy - ELB-
SecurityPolicy-2014-01:
• policy-name = MySSLNegotiationPolicy
• policy-type-name = SSLNegotiationPolicyType
• policy-attributes
• AttributeName = Reference-Security-Policy
• AttributeValue = ELBSecurityPolicy-2014-01
• load-balancer-name = my-test-loadbalancer
Your command should look like the following example:
aws elb create-load-balancer-policy --load-balancer-name my-test-loadbalancer
--policy-name MySSLNegotiationPolicy --policy-type-name SSLNegotiation
Policy
Type --policy-attributes AttributeName=Reference-Security-Policy,Attribute
Value=
ELBSecurityPolicy-2014-01
Or, use the following options to create a custom security policy by enabling the protocols
and ciphers that meet your requirements:
Note
You must enable at least one protocol and one cipher.You only need to set to true the
attributes that you want enabled.
The DSA and RSA ciphers are specific to the signing algorithm and are used to create the
SSL certificate. If you already have your SSL certificate, make sure to enable the cipher
that was used to create your certificate.
Your custom policy name must not contain the prefixes - ELBSecurityPolicy- and ELB-
Sample-.These prefixes are used by Elastic Load Balancing for its predefined security
API Version 2012-06-01
87
Elastic Load Balancing Developer Guide
Using the AWS Command Line Interface

policy names. If Elastic Load Balancing reads this prefix in your custom security policy name,
it will throw an error.
• policy-name = MySSLNegotiationPolicy
• policy-type-name = SSLNegotiationPolicyType
• attributes
• AttributeName = ProtocolTLSv1.2
• AttributeValue = true
• AttributeName = ProtocolTLSv1.1
• AttributeValue = true
• AttributeName = DHE-RSA-AES256-SHA256
• AttributeValue = true
• [optional] AttributeName = Server-Defined-Cipher-Order
• [optional] AttributeValue = true
Note
Enable Server-Defined-Cipher-Order if you want to use Server Order Preference
(the order listed in the SSL Security Policy Table (p. 56)) for SSL negotiation.
• load-balancer-name = my-test-loadbalancer
Your command should look like in the following example.
aws elb create-load-balancer-policy --load-balancer-name my-test-loadbalancer
--policy-name MySSLNegotiationPolicy --policy-type-name SSLNegotiationPoli
cyType
--policy-attributes AttributeName=Protocol-TLSv1.2,AttributeValue=true
AttributeName=Protocol-TLSv1.1,AttributeValue=true AttributeName=DHE-RSA-
AES256-SH
A256,AttributeValue=true AttributeName=Server-Defined-Cipher-Order,Attrib
uteValue=true
3. Enter the describe-load-balancer-policies command with the following options to verify that the policy
is created.
• load-balancer-name = my-test-loadbalancer
• --policy-names = MySSLNegotiationPolicy
Your command should look like in the following example.
aws elb describe-load-balancer-policies --load-balancer-name my-test-load
balancer --policy-name MySSLNegotiationPolicy
The response includes the description of the MySSLNegotiationPolicy.
4. Enter the set-load-balancer-policies-of-listener command with the following options to enable your
newly created policy on the load balancer port 443:
• load-balancer-port = 443
• policy-names = MySSLNegotiationPolicy
• load-balancer-name = my-test-loadbalancer
API Version 2012-06-01
88
Elastic Load Balancing Developer Guide
Using the AWS Command Line Interface

Your command should look like in the following example.
aws elb set-load-balancer-policies-of-listener --load-balancer-name my-test-
loadbalancer --load-balancer-port 443 --policy-names MySSLNegotiationPolicy
5. Enter the describe-load-balancers command with the following option to verify that the new policy is
enabled for the load balancer port.
• load-balancer-name = my-test-loadbalancer
Your command should look like in the following example.
aws elb describe-load-balancers --load-balancer-name my-test-loadbalancer
Elastic Load Balancing responds as in the following example.
{
"LoadBalancerDescriptions": [
{
"Subnets": [],
"CanonicalHostedZoneNameID": "Z3DZXE0Q79N41H",
"CanonicalHostedZoneName": "my-test-loadbalancer-34503258.us-
east-1a.elb.amazonaws.com",
"ListenerDescriptions": [
{
"Listener": {
"InstancePort": 443,
"SSLCertificateId": "arn:aws:iam::55555555555:server-
certificate/myservercert",
"LoadBalancerPort": 443,
"Protocol": "HTTPS",
"InstanceProtocol": "HTTPS"
},
"PolicyNames": [
"MySSLNegotiationPolicy"
]
},
{
"Listener": {
"InstancePort": 80,
"LoadBalancerPort": 80,
"Protocol": "HTTP",
"InstanceProtocol": "HTTP"
},
"PolicyNames": []
}
],
"HealthCheck": {
"HealthyThreshold": 10,
"Interval": 30,
"Target": "HTTP:80/",
"Timeout": 5,
"UnhealthyThreshold": 2
},
"BackendServerDescriptions": [],
API Version 2012-06-01
89
Elastic Load Balancing Developer Guide
Using the AWS Command Line Interface

"Instances": [],
"DNSName": "my-test-loadbalancer-012345678.us-east-
1.elb.amazonaws.com",
"SecurityGroups": [],
"Policies": {
"LBCookieStickinessPolicies": [],
"AppCookieStickinessPolicies": [],
"OtherPolicies": [
"ELBSecurityPolicy-2014-01",
"MySSLNegotiationPolicy"
]
},
"LoadBalancerName": "my-test-loadbalancer",
"CreatedTime": "2014-03-19T03:24:02.650Z",
"AvailabilityZones": [
"us-east-1a"
],
"Scheme": "internet-facing",
"SourceSecurityGroup": {
"OwnerAlias": "amazon-elb",
"GroupName": "amazon-elb-sg"
}
}
]
}
You can see that MySSLNegotiationPolicy is enabled for the load balancer port 443.
6. See Step 3: Configure Backend Server Authentication (p. 91) for instructions on configuring back-
end server authentication.
API Version 2012-06-01
90
Elastic Load Balancing Developer Guide
Using the AWS Command Line Interface

Step 3: Configure Backend Server Authentication
If you have HTTPS/SSL on the back-end connection, you can choose to enable authentication on your
back-end instance. This authentication can be used to ensure that back-end instances accept only en-
crypted communication and to ensure that the back-end instance has the correct certificates.
Skip this step if you do not want to enable the back-end server authentication.
In this example, you enable the back-end server authentication by creating a public key policy that uses
a public key for authentication.You then use the public key policy to create a back-end server authentic-
ation policy. Finally, you enable the back-end server authentication by setting the back-end server authen-
tication policy with the back-end server port. In this example, the back-end server is listening with
SSL/HTTPS protocol set to instance port 443.
The value of the public key policy is the public key of the certificate that the back-end servers will present
to the load balancer.You can retrieve the public key using OpenSSL.
To configure back-end server authentication
1. Enter the openssl x509 command to retrieve the public key.
openssl x509 -in your X509 certificate PublicKey -pubkey -noout
2. Enter the create-load-balancer-policy command, as in the following example, to create a public key
policy.
aws elb create-load-balancer-policy --load-balancer-name my-test-loadbalancer
--policy-name MyPublicKeyPolicy --policy-type-name PublicKeyPolicyType --
policy-attributes AttributeName=PublicKey,AttributeValue=
MIICiTCCAfICCQD6m7oRw0uXOjANBgkqhkiG9w0BAQUFADCBiDELMAkGA1UEBhMC
VVMxCzAJBgNVBAgTAldBMRAwDgYDVQQHEwdTZWF0dGxlMQ8wDQYDVQQKEwZBbWF6
b24xFDASBgNVBAsTC0lBTSBDb25zb2xlMRIwEAYDVQQDEwlUZXN0Q2lsYWMxHzAd
BgkqhkiG9w0BCQEWEG5vb25lQGFtYXpvbi5jb20wHhcNMTEwNDI1MjA0NTIxWhcN
MTIwNDI0MjA0NTIxWjCBiDELMAkGA1UEBhMCVVMxCzAJBgNVBAgTAldBMRAwDgYD
VQQHEwdTZWF0dGxlMQ8wDQYDVQQKEwZBbWF6b24xFDASBgNVBAsTC0lBTSBDb25z
b2xlMRIwEAYDVQQDEwlUZXN0Q2lsYWMxHzAdBgkqhkiG9w0BCQEWEG5vb25lQGFt
YXpvbi5jb20wgZ8wDQYJKoZIhvcNAQEBBQADgY0AMIGJAoGBAMaK0dn+a4GmWIWJ
21uUSfwfEvySWtC2XADZ4nB+BLYgVIk60CpiwsZ3G93vUEIO3IyNoH/f0wYK8m9T
rDHudUZg3qX4waLG5M43q7Wgc/MbQITxOUSQv7c7ugFFDzQGBzZswY6786m86gpE
Ibb3OhjZnzcvQAaRHhdlQWIMm2nrAgMBAAEwDQYJKoZIhvcNAQEFBQADgYEAtCu4
nUhVVxYUntneD9+h8Mg9q6q+auNKyExzyLwaxlAoo7TJHidbtS4J5iNmZgXL0Fkb
FFBjvSfpJIlJ00zbhNYS5f6GuoEDmFJl0ZxBHjJnyp378OD8uTs7fLvjx79LjSTb
NYiytVbZPQUQ5Yaxu2jXnimvw3rrszlaEXAMPLE=
Note
To specify a public key value for the policy-attributes argument, remove the first and
last lines of the public key (the line containing "-----BEGIN PUBLIC KEY-----" and the
line containing "-----END PUBLIC KEY-----").The AWS CLI does not accept white
space characters inside the value for the policy-attributes argument.
3. Enter the create-load-balancer-policy command as in the following example, to create a back-end
server authentication policy by referring to MyPublicKeyPolicy.You can refer to multiple public
key policies.When multiple public key policies are used, the load balancer will try all the keys one
API Version 2012-06-01
91
Elastic Load Balancing Developer Guide
Using the AWS Command Line Interface

by one for authentication. If one of the public keys matches the server certificate, authentication
passes.
aws elb create-load-balancer-policy --load-balancer-name my-test-loadbalancer
--policy-name MyBackendServerAuthenticationPolicy --policy-type-name
BackendServerAuthenticationPolicyType --policy-attributes AttributeName=Pub
licKeyPolicyName,AttributeValue=MyPublicKeyPolicy
4. Enter the set-load-balancer-policies-for-backend-server command as in the following example to set
MyBackendServerAuthenticationPolicy to the instance (back-end server) port.
aws elb set-load-balancer-policies-for-backend-server --load-balancer-name
my-test-loadbalancer --instance-port 443 --policy-names MyBackendServerAu
thenticationPolicy
5. Enter the describe-load-balancer-policies command as in the following example, to list all the policies
created for my-test-loadbalancer.
aws elb describe-load-balancer-policies --load-balancer-name my-test-load
balancer
6. Enter the describe-load-balancer-policies command as in the following example, to view details of
MyBackendServerAuthenticationPolicy.
aws elb describe-load-balancer-policies --load-balancer-name my-test-load
balancer --policy-names MyBackendServerAuthenticationPolicy
7. See Step 4: Configure Health Check (p. 93) for instructions on configuring health check for your
application instances.
API Version 2012-06-01
92
Elastic Load Balancing Developer Guide
Using the AWS Command Line Interface

Step 4: Configure Health Check
Elastic Load Balancing routinely checks the health of each registered Amazon EC2 instance based on
the configurations that you specify. If Elastic Load Balancing finds an unhealthy instance, it stops sending
traffic to the instance and reroutes traffic to healthy instances. For more information on Elastic Load Bal-
ancing health check, see Health Check (p. 7).
When you create your load balancer, Elastic Load balancing configures the health check of your back-
end instances with default settings.You can change the default health check configurations at any time.
In this example, you configure the health check settings for your back-end instances.
Skip this step if you want to leave the health check configuration of your back-end instances set to default
settings.
To configure health check settings for your back-end instance
1. Enter the configure-health-check command as in the following example.
aws elb configure-health-check --load-balancer-name my-test-loadbalancer -
-health-check Target=HTTP:80/png,Interval=30,Un
healthyThreshold=2,HealthyThreshold=2,Timeout=3
Elastic Load Balancing returns the following:
{
"HealthCheck": {
"HealthyThreshold": 2,
"Interval": 30,
"Target": "HTTP:80/png",
"Timeout": 3,
"UnhealthyThreshold": 2
}
2. See Step 5: Register EC2 Instances (p. 94) for instructions to register your EC2 instances.
API Version 2012-06-01
93
Elastic Load Balancing Developer Guide
Using the AWS Command Line Interface

Step 5: Register EC2 Instances
After you create your load balancer, you have to register your EC2 instances with the load balancer.Your
EC2 instances can be within a single Availability Zone or span multiple Availability Zones within a region.
For more information on configuring EC2 instances you plan to register with your load balancer, see
Configuring EC2 Instances for Load Balancing (p. 7).
In this example, you register your newly created load balancer with your Amazon EC2 instances.
Important
You should only register instances that are in the Pending or Running state and are not in a
Virtual Private Cloud (VPC). If you are using Elastic Load Balancing in a VPC, see Elastic Load
Balancing in Amazon VPC (p. 113).
To register Amazon EC2 instances
1. Enter the register-instances-with-load-balancer command as in the following example.
aws elb register-instances-with-load-balancer --load-balancer-name my-test-
loadbalancer --instances i-4f8cf126 i-0bb7ca62
Elastic Load Balancing returns the following:
{
"Instances": [
{
"InstanceId": "i-4f8cf126"
},
{
"InstanceId": "i-0bb7ca62"
}
]
}
2. See Step 6: Verify Instances (p. 95) to verify that the load balancer is launched.
API Version 2012-06-01
94
Elastic Load Balancing Developer Guide
Using the AWS Command Line Interface

Step 6:Verify Instances
In this example, you check the state of your newly registered Amazon EC2 instances.Your load balancer
is usable as soon as any one of your registered EC2 instance is in InService state.
1. To check the state of your newly registered Amazon EC2 instances
Enter the describe-instance-health command as in the following example.
aws elb describe-instance-health --load-balancer-name my-test-loadbalancer
--instances i-4f8cf126 i-0bb7ca62
Elastic Load Balancing returns the following:
{
"InstanceStates": [
{
"InstanceId": "i-4f8cf126",
"ReasonCode": "N/A",
"State": "InService",
"Description": "N/A"
},
{
"InstanceId": "i-0bb7ca62",
"ReasonCode": "Instance",
"State": "OutOfService",
"Description": "Instance registration is still in progress"
}
]
}
2. If the State field of some or all of your instances display OutOfService, it's probably because your
instances are still registering. For more information, see Troubleshooting Elastic Load Balancing:
Registering Instances (p. 262).
3. You can test your load balancer after you have verified that at least one of your EC2 instances is
InService.To test your load balancer, copy the DNS Name of your load balancer that you got after
you completed the Step 1: Configure Listeners (p. 82) task, and paste it into the address field of an
Internet-connected web browser. If your load balancer is working, you will see the default page of
your HTTP server.
API Version 2012-06-01
95
Elastic Load Balancing Developer Guide
Using the AWS Command Line Interface

Add or Remove Availability Zones for Your Load
Balanced Application
Elastic Load Balancing provides you with option to add or remove Availability Zones for your load balancer
at any time. After you add an Availability Zone, the load balancer starts routing traffic to the instances in
the added zone. When you remove an Availability Zone from your load balancer, the load balancer stops
routing traffic to the instances in the removed Availability Zone. For more information, see Availability
Zones and Regions (p. 5).
This section walks you through the process for adding or removing Availability Zones for your load balancer.
Topics
• Add Availability Zone (p. 96)
• Remove Availability Zone (p. 99)
Add Availability Zone
In this tutorial, you expand your EC2 application to run in an additional Availability Zone (us-east-1b).
To do so, you first register the instances in the Availability Zone us-east-1b with the load balancer.
Preconditions:
• You have deployed a load balancer in Availability Zone us-east-1a as in Create a HTTPS/SSL Load
Balancer (p. 72).
• In Availability Zone us-east-1b, you have launched the instances you intend to register with your load
balancer.
The following sections include instructions for adding an Availability Zone to your load balancer using the
AWS Management Console, the AWS command line interface (AWS CLI), or the Query API.
Topics
• Using the AWS Management Console (p. 96)
• Using the AWS Command Line Interface (p. 97)
• Using Query API (p. 98)
Using the AWS Management Console
It is important to first register the instances in the new Availability Zone with your load balancer before
adding the Availability Zone.
To add Availability Zone to your load balancer
1. Sign in to the AWS Management Console and open the Amazon EC2 console at https://con-
sole.amazonaws.cn/ec2/.
2. On the Amazon EC2 console Resources page, in the EC2 Dashboard pane, under NETWORK &
SECURITY, click Load Balancers.
3. On the Load Balancers page, select your load balancer.
4. The bottom pane displays the details of your load balancer. Click the Instances tab.
5. Register the instances launched in the new Availability Zone with your load balancer
a. In the Instances pane, click Edit Instances.
API Version 2012-06-01
96
Elastic Load Balancing Developer Guide
Add or Remove Availability Zones

b. In the Add and Remove Instances page, select the instances you just launched in us-east-
1b.
c. Click Save.The newly registered instances appear in the instance list.
6. Enable the new Availability Zone
a. In the bottom pane, make sure your newly added Availability Zone appears in the list. Click Edit
Availability Zones.
b. In the Add and Remove Availability Zones page, make sure your new Availability Zone us-
east-1b is selected. If not, select it now.
c. Click Save.
Using the AWS Command Line Interface
Before you get started make sure that you have installed and configured your AWS CLI environment. For
more information, see Getting Set Up with the AWS Command Line Interface.
It is important to register instances in the new Availability Zone with your load balancer before adding the
Availability Zone. After you add the Availability Zone, the load balancer begins to route traffic to all the
enabled Availability Zones.
1. To add a new Availability Zone to your load balancer
Enter the register-instances-with-load-balancer command as in the following example by specifying
your load balancer name and the instance IDs of the instances launched in the new Availability Zone.
aws elb register-instances-with-load-balancer --load-balancer-name my-test-
loadbalancer --instances i-3a8cf324, i-2603ca33
Elastic Load Balancing returns the following:
{
"Instances": [
{
"InstanceId": "i-4f8cf126"
},
{
"InstanceId": "i-0bb7ca62"
},
{
"InstanceId": "i-3a8cf324"
},
{
"InstanceId": "i-2603ca33"
}
]
}
2. Enter the describe-instance-health command as in the following example to verify if the newly added
instances are registered with the load balancer.
API Version 2012-06-01
97
Elastic Load Balancing Developer Guide
Add Availability Zone

aws elb describe-instance-health --load-balancer-name my-test-loadbalancer
--instances i-3a8cf324,i-2603ca33
Elastic Load Balancing returns the following:
{
"InstanceStates": [
{
"InstanceId": "i-3a8cf324",
"ReasonCode": "N/A",
"State": "InService",
"Description": "N/A"
},
{
"InstanceId": "i-2603ca33",
"ReasonCode": "Instance",
"State": "OutOfService",
"Description": "Instance registration is still in progress"
}
]
}
3. If the instance state description shows Instance registration is still in progress, it
means that Elastic Load Balancing is checking the health state of the instances.You can proceed
to add the new Availability Zone while the health check is underway.
Enter the enable-availability-zones-for-load-balancer command as in the following example.
aws elb enable-availability-zones-for-load-balancer --load-balancer-name
my-test-loadbalancer --availability-zones us-east-1b
Elastic Load Balancing returns a list of availability zones enabled for the load balancer as in the fol-
lowing example:
{
"AvailabilityZones": [
"us-east-1a",
"us-east-1b"
]
}
Using Query API
It is important to register instances in the new Availability Zone with your load balancer before adding the
Availability Zone. After you add the Availability Zone, the load balancer begins to route traffic to all the
enabled Availability Zones.
1. To add a new Availability Zone to your load balancer
Call the RegisterInstancesWithLoadBalancer action with the following parameters:
• LoadBalancerName = my-test-loadbalancer
• Instances = [i-3a8cf324, i-2603ca33]
API Version 2012-06-01
98
Elastic Load Balancing Developer Guide
Add Availability Zone

2. Call the DescribeInstanceHealth action with the following parameters.
• LoadBalancerName = my-test-loadbalancer
• Instances = i-3a8cf324, i-2603ca33
3. When the instances from the previous step are in the OutOfService state, you can proceed to the
next step. Call the EnableAvailabilityZonesForLoadBalancer action with the following
parameters:
• LoadBalancerName = my-test-loadbalancer
• AvailabilityZones.member.1 = us-east-1b
The operation returns the updated list of Availability Zones enabled for your load balancer.
Remove Availability Zone
When you remove an Availability Zone from your load balancer, the load balancer stops routing traffic to
the removed zone. Some of the common use cases where you might want to remove an Availability Zone
from your load balancer is when there are no healthy instances in the zone, when you are experiencing
a temporary decrease in traffic, when you want to troubleshoot or update your instances in the zone, or
when you want to permanently remove that zone from your load balancer.
In this tutorial, you remove the Availability Zone us-east-1a from your MyLoadBalancer load balancer.
Note
The instances launched in an Availability Zone will continue to be registered with your load bal-
ancer after you remove the Availability Zone from the load balancer. Follow the instructions in
Deregister and Register Amazon EC2 Instances (p. 145) if you want to deregister the instances
after you have removed the Availability Zone.
This tutorial assumes that you have an HTTP load balancer enabled in Availability Zones us-east-1a
and us-east-1b.
The following sections include instructions for removing an Availability Zone from your load balancer using
the AWS Management Console, the AWS command line interface (AWS CLI), or the Query API.
Topics
• Using the AWS Management Console (p. 99)
• Using the AWS Command Line Interface (p. 100)
• Using Query API (p. 100)
Using the AWS Management Console
To remove Availability Zone from your load balancer
1. Sign in to the AWS Management Console and open the Amazon EC2 console at https://con-
sole.amazonaws.cn/ec2/.
2. On the Amazon EC2 console Resources page, in the EC2 Dashboard pane, under NETWORK &
SECURITY, click Load Balancers.
3. On the Load Balancers page, select your load balancer.
4. The bottom pane displays the details of your load balancer. Click the Instances tab.
API Version 2012-06-01
99
Elastic Load Balancing Developer Guide
Remove Availability Zone

5. In the Instances pane, in the Edit Availability Zones table, identify the row that lists the Availability
Zone. , click .
6. In the Actions column of the identified row, click Remove from Load Balancer.
Using the AWS Command Line Interface
To remove an availability zone from your load balancer,
• Enter the disable-availability-zones-for-load-balancer command as in the following example.
aws elb disable-availability-zones-for-load-balancer --load-balancer-name
my-test-loadbalancer --availability-zones us-east-1a
Elastic Load Balancing returns an updated list of Availability Zones enabled for your load balancer.
{
"AvailabilityZones": [
"us-east-1b"
]
}
Using Query API
To remove an availability zone from your load balancer,
• Call the DisableAvailabilityZonesForLoadBalancer action with the following parameters:
• LoadBalancerName = my-test-loadbalancer
• AvailabilityZones.member.1 = us-east-1a
The operation returns the updated list of Availability Zones enabled for your load balancer.
API Version 2012-06-01
100
Elastic Load Balancing Developer Guide
Remove Availability Zone

Manage Security Groups in Amazon EC2-Classic
A security group acts as a firewall that controls the traffic allowed into a group of instances.When you
launch an Amazon EC2 instance, you can assign it to one or more security groups. For each security
group, you can add rules that govern the allowed inbound traffic to instances in the group. All other inbound
traffic is discarded.You can modify rules for a security group at any time.The new rules are automatically
enforced for all existing and future instances in the group. For information on Amazon EC2 security groups,
go to Using Security Groups.
Elastic Load Balancing provides a special Amazon EC2 source security group that you can use to ensure
that a back-end Amazon EC2 instance receives traffic only from Elastic Load Balancing. This feature in-
volves two security groups—the source security group and a security group that defines the ingress rules
for your back-end instance.To lock down traffic between your load balancer and your back-end instances,
add or modify a rule to your back-end security group that limits ingress traffic so that it can come only
from the Amazon EC2 source security group provided by the Elastic load Balancing.
Locking down traffic between Elastic Load Balan-
cing and back-end Amazon EC2 instance
In this section, we will walk you through the process for locking down the traffic between your load balancer
and your back-end Amazon EC2 instances.
Before you continue, be sure you’ve read Security Group Concepts section in the Amazon EC2 User
Guide.
The following table outlines the steps for locking down the traffic between your load balancer and the
back-end instances.This will be followed by instructions for locking down traffic between your load balancer
and your back-end instances using the AWS Management Console, the AWS command line interface
(AWS CLI), or the Query API.
Steps for locking down the traffic between your load balancer and your back-end instance
Get the name of the source security group provided by Elastic Load Balancing for your load balancer.1
Add a new rule in the security group associated with your Amazon EC2 back-end instances to allow
inbound traffic from your load balancer.
2
Verify that the new rule has been added.3
[optional] Remove the rules in your back-end instance's security group that are less restrictive.4
Topics
• Using the AWS Management Console (p. 101)
• Using the AWS Command Line Interface (AWS CLI) (p. 102)
• Using the Query API (p. 106)
Using the AWS Management Console
1. To get the name of the source security group provided by Elastic Load Balancing for your
load balancer,
a. On the Amazon EC2 console Resources page, in the EC2 Dashboard pane, under NETWORK
& SECURITY, click Load Balancers.
API Version 2012-06-01
101
Elastic Load Balancing Developer Guide
Security Groups

b. On the Load Balancers page, select your load balancer.
c. The bottom pane displays the details of your load balancer.
d. Click the Security tab.
e. Copy the name displayed in the Source Security Group row.This is the source security group
provided by Elastic Load Balancing for your load balancer.
2. To add a rule in the security group of your Amazon EC2 back-end instances to allow incoming
traffic from the Elastic Load Balancing source security group,
a. On the Load Balancers page, click Instances in the Navigation pane.
b. On the My Instances page, select an instance registered with your load balancer.
c. The bottom pane displays details of your instance. Make sure that the Description tab is selected.
d. Make a note of the name of the security group displayed in the Security Groups: field.This is
the security group associated with your back-end instance.
e. Click Security Groups in the Navigation pane.
f. On the Security Groups page, select the security group associated with your back-end instance.
g. The bottom pane displays details of the security group.
h. Click the Inbound tab. The bottom pane of the Inbound tab displays the rules that belong to
the security group.
i. Click Edit and then click Add Rule
j. In the Type column, click the last dialog box and select the protocol type. The fields in the Pro-
tocol and Port Range columns gets populated.
k. Click the Source: field and select Custom IP. In the empty box, type the source security group
name of your load balancer. This should be the same name you used in step 1. In our example
it’s amazon-elb/amazon-elb-sg.
l. Click Save.
3. The bottom pane of the Inbound tab displays the new rule.
4. [optional] If your security group has rules that are less restrictive than the rule you added in step 2,
remove the less restrictive rule by clicking Edit and in the Edit inbound rules page, clicking the
delete icon next in the row that has the less restrictive rule.
Note
If you want to connect directly to your back-end instances, do not delete inbound rules that
allow you to do so. For example, you might have rules that allow inbound traffic on ports 22
(SSH) and 3389 (RDP).
Using the AWS Command Line Interface (AWS CLI)
Before you get started make sure that you have installed and configured your AWS CLI environment. For
more information, see Getting Set Up with the AWS Command Line Interface.
API Version 2012-06-01
102
Elastic Load Balancing Developer Guide
Locking down traffic between Elastic Load Balancing
and back-end Amazon EC2 instance

1. To get the name of the source security group provided by Elastic Load Balancing for your
load balancer,
Enter the describe-load-balancers command as in the following example to display the source security
group name of your load balancer.
aws elb describe-load-balancers --load-balancer-name my-test-loadbalancer
Elastic Load Balancing returns the description of the specified load balancer.
{
"LoadBalancerDescriptions": [
{
"Subnets": [],
"CanonicalHostedZoneNameID": "Z3DZXE0Q79N41H",
"CanonicalHostedZoneName": "my-test-loadbalancer-012345678.us-
east-1.elb.amazonaws.com",
"ListenerDescriptions": [
{
"Listener": {
"InstancePort": 443,
"SSLCertificateId": "arn:aws:iam::55555555555:server-
certificate/myservercert",
"LoadBalancerPort": 443,
"Protocol": "HTTPS",
"InstanceProtocol": "HTTPS"
},
"PolicyNames": [
"ELBSecurityPolicy-2014-01"
]
},
{
"Listener": {
"InstancePort": 80,
"LoadBalancerPort": 80,
"Protocol": "HTTP",
"InstanceProtocol": "HTTP"
},
"PolicyNames": []
}
],
"HealthCheck": {
"HealthyThreshold": 10,
"Interval": 30,
"Target": "HTTP:80/",
"Timeout": 5,
"UnhealthyThreshold": 2
},
"BackendServerDescriptions": [],
"Instances": [
{
"InstanceId": "i-315b7e51"
}
],
"DNSName": "my-test-loadbalancer-012345678.us-east-
1.elb.amazonaws.com",
"SecurityGroups": [],
"Policies": {
API Version 2012-06-01
103
Elastic Load Balancing Developer Guide
Locking down traffic between Elastic Load Balancing
and back-end Amazon EC2 instance

"LBCookieStickinessPolicies": [],
"AppCookieStickinessPolicies": [],
"OtherPolicies": [
"ELBSecurityPolicy-2014-01"
]
},
"LoadBalancerName": "my-test-loadbalancer",
"CreatedTime": "2014-03-19T03:24:02.650Z",
"AvailabilityZones": [
"us-east-1a"
],
"Scheme": "internet-facing",
"SourceSecurityGroup": {
"OwnerAlias": "amazon-elb",
"GroupName": "amazon-elb-sg"
}
}
]
}
The response element includes a SourceSecurityGroup data structure composed of an Owner-
Alias and GroupName.This is the source security group associated with your load balancer. Make
a note of the OwnerAlias and GroupName.You’ll use it in the next step.
2. To add a rule in the security group of your Amazon EC2 back-end instances to allow incoming
traffic from the Elastic Load Balancing source security group,
You will be using the AWS EC2 CLI commands for this step.
a. If you do not know the name of the security group of your back-end instances, enter the describe-
instances command and specify the instance id of your back-end instance as in the following
example.
aws ec2 describe-instances --instance-ids i-315b7e51
The response element includes a SecurityGroups data structure composed of GroupId and
GroupName elements.This is the security group associated with your instance. Make a note of
GroupName.You'll use it in the next step.
b. Enter the authorize-security-group-ingress command to add a rule to the security group associated
with your back-end instance.
In the following example, authorize-security-group-ingress command adds an ingress
rule to your back-end instance's security group (MyTestSecurityGroup) by specifying the
source security group associated with your load balancer.
aws ec2 authorize-security-group-ingress --group-name MyTestSecurityGroup
--source-security-group-name amazon-elb-sg --source-security-group-
owner-id amazon-elb
Amazon EC2 responds as in the following example:
{
"return": "true"
}
API Version 2012-06-01
104
Elastic Load Balancing Developer Guide
Locking down traffic between Elastic Load Balancing
and back-end Amazon EC2 instance

3. To verify that the security group associated with your back-end instance has the new rule
that allows incoming traffic from the Elastic Load Balancing source security group,
Enter describe-security-groups command as in the following example:
aws ec2 describe-security-groups --group-names MyTestSecurityGroup
The response element includes a UserIdGroupPairs data structure that lists the security groups
that are granted permissions to access the instance.
{
"SecurityGroups": [
{
"Description": "My ELB Security Group",
"GroupId": "sg-076e2537",
"OwnerId": "012345678901",
"GroupName": "MyTestSecurityGroup",
"IpPermissionsEgress": [],
"IpPermissions": [
{
"IpRanges": [],
"FromPort": -1,
"IpProtocol": "icmp",
"ToPort": -1,
"UserIdGroupPairs": [
{
"GroupName": "amazon-elb-sg",
"GroupId": "sg-5a9c116a",
"UserId": "amazon-elb"
}
]
},
{
"IpRanges": [],
"FromPort": 1,
"IpProtocol": "tcp",
"ToPort": 65535,
"UserIdGroupPairs": [
{
"GroupName": "amazon-elb-sg",
"GroupId": "sg-5a9c116a",
"UserId": "amazon-elb"
}
]
},
{
"IpRanges": [],
"FromPort": 1,
"IpProtocol": "udp",
"ToPort": 65535,
"UserIdGroupPairs": [
{
"GroupName": "amazon-elb-sg",
"GroupId": "sg-5a9c116a",
"UserId": "amazon-elb"
}
]
API Version 2012-06-01
105
Elastic Load Balancing Developer Guide
Locking down traffic between Elastic Load Balancing
and back-end Amazon EC2 instance

},
. . . . . .
. . . . . .
4. [optional] If your security group has rules that are less restrictive than the rule you added in the pre-
vious step, use the revoke-security-group-ingress command to remove the less restrictive rules. For
example, an existing rule might allow ingress traffic from the CIDR range 0.0.0.0/0 (all IPv4 addresses).
The following example removes a rule that allows TCP traffic from all IPv4 addresses from a security
group named MyTestSecurityGroup.
aws ec2 revoke-security-group-ingress --group-name MyTestSecurityGroup --
protocol tcp --port 80 --cidr 0.0.0.0/0
Amazon EC2 responds as in the following example:
{
"return": "true"
}
Note
If you want to connect directly to your back-end instances, do not revoke ingress rules that
allow you to do so. For example, you might have rules that allow ingress traffic on ports 22
(SSH) and 3389 (RDP).
Using the Query API
1. To get the name of the source security group provided by Elastic Load Balancing for your
load balancer,
a. Call the DescribeLoadBalancers action with the following parameter:
• LoadBalancerNames = my-test-loadbalancer
Elastic Load Balancing responds with the details of your load balancer.
<DescribeLoadBalancersResponse xmlns="http://elasticloadbalancing.amazon
aws.com/doc/2012-06-01/">
<DescribeLoadBalancersResult>
<LoadBalancerDescriptions>
<member>
<SecurityGroups/>
<LoadBalancerName>my-test-loadbalancer</LoadBalancerName>
<CreatedTime>2012-09-28T17:57:27.580Z</CreatedTime>
<HealthCheck>
<Interval>30</Interval>
<Target>HTTP:80/</Target>
<HealthyThreshold>10</HealthyThreshold>
<Timeout>5</Timeout>
<UnhealthyThreshold>2</UnhealthyThreshold>
</HealthCheck>
<ListenerDescriptions>
API Version 2012-06-01
106
Elastic Load Balancing Developer Guide
Locking down traffic between Elastic Load Balancing
and back-end Amazon EC2 instance

<member>
<PolicyNames/>
<Listener>
<Protocol>HTTP</Protocol>
<LoadBalancerPort>80</LoadBalancerPort>
<InstanceProtocol>HTTP</InstanceProtocol>
<InstancePort>80</InstancePort>
</Listener>
</member>
<member>
<PolicyNames>
<member>ELBSecurityPolicy-2014-01</member>
</PolicyNames>
<Listener>
<Protocol>HTTPS</Protocol>
<LoadBalancerPort>443</LoadBalancerPort>
<InstanceProtocol>HTTPS</InstanceProtocol>
<SSLCertificateId>arn:aws:iam::55555555555:server-certific
ate/production/myservercert</SSLCertificateId>
<InstancePort>443</InstancePort>
</Listener>
</member>
</ListenerDescriptions>
<Instances>
<member>
<InstanceId>i-315b7e51</InstanceId>
</member>
</Instances>
<Policies>
<AppCookieStickinessPolicies/>
<OtherPolicies>
<member>ELBSecurityPolicy-2014-01</member>
</OtherPolicies>
<LBCookieStickinessPolicies/>
</Policies>
<AvailabilityZones>
<member>us-east-1a</member>
</AvailabilityZones>
<CanonicalHostedZoneName>my-test-loadbalancer-012345678.us-east-
1.elb.amazonaws.com</CanonicalHostedZoneName>
<CanonicalHostedZoneNameID>Z3DZXE0Q79N41H</CanonicalHostedZone
NameID>
<Scheme>internet-facing</Scheme>
<SourceSecurityGroup>
<OwnerAlias>amazon-elb</OwnerAlias>
<GroupName>amazon-elb-sg</GroupName>
</SourceSecurityGroup>
<DNSName>my-test-loadbalancer-012345678.us-east-1.elb.amazon
aws.com</DNSName>
<BackendServerDescriptions/>
<Subnets/>
</member>
</LoadBalancerDescriptions>
</DescribeLoadBalancersResult>
<ResponseMetadata>
<RequestId>0d7f1256-0b10-11e2-b66c-d3e9bEXAMPLE</RequestId>
</ResponseMetadata>
API Version 2012-06-01
107
Elastic Load Balancing Developer Guide
Locking down traffic between Elastic Load Balancing
and back-end Amazon EC2 instance

</DescribeLoadBalancersResponse>
b. The response element includes a SourceSecurityGroup data structure composed of an
OwnerAlias and GroupName.This is the security group provided by Elastic Load Balancing
for your load balancer. Make a note of the details in the SourceSecurityGroup data structure.
You’ll use it in the next step.
2. To add a rule in the security group of your Amazon EC2 back-end instances to allow incoming
traffic from the Elastic Load Balancing source security group,
a. [optional] If you do not know the name of the security group associated with your back-end in-
stances, call the DescribeInstances, action using the following parameters to find out the name
of the security group associated with your back-end instance.
• InstanceId.1 = i-315b7e51
The response includes a groupSet data structure composed of groupId and groupName
elements.This is the security group associated with your instance. Make a note of groupName.
You'll use it in the next step.
b. Call the AuthorizeSecurityGroupIngress action. Specify your back-end instance's security group
and the source security group associated with your load balancer using the following parameters:
• GroupName = MyTestSecurityGroup
• IpPermissions.1.Groups.1.UserId = amazon-elb
• IpPermissions.1.Groups.1.GroupName = amazon-elb-sg
3. Verify that the security group associated with your back-end instance has the new rule that allows
incoming traffic from the Elastic Load Balancing source security group.
Call the DescribeSecurityGroups action with the following parameters:
• GroupName = MyTestSecurityGroup
The response includes the details of the security group including the newly added rule.
<DescribeSecurityGroupsResponse xmlns="http://ec2.amazonaws.com/doc/2012-
03-01/">
<requestId>a8a2955f-61db-4e5e-b138-e2be7EXAMPLE</requestId>
<securityGroupInfo>
<item>
<ownerId>012345678901</ownerId>
<groupId>sg-076e2537</groupId>
<groupName>MyTestSecurityGroup </groupName>
<groupDescription>This is an example </groupDescription>
<ipPermissions>
<item>
<ipProtocol>tcp</ipProtocol>
<fromPort>0</fromPort>
<toPort>0</toPort>
<groups>
API Version 2012-06-01
108
Elastic Load Balancing Developer Guide
Locking down traffic between Elastic Load Balancing
and back-end Amazon EC2 instance

<item>
<userId>amazon-elb</userId>
<groupId>sg-843f59ed</groupId>
<groupName>amazon-elb-sg</groupName>
</item>
</groups>
<ipRanges/>
</item>
<item>
<ipProtocol>tcp</ipProtocol>
<fromPort>3389</fromPort>
<toPort>3389</toPort>
<groups>
<item>
<userId>amazon-elb</userId>
<groupId>sg-843f59ed</groupId>
<groupName>amazon-elb-sg</groupName>
</item>
</groups>
<ipRanges/>
</item>
<item>
<ipProtocol>tcp</ipProtocol>
<fromPort>22</fromPort>
<toPort>22</toPort>
<groups/>
<ipRanges>
<item>
<cidrIp>0.0.0.0/0</cidrIp>
</item>
</ipRanges>
</item>
<item>
<ipProtocol>tcp</ipProtocol>
<fromPort>80</fromPort>
<toPort>80</toPort>
<groups/>
<ipRanges>
<item>
<cidrIp>0.0.0.0/0</cidrIp>
</item>
</ipRanges>
</item>
</securityGroupInfo>
</DescribeSecurityGroupsResponse>
4. [optional] If your security group has rules that are less restrictive than the rule you added in the pre-
vious step, use the RevokeSecurityGroupIngress action to remove the less restrictive rules. For
example, an existing rule might allow ingress traffic from the CIDR range 0.0.0.0/0 (all IPv4 addresses).
Call the RevokeSecurityGroupIngress action with the following parameters to remove a rule that allows
HTTP traffic from all IPv4 addresses from a security group named MyTestSecurityGroup.
• GroupName = MyTestSecurityGroup
• IpPermissions.1.IpProtocol = tcp
• IpPermissions.1.FromPort = 80
• IpPermissions.1.ToPort = 80
API Version 2012-06-01
109
Elastic Load Balancing Developer Guide
Locking down traffic between Elastic Load Balancing
and back-end Amazon EC2 instance

• IpPermissions.1.IpRanges.1.CidrIp = 0.0.0.0/0
Note
If you want to connect directly to your back-end instances, do not revoke ingress rules that
allow you to do so. For example, you might have rules that allow ingress traffic on ports 22
(SSH) and 3389 (RDP).
API Version 2012-06-01
110
Elastic Load Balancing Developer Guide
Locking down traffic between Elastic Load Balancing
and back-end Amazon EC2 instance

Use IPv6 with Elastic Load Balancing
Elastic Load Balancing supports both Internet Protocol version 6 (IPv6) and Internet Protocol version 4
(IPv4) in EC2-Classic. Clients can connect to your load balancer in EC2-Classic using either IPv4 or IPv6.
Communication between the load balancer and its back-end instances uses only IPv4 (regardless of how
the client communicates with your load balancer).This means that your back-end Amazon EC2 instances
do not need native IPv6 support.
Note
IPv6 support is currently not available for load balancers in Amazon VPC (EC2-VPC).
Elastic Load Balancing provides a public DNS name that combines your load balancer's name and Region.
For example, a load balancer named myLB in the US-East Region might be represented by the DNS
name myLB-1234567890.us-east-1.elb.amazonaws.com.This base public DNS name returns only IPv4
records.
In addition to the base public DNS name, Elastic Load Balancing provides two additional public DNS
names.The first combines the string ipv6 with the name of your load balancer and Region.This might
look like ipv6.myLB-1234567890.us-east-1.elb.amazonaws.com.The ipv6-prefixed DNS name returns
only IPv6 records.The second public DNS name combines the string dualstack with the name of your
load balancer and Region.This might look like dualstack.myLB-1234567890.us-east-1.elb.amazonaws.com.
The dualstack-prefixed DNS name returns both IPv4 and IPv6 records.
Most customers will want to use the dualstack-prefixed DNS name to enable IPv6 support for their load
balancers. Because the dualstack-prefixed DNS name returns both IPv6 and IPv4 records, clients are
able to access the load balancer using either IPv4 or IPv6 as their individual connectivity needs dictate.
The ipv6-prefixed DNS name returns only IPv6 addresses, which means that clients with only IPv4 con-
nectivity will not be able to reach the load balancer if they use the ipv6-prefixed DNS name.
Elastic Load Balancing supports X-Forwarded-For request headers for clients that connect using either
IPv4 or IPv6. If a client connects using IPv6, Elastic Load Balancing inserts the IPv6 address of the client
into the request header. For more information on X-Forwarded-For support, see Terminology and Key
Concepts (p. 4).
Elastic Load Balancing allows you to map DNS names to your load balancer with IPv6 in much the same
way as you map DNS names with IPv4. If you use a CNAME record to map your DNS name to your load
balancer, you can continue to use that method. If you use an Amazon Route 53 hosted zone, you can
use the same Elastic Load Balancing command to create a resource record for both IPv4 and IPv6.
IPv6 and CNAME records for Elastic Load Balan-
cing
If you use a CNAME record to map a DNS name such as www.example.com to your load balancer, you
can use any of the three public DNS names as the alias in a CNAME record. For example, the following
CNAME record maps www.example.com to a load balancer's IPv4 address.
www.example.com CNAME myLB-1234567890.us-east-1.elb.amazonaws.com
The following example maps www.example.com to a load balancer's IPv6 address.
www.example.com CNAME ipv6.myLB-1234567890.us-east-1.elb.amazonaws.com
To handle a mixture of IPv4 and IPv6 address resolution, use the dualstack prefix in your CNAME record.
API Version 2012-06-01
111
Elastic Load Balancing Developer Guide
Internet Protocol version 6 (IPv6)

www.example.com CNAME dualstack.myLB-1234567890.us-east-1.elb.amazonaws.com
IPv6 and Hosted Zones for Elastic Load Balancing
If you use an Amazon Route 53 hosted zone to map a domain name or zone apex to your load balancer,
you can use the elb-associate-route53-hosted-zone command to create resource records that
work with IPv4, IPv6, or both.
To create an IPv4 resource record, specify the value A for the --rr-type parameter.You can also omit
this parameter because its default value is A.
elb-associate-route53-hosted-zone myLB --rr-name example.com --rr-type A --
hosted-zone-id Z123456789 --weight 100
To create an IPv6 resource record, specify the value AAAA for the --rr-type parameter.
elb-associate-route53-hosted-zone myLB --rr-name example.com --rr-type AAAA --
hosted-zone-id Z123456789 --weight 100
To create the equivalent of a dualstack resource record, create a resource record that specifies the value
A for the --rr-type parameter and another resource record that specifies the value AAAA.
elb-associate-route53-hosted-zone myLB --rr-name example.com --rr-type A --
hosted-zone-id Z123456789 --weight 100
elb-associate-route53-hosted-zone myLB --rr-name example.com --rr-type AAAA --
hosted-zone-id Z123456789 --weight 100
For more information about using Amazon Route 53 with Elastic Load Balancing, see Option 2: Create
an Amazon Route 53 Hosted Zone (p. 161).
API Version 2012-06-01
112
Elastic Load Balancing Developer Guide
IPv6 and Hosted Zones for Elastic Load Balancing

Elastic Load Balancing in Amazon
VPC
Amazon Virtual Private Cloud (Amazon VPC) lets you define a virtual networking environment in a private,
isolated section of the Amazon Web Services (AWS) cloud.Within this virtual private cloud, you can
launch AWS resources such as, ELB load balancers and EC2 instances.
This section covers information that is specific to creating and managing your load balancers launched
within Amazon VPC and provide procedural instruction and examples.
To use load balancers to monitor and route traffic to your EC2 instances launched within VPC, you must
create your load balancer within the same VPC as your EC2 instances.
Before you can create your load balancer within a VPC, you must first create a VPC.You define your
Amazon VPC by assigning IP address in the classless inter-domain routing (CIDR) range of your choice
(for example, 10.0.0.0/16). For more information on CIDR and what ‘/16’ means, see Classless Inter-
Domain Routing.
You can create a VPC that spans multiple Availability Zones then add one or more subnets in each
Availability Zone. A subnet in Amazon VPC is a subdivision within an Availability Zone defined by a segment
of the IP address range of the VPC. A subnet resides entirely within the Availability Zone it was created
in.You launch your EC2 instances and load balancers into a subnet you select.
You create a subnet by specifying the CIDR block for the subnet.The CIDR block of a subnet can be the
same as the CIDR block for the VPC (for a single subnet in the VPC), or a subset (to enable multiple
subnets). When you add a new subnet to your VPC, you can optionally set up the routing and security
you want for the subnet.
To enable communication between the Internet and the load balancer in your subnet, you must create
and attach an Internet gateway (IGW) to your VPC. An Internet gateway enables your load balancer
within the subnet to connect to the Internet through the Amazon EC2 network edge. Communication
between the clients and your load balancer and also between the load balancer and your back-end in-
stances uses Internet Protocol version 4 (IPv4). Internet Protocol version 6 (IPv6) is currently not available
for load balancers in Amazon VPC.
API Version 2012-06-01
113
Elastic Load Balancing Developer Guide

Understanding Public and Private Subnets
Each subnet you create is automatically associated with a route table.The route table controls the routing
for the internet. By default, the subnet is associated with a main route table that enables communication
within the VPC.You can change the association of the route table for your subnet at any time.To enable
a subnet to communicate with the Internet, you must associate the subnet's route table with the Internet
gateway.
If a subnet's traffic is routed to an Internet gateway, the subnet is known as a public subnet. If a subnet's
traffic is not routed to an Internet gateway, the subnet is known as a private subnet. Use a public subnet
for load balancer that must be connected to the Internet, and a private subnet for load balancer that need
not be connected to the Internet.
The following figure shows an example of Elastic Load Balancing within Amazon VPC.
In this example, the Availability Zone 1A has load balancer in its own subnet and the EC2 instances in
another subnet.The load balancer is in a public subnet. It means that the traffic from the subnet is routed
to the Internet gateway which allows the load balancer to communicate with the Internet.The EC2 instances
are in a private subnet. It means that the traffic from the subnet is not routed to the Internet gateway.The
EC2 instances in the private subnet cannot communicate with the Internet.
In Availability Zone 1B, the load balancer and the EC2 instances are both in the same public subnet.The
traffic from the subnet is routed to the Internet gateway. Both the load balancer and EC2 instances can
communicate with the Internet.You can configure your VPC architecture either way, depending on your
specific security and routing requirements.
If you are planning on creating more than one subnets in your VPC, be sure to configure the security
group rules and network ACLs to allow traffic to be routed between the subnets in your VPC. If your rules
are not configured correctly, instances in other subnets may not be reachable by load balancer nodes in
a different subnet.
API Version 2012-06-01
114
Elastic Load Balancing Developer Guide
Understanding Public and Private Subnets

Security for Your Load Balancers and Instances
in Amazon VPC
A security group acts as a virtual firewall that controls the traffic allowed into an instance.You create se-
curity group by adding a set of rules that control the inbound traffic to instances, and a separate set of
rules that control the outbound traffic.There is a significant difference between the way the security groups
function on Amazon VPC and Amazon EC2. In Amazon EC2, Elastic Load Balancing provides a special
Amazon EC2 source security group that you can use to ensure that a back-end Amazon EC2 instance
receives traffic only from the ELB load balancers.You cannot modify the source security group.Within
Amazon VPC, you have control over the security groups assigned to your load balancer. Having control
over your load balancer's security groups allows you to choose the ports and protocols to accept. For
example, in Amazon VPC you can open Internet Control Message Protocol (ICMP) connections for the
load balancer to respond to ping requests (however, ping requests will not be forwarded to any registered
instances). When creating your load balancer if you don't specify a particular security group, your load
balancer automatically belongs to the VPC's default security group.
See Also
• What is Default VPC? (p. 115)
• Internet-facing and Internal Load Balancers (p. 116)
• Configure Amazon VPC for Elastic Load Balancing (p. 118)
What is Default VPC?
If your AWS account comes with a default virtual private cloud (default VPC), your instances are launched
within the default VPC, by default, unless you specify a subnet from a nondefault VPC. For more inform-
ation, see Detecting Your Supported Platforms and Whether You Have a Default VPC.
A default VPC combines the benefits of the advanced networking features provided by Amazon VPC
platform (EC2-VPC) with the ease of use of the Amazon Elastic Compute Cloud platform (EC2-Classic).
Your default VPC automatically comes with a default subnet in each Availability Zone, an Internet Gateway
connected to your default VPC, and a default security group associated with your default VPC, among
other default configurations. For more information on default VPC and Subnets, see Your Default VPC
and Subnets.
When you launch your EC2 instances within default VPC without specifying a subnet, it is automatically
launched into a default subnet in your default VPC. By default, we select an Availability Zone for you and
launch the instance into the corresponding subnet for that Availability Zone. Alternatively, you can select
the Availability Zone for your instance by selecting its corresponding default subnet.
To load balance your EC2 instances launched in default VPC, you have to create your load balancers
within your default VPC.When you create a load balancer within default VPC, Elastic Load Balancing
automatically creates a security group by defining the ports specified for the load balancer to be opened.
If you are using the AWS Management Console to create your load balancer with default VPC, you can
choose the default VPC security group associated with your default VPC, choose any other pre-existing
security group associated with your AWS account, or modify the existing security group to create a new
one. If you choose a non-default pre-existing security group, ensure that it allows ingress to the ports that
you configured the load balancer to use. If you choose to create a security group, the console will define
these ports to be open for you.
API Version 2012-06-01
115
Elastic Load Balancing Developer Guide
Security for Your Load Balancers and Instances in
Amazon VPC

The security group you create using the AWS Management Console is associated with your load balancer.
You cannot delete the security group as long as it is associated with a load balancer.
If you are using the Elastic Load Balancing command line interface (CLI) or the Query API to create your
load balancer within your default VPC, a default security group; default_elb_special number will be
created for 0.0.0.0/0 with the ports specified for the load balancer. Currently, Elastic Load Balancing does
not support the option to choose a security group to associate with your load balancer when you use
either the CLI or the Query API.
A security group created for your load balancer within default VPC using either the CLI or the Query API
is associated with your AWS account. Only one security group will be created per AWS account. Sub-
sequent calls to create new load balancers will re-use the same security group. If you add listeners to an
existing load balancer, you will need to review the security groups that are applied to the load balancer;
otherwise, traffic may not reach the load balancer. If you create a load balancer that uses this default
security group and the new load balancer has a different listener configuration, you will need to review
and update the security groups that are applied to the load balancer.
If you are using the CLI to create a load balancer for your EC2 instances in default VPC, you can see the
security group associated with your load balancer by using the -show-long option with elb-describe-
lbs command.The load balancer security group is listed as SOURCE_SECURITY_GROUP in the CLI output
and the query response.This security group can be used to limit ingress to your instance from only the
selected security group.
Whether you are using the console, CLI, or the Query API, if you update the listeners of your load balancer
within default VPC, the security groups associated with the load balancer will not change. If you delete
your load balancer, the security group will not be deleted automatically.
For information on creating a basic load balancer for your EC2 instances within default VPC, see Create
a Basic Load Balancer in Default VPC (p. 41).
Internet-facing and Internal Load Balancers
When you create your load balancer in VPC, you can make your load balancer internal (private) or Internet-
facing (public).When you make your load balancer internal, a DNS name will be created, and it will contain
the private IP address of the load balancer. Internal load balancer is not exposed to the internet. When
you make your load balancer Internet-facing, a DNS name will be created with the public IP address.The
DNS records are publicly resolvable in both cases.
By combining both internal and Internet-facing load balancers, you can balance requests between multiple
tiers of your application. For example, let us say you have web servers at your front-end that takes requests
from the internet and passes it on to your back-end application instances.You can create an internal load
balancer in your VPC and then place your back-end application instances behind the internal load balancer.
You can create an Internet-facing load balancer with the DNS name and public IP address and place it
in front of your web server.Your web server will take requests coming from the Internet-facing load bal-
ancer and will make requests to the internal load balancer, using private IP addresses that are resolved
from the internal load balancer’s DNS name.The internal load balancer will route requests to the back-
end application instances, which are also using private IP addresses and only accept requests from the
internal load balancer.With this multi-tier architecture, all your infrastructure can use private IP addresses
and security groups so that the only part of your architecture that has public IP address is the Internet-
facing load balancer.
For an Internet-facing load balancer to be connected to the Internet, the load balancer must reside in a
subnet that is connected to the Internet using the Internet gateway.The application instances behind the
load balancer do not need to be in the same subnet as the load balancer.
The following diagram shows Elastic Load Balancing within Amazon VPC combining both Internet-facing
and internal load balancers.
API Version 2012-06-01
116
Elastic Load Balancing Developer Guide
Internet-facing and Internal Load Balancers

API Version 2012-06-01
117
Elastic Load Balancing Developer Guide
Internet-facing and Internal Load Balancers

Configure Amazon VPC for Elastic Load Balan-
cing
To create and use ELB load balancers within Amazon VPC, you have to first configure your VPC envir-
onment by creating a VPC, creating one or more subnets, and then launch your instances in the subnets.
Here are some tips on configuring your VPC and subnets for Elastic Load Balancing.
• Create your Amazon VPC with an Internet Gateway in the region where you want to launch your in-
stances and load balancer.
• If you are a new customer or if you are using the region you have not previously used, you are likely
to get a default VPC, by default.You can either use the default VPC or create your own.
• Create subnets in each Availability Zone in which you want to launch your instances. Depending on
your use case, your security and operational requirements, the subnets where you want to launch your
instances can either be a private subnet or a public subnet.
Instances launched in a private subnet cannot communicate with the Internet. If you want your instances
in private subnet to have outbound internet access only, place a network address translation (NAT)
instance in a public subnet. A NAT instance enables instances in the private subnet to initiate outbound
traffic to the Internet, but prevents them from receiving inbound traffic.
• You can optionally create a separate subnet for your load balancer.Your instances do not need to be
in the same subnet that has your load balancer. If you plan to place your load balancer and your back-
end instances in separate subnets, make sure to configure the security group rules and network ACLs
to allow traffic to be routed between the subnets in your VPC. If your rules are not configured correctly,
instances in other subnets may not be reachable by the load balancer in a different subnet.
To ensure that your load balancer can scale properly, make sure that the subnet in which you plan to
place your load balancer has CIDR block of at least a /27 bitmask (e.g., 10.0.0.0/27) and also has at
least 8 free IP addresses.When you create your load balancer and place it in a subnet, this defines
the subnet that traffic must enter to forward the request to registered instances.
Important
If you are creating an Internet-facing load balancer, make sure to place your load balancer in
a public subnet. After you create the public subnet, make sure to associate the route table of
your public subnet with the Internet gateway to enable your load balancer in the subnet to
connect with the Internet.
The most common VPC scenarios are documented in the Scenarios for Amazon VPC. Each of these
scenarios has a link to a detailed explanation of the scenario. At the end of the section is a section called
Implementing the Scenario that gives you instructions on how to create a VPC for that scenario.You
can follow the instructions from the scenario that best suits your use case to create your VPC environment.
If your scenario is not listed in the Scenarios for Amazon VPC section, you can create your VPC environ-
ment by stepping through the instructions in the following sections of the Amazon Virtual Private Cloud
User Guide.
DocumentationDescription
What is Amazon VPC?Learn about Amazon VPC
Your VPCCreate VPC
Subnets in Your VPCLearn about subnets and creating
subnets
API Version 2012-06-01
118
Elastic Load Balancing Developer Guide
Configure Amazon VPC for Elastic Load Balancing

DocumentationDescription
Security in Your VPCLearn about creating security groups and
network ACLs
NAT InstancesLearn about NAT instance
Route TablesLearn about route tables
Adding an Internet Gateway to Your VPCLearn about Internet gateways
Launching an Instance into Your SubnetLaunch EC2 instances in your subnet
Using EC2 Dedicated InstancesYou can also launch EC2 dedicated
instances in your subnet.
When you have completed creating your VPC environment, be sure to make a note of the VPC ID, subnet
ID, and the security group associated with your VPC.You will need them later when you create your load
balancer. And also make sure to launch your instances in the subnets.
Next Steps
• To learn how to create a basic load balancer in Amazon VPC, see Create a Basic Load Balancer in
EC2-VPC (p. 31)
• To learn how to create basic load balancer in default VPC, see Create a Basic Load Balancer in Default
VPC (p. 41)
• To learn how to create an internal load balancer, see Create a Basic Internal Load Balancer in Amazon
VPC (p. 119)
• To learn how to attach a subnet to your load balancer, see Attach Your Load Balancer to Subnets
(p. 129)
• To learn how to detach a subnet from your load balancer, Detach Your Load Balancer from a Sub-
net (p. 131)
• To learn how to manage security groups for your load balancer in VPC, see Manage Security Groups
in Amazon VPC (p. 133)
Create a Basic Internal Load Balancer in Amazon
VPC
You can make your load balancer internal (private) or Internet-facing (public) when creating it within a
VPC. When you make your load balancer internal, a DNS name will be created, and it will contain the
private IP address of the load balancer. Internal load balancer is not exposed to the internet. When you
make your load balancer Internet-facing, a DNS name will be created with the public IP address.The
DNS records are publicly resolvable in both cases. For information on using both internal and Internet-
facing load balancer to support multiple tier architecture, see Internet-facing and Internal Load Balan-
cers (p. 116).
This topic uses an example to walk you through the process for creating a basic internal load balancer
within your VPC and registering your EC2 instances with the newly created internal load balancer.This
example uses default configurations for security group, listener protocols and ports, and for the health
check. If you want to create an Internet-facing load balancer, see Create a Basic Load Balancer in EC2-
VPC (p. 31).
API Version 2012-06-01
119
Elastic Load Balancing Developer Guide
Create an Internal Load Balancer

When you create your internal load balancer, you can optionally assign tags for your load balancer. Tags
help you to categorize your load balancers in different ways, for example, by purpose, owner, or environ-
ment. For more information, see Tagging (p. 12).
If you have not yet created your VPC environment for using an internal load balancer, create one before
you proceed further. For information about creating a VPC environment, see Configure Amazon VPC for
Elastic Load Balancing (p. 118).
The following task list gives you a general overview of what you'll need to create a basic internal load
balancer in Amazon VPC.Then you'll step through detailed procedures for each part of the creation
process.
Creating a Basic Internal Load Balancer in VPC
Configure the listeners for your load balancer by specifying the ports and protocols to use for
front-end connection (client to load balancer) and back-end connection (load balancer to back-end
instance).
1
Configure a health check for your Amazon EC2 back-end instances.2
Select the subnets in which to launch your load balancer.3
Select security groups to assign to your load balancer.4
Add Amazon EC2 instances to your load balancer.5
[optional] Add tags to your load balancer.6
Review settings.7
Create your load balancer.8
You can choose to create your load balancer in EC2-VPC using the AWS Management Console, the
AWS command line interface (AWS CLI), or the Query API.
Topics
• Using the AWS Management Console (p. 120)
• Using the AWS Command Line Interface (p. 124)
• Using the Query API (p. 127)
Using the AWS Management Console
To create a basic internal load balancer in VPC
1. Start the Create Load Balancer wizard:
a. On the Amazon EC2 console Resources page, in the EC2 Dashboard pane, under NETWORK
& SECURITY, click Load Balancers.
API Version 2012-06-01
120
Elastic Load Balancing Developer Guide
Using the AWS Management Console

b. On the Load Balancers page, click Create Load Balancer.
2. On the Define Load Balancer page, enter a name for your Amazon VPC load balancer (e.g., my-
internal-loadbalancer).
The load balancer name you choose must be unique within your set of load balancers, must have a
maximum of 32 characters, and must only contain alphanumeric characters or hyphens.
3. Click the Create LB inside dialog box and select the Amazon VPC in which you want to create your
load balancer.
4. If it is not already selected, click Create an internal load balancer box.
5. Leave the Listener Configuration set to the default value.
6. Click Continue to configure the health check for your instances.
7. On the Configure health Check page, configure the health check settings that your application re-
quires.
8. Click Continue to select the subnet in which you want to launch your load balancer instance.
9. On the Select Subnets page, in the Available Subnets table, click the button in the Action column
to select a subnet in which to create your internal load balancer.
API Version 2012-06-01
121
Elastic Load Balancing Developer Guide
Using the AWS Management Console

Your selected subnets are displayed in the Selected Subnets table.
10. Click Continue to select a security group to assign to your load balancer.
11. This tutorial uses the default security group associated with your virtual private cloud.
On the Assign Security Groups page, click Select an existing security group and then select
the default VPC security group.
12. If you use a pre-existing security group, ensure that it allows ingress to the ports that you configured
the load balancer to use. If you create a security group in this step, the console will define these ports
to be open for you.
13. Click Continue to register EC2 instances with your load balancer.
14. On the Add EC2 Instances page, in the Add Instances to Load Balancer table, select the boxes
in the Instance column to register instances with your load balancer.
API Version 2012-06-01
122
Elastic Load Balancing Developer Guide
Using the AWS Management Console

Note
When you register a multi-homed instance (an instance that has an elastic network interface
(ENI) attached) with your load balancer, the load balancer will route traffic to the primary IP
address of the instance (eth0). For more information on using ENIs, go to Elastic Network
Interfaces.
When you stop and then start your back-end EC2 instances associated with your load balancer, we
recommend that you de-register your stopped instance from your load balancer, and then re-register
the restarted instance. Failure to do so may prevent the load balancer from routing the traffic to the
restarted instance. For procedures associated with de-registering and then registering your instances
with your load balancer, see Deregister and Register Amazon EC2 Instances (p. 145).
15. Click Continue to set tags for your load balancer.
16. Skip this step if you do not want to assign tags to your load balancer at this time and click Continue
to review the details of your load balancer.
On the Add Tags page, specify a key and a value for the tag.
17. To add multiple tags, click Create Tag and continue to specify key and value for the tags.
18. After you are done adding tags for your load balancer, click Continue to review the details of your
load balancer.
API Version 2012-06-01
123
Elastic Load Balancing Developer Guide
Using the AWS Management Console

19. On the Review page of the Create Load Balancer wizard, check your settings.You can make
changes by clicking the edit link for each setting.
20. Click Create to create your load balancer.
21. The Create Load Balancer wizard displays the status of your newly created load balancer. Click
Close after confirming that your load balancer was successfully created.
22. Your new load balancer is listed in the load balancer page. Select the check box next to your load
balancer.
23. The bottom pane displays the description of your load balancer.Verify that the descriptions match
your specifications. Note that the DNS name and the description in the row titled Scheme, both in-
dicate that your newly created load balancer is internal.
Using the AWS Command Line Interface
Important
Elastic Load Balancing CLI has been replaced by AWS Command Line Interface (AWS CLI), a
unified tool to manage multiple AWS services. New features released after ELB CLI version
1.0.35.0 (dated 7/24/14) will be included in the AWS CLI only. We recommend that you start
using the AWS CLI.
For a list of the functionality supported in previous ELB CLI versions, see Elastic Load Balancing
API Tools.
Before you get started make sure that you have installed and configured your AWS CLI environment. For
more information, see Getting Set Up with the AWS Command Line Interface.
By default, Elastic Load Balancing creates an Internet-facing load balancer with a publicly resolvable
DNS name that resolves to public IP addresses.You can choose to create an internal load balancer with
a DNS name that resolves to private IP addresses.
This example walks you through the process for creating a basic HTTP internal load balancer on Amazon
VPC and registers Amazon EC2 instances with the newly created VPC load balancer.This example uses
a default security group that is open to the Internet on port 80.
To create a basic internal load balancer in EC2-VPC
1. Enter the create-load-balancer command as in the following example.
aws elb create-load-balancer --load-balancer-name my-internal-loadbalancer
--listeners Protocol=HTTP,LoadBalancerPort=80,InstanceProtocol=HTTP,Instan
cePort=80
--subnets subnet-4e05f721 --scheme internal --security-groups sg-b9ffedd5
--tags Key=department,Value=digital-media
API Version 2012-06-01
124
Elastic Load Balancing Developer Guide
Using the AWS Command Line Interface

Note
Use --scheme option to create an internal load balancer.You need not specify this option
if you're creating an Internet-facing (public) load balancer.
--tags is an optional parameter. Do not use this option if you do not want to assign tags
to your load balancer at this time.
2. Elastic Load Balancing returns the following:
{
"DNSName": "internal-my-internal-loadbalancer-786501203.us-east-
1.elb.amazonaws.com"
}
To register your Amazon EC2 instances with your VPC load balancer
You should only register instances that are in the Pending or Running state and are in an Amazon VPC.
• Enter the register-instances-with-load-balancer command as in the following example.
aws elb register-instances-with-load-balancer --load-balancer-name my-in
ternal-loadbalancer --instances i-4f8cf126 i-0bb7ca62
Elastic Load Balancing returns the following:
{
"Instances": [
{
"InstanceId": "i-4f8cf126"
},
{
"InstanceId": "i-0bb7ca62"
}
]
}
Note
When you register a multi-homed instance (an instance that has an elastic network interface
(ENI) attached) with your load balancer, the load balancer will route traffic to the primary IP
address of the instance (eth0). For more information on using ENIs, go to Elastic Network
Interfaces.
When you stop and then start your back-end EC2 instances associated with your load balancer, we
recommend that you de-register your stopped instance from your load balancer, and then re-register
the restarted instance. Failure to do so may prevent the load balancer from routing the traffic to the
restarted instance. For procedures associated with de-registering and then registering your instances
with your load balancer, see Deregister and Register Amazon EC2 Instances (p. 145).
To verify that an internal load balancer was created
1. Enter the describe-load-balancers command as in the following example.
aws elb describe-load-balancers --load-balancer-name my-internal-loadbalancer
API Version 2012-06-01
125
Elastic Load Balancing Developer Guide
Using the AWS Command Line Interface

2. Elastic Load Balancing returns the following:
{
"LoadBalancerDescriptions": [
{
"Subnets": [
"subnet-4e05f721"
],
"CanonicalHostedZoneNameID": "Z3DZXE0Q79N41H",
"VPCId": "vpc-5ba9473e",
"ListenerDescriptions": [
{
"Listener": {
"InstancePort": 80,
"LoadBalancerPort": 80,
"Protocol": "HTTP",
"InstanceProtocol": "HTTP"
},
"PolicyNames": []
}
],
"HealthCheck": {
"HealthyThreshold": 10,
"Interval": 30,
"Target": "TCP:80",
"Timeout": 5,
"UnhealthyThreshold": 2
},
"BackendServerDescriptions": [],
"Instances": [
{
"InstanceId": "i-4f8cf126"
},
{
"InstanceId": "i-0bb7ca62"
}
],
"DNSName": "internal-my-internal-loadbalancer-786501203.us-east-
1.elb.amazonaws.com",
"SecurityGroups": [
"sg-b9ffedd5"
],
"Policies": {
"LBCookieStickinessPolicies": [],
"AppCookieStickinessPolicies": [],
"OtherPolicies": []
},
"LoadBalancerName": "my-internal-loadbalancer",
"CreatedTime": "2014-05-22T20:32:19.920Z",
"AvailabilityZones": [
"us-east-1"
],
"Scheme": "internal",
"SourceSecurityGroup": {
"OwnerAlias": "803981987763",
"GroupName": "ELB Security Group"
}
}
API Version 2012-06-01
126
Elastic Load Balancing Developer Guide
Using the AWS Command Line Interface

]
}
Note that both the DNS name and the entry in the Scheme field indicate that the load balancer is internal.
Using the Query API
By default, Elastic Load Balancing creates an Internet-facing load balancer with a publicly resolvable
DNS name that resolves to public IP addresses.You can choose to create an internal load balancer with
a DNS name that resolves to private IP addresses.
This example walks you through the process for creating a basic HTTP internal load balancer on Amazon
VPC and registers Amazon EC2 instances with the newly created VPC load balancer.This example uses
a default security group.
To create a basic internal load balancer in EC2-VPC
1. Use the CreateLoadBalancer action and specify the following parameters:
• Subnets = subnet-4e05f721
• Scheme = internal
Note
Use this parameter to create an internal load balancer.You need not specify this parameter
if you're creating an Internet-facing load balancer.
• Listener
• Protocol = HTTP
• InstanceProtocol = HTTP
• InstancePort = 80
• LoadBalancerPort = 80
• LoadBalancerName = my-internal-loadbalancer
The load balancer name you choose must be unique within your set of load balancers, must have
a maximum of 32 characters, and must only contain alphanumeric characters or hyphens.
• SecurityGroups = sg-b9ffedd5
• Tags.member.1.Key = department
Tags.member.1.Value = digital-media
Note
Tags is an optional parameter. Do not use this option if you do not want to assign tags
to your load balancer at this time.
2. The operation returns the DNS name of your load balancer.You can then map any other domain
name (such as www.example.com) to your load balancer's DNS name using CNAME or some other
technique.
To register your Amazon EC2 instances with your VPC load balancer
You should only register instances that are in the Pending or Running state and are in an Amazon Virtual
Private Cloud (VPC).
API Version 2012-06-01
127
Elastic Load Balancing Developer Guide
Using the Query API

• Use the RegisterInstancesWithLoadBalancer action and specify the following parameters:
• LoadBalancerName = my-internal-loadbalancer
• Instances.member.1 = i-4f8cf126
Instances.member.2 = i-0bb7ca62
Note
When you register a multi-homed instance (an instance that has an elastic network interface
(ENI) attached) with your load balancer, the load balancer will route traffic to the primary IP
address of the instance (eth0). For more information on using ENIs, go to Elastic Network
Interfaces.
When you stop and then start your back-end EC2 instances associated with your load balancer, we
recommend that you de-register your stopped instance from your load balancer, and then re-register
the restarted instance. Failure to do so may prevent the load balancer from routing the traffic to the
restarted instance. For procedures associated with de-registering and then registering your instances
with your load balancer, see Deregister and Register Amazon EC2 Instances (p. 145).
To verify that an internal load balancer was created
1. Enter the DescribeLoadBalancers action and specify the following parameter:
• LoadBalancerName = my-internal-loadbalancer
2. The operation returns the description of your load balancer.The description in the Scheme field in-
dicates that your newly created load balancer is internal.
API Version 2012-06-01
128
Elastic Load Balancing Developer Guide
Using the Query API

Attach Your Load Balancer to Subnets
This example walks you through the process of attaching subnets to an existing load balancer using either
the AWS Management Console, the AWS command line interface (AWS CLI), or the Query API.
Topics
• Using AWS Management Console (p. 129)
• Using the AWS Command Line Interface (p. 130)
• Using the Query API (p. 130)
Using AWS Management Console
To attach your load balancer to subnets
1. Open the Amazon EC2 console at https://console.amazonaws.cn/ec2/.
2. On the Amazon EC2 console Resources page, in the EC2 Dashboard pane, under NETWORK &
SECURITY, click Load Balancers.
3. On the Load Balancers page, select the load balancer that you created for your Amazon VPC.
4. The bottom pane displays the details of your load balancer.
5. Click the Instances tab.
6. Click Edit Availability Zones.
7. The Add and Remove Subnets page is displayed.
8. In the Available Subnets table, click the button in the Action column to select your subnets.
You can select only one subnet per Availability Zone.
9. The selected subnets are displayed in the Selected Subnets table.
10. Click Save to attach the subnets to your load balancer.
API Version 2012-06-01
129
Elastic Load Balancing Developer Guide
Attach Subnets

Using the AWS Command Line Interface
Before you get started make sure that you have installed and configured your AWS CLI environment. For
more information, see Getting Set Up with the AWS Command Line Interface.
To attach your load balancer to subnets
1. Enter the command attach-load-balancer-to-subnets as in the following example.
aws elb attach-load-balancer-to-subnets --load-balancer-name my-vpc-loadbal
ancer --subnets subnet-dea770a9 subnet-fb14f6a2
2. Elastic Load Balancing responds with a list of attached subnets.
{
"Subnets": [
"subnet-5c11033e",
"subnet-dea770a9",
"subnet-fb14f6a2"
]
}
Using the Query API
To attach your load balancer to subnets
1. Call the AttachLoadBalancerToSubnets action with the following parameters:
• Subnets.member.1 = subnet-dea770a9
• Subnets.member.2 = subnet-fb14f6a2
• LoadBalancerName = my-vpc-loadbalancer
2. If your request is successful, Elastic Load Balancing returns a list of attached subnets.
API Version 2012-06-01
130
Elastic Load Balancing Developer Guide
Using the AWS Command Line Interface

Detach Your Load Balancer from a Subnet
This example walks you through the process of detaching a subnet from your load balancer using the
AWS Management Console, the AWS command line interface (AWS CLI), or the Query API.
Topics
• Using AWS Management Console (p. 131)
• Using the AWS Command Line Interface (p. 131)
• Using the Query API (p. 132)
Using AWS Management Console
To detach your load balancer from subnet
1. Open the Amazon EC2 console at https://console.amazonaws.cn/ec2/.
2. On the Amazon EC2 console Resources page, in the EC2 Dashboard pane, under NETWORK &
SECURITY, click Load Balancers.
3. Select the load balancer that you created for your Amazon VPC.
4. The bottom pane displays the details of your load balancer.
5. Click the Instances tab.
6. Click Edit Availability Zones.
7. On the Add and Remove Subnets page, in the Selected Subnets table, click the button in the
Actions column to select the subnet you want to detach.
8. The detached subnet becomes available and is displayed in the Available Subnets table.
9. Click Save to detach the subnet from your load balancer.
Using the AWS Command Line Interface
Before you get started make sure that you have installed and configured your AWS CLI environment. For
more information, see Getting Set Up with the AWS Command Line Interface.
To detach your load balancer from a subnet
1. Enter the command detach-load-balancer-from-subnets as in the following example.
aws elb detach-load-balancer-from-subnets --load-balancer-name my-vpc-load
balancer --subnets subnet-450f5127
2. Elastic Load Balancing responds with a list of subnet IDs the load balancer is now attached to.
{
"Subnets": [
"subnet-15aaab61"
]
}
API Version 2012-06-01
131
Elastic Load Balancing Developer Guide
Detach Subnet

Using the Query API
To detach your load balancer from a subnet
1. Call the DetachLoadBalancerFromSubnets action with the following parameters:
• Subnets = subnet-450f512c
• LoadBalancerName = my-vpc-loadbalancer
2. If your request was successful, Elastic Load Balancing returns a list of subnet IDs the load balancer
is now attached to.
API Version 2012-06-01
132
Elastic Load Balancing Developer Guide
Using the Query API

Manage Security Groups in Amazon VPC
A security group acts as a virtual firewall that controls the traffic allowed into an instance. When you
launch an instance in an Amazon Virtual Private Cloud, you can assign the instance to up to five VPC
security groups.The groups act at the instance level, not the subnet level. Therefore, each instance in a
subnet in your Amazon VPC could belong to a different set of security groups. If you don't specify a par-
ticular security group at launch time, the instance automatically belongs to the VPC's default security
group.
For each security group you create, you add rules that control the inbound traffic to instances, and a
separate set of rules that control the outbound traffic.The security groups you've created for Amazon
EC2 (i.e., EC2 security groups) are not available to use in your VPC.You must create a separate set of
security groups to use in your Amazon VPC (i.e., VPC security groups).The rules you create for a VPC
security group can't reference a EC2 security group in your account, and vice versa. Also, VPC security
groups have additional capabilities not available to EC2 security groups.
For information on Amazon VPC security groups, go to Security Groups for Your VPC.
This section walks you through the process to update or reset the VPC security group assigned to your
existing load balancer in Amazon VPC.You can use the AWS Management Console, the AWS command
line interface (AWS CLI), or the Query API to update or reset the VPC security group.
Topics
• Using the AWS Management Console (p. 133)
• Using the AWS Command Line Interface (p. 133)
• Using the Query API (p. 134)
Using the AWS Management Console
To update a security group assigned to your load balancer
1. In the AWS Management Console, click the Amazon EC2 tab.
2. On the Amazon EC2 console Resources page, in the EC2 Dashboard pane, under NETWORK &
SECURITY, click Load Balancers.
3. On the Load Balancers page, select the load balancer that you created for your VPC.
4. The bottom pane displays the details of your load balancer.
5. Click the Security tab.
6. In the Security Groups pane, click Edit.
7. On the Edit security groups page, select your new security group and click Save.
Using the AWS Command Line Interface
To assign a security group to your existing load balancer in Amazon VPC
Enter the apply-security-groups-to-load-balancer command as in the following example.
aws elb apply-security-groups-to-load-balancer --load-balancer-name my-vpc-
loadbalancer --security-groups sg-53fae93f
Elastic Load Balancing responds with a list of security group IDs associated with the load balancer.
API Version 2012-06-01
133
Elastic Load Balancing Developer Guide
Security Groups

{
"SecurityGroups": [
"sg-fc448899"
"sg-53fae93f"
]
}
Using the Query API
To assign a security group to an existing load balancer
1. Call the ApplySecurityGroupsToLoadBalancer action with the following parameters:
• SecurityGroups = sg-53fae93f
• LoadBalancerName = my-vpc-loadbalancer
2. If your request is successful, Elastic Load Balancing returns the security group IDs of the security
groups associated with your load balancer.
API Version 2012-06-01
134
Elastic Load Balancing Developer Guide
Using the Query API

Managing Load Balancers
This section covers information about the Elastic Load Balancing features you are most likely to use to
manage your load balancers launched either in EC2-Classic or in ELB-VPC platforms, and provides
procedural instruction and examples.
The procedures in this section include instructions using the AWS Management Console, the AWS
command line interface (AWS CLI), or the Query API. Before you get started, make sure that you have
installed the Elastic Load Balancing interface you plan to use. For more information, see Setting Up
Elastic Load Balancing Interfaces (p. 18).
Important
Elastic Load Balancing CLI has been replaced by AWS Command Line Interface (AWS CLI), a
unified tool to manage multiple AWS services. New features released after ELB CLI version
1.0.35.0 (dated 7/24/14) will included in the AWS CLI only. We recommend that you start using
the AWS CLI.
For a list of the functionality supported in previous ELB CLI versions, see Elastic Load Balancing
API Tools.
Topics
• Add a Listener to Your Load Balancer (p. 136)
• Delete a Listener from Your Load Balancer (p. 142)
• Deregister and Register Amazon EC2 Instances (p. 145)
• Update an SSL Certificate for a Load Balancer (p. 147)
• Update SSL Negotiation Configuration of Your Load Balancer (p. 151)
• Configure Custom Domain Name for Your Load Balancer (p. 158)
• Enable or Disable Cross-Zone Load Balancing for Your Load Balancer (p. 163)
• Enable or Disable Connection Draining for Your Load Balancer (p. 170)
• Configure Idle Connection Timeout (p. 177)
• Enable or Disable Proxy Protocol Support (p. 181)
• Configure DNS Failover for Your Load Balancer (p. 194)
• Sticky Sessions (p. 198)
• Add or Remove Tags (p. 208)
• Delete Your Load Balancer (p. 215)
API Version 2012-06-01
135
Elastic Load Balancing Developer Guide

Add a Listener to Your Load Balancer
Elastic Load Balancing supports the load balancing of applications using HTTP, HTTPS (Secure HTTP),
TCP, and SSL (Secure TCP) protocols.You can specify the protocols for the front-end connections (client
to load balancer) and the back-end connections (load balancer to back-end instance) independently.You
choose configurations for the front-end and the back-end connections when you create your load balancer.
By default, your load balancer is set to use HTTP for both the connections.The Elastic Load Balancing
Listener Configurations Quick Reference (p. 52) table provides information on different configurations,
along with the use case best suited for that configuration.
This section describes how to add a new listener on your existing load balancer using the AWS Manage-
ment Console, the AWS command line interface (AWS CLI), or the Query API. In this example, you
configure a new listener for your existing load balancer my-test-loadbalancer that accepts HTTPS
requests on port 443 for both the front-end and back-end connections.
Topics
• Using the AWS Management Console (p. 136)
• Using the AWS Command Line Interface (p. 138)
• Using the Query API (p. 140)
Using the AWS Management Console
To add a new listener to your load balancer
1. Sign in to the AWS Management Console and open the Amazon EC2 console at https://con-
sole.amazonaws.cn/ec2/.
2. On the Amazon EC2 console Resources page, in the EC2 Dashboard pane, under NETWORK &
SECURITY, click Load Balancers.
3. On the Load Balancers page, select your load balancer.
4. The bottom pane displays the details of your load balancer.
5. Click the Listeners tab.
6. In the Listeners pane, click Edit.
7. In the Edit Listeners page, click Add.
8. In the Load Balancer Protocol column, click the dialog box and select HTTPS (Secure HTTP) from
the drop-down box.This populates the box in the Load Balancer Port column. In the Instance
Protocol column, click the dialog box and select HTTPS from the drop-down box. The box in the
Instance Port column gets populated.
9. The Elastic Load Balancing service provides you with security policies that have predefined SSL
negotiation configurations used for negotiating SSL connections between the client and the load
balancer.You can select one of the predefined security policies, or Custom to create your own se-
curity policy.
For more information about the Security Policies, see SSL Negotiation Configurations for Elastic
Load Balancing (p. 55). For information about the current configuration for all Security Policies, see
SSL Security Policy Table (p. 56).
By default, Elastic Load Balancing pre-selects ELBSecurityPolicy-2014-01 for your HTTPS/SSL
listener.This is the recommended setting. This policy uses server order preference (the order listed
in the SSL Security Policy Table (p. 56) ) to negotiate SSL connections.
a. To specify a Security Policy, in the Cipher column, click Change.
b. On the Select a Cipher page, select a Security Policy from the following options:
API Version 2012-06-01
136
Elastic Load Balancing Developer Guide
Add Listener

To keep the recommended setting,
• On the Select Cipher page, make sure that Predefined Security Policy is selected and
the drop-down pane is showing ELBSecurityPolicy-2014-01. Click Save and then go to
step 8.
To select a policy from the predefined security policy list,
a. On the Select a Cipher page, select Predefined Security Policy.
b. In the security policy drop-down pane, select a policy.
c. Click Save and then go to step 8.
To create your own security policy,
a. Select Custom.
b. Under SSL Protocols, select one or more protocols to enable or disable.
c. Under SSL Options, select Server Order Preference if you want to use the order listed in
the SSL Security Policy Table (p. 56) for SSL negotiation.
d. Under SSL Ciphers, select one or more ciphers to enable or disable.
Note
You must enable at least one protocol and one cipher for SSL negotiation to take
place.
The DSA and RSA ciphers are specific to the signing algorithm and are used to
create the SSL certificate. If you already have your SSL certificate, make sure to
enable the cipher that was used to create your certificate.
e. Click Save.
10. To enable HTTPS support for your listeners, you must install an SSL server certificate on your load
balancer.The load balancer uses the certificate to terminate and then decrypt requests before
sending them to the back-end instances.
If you already have certificate installed on your load balancer and want to continue using it, skip the
following steps for installing a new one and go to step 13.
If you do not have an SSL certificate, see SSL Certificate for Elastic Load Balancing (p. 61) for in-
structions on creating and uploading SSL certificates and then complete the following steps to install
the certificate on your load balancer.
To install an SSL server certificate, in the SSL Certificate column, click Change.
11. To use a previously uploaded certificate
a. On the Select Certificate page, in the Certificate Type: field, select Choose from an existing
SSL Certificate.
b. Click the Certificate Name: dialog box and select your certificate.
c. Click Save and then go to step 13.
12. To upload a signed certificate
On the Select Certificate page, in the Certificate Type: field, select Upload a new SSL Certificate.
API Version 2012-06-01
137
Elastic Load Balancing Developer Guide
Using the AWS Management Console

Before you upload, check if your certificate meets the criteria described in Upload the Signed Certi-
ficate (p. 65)
Note
If your certificate does not meet the criteria, you might get an error when you upload it.
Create a new SSL certificate and upload the certificate using IAM. For instructions on creating
and uploading the SSL certificate, see SSL Certificate for Elastic Load Balancing (p. 61).
If your certificate meets the criteria, step through the following instructions to continue uploading your
SSL certificate.
a. Enter the name of the certificate to upload.
b. Copy and paste the contents of the private key file (PEM-encoded) in the Private Key box.
Note
The private key cannot be retrieved after you are finished uploading it.
c. Copy and paste the contents of the public key certificate file (PEM-encoded) in the Public Key
Certificate box.
d. Copy and paste the contents of the certificate chain file (PEM-encoded) in the Certificate Chain
box.
Note
You can skip this step if you are using a self-signed certificate and it's not important
that browsers implicitly accept the certificate.
13. In the Edit Listeners page, click Save to add the listener you just configured.
Click Add to add additional listeners.
Using the AWS Command Line Interface
To enable HTTPS support for your listeners, you must install an SSL server certificate on your load bal-
ancer.The load balancer uses the certificate to terminate and then decrypt requests before sending them
to the back-end instances. If you do not have an SSL certificate, see SSL Certificate for Elastic Load
Balancing (p. 61) for instructions on creating and uploading SSL certificates.
API Version 2012-06-01
138
Elastic Load Balancing Developer Guide
Using the AWS Command Line Interface

To add a new listener to your load balancer
1. Get the Amazon Resource Name (ARN) of your SSL certificate.
2. Enter the create-load-balancer-listeners command as in the following example.
aws elb create-load-balancer-listeners --load-balancer-name my-test-load
balancer --listeners Protocol=HTTPS,LoadBalancerPort=443,InstanceProtocol=HT
TPS,InstancePort=443,SSLCertificateId=arn:aws:iam::55555555555:server-certi
ficate/production/myservercert
3. Enter the describe-load-balancers command as in the following example to view the updated details
of your load balancer my-test-loadbalancer.
aws elb describe-load-balancers --load-balancer-name my-test-loadbalancer
Elastic Load Balancing responds with a list of updated configurations of your load balancer.
{
"LoadBalancerDescriptions": [
{
"Subnets": [],
"CanonicalHostedZoneNameID": "Z3DZXE0Q79N41H",
"CanonicalHostedZoneName": "my-test-loadbalancer-012345678.us-
east-1.elb.amazonaws.com",
"ListenerDescriptions": [
{
"Listener": {
"InstancePort": 443,
"SSLCertificateId": "arn:aws:iam::55555555555:server-
certificate/production/myservercert",
"LoadBalancerPort": 443,
"Protocol": "HTTPS",
"InstanceProtocol": "HTTPS"
},
"PolicyNames": [
"ELBSecurityPolicy-2014-01"
]
},
{
"Listener": {
"InstancePort": 80,
"LoadBalancerPort": 80,
"Protocol": "HTTP",
"InstanceProtocol": "HTTP"
},
"PolicyNames": []
}
],
"HealthCheck": {
"HealthyThreshold": 10,
"Interval": 30,
"Target": "HTTP:80/",
"Timeout": 5,
"UnhealthyThreshold": 2
},
API Version 2012-06-01
139
Elastic Load Balancing Developer Guide
Using the AWS Command Line Interface

"BackendServerDescriptions": [],
"Instances": [],
"DNSName": "my-test-loadbalancer-012345678.us-east-
1.elb.amazonaws.com",
"SecurityGroups": [],
"Policies": {
"LBCookieStickinessPolicies": [],
"AppCookieStickinessPolicies": [],
"OtherPolicies": [
"ELBSecurityPolicy-2014-01"
]
},
"LoadBalancerName": "my-test-loadbalancer",
"CreatedTime": "2014-03-19T03:24:02.650Z",
"AvailabilityZones": [
"us-east-1a"
],
"Scheme": "internet-facing",
"SourceSecurityGroup": {
"OwnerAlias": "amazon-elb",
"GroupName": "amazon-elb-sg"
}
}
]
}
Using the Query API
To enable HTTPS support for your listeners, you must install an SSL server certificate on your load bal-
ancer.The load balancer uses the certificate to terminate and then decrypt requests before sending them
to the back-end instances. Elastic Load Balancing uses AWS Identity and Access Management (IAM) to
upload your certificate to your load balancer. If you do not have an SSL certificate, see SSL Certificate
for Elastic Load Balancing (p. 61) for instructions on creating and uploading SSL certificates.
To add a new listener to your load balancer
1. Get the Amazon Resource Name (ARN) of your SSL certificate.
2. Call the CreateLoadBalancerListeners action with the following parameters:
• Listener
• Protocol = HTTPS
• InstanceProtocol = HTTPS
• InstancePort = 443
• LoadBalancerPort = 443
• SSLCertificateId = arn:aws:iam::55555555555:server-certificate/produc-
tion/myservercert
• LoadBalancerName = my-test-loadbalancer
3. Call the DescribeLoadBalancers action with the following parameter to view the updated configuration
information of your load balancer.
• LoadBalancerName = my-test-loadbalancer
API Version 2012-06-01
140
Elastic Load Balancing Developer Guide
Using the Query API

The operation returns a list of updated configurations of your load balancer.
API Version 2012-06-01
141
Elastic Load Balancing Developer Guide
Using the Query API

Delete a Listener from Your Load Balancer
This section describes how to delete a listener from the specified port of your existing load balancer using
the AWS Management Console, the AWS command line interface (AWS CLI), or the Query API.
Topics
• Using the AWS Management Console (p. 142)
• Using the AWS Command Line Interface (p. 142)
• Using the Query API (p. 143)
Using the AWS Management Console
To delete a listener from your load balancer
1. Sign in to the AWS Management Console and open the Amazon EC2 console at https://con-
sole.amazonaws.cn/ec2/.
2. On the Amazon EC2 console Resources page, in the EC2 Dashboard pane, under NETWORK &
SECURITY, click Load Balancers.
3. On the Load Balancers page, select your load balancer.
4. The bottom pane displays the details of your load balancer.
5. Click the Listeners tab.
6. In the Listeners pane, click Edit.
7. In the Edit Listeners page, click the delete icon next to the listener you want to delete.
8. Click Save.
Using the AWS Command Line Interface
To delete a listener from your load balancer
1. Enter the delete-load-balancer-listeners command as in the following example.
aws elb delete-load-balancer-listeners --load-balancer-name my-test-loadbal
ancer --load-balancer-ports 80
2. Enter the describe-load-balancers command as in the following example to view the updated details
of your load balancer my-test-loadbalancer.
aws elb describe-load-balancers --load-balancer-name my-test-loadbalancer
Elastic Load Balancing responds with a list of updated configurations of your load balancer.
{
"LoadBalancerDescriptions": [
{
"Subnets": [],
"CanonicalHostedZoneNameID": "Z3DZXE0Q79N41H",
"CanonicalHostedZoneName": "my-test-loadbalancer-012345678.us-
east-1.elb.amazonaws.com",
"ListenerDescriptions": [
API Version 2012-06-01
142
Elastic Load Balancing Developer Guide
Delete Listener

{
"Listener": {
"InstancePort": 443,
"SSLCertificateId": "arn:aws:iam::55555555555:server-
certificate/production/myservercert",
"LoadBalancerPort": 443,
"Protocol": "HTTPS",
"InstanceProtocol": "HTTPS"
},
"PolicyNames": [
"MySSLNegotiationPolicy"
]
}
],
"HealthCheck": {
"HealthyThreshold": 10,
"Interval": 30,
"Target": "HTTP:80/",
"Timeout": 5,
"UnhealthyThreshold": 2
},
"BackendServerDescriptions": [],
"Instances": [],
"DNSName": "my-test-loadbalancer-012345678.us-east-
1.elb.amazonaws.com",
"SecurityGroups": [],
"Policies": {
"LBCookieStickinessPolicies": [],
"AppCookieStickinessPolicies": [],
"OtherPolicies": [
"ELBSecurityPolicy-2014-01"
]
},
"LoadBalancerName": "my-test-loadbalancer",
"CreatedTime": "2014-03-19T03:24:02.650Z",
"AvailabilityZones": [
"us-east-1a"
],
"Scheme": "internet-facing",
"SourceSecurityGroup": {
"OwnerAlias": "amazon-elb",
"GroupName": "amazon-elb-sg"
}
}
]
}
Using the Query API
To delete a listener from your load balancer
Call the DeleteLoadBalancerListeners action with the following parameters:
• LoadBalancerPorts = 80
• LoadBalancerName = my-test-loadbalancer
API Version 2012-06-01
143
Elastic Load Balancing Developer Guide
Using the Query API

Call the DescribeLoadBalancers action using the following parameter to view the updated configuration
information of your load balancer.
• LoadBalancerName = my-test-loadbalancer
The operation returns a list of updated configurations of your load balancer.
API Version 2012-06-01
144
Elastic Load Balancing Developer Guide
Using the Query API

Deregister and Register Amazon EC2 Instances
Elastic Load Balancing registers your EC2 instance with your load balancer using the associated IP ad-
dress.When your EC2 instance launched in EC2-Classic is stopped and then started, the IP address
associated with your instance changes.Your load balancer does not recognize the new IP address.When
you stop and then start your registered EC2 instance launched in EC2-Classic, you must deregister your
stopped instance from your load balancer, and then reregister the restarted instance. Failure to do so
may prevent the load balancer from routing the traffic to the restarted instance.
If you have launched your instance in EC2-VPC, by default, the IP address associated with your instance
does not change when you stop and then start the instance. However, when you stop and then start your
EC2-VPC instance, your load balancer might take sometime to recognize that the stopped instance has
started. During this time your load balancer is not connected to the restarted instance. We recommend
that you reregister your restarted instance with the load balancer. For information on reregistering your
instance, see Registering Your Amazon EC2 Instances with Your Load Balancer (p. 146).
In this example you deregister your stopped back-end instance from load balancer, and then register
your restarted instance with the load balancer.
Before you get started, be sure you've done the following:
• Stop one of your back-end Amazon EC2 instance. For more information, go to Stopping and Starting
Instances.
The following sections include instructions for deregistering and registering your back-end instances using
the AWS Management Console, the AWS command line interface (AWS CLI), or the Query API.
Topics
• De-Registering Your Amazon EC2 Instances from Your Load Balancer (p. 145)
• Registering Your Amazon EC2 Instances with Your Load Balancer (p. 146)
De-Registering Your Amazon EC2 Instances from
Your Load Balancer
Using AWS Management Console
To deregister your back-end instance from your load balancer
1. Sign in to the AWS Management Console and open the Amazon EC2 console at https://con-
sole.amazonaws.cn/ec2/.
2. On the Amazon EC2 console Resources page, in the EC2 Dashboard pane, under NETWORK &
SECURITY, click Load Balancers.
3. In the Load Balancers page, select your load balancer.
4. The bottom pane displays the details of your load balancer.
5. Click Instances tab.
6. In the Instances table, in the Actions column, click Remove from Load Balancer in the row of the
instance that you want to deregister.
API Version 2012-06-01
145
Elastic Load Balancing Developer Guide
Deregister and Register Instances

Using the AWS Command Line Interface
To de-register your back-end instance from your load balancer
• Enter the deregister-instances-from-load-balancer command as in the following example.
aws elb deregister-instances-from-load-balancer --load-balancer-name my-test-
loadbalancer --instances i-4e05f721
• Elastic Load Balancing responds with the updated list of remaining instances registered with the load
balancer.
{
"Instances": [
{
"InstanceId": "i-315b7e51"
}
]
}
Using the Query API
To deregister your back-end instance from your load balancer
• Call the DeregisterInstancesFromLoadBalancer action with the following parameters:
• Instances = i-4e05f721
• LoadBalancerName = my-test-loadbalancer
The operation returns an updated list of remaining instances registered with the load balancer.
Registering Your Amazon EC2 Instances with Your
Load Balancer
If you haven't done so yet, you should now restart the instance that you stopped in the previous step.
Using AWS Management Console
To register your back-end instance with your load balancer
1. Sign in to the AWS Management Console and open the Amazon EC2 console at https://con-
sole.amazonaws.cn/ec2/.
2. On the Amazon EC2 console Resources page, in the EC2 Dashboard pane, under NETWORK &
SECURITY, click Load Balancers.
3. In the Load Balancers page, select your load balancer.
4. The bottom pane displays the details of your load balancer.
5. Click Instances tab.
6. In the Instances pane, click Edit Instances.
API Version 2012-06-01
146
Elastic Load Balancing Developer Guide
Registering Your Amazon EC2 Instances with Your Load
Balancer

7. In the Add or Remove Instances table, in the Instance column, select the instance you want to
your load balancer.
8. Click Save to register your instances.
Using the AWS Command Line Interface
To register your back-end instance with your load balancer
Enter the register-instances-with-load-balancer command as in the following example.
aws elb register-instances-with-load-balancer --load-balancer-name my-test-
loadbalancer --instances i-4e05f721
Elastic Load Balancing responds with a list of instances registered with the load balancer.
{
"Instances": [
{
"InstanceId": "i-315b7e51"
},
{
"InstanceId": "i-4e05f721"
}
]
}
Using the Query API
To register your back-end instance with your load balancer
Call the RegisterInstancesWithLoadBalancer action with following parameters:
• Instances = i-4e05f721
• LoadBalancerName = my-test-loadbalancer
The operation returns an updated list of instances registered with the load balancer.
Update an SSL Certificate for a Load Balancer
If you are using HTTPS/SSL protocol for your listeners, you might have an SSL server certificate installed
on your load balancer.Your SSL certificate comes with a validity period.You must replace the certificate
before its validity period ends.To replace the certificate you must first create a new certificate by following
the same steps you used when you created your certificate for the first time. For information on creating
a new SSL certificate, see SSL Certificate for Elastic Load Balancing (p. 61).
All your SSL certificates are managed by AWS Identity and Management (IAM) service. By default, IAM
allows 10 server certificates per AWS account. If you try to upload a new server certificate after reaching
this limit, you'll get an error.You can request for more certificates using this form - IAM Limit Increase
Contact Us Form.
API Version 2012-06-01
147
Elastic Load Balancing Developer Guide
Update SSL Certificate

Before you install your SSL certificate on your load balancer, you must first upload your certificate to IAM.
You can use the Elastic Load Balancing wizard from the Amazon EC2 console, the upload-server-certi-
ficate IAM command, or the UploadServerCertificate IAM action to upload your SSL certificate.
The following sections include instructions for updating an SSL certificate using the AWS Management
Console, the AWS command line interface (AWS CLI), or the Query API.
Topics
• Using the AWS Management Console (p. 148)
• Using the AWS Command Line Interface (p. 149)
• Using the Query API (p. 149)
Using the AWS Management Console
To update an SSL certificate for an HTTPS load balancer
1. Sign in to the AWS Management Console and open the Amazon EC2 console at https://con-
sole.amazonaws.cn/ec2/.
2. On the Amazon EC2 console Resources page, in the EC2 Dashboard pane, under NETWORK &
SECURITY, click Load Balancers.
3. On the Load Balancers page, select your load balancer.
4. The bottom pane displays the details of your load balancer.
5. Click the Listeners tab.
6. In the Listeners pane, click Change in the SSL Certificate column of the certificate you want to
update.
7. On the Select Certificate page, select Choose from an existing SSL Certificates if you have
already uploaded your SSL certificate using IAM. Click the Certificate Name: dialog box and select
your certificate. Click Save.
8. Or, select Upload a new SSL Certificate if you have an SSL certificate and want to upload it.
Before you upload, ensure that your certificate meets the criteria described in Upload the Signed
Certificate (p. 65)
If your certificate does not meet the criteria listed in this step, you might get an error when you upload
it. Create a new SSL certificate and upload the certificate using AWS Identity and Access Management
(IAM). For instructions on creating and uploading the SSL certificate, see SSL Certificate for Elastic
Load Balancing (p. 61).
Step through the following instructions to continue uploading your SSL certificate.
a. Enter the name of the certificate to upload.
b. Copy and paste the contents of the private key file (PEM-encoded) in the Private Key box.
Note
The private key cannot be retrieved after you are finished uploading it.
c. Copy and paste the contents of the public key certificate file (PEM-encoded) in the Public Key
Certificate box.
d. You can skip this step if you are using a self-signed certificate and it's not important that browsers
implicitly accept the certificate.
If you are not using self-signed certificate, copy and paste the contents of the public key certificate
chain file (PEM-encoded) in the Certificate Chain box.
API Version 2012-06-01
148
Elastic Load Balancing Developer Guide
Using the AWS Management Console

Note
The certificate chain must be ordered such that the root certificate is the last certificate
in the chain. If you use a certificate chain in a different order, you will receive an error.
9. Click Save.
Using the AWS Command Line Interface
Before you get started, make sure that you have installed the AWS CLI tools. For information on installing
the CLI see Use the AWS Command Line Interface (p. 20).
To update an SSL certificate for an HTTPS load balancer
1. If you have an SSL certificate and have uploaded it using the AWS Identity and Access Management
(IAM), use the AWS CLI command get-server-certificate to get the ARN of the certificate,
and then go to step 3.
2. If you have an SSL certificate and want to upload it, step through the instructions described in Upload
the Signed Certificate (p. 65).
Make a note of the ARN of the certificate.
3. Enter the set-load-balancer-listener-ssl-certificate command and specify the load balancer port of
an HTTPS listener, as in the following example.
aws elb set-load-balancer-listener-ssl-certificate --load-balancer-name my-
test-loadbalancer --load-balancer-port 443 --ssl-certificate-id
arn:aws:iam::012345678901:server-certificate/production/newCert
Using the Query API
To update an SSL certificate for an HTTPS load balancer
API Version 2012-06-01
149
Elastic Load Balancing Developer Guide
Using the AWS Command Line Interface

1. If you have an SSL certificate and have uploaded it using the AWS Identity and Access Management
(IAM), use the IAM action GetServerCertificate to get the ARN of the certificate, and then go to step
3.
2. If you have an SSL certificate and want to upload it, step through the instructions described in Upload
the Signed Certificate (p. 65).
Make a note of the ARN of the certificate.
3. Call the SetLoadBalancerListenerSSLCertificate action to replace the expired certificate with the new
one using the following parameters:
• LoadBalancerName = my-test-loadbalancer
• LoadBalancerPort = 443
• SSLCertificateId = arn:aws:iam::012345678901:server-certificate/produc-
tion/newCert
API Version 2012-06-01
150
Elastic Load Balancing Developer Guide
Using the Query API

Update SSL Negotiation Configuration of Your
Load Balancer
Elastic Load Balancing service provides you with security policies that have predefined SSL negotiation
configurations used for negotiating SSL connections between the client and the load balancer. If you are
using a HTTPS/SSL protocol for your listener, it is likely that you are either using one of the predefined
security policies, or using your own custom security policy for negotiating SSL connections between the
client and your load balancer.
For more information about the security policies, see SSL Negotiation Configurations for Elastic Load
Balancing (p. 55). For information about the current configuration for all the security policies provided by
Elastic Load Balancing, see SSL Security Policy Table (p. 56).
If you have an existing load balancer with an SSL negotiation configuration that does not use the latest
protocols and ciphers, we recommend that you upgrade your load balancer to the latest version of the
ELBSecurityPolicy-YYYY-MM. If you prefer not to use any of the predefined security policies, you can
create a custom configuration.We strongly recommend that you first test the new security policies before
you upgrade your load balancer configuration.
Note
If you have created a HTTPS/SSL listener without associating any security policy, Elastic Load
Balancing will, by default, associate the latest version of the ELBSecurityPolicy-YYYY-MM with
your load balancer.
When you update the SSL negotiation configuration for your load balancer, be sure to associate
a security policy with your load balancer.
The following section steps you through the process for updating the SSL negotiation configuration for
the HTTPS/SSL listener on your existing load balancer.You can update the SSL negotiation configuration
for your exisitng load balancer using the AWS Management Console, the AWS Command Line Interface
(AWS CLI), or the Query API.
Topics
• Using the AWS Management Console (p. 151)
• Using the AWS Command Line Interface (p. 152)
• Using the Query API (p. 156)
Using the AWS Management Console
To update SSL negotiation configuration for an HTTPS/SSL load balancer
1. Sign in to the AWS Management Console and open the Amazon EC2 console at https://con-
sole.amazonaws.cn/ec2/.
2. On the Amazon EC2 console Resources page, in the EC2 Dashboard pane, under NETWORK &
SECURITY, click Load Balancers.
3. On the Load Balancers page, select your load balancer.
4. The bottom pane displays the details of your load balancer.
5. Click the Listeners tab.
6. Click Change in the Cipher column of the listener you want to update.
7. On the Select Cipher page, select a security policy from the following options:
To select a policy from the predefined security policy list
1. Select Predefined Security Policy.
API Version 2012-06-01
151
Elastic Load Balancing Developer Guide
Update SSL Negotiation Configuration

2. In the security policy drop-down list, select a policy.
3. Click Save.
To create your own security policy
1. Select Custom.
2. Under SSL Protocols, select one or more protocols to enable.
3. Under SSL Options, select Server Order Preference if you want to use the order listed in the
SSL Security Policy Table (p. 56) for SSL negotiation.
4. Under SSL Ciphers, select one or more ciphers to enable.
Note
You must enable at least one protocol and one cipher for SSL negotiation to take place.
The DSA and RSA ciphers are specific to the signing algorithm and are used to create
the SSL certificate. If you already have your SSL certificate, make sure to enable the
cipher that was used to create your certificate.
5. Click Save.
Using the AWS Command Line Interface
Before you get started, make sure that you have installed the AWS CLI tools. For information on installing
the CLI see Use the AWS Command Line Interface.
The following steps outline how to update SSL negotiation configuration for an existing HTTPS/SSL load
balancer using the AWS CLI:
1. Get the list of predefined security policies provided by Elastic Load Balancing.
2. Create a SSL negotiation policy either by specifying one of the listed security policies or by creating a
custom security policy by specifying SSL protocols, ciphers and option.
3. Verify that the policy is created.
4. Enable the policy by setting the policy for the load balancer port.
5. Verify that the policy is set for the load balancer port.
This example walks you through the process of creating a SSLNegotiationPolicyType policy to use the
latest version of the predefined security policy, ELBSecurityPolicy-2014-10.
This example also includes instruction for creating a custom security policy.You can skip step 1 if you
want to create a custom security policy.
To configure SSL security policy
1. Enter the describe-load-balancer-policies command, as in the following example, to list all the security
policies provided by Elastic Load Balancing.
aws elb describe-load-balancer-policies
The response includes the names of all the security policies provided by Elastic Load Balancing. All
the security policy types are SSLNegotiationPolicyType and are used for SSL/HTTPS listeners.
API Version 2012-06-01
152
Elastic Load Balancing Developer Guide
Using the AWS Command Line Interface

The ELBSecurityPolicy-2014-10 policy uses Server Order Preference to negotiate SSL connections.
For information about the current configuration for all the listed Security Policies, see SSL Security
Policy Table (p. 56).
2. Enter the create-load-balancer-policy command using the following options to create a SSL negotiation
policy either using the predefined security policy ELBSecurityPolicy-2014-10, or the custom security
policy.
In this example, you create a MySSLNegotiationPolicy of the type SSLNegotiationPolicyType
for your load balancer my-test-loadbalancer.
Use the following options to create a SSL negotiation policy using the security policy - ELB-
SecurityPolicy-2014-10:
• policy-name = MySSLNegotiationPolicy
• policy-type-name = SSLNegotiationPolicyType
• policy-attributes
• AttributeName = Reference-Security-Policy
• AttributeValue = ELBSecurityPolicy-2014-10
• load-balancer-name = my-test-loadbalancer
Your command should look like the following example:
aws elb create-load-balancer-policy --load-balancer-name my-test-loadbalancer
--policy-name MySSLNegotiationPolicy --policy-type-name SSLNegotiation
Policy
Type --policy-attributes AttributeName=Reference-Security-Policy,Attribute
Value=
ELBSecurityPolicy-2014-10
Or, use the following options to create a custom security policy by enabling the protocols
and ciphers that meet your requirements:
Note
You must enable at least one protocol and one cipher.You only need to set to true the
attributes that you want enabled.
The DSA and RSA ciphers are specific to the signing algorithm and are used to create the
SSL certificate. If you already have your SSL certificate, make sure to enable the cipher
that was used to create your certificate.
Your custom policy name must not contain the prefixes - ELBSecurityPolicy- and ELB-
Sample-.These prefixes are used by Elastic Load Balancing for its predefined security
policy names. If Elastic Load Balancing reads this prefix in your custom security policy name,
it will throw an error.
• policy-name = MySSLNegotiationPolicy
• policy-type-name = SSLNegotiationPolicyType
• attributes
• AttributeName = ProtocolTLSv1.2
• AttributeValue = true
• AttributeName = ProtocolTLSv1.1
• AttributeValue = true
• AttributeName = DHE-RSA-AES256-SHA256
• AttributeValue = true
• [optional] AttributeName = Server-Defined-Cipher-Order
API Version 2012-06-01
153
Elastic Load Balancing Developer Guide
Using the AWS Command Line Interface

• [optional] AttributeValue = true
Note
Enable Server-Defined-Cipher-Order if you want to use Server Order Preference
(the order listed in the SSL Security Policy Table (p. 56)) for SSL negotiation.
• load-balancer-name = my-test-loadbalancer
Your command should look like in the following example.
aws elb create-load-balancer-policy --load-balancer-name my-test-loadbalancer
--policy-name MySSLNegotiationPolicy --policy-type-name SSLNegotiationPoli
cyType
--policy-attributes AttributeName=Protocol-TLSv1.2,AttributeValue=true
AttributeName=Protocol-TLSv1.1,AttributeValue=true AttributeName=DHE-RSA-
AES256-SH
A256,AttributeValue=true AttributeName=Server-Defined-Cipher-Order,Attrib
uteValue=true
3. Enter the describe-load-balancer-policies command with the following options to verify that the policy
is created.
• load-balancer-name = my-test-loadbalancer
• --policy-names = MySSLNegotiationPolicy
Your command should look like in the following example.
aws elb describe-load-balancer-policies --load-balancer-name my-test-load
balancer --policy-name MySSLNegotiationPolicy
The response includes the description of the MySSLNegotiationPolicy.
4. Enter the set-load-balancer-policies-of-listener command with the following options to enable your
newly created policy on the load balancer port 443:
• load-balancer-port = 443
• policy-names = MySSLNegotiationPolicy
• load-balancer-name = my-test-loadbalancer
Your command should look like in the following example.
aws elb set-load-balancer-policies-of-listener --load-balancer-name my-test-
loadbalancer --load-balancer-port 443 --policy-names MySSLNegotiationPolicy
5. Enter the describe-load-balancers command with the following option to verify that the new policy is
enabled for the load balancer port.
• load-balancer-name = my-test-loadbalancer
Your command should look like in the following example.
aws elb describe-load-balancers --load-balancer-name my-test-loadbalancer
API Version 2012-06-01
154
Elastic Load Balancing Developer Guide
Using the AWS Command Line Interface

Elastic Load Balancing responds as in the following example.
{
"LoadBalancerDescriptions": [
{
"Subnets": [],
"CanonicalHostedZoneNameID": "Z3DZXE0Q79N41H",
"CanonicalHostedZoneName": "my-test-loadbalancer-34503258.us-
east-1a.elb.amazonaws.com",
"ListenerDescriptions": [
{
"Listener": {
"InstancePort": 443,
"SSLCertificateId": "arn:aws:iam::55555555555:server-
certificate/myservercert",
"LoadBalancerPort": 443,
"Protocol": "HTTPS",
"InstanceProtocol": "HTTPS"
},
"PolicyNames": [
"MySSLNegotiationPolicy"
]
},
{
"Listener": {
"InstancePort": 80,
"LoadBalancerPort": 80,
"Protocol": "HTTP",
"InstanceProtocol": "HTTP"
},
"PolicyNames": []
}
],
"HealthCheck": {
"HealthyThreshold": 10,
"Interval": 30,
"Target": "HTTP:80/",
"Timeout": 5,
"UnhealthyThreshold": 2
},
"BackendServerDescriptions": [],
"Instances": [],
"DNSName": "my-test-loadbalancer-012345678.us-east-
1.elb.amazonaws.com",
"SecurityGroups": [],
"Policies": {
"LBCookieStickinessPolicies": [],
"AppCookieStickinessPolicies": [],
"OtherPolicies": [
"ELBSecurityPolicy-2014-10",
"MySSLNegotiationPolicy"
]
},
"LoadBalancerName": "my-test-loadbalancer",
"CreatedTime": "2014-03-19T03:24:02.650Z",
"AvailabilityZones": [
"us-east-1a"
API Version 2012-06-01
155
Elastic Load Balancing Developer Guide
Using the AWS Command Line Interface

],
"Scheme": "internet-facing",
"SourceSecurityGroup": {
"OwnerAlias": "amazon-elb",
"GroupName": "amazon-elb-sg"
}
}
]
}
You can see that MySSLNegotiationPolicy is enabled for the load balancer port 443.
Using the Query API
The following steps outline how to update SSL negotiation configuration for an existing HTTPS/SSL load
balancer using the Query API:
1. Get the list of predefined security policies provided by Elastic Load Balancing.
2. Create a SSL negotiation policy either by specifying one of the listed security policies or by creating a
custom security policy by specifying SSL protocols, ciphers and option.
3. Verify that the policy is created.
4. Enable the policy by setting the policy for the load balancer port.
5. Verify that the policy is set for the load balancer port.
This example walks you through the process of creating a SSLNegotiationPolicyType policy to use the
latest version of the predefined security policy,ELBSecurityPolicy-2014-10.
This example also includes instruction for creating a custom security policy.You can skip step 1 if you
want to create a custom security policy.
To configure SSL security policy
1. Use the DescribeLoadBalancerPolicies action.
The response includes the names of all the security policies provided by Elastic Load Balancing. All
the security policy types are SSLNegotiationPolicyType and are used for SSL/HTTPS listeners.
The ELBSecurityPolicy-2014-10 policy uses Server Order Preference to negotiate SSL connections.
For information about the current configuration for all the listed Security Policies, see SSL Security
Policy Table (p. 56).
2. Use the CreateLoadBalancerPolicy action using the following parameters to create a SSL negotiation
policy either using the predefined security policy ELBSecurityPolicy-2014-10, or the custom security
policy.
In this example, you create a MySSLNegotiationPolicy of the type SSLNegotiationPolicyType
for your load balancer my-test-loadbalancer.
Use the following parameters to create a SSL negotiation policy using the security policy -
ELBSecurityPolicy-2014-10:
• PolicyName = MySSLNegotiationPolicy
• PolicyTypeName = SSLNegotiationPolicyType
• PolicyAttributes.member.1.AttributeName = ReferenceSecurityPolicy
• PolicyAttributes.member.1.AttributeValue = ELBSecurityPolicy-2014-10
• LoadBalancerName = my-test-loadbalancer
API Version 2012-06-01
156
Elastic Load Balancing Developer Guide
Using the Query API

Or, use the following options to create a custom security policy by enabling the protocols
and ciphers that meet your requirements:
Note
You must enable at least one protocol and one cipher.You only need to set to true the
attributes that you want enabled.
The DSA and RSA ciphers are specific to the signing algorithm and are used to create the
SSL certificate. If you already have your SSL certificate, make sure to enable the cipher
that was used to create your certificate.
Your custom policy name must not contain the prefixes - ELBSecurityPolicy- and ELB-
Sample-.These prefixes are used by Elastic Load Balancing for its predefined security
policy names. If Elastic Load Balancing reads this prefix in your custom security policy name,
it will throw an error.
• PolicyName = MySSLNegotiationPolicy
• PolicyTypeName = SSLNegotiationPolicyType
• PolicyAttributes.member.1.AttributeName = ProtocolTLSv1.2
• PolicyAttributes.member.1.AttributeValue = true
• PolicyAttributes.member.2.AttributeName = ProtocolTLSv1.1
• PolicyAttributes.member.2.AttributeValue = true
• PolicyAttributes.member.3.AttributeName = DHE-RSA-AES256-SHA256
• PolicyAttributes.member.3.AttributeValue = true
• [optional] PolicyAttributes.member.4.AttributeName = ServerDefinedCipherOrder
• [optional] PolicyAttributes.member.4.AttributeValue = true
Note
Enable ServerDefinedCipherOrder if you want to use Server Order Preference (the
order listed in the SSL Security Policy Table (p. 56)) for SSL negotiation.
• LoadBalancerName = my-test-loadbalancer
3. Use the DescribeLoadBalancerPolicies action with the following parameters to verify that the policy
is created:
• LoadBalancerName = my-test-loadbalancer
• PolicyNames.member.1 = MySSLNegotiationPolicy
The response includes the description of the MySSLNegotiationPolicy.
4. Use the SetLoadBalancerPoliciesOfListener action with the following parameters to enable your
newly created policy on the load balancer port 443:
• LoadBalancerPort = 443
• PolicyNames.member.1 = MySSLNegotiationPolicy
• LoadBalancerName = my-test-loadbalancer
5. Use the DescribeLoadBalancers action with the following parameters to verify that the new policy is
enabled for the load balancer port:
• LoadBalancerNames.member.1 = my-test-loadbalancer
You can see that MySSLNegotiationPolicy is enabled for the load balancer port 443.
API Version 2012-06-01
157
Elastic Load Balancing Developer Guide
Using the Query API

Configure Custom Domain Name for Your Load
Balancer
Each Elastic Load Balancing instance that you create has an automatically created Domain Name System
(DNS) name.Typically, the DNS name includes the name of the AWS region in which the load balancer
is created. For example, if you create a load balancer named myLB in the US-East region, your load
balancer might have a DNS name such as myLB-1234567890.us-east-1.elb.amazonaws.com..You just
have to paste the DNS name generated by Elastic Load Balancing into the address field of an Internet-
connected web browser to connect to your load balancer.
If you'd rather use a user-friendly domain name, such as www.example.com, instead of the load balancer
DNS name, you can create a custom domain name and then associate the custom domain name with
the load balancer DNS name.When a request is placed to your load balancer using the custom domain
name that you created, it resolves to the load balancer DNS name.
To use a custom domain name for your load balancer instance, you’ll have to first register your domain
name with a DNS service provider.
When you register a domain name, you reserve not only the domain name itself, but also an entire set
of subdomain names. For example, if you register example.com as your custom domain name, you can
create subdomain names such as foo.bar.example.com, foo.myLB.example.com, and so on.This set of
a domain and its subdomain names is called a zone. A domain name that you reserve, such as ex-
ample.com, is called the zone apex because it sits at the top of the zone's hierarchy.
After you register your custom domain name, you have to associate your custom domain name with the
load balancer DNS name.
Associating Your Custom Domain Name with Your
Load Balancer Name
You can associate your custom domain name with your load balancer DNS name using either of the fol-
lowing options.
• Option 1: Create a canonical name (CNAME) record for your zone with your existing domain
name provider.
A CNAME record specifies that a domain name is an alias of another CNAME domain name.The creation
of CNAME records is a simple process. Many domain name registrars provide self-service tools that
you can use to create the CNAME record yourself. For more information on CNAME records, go to the
Wikipedia article http://en.wikipedia.org/wiki/CNAME_record.
The following example creates a CNAME record by associating an alias, www.foo.example.com,
with a canonical name, the DNS name of an Elastic Load Balancing instance.
www.foo.example.com CNAME myLB-1234567890.us-east-1.elb.amazonaws.com
You can create a CNAME record for your load balancer launched in EC2-Classic using any one of the
three public DNS names of your load balancer instance. Using dualstack-prefixed DNS name such as,
dualstack.myLB-1234567890.us-east-1.elb.amazonaws.com, allows clients with either IPv4
or IPv6 connectivity to connect with your load balancer in EC2-Classic. IPv6 support is currently not
available for load balancers in Amazon VPC (EC2-VPC).
You can't use a CNAME record to associate your zone apex with your Elastic Load Balancing instance.
DNS rules prohibit the creation of a CNAME record at the zone apex (e.g., example.com). For example,
API Version 2012-06-01
158
Elastic Load Balancing Developer Guide
Custom Domain Names

if you own the example.com domain name, you can use a CNAME record for the foo.example.com
subdomain name, but not for the example.com zone apex.
You can use the next option if you want to associate a zone apex with your load balancer DNS name.
• Option 2: Create a domain using Amazon Route 53 as the DNS service.
Amazon Route 53 stores information about your domain in a hosted zone. A hosted zone is an Amazon
Route 53 concept that is similar to a zone file on a DNS name server. Like a zone file, a hosted zone
contains information about your domain name, including the subdomain names within the domain and
mappings between names and IP addresses. For more information about Amazon Route 53, go to
What is Route 53 and How Does it Work?
Use this option to associate a zone apex with your load balancer DNS name.You’ll use Amazon Route
53 to create a hosted zone for your domain (for example, example.com), and then create alias resource
record sets. An alias resource record set contains a pointer to a resource record set that contains your
DNS resource records. For example, an alias resource record set for your domain, example.com, can
point to the DNS name of your load balancer instance.
You can associate a zone apex with any of the three public DNS names of your load balancer instance
launched in EC2-Classic. Using dualstack-prefixed DNS name such as, dualstack.myLB-
1234567890.us-east-1.elb.amazonaws.com, allows clients with either IPv4 or IPv6 connectivity to
connect with your load balancer in EC2-Classic. IPv6 support is currently not available for load balancers
in Amazon VPC (EC2-VPC).
After you create a hosted zone, you can also create alias resource record sets to associate subdomain
names with your load balancer instance.
DNS Failover: When you use Route 53 to create and associate a custom domain name with your load
balancer you have an option to enable DNS failover for your load balancer. If DNS failover is enabled,
Route 53 responds to the queries to your alias record set, example.com based on the health checks
of the associated primary and secondary load balancer instances.
If you plan to enable DNS failover for your load balancers, see Configure DNS Failover for Your Load
Balancer (p. 194).
This section describes how to associate your Elastic Load Balancing instance with a custom domain
name using Option 1 or Option 2.
Prerequisite
Before you start associating a load balancer DNS name with a custom domain name, you first need to
create a load balancer. For information on creating a basic load balancer, see Get Started with Elastic
Load Balancing (p. 23) For information on creating a load balancer with custom settings, see Create a
HTTPS/SSL Load Balancer (p. 72).
Note
The time-to-live (TTL) for an Elastic Load Balancing DNS entry is set to 60 seconds.This setting
ensures that IP addresses can be re-mapped quickly to respond to events that cause Elastic
Load Balancing to scale up or down.
Option 1: Create a CNAME Record for your subdomain and
load balancer
1. Register your custom domain name with your DNS provider. For a list of registrar websites you can
use to register your domain name, go to ICANN.Wait for your registrar to notify you that your domain
name is successfully registered.
API Version 2012-06-01
159
Elastic Load Balancing Developer Guide
Associating Your Custom Domain Name with Your Load
Balancer Name

2. Create a subdomain name to associate with your load balancer DNS name. For example, if your
custom domain name is example.com, you can create a subdomain name such as foo.mylb.ex-
ample.com.
3. Retrieve the public DNS name of your load balancer.You can use AWS Management Console, the
Elastic Load Balancing command line interface (ELB CLI), or the Elastic Load Balancing Query API
to retrieve your load balancer DNS name.
To use the AWS Management Console to retrieve the public DNS name of your load balancer
a. Sign in to the AWS Management Console and open the Amazon EC2 console at https://con-
sole.amazonaws.cn/ec2/.
b. On the Amazon EC2 console Resources page, in the EC2 Dashboard pane, under NETWORK
& SECURITY, click Load Balancers.
c. On the Load Balancers page, select your load balancer.
d. The bottom pane displays the details of your load balancer.
e. Make a note of the DNS name of your load balancer.
4. To use the ELB CLI to retrieve the public DNS name of your load balancer
a. Enter the elb-describe-lbs command, as in the following example.
elb-describe-lbs my-test-loadbalancer
The command returns the DNS name of your load balancer along with other details.
b. Make a note of the DNS name.
5. To use the Elastic Load Balancing Query API to retrieve the public DNS name of your load
balancer
a. You can call the Elastic Load Balancing API by submitting a query request. For information about
using query requests, see Use Query Requests to Call Elastic Load Balancing APIs (p. 21).
b. Call the DescribeLoadBalancers with the following parameter:
LoadBalancerName = my-test-loadbalancer
The operation returns the DNS name of your load balancer along with other details.
c. Make a note of the DNS name.
6. Create a CNAME record to associate your custom subdomain name with your load balancer DNS
name, as in the following example:
Note
Ask the company that provides your DNS name services (your domain name registrar) to
create a CNAME record for your zone. Many domain name registrars provide self-service
tools that you can use to create the CNAME record yourself.
www.foo.my-test-loadbalancer.example.com CNAME my-test-loadbalancer-
1234567890.us-east-1.elb.amazonaws.com
API Version 2012-06-01
160
Elastic Load Balancing Developer Guide
Associating Your Custom Domain Name with Your Load
Balancer Name

Option 2: Create an Amazon Route 53 hosted zone
1. Register your custom domain name with your DNS provider. For a list of registrar websites you can
use to register your domain name, go to ICANN.Wait for your registrar to notify you that your domain
name is successfully registered.
2. Create a hosted zone for your custom domain name using Amazon Route 53. For detailed instructions,
go to Creating a Hosted Zone in Amazon Route 53 Developer Guide.
As with other AWS products, there are no contracts or minimum commitments for using Amazon
Route 53—you pay only for the hosted zones that you configure and the number of queries that
Route 53 answers. For more information, see Route 53 Pricing.
3. For each hosted zone you create, Route 53 automatically creates four name server (NS) records.
These four name servers are called the delegation set. Before the Domain Name System will start
to route queries for your domain to Route 53 name servers, you must update your registrar's or your
DNS service's name server records, to point to the Route 53 name servers.
Follow the instructions in Getting the Name Servers for a Hosted Zone to get the four name servers
assigned to your hosted zone.
Follow the instructions in Name Server (NS) Records to update your registrar's or your DNS service's
name server records, to point to the Route 53 assigned name servers.
4. Create an alias resource record set you will use to associate your zone apex with your Elastic Load
Balancing instance DNS name.To create the alias resource record set you can use the Amazon
Route 53 console, Amazon Route 53 API, or the Elastic Load Balancing command line interface
(ELB CLI).
To use Amazon Route 53 console or Amazon Route 53 Query API
For detailed instructions on using the Amazon Route 53 console or the Amazon Route 53 Query API
to create an alias resource record set, go to Creating Alias Resource Record Sets in the Amazon
Route 53 Developer Guide.
To use the ELB CLI
a. Before you get started, be sure you’ve installed the Elastic Load Balancing CLI tools. For more
information, see Appendix A: Using the Elastic Load Balancing Command Line Interface (p.272)
for instructions on downloading and installing the CLI tools. For detailed descriptions of the
Elastic Load Balancing commands, see the Elastic Load Balancing Quick Reference Card.
b. Enter the elb-associate-route53-hosted-zone command, as in the following example,
to associate a zone apex with an Elastic Load Balancing instance.
This command creates an association between your zone apex and your Elastic Load Balancing
instance by adding an alias resource record set to your hosted zone. The following example
creates an association between example.com and a load balancer named my-test-loadbalancer.
elb-associate-route53-hosted-zone my-test-loadbalancer --rr-name ex
ample.com --hosted-zone-id Z123456789 --weight 100
For the hosted-zone-id parameter, use the hosted zone ID of your custom domain name
rather than the Elastic Load Balancing hosted zone ID. For instructions on getting the hosted
zone ID of your custom domain name, go to Listing the Hosted Zones for an AWS Account.
For more information about the weight parameter, go to Setting Up Weighted Resource Record
Sets in the Amazon Route 53 API Reference Guide.
API Version 2012-06-01
161
Elastic Load Balancing Developer Guide
Associating Your Custom Domain Name with Your Load
Balancer Name

Note
You might have to wait several minutes for your changes to propagate to all Amazon
Route 53 DNS servers. For information on how to check the status of your change, go
to Checking the Status of Your Change in the Amazon Route 53 Developer Guide.
c. You can also use elb-associate-route53-hosted-zone to create aliases for subdomains
that are part of your hosted zone.The following example associates the subdomain foo.bar.ex-
ample.com your Amazon Route 53 hosted zone with ID number Z123456789.
elb-associate-route53-hosted-zone my-test-loadbalancer --rr-name
foo.bar.example.com --hosted-zone-id Z123456789 --weight 100
Note
The elb-associate-route53-hosted-zone command works only with AWS secret
key authentication. Unlike other Elastic Load Balancing CLI commands, this Elastic
Load Balancing command does not work with X.509 certificate and RSA private key
credentials.
Disassociating Your Custom Domain Name From
Your Load Balancer Name
You can disassociate your custom domain name from a load balancer instance by first deleting the resource
record sets in your hosted zone and then deleting the hosted zone.
1. Delete the alias resource record sets in your Amazon Route 53 hosted zone
You can use Amazon Route 53 console, Amazon Route 53 API, or the Elastic Load Balancing
command line interface (CLI) to delete alias resource record sets in your hosted zone.
Using the Amazon Route 53 Console
• For information on using Amazon Route 53 console, go to Creating, Changing, and Deleting Re-
source Record Sets in the Amazon Route 53 Developer Guide.
Using the Amazon Route 53 Query API
• For information on using Amazon Route 53 Query API, scroll down to the Creating, Changing,
and Deleting Resource Record Sets Using the Route 53 API section in the Creating, Changing,
and Deleting Resource Record Sets topic in the Amazon Route 53 Developer Guide.
Using the ELB CLI
• Enter the elb-disassociate-route53-hosted-zone command.
This command removes the association between your zone apex or subdomain and your Elastic
Load Balancing instance by deleting an alias resource record set from your hosted zone. The fol-
lowing example removes an association between example.com and a load balancer named my-
test-loadbalancer.The hosted-zone-id parameter is your custom hosted zone ID.
elb-disassociate-route53-hosted-zone my-test-loadbalancer --rr-name ex
ample.com --hosted-zone-id Z123456789 --weight 100
API Version 2012-06-01
162
Elastic Load Balancing Developer Guide
Disassociating Your Custom Domain Name From Your
Load Balancer Name

Note
The weight parameter value must match the value you used to create the resource record
set specified in the rr-name parameter. If you don't remember the original weight value,
use the Amazon Route 53 ListResourceRecordSets action to retrieve the value. For
more information, go to ListResourceRecordSets in the Amazon Route 53 API Reference
Guide. For more information about the weight parameter, go to Setting Up Weighted Re-
source Record Sets in the Amazon Route 53 API Reference Guide.
Note
The elb-disassociate-route53-hosted-zone command works only with AWS secret
key authentication. Unlike other Elastic Load Balancing CLI commands, this new Elastic
Load Balancing command does not work with X.509 certificate and RSA private key creden-
tials.
2. Delete the hosted zone associated with your load balancer DNS name
You can use the Amazon Route 53 console or the Amazon Route 53 Query API to delete the hosted
zone associated with your load balancer DNS name. For more information, go to Deleting a Hosted
Zone in the Amazon Route 53 Developer Guide.
Enable or Disable Cross-Zone Load Balancing
for Your Load Balancer
Elastic Load Balancing provides you with an option to either enable or disable cross-zone load balancing
for your load balancer.
With cross-zone load balancing, your load balancer nodes route traffic to the back-end instances across
all Availability Zones. For more information, see Availability Zones and Regions (p. 5).
This section walks you through the process for enabling or disabling the cross-zone load balancing for
your load balancer.
Topics
• Enable Cross-Zone Load Balancing (p. 163)
• Disable Cross-Zone Load Balancing (p. 166)
Enable Cross-Zone Load Balancing
You can enable cross-zone load balancing for your load balancer using the AWS Management Console,
the AWS command line interface (AWS CLI) or the Elastic Load Balancing Query API.
To enable cross-zone load balancing using the AWS Management Console
1. Sign in to the AWS Management Console and open the Amazon EC2 console at https://con-
sole.amazonaws.cn/ec2/.
2. On the Amazon EC2 console Resources page, in the navigation pane, under NETWORK & SECUR-
ITY, click Load Balancers.
3. If necessary, change the region. From the navigation bar, select the region that has your load balancer.
4. On the Create Load Balancer page, select your load balancer.
5. The bottom pane displays the details of your load balancer.
6. Click (Edit) in the Cross-Zone Load Balancing: Disabled row.
7. In the Configure Cross-Zone Load Balancing dialog box, select Enable.
API Version 2012-06-01
163
Elastic Load Balancing Developer Guide
Cross-Zone Load Balancing

8. Click Save.
To enable cross-zone load balancing using the AWS CLI
You need to modify the CrossZoneLoadBalancing attribute of your load balancer by setting the attribute
value to true.
1. Enter the modify-load-balancer-attributes command using the following options:
• load-balancer-name = my-test-loadbalancer
• CrossZoneLoadBalancing
• Enabled=true
Your command should look like the following example:
Note
The following example uses JSON syntax on a Windows operating system to specify the
attributes. For information about specifying JSON syntax on your operating system, see
Quoting Strings.
aws elb modify-load-balancer-attributes --load-balancer-name my-test-load
balancer --load-balancer-attributes "{\"CrossZoneLoadBalancing\":{\"En
abled\":true}}"
Elastic Load Balancing responds as in the following example.
{
"LoadBalancerAttributes": {
"CrossZoneLoadBalancing": {
"Enabled": true
}
},
"LoadBalancerName": "my-test-loadbalancer"
}
2. Enter describe-load-balancer-attributes command as in the following example to verify that the cross-
zone load balancing is enabled for your load balancer. Use the following option:
• load-balancer-name = my-test-loadbalancer
Your command should look like the following example.
aws elb describe-load-balancer-attributes --load-balancer-name my-test-
loadbalancer
Elastic Load Balancing responds as in the following example.
{
"LoadBalancerAttributes": {
"ConnectionDraining": {
"Enabled": false,
"Timeout": 300
},
API Version 2012-06-01
164
Elastic Load Balancing Developer Guide
Enable Cross-Zone Load Balancing

"CrossZoneLoadBalancing": {
"Enabled": true
},
"ConnectionSettings": {
"IdleTimeout": 60
},
"AccessLog": {
"Enabled": false
}
}
}
To enable Cross-Zone load balancing using the Query API
You need to modify the CrossZoneLoadBalancing attribute of your load balancer by setting the attribute
value to true.
1. Use the ModifyLoadBalancerAttributes action with the following parameters:
• LoadBalancerName = my-test-loadbalancer
• CrossZoneLoadBalancingEnabled = true
Your request should look like the following example:
https://elasticloadbalancing.amazonaws.com/?LoadBalancerName=my-test-load
balancer &LoadBalancerAttributes.CrossZoneLoadBalancing.Enabled=true
&Version=2012-06-01
&Action=ModifyLoadBalancerAttributes
&AUTHPARAMS
If your request was successful, you should get a response similar to the following example.
<ModifyLoadBalancerAttributesResponse xmlns="http://elasticloadbalan
cing.amazonaws.com/doc/2012-06-01/">
<ModifyLoadBalancerAttributesResult/>
<ResponseMetadata>
<RequestId>9f646d88-1507-11e3-a983-c5f2EXAMPLE</RequestId>
</ResponseMetadata>
</ModifyLoadBalancerAttributesResponse>
2. Use the DescribeLoadBalancerAttributes action with the following parameter to verify that
the cross-zone load balancing is enabled for your load balancer.
• LoadBalancerName = my-test-loadbalancer
Your request should look like the following example.
https://elasticloadbalancing.amazonaws.com/?LoadBalancerName=my-test-load
balancer
&Version=2012-06-01
&Action=DescribeLoadBalancerAttributes
&AUTHPARAMS
API Version 2012-06-01
165
Elastic Load Balancing Developer Guide
Enable Cross-Zone Load Balancing

If your request is successful, you should get a response similar to the following example.
<DescribeLoadBalancerAttributesResponse xmlns="http://elasticloadbalan
cing.amazonaws.com/doc/2012-06-01/">
<DescribeLoadBalancerAttributesResult>
<LoadBalancerAttributes>
<CrossZoneLoadBalancing>
<Enabled>true</Enabled>
</CrossZoneLoadBalancing>
</LoadBalancerAttributes>
</DescribeLoadBalancerAttributesResult>
<ResponseMetadata>
<RequestId>3f42b4fe-1506-11e3-bcfd-3188aEXAMPLE</RequestId>
</ResponseMetadata>
</DescribeLoadBalancerAttributesResponse>
You have successfully enabled cross-zone load balancing for your load balancer.
Disable Cross-Zone Load Balancing
You can disable the cross-zone load balancing option for your load balancer at any time.
To disable cross-zone load balancing for your load balancer, you need to modify the CrossZoneLoad-
Balancing attribute of your load balancer by setting the attribute value to false.
This section shows you how to disable the cross-zone load balancing for your load balancer using the
AWS Management Console, the AWS command line interface (AWS CLI), or the Query API.
To disable cross-zone load balancing using the AWS Management Console
1. Sign in to the AWS Management Console and open the Amazon EC2 console at https://con-
sole.amazonaws.cn/ec2/.
2. On the Amazon EC2 console Resources page, in the navigation pane, under NETWORK & SECUR-
ITY, click Load Balancers.
3. If necessary, change the region. From the navigation bar, select the region that has your load balancer.
4. On the Create Load Balancer page, select your load balancer.
5. The bottom pane displays the details of your load balancer.
6. Click (Edit) in the Cross-Zone Load Balancing: Enabled row.
7. In the Configure Cross-Zone Load Balancing dialog box, select Disable.
8. Click Save.
To disable cross-zone load balancing using the AWS CLI
You need to modify the CrossZoneLoadBalancing attribute of your load balancer by setting the attribute
value to false.
1. Enter the modify-load-balancer-attributes command using the following options:
• load-balancer-name = my-test-loadbalancer
• CrossZoneLoadBalancing
• Enabled=false
API Version 2012-06-01
166
Elastic Load Balancing Developer Guide
Disable Cross-Zone Load Balancing

Your command should look like the following example:
Note
This example uses JSON syntax on a Windows operating system to specify the attributes.
For information about specifying JSON syntax on your operating system, see Quoting
Strings.
aws elb modify-load-balancer-attributes --load-balancer-name my-test-load
balancer --load-balancer-attributes "{\"CrossZoneLoadBalancing\":{\"En
abled\":false}}"
Elastic Load Balancing responds as in the following example.
{
"LoadBalancerAttributes": {
"CrossZoneLoadBalancing": {
"Enabled": false
}
},
"LoadBalancerName": "my-test-loadbalancer"
}
2. Enter describe-load-balancer-attributes command as in the following example to verify that the cross-
zone load balancing is disabled for your load balancer. Use the following option:
• load-balancer-name = my-test-loadbalancer
Your command should look like the following example.
aws elb describe-load-balancer-attributes --load-balancer-name my-test-
loadbalancer
Elastic Load Balancing responds as in the following example.
{
"LoadBalancerAttributes": {
"ConnectionDraining": {
"Enabled": false,
"Timeout": 300
},
"CrossZoneLoadBalancing": {
"Enabled": false
},
"ConnectionSettings": {
"IdleTimeout": 60
},
"AccessLog": {
"Enabled": false
}
}
}
API Version 2012-06-01
167
Elastic Load Balancing Developer Guide
Disable Cross-Zone Load Balancing

To disable cross-zone load balancing using the Query API
1. Use the ModifyLoadBalancerAttributes action with the following parameters:
• LoadBalancerName = my-test-loadbalancer
• CrossZoneLoadBalancingEnabled = false
Your request should look similar to the following example:
https://elasticloadbalancing.amazonaws.com/?LoadBalancerName=my-test-load
balancer &LoadBalancerAttributes.CrossZoneLoadBalancing.Enabled=false
&Version=2012-06-01
&Action=ModifyLoadBalancerAttributes
&AUTHPARAMS
If your request was successful, you should get a response similar to the following example:
<ModifyLoadBalancerAttributesResponse xmlns="http://elasticloadbalan
cing.amazonaws.com/doc/2012-06-01/">
<ModifyLoadBalancerAttributesResult/>
<ResponseMetadata>
<RequestId>9f646d88-1507-11e3-a983-c5f2EXAMPLE</RequestId>
</ResponseMetadata>
</ModifyLoadBalancerAttributesResponse>
2. Use the DescribeLoadBalancerAttributes action with the following parameter to verify that
the Cross-Zone load balancing is disabled for your load balancer.
• LoadBalancerName = my-test-loadbalancer
Your request should look like the following example.
https://elasticloadbalancing.amazonaws.com/?LoadBalancerName=my-test-load
balancer
&Version=2012-06-01
&Action=DescribeLoadBalancerAttributes
&AUTHPARAMS
If your request is successful, you should get a response similar to the following example:
<DescribeLoadBalancerAttributesResponse xmlns="http://elasticloadbalan
cing.amazonaws.com/doc/2012-06-01/">
<DescribeLoadBalancerAttributesResult>
<LoadBalancerAttributes>
<CrossZoneLoadBalancing>
<Enabled>false</Enabled>
</CrossZoneLoadBalancing>
</LoadBalancerAttributes>
</DescribeLoadBalancerAttributesResult>
<ResponseMetadata>
<RequestId>3f42b4fe-1506-11e3-bcfd-3188aEXAMPLE</RequestId>
</ResponseMetadata>
</DescribeLoadBalancerAttributesResponse>
API Version 2012-06-01
168
Elastic Load Balancing Developer Guide
Disable Cross-Zone Load Balancing

You have successfully disabled cross-zone load balancing for your load balancer.
API Version 2012-06-01
169
Elastic Load Balancing Developer Guide
Disable Cross-Zone Load Balancing

Enable or Disable Connection Draining for Your
Load Balancer
You have the option to either enable or disable connection draining on your load balancer. Connection
draining causes the load balancer to stop sending new requests to the back-end instances when the in-
stances are deregistering or when instances become unhealthy, while ensuring that in-flight requests
continue to be served. For more information, see Connection Draining (p. 9).
This section walks you through the process for enabling or disabling connection draining for your load
balancer.
Enable Connection Draining
When you enable connection draining, you can specify a maximum time for the load balancer to keep
the connections alive before reporting the instance as deregistered. If you do not specify the maximum
timeout period, by default, the load balancer will close connections to the deregistering instance after 300
seconds.
The maximum timeout value can be set between 1 and 3600 seconds.
You can enable the connection draining on your load balancer using the AWS Management Console,
the AWS command line interface (AWS CLI), or the Query API.
To enable connection draining using the AWS Management Console
1. Sign in to the AWS Management Console and open the Amazon EC2 console at https://con-
sole.amazonaws.cn/ec2/.
2. On the Amazon EC2 console Resources page, in the navigation pane, under NETWORK & SECUR-
ITY, click Load Balancers.
3. If necessary, change the region. From the navigation bar, select the region that has your load balancer.
4. On the load balancer page, select your load balancer.
5. The bottom pane displays the details of your load balancer. Click the Instances tab.
6. Click (Edit) in the Connection Draining: Disabled row.
7. In the Configure Connection Draining dialog box, select Enable Connection Draining.
8. [optional] Click the Timeout dialog box and enter a value for maximum time limit.
9. Click Save.
API Version 2012-06-01
170
Elastic Load Balancing Developer Guide
Connection Draining

To enable connection draining using the AWS CLI
To enable connection draining, you must modify the ConnectionDraining attribute of your load balancer
by setting the attribute value to true and by optionally specifying a Timeout value.
Before you get started, make sure you have downloaded the latest version of the AWS CLI.
1. Enter the command modify-load-balancer-attributes using the following options:
• load-balancer-name = my-test-loadbalancer
• ConnectionDraining
• Enabled=true
• [optional] Timeout=300
Your command should look like the following example:
Note
The following example uses JSON syntax on a Windows operating system to specify the
attributes. For information about specifying JSON syntax on your operating system, see
Quoting Strings.
aws elb modify-load-balancer-attributes --load-balancer-name my-test-load
balancer --load-balancer-attributes "{\"ConnectionDraining\":{\"En
abled\":true,\"Timeout\":300}}"
Elastic Load Balancing responds as in the following example.
{
"LoadBalancerAttributes": {
"ConnectionDraining": {
"Enabled": true,
"Timeout": 300
}
},
"LoadBalancerName": "my-test-loadbalancer"
}
2. Enter describe-load-balancer-attributes command as in the following example to verify that the con-
nection draining is enabled for your load balancer. Use the following option:
• load-balancer-name = my-test-loadbalancer
Your command should look like the following example.
aws elb describe-load-balancer-attributes --load-balancer-name my-test-
loadbalancer
Elastic Load Balancing responds as in the following example.
{
"LoadBalancerAttributes": {
"ConnectionDraining": {
"Enabled": true,
API Version 2012-06-01
171
Elastic Load Balancing Developer Guide
Enable Connection Draining

"Timeout": 300
},
"CrossZoneLoadBalancing": {
"Enabled": false
},
"ConnectionSettings": {
"IdleTimeout": 60
},
"AccessLog": {
"Enabled": false
}
}
}
You have successfully enabled connection draining for your load balancer.
To enable connection draining using the Query API
To enable connection draining, you must modify the ConnectionDraining attribute of your load balancer
by setting the attribute value to true and by optionally specifying a connection timeout value.
1. Use the ModifyLoadBalancerAttributes action with the following parameters:
• LoadBalancerName = my-test-loadbalancer
• ConnectionDraining
• Enabled=true
• [optional] Timeout=300
Your request should look like the following example:
https://elasticloadbalancing.sa-east-1.amazonaws.com/?LoadBalancerAttrib
utes.AccessLog.Enabled=true
&LoadBalancerAttributes.ConnectionDraining.Timeout=300
&LoadBalancerName=my-test-loadbalancer
&Version=2012-06-01
&Action=ModifyLoadBalancerAttributes
&AUTHPARAMS
If your request is successful, you should get a response similar to the following example:
<ModifyLoadBalancerAttributesResponse xmlns="http://elasticloadbalan
cing.amazonaws.com/doc/2012-06-01/">
<ModifyLoadBalancerAttributesResult>
<LoadBalancerName>my-test-loadbalancer</LoadBalancerName>
<LoadBalancerAttributes>
<ConnectionDraining>
<Enabled>true</Enabled>
<Timeout>300</Timeout>
</ConnectionDraining>
</LoadBalancerAttributes>
</ModifyLoadBalancerAttributesResult>
<ResponseMetadata>
<RequestId>020744c8-9d97-11e3-919a-33887EXAMPLE</RequestId>
API Version 2012-06-01
172
Elastic Load Balancing Developer Guide
Enable Connection Draining

</ResponseMetadata>
</ModifyLoadBalancerAttributesResponse>
2. Use the DescribeLoadBalancerAttributes action with the following parameter to verify that
connection draining is enabled for your load balancer.
• LoadBalancerName = my-test-loadbalancer
Your request should look like the following example.
https://elasticloadbalancing.amazonaws.com/?LoadBalancerName=my-test-load
balancer
&Version=2012-06-01
&Action=DescribeLoadBalancerAttributes
&AUTHPARAMS
If your request is successful, you should get a response similar to the following example:
<DescribeLoadBalancerAttributesResponse xmlns="http://elasticloadbalan
cing.amazonaws.com/doc/2012-06-01/">
<DescribeLoadBalancerAttributesResult>
<LoadBalancerAttributes>
<AccessLog>
<Enabled>false</Enabled>
</AccessLog>
<CrossZoneLoadBalancing>
<Enabled>false</Enabled>
</CrossZoneLoadBalancing>
<ConnectionDraining>
<Enabled>true</Enabled>
<Timeout>60</Timeout>
</ConnectionDraining>
</LoadBalancerAttributes>
</DescribeLoadBalancerAttributesResult>
<ResponseMetadata>
<RequestId>64e7b49d-41fb-11e3-962d-c57EXAMPLE</RequestId>
</ResponseMetadata>
</DescribeLoadBalancerAttributesResponse>
You have successfully enabled connection draining for your load balancer.
Disable Connection Draining
You can disable the connection draining if you want your load balancer to immediately close connections
to the registered instances when the instances are deregistering or become unhealthy. With connection
draining attribute disabled, any in-flight requests made to the deregistering or unhealthy instances will
not be completed.
You can disable connection draining on your load balancer using the AWS Management Console, the
AWS command line interface (AWS CLI), or the Query API.
API Version 2012-06-01
173
Elastic Load Balancing Developer Guide
Disable Connection Draining

To disable connection draining using the AWS Management Console
1. Sign in to the AWS Management Console and open the Amazon EC2 console at https://con-
sole.amazonaws.cn/ec2/.
2. On the Amazon EC2 console Resources page, in the navigation pane, under NETWORK & SECUR-
ITY, click Load Balancers.
3. If necessary, change the region. From the navigation bar, select the region that has your load balancer.
4. On the Create Load Balancer page, select your load balancer.
5. The bottom pane displays the details of your load balancer. Click the Instances tab.
6. Click (Edit) in the Connection Draining: Enabled row.
7. In the Configure Connection Draining dialog box, click Enable Connection Draining to disable.
8. Click Save.
To disable connection draining using the AWS CLI
To disable connection draining, you must modify the ConnectionDraining attribute of your load balancer
by setting the attribute value to false.
Before you get started, make sure you have downloaded the latest version of the AWS CLI.
1. Enter the command modify-load-balancer-attributes using the following options:
• load-balancer-name = my-test-loadbalancer
• ConnectionDraining
• Enabled=false
Your command should look like the following example:
Note
This example uses JSON syntax on a Windows operating system to specify the attributes.
For information about specifying JSON syntax on your operating system, see Quoting
Strings.
aws elb modify-load-balancer-attributes --load-balancer-name my-test-load
balancer --load-balancer-attributes "{\"ConnectionDraining\":{\"En
abled\":false}}"
Elastic Load Balancing responds as in the following example.
{
"LoadBalancerAttributes": {
"ConnectionDraining": {
"Enabled": false,
"Timeout": 300
}
},
"LoadBalancerName": "my-test-loadbalancer"
}
2. Enter describe-load-balancer-attributes command as in the following example to verify that the con-
nection draining is enabled for your load balancer. Use the following option:
• load-balancer-name = my-test-loadbalancer
API Version 2012-06-01
174
Elastic Load Balancing Developer Guide
Disable Connection Draining

Your command should look like the following example.
aws elb describe-load-balancer-attributes --load-balancer-name my-test-
loadbalancer
Elastic Load balancing responds as in the following example.
{
"LoadBalancerAttributes": {
"ConnectionDraining": {
"Enabled": false,
"Timeout": 300
},
"CrossZoneLoadBalancing": {
"Enabled": false
},
"ConnectionSettings": {
"IdleTimeout": 60
},
"AccessLog": {
"Enabled": false
}
}
}
To disable connection draining using the Query API
To disable the connection draining, you must modify the ConnectionDraining attribute of your load
balancer by setting the attribute value to false.
1. Use the ModifyLoadBalancerAttributes action with the following parameters:
• LoadBalancerName = my-test-loadbalancer
• ConnectionDraining
• Enabled=false
Your request should look like the following example:
https://elasticloadbalancing.sa-east-1.amazonaws.com/?LoadBalancerAttrib
utes.AccessLog.Enabled=false
&LoadBalancerName=my-test-loadbalancer
&Version=2012-06-01
&Action=ModifyLoadBalancerAttributes
&AUTHPARAMS
If your request is successful, you should get a response similar to the following example:
<ModifyLoadBalancerAttributesResponse xmlns="http://elasticloadbalan
cing.amazonaws.com/doc/2012-06-01/">
<ModifyLoadBalancerAttributesResult>
<LoadBalancerName>my-test-loadbalancer</LoadBalancerName>
<LoadBalancerAttributes>
API Version 2012-06-01
175
Elastic Load Balancing Developer Guide
Disable Connection Draining

<ConnectionDraining>
<Enabled>false</Enabled>
<Timeout>300</Timeout>
</ConnectionDraining>
</LoadBalancerAttributes>
</ModifyLoadBalancerAttributesResult>
<ResponseMetadata>
<RequestId>020744c8-9d97-11e3-919a-33887EXAMPLE</RequestId>
</ResponseMetadata>
</ModifyLoadBalancerAttributesResponse>
2. Use the DescribeLoadBalancerAttributes action with the following parameter to verify that
connection draining is disabled for your load balancer.
• LoadBalancerName = my-test-loadbalancer
Your request should look like the following example.
https://elasticloadbalancing.amazonaws.com/?LoadBalancerName=my-test-load
balancer
&Version=2012-06-01
&Action=DescribeLoadBalancerAttributes
&AUTHPARAMS
If your request is successful, you should get a response similar to the following example:
<DescribeLoadBalancerAttributesResponse xmlns="http://elasticloadbalan
cing.amazonaws.com/doc/2012-06-01/">
<DescribeLoadBalancerAttributesResult>
<LoadBalancerAttributes>
<AccessLog>
<Enabled>false</Enabled>
</AccessLog>
<CrossZoneLoadBalancing>
<Enabled>false</Enabled>
</CrossZoneLoadBalancing>
<ConnectionDraining>
<Enabled>false</Enabled>
<Timeout>60</Timeout>
</ConnectionDraining>
</LoadBalancerAttributes>
</DescribeLoadBalancerAttributesResult>
<ResponseMetadata>
<RequestId>64e7b49d-41fb-11e3-962d-c57EXAMPLE</RequestId>
</ResponseMetadata>
</DescribeLoadBalancerAttributesResponse>
You have successfully disabled connection draining for your load balancer.
API Version 2012-06-01
176
Elastic Load Balancing Developer Guide
Disable Connection Draining

Configure Idle Connection Timeout
By default, Elastic Load Balancing sets the idle timeout to 60 seconds for the connections to the client
and the back-end instance.You can change the idle timeout setting for the connections at any time. For
information on idle timeout, see Idle Connection Timeout (p. 10).
The idle timeout setting on your load balancer can be any value from 1 second to 3600 seconds.
If you have enabled the keep-alive option on your back-end instances, and if you want to ensure that load
balancer is responsible for closing connections, we recommend that you change the keep-alive setting
on your back-end instances to a value greater than the idle timeout setting on your load balancer.
This section walks you through the process for configuring the idle timeout setting on your load balancer
using the AWS Management Console, the AWS command line interface ( AWS CLI), or the Query API.
Topics
• Using the AWS Management Console (p. 177)
• Using the AWS Command Line Interface (p. 177)
• Using the Query API (p. 179)
Using the AWS Management Console
This console provides an easy way to set the idle timeout on your load balancer.
To configure idle timeout setting for your load balancer
1. Sign in to the AWS Management Console and open the Amazon EC2 console at https://con-
sole.amazonaws.cn/ec2/.
2. On the Amazon EC2 console Resources page, in the navigation pane, under NETWORK & SECUR-
ITY, click Load Balancers.
3. If necessary, change the region. From the navigation bar, select the region that has your load balancer.
4. On the load balancer page, select your load balancer.
5. The bottom pane displays the details of your load balancer.
6. Click (Edit) in the Connection Settings: row.
7. In the Configure Connection Settings dialog box, enter a value for Idle Timeout.
8. Click Save.
Using the AWS Command Line Interface
Before you get started, make sure you downloaded the latest version of the AWS CLI.
To configure idle timeout setting for your load balancer
1. Enter the command modify-load-balancer-attributes using the following options:
API Version 2012-06-01
177
Elastic Load Balancing Developer Guide
Idle Timeout

• load-balancer-name = my-test-loadbalancer
• ConnectionSettings
• IdleTimeout = 30
Your command should look like the following example:
Note
The following example uses JSON syntax on a Windows operating system to specify the
attributes. For information about specifying JSON syntax on your operating system, see
Quoting Strings.
aws elb modify-load-balancer-attributes --load-balancer-name my-test-load
balancer --load-balancer-attributes "{\"ConnectionSettings\":{\"Idle
Timeout\":30}}"
Elastic Load Balancing responds as in the following example:
{
"LoadBalancerAttributes": {
"ConnectionSettings": {
"IdleTimeout": 30
}
},
"LoadBalancerName": "my-test-loadbalancer"
}
2. Enter describe-load-balancer-attributes command as in the following example to verify that the idle
timeout setting is updated for your load balancer . Use the following option:
• load-balancer-name = my-test-loadbalancer
Your command should look like the following example.
aws elb describe-load-balancer-attributes --load-balancer-name my-test-
loadbalancer
Elastic Load balancing responds as in the following example.
{
"LoadBalancerAttributes": {
"ConnectionDraining": {
"Enabled": false,
"Timeout": 300
},
"CrossZoneLoadBalancing": {
"Enabled": false
},
"ConnectionSettings": {
"IdleTimeout": 30
},
"AccessLog": {
"Enabled": false
}
API Version 2012-06-01
178
Elastic Load Balancing Developer Guide
Using the AWS Command Line Interface

}
}
Using the Query API
To configure idle timeout setting, you must modify the ConnectionSettings attribute of your load bal-
ancer by specifying the IdleTimeout value.
To configure idle timeout setting for your load balancer
1. Use the ModifyLoadBalancerAttributes action by specifying the following parameters:
• LoadBalancerName = my-test-loadbalancer
• ConnectionSettings
• IdleTimeout = 30
Your request should look like the following example:
https://elasticloadbalancing.us-east-1.amazonaws.com/? LoadBalancerAttrib
utes.ConnectionSettings.IdleTimeout=30
&LoadBalancerName=my-test-loadbalancer
&Version=2012-06-01
&Action=ModifyLoadBalancerAttributes
&AUTHPARAMS
If your request is successful, you should get a response similar to the following example:
<ModifyLoadBalancerAttributesResponse xmlns="http://elasticloadbalan
cing.amazonaws.com/doc/2012-06-01/">
<ModifyLoadBalancerAttributesResult>
<LoadBalancerName>my-test-loadbalancer</LoadBalancerName>
<LoadBalancerAttributes>
<ConnectionSettings>
<IdleTimeout>30</IdleTimeout>
</ConnectionSettings>
</LoadBalancerAttributes>
</ModifyLoadBalancerAttributesResult>
<ResponseMetadata>
<RequestId>020744c8-9d97-11e3-919a-33887EXAMPLE</RequestId>
</ResponseMetadata>
</ModifyLoadBalancerAttributesResponse>
2. Use the DescribeLoadBalancerAttributes action as in the following example to verify that the idle
connection timeou r't setting is updated for your load balancer. Use the following parameter:
• LoadBalancerName = my-test-loadbalancer
Your request should look like the following example:
API Version 2012-06-01
179
Elastic Load Balancing Developer Guide
Using the Query API

https://elasticloadbalancing.amazonaws.com/?LoadBalancerName=my-test-load
balancer
&Version=2012-06-01
&Action=DescribeLoadBalancerAttributes
&AUTHPARAMS
If your request is successful, you should get a response similar to the following example:
<DescribeLoadBalancerAttributesResponse xmlns="http://elasticloadbalan
cing.amazonaws.com/doc/2012-06-01/">
<DescribeLoadBalancerAttributesResult>
<LoadBalancerAttributes>
<ConnectionSettings>
<IdleTimeout>30</IdleTimeout>
</ConnectionSettings>
<AccessLog>
<Enabled>false</Enabled>
</AccessLog>
<CrossZoneLoadBalancing>
<Enabled>true</Enabled>
</CrossZoneLoadBalancing>
<ConnectionDraining>
<Enabled>false</Enabled>
<Timeout>300</Timeout>
</ConnectionDraining>
</LoadBalancerAttributes>
</DescribeLoadBalancerAttributesResult>
<ResponseMetadata>
<RequestId>64e7b49d-41fb-11e3-962d-c57EXAMPLE</RequestId>
</ResponseMetadata>
</DescribeLoadBalancerAttributesResponse>
API Version 2012-06-01
180
Elastic Load Balancing Developer Guide
Using the Query API

Enable or Disable Proxy Protocol Support
By default, when you use Transmission Control Protocol (TCP) or Secure Sockets Layer (SSL) for both
front-end and back-end connections, your load balancer forwards the request to the back-end instances
without modifying the request headers. If you enable Proxy Protocol, a human-readable header gets
prepended to the request header with connection information such as the source IP address, destination
IP address, and port numbers.The header is then sent to the back-end instance as part of the request.
Proxy Protocol is an Internet protocol used for carrying connection information from the source requesting
the connection to the destination for which the connection was requested. Elastic Load Balancing uses
Proxy Protocol version 1, which uses a human-readable header format.
Proxy Protocol can only be enabled on ports using either SSL or TCP protocols.You can use Proxy
Protocol to capture your client’s source IP when you are using a non-HTTP protocol, or when you are
using HTTPS and not terminating the SSL connection on your load balancer.
If you have a Proxy Protocol enabled proxy server in front of your load balancer, then you must not enable
Proxy Protocol on your load balancer. If the Proxy Protocol is enabled on both the proxy server and the
load balancer, the load balancer will add another header to the request that already has a header from
the proxy server. Depending on how your back-end instance is configured, this duplication might result
in errors.
The following diagrams illustrate the incorrect and correct configurations for enabling Proxy Protocol when
you have a proxy server in front of your load balancer.
This section walks you through the process for enabling Proxy Protocol and then associating it with your
back-end instance using either the AWS command line interface (AWS CLI) or the Query API. At present,
the Elastic Load Balancing console does not support enabling Proxy Protocol.
Prerequisites for Enabling Proxy Protocol
API Version 2012-06-01
181
Elastic Load Balancing Developer Guide
Proxy Protocol

Before you begin, be sure that you complete the following steps:
• Create a basic load balancer by specifying either an SSL or a TCP protocol for both front-end and back-
end listeners. For more information, see Get Started with Elastic Load balancing.
• Confirm that your back-end instances can process the Proxy Protocol information.
Topics
• Enable Proxy Protocol Using the AWS Command Line Interface (p. 182)
• Enable Proxy Protocol Using the Query API (p. 188)
Enable Proxy Protocol Using the AWS Command
Line Interface
To enable Proxy Protocol, you need to create a policy of the type ProxyProtocolPolicyType and
then set the policy to the back-end instance port.
In this walkthrough, you will create a new policy EnableProxyProtocol of the type ProxyProtocol-
PolicyType for a load balancer named my-test-loadbalancer, set the newly created policy to the
back-end instance on port 80, and verify that the policy is enabled.
To create a policy
1. Enter the describe-load-balancer-policy-types command to list all the policies supported by Elastic
Load Balancing.
aws elb describe-load-balancer-policy-types
2. Elastic Load Balancing responds with the names and descriptions of the supported policy types.The
following example shows a partial listing of the supported policy types.
{
"PolicyTypeDescriptions": [
{
"PolicyAttributeTypeDescriptions": [
{
"Cardinality": "ONE_OR_MORE",
"AttributeName": "PublicKeyPolicyName",
"AttributeType": "PolicyName"
}
],
"PolicyTypeName": "BackendServerAuthenticationPolicyType",
"Description": "Policy that controls authentication to back-end
server(s) and contains one or more policies, such as an instance of a
PublicKeyPolicyType. This policy can be associated only with back-end
servers that are using HTTPS/SSL."
},
{
"PolicyAttributeTypeDescriptions": [
{
"Cardinality": "ONE",
"AttributeName": "PublicKey",
"AttributeType": "String"
API Version 2012-06-01
182
Elastic Load Balancing Developer Guide
Enable Proxy Protocol Using the AWS Command Line
Interface

}
],
"PolicyTypeName": "PublicKeyPolicyType",
"Description": "Policy containing a list of public keys to accept
when authenticating the back-end server(s). This policy cannot be a
pplied directly to back-end servers or listeners but must be part of a
BackendServerAuthenticationPolicyType."
},
{
"PolicyAttributeTypeDescriptions": [
{
"Cardinality": "ONE",
"AttributeName": "CookieName",
"AttributeType": "String"
}
],
"PolicyTypeName": "AppCookieStickinessPolicyType",
"Description": "Stickiness policy with session lifetimes con
trolled by the lifetime of the application-generated cookie. This policy
can be associated only with HTTP/HTTPS listeners."
},
{
"PolicyAttributeTypeDescriptions": [
{
"Cardinality": "ZERO_OR_ONE",
"AttributeName": "CookieExpirationPeriod",
"AttributeType": "Long"
}
],
"PolicyTypeName": "LBCookieStickinessPolicyType",
"Description": "Stickiness policy with session lifetimes con
trolled by the browser (user-agent) or a specified expiration period. Thi
s policy can be associated only with HTTP/HTTPS listeners."
},
{
"PolicyAttributeTypeDescriptions": [
{
"Cardinality": "ONE",
"AttributeName": "ProxyProtocol",
"AttributeType": "Boolean"
}
],
"PolicyTypeName": "ProxyProtocolPolicyType",
"Description": "Policy that controls whether to include the IP
address and port of the originating request for TCP messages. This pol
icy operates on TCP/SSL listeners only"
},
{
"PolicyAttributeTypeDescriptions": [
{
"Cardinality": "ZERO_OR_ONE",
"AttributeName": "Protocol-SSLv2",
"AttributeType": "Boolean"
}
{
..............
}
API Version 2012-06-01
183
Elastic Load Balancing Developer Guide
Enable Proxy Protocol Using the AWS Command Line
Interface

],
"PolicyTypeName": "SSLNegotiationPolicyType",
"Description": "Listener policy that defines the ciphers and
protocols that will be accepted by the load balancer. This policy can be
associated only with HTTPS/SSL listeners."
}
]
}
Use the policy type ProxyProtocolPolicyType to create a new policy EnableProxyProtocol.
3. Enter the create-load-balancer-policy command to create a new policy.
aws elb create-load-balancer-policy --load-balancer-name my-test-loadbalancer
--policy-name EnableProxyProtocol --policy-type-name ProxyProtocolPolicyType
--policy-attributes AttributeName=ProxyProtocol,AttributeValue=True
To enable the policy
• Enter the command set-load-balancer-policies-for backend-server to set the newly created policy to
the back-end instance port.
Note
The set-load-balancer-policies-for-backend-server command replaces the
current set of policies associated with your instance port. Every time you use this command
to enable the policies, use the --policy-names option to list all the policies you want to
enable.
aws elb set-load-balancer-policies-for-backend-server --load-balancer-name
my-test-loadbalancer --instance-port 80 --policy-names EnableProxyProtocol
MyPolicyName2 MyPolicyName3
To verify that the Proxy Protocol is enabled
1. Enter the describe-load-balancers command to verify that the Proxy Protocol is enabled.
aws elb describe-load-balancers --load-balancer-name my-test-loadbalancer
2. Elastic Load Balancing responds as in the following example.
{
"LoadBalancerDescriptions": [
{
"Subnets": [],
"CanonicalHostedZoneNameID": "Z3DZXE0Q79N41H",
"CanonicalHostedZoneName": "my-test-loadbalancer-521886987.us-
east-1.elb.amazonaws.com",
"ListenerDescriptions": [
{
"Listener": {
API Version 2012-06-01
184
Elastic Load Balancing Developer Guide
Enable Proxy Protocol Using the AWS Command Line
Interface

"InstancePort": 443,
"SSLCertificateId": "arn:aws:iam::55555555:server-
certificate/production/myservercert",
"LoadBalancerPort": 443,
"Protocol": "HTTPS",
"InstanceProtocol": "HTTPS"
},
"PolicyNames": [
"MySSLNegotiationPolicy"
]
},
{
"Listener": {
"InstancePort": 80,
"LoadBalancerPort": 80,
"Protocol": "TCP",
"InstanceProtocol": "TCP"
},
"PolicyNames": []
}
],
"HealthCheck": {
"HealthyThreshold": 10,
"Interval": 30,
"Target": "TCP:443",
"Timeout": 5,
"UnhealthyThreshold": 2
},
"BackendServerDescriptions": [
{
"InstancePort": 80,
"PolicyNames": [
"EnableProxyProtocol"
]
}
],
"Instances": [],
"DNSName": "my-test-loadbalancer-521886987.us-east-
1.elb.amazonaws.com",
"SecurityGroups": [],
"Policies": {
"LBCookieStickinessPolicies": [],
"AppCookieStickinessPolicies": [],
"OtherPolicies": [
"ELBSecurityPolicy-2014-01",
"MySSLNegotiationPolicy",
"EnableProxyProtocol"
]
},
"LoadBalancerName": "my-test-loadbalancer",
"CreatedTime": "2014-08-03T02:43:43.860Z",
"AvailabilityZones": [
"us-east-1c"
],
"Scheme": "internet-facing",
"SourceSecurityGroup": {
"OwnerAlias": "amazon-elb",
"GroupName": "amazon-elb-sg"
API Version 2012-06-01
185
Elastic Load Balancing Developer Guide
Enable Proxy Protocol Using the AWS Command Line
Interface

}
}
]
}
The description in the BackendServerDescriptions field confirms that the EnableProxyProtocol
policy is associated with the instance port 80.
Disable the Policy
At any time you can disable the policies associated with your back-end instance and then enable them
at a later time. Skip this step if you want to continue associating the Proxy Protocol policy with your back-
end instance.
To disable the Proxy Protocol policy
• Use the set-load-balancer-policies-for-backend-server command to disable the Proxy Protocol policy
by not specifying the Proxy Protocol policy name with the --policy-names option.
Note
The set-load-balancer-policies-for-backend-server command replaces the
current set of policies associated with your instance port. Every time you use this command
to disable policies, use the --policy-names option to list the policy names you want to
enable and omit the policy names you want to disable.
If you do not have any other policies to enable for the instance port 80, use an empty string with
--policy-names option as shown in the following example:
Note
The following example uses JSON syntax on a Windows operating system to specify the
attributes. For information about specifying JSON syntax on your operating system, see
Quoting Strings.
aws elb set-load-balancer-policies-for-backend-server --load-balancer-name
my-test-loadbalancer --instance-port 80 --policy-names "[]"
If you want to enable policies other than the Proxy Protocol policy for the instance port 80, use
--policy-names option to list the other policies.
elb-set-lb-policies-for-backend-server my-test-loadbalancer --instance-port
80 --policy-names MyPolicyName2 MyPolicyName3
To verify that the Proxy Protocol policy is disabled
1. Enter describe-load-balancers command to verify if the policy is disabled.
aws elb describe-load-balancers --load-balancer-name my-test-loadbalancer
2. Elastic Load Balancing responds as in the following example.
API Version 2012-06-01
186
Elastic Load Balancing Developer Guide
Enable Proxy Protocol Using the AWS Command Line
Interface

{
"LoadBalancerDescriptions": [
{
"Subnets": [],
"CanonicalHostedZoneNameID": "Z3DZXE0Q79N41H",
"CanonicalHostedZoneName": "my-test-loadbalancer-521886987.us-
east-1a.elb.amazonaws.com",
"ListenerDescriptions": [
{
"Listener": {
"InstancePort": 443,
"SSLCertificateId": "arn:aws:iam::55555555:server-
certificate/production/myservercert",
"LoadBalancerPort": 443,
"Protocol": "HTTPS",
"InstanceProtocol": "HTTPS"
},
"PolicyNames": [
"MySSLNegotiationPolicy"
]
},
{
"Listener": {
"InstancePort": 80,
"LoadBalancerPort": 80,
"Protocol": "TCP",
"InstanceProtocol": "TCP"
},
"PolicyNames": []
}
],
"HealthCheck": {
"HealthyThreshold": 10,
"Interval": 30,
"Target": "TCP:443",
"Timeout": 5,
"UnhealthyThreshold": 2
},
"BackendServerDescriptions": [],
"Instances": [],
"DNSName": "my-test-loadbalancer-521886987.us-east-
1a.elb.amazonaws.com",
"SecurityGroups": [],
"Policies": {
"LBCookieStickinessPolicies": [],
"AppCookieStickinessPolicies": [],
"OtherPolicies": [
"ELBSecurityPolicy-2014-01",
"MySSLNegotiationPolicy",
"EnableProxyProtocol"
]
},
"LoadBalancerName": "my-test-loadbalancer",
"CreatedTime": "2014-08-03T02:43:43.860Z",
"AvailabilityZones": [
"us-east-1c"
],
"Scheme": "internet-facing",
API Version 2012-06-01
187
Elastic Load Balancing Developer Guide
Enable Proxy Protocol Using the AWS Command Line
Interface

"SourceSecurityGroup": {
"OwnerAlias": "amazon-elb",
"GroupName": "amazon-elb-sg"
}
}
]
}
The empty BackendServerDescriptions field confirms that the instance port 80 is not associated
with any policy.
Enable Proxy Protocol Using the Query API
To enable Proxy Protocol, you need to create a policy of the type ProxyProtocolPolicyType and
then set the policy to the back-end instance port.
In this walkthrough, you will create a new policy EnableProxyProtocol of the type ProxyProtocol-
PolicyType for a load balancer named my-test-loadbalancer, set the newly-created policy to the
back-end instance on port 80, and verify that the policy is enabled.
For information on making a query request, see Use Query Requests to Call Elastic Load Balancing
APIs (p. 21)
To create a policy
1. Call the DescribeLoadBalancerPolicyTypes action to list all the policies supported by Elastic Load
Balancing.
Your request should look similar to the following example:
https://elasticloadbalancing.amazonaws.com/?Version=2012-06-01
&Action=DescribeLoadBalancerPolicyTypes
&AUTHPARAMS
2. The response includes the names and descriptions of the supported policy types.The following ex-
ample is a partial response.
<DescribeLoadBalancerPolicyTypesResponse xmlns="http://elasticloadbalan
cing.amazonaws.com/doc/2012-06-01/">
<DescribeLoadBalancerPolicyTypesResult>
<PolicyTypeName>SSLNegotiationPolicyType</PolicyTypeName>
< . . . .>
<PolicyTypeName>BackendServerAuthenticationPolicyType</PolicyTypeName>
< . . . .>
<PolicyTypeName>PublicKeyPolicyType</PolicyTypeName>
< . . . .>
<PolicyTypeName>AppCookieStickinessPolicyType</PolicyTypeName>
< . . . .>
<PolicyTypeName>LBCookieStickinessPolicyType</PolicyTypeName>
< . . . .>
<PolicyTypeName>ProxyProtocolPolicyType</PolicyTypeName>
< . . . .>
</DescribeLoadBalancerPolicyTypesResult>
API Version 2012-06-01
188
Elastic Load Balancing Developer Guide
Enable Proxy Protocol Using the Query API

<ResponseMetadata>
<RequestId>94a1d9fd-e01b-11e2-bff8-276f19bc1b97</RequestId>
</ResponseMetadata>
</ DescribeLoadBalancerPolicyTypesResponse >
Use ProxyProtocolPolicyType to create a new policy EnableProxyProtocol.
3. Call the CreateLoadBalancerPolicy action to create a new policy EnableProxyProtocol by spe-
cifying the following parameters:
• Load Balancer name = my-test-loadbalancer
• Policy name = EnableProxyProtocol
• Policy type = ProxyProtocolPolicyType
• PolicyAttributeName = ProxyProtocol
• PolicyAttributeValue = true
Your request should look similar to the following example:
https://elasticloadbalancing.amazonaws.com/?PolicyAttributes.member.1.Attrib
uteName=ProxyProtocol
&PolicyAttributes.member.1.AttributeValue=true
&PolicyTypeName=ProxyProtocolPolicyType
&LoadBalancerName=my-test-loadbalancer
&PolicyName=EnableProxyProtocol
&Version=2012-06-01
&Action=CreateLoadBalancerPolicy
&AUTHPARAMS
4. If your request was successful, you should get a confirmation like the following example:
<CreateLoadBalancerPolicyResponse xmlns="http://elasticloadbalancing.amazon
aws.com/doc/2012-06-01/">
<CreateLoadBalancerPolicyResult/>
<ResponseMetadata>
<RequestId>2f5856c5-dddf-11e2-a79c-e97dcEXAMPLE</RequestId>
</ResponseMetadata>
</CreateLoadBalancerPolicyResponse>
To enable the policy
1. Call the SetLoadBalancerPoliciesForBackendServer action with the following parameters:
Note
The SetLoadBalancerPoliciesForBackendServer action replaces the current set of
policies associated with your instance port. Every time you use this action to enable the
policies, use the Policy Names parameter to list all the policies you want to enable.
• Load Balancer name = my-test-loadbalancer
• Back-end instance port number = 80
• Policy names = EnableProxyProtocol
API Version 2012-06-01
189
Elastic Load Balancing Developer Guide
Enable Proxy Protocol Using the Query API

Policy names = MyPolicyName2
Policy names = MyPolicyName3
Your request should look similar to the following example:
https://elasticloadbalancing.amazonaws.com/?InstancePort=80
&PolicyNames.member.1=EnableProxyProtocol
&PolicyNames.member.2=MyPolicyName2
&PolicyNames.member.3=MyPolicyName3
&LoadBalancerName=my-test-loadbalancer
&Version=2012-06-01
&Action=SetLoadBalancerPoliciesForBackendServer
&AUTHPARAMS
2. If your request was successful, you should get a confirmation like the following example:
<SetLoadBalancerPoliciesForBackendServerResponse xmlns="http://elasticload
balancing.amazonaws.com/doc/2012-06-01/">
<SetLoadBalancerPoliciesForBackendServerResult/>
<ResponseMetadata>
<RequestId>0eb9b381-dde0-11e2-8d78-6ddbaEXAMPLE</RequestId>
</ResponseMetadata>
</SetLoadBalancerPoliciesForBackendServerResponse>
To verify that Proxy Protocol policy is enabled
1. Call the DescribeLoadBalancers action with the following parameter:
• Load Balancer name = my-test-loadbalancer
Your request should look similar to the following example:
https://elasticloadbalancing.amazonaws.com/?LoadBalancerNames.member.1=my-
test-loadbalancer
&Version=2012-06-01
&Action=DescribeLoadBalancers
&AUTHPARAMS
2. The response includes details about your load balancer. The information you get should be similar
to the following example:
<DescribeLoadBalancersResponse xmlns="http://elasticloadbalancing.amazon
aws.com/doc/2012-06-01/">
<DescribeLoadBalancersResult>
<LoadBalancerDescriptions>
<member>
<SecurityGroups/>
<CreatedTime>2013-01-24T20:51:35.710Z</CreatedTime>
<LoadBalancerName>my-test-loadbalancer</LoadBalancerName>
<HealthCheck>
API Version 2012-06-01
190
Elastic Load Balancing Developer Guide
Enable Proxy Protocol Using the Query API

. . . .
</HealthCheck>
<ListenerDescriptions>
. . . .
</ListenerDescriptions>
<Instances>
. . . .
</Instances>
<Policies>
<AppCookieStickinessPolicies/>
<OtherPolicies>
<member>AWSConsole-SSLNegotiationPolicy-my-test-loadbalancer</mem
ber>
<member>EnableProxyProtocol</member>
</OtherPolicies>
<LBCookieStickinessPolicies/>
</Policies>
. . . .
. . . .
<BackendServerDescriptions>
<member>
<PolicyNames>
<member>EnableProxyProtocol</member>
</PolicyNames>
<InstancePort>80</InstancePort>
</member>
</BackendServerDescriptions>
<Subnets/>
</member>
</LoadBalancerDescriptions>
</DescribeLoadBalancersResult>
<ResponseMetadata>
<RequestId>d0463294-e331-11e2-9776-c3fEXAMPLE</RequestId>
</ResponseMetadata>
</DescribeLoadBalancersResponse>
The descriptions in the BackendServerDescriptions field confirms that the policy is associated with
the instance port.
Disable the Policy
At any time you can disable the policies associated with your backend instance and then enable them at
a later time. Skip this step if you want to continue associating the Proxy Protocol policy with your back-
end instance.
Use the SetLoadBalancerPoliciesForBackendServer action to disable the Proxy Protocol policy
by not specifying the Proxy Protocol policy name with the Policy Names parameter.
Note
The SetLoadBalancerPoliciesForBackendServer action replaces the current set of policies
associated with your instance port. Every time you use this action to disable policies, use the
Policy Names parameter to list the policy names you want to enable and omit the policy names
you want to disable.
API Version 2012-06-01
191
Elastic Load Balancing Developer Guide
Enable Proxy Protocol Using the Query API

To disable the Proxy Protocol policy
1. Call the SetLoadBalancerPoliciesForBackendServer action by specifying the following parameters.
If you do not have any other policies to enable for the instance port 80, use an empty string with
the Policy Names parameter.
• Load Balancer name = my-test-loadbalancer
• Back-end instance port number = 80
• Policy Names =
Your request should look similar to the following example:
https://elasticloadbalancing.amazonaws.com/?InstancePort=80
&PolicyNames=
&LoadBalancerName=my-test-loadbalancer
&Version=2012-06-01
&Action=SetLoadBalancerPoliciesForBackendServer
&AUTHPARAMS
If you want to enable policies other than the Proxy Protocol policy for the instance port 80, list
those policies using the Policy Names parameter, as in the following example:
• Load Balancer name = my-test-loadbalancer
• Back-end instance port number = 80
• Policy names = MyPolicyName2
Policy names = MyPolicyName3
Your request should look similar to the following example:
https://elasticloadbalancing.amazonaws.com/?InstancePort=80
&PolicyNames.member.1=MyPolicyName2
&PolicyNames.member.2=MyPolicyName3
&LoadBalancerName=my-test-loadbalancer
&Version=2012-06-01
&Action=SetLoadBalancerPoliciesForBackendServer
&AUTHPARAMS
2. If your request was successful, you should get a confirmation like the following example:
<SetLoadBalancerPoliciesForBackendServerResponse xmlns="http://elasticload
balancing.amazonaws.com/doc/2012-06-01/">
<SetLoadBalancerPoliciesForBackendServerResult/>
<ResponseMetadata>
<RequestId>0eb9b381-dde0-11e2-8d78-6ddbaEXAMPLE</RequestId>
</ResponseMetadata>
</SetLoadBalancerPoliciesForBackendServerResponse>
To verify that the Proxy Protocol policy is disabled
1. Call the DescribeLoadBalancers action with the following parameter:
API Version 2012-06-01
192
Elastic Load Balancing Developer Guide
Enable Proxy Protocol Using the Query API

• Load Balancer name = my-test-loadbalancer
Your request should look similar to the following example:
https://elasticloadbalancing.amazonaws.com/?LoadBalancerNames.member.1=my-
test-loadbalancer
&Version=2012-06-01
&Action=DescribeLoadBalancers
&AUTHPARAMS
2. The response includes details about the load balancer.The information you get should be similar to
the following example:
<DescribeLoadBalancersResponse xmlns="http://elasticloadbalancing.amazon
aws.com/doc/2012-06-01/">
<DescribeLoadBalancersResult>
<LoadBalancerDescriptions>
<member>
<SecurityGroups/>
<CreatedTime>2013-01-24T20:51:35.710Z</CreatedTime>
<LoadBalancerName>my-test-loadbalancer</LoadBalancerName>
<HealthCheck>
. . . .
</HealthCheck>
<ListenerDescriptions>
. . . .
</ListenerDescriptions>
<Instances>
. . . .
</Instances>
<Policies>
<AppCookieStickinessPolicies/>
<OtherPolicies>
<member>AWSConsole-SSLNegotiationPolicy-my-test-loadbalancer</mem
ber>
<member>EnableProxyProtocol</member>
</OtherPolicies>
<LBCookieStickinessPolicies/>
</Policies>
. . . .
. . . .
<BackendServerDescriptions/>
<Subnets/>
</member>
</LoadBalancerDescriptions>
</DescribeLoadBalancersResult>
<ResponseMetadata>
<RequestId>d0463294-e331-11e2-9776-c3fEXAMPLE</RequestId>
</ResponseMetadata>
</DescribeLoadBalancersResponse>
The empty BackendServerDescriptions field confirms that the instance port is not associated with
any policy.
API Version 2012-06-01
193
Elastic Load Balancing Developer Guide
Enable Proxy Protocol Using the Query API

Configure DNS Failover for Your Load Balancer
You can provide high availability and redundancy for your applications running behind Elastic Load Bal-
ancing by enabling Amazon Route 53 Domain Name System (DNS) failover for your load balancers.
Amazon Route 53 is a DNS service that provides reliable routing to your infrastructure.When DNS failover
is enabled, Route 53 uses a health-checking feature to determine the availability of the applications running
behind the load balancers. If there are no healthy EC2 instances registered with the load balancer or if
the load balancer itself is unhealthy, Route 53 will route traffic away from the unhealthy load balancer,
and to the other available healthy load balancers.
For information on Amazon Route 53, see What is Route 53 and How Does it Work?.
We will use an example to illustrate how Route 53 DNS failover works with your load balancers. Suppose
you have a web application for www.example.com, and you want to have redundant applications running
behind two load balancers residing in two different regions, US East (N.Virginia) region and US West
(Oregon) region.You want the traffic for www.example.com to be primarily routed to the load balancer
in US East, and use the load balancer in US West as a backup during failures. In this example, if you use
Route 53 DNS failover, you can specify how you want the DNS service to route queries to your domain
name, www.example.com. When you enable DNS failover, you must specify your primary and your sec-
ondary (backup) load balancers. Enabling the failover routing mechanism tells Route 53 to direct traffic
to a primary load balancer, if available, or otherwise reroute the traffic to a secondary load balancer.
To configure DNS failover, you will need to associate your domain name, www.example.com, with your
load balancers. Each load balancer has an automatically generated DNS name, such as myLB-
1234567890.us-east-1.elb.amazonaws.com. Using Route 53, you will create records for your domain
name, www.example.com, pointing to the load balancer DNS name, myLB-1234567890.us-east-
1.elb.amazonaws.com.
In this section we walk you through the process of enabling Amazon Route 53 DNS failover for your load
balancers running in two different regions.
Prerequisites
Before you can enable DNS failover for your load balancers, you first need to create your load balancers.
Be sure to create a primary and a secondary load balancer, preferably in two separate regions. For in-
formation on creating a basic load balancer, see Get Started with Elastic Load Balancing (p. 23).
If you do not already have a custom domain name, register your domain name with your DNS provider.
For a list of registrar websites you can use to register your domain name, go to ICANN.org.Wait for your
registrar to notify you that your domain name is successfully registered.
Use the Console to Configure DNS Failover for
Your Load Balancers
The following steps outline how to configure DNS failover for your load balancers using the Route 53
console.
1. Create a hosted zone for your custom domain name.
2. Update the DNS Name Server Records to Point to Route 53 Name Servers.
3. Create alias record sets for your primary and secondary load balancers.
API Version 2012-06-01
194
Elastic Load Balancing Developer Guide
DNS Failover

Create an Amazon Route 53 Hosted Zone for Your Custom
Domain Name
The hosted zone contains information about your domain name, including the subdomain names and
mappings.
Follow the instructions in Creating a Hosted Zone in the Amazon Route 53 Developer Guide to create a
hosted zone for your custom domain name, www.example.com.
As with other AWS products, there are no contracts or minimum commitments for using Amazon Route
53—you pay only for the hosted zones that you configure and the number of queries that Route 53 answers.
For more information, see Route 53 Pricing.
Update the DNS Name Server Records to Point to Route 53
Name Servers
For each hosted zone you create, Route 53 automatically creates four name server (NS) records. Before
the DNS will start to route queries for your domain to Route 53 name servers, you must update your re-
gistrar's or your DNS service's name server records, to point to the Route 53 name servers.
1. Follow the instructions in Getting the Name Servers for a Hosted Zone to get the name servers as-
signed to your hosted zone.
2. Follow the instructions in Name Server (NS) Records to update your registrar's or your DNS service's
name server records to point to the Route 53 assigned name servers.
Create Alias Resource Records Sets and Enable DNS Failover
After you have created a hosted zone for your domain, you need to create primary and secondary alias
resource record sets to tell the DNS how you want traffic to be routed for your domain.
1. Open the Amazon Route 53 console at https://console.amazonaws.cn/route53/.
2. Click the row of your hosted zone, and click Go to Record Sets.
3. Click Create Record Set.
4. In the Name box, type the domain name for this record set, or use the default value.
5. In the Type box, select A - Ipv4 address.
6. For Alias, click Yes
API Version 2012-06-01
195
Elastic Load Balancing Developer Guide
Use the Console to Configure DNS Failover for Your
Load Balancers

7. Click the Alias Target field, and choose your primary load balancer from the list.
8. The value of Alias Hosted Zone ID appears automatically based on the value that you selected or
entered for Alias Target.
9. In the Routing Policy: drop-down box, select Failover.
10. For Failover Record Type:, select Primary.
11. For Set ID: enter an ID for the record set or use the default value.
12. For Evaluate Target Health, select Yes.
13. For Associate with Health Check, select No.
14. Click Create Record Set.
API Version 2012-06-01
196
Elastic Load Balancing Developer Guide
Use the Console to Configure DNS Failover for Your
Load Balancers

15. Follow the same steps to create another alias record set for your secondary load balancer, with the
following exceptions:
• In the Alias Target field, choose your secondary load balancer from the list.
• For Failover Record Type:, select Secondary.
• For Evaluate Target Health, select Yes if you want Route 53 to evaluate the health of the secondary
load balancer. If the secondary load balancer is unhealthy, Route 53 will route back to the primary
load balancer. If Evaluate Target Health is set to No, Route 53 will assume that the secondary
load balancer is healthy and route traffic to the secondary load balancer whenever the primary
load balancer is unhealthy.
For information on how to set up advanced DNS failover configurations, see Managing Resource Avail-
ability with Route 53 DNS Failover in the Amazon Route 53 Developer Guide.
API Version 2012-06-01
197
Elastic Load Balancing Developer Guide
Use the Console to Configure DNS Failover for Your
Load Balancers

Sticky Sessions
By default, a load balancer routes each request independently to the application instance with the smallest
load. However, you can use the sticky session feature (also known as session affinity) which enables the
load balancer to bind a user's session to a specific application instance.This ensures that all requests
coming from the user during the session will be sent to the same application instance.
You can use sticky sessions for only HTTP/HTTPS load balancer listeners.
The key to managing the sticky session is determining how long should your load balancer consistently
route the user's request to the same application instance. If your application has its own session cookie,
then you can set Elastic Load Balancing to create the session cookie to follow the duration specified by
the application's session cookie. If your application does not have its own session cookie, then you can
set Elastic Load Balancing to create a session cookie by specifying your own stickiness duration.
Topics
• Duration-Based Session Stickiness (p. 198)
• Application-Controlled Session Stickiness (p. 203)
Duration-Based Session Stickiness
The load balancer uses a special load-balancer-generated cookie to track the application instance for
each request. When the load balancer receives a request, it first checks to see if this cookie is present
in the request. If so, the request is sent to the application instance specified in the cookie. If there is no
cookie, the load balancer chooses an application instance based on the existing load balancing algorithm.
A cookie is inserted into the response for binding subsequent requests from the same user to that applic-
ation instance.The stickiness policy configuration defines a cookie expiration, which establishes the
duration of validity for each cookie.The cookie is automatically updated after its duration expires.
If an application instance fails or becomes unhealthy, the load balancer stops routing request to that in-
stance, instead chooses a new instance based on the existing load balancing algorithm.The request is
routed to the new instance as if there is no cookie and the session is no longer sticky.
In this example, you create a stickiness policy and then use it to enable sticky sessions for a load balancer
that has load balancer-generated HTTP cookies. Before you get started, make sure you have a HTTP/HT-
TPS load balancer. For information on how to set up a HTTPS/SSL load balancer with the AWS Manage-
ment Console, command line interface (CLI), or Query API, see Create a HTTPS/SSL Load Balancer
(p. 72). For information on how to set up a HTTP load balancer using the AWS Management Console,
see Get Started with Elastic Load Balancing (p. 23).
The following sections walk you through the steps for enabling duration-based sticky sessions for your
load balancer using the AWS Management Console, the AWS command line interface (AWS CLI), or the
Query API.
Topics
• Using the AWS Management Console (p. 199)
• Using the AWS Command Line Interface (p. 200)
• Using the Query API (p. 202)
API Version 2012-06-01
198
Elastic Load Balancing Developer Guide
Sticky Sessions

Using the AWS Management Console
To enable duration-based sticky sessions for a load balancer
1. Sign in to the AWS Management Console and open the Amazon EC2 console at https://con-
sole.amazonaws.cn/ec2/.
2. On the Amazon EC2 console Resources page, in the EC2 Dashboard pane, under NETWORK &
SECURITY, click Load Balancers.
3. On the Load Balancers page, select your load balancer.
4. The bottom pane displays the details of your load balancer.
5. Click (edit) in the Port Configuration: row.
6. On the Edit Stickiness page, click Enable Load Balancer Generated Cookie Stickiness.
7. In the Expiration Period box, enter the cookie expiration period.This example creates a cookie
stickiness policy with a cookie expiration period of 60 seconds.
8. Click Save. The Port Configurationrow in the Description pane shows that the stickiness policy
enabled for the load balancer.
API Version 2012-06-01
199
Elastic Load Balancing Developer Guide
Duration-Based Session Stickiness

Using the AWS Command Line Interface
Before you get started make sure that you have installed and configured your AWS CLI environment. For
more information, see Getting Set Up with the AWS Command Line Interface.
To enable duration-based sticky sessions for a load balancer
1. Enter the create-lb-cookie-stickiness-policy command to create a load-balancer-generated cookie
stickiness policy with a cookie expiration period of 60 seconds. Use the following options:
• load-balancer-name = my-test-loadbalancer
• policy-name = MyDurationStickyPolicy
• cookie-expiration-period = 60
Your command should look like the following example:
aws elb create-lb-cookie-stickiness-policy --load-balancer-name my-test-
loadbalancer --policy-name MyDurationStickyPolicy --cookie-expiration-
period 60
2. Enter the set-load-balancer-policies-of-listener command to enable session stickiness for a load
balancer using the following options:
Note
The set-load-balancer-policies-of-listener command replaces the current set
of policies associated with the specified load balancer port. Every time you use this command
to enable the policies, use the --policy-names option to list all the policies you want to
enable for the port.
• load-balancer-name = my-test-loadbalancer
• load-balancer-port = 443
• policy-names = MyDurationStickyPolicy
To enable multiple policies for the port, list the policy names separated by a space, as follows:
policy-names = MyDurationStickyPolicy MyPolicy2 MyPolicy3
Your command should look like the following example:
aws elb set-load-balancer-policies-of-listener --load-balancer-name my-
test-loadbalancer --load-balancer-port 443 --policy-names MyDurationSticky
Policy
3. Enter the describe-load-balancers command to verify that the sticky policy is enabled.
aws elb describe-load-balancers --load-balancer-name my-test-loadbalancer
4. Elastic Load Balancing responds as in the following example.
{
"LoadBalancerDescriptions": [
{
API Version 2012-06-01
200
Elastic Load Balancing Developer Guide
Duration-Based Session Stickiness

"Subnets": [],
"CanonicalHostedZoneNameID": "Z3DZXE0Q79N41H",
"CanonicalHostedZoneName": "my-test-loadbalancer-521886987.us-
east-1.elb.amazonaws.com",
"ListenerDescriptions": [
{
"Listener": {
"InstancePort": 443,
"SSLCertificateId": "arn:aws:iam::55555555:server-
certificate/production/myservercert",
"LoadBalancerPort": 443,
"Protocol": "HTTPS",
"InstanceProtocol": "HTTPS"
},
"PolicyNames": [
"MyDurationStickyPolicy",
"ELBSecurityPolicy-2014-01"
]
},
{
"Listener": {
"InstancePort": 80,
"LoadBalancerPort": 80,
"Protocol": "TCP",
"InstanceProtocol": "TCP"
},
"PolicyNames": []
}
],
"HealthCheck": {
"HealthyThreshold": 10,
"Interval": 30,
"Target": "TCP:443",
"Timeout": 5,
"UnhealthyThreshold": 2
},
"BackendServerDescriptions": [],
"Instances": [],
"DNSName": "my-test-loadbalancer-521886987.us-east-
1.elb.amazonaws.com",
"SecurityGroups": [],
"Policies": {
"LBCookieStickinessPolicies": [
{
"PolicyName": "MyDurationStickyPolicy",
"CookieExpirationPeriod": 60
}
],
"AppCookieStickinessPolicies": [],
"OtherPolicies": [
"ELBSecurityPolicy-2014-01",
"MySSLNegotiationPolicy",
"EnableProxyProtocol"
]
},
"LoadBalancerName": "my-test-loadbalancer",
"CreatedTime": "2014-08-03T02:43:43.860Z",
API Version 2012-06-01
201
Elastic Load Balancing Developer Guide
Duration-Based Session Stickiness

"AvailabilityZones": [
"us-east-1a"
],
"Scheme": "internet-facing",
"SourceSecurityGroup": {
"OwnerAlias": "amazon-elb",
"GroupName": "amazon-elb-sg"
}
}
]
}
The PolicyNames field of the Listener 443 lists the new MyDurationStickyPolicy policy
confirming that the policy is enabled
Using the Query API
To enable duration-based sticky sessions for a load balancer
1. Use the CreateLBCookieStickinessPolicy action with the following parameters to create a load-bal-
ancer-generated cookie stickiness policy with a cookie expiration period of 60 seconds.
• LoadBalancerName = my-test-loadbalancer
• PolicyName = MyLoadBalancerPolicy
• CookieExpirationPeriod = 60
2. Use the SetLoadBalancerPoliciesOfListener action with the following parameters to enable session
stickiness for a load balancer using the MyLoadBalancerPolicy policy.
• LoadBalancerName = my-test-loadbalancer
• LoadBalancerPort = 80
• PolicyNames = MyLoadBalancerPolicy
API Version 2012-06-01
202
Elastic Load Balancing Developer Guide
Duration-Based Session Stickiness

Application-Controlled Session Stickiness
The load balancer uses a special cookie to associate the session with the original server that handled
the request, but follows the lifetime of the application-generated cookie corresponding to the cookie name
specified in the policy configuration.The load balancer only inserts a new stickiness cookie if the applic-
ation response includes a new application cookie. The load balancer stickiness cookie does not update
with each request. If the application cookie is explicitly removed or expires, the session stops being sticky
until a new application cookie is issued.
If an application instance fails or becomes unhealthy, the load balancer stops routing request to that in-
stance, instead chooses a new healthy application instance based on the existing load balancing algorithm.
The load balancer will treat the session as now "stuck" to the new healthy instance and continue routing
requests to that instance even if the failed application instance comes back. However, it is up to the new
application instance whether and how to respond to a session which it has not previously seen.
In this example, you configure a load balancer for session stickiness when the life of the session follows
that of an application-generated cookie. Before you get started, make sure you have a HTTP/HTTPS
load balancer. For information on how to set up a HTTPS/SSL load balancer with the AWS Management
Console, command line interface (CLI), or Query API, see Create a HTTPS/SSL Load Balancer (p. 72).
For information on how to set up a HTTP load balancer using the AWS Management Console, see Get
Started with Elastic Load Balancing (p. 23).
The following sections walk you through the steps for enabling application-controlled sticky sessions for
your load balancer using the AWS Management Console, the AWS Command Line Interface (AWS CLI),
or the Query API.
Topics
• Using the AWS Management Console (p. 203)
• Using the AWS Command Line Interface (p. 204)
• Using the Query API (p. 207)
Using the AWS Management Console
To Enable Application-Controlled Session Stickiness
1. Sign in to the AWS Management Console and open the Amazon EC2 console at https://con-
sole.amazonaws.cn/ec2/.
2. On the Amazon EC2 console Resources page, in the EC2 Dashboard pane, under NETWORK &
SECURITY, click Load Balancers.
3. On the Load Balancers page, select your load balancer.
4. The bottom pane displays the details of your load balancer.
5. Click (edit) in the Port Configuration: row.
API Version 2012-06-01
203
Elastic Load Balancing Developer Guide
Application-Controlled Session Stickiness

6. On the Edit Stickiness page, click Enable Application Generated Cookie Stickiness.
7. In the Cookie Name box, enter the name for your cookie, for example my-cookie.
8. Click Save.
9. The Port Configurationrow in the Description pane shows the newly created cookie stickiness
policy.
Using the AWS Command Line Interface
Before you get started, make sure you have updated the AWS CLI.
To Enable Application-Controlled Session Stickiness
1. Enter the create-app-cookie-stickiness-policy command to create an application-generated cookie
stickiness policy. Use the following options:
• load-balancer-name = my-test-loadbalancer
• policy-name = MyAppStickyPolicy
• cookie-name = MyAppCookie
API Version 2012-06-01
204
Elastic Load Balancing Developer Guide
Application-Controlled Session Stickiness

Your command should look like the following example:
aws elb create-app-cookie-stickiness-policy --load-balancer-name my-test-
loadbalancer --policy-name MyAppStickyPolicy --cookie-name MyAppCookie
2. Enter the set-load-balancer-policies-of-listener command to enable session stickiness for a load
balancer using the following options:
Note
The set-load-balancer-policies-of-listener command replaces the current set
of policies associated with the specified load balancer port. Every time you use this command
to enable the policies, use the --policy-names option to list all the policies you want to
enable for the port.
• load-balancer-name = my-test-loadbalancer
• load-balancer-port = 443
• policy-names = MyAppStickyPolicy
To enable multiple policies for the port, list the policy names separated by a space, as follows:
policy-names = MyDurationStickyPolicy MyPolicy2 MyPolicy3
Your command should look like the following example:
aws elb set-load-balancer-policies-of-listener --load-balancer-name my-
test-loadbalancer --load-balancer-port 443 --policy-names MyAppStickyPolicy
3. Enter the describe-load-balancers command to verify that the sticky policy is enabled.
aws elb describe-load-balancers --load-balancer-name my-test-loadbalancer
4. Elastic Load Balancing responds as in the following example.
{
"LoadBalancerDescriptions": [
{
"Subnets": [],
"CanonicalHostedZoneNameID": "Z3DZXE0Q79N41H",
"CanonicalHostedZoneName": "my-test-loadbalancer-521886987.us-
east-1.elb.amazonaws.com",
"ListenerDescriptions": [
{
"Listener": {
"InstancePort": 443,
"SSLCertificateId": "arn:aws:iam::55555555:server-
certificate/production/myservercert",
"LoadBalancerPort": 443,
"Protocol": "HTTPS",
"InstanceProtocol": "HTTPS"
},
"PolicyNames": [
"MyAppStickyPolicy",
"ELBSecurityPolicy-2014-01"
]
API Version 2012-06-01
205
Elastic Load Balancing Developer Guide
Application-Controlled Session Stickiness

},
{
"Listener": {
"InstancePort": 80,
"LoadBalancerPort": 80,
"Protocol": "TCP",
"InstanceProtocol": "TCP"
},
"PolicyNames": []
}
],
"HealthCheck": {
"HealthyThreshold": 10,
"Interval": 30,
"Target": "TCP:443",
"Timeout": 5,
"UnhealthyThreshold": 2
},
"BackendServerDescriptions": [],
"Instances": [],
"DNSName": "my-test-loadbalancer-521886987.us-east-
1.elb.amazonaws.com",
"SecurityGroups": [],
"Policies": {
"LBCookieStickinessPolicies": [],
"AppCookieStickinessPolicies": [
{
"PolicyName": "MyAppStickyPolicy",
"CookieName": "MyAppCookie"
}
],
"OtherPolicies": [
"ELBSecurityPolicy-2014-01",
"MySSLNegotiationPolicy",
"EnableProxyProtocol"
]
},
"LoadBalancerName": "my-test-loadbalancer",
"CreatedTime": "2014-08-03T02:43:43.860Z",
"AvailabilityZones": [
"us-east-1a"
],
"Scheme": "internet-facing",
"SourceSecurityGroup": {
"OwnerAlias": "amazon-elb",
"GroupName": "amazon-elb-sg"
}
}
]
}
The PolicyNames field of the Listener 443 lists the new MyAppStickyPolicy policy confirming
that the policy is enabled
API Version 2012-06-01
206
Elastic Load Balancing Developer Guide
Application-Controlled Session Stickiness

Using the Query API
To Enable Application-Controlled Session Stickiness
1. Use the CreateAppCookieStickinessPolicy action with the following parameters to create an applic-
ation-generated cookie stickiness policy.
• LoadBalancerName = my-test-loadbalancer
• PolicyName = my-app-cookie-lb-policy
• CookieName = my-cookie
2. Use the SetLoadBalancerPoliciesOfListener action with the following parameters to enable session
stickiness.
• LoadBalancerName = my-test-loadbalancer
• LoadBalancerPort = 80
• PolicyNames = my-app-cookie-lb-policy
API Version 2012-06-01
207
Elastic Load Balancing Developer Guide
Application-Controlled Session Stickiness

Add or Remove Tags
You can add or remove tags from your load balancer at any time. Tags help you to categorize your load
balancers in different ways, for example, by purpose, owner, or environment. For more information, see
Tagging (p. 12).
This section walks you through the process for adding or removing tags from your load balancer.
Topics
• Add Tags (p. 208)
• Remove Tags (p. 211)
Add Tags
You can add one or more tags to each load balancer. A load balancer can have a maximum of 10 user-
created tags.Tag keys must be unique for each load balancer. If you add a tag with a key that is already
associated with the load balancer, this action will update the value of that key.
You can add tags to your load balancer using the AWS Management Console, the AWS command line
interface (AWS CLI) command, or the Query API.
• Using the AWS Management Console (p. 209)
• Using the Query API (p. 210)
• Using the AWS Command Line Interface (p. 209)
Important: Elastic Load Balancing CLI has been replaced by AWS Command Line Interface (AWS
CLI), a unified tool to manage multiple AWS services. New features released after ELB CLI version
1.0.35.0 (dated 7/24/14) will be included in the AWS CLI only. We recommend that you start using the
AWS CLI.
For a list of the functionality supported in previous ELB CLI versions, see Elastic Load Balancing API
Tools.
API Version 2012-06-01
208
Elastic Load Balancing Developer Guide
Tags

Using the AWS Management Console
This section walks you through the process of adding tags to your load balancer by using the AWS
Management Console.
To add tags
1. Sign in to the AWS Management Console and open the Amazon EC2 console at https://con-
sole.amazonaws.cn/ec2/.
2. On the Amazon EC2 console Resources page, in the navigation pane, under NETWORK & SECUR-
ITY, click Load Balancers.
3. If necessary, change the region. From the navigation bar, select the region that has your load balancer.
4. On the load balancer page, select your load balancer.
5. The bottom pane displays the details of your load balancer. Click the Tags tab.
6. The Tags pane displays the tags currently assigned to your load balancer. Click Add/Edit Tags.
7. In the Add/Edit Tags dialog box, click Create Tag and specify a key and a value for each tag.
8. After you are done adding all the tags, click Save.
Using the AWS Command Line Interface
Before you get started make sure that you have installed and configured your AWS CLI environment. For
more information, see Getting Set Up with the AWS Command Line Interface.
To add tags
1. Enter the add-tags command using the following options:
• load-balancer-name = my-test-loadbalancer
• tags
• Key = project
• Value = lima
Your command should look like the following example:
aws elb add-tags --load-balancer-name my-test-loadbalancer --tag
Key=project,Value=lima
Note
Multiple tags must be specified in the following format separated by a space:
API Version 2012-06-01
209
Elastic Load Balancing Developer Guide
Add Tags

--tags “Key=key1,Value=value1” “Key=key2,Value=value2”
2. Enter the describe-tags command using the following option to verify that the new tags are set for
your load balancer.
• load-balancer-name = my-test-loadbalancer
Your command should look like the following example:
aws elb describe-tags --load-balancer-name my-test-loadbalancer
Elastic Load Balancing responds as in the following example:
{
"TagDescriptions": [
{
"Tags": [
{
"Value": "lima",
"Key": "project"
},
{
"Value": "digital-media",
"Key": "department"
}
],
"LoadBalancerName": "my-test-loadbalancer"
}
]
}
Using the Query API
This section walks you through the process of adding tags to your load balancer by using the Query API.
To add tags
1. Use the AddTags action with the following parameters:
• LoadBalancerName = my-test-loadbalancer
• Tags
• Tags.member.1.Key = project
• Tags.member.1.Value = lima
Your request should look like the following example:
https://elasticloadbalancing.amazonaws.com/?Tags.member.1.Key=project
&Action=AddTags
&LoadBalancerNames.member.1=my-test-loadbalancer
&Tags.member.1.Value=lima
&Version=2012-06-01
&AUTHPARAMS
API Version 2012-06-01
210
Elastic Load Balancing Developer Guide
Add Tags

If your request is successful, you should get a response similar to the following example:
<AddTagsResponse xmlns="http://elasticloadbalancing.amazonaws.com/doc/2012-
06-01/">
<AddTagsResult/>
<ResponseMetadata>
<RequestId>360e81f7-1100-11e4-b6ed-0f30EXAMPLE</RequestId>
</ResponseMetadata>
</AddTagsResponse>
2. Use the DescribeTags action using the following parameter to verify that the new tags are set for
your load balancer.
• LoadBalancerName = my-test-loadbalancer
Your request should look like the following example:
https://elasticloadbalancing.amazonaws.com/?Action=DescribeTags
&LoadBalancerNames.member.1=my-test-loadbalancer
&Version=2012-06-01
&AUTHPARAMS
If your request is successful, you should get a response similar to the following example:
<DescribeTagsResponse xmlns="http://elasticloadbalancing.amazon
aws.com/doc/2012-06-01/">
<DescribeTagsResult>
<TagDescriptions>
<member>
<Tags>
<Value>lima</Value>
<Key>project</Key>
</member>
<member>
<Value>digital-media</Value>
<Key>department</Key>
</member>
</Tags>
<LoadBalancerName>my-test-loadbalancer</LoadBalancerName>
</member>
</TagDescriptions>
</DescribeTagsResult>
<ResponseMetadata>
<RequestId>4a04b664-106d-11e4-bdd7-db8fEXAMPLE</RequestId>
</ResponseMetadata>
</DescribeTagsResponse>
Remove Tags
You can remove tags set for your load balancer at any time using the AWS Management Console, the
AWS Command Line Interface (AWS CLI) command, or the Query API.
Topics
API Version 2012-06-01
211
Elastic Load Balancing Developer Guide
Remove Tags

• Using the AWS Management Console (p. 212)
• Using the AWS Command Line Interface (p. 212)
• Using the Query API (p. 213)
Using the AWS Management Console
This section walks you through the process of adding tags to your load balancer by using the AWS
Management Console.
To remove tags
1. Sign in to the AWS Management Console and open the Amazon EC2 console at https://con-
sole.amazonaws.cn/ec2/.
2. On the Amazon EC2 console Resources page, in the navigation pane, under NETWORK & SECUR-
ITY, click Load Balancers.
3. If necessary, change the region. From the navigation bar, select the region that has your load balancer.
4. On the load balancer page, select your load balancer.
5. The bottom pane displays the details of your load balancer. Click the Tags tab.
6. The Tags pane displays the tags currently assigned to your load balancer. Click Add/Edit Tags.
7. In the Add/Edit Tags dialog box, click the remove icon of the tag you want to remove.
8. After you are done removing the tags, click Save.
Using the AWS Command Line Interface
Before you get started make sure that you have installed and configured your AWS CLI environment. For
more information, see Getting Set Up with the AWS Command Line Interface.
To remove tags
1. Enter the remove-tags command using the following options:
• load-balancer-name = my-test-loadbalancer
• tag = project
Note
This command takes only the name of the key to be removed.You need not mention the
key value.
Your command should look like the following example:
API Version 2012-06-01
212
Elastic Load Balancing Developer Guide
Remove Tags

aws elb remove-tags --load-balancer-name my-test-loadbalancer --tag project
2. Enter the describe-tags command using the following option to verify that the tag is removed.
• load-balancer-name = my-test-loadbalancer
Your command should look like the following example:
aws elb describe-tags --load-balancer-name my-test-loadbalancer
Elastic Load Balancing responds as in the following example:
{
"TagDescriptions": [
{
"Tags": [
{
"Value": "digital-media",
"Key": "department"
}
],
"LoadBalancerName": "my-test-loadbalancer"
}
]
}
Using the Query API
This section walks you through the process of removing tags from your load balancer by using the Query
API.
To remove tags
1. Use the RemoveTags using the following options:
• LoadBalancerName = my-test-loadbalancer
• Tags.member.1.Key = project
Note
This action takes only the name of the key to be removed.You need not mention the key
value.
Your request should look like the following example:
https://elasticloadbalancing.amazonaws.com/?Tags.member.1.Key=project
&LoadBalancerNames.member.1=my-test-loadbalancer
&Action=RemoveTags
&Version=2012-06-01
&AUTHPARAMS
If your request is successful, you should get a response similar to the following example:
API Version 2012-06-01
213
Elastic Load Balancing Developer Guide
Remove Tags

<RemoveTagsResponse xmlns="http://elasticloadbalancing.amazonaws.com/doc/2012-
06-01/">
<RemoveTagsResult/>
<ResponseMetadata>
<RequestId>8104fcb9-10ff-11e4-bdd7-db8f2EXAMPLE</RequestId>
</ResponseMetadata>
</RemoveTagsResponse>
2. Use the DescribeTags action using the following parameter to verify that the tag is removed.
• LoadBalancerName = my-test-loadbalancer
Your request should look like the following example:
https://elasticloadbalancing.amazonaws.com/?Action=DescribeTags
&LoadBalancerNames.member.1=my-test-loadbalancer
&Version=2012-06-01
&AUTHPARAMS
If your request is successful, you should get a response similar to the following example:
<DescribeTagsResponse xmlns="http://elasticloadbalancing.amazon
aws.com/doc/2012-06-01/">
<DescribeTagsResult>
<TagDescriptions>
<member>
<Tags>
<member>
<Value>digital-media</Value>
<Key>department</Key>
</member>
</Tags>
<LoadBalancerName>my-test-loadbalancer</LoadBalancerName>
</member>
</TagDescriptions>
</DescribeTagsResult>
<ResponseMetadata>
<RequestId>ef9ed23b-1101-11e4-b327-ab5aaEXAMPLE</RequestId>
</ResponseMetadata>
</DescribeTagsResponse>
API Version 2012-06-01
214
Elastic Load Balancing Developer Guide
Remove Tags

Delete Your Load Balancer
In this example, you stop using Elastic Load Balancing on a currently load balanced EC2 fleet.You delete
the load balancer, which automatically deregisters the associated instances from the load balancer. As
soon as the load balancer is deleted, you stop incurring charges for that load balancer.
Note
Even after you delete the load balancer and the associated EC2 instances are deregistered, the
EC2 instances continue to run.You will continue to incur charges on the Amazon EC2 instances
while they are running. For information on stopping your EC2 instances, go to Stopping and
Starting Instances in the Amazon EC2 User Guide. For information on terminating your EC2 in-
stances, go to Terminate Your Instance.
The following sections include instructions for deleting your load balancer using the AWS Management
Console, the Query API, or the command line interface (CLI). If you plan on using either the Query API
or the CLI, be sure that you've installed the tools. For information on installing the CLI or the Query API,
see Setting Up Elastic Load Balancing Interfaces (p. 18).
Using the AWS Management Console
To delete your load balancer
1. On the Amazon EC2 console Resources page, in the EC2 Dashboard pane, under NETWORK &
SECURITY, click Load Balancers.
2. On the Load Balancers page, select the check box next to the load balancer you want to delete,
and then click Delete.
3. In the Delete Load Balancer windows, click Yes, Delete.
Using the Query API
To delete a load balancer
• Call the DeleteLoadBalancer action using the following parameter:
• LoadBalancerName = my-test-loadbalancer
The operation returns an empty response.
Using the AWS Command Line Interface
To delete a load balancer
• Use the delete-load-balancer command as in the following example.
API Version 2012-06-01
215
Elastic Load Balancing Developer Guide
Delete Your Load Balancer

aws elb delete-load-balancer --load-balancer-name my-test-loadbalancer
API Version 2012-06-01
216
Elastic Load Balancing Developer Guide
Using the AWS Command Line Interface

Monitoring and Logging
Elastic Load Balancing captures the following information about your load balancer:
• CloudWatch Metrics— Elastic Load Balancing publishes data points to Amazon CloudWatch about
your load balancers and your back-end application instances. CloudWatch allows you to retrieve stat-
istics about those data points as an ordered set of time-series data, known as metrics.You can use
CloudWatch to monitor the metrics from your load balancers and back-end instances to verify that your
system is performing as expected. For example, you can request statistics of all the unhealthy EC2
instances behind a load balancer launched in a specific Availability Zone or you can request statistics
of the number of connections that were not successfully established between the load balancers and
the back-end instances.
• Access Logs—The Elastic Load Balancing access logs capture detailed information for all requests
made to your load balancer and stores them as log files in an Amazon S3 bucket that you specify. Each
log contains details such as the time a request was received, client’s IP address, latencies, request
path, and server responses.You can use Elastic Load Balancing access logs to analyze traffic patterns
and to troubleshoot your back-end applications.
• Elastic Load Balancing API Calls— You can use AWS CloudTrail to keep track of all the Elastic Load
Balancing API calls made by or on behalf of your AWS account. CloudTrail stores the information as
log files in an Amazon S3 bucket that you specify.You can use the logs collected by CloudTrail to
monitor activity of your load balancers and determine what request was made to the load balancer, the
source IP address the request was made from, who made the request, when it was made, and so on.
This section covers information about using the monitoring and logging features of Elastic Load Balancing
to monitor your load balancers, to analyze the traffic patterns, and to troubleshoot your load balancers
and your back-end instances.This section also provides procedural instruction and examples.
Topics
• Monitor Your Load Balancer Using Amazon CloudWatch (p. 218)
• Access Logs (p. 228)
• Logging Elastic Load Balancing API Calls Using AWS CloudTrail (p. 245)
API Version 2012-06-01
217
Elastic Load Balancing Developer Guide

Monitor Your Load Balancer Using Amazon
CloudWatch
Topics
• Available Metrics (p. 218)
• View Metrics (p. 225)
• Create Alarms (p. 226)
Elastic Load Balancing publishes data points to Amazon CloudWatch about your load balancers and your
back-end application instances. CloudWatch allows you to retrieve statistics about those data points as
an ordered set of time-series data, known as metrics. Think of a metric as a variable to monitor, and the
data points represent the values of that variable over time. Each data point has an associated time stamp
and (optionally) a unit of measurement. For example, total number of healthy EC2 instances behind a
load balancer over a specified time period can be a metric.
Amazon CloudWatch provides statistics based on the metric data points published by Elastic Load Bal-
ancing. Statistics are metric data aggregations over specified periods of time.The following statistics are
available: Minimum (min), Maximum (max), Sum, Average, and Count.When you request statistics, the
returned data stream is identified by the metric name and a dimension. A dimension is a name/value pair
that helps you to uniquely identify a metric. For example, you can request statistics of all the healthy EC2
instances behind a load balancer launched in a specific Availability Zone.
One purpose for monitoring metrics in Amazon CloudWatch is to verify that your system is performing
as expected. If a metric goes outside what you consider an acceptable range, you can create a CloudWatch
alarm. A CloudWatch alarm watches over a specified metric and initiates an action if the metric goes
outside of the specified range. An action can be a notification sent to you.
For more information on Amazon CloudWatch, see What is Amazon CloudWatch.
This section provides information about the metrics that Elastic Load Balancing sends to Amazon
CloudWatch.This section also explains how to view and use the metrics, and how you can set alarms
when a metric meets a condition that you specify.
Available Metrics
Elastic Load Balancing sends metrics for all of the load balancers associated with your AWS account to
Amazon CloudWatch. By default, CloudWatch uses these metrics to provide detailed monitoring of your
load balancers.You do not need to specifically enable detailed monitoring.
Elastic Load Balancing Metrics
The following Elastic Load Balancing metrics are available from Amazon CloudWatch.
Elastic Load Balancing only reports when requests are flowing through the load balancer. If there are no
requests or data for a given metric, the metric will not be reported to CloudWatch. If there are requests
flowing through the load balancer, Elastic Load Balancing will measure and send metrics for that load
balancer in 60-second intervals.
Note: The Statistic value available through Amazon CloudWatch, such as Min or Count are not always
applicable to every metric. However, they are all available through the console, API, and the command
line interface (CLI). For each metric, be aware of the Preferred Statistic for all the Elastic Load Balancing
metrics to track useful information.
API Version 2012-06-01
218
Elastic Load Balancing Developer Guide
Monitoring Load Balancers

DescriptionMetric
The count of the number of healthy instances in each Availability
Zone. Hosts are declared healthy if they meet the threshold for
the number of consecutive health checks that are successful.
Hosts that have failed more health checks than the value of the
unhealthy threshold are considered unhealthy. If cross-zone is
enabled, the count of the number of healthy instances is calculated
for all Availability Zones.
Preferred statistic: average
HealthyHostCount
The count of the number of unhealthy instances in each Availability
Zone. Hosts that have failed more health checks than the value
of the unhealthy threshold are considered unhealthy. If cross-zone
is enabled, the count of the number of unhealthy instances is
calculated for all Availability Zones. Instances may become
unhealthy due to connectivity issues, health checks returning
non-200 responses (in the case of HTTP or HTTPS health checks),
or timeouts when performing the health check.
Preferred statistic: average
UnHealthyHostCount
The count of the number of completed requests that were received
and routed to the back-end instances.
Preferred statistic: sum
RequestCount
Measures the time elapsed in seconds after the request leaves
the load balancer until the response is received.
Preferred statistic: average
Latency
The count of the number of HTTP 4XX client error codes
generated by the load balancer when the listener is configured to
use HTTP or HTTPS protocols. Client errors are generated when
a request is malformed or is incomplete.
Preferred statistic: sum
HTTPCode_ELB_4XX
The count of the number of HTTP 5XX server error codes
generated by the load balancer when the listener is configured to
use HTTP or HTTPS protocols.This metric does not include any
responses generated by back-end instances.
The metric is reported if there are no back-end instances that are
healthy or registered to the load balancer, or if the request rate
exceeds the capacity of the instances or the load balancers.
Preferred statistic: sum
HTTPCode_ELB_5XX
The count of the number of HTTP response codes generated by
back-end instances. This metric does not include any response
codes generated by the load balancer.
The 2XX class status codes represent successful actions.The
3XX class status code indicates that the user agent requires
action.The 4XX class status code represents client errors.The
5XX class status code represents back-end server errors.
Preferred statistic: sum
HTTPCode_Backend_2XX
HTTPCode_Backend_3XX
HTTPCode_Backend_4XX
HTTPCode_Backend_5XX
API Version 2012-06-01
219
Elastic Load Balancing Developer Guide
Available Metrics

DescriptionMetric
The count of the number of connections that were not successfully
established between the load balancer and the registered
instances. Because the load balancer will retry when there are
connection errors, this count can exceed the request rate.
Preferred statistic: sum
BackendConnectionErrors
A count of the total number of requests that are pending
submission to a registered instance.
Preferred statistic: max
SurgeQueueLength
A count of the total number of requests that were rejected due to
the queue being full.
Preferred statistic: sum
SpilloverCount
Dimensions for Elastic Load Balancing Metrics
To refine the metrics returned by a query, you can use the dimensions for Elastic Load Balancing that
are listed in the table in this section. For example, with the HealthyHostCount metric, you can use the
dimensions LoadBalancerName and AvailabilityZone to get the average number of healthy instances
behind the specified load balancer within the specified Availability Zone for a given period of time. Altern-
atively, it may be useful to track the minimum number of healthy hosts or the maximum number of unhealthy
hosts to better understand how the health and the count of backend instances change over time.
Elastic Load Balancing data can be aggregated along any of the following dimensions shown in the fol-
lowing table.
DescriptionDimension
Limits the metric data to Amazon EC2 instances that are connected to the
specified load balancer.
LoadBalancerName
Limits the metric data to load balancers in the specified Availability Zone.AvailabilityZone
How Elastic Load Balancing Statistics Are Measured
Elastic Load Balancing is made up of load balancer nodes that forward traffic to your back-end instances.
Each load balancer node is designated to route traffic to instances within a single Availability Zone and
each load balancer node reports metrics for the designated Availability Zone.
For all CloudWatch metrics, min and max represent the min and max as reported by individual load bal-
ancer nodes. For example, say there are 2 load balancer nodes. Node 1 reports a HealthyHostCount
with a min of 2, a max of 10, and an average of 6. Load balancer node 2 reports a HealthyHostCount
with a min of 1, max of 5, and an average of 3.This means that the min in CloudWatch will be 1, the
max will be 10, and the average will be around 4.
The sum is the aggregate value reported across all load balancer nodes during the given time period.
Because the metrics include multiple reports per period, sum is only applicable to metrics that are aggreg-
ated across all load balancer nodes, such as RequestCount, HTTPCode_ELB_4XX, HTTPCode_ELB_5XX,
HTTPCode_Backend_2XX,3XX,4XX,5XX, BackendConnectionErrors, and SpilloverCount.
The count is the number of samples measured. Because the metrics are gathered based on sampling
intervals and events, the count is typically not useful. For instance, in the healthy/unhealthy host metrics,
count is based on the number of health check samples collected by the load balancer nodes, not the
API Version 2012-06-01
220
Elastic Load Balancing Developer Guide
Available Metrics

number of healthy/unhealthy hosts. For latency metrics, count is the number of samples that each load
balancer node reports, not the actual value of latency reported.
The following table describes how to evaluate the statistics for the CloudWatch metrics sent by Elastic
Load Balancing.
Statistics for Elastic Load Balancing Metrics
Statistics DetailsMetric Name
This metric should be used with AvailabilityZone dimension.
Preferred statistic: average
The average statistic indicates the average number of healthy or
unhealthy instances as seen by the load balancer nodes.To get the
total healthy or unhealthy instances, calculate the average value for
each Availability Zone (AZ).
Min and max represent the least and the most number of instances that
were in the healthy or unhealthy state during the specified interval.
Because some load balancer nodes may see an instance as unhealthy
for a brief period while other nodes see the instance as healthy, the min
and max can be misleading.
Sum is not a meaningful statistic for this measure.
Count is the number of samples reported by all nodes and is not a useful
measure for troubleshooting issues.
Example: Say that your load balancer has 4 back-end instances with
2 instances in AZ-1 and 2 instances in AZ-2. AZ-1 has 1 unhealthy
instance and 1 healthy instance, and AZ-2 has 2 healthy and 0 unhealthy
instances.The AZ dimension will report an average of 1 healthy and 1
unhealthy instance in AZ-1, and an average of 2 healthy and 0 unhealthy
instances in AZ-2.The regional (load balancer) dimension would report
an average of 1.5 healthy instances in AZ-1 and in AZ-2 and 0.5
unhealthy instances in AZ-1 and AZ-2.
HealthyHostCount
UnHealthyHostCount
This metric is typically used with the LoadBalancerName dimension
to view the total requests for a load balancer. The metrics can also be
used to measure the number of requests that were routed to an
Availability Zone (which may or may not be the same Availability Zone
that serviced the request for the back end).
Preferred statistic: sum
Sum is the only meaningful statistic for this measure.
Min, max, and average are not meaningful because all return a value
of 1.
Count is the number of samples reported by all load balancer nodes
and typically equals the sum for the period.
Example: Say your load balancer has 4 back-end instances with 2
instances in AZ-1 and 2 instances in AZ-2. 100 requests are sent to the
load balancer; 60 requests are sent to AZ-1 with each instance receiving
30 requests. 40 requests are sent to AZ-2 with each instance receiving
20 requests.The AZ dimension will report a sum of 60 requests in AZ-1
and 40 requests in AZ-2.The regional (load balancer) dimension reports
a sum of 100 requests. Instances in AZ-1 would each see a request
count of 30; instances in AZ-2 would each see a request count of 20.
RequestCount
API Version 2012-06-01
221
Elastic Load Balancing Developer Guide
Available Metrics

Statistics DetailsMetric Name
Latency can be viewed for all requests or for requests routed to a single
Availability Zone.
Preferred statistic: average
The average provides the most useful diagnostic because it is the
average of all requests that were sent to the back end.
Max can be useful to determine if some requests are taking substantially
longer than the average.
Min is typically not a useful measure, because it is the request/response
with the lowest total time elapsed.
Count is approximately equal to the sum of the RequestCount metric,
because it is the number of samples taken.
Example: Say your load balancer has 4 back-end instances with 2
instances in AZ-1 and 2 instances in AZ-2. Requests sent to 1 instance
in AZ-1 have a higher latency. The latency metric reported for AZ-1 will
have a higher value than the latency metric for AZ-2.
Latency
This metric is typically used with the LoadBalancerName dimension
to view the total number of HTTP 4XX errors generated by all the load
balancer nodes.The metrics can also be used to measure the number
of errors for requests that were routed to an Availability Zone (which
may or may not be the same Availability Zone that serviced the request
for the back-end).
Preferred statistic: sum
Sum is the only meaningful statistic for this measure.
Min, max, and average are not meaningful and all return a value of
1.
Count is the number of samples reported by all load balancer nodes
and typically equals the sum for the period.
Example: Say that your load balancer has AZ-1 and AZ-2 enabled.
Client requests include a malformed request URL. Client HTTP errors
would likely increase in all Availability Zones.The regional (load balancer)
metric would be the sum of the values for each Availability Zone.
HTTPCode_ELB_4XX
This metric is typically used with the LoadBalancerName dimension
to view the total number of HTTP 5XX errors generated by all the load
balancer nodes.The metrics can also be used to measure the number
of errors for requests that were routed to an Availability Zone (which
may or may not be the same Availability Zone that serviced the request
for the back end).
Preferred statistic: sum
Sum is the only meaningful statistic for this measure.
Min, max, and average are not meaningful statistics for this measure
and all return a value of 1.
Count is the number of samples reported by all load balancer nodes
and typically equals the sum for the period.
Example: Say that your load balancer has AZ-1 and AZ-2 enabled.
Instances in AZ-1 are experiencing high latency and are slow to respond
to requests. As a result the load balancer nodes' surge queue in AZ-1
fills up, resulting in spillovers and returns a 503 error to clients. (see
SpilloverCount metric in this table). Assuming AZ-2 continues to respond
normally, the regional (load balancer) sum of HTTPCode_ELB_5XX
equals the sum for AZ-1.
HTTPCode_ELB_5XX
API Version 2012-06-01
222
Elastic Load Balancing Developer Guide
Available Metrics

Statistics DetailsMetric Name
This metric is typically used with the LoadBalancerName dimension
to view the total number of HTTP response codes generated by back-end
instances registered to a load balancer.The metrics can also be used
to measure the number of errors for requests that were routed to an
Availability Zone (which may or may not be the same Availability Zone
that serviced the request for the back end).
Preferred statistic: sum
Sum is the only meaningful statistic for this measure.
Min, max, and average are not meaningful statistics for this measure
and all return a value of 1.
Count is the number of samples reported by all load balancer nodes
and typically equals the sum for the period.
Example: Say that your load balancer has 4 back-end instances with
2 instances in AZ-1 and 2 instances in AZ-2. Requests sent to 1 instance
in AZ-1 result in an HTTP 500 response.The metric reported for AZ-1
will include these error responses, while the value in AZ-2 will not include
these error responses.The regional (load balancer) total would be equal
to the total for AZ-1.
HTTPCode_Backend_2XX
HTTPCode_Backend_3XX
HTTPCode_Backend_4XX
HTTPCode_Backend_5XX
This metric can be viewed for all back-end instances or the back-end
instances in a single Availability Zone.
Preferred statistic: sum
Sum represents the total connection errors seen by all load balancer
nodes for the given period of time.
Sum is the only meaningful statistic for this measure.
Average, min, and max are reported per load balancer node and are
not typically useful.The difference between min and max or peak to
average or average to trough may be useful to determine if a single load
balancer node is an outlier.
Count is the number of samples reported by all load balancer nodes
and will typically equal the sum for the period.
Example: Say that your load balancer has 4 back-end instances with
2 instances in AZ-1 and 2 instances in AZ-2. Attempts to connect to 1
instance in AZ-1 result in an increase in the back end connection errors.
The metric reported for AZ-1 will include these connection errors for the
failed attempts, while the value in AZ-2 will not include these errors.The
regional (load balancer) total would be equal to the total for AZ-1.
BackendConnectionErrors
API Version 2012-06-01
223
Elastic Load Balancing Developer Guide
Available Metrics

Statistics DetailsMetric Name
This metric can be used to monitor the surge queue size for a single
Availability Zone or for the region (the overall load balancer).
Preferred statistic: max
Max is the most useful statistic because it represents the peak of requests
that were queued.The maximum value is 1,024. If any load balancer
node has a full queue of 1,024 requests there will likely be spillovers
(see the SpilloverCount metric in this table).
Average represents the number of requests that were in the queue on
average across all load balancer nodes for a given period of time.
Average can be useful in combination with min and max to determine
the range of queuing by load balancer nodes.
Sum is not a useful statistic, because it is the total of all recorded samples
across all load balancer nodes.
Min is not typically useful because it represents the lowest value
observed for any load balancer node for any sample.
Count is not a meaningful statistic for this measure.
Example: Say that your load balancer has AZ-1 and AZ-2 enabled.
Instances in AZ-1 are experiencing high latency and are slow to respond
to requests. As a result the load balancers' surge queue in AZ-1 fills up,
with clients likely experiencing increased response times. If this
continues, the load balancer will have spillovers (see Spillover metrics
in this table). Assuming AZ-2 continues to respond normally, the regional
(load balancer) max will be the same as the max for AZ-1, while AZ-2
will have a small value (or no metric) for the same period.
SurgeQueueLength
This metric is typically used with the LoadBalancerName dimension
to view the total spillovers for the load balancer.This metric can also be
used to measure the number of rejected requests that were routed to
an Availability Zone.
Preferred statistic: sum
Sum represents the total of all load balancer nodes reports for the given
period of time.
Sum is the only meaningful statistic for this measure.
Average, min, and max are reported per load balancer node and
are not typically useful for the spillover metric.
Min is not typically useful because it represents the lowest value
observed for any load balancer node for any sample.
Count is not a meaningful statistic for this measure.
Example: Say that your load balancer has AZ-1 and AZ-2 enabled.
Instances in AZ-1 are experiencing high latency and are slow to respond
to requests. As a result the load balancers' surge queue in AZ-1 fills up,
resulting in load balancer spillovers.The spillover metric will be
incremented. Assuming AZ-2 continues to respond normally, the regional
(load balancer) sum will be the same as the sum for AZ-1, while AZ-2
will have a small value (or no metric) for the same period.
SpilloverCount
API Version 2012-06-01
224
Elastic Load Balancing Developer Guide
Available Metrics

View Metrics
You can view the CloudWatch metrics for your Elastic Load Balancing load balancers directly in the EC2
console’s Load Balancer page.The load balancer metrics are displayed as monitoring graphs.The fol-
lowing metrics are available in the EC2 console:
• Average Latency
• Sum Requests
• Sum ELB HTTP 4XXs
• Sum ELB HTTP 5XXs
• Sum HTTP 2XXs
• Sum HTTP 4XXs
• Sum HTTP 5XXs
To view the metrics from your load balancer
1. Sign in to the AWS Management Console and open the Amazon EC2 console at https://con-
sole.amazonaws.cn/ec2/.
2. On the Amazon EC2 console Resources page, in the EC2 Dashboard pane, under NETWORK &
SECURITY, click Load Balancers.
3. On the Load Balancers page, select the check box next to your load balancer.
The bottom pane displays the details of your load balancer.
4. Click the Monitoring tab.
The bottom pane displays the graphs of metrics sent by Elastic Load Balancing for the selected load
balancer.
5. If you want to filter the results by time, select the time range in the Showing data for drop-down
box.
6. Click on an individual graph to get a larger view of the individual metric.
The my-test-loadbalancer load balancer used in this example is inactive and is used for display
purposes only. The monitoring graphs will show data points if the load balancer is active and receiving
requests.
You can also view metrics for your load balancer using the Amazon CloudWatch console, command line
interface (CLI), or the Query API. For information on using the CloudWatch console to view metrics, see
API Version 2012-06-01
225
Elastic Load Balancing Developer Guide
View Metrics

Viewing Your AWS Metrics with Amazon CloudWatch.To view metrics using the command line interface,
use the mon-list-metrics command. To view metrics using the Query API, use the ListMetrics action.
Create Alarms
An alarm watches a single metric over a time period you specify. Depending on the value of the metric
relative to a threshold that you define, the alarm can send one or more notifications to an Amazon Simple
Notification Service (Amazon SNS) topic. Amazon SNS is a web service that enables applications, end
users, and devices to instantly send and receive notifications. For more information, see Get Started with
Amazon SNS.
An alarm will send notifications to Amazon SNS when the specified metric reaches the defined range and
remains in that range for a specified period of time. An alarm has three possible states:
• OK—This is the state the alarm is in when the value of the metric remains within the range you’ve
specified.
• ALARM—This is the state the alarm goes to when the value of the metric goes out of the range you’ve
specified and remains outside of the range for a specified time duration.
• INSUFFICIENT_DATA—When the alarm is in this state, it either means that the metric is not yet
available or not enough data is available for the metric to determine the alarm state.
Whenever the state of an alarm changes, Amazon CloudWatch uses Amazon SNS to send a notification
to the email addresses that you specify.
You can create alarms for your load balancer using either the Elastic Load Balancing wizard in the EC2
console or the Amazon CloudWatch console. This section walks you through the steps for creating an
alarm using the Elastic Load Balancing wizard. For information on creating a load balancer alarm using
the Amazon CloudWatch console, see Send Email Based on Load Balancer Alarm.
To create an alarm for your load balancer
1. Sign in to the AWS Management Console and open the Amazon EC2 console at https://con-
sole.amazonaws.cn/ec2/.
2. On the Amazon EC2 console page, in the EC2 Dashboard pane, under NETWORK & SECURITY,
click Load Balancers.
3. On the Load Balancers page, select the check box next to the load balancer for which you want to
create an alarm.
The bottom pane displays the details of your load balancer.
4. On the Monitoring tab in the bottom pane, click Create Alarm.
5. In the Create Alarm dialog box, set the criteria for your alarm. In this example, we’ll set an alarm if
the load balancer's latency is above 120 seconds for 1 consecutive period of 5 minutes.
6. The check box next to Send a notification to is selected by default.
If you've already created a SNS topic and want to use it, select your topic from the drop-down box.
Skip the next step.
If you do not have a SNS topic, click create topic.
7. To create SNS topic
a. In the Send a notification to: box, enter a name for your topic.
b. In the With these recipients box, enter the email addresses of the recipients you want to notify.
You can enter up to 10 email addresses, each separated by a comma.
API Version 2012-06-01
226
Elastic Load Balancing Developer Guide
Create Alarms

Note
If your email recipients have not yet been subscribed to the SNS topic, each email re-
cipient will receive an email from Amazon SNS with a link to confirm their subscription
to the SNS topic. If they do not confirm subscription, they will not receive future email
Alarm notifications.
8. Configure the threshold for your alarm.
a. In the Whenever boxes, select Average and Average Latency.
b. In the Is boxes, define the threshold for the alarm by selecting > and entering 120.
c. In the For at least boxes, enter 1 and then select 5 minutes, or you can define your own eval-
uation period.
Note
A shorter period creates a more sensitive alarm. A longer period can mitigate brief
spikes in a metric.
d. In Name this alarm, a name is automatically generated for you. Enter a new name if you want
to change it.
Important
You cannot modify the name after you create the alarm.
9. Click Create Alarm.
10. The Alarm created successfully dialog box opens confirming successful creation of your alarm.
Click Close.
After you create the alarm, you can use the Monitoring tab to view a summary of alarms that have been
set for that load balancer. From there, you can also edit the alarm.
API Version 2012-06-01
227
Elastic Load Balancing Developer Guide
Create Alarms

Access Logs
The Elastic Load Balancing access logs capture detailed information for all requests made to your load
balancer. Each log contains details such as the time a request was received, client’s IP address, latencies,
request path, and server responses.You can use Elastic Load Balancing access logs to analyze traffic
patterns and to troubleshoot your back-end applications.
This topic provides you with an overview of Elastic Load Balancing access logs and describes how to
enable or disable access logs for your load balancer.
Access logging is an optional feature of Elastic Load Balancing. This feature is disabled by default.You
must explicitly enable your load balancer to capture and deliver the logs. After you enable this feature,
Elastic Load Balancing captures the logs and stores them in an Amazon Simple Storage Service (Amazon
S3) bucket you specify.You can either use an existing bucket or create a new one.You can disable the
log delivery at any time.
There is no additional charge for access logs.You will incur storage costs for Amazon S3, but will not be
charged for the bandwidth used by Elastic Load Balancing to send log files to Amazon S3. For details on
the storage costs, see Amazon S3 Pricing.
Access Log File
Elastic Load Balancing publishes a log file from each load balancer node at the interval you specify.You
can specify an interval of either 5 minutes or 60 minutes when you enable the access log for your load
balancer. By default, Elastic Load Balancing publishes the log at a 60 minute interval.The logs are
emitted at the specified interval starting at each hour. For example, if the interval is set for 5 minutes, the
logs will be emitted every 5 minutes starting at each hour, that is, 1:05, 1:10, 1:15, and so on.The actual
log delivery is delayed up to 5 minutes if the interval is set to 5 minutes, and it is delayed up to 15 minutes
if the interval is set to 60 minutes.You can modify the publishing interval at any time.
The load balancer can deliver multiple logs for the same period.This usually happens if the site has high
traffic, multiple load balancer nodes, and a short log publishing interval.
Elastic Load Balancing creates log file names in the following format:
{Bucket}/{Prefix}/AWSLogs/{AWS AccountID}/elasticloadbalancing/{Re
gion}/{Year}/{Month}/{Day}/{AWS Account ID}_elasticloadbalancing_{Region}_{Load
Balancer Name}_{End Time}_{Load Balancer IP}_{Random String}.log
The following is an example of a log file name:
S3://mylogsbucket/myapp/prod/AWSLogs/123456789012/elasticloadbalancing/us-east-
1/2014/02/15/123456789012_elasticloadbalancing_us-east-1_my-test-loadbalan
cer_20140215T2340Z_172.160.001.192_20sg8hgm.log
The following table describes the format of the log file name using the values from the previous example:
Example valueDescriptionParameter
mylogsbucketName of the S3 bucket that you
have created.
Bucket
API Version 2012-06-01
228
Elastic Load Balancing Developer Guide
Access Logs

Example valueDescriptionParameter
myapp/prodPrefix (logical hiearchy) that you
created in the S3 bucket. If there
is no prefix specified, the log is
placed at the root level.
Prefix
123456789012The AWS account number
associated with the load
balancer.Value is automatically
populated by the system.
AWS Account ID
us-east-1Region where your load balancer
and your S3 bucket is located.
This is automatically populated
by the system.
Region
2014/02/15Date the log was delivered.
Value is automatically populated
by the system.
Year/Month/Day
my-test-loadbalancerThe name of the load balancer
from which the log is collected.
This is automatically populated
by the system.
Load Balancer Name
20140215T2340ZTimestamp (UTC) of the end of
the logging interval (e.g., an end
time of 20140215T2340Z
contains entries for requests
made between 23:35 and 23:40
for logs emitted every 5 minutes).
End Time
172.160.001.192IP address of the load balancer
node that handled the request.
For an internal load balancer, this
is a private IP address.Value is
automatically populated by the
system.
Load Balancer IP
20sg8hgmSystem-generated random string.Random String
You can store your log files in your bucket for as long as you want, but you can also define Amazon S3
lifecycle rules to archive or delete log files automatically. For more information, see Object Lifecycle
Management in the Amazon Simple Storage Service Developer Guide.
Access Log Entry
The access log file can have one or more log entries. Each log entry contains the details of a single request
made to the load balancer. Elastic Load Balancing logs all requests sent to the load balancer, including
requests that never made it to the back-end instances. For example, if a client sends a malformed request,
or there are no healthy instances to respond, then the requests would still be logged.
Each entry in the log file follows the following format:
API Version 2012-06-01
229
Elastic Load Balancing Developer Guide
Access Log Entry

timestamp elb client:port backend:port request_processing_time backend_pro
cessing_time response_processing_time elb_status_code backend_status_code re
ceived_bytes sent_bytes "request"
All the fields in the log entry are space delimited.The following example shows a log entry:
2014-02-15T23:39:43.945958Z my-test-loadbalancer 192.168.131.39:2817 10.0.0.1
0.000073 0.001048 0.000057 200 200 0 29 "GET http://www.example.com:80/HTTP/1.1"
The following table describes the fields of a log entry using the values from the previous example:
Example field
value
DescriptionField name
2014-02-15T23:39:43.945958ZTime (UTC) at which the load balancer receives request
from the client. Uses ISO 8601 format.
timestamp
my-test-loadbalancerName of the load balancerelb
192.168.131.39:2817IP address and the port of the requesting client.client:port
10.0.0.1IP address of the registered instance that processed this
request.
backend:port
0.000073Total time elapsed (in seconds) from the time the load
balancer receives the request and sends the request to a
registered instance
request_processing_time
0.001048For HTTP listener: Total time elapsed (in seconds) from
the time the load balancer sends the request to a registered
instance and the instance begins sending the response
headers.
For TCP listener:Total time elapsed (in seconds) from the
time the load balancer sends the first byte of the request
to a registered instance and the instance sends back the
first byte.
backend_processing_time
0.000057For HTTP listener: Total time elapsed (in seconds) from
the time the load balancer receives the response header
from the registered instance and starts sending the
response to the client.This processing time includes both
queuing time at the load balancer and the connection
acquisition time from the load balancer to the backend.
For TCP listener:Total time elapsed (in seconds) from the
time the load balancer receives the first byte from the
registered instance and starts sending the response to the
client.
response_processing_time
200Status code of the response from the load balancer (HTTP
only)
elb_status_code
200Status code of the response from the registered instance
(HTTP only)
backend_status_code
API Version 2012-06-01
230
Elastic Load Balancing Developer Guide
Access Log Entry

Example field
value
DescriptionField name
0Size of the request (bytes) received from the client
(requester).
For HTTP listener: The bytes received account for the
request body and do not include headers.
For TCP listener:The bytes include the headers.
received_bytes
29Size of the response (bytes) sent back to the client
(requester).
For HTTP listener:The bytes sent account for the response
body and do not include headers.
For TCP listener:The bytes include the headers.
sent_bytes
"GET
http://www.example.com:
80/HTTP/1.1"
The request line from the client enclosed in double quotes
and logged in the following format: HTTP Method +
Protocol://Host header:port + Path + HTTP version.
For TCP listener:The URL will not be populated but instead
show three dashes, each separated by a space, ending
with a space, and enclosed in quotes, for example, "- - - "
"request"
• To enable access logs for your load balancer, see Enable Access Logs (p. 231)
• To disable access logs for your load balancer, see Disable Access Logs (p. 237)
Log Processing
Depending on your website traffic, your load balancer may generate large gigabytes of log files. Since
line-by-line processing may not be feasible to process such large volumes of data, you might have to use
analytical tools that provide parallel processing solutions.You can use any one of the following analytical
tools to analyze and process the access logs generated by your load balancer:
Amazon Elastic MapReduce (Amazon EMR)
Amazon EMR allows you to quickly and efficiently process vast amounts of data, such as Elastic Load
Balancing access logs. Amazon EMR runs Apache Hadoop on Amazon EC2 instances. Hadoop is a
framework that distributes a computational task to multiple computers that work in parallel, allowing you
to quickly process vast amounts of data. For instructions on using Amazon EMR to query and analyze
the logs generated by your load balancer, see Analyze Elastic Load Balancing Access Log Data.
Partner Solutions
You can also analyze your access logs using integrated solutions offered by our following partners:
• Splunk
• Sumo Logic
Enable Access Logs
This section walks you through the following steps to enable access logs for your load balancer:
API Version 2012-06-01
231
Elastic Load Balancing Developer Guide
Log Processing

1. Enable access logs for your load balancer.
2. Verify that the access logs are enabled for the load balancer.
You can enable access logs for your load balancer using the AWS Management Console, the AWS
command line interface (AWS CLI), or the Query API.
Topics
• Using the AWS Management Console (p. 232)
• Using the AWS CLI (p. 233)
• Using the Query API (p. 235)
• Verify that Elastic Load Balancing Created a Test File in the Amazon S3 Bucket (p. 237)
Using the AWS Management Console
After you have identified your load balancer, you must specify the name of your Amazon S3 bucket where
you want the load balancer to store the logs.When you enable access logs using the console, Elastic
Load Balancing provides you with an option for creating the bucket for you with necessary permissions
for the load balancer to write to your bucket.
If you want to use an existing bucket or create your own bucket, first follow the instructions in Configure
an Amazon S3 Bucket for Storing Access Logs (p. 241).
In this walkthrough, you enable your load balancer, my-test-loadbalancer to capture and deliver
logs every 60 minutes (default interval) to the S3 bucket, my-test-loadbalancer-log, that is created
by Elastic Load Balancing.
To enable access logs for your load balancer using the console
1. Sign in to the AWS Management Console and open the Amazon EC2 console at https://con-
sole.amazonaws.cn/ec2/.
2. On the Amazon EC2 console Resources page, in the navigation pane, under NETWORK & SECUR-
ITY, click Load Balancers.
3. If necessary, change the region. From the navigation bar, select the region that has your load balancer.
4. On the Create Load Balancer page, select your load balancer.
5. The bottom pane displays the details of your load balancer.
6. Click (Edit) in the Access Logs: Disabled row.
7. In the Configure Access Logs dialog box perform the following actions:
a. Select Enable Access Logs.
b. Leave the Interval dialog box set to the default setting.
c. In the S3 Location field, enter the name of your S3 bucket, including the prefix (this example
uses my-test-loadbalancer-log/myapp).
Note
If you want Elastic Load Balancing to create the bucket for you, make sure the bucket
name you choose is unique across all existing bucket names in Amazon S3.You cannot
change the name of a bucket after it is created. For more information on bucket naming
rules and conventions, see Bucket restrictions and Limitations in the Amazon Simple
Storage Service Developer Guide.
d. Select Create the location for me if you want Elastic Load Balancing to create the S3 bucket
for you.
API Version 2012-06-01
232
Elastic Load Balancing Developer Guide
Enable Access Logs

e. Click Save.
Using the AWS CLI
To enable access logs, you must modify the AccessLog attribute of your load balancer by setting the
attribute value to true and by specifying the other attributes, such as the Amazon S3 bucket name and
the prefix.
Prerequisites
Before you get started, make sure you complete the following steps:
• Download and install the latest version of the AWS command line interface (AWS CLI). For instructions
to download and install the latest CLI, see Getting Set Up with the AWS Command Line Interface.
• Create or identify an Amazon S3 bucket and attach a bucket policy to your bucket.The bucket policy
must grant permissions to Elastic Load Balancing to write to the Amazon S3 bucket you specify. Make
sure that you do not grant any other permissions, other than the write permission, to Elastic Load Bal-
ancing. For instructions to create a bucket and attach a policy to your bucket, see Configure an Amazon
S3 Bucket for Storing Access Logs (p. 241).
To enable access logs for your load balancer
1. Enter the command modify-load-balancer-attributes using the following options:
• load-balancer-name = my-test-loadbalancer
• load-balancer-attributes
• AccessLog
• Enabled=true
• S3BucketName=my-test-loadbalancer-log
• S3BucketPrefix=myapp
• EmitInterval=60
This command requires the input data to be formatted as JSON.You can either enter the JSON directly
on the command line, or save the JSON in a file and then reference the file in the command line.
API Version 2012-06-01
233
Elastic Load Balancing Developer Guide
Enable Access Logs
a. To reference a JSON file in the command line
Enter the parameters in the JSON format as follows in a file and then save the file with the JSON
extension (.json)
{
"AccessLog": {
"Enabled": true,
"S3BucketName": "my-test-loadbalancer-log",
"EmitInterval": 60,
"S3BucketPrefix": "myapp"
}
}
b. Reference the saved file in the command line.
Your command should look like the following example:
aws elb modify-load-balancer-attributes --load-balancer-name my-test-
loadbalancer --load-balancer-attributes file:your-json-file-path.json
Or, use JSON in the command line
Your command should look like the following example:
Note
The following example uses JSON syntax on a Windows operating system to specify the
attributes. For information about specifying JSON syntax on your operating system, see
Quoting Strings.
aws elb modify-load-balancer-attributes --load-balancer-name my-test-load
balancer --load-balancer-attributes "{\"AccessLog\":{\"En
abled\":true,\"S3BucketName\":\"my-test-loadbalancer-log\",\"EmitInter
val\":60,\"S3BucketPrefix\":\"myapp\"}}"
2. Elastic Load Balancing responds as in the following example.
{
"LoadBalancerAttributes": {
"AccessLog": {
"Enabled": true,
"EmitInterval": 60,
"S3BucketName": "my-test-loadbalancer-log",
"S3BucketPrefix": "myapp"
}
},
"LoadBalancerName": "my-test-loadbalancer"
}
3. Enter the describe-load-balancer-attributes command using the following parameter to verify that
the access log is enabled for your load balancer.
• load-balancer-name = my-test-loadbalancer
API Version 2012-06-01
234
Elastic Load Balancing Developer Guide
Enable Access Logs

Your command should look like the following example.
aws elb describe-load-balancer-attributes --load-balancer-name my-test-
loadbalancer
Elastic Load Balancing responds as in the following example.
{
"LoadBalancerAttributes": {
"ConnectionDraining": {
"Enabled": false,
"Timeout": 360
},
"CrossZoneLoadBalancing": {
"Enabled": false
},
"ConnectionSettings": {
"IdleTimeout": 60
},
"AccessLog": {
"S3BucketPrefix": "myapp",
"EmitInterval": 60,
"Enabled": true,
"S3BucketName": "my-test-loadbalancer-log"
}
}
}
You have successfully enabled access logs for your load balancer.
Using the Query API
To enable access logs, you must modify the AccessLog attribute of your load balancer by setting the
attribute value to true and by specifying the other attributes, such as the Amazon S3 bucket name and
the prefix.
To enable access logs for your load balancer
1. Use the ModifyLoadBalancerAttributes action with the following parameters:
• LoadBalancerName = my-test-loadbalancer
• AccessLog
• Enabled=true
• S3BucketName=my-test-loadbalancer-log
• S3BucketPrefix=myapp
• EmitInterval=60
Your request should look like the following example:
https://elasticloadbalancing.sa-east-1.amazonaws.com/?LoadBalancerAttrib
utes.AccessLog.Enabled=true
&LoadBalancerAttributes.AccessLog.S3BucketName=my-test-loadbalancer-log
API Version 2012-06-01
235
Elastic Load Balancing Developer Guide
Enable Access Logs

&LoadBalancerAttributes.AccessLog.S3BucketPrefix=myapp
&LoadBalancerAttributes.AccessLog.EmitInterval=60
&LoadBalancerName=my-test-loadbalancer
&Version=2012-06-01
&Action=ModifyLoadBalancerAttributes
&AUTHPARAMS
If your request is successful, you should get a response similar to the following example:
<ModifyLoadBalancerAttributesResponse xmlns="http://elasticloadbalan
cing.amazonaws.com/doc/2012-06-01/">
<ModifyLoadBalancerAttributesResult>
<LoadBalancerName>my-test-loadbalancer</LoadBalancerName>
<LoadBalancerAttributes>
<AccessLog>
<Enabled>true</Enabled>
<S3BucketName>my-test-loadbalancer-log</S3BucketName>
<S3BucketPrefix>myapp</S3BucketPrefix>
<EmitInterval>60</EmitInterval>
</AccessLog>
</LoadBalancerAttributes>
</ModifyLoadBalancerAttributesResult>
<ResponseMetadata>
<RequestId>020744c8-9d97-11e3-919a-33887EXAMPLE</RequestId>
</ResponseMetadata>
</ModifyLoadBalancerAttributesResponse>
2. Use the DescribeLoadBalancerAttributes action with the following parameter to verify that
access log is enabled for your load balancer.
• LoadBalancerName = my-test-loadbalancer
Your request should look like the following example.
https://elasticloadbalancing.amazonaws.com/?LoadBalancerName=my-test-load
balancer
&Version=2012-06-01
&Action=DescribeLoadBalancerAttributes
&AUTHPARAMS
If your request is successful, you should get a response similar to the following example:
<DescribeLoadBalancerAttributesResponse xmlns="http://elasticloadbalan
cing.amazonaws.com/doc/2012-06-01/">
<DescribeLoadBalancerAttributesResult>
<LoadBalancerAttributes>
<AccessLog>
<Enabled>true</Enabled>
<S3BucketName>my-test-loadbalancer-log</S3BucketName>
<S3BucketPrefix>myapp</S3BucketPrefix>
<EmitInterval>60</EmitInterval>
</AccessLog>
<ConnectionSettings>
<IdleTimeout>30</IdleTimeout>
API Version 2012-06-01
236
Elastic Load Balancing Developer Guide
Enable Access Logs

</ConnectionSettings>
<ConnectionDraining>
<Enabled>true</Enabled>
<Timeout>60</Timeout>
</ConnectionDraining>
<CrossZoneLoadBalancing>
<Enabled>false</Enabled>
</CrossZoneLoadBalancing>
</LoadBalancerAttributes>
</DescribeLoadBalancerAttributesResult>
<ResponseMetadata>
<RequestId>64e7b49d-41fb-11e3-962d-c57EXAMPLE</RequestId>
</ResponseMetadata>
</DescribeLoadBalancerAttributesResponse>
You have successfully enabled access logs for your load balancer.
Verify that Elastic Load Balancing Created a Test File in the
Amazon S3 Bucket
After the access log is enabled for your load balancer, Elastic Load Balancing validates the Amazon S3
bucket and creates a test file.You can use the S3 console to verify that the test file is created in your
Amazon S3 bucket.
To verify that Elastic Load Balancing has created a test file in the Amazon S3 bucket
1. From the navigation bar, click Servicesand select S3.
2. In the S3 console All Buckets list, select your S3 bucket.
3. Keep clicking through your bucket path until you see the test log file.
Disable Access Logs
You can disable the access logs option for your load balancer at any time. After you disable this option,
your Amazon S3 bucket will continue to keep your access logs until you delete the logs or the bucket.
For information on managing your Amazon S3 bucket, see Working with Buckets in the Amazon S3
Console User Guide.
This section shows you how to disable the access log for your load balancer using the AWS Management
Console, the AWS command line interface (CLI), or the Query API.
To disable the access log using the console
1. Sign in to the AWS Management Console and open the Amazon EC2 console at https://con-
sole.amazonaws.cn/ec2/.
API Version 2012-06-01
237
Elastic Load Balancing Developer Guide
Disable Access Logs

2. On the Amazon EC2 console Resources page, in the navigation pane, under NETWORK & SECUR-
ITY, click Load Balancers.
3. If necessary, change the region. From the navigation bar, select the region that has your load balancer.
4. On the Load Balancers page, select your load balancer.
5. The bottom pane displays the details of your load balancer.
6. Click (Edit) in the Access Logs: Enabled row.
7. In the Configure Access Logs dialog box, select Disable Access Logs.
8. Click Save.
To disable the access log using the AWS CLI
You must modify the AccessLog attribute of your load balancer by setting the attribute value to false.
1. Enter the modify-load-balancer-attributes command using the following options:
• load-balancer-name = my-test-loadbalancer
• AccessLog
• Enabled=false
Your command should look like the following example:
Note
The following example uses JSON syntax on a Windows operating system to specify the
attributes. For information about specifying JSON syntax on your operating system, see
Quoting Strings.
aws elb modify-load-balancer-attributes --load-balancer-name my-test-load
balancer --load-balancer-attributes "{\"AccessLog\":{\"Enabled\":false}}"
Elastic Load Balancing responds as in the following example.
{
"LoadBalancerName": "my-test-loadbalancer",
"LoadBalancerAttributes": {
"AccessLog": {
"S3BucketName": "my-test-loadbalancer-log",
"EmitInterval": 60,
"Enabled": false,
"S3BucketPrefix": "myapp"
}
}
}
2. Enter the describe-load-balancer-attributes command as in the following example to verify that the
access log is disabled for your load balancer. Use the following option:
• load-balancer-name = my-test-loadbalancer
Your command should look like the following example.
aws elb describe-load-balancer-attributes --load-balancer-name my-test-
loadbalancer
API Version 2012-06-01
238
Elastic Load Balancing Developer Guide
Disable Access Logs

Elastic Load Balancing responds as in the following example.
{
"LoadBalancerAttributes": {
"ConnectionSettings": {
"IdleTimeout": 60
},
"AccessLog": {
"EmitInterval": 60,
"Enabled": false,
"S3BucketName": "my-test-loadbalancer-log",
"S3BucketPrefix": "myapp"
},
"CrossZoneLoadBalancing": {
"Enabled": false
},
"ConnectionDraining": {
"Timeout": 360,
"Enabled": false
}
}
}
To disable the access log using the Query API
You must modify the AccessLog attribute of your load balancer by setting the attribute value to false.
1. Use the ModifyLoadBalancerAttributes action with the following parameters:
• LoadBalancerName = my-test-loadbalancer
• AccessLog
• Enabled=false
Your request should look like the following example.
https://elasticloadbalancing.sa-east-1.amazonaws.com/?LoadBalancerAttrib
utes.AccessLog.Enabled=false
&LoadBalancerName=my-test-loadbalancer
&Version=2012-06-01
&Action=ModifyLoadBalancerAttributes
&AUTHPARAMS
If your request is successful, you should get a response similar to the following example.
<ModifyLoadBalancerAttributesResponse xmlns="http://elasticloadbalan
cing.amazonaws.com/doc/2012-06-01/">
<ModifyLoadBalancerAttributesResult>
<LoadBalancerName>my-test-loadbalancer</LoadBalancerName>
<LoadBalancerAttributes>
<AccessLog>
<Enabled>false</Enabled>
<S3BucketName>my-test-loadbalancer-log</S3BucketName>
<S3BucketPrefix>myapp</S3BucketPrefix>
API Version 2012-06-01
239
Elastic Load Balancing Developer Guide
Disable Access Logs

<EmitInterval>60</EmitInterval>
</AccessLog>
</LoadBalancerAttributes>
</ModifyLoadBalancerAttributesResult>
<ResponseMetadata>
<RequestId>020744c8-9d97-11e3-919a-33887EXAMPLE</RequestId>
</ResponseMetadata>
</ModifyLoadBalancerAttributesResponse>
2. Use the DescribeLoadBalancerAttributes action with the following parameter to verify that
access log is disabled for your load balancer.
• LoadBalancerName = my-test-loadbalancer
Your request should look like the following example.
https://elasticloadbalancing.amazonaws.com/?LoadBalancerName=my-test-load
balancer
&Version=2012-06-01
&Action=DescribeLoadBalancerAttributes
&AUTHPARAMS
If your request is successful, you should get a response similar to the following example:
<DescribeLoadBalancerAttributesResponse xmlns="http://elasticloadbalan
cing.amazonaws.com/doc/2012-06-01/">
<DescribeLoadBalancerAttributesResult>
<LoadBalancerAttributes>
<AccessLog>
<Enabled>false</Enabled>
<S3BucketName>my-test-loadbalancer-log</S3BucketName>
<S3BucketPrefix>myapp</S3BucketPrefix>
<EmitInterval>60</EmitInterval>
</AccessLog>
<ConnectionSettings>
<IdleTimeout>30</IdleTimeout>
</ConnectionSettings>
<CrossZoneLoadBalancing>
<Enabled>true</Enabled>
</CrossZoneLoadBalancing>
<ConnectionDraining>
<Enabled>true</Enabled>
<Timeout>60</Timeout>
</ConnectionDraining>
<CrossZoneLoadBalancing>
<Enabled>false</Enabled>
</CrossZoneLoadBalancing>
</LoadBalancerAttributes>
</DescribeLoadBalancerAttributesResult>
<ResponseMetadata>
<RequestId>64e7b49d-41fb-11e3-962d-c57EXAMPLE</RequestId>
</ResponseMetadata>
</DescribeLoadBalancerAttributesResponse>
API Version 2012-06-01
240
Elastic Load Balancing Developer Guide
Disable Access Logs

Configure an Amazon S3 Bucket for Storing Ac-
cess Logs
This section walks you through the following steps for configuring Amazon S3 bucket for storing access
logs:
• Create an Amazon S3 bucket.
• Attach a policy to the bucket.
Create an Amazon S3 Bucket
You can create an Amazon S3 bucket using the S3 console. If you already have an Amazon S3 bucket
and want to use it to store the access logs, skip this step and go to Attach a Policy to Your Amazon S3
Bucket (p.241) for granting permissions to Elastic Load Balancing to write logs to your Amazon S3 bucket.
1. Sign into the AWS Management Console and open the Amazon S3 console at https://console.amazon-
aws.cn/s3.
2. Click Create Bucket.
3. In the Create a Bucket – Select a Bucket Name and Region dialog box enter the following inform-
ation:
a. In the Bucket Name: field, enter a name for your bucket (this example uses my-test-load-
balancer-log).
Note
Make sure the bucket name you choose is unique across all existing bucket names in
Amazon S3.You cannot change the name of a bucket after it is created. For more in-
formation on bucket naming rules and conventions, see Bucket restrictions and Limita-
tions in the Amazon Simple Storage Service Developer Guide.
b. Click the Region dialog box, and select a region.
Important
Make sure to select the same region where you created your load balancer.
c. Click Create.
Attach a Policy to Your Amazon S3 Bucket
After you've created or identified your Amazon S3 bucket, you must attach a policy for the bucket. Bucket
policies are a collection of JSON statements written in the access policy language to define access per-
missions for your S3 bucket. Each statement includes information about a single permission and contains
a series of elements. In this walkthrough, you will use the following elements to create a bucket policy
that grants permissions to Elastic Load Balancing to write to your Amazon S3 bucket:
• Effect—Specifies whether to allow or deny access to the bucket.
• Principal—Specifies one or more people who are allowed or denied access.You must specify the
principal by using the Account ID. In this policy, the principal is Elastic Load Balancing.
The following table lists the Elastic Load Balancing Account IDs from all the regions. Make a note of
the Elastic Load Balancing Account ID of the region where you have created your load balancer and
your Amazon S3 bucket.
API Version 2012-06-01
241
Elastic Load Balancing Developer Guide
Configure an Amazon S3 Bucket for Storing Access
Logs

Elastic Load Balancing Account IDRegion NameRegion
127311923021US East (N.Virginia)us-east-1
027434742980US West (N.California)us-west-1
797873946194US West (Oregon)us-west-2
156460612806EU (Ireland)eu-west-1
054676820928EU (Frankfurt)eu-central-1
582318560864Asia Pacific (Tokyo)ap-northeast-1
114774131450Asia Pacific (Singapore)ap-southeast-1
783225319266Asia Pacific (Sydney)ap-southeast-2
507241528517South America (Sao
Paulo)
sa-east-1
638102146993China (Beijing)cn-north-1
048591011584AWS GovCloud (US)us-gov-west-1
• Action—Defines the specific type of access allowed or denied (for example, read or write).
• Resource—Specifies the object the policy covers. The object for this policy is the Amazon S3 bucket.
You specify the object using the Amazon Resource Name (ARN) format.
If you are using an existing Amazon S3 bucket, make sure that the identified bucket and your load
balancer are in the same region.The Amazon S3 bucket need not be associated with the same account
as your load balancer.
Caution
If your bucket already has one or more policies attached to it, add the statements for the Elastic
Load Balancing access log to that policy or policies.We recommend that you evaluate the res-
ulting set of permissions to be sure that they are appropriate for the users who will be accessing
the bucket.
For this walkthrough, you do not need to know the access policy language. Instead, you can use AWS
Policy Generator tool to create the policy for your S3 bucket.
To attach policy statement to your bucket
1. Open the Amazon S3 console at https://console.amazonaws.cn/s3.
2. Select the Amazon S3 bucket you just created.
3. Click the Properties tab.
4. Click Permissions.
5. In the Permissions pane, click Add bucket policy.
API Version 2012-06-01
242
Elastic Load Balancing Developer Guide
Configure an Amazon S3 Bucket for Storing Access
Logs

6. On the Bucket Policy Editor page, click AWS Policy Generator.
Alternatively, you can copy the policy directly from the image in Step 10, paste the copied policy in
the text area of the Bucket Policy Editor page, substitute the correct names of your bucket name,
prefix, and your AWS account ID, and then skip to Step 11.
7. On the AWS Policy Generator page, enter the following details:
a. Click the Select Type of Policy dialog box, and select S3 Bucket Policy.
b. In the Effect field, select Allow.
c. In the Principal field, enter the Elastic Load Balancing Account ID you just saved.
d. Click the Actions dialog box, and select PutObject.
e. In the Amazon Resource Name (ARN) field, enter the ARN of your Amazon S3 bucket in the
following format:
arn:aws:s3:::yourS3bucketname/prefix/AWSLogs/yourAWSAccountID/*
If you are using us-gov-west-1 region, use the ARN format arn:aws-us-gov: instead of
arn:aws:.
The Account ID specified in the ARN (yourAWSAccountID) is the AWS Account ID that is as-
sociated with the load balancer.The Amazon S3 bucket (yourS3bucketname) can either belong
to the same account as the load balancer or belong to a different account.
Important
Make sure to specify the AWS Account ID without the hyphens.
f. Click Add Statement.
g. Your policy statement is displayed.Your policy statement should look like the statement in the
following image:
h. Click Generate Policy.
8. On the Policy JSON Document page, select and copy the generated policy.
9. Click Close to close the policy document page.
10. Go back to the Bucket Policy Editor page and paste the copied policy in the text area.
API Version 2012-06-01
243
Elastic Load Balancing Developer Guide
Configure an Amazon S3 Bucket for Storing Access
Logs

11. Click Save to save the policy. If the Save button is not enabled, press Enter.
12. On the S3 Console page, in the Permissions pane, click Save to attach the policy to your Amazon
S3 bucket.
API Version 2012-06-01
244
Elastic Load Balancing Developer Guide
Configure an Amazon S3 Bucket for Storing Access
Logs

Logging Elastic Load Balancing API Calls Using
AWS CloudTrail
You can use AWS CloudTrail to capture Elastic Load Balancing (ELB) API calls made by or on behalf of
your Amazon Web Services (AWS) account. CloudTrail stores the information as log files in an Amazon
S3 bucket that you specify. API calls are logged when you use the ELB API, the ELB CLI, the ELB console,
or the AWS CLI.You can use the logs collected by CloudTrail to monitor activity of your ELB load balancers
and determine what API call was made to the load balancer, the source IP address that made the API
call, who made the call, when it was made, and so on.
To learn more about AWS CloudTrail, see the AWS CloudTrail User Guide.
Note
AWS CloudTrail only logs events for ELB API calls. If you want to monitor actions taken on your
load balancer that are not part of the ELB API, such as when a client makes a request to your
load balancer, then you will need to use Elastic Load Balancing’s access log feature. For more
information, see Access Logs (p. 228).
Configure CloudTrail Event Logging
AWS CloudTrail creates log entries in each supported region separately and stores them in the Amazon
S3 bucket created for that region. For information on regions supported by CloudTrail, see Regions and
Endpoints – CloudTrail
You can enable CloudTrail using the AWS Management Console, CLI, or API.When you enable CloudTrail
logging, the CloudTrail service can create an Amazon S3 bucket for you to store your log files. If you
would rather get one log file for all the supported regions, you can choose to aggregate the logs created
across the regions to a single Amazon S3 bucket.
For information on creating a CloudTrail, see Creating and Updating Your Trail. For information on ag-
gregating logs, see Aggregating CloudTrail Log Files to a Single Amazon S3 Bucket.
You can optionally configure CloudTrail to use Amazon SNS to notify you when a log file is created.
CloudTrail will send notifications to you frequently, so we recommend that you use Amazon SNS in con-
junction with an Amazon SQS queue and handle notifications programmatically.
There is no cost to use the CloudTrail service. However, standard rates for Amazon S3 apply as well as
rates for Amazon SNS and Amazon SQS apply should you include that option. For pricing details, see
the Amazon S3 Pricing, Amazon SNS Pricing, and Amazon SQS Pricing pages.
Elastic Load Balancing Event Entries in CloudTrail
Log Files
AWS CloudTrail log files contain event information formatted using JSON. An event record represents a
single AWS API call and includes information about the requested action, such as the user that requested
the action, and the date and the time of the request.
CloudTrail log files include events for all AWS API calls for your AWS account, not just calls to the
Elastic Load Balancing API. However, you can read the log files and scan for calls to the Elastic Load
Balancing API using the eventSource element with the value elasticloadbalancing.amazon-
aws.com. If you would like to obtain a specific ELB API such as CreateLoadBalancer, then scan for
calls in the eventName element.
The following example shows a CloudTrail log for a user who created a load balancer and then deleted
that load balancer using the ELB CLI.The CLI is identified by the userAgent element.The requested
API Version 2012-06-01
245
Elastic Load Balancing Developer Guide
Elastic Load Balancing API Call Logs

API calls (CreateLoadBalancer and DeleteLoadBalancer) are found in the eventName element for each
record. Information about the user (Alice) can be found in the userIdentity element.
{
Records: [
eventVersion: "1.01",
userIdentity:
{
type: "IAMUser",
principalId: "60505EXAMPLE",
arn: "arn:aws:iam::123456789012:user/Alice",
accountId: "123456789012",
accessKeyId: "AKIAIOSFODNN7EXAMPLE"
},
eventTime: "2014-04-01T15:31:48Z",
eventSource: "elasticloadbalancing.amazonaws.com",
eventName: "CreateLoadBalancer",
awsRegion: "us-east-1",
sourceIPAddress: "127.0.0.01",
userAgent: "Amazon CLI/ElasticLoadBalancing API 2012-06-01",
requestParameters:
{
loadBalancerName: "my-test-loadbalancer",
listeners:
[
{
loadBalancerPort: 80,
protocol: "http",
instanceProtocol: "http",
instancePort: 80
}
],
availabilityZones:
[
"us-east-1a"
]
},
responseElements:
{
dNSName: "my-test-loadbalancer-1234567890.elb.amazonaws.com"
},
requestID: "b9960276-b9b2-11e3-8a13-f1ef1EXAMPLE",
eventID: "6f4ab5bd-2daa-4d00-be14-d92efEXAMPLE"
}
]
{
eventVersion: "1.01",
userIdentity:
{
type: "IAMUser",
principalId: "60505EXAMPLE",
arn: "arn:aws:iam::123456789012:user/Alice",
accountId: "123456789012",
accessKeyId: "AKIAIOSFODNN7EXAMPLE"
},
eventTime: "2014-04-01T16:30:30Z",
eventSource: "elasticloadbalancing.amazonaws.com",
eventName: "DeleteLoadBalancer",
API Version 2012-06-01
246
Elastic Load Balancing Developer Guide
Elastic Load Balancing Event Entries in CloudTrail Log
Files

awsRegion: "us-east-1",
sourceIPAddress: "127.0.0.02",
userAgent: "Amazon CLI/ElasticLoadBalancing API 2012-06-01",
requestParameters: {
loadBalancerName: "my-test-loadbalancer"
},
responseElements: null,
requestID: "f0f17bb6-b9ba-11e3-9b20-999fdEXAMPLE",
eventID: "4f99f0e8-5cf8-4c30-b6da-3b69fEXAMPLE"
},
. . . . additional entries
]
}
For more information about the different elements and values in CloudTrail log files, see CloudTrail Event
Reference in the AWS CloudTrail User Guide.
You can also use one of the Amazon partner solutions that integrate with CloudTrail to read and analyze
your CloudTrail log files. For options, see the AWS partners page.
API Version 2012-06-01
247
Elastic Load Balancing Developer Guide
Elastic Load Balancing Event Entries in CloudTrail Log
Files

Controlling User Access to Your
Load Balancer
When you sign up with Amazon Web Services (AWS), you are granted access to all AWS resources, in-
cluding Elastic Load Balancing (ELB) and Amazon Elastic Cloud Compute (EC2). AWS uses your security
credentials to identify you and to grant you access. If your organization needs to have multiple users and
groups able to access AWS resources, then you must either create multiple accounts with AWS or use
AWS Identity and Access Management (IAM) to create multiple users and groups under your AWS account.
With IAM, you can centrally manage users, security credentials such as access keys, and permissions
that control which AWS resources users and groups can access.
For example, you can use IAM to create users and groups under your AWS account (an IAM user can
be a person, a system, or an application).Then you grant permissions to the users and groups to perform
specific actions on the specified resources.
For general information about IAM, see, What is IAM?. For information on creating and managing users
and groups, see IAM Users and Groups.
Using IAM Policy to Grant Permissions
By default, IAM users are not allowed to create or modify any Elastic Load Balancing resource. An
Elastic Load Balancing resource can be one or more load balancers associated with your AWS account.
After you create IAM users and groups, you can grant them permissions to access your load balancers
by creating IAM policies. The IAM policies are attached to the IAM users or groups that require those
permissions.When the policy is attached, it allows or denies the users permission to perform the specified
tasks on the specified load balancers.
For example, you can create an IAM policy that allows only a group of managers to use DeleteLoadBal-
ancer API action on all your load balancers or you can create an IAM policy that allows only a group of
developers to use API actions on a specific load balancer.You can then attach the policy to the specific
IAM group that requires these permissions.
IAM Policy Syntax
An IAM policy is a JSON document that consists of one of more statements. A statement has the following
elements:
API Version 2012-06-01
248
Elastic Load Balancing Developer Guide
Using IAM Policy to Grant Permissions

• Effect: The effect can be Allow or Deny. By default, IAM users don't have permission to use resources
and API actions, so all requests are denied. An explicit allow overrides the default. An explicit deny
overrides any allows.
• Action: The action is the specific API action for which you are granting or denying permission.To learn
about specifying action, see Specifying ELB Actions in an IAM Policy (p. 249).
• Resource: The resource that's affected by the action. Some Elastic Load Balancing API actions allow
you to include specific load balancer in your policy that can be created or modified by the action.To
specify a load balancer in the statement, you need to use its Amazon Resource Name (ARN). For more
information about specifying the arn value, see Specifying ELB Resources in an IAM Policy (p. 250).
For more information about which API actions support specifying the load balancer ARN, see Elastic
Load Balancing APIs Supporting Permissions (p. 250). If the API action does not support ARNs, use
the * wildcard to specify that all load balancers can be affected by the action.
• Condition: Conditions are optional.They can be used to control when your policy will be in effect. For
more information about specifying conditions for Elastic Load Balancing, see Specifying Condition Keys
in an IAM Policy (p. 251).
The following example shows the structure of a statement in an IAM policy JSON document:
{
"Version": "2012-10-17",
"Statement":[{
"Effect":"effect",
"Action":"action",
"Resource":"resource-arn",
"Condition":{
"condition":{
"key":"value"
}
}
}
]
}
For examples of IAM policies that control access to your load balancers, see Example IAM Policies for
Elastic Load Balancing (p. 252).
Allow or Deny Permissions in an IAM Policy
In the Effect element of your IAM policy statement, you can control user access to your load balancer
by either allowing or denying permissions to use API actions specified in the Action element of your IAM
policy statement.
Specifying ELB Actions in an IAM Policy
In the Action element of your IAM policy statement, you can specify any API action that Elastic Load
Balancing offers.The action name must be prefixed with the lowercase string elasticloadbalancing:.
For example: elasticloadbalancing:DescribeLoadBalancers.
To specify multiple actions in a single statement, enclose them in square brackets and separate them
with a comma as follows:
"Action":["elasticloadbalancing:action1","elasticloadbalancing:action2"]
API Version 2012-06-01
249
Elastic Load Balancing Developer Guide
Allow or Deny Permissions in an IAM Policy

You can also specify multiple actions using the * wildcard. The following example specifies all ELB API
action names that start with the word “Create”.
"Action":"elasticloadbalancing:Create*"
To specify all Elastic Load Balancing API actions, use the * wildcard as in the following example:
"Action":"elasticloadbalancing:*"
For a list of the API actions for ELB, see Actions in the Elastic Load Balancing API Reference.
Specifying ELB Resources in an IAM Policy
To specify a load balancer in the Resource element of the policy statement, you need to use its Amazon
Resource Name (ARN). An ELB load balancer ARN consists of the following information:
region— The region for the load balancer. For list of regions supported by Elastic Load Balancing, see
Regions and Endpoints.
account-id— The AWS account ID, with no hyphens (for example, 0123456789012).
load-balancer-name— Name of your load balancer.You can use the * wildcard to specify all load
balancers that belong to a specific account.
An ELB load balancer ARN has the following syntax:
"Resource":"arn:aws:elasticloadbalancing:region:your-account-id:loadbalan
cer/your-load-balancer-name"
The following is an example of an ARN for a load balancer MyTestLoadBalancer in us-east-1 region.
"Resource":"arn:aws:elasticloadbalancing:us-east-1:123456789012:loadbalan
cer/MyTestLoadBalancer"
You control user access to your load balancer by either allowing or denying permissions to use APIs
specified in the Action element of your IAM policy statement.
Elastic Load Balancing APIs Supporting Permissions
Elastic Load Balancing currently supports setting permissions for a user or a group to use the following
APIs with a specific load balancer:
ELB APIs Supporting Permissions
ApplySecurityGroupsToLoadBalancerAddTags
ConfigureHealthCheckAttachLoadBalancerToSubnets
CreateLBCookieStickinessPolicyCreateAppCookieStickinessPolicy
CreateLoadBalancerListenersCreateLoadBalancer
DeleteLoadBalancerCreateLoadBalancerPolicy
DeleteLoadBalancerPolicyDeleteLoadBalancerListeners
API Version 2012-06-01
250
Elastic Load Balancing Developer Guide
Specifying ELB Resources in an IAM Policy

ELB APIs Supporting Permissions
DetachLoadBalancerFromSubnetsDeregisterInstancesFromLoadBalancer
EnableAvailabilityZonesForLoadBalancerDisableAvailabilityZonesForLoadBalancer
RegisterInstancesWithLoadBalancerModifyLoadBalancerAttributes
SetLoadBalancerListenerSSLCertificateRemoveTags
SetLoadBalancerPoliciesOfListenerSetLoadBalancerPoliciesForBackendServer
Elastic Load Balancing does not support setting permissions for a user or a group to use the following
APIs with a specific load balancer:
• DescribeInstanceHealth
• DescribeLoadBalancerAttributes
• DescribeLoadBalancerPolicyTypes
• DescribeLoadBalancers
• DescribeLoadBalancerPolicies
• DescribeTags
You can continue to use the Describe APIs in the Action element of the policy statement to grant access
to all ELB load balancers. However, if you use the Describe APIs in the Action element and also specify
a load balancer ARN in the Resource element, the API call will fail.
The following example policy allows users to call DescribeInstanceHealth API on all load balancers.
{
"Version": "2012-10-17",
"Statement":[
{
"Effect":"Allow",
"Action":"elasticloadbalancing:DescribeInstanceHealth",
"Resource":"*"
}
]
}
Specifying Condition Keys in an IAM Policy
In an IAM policy statement, you have the option to specify conditions that control when it is in effect. Each
condition contains one or more key-value pairs. AWS has defined the following keys you can use to
specify conditions under which your IAM users and groups can use the load balancers.
Note
Key names are case sensitive.
• aws:CurrentTime— Use with date/time conditions to restrict access based on request time (see Date
Conditions).
• aws:EpochTime— Use with date/time conditions to specify a date in epoch or UNIX time (see Date
Conditions).
• aws:MultiFactorAuthPresent— Use to check whether the IAM user making the API request was
authenticated using a multi-factor authentication (MFA) device.
API Version 2012-06-01
251
Elastic Load Balancing Developer Guide
Specifying Condition Keys in an IAM Policy

• aws:MultiFactorAuthAge— Use to check how long ago (in seconds) the Multi-Factor Authentication
(MFA) validated security credentials making the request were issued using multi-factor authentication
(MFA). Unlike other keys, if MFA is not used, this key is not present (see Existence of Condition Keys,
Numeric Conditions and Using Multi-Factor Authentication (MFA) Devices with AWS).
• aws:SecureTransport— Use to check whether the request was sent using SSL (see Boolean
Conditions).
• aws:SourceIp— Use to check the requester's IP address (see IP Address). Note that if you use
aws:SourceIp, and the request comes from an Amazon EC2 instance, the public IP address of the
instance is evaluated.
• aws:Referer— Use to check the user making the HTTP request.
• aws:UserAgent— Use with string conditions to check the client application that made the request
(see String Conditions).
• aws:userid— Use to check the user ID of the requester (see String Conditions).
• aws:username—Use to check the user name of the requester, if available (see String Conditions).
After you have decided how you want to control access to your load balancers, go to the IAM Console
and follow the instructions in the Managing IAM Policies to create an IAM policy for Elastic Load Balancing.
For information on testing the IAM policy you just created, see Testing IAM Policies.
Example IAM Policies for Elastic Load Balancing
This section shows several example IAM policy statements that you can use to control permissions that
IAM users or IAM groups have to access your load balancer.
Example 1: Allows users to use only those API actions that support permissions with a specific
load balancer
The following policy allows users to use all Describe APIs with all the load balancers associated with
AWS account and allows users to use the supported API actions on the load balancer, MyTestLoadBal-
ancer only.
{
"Version": "2012-10-17",
"Statement":[{
"Effect":"Allow",
"Action":"elasticloadbalancing:Describe*",
"Resource":"*"
},
{
"Effect":"Allow",
"Action": [
"elasticloadbalancing:ApplySecurityGroupsToLoadBalancer",
"elasticloadbalancing:AttachLoadBalancerToSubnets",
"elasticloadbalancing:ConfigureHealthCheck",
"elasticloadbalancing:Create*",
"elasticloadbalancing:Delete*",
"elasticloadbalancing:DeregisterInstancesFromLoadBalancer",
"elasticloadbalancing:DetachLoadBalancerFromSubnets",
"elasticloadbalancing:DisableAvailabilityZonesForLoadBalancer",
"elasticloadbalancing:EnableAvailabilityZonesForLoadBalancer",
"elasticloadbalancing:ModifyLoadBalancerAttributes",
"elasticloadbalancing:RegisterInstancesWithLoadBalancer",
"elasticloadbalancing:Set*"
],
"Resource":"arn:aws:elasticloadbalancing:us-east-1:123456789012:loadbal
API Version 2012-06-01
252
Elastic Load Balancing Developer Guide
Example IAM Policies for Elastic Load Balancing

ancer/MyTestLoadBalancer"
}
]
}
Example 2: Allow users to use only those API actions that support permissions with two load
balancers
The following policy grants users permission to use only those API actions that support permissions with
MyTestLoadBalancer-1 and MyTestLoadBalancer-2.
{
"Version": "2012-10-17",
"Statement":[{
"Effect":"Allow",
"Action":"elasticloadbalancing:Describe*",
"Resource":"*"
},
{
"Effect":"Allow",
"Action": [
"elasticloadbalancing:ApplySecurityGroupsToLoadBalancer",
"elasticloadbalancing:AttachLoadBalancerToSubnets",
"elasticloadbalancing:ConfigureHealthCheck",
"elasticloadbalancing:Create*",
"elasticloadbalancing:Delete*",
"elasticloadbalancing:DeregisterInstancesFromLoadBalancer",
"elasticloadbalancing:DetachLoadBalancerFromSubnets",
"elasticloadbalancing:DisableAvailabilityZonesForLoadBalancer",
"elasticloadbalancing:EnableAvailabilityZonesForLoadBalancer",
"elasticloadbalancing:ModifyLoadBalancerAttributes",
"elasticloadbalancing:RegisterInstancesWithLoadBalancer",
"elasticloadbalancing:Set*"
],
"Resource":[
"arn:aws:elasticloadbalancing:us-east-1:123456789012:loadbalancer/MyTest
LoadBalancer-1",
"arn:aws:elasticloadbalancing:us-east-1:123456789012:loadbalancer/MyTest
LoadBalancer-2"
]
]
}
]
}
Example 3: Allow users to call multiple API actions on a specific load balancer
The following policy grants users to use only RegisterInstancesWithLoadBalancer and Deregis-
terInstancesFromLoadBalancer API actions on load balancer MyTestLoadBalancer.
{
"Version": "2012-10-17",
"Statement":[{
"Effect":"Allow",
"Action":[
"elasticloadbalancing:DeregisterInstancesFromLoadBalancer",
API Version 2012-06-01
253
Elastic Load Balancing Developer Guide
Example IAM Policies for Elastic Load Balancing

"elasticloadbalancing:RegisterInstancesWithLoadBalancer"
],
"Resource":"arn:aws:elasticloadbalancing: us-east-1:123456789012:loadbal
ancer/MyTestLoadBalancer”
}
]
}
Example 4: Allow users to call multiple API actions on a specific load balancer using SSL
The following policy grants users to use only RegisterInstancesWithLoadBalancer and Deregis-
terInstancesFromLoadBalancer API actions on load balancer MyTestLoadBalancer with an SSL
request.
{
"Version": "2012-10-17",
"Statement":[{
"Effect":"Allow",
"Action":[
"elasticloadbalancing:DeregisterInstancesFromLoadBalancer",
"elasticloadbalancing:RegisterInstancesWithLoadBalancer"
],
"Condition":{"Bool":{"aws:SecureTransport":"true"}},
"Resource":"arn:aws:elasticloadbalancing:us-east-1:123456789012:loadbal
ancer/MyTestLoadBalancer"
}
]
}
API Version 2012-06-01
254
Elastic Load Balancing Developer Guide
Example IAM Policies for Elastic Load Balancing

Troubleshoot Elastic Load
Balancing
The following tables list the troubleshooting resources that you'll find useful as you work with Elastic Load
Balancing.
Troubleshooting Elastic Load Balancing: API Response
API Response
CertificateNotFound: undefined (p. 256)
OutofService: A Transient Error Occurred (p. 257)
Troubleshooting Elastic Load Balancing: HTTP Error Messages
HTTP Error Message
HTTP 400: BAD_REQUEST (p. 257)
HTTP 405: METHOD_NOT_ALLOWED (p. 257)
HTTP 408: Request Timeout (p. 257)
HTTP 502: Bad Gateway (p. 257)
HTTP 503: Service Unavailable or HTTP 504 Gateway Timeout (p. 257)
Troubleshooting Elastic Load Balancing: Response Codes
Response Code
HTTPCode_ELB_4XX (p. 258)
HTTPCode_ELB_5XX (p. 258)
HTTPCode_Backend_2XX (p. 259)
HTTPCode_Backend_3XX (p. 259)
API Version 2012-06-01
255
Elastic Load Balancing Developer Guide

Response Code
HTTPCode_Backend_4XX (p. 259)
HTTPCode_Backend_5XX (p. 259)
Troubleshooting Elastic Load Balancing: Health Check
Health Check Errors
Connection to the instances has timed out (p. 260)
Health check target page error (p. 260)
Public key authentication is failing (p. 261)
Stopped and started instances failing load balancer health check (p. 261)
Instance is not receiving traffic from the load balancer. (p. 261)
Ports on instance are not open (p. 262)
Instances in the Auto Scaling group are failing load balancer health check (p. 262)
Troubleshooting Elastic Load Balancing : Registering Instances
Error Registering Instances
Taking too long to register back-end instances. (p. 262)
Unable to register instance launched from a paid AMI. (p. 263)
Troubleshooting Elastic Load Balancing: API
Response
This section provides information about the error messages returned by Elastic Load Balancing API, po-
tential causes, and steps you can take to narrow down and resolve the issue.
CertificateNotFound: undefined
Cause 1: There is a delay in propagating the certificate to all the regions when it is created using the
AWS Management Console.When the delay occurs, the error message is shown in the last step of the
Create Load Balancer process.
Solution: Wait approximately 15 minutes and then try again. If the problem persists, contact the AWS
Support Center.
Cause 2: If you are using the command line tools or API directly, you may receive this error if you provide
a certificate Amazon Resource Name (ARN) that does not exist.
Solution: Use the Identity and Access Management (IAM) action GetServerCertificate to get the certificate
ARN and verify that you provided the correct value for the ARN.
API Version 2012-06-01
256
Elastic Load Balancing Developer Guide
API Response

OutofService: A Transient Error Occurred
Cause:This error message usually indicates a transient internal problem within the Elastic Load Balancing
service or the underlying network. This temporary issue may also occur when Elastic Load Balancing
queries the health of the load balancer and its associated back-end instances.
Solution: Retry the API call. If the problem persists, contact the AWS Support Center.
Troubleshooting Elastic Load Balancing: Error
Messages
This section provides information about the error messages returned by your load balancer, potential
causes, and steps you can take to narrow down and resolve the issue.
HTTP 400: BAD_REQUEST
Description: Indicates that the client sent a bad request.
Cause: The client sent a malformed request that does not meet HTTP specifications.
Solution: Connect directly to your instance and capture the details of the client request. Review the
headers and the URL for malformed requests.Verify that the request meets the HTTP specifications.
HTTP 405: METHOD_NOT_ALLOWED
Description: Indicates that the method length is not valid.
Cause: The length of the method in the request header exceeds 127 characters.
Solution: Check the length of the method.
HTTP 408: Request Timeout
Description: Indicates that the client cancelled the request or failed to send a full request.
Cause: A network interruption or a bad request construction, such as partially formed headers; specified
content size doesn’t match the actual content size transmitted; and so on.
Solution: Inspect the code that is making the request and try sending it directly to your registered instances
(or a development / test environment) where you have more control over inspecting the actual request.
HTTP 502: Bad Gateway
Description: Indicates that the load balancer was unable to parse the response sent from a registered
instance.
Cause: Malformed response from the instance or potentially an issue with the load balancer.
Solution:Verify that the response being sent from the instance conforms to HTTP specifications. Contact
the AWS Support Center for further assistance.
HTTP 503: Service Unavailable or HTTP 504 Gate-
way Timeout
Description: Indicates that either the load balancer or the registered instances are causing error. The
error can be caused by either one of more of the following:
• Cause 1: Insufficient capacity in the load balancer to handle the request.
Solution: This should be a transient issue and should not last more than a few minutes. If it persists,
contact the AWS Support Center for further assistance.
API Version 2012-06-01
257
Elastic Load Balancing Developer Guide
OutofService: A Transient Error Occurred

• Cause 2: Registered instances closing the connection to Elastic Load Balancing.
Solution: Enable keep-alive settings on your EC2 instances and set the keep-alive timeout to greater
than or equal to the idle timeout settings of your load balancer. For more information, see Idle Connection
Timeout (p. 10).
• Cause 3: No registered instances.
Solution: Register at least one instance in every Availability Zone that your load balancer is configured
to respond in.Verify this by looking at the HealthyHostCount metrics in CloudWatch. If you cannot
ensure that an instance is registered in each Availability Zone, we recommend enabling cross-zone
load balancing. For more information, see Enable or Disable Cross-Zone Load Balancing for Your Load
Balancer (p. 163).
• Cause 4: No healthy instances.
Solution: Ensure that you have healthy instances in every Availability Zone that your load balancer is
configured to respond in.Verify this by looking at the HealthyHostCount in CloudWatch.
• Cause 5: Connection to the client is closed (load balancer could not send a response)
Solution: Verify that the client is not closing the connection before a response is sent by using a
packet sniffer on the machine making the request.
• Cause 6: The instance's security group does not allow communication with load balancer.
Solution: Ensure that your back-end instance's security group is configured to allow access your load
balancer's instance port.
Troubleshooting Elastic Load Balancing: Re-
sponse Codes
This section provides information about the response code metrics returned by Amazon CloudWatch for
your load balancer, potential causes, and steps you can take to narrow down and resolve the issue.
What is Response Code Metrics?
Your load balancer emits metrics to Amazon CloudWatch for the HTTP response codes sent to clients,
identifying the source of the errors as either the load balancer or the back-end instances.You can use
the metrics returned by CloudWatch for your load balancer to troubleshoot Elastic Load Balancing. For
information on using Amazon CloudWatch, list of available metrics for your load balancer, and for the
procedure for viewing the available metrics, see Monitor Your Load Balancer Using Amazon Cloud-
Watch (p. 218).The following metrics are available:
HTTPCode_ELB_4XX
Cause: Indicates a malformed or a cancelled request from the client.
Solution: See HTTP 400: BAD_REQUEST (p. 257).
Solution: See HTTP 405: METHOD_NOT_ALLOWED (p. 257).
Solution: See HTTP 408: Request Timeout (p. 257).
HTTPCode_ELB_5XX
Cause: Either the load balancer or the registered instance is causing the error or the load balancer is
unable to parse the response.
Solution: See HTTP 502: Bad Gateway (p. 257).
Solution: See HTTP 503: Service Unavailable or HTTP 504 Gateway Timeout (p. 257).
API Version 2012-06-01
258
Elastic Load Balancing Developer Guide
Response Codes

HTTPCode_Backend_2XX
Cause: Indicates a normal, successful response from the registered instance(s).
Solution: None
HTTPCode_Backend_3XX
Cause: Indicates some type of redirect response sent from the registered instance(s).
Solution:View the access or error logs on your instance(s) to determine the cause. Send requests directly
to the instance (bypass the load balancer) to view the responses.
HTTPCode_Backend_4XX
Cause: Indicates some type of client error response sent from the registered instance(s).
Solution:View the access or error logs on your instance(s) to determine the cause. Send requests directly
to the instance (bypass the load balancer) to view the responses.
HTTPCode_Backend_5XX
Cause: Indicates some type of server error response sent from the registered instance(s).
Solution:View the access or error logs on your instance(s) to determine the cause. Send requests directly
to the instance (bypass the load balancer) to view the responses.
Troubleshooting Elastic Load Balancing: Health
Check Configuration
Your load balancer checks the health of the registered instances using either the default health check
configuration provided by Elastic Load Balancing (ELB) or a health check configuration that you specify.
The health check configuration contains information such as, protocol, ping port, ping path, response
timeout, and health check interval. For more information, see Health Check (p. 7).
There are three ways you can check the current health state of EC2 instances registered with your load
balancer.You can use the AWS Management Console, the describe-instance-health AWS CLI command,
or the DescribeInstanceHealth action.
If the current state of some or all your instances is OutOfService and the description field displays the
message that the Instance has failed at least the Unhealthy Threshold number of
health checks consecutively, then you know that the instances have failed the load balancer
health check.This section provides information about issues to look for, the potential causes, and the
steps you can take to narrow down and resolve the failed health check issues.
Your instances can be failing the load balancer health check due to one or more of the following reasons:
Topics
• Connection to the instances has timed out (p. 260)
• Health check target page error (p. 260)
• Public key authentication is failing (p. 261)
• Stopped and started instances failing load balancer health check (p. 261)
• Instance is not receiving traffic from the load balancer. (p. 261)
• Ports on instance are not open (p. 262)
• Instances in the Auto Scaling group are failing load balancer health check (p. 262)
API Version 2012-06-01
259
Elastic Load Balancing Developer Guide
HTTPCode_Backend_2XX

Connection to the instances has timed out
Problem: Health check requests from your load balancer to your EC2 instances are timing out or failing
intermittently.
First, verify the issue by connecting directly with the instance. We recommend that you connect to your
instance from within the network using the private IP address of the instance.
Use the following command for TCP connection:
telnet private-IP-address-of-the-instance port
Use the following command for an HTTP or an HTTPS connection:
$curl –I private-IP-address-of-the-instance/health-check-target-page:port
If you are using HTTP/HTTPS connection and getting a non-200 response, see Health check target page
error (p. 260). If you are able to connect directly to the instance, step through the following:
• Cause 1: The instance is failing to respond within the configured response timeout period.
Solution 1: Adjust the response timeout settings in your load balancer health check configuration.
• Cause 2: The instance is under significant load and is taking longer than your configured response
timeout period to respond.
Solution 2:
• Verify by checking the Amazon EC2 monitoring graph for over-utilization of CPU. For information,
see Get Statistics for a Specific EC2 Instance.
• Verify by checking the utilization of other application resources, such as memory or limits, by con-
necting to your EC2 instances.
• If necessary, add more instances or enable Auto Scaling. For more information about using Auto
Scaling, see What is Auto Scaling?.
• Cause 3: If you are using an HTTP or an HTTPS connection and the health check is being performed
on a target page specified in the ping path field (for example, “HTTP:80/index.html”), the target page
might be taking longer than your configured timeout to respond.
Solution 3: Use a simpler health check target page or adjust the health check interval settings.
Health check target page error
Problem: An HTTP GET request issued to the instance on the given ping port and the ping path (for ex-
ample, HTTP:80/index.html) is receiving a non-200 response code. Or, some instances are failing the
health check and some instances are healthy.
• Cause 1: No target page is configured on some or all the instances.
Solution 1: Create a target page (for example, index.html) on all the registered instances.
• Cause 2: The value of the Content-Length header in the response is not set.
Solution 2: If the response includes a body, then either set the Content-Length header to a value
greater than or equal to zero, or set the Transfer-Encoding value to 'chunked'.
• Cause 3:The application on the instances is not configured to receive request from the load balancer.
Solution 3: Check the application on your instance to investigate the cause for non-200 response.
API Version 2012-06-01
260
Elastic Load Balancing Developer Guide
Connection to the instances has timed out

Public key authentication is failing
Problem: A load balancer configured to use the HTTPS or the SSL protocol with back-end authentication
enabled is failing public key authentication. Use the s_client command to see the list of all the server
certificates in the certificate chain. For more information on this command, see https://www.openssl.org/
docs/apps/s_client.html.
Cause:The public key on the SSL certificate does not match the public key configured on the load balancer.
Solution:Your SSL certificate might need to be updated. If your SSL certificate is current, try re-installing
the certificate on your load balancer. For more information on updating the SSL certificate, see Update
an SSL Certificate for a Load Balancer (p. 147).
Stopped and started instances failing load balan-
cer health check
EC2-Classic Instance
Problem:The instances launched in EC2-Classic have been stopped and then started.The load balancer
is not able to connect to the restarted instance.
Cause: Elastic Load Balancing registers your load balancer with your EC2 instance using the associated
IP address.When your EC2 instance launched in EC2-Classic is stopped and then restarted, the IP address
associated with your instance changes.Your load balancer does not recognize the new IP address which
prevents it from connecting with the instance.
Solution: Deregister the instance from the load balancer after you stop the instance and then register
the instance with the load balancer after you start the instance. To learn how to do this, see Deregister
and Register Amazon EC2 Instances (p. 145).
EC2-VPC Instance
Problem: The instances launched in Amazon Virtual Private Cloud (Amazon VPC) have been stopped
and then started.The load balancer in Amazon VPC is not able to connect to the restarted instance.
Cause: When you stop and then start your VPC instance, it might take some time for the load balancer
to recognize that the instance has restarted. During this time, the load balancer is not connected with the
restarted instance.
Solution: Re-register the instance with the load balancer after the restart.To learn how to do this, see
Registering Your Amazon EC2 Instances with Your Load Balancer (p. 146).
Instance is not receiving traffic from the load bal-
ancer.
Problem: Instance security group is blocking the traffic from ELB security group.
Do a packet capture on the instance to verify the issue. Use the following command:
# tcpdump port health-check-port
Cause 1: The security group on the instances does not allow traffic from the load balancer.
Solution 1: Edit the instance security group to allow traffic from the load balancer. Add a rule to allow all
traffic from the load balancer security group.
Cause 2: The security group of your EC2-VPC load balancer does not have egress rules set up to send
traffic to the back-end instances.
Solution 2: Edit the security group of your EC2-VPC load balancer to allow traffic to the subnets and the
back-end instances.
For information on managing the security group for the instances launched in EC2-Classic, see Manage
Security Groups in Amazon EC2-Classic (p. 101).
API Version 2012-06-01
261
Elastic Load Balancing Developer Guide
Public key authentication is failing

For information on managing the security group of the instances launched in VPC, see Manage Security
Groups in Amazon VPC (p. 133).
Ports on instance are not open
Problem:The health check sent by the load balancer is blocked by the back-end instance ports or firewalls.
Verify the issue by using the following command:
netstat –ant
Cause: The specified health port or the listener port (if configured differently) is not open. Both the port
specified for the health check and the listener port must be open and listening.
Solution: Open up the listener port and the port specified in your health check configuration (if configured
differently) on your instances to receive load balancer traffic.
Instances in the Auto Scaling group are failing
load balancer health check
Problem: Instances in your Auto Scaling group are passing the default Amazon EC2 health check but
failing the load balancer health check.
Cause: Amazon EC2 health checks are different from load balancer health checks. Amazon EC2 health
checks include status checks on an instance to detect hardware and software issues, but the load balancer
performs health checks by sending a request to the instance and waiting for a 200 response code, or by
establishing a TCP connection (for a TCP-based health check) with the instance.
An instance might fail the load balancer health check because the application running within the instance
might have issues that cause the load balancer to consider the instance “Out of service”.This instance
could still pass the Amazon EC2 health check; it would not be replaced by the Auto Scaling policy because
it is considered healthy based on the EC2 health check.
Solution: Use the load balancer health check for your Auto Scaling group.When you use the load balancer
health check, Auto Scaling will determine the health status of your instances by checking the results of
both the Amazon EC2 instance status check and the load balancer health check. For more information,
see Add an Elastic Load Balancing Health Check to your Auto Scaling Group in the Auto Scaling Developer
Guide.
If these troubleshooting steps do not help you resolve your issue, contact AWS Premium Support or post
in AWS Discussion Forums.
Troubleshooting Elastic Load Balancing: Regis-
tering Instances
When you register an instance with your load balancer, there are a number of steps that are taken before
the load balancer will begin sending requests to your instance. This section provides information about
potential causes and steps you can take to narrow down and resolve the issues your load balancer might
encounter when registering your back-end instances.
Taking too long to register back-end instances.
Problem: Registering instances taking longer than expected to be In Service.
Cause:Your back-end instances might be failing health check. After the initial instance registration steps
are completed (it can take up to approximately 30 seconds), the back-end instances go through the health
checks.Your load balancer will not treat your back-end instances as In Service until it has successfully
met the healthy threshold defined in your health check configuration.
API Version 2012-06-01
262
Elastic Load Balancing Developer Guide
Ports on instance are not open

Solution: Try the steps recommended in the preceding section Connection to the instances has timed
out (p. 260).
Unable to register instance launched from a paid
AMI.
Problem: Elastic Load Balancing not registering instances launched using a paid AMI.
Cause:Your instances might have been launched using a paid AMI from Amazon DevPay site.
Solution: Elastic Load Balancing does not support registering instances launched using paid AMI from
Amazon DevPay site. If you want to use paid AMI, depending on your use case, you might find AWS
Marketplace to be a good alternative. If you are already using a paid AMI from AWS Marketplace and
are unable to register the instance launched from that paid AMI, contact the AWS Support Center for
further assistance.
For more information on paid AMIs, see Paid AMIs in the Amazon Elastic Compute Cloud User Guide.
API Version 2012-06-01
263
Elastic Load Balancing Developer Guide
Unable to register instance launched from a paid AMI.

Elastic Load Balancing Resources
The following table lists resources that you'll find useful as you work with Elastic Load Balancing.
DescriptionResource
The primary web page for information about Elastic Load
Balancing.
Elastic Load Balancing
The primary web page for Elastic Load Balancing pricing
information.
Elastic Load Balancing Pricing
The FAQ covers questions developers have asked about
Elastic Load Balancing.
Technical FAQ
The release notes give a high-level overview of the current
release.They specifically note any new features, corrections,
and known issues.
Release Notes
Get help from the community of developers.Amazon EC2 Discussion Forums
A central contact point for inquiries concerning AWS billing,
account, events, abuse, etc.
Contact Us
A central point to track and manage all support cases related
to your AWS account.
Support Center
The primary web page for information about AWS Premium
Support, a one-on-one, fast-response support channel to
help you build and run applications on AWS Infrastructure
Services.
AWS Support
A cloud consultant service that is available to customers with
Business-level and Enterprise-level support to help optimize
the costs, security, and performance of your AWS
environment
AWS Trusted Advisor
API Version 2012-06-01
264
Elastic Load Balancing Developer Guide

Document History
The following table describes the important changes to the Elastic Load Balancing Developer Guide.
• API version: 2012-06-01
• Latest documentation update: August 11, 2014
Release
Date
DescriptionWSDL and CLI
Download
Feature
August 11,
2014
Added information about using tags to
organize and manage your load
balancers. For more information, see
Tagging (p. 12).
Starting with this release, Elastic Load
Balancing CLI (ELB CLI) has been
replaced by AWS Command Line
Interface (AWS CLI), a unified tool to
manage multiple AWS services. New
features released after ELB CLI version
1.0.35.0 (dated 7/24/14) will be included
in the AWS CLI only. If you are currently
using the ELB CLI, we recommend that
you start using the AWS Command Line
Interface (AWS CLI) instead. For more
information, see Use the AWS
Command Line Interface (p. 20).
2014-08-11 WSDLSupport for tagging
your load balancer.
July 24,
2014
Added information about idle connection
timeout and the steps for configuring idle
timeout for your load balancer. For more
information, see Idle Connection
Timeout (p. 10).
2014-07-24 WSDLSupport for
configuring idle
connection timeout
for your load
balancer.
API Version 2012-06-01
265
Elastic Load Balancing Developer Guide

Release
Date
DescriptionWSDL and CLI
Download
Feature
May 12,
2014
Added information about using IAM
policy to grant IAM users and groups
access to specific load balancer or API
actions. For more information, see
Controlling User Access to Your Load
Balancer (p. 248).
2014-03-20 WSDLSupport for
granting IAM users
and groups access
to specific load
balancers or API
actions.
April 04,
2014
Added information about using AWS
CloudTrail to capture API calls made by
or on behalf of your AWS account using
the ELB API, the ELB console, the ELB
CLI, or the AWS CLI. For more
information, see Logging Elastic Load
Balancing API Calls Using AWS
CloudTrail (p. 245).
2014-03-20 WSDLSupport for AWS
CloudTrail
March 20,
2014
Added information about connection
draining.With this support you can
enable your load balancer to stop
sending new requests to the registered
instance when the instance is
deregistering or when the instance
becomes unhealthy, while keeping the
existing connections open. For more
information, see Connection
Draining (p. 9).
2014-03-20 WSDLSupport for
Connection
Draining
March 06,
2014
Added information about Access Logs.
With this support you can enable your
load balancer to capture access logs and
store them into an Amazon S3 bucket.
For more information, see Access
Logs (p. 228).
2014-03-06 WSDLSupport for Access
Logs
February 19,
2014
Added information about TLSv1.1-1.2
protocol support for load balancers
configured with HTTPS/SSL listeners.
With this support, Elastic Load Balancing
also updates the predefined SSL
negotiation configurations. For
information about the updated
predefined SSL negotiation
configurations, see SSL Negotiation
Configurations for Elastic Load
Balancing (p. 55). For information on
how to update your current SSL
negotiation configuration, see Update
SSL Negotiation Configuration of Your
Load Balancer (p. 151).
2013-11-06 WSDLSupport for
TLSv1.1-1.2
API Version 2012-06-01
266
Elastic Load Balancing Developer Guide

Release
Date
DescriptionWSDL and CLI
Download
Feature
November
06, 2013
Added information about enabling
cross-zone load balancing for your load
balancer. For information on cross-zone
load balancing, see Request
Routing (p. 6). For procedure on
enabling or disabling the cross-zone load
balancing, see Enable or Disable
Cross-Zone Load Balancing for Your
Load Balancer (p. 163)
2013-11-06 WSDLCross-Zone Load
Balancing
October 28,
2013
Added information about the additional
Amazon Cloudwatch metrics reported
by Elastic Load Balancing. For
information on all the metrics reported
by Elastic Load Balancing and on how
to use the metrics, see Monitor Your
Load Balancer Using Amazon
CloudWatch (p. 218).
2012-06-01 WSDLAdditional Amazon
CloudWatch
Metrics
July 30,
2013
Added information about Proxy Protocol
support for load balancers configured
for TCP/SSL connections. For more
information, see Proxy Protocol (p. 11).
2012-06-01 WSDLSupport for Proxy
Protocol
June 03,
2013
Added information about configuring
Route 53 DNS failover for load
balancers. For more information, see
Configure DNS Failover for Your Load
Balancer (p. 194).
2012-06-01 WSDLSupport for DNS
Failover
May 20,
2013
Added information about the HTTP
methods supported by Elastic Load
Balancing. For more information, see
HTTP Methods (p. 11).
2012-06-01 WSDLHTTP Methods
March 28,
2013
Added information about viewing
Amazon CloudWatch metrics and
creating alarms for a specified load
balancer using the Monitoring tab in the
console. For more information, see
Monitor Your Load Balancer Using
Amazon CloudWatch (p. 218).
2012-06-01 WSDLConsole support
for viewing
Amazon
CloudWatch
metrics and for
creating alarms
March 11,
2013
Added information about default VPC
and load balancing Amazon EC2
instances launched within the default
VPC. For information on default VPC,
see What is Default VPC? (p. 115). For
information on creating a load balancer
within a default VPC, see Create a Basic
Load Balancer in Default VPC (p. 41).
2012-06-01 WSDLLoad Balancing in
Default VPC
API Version 2012-06-01
267
Elastic Load Balancing Developer Guide

Release
Date
DescriptionWSDL and CLI
Download
Feature
June 10,
2012
With this release, a load balancer in
Amazon Virtual Private Cloud (Amazon
VPC) can be made either internal or
Internet-facing. An internal load balancer
has a publicly resolvable DNS name that
resolves to private IP addresses. An
Internet-facing load balancer has a
publicly resolvable DNS name that
resolves to public IP addresses. For
more information, see Create a Basic
Internal Load Balancer in Amazon
VPC (p. 119).
2012-06-01 WSDLInternal Load
Balancing in
Amazon VPC
May 18,
2012
Added information about console support
for managing listeners, certificates, and
cipher settings for existing load
balancers. For information on managing
listeners and cipher settings, see Add a
Listener to Your Load Balancer (p. 136)
and Delete a Listener from Your Load
Balancer (p. 142). For information on
managing certificates, see Update an
SSL Certificate for a Load
Balancer (p. 147).
2011-11-15 WSDLConsole support
for managing
listeners, cipher
settings, and SSL
certificates
April 03,
2012
Folded the previously separate Elastic
Load Balancing Getting Started Guide
into this guide. For more information,
see Get Started with Elastic Load
Balancing (p. 23).
2011-11-15 WSDLMoved Getting
Started information
April 03,
2012
Added a section on choosing the listener
configurations for your load balancer that
work best for your use case. For more
information, see Listener Configurations
for Elastic Load Balancing (p. 49).
2011-11-15 WSDLNew listener
configuration
content
April 03,
2012
Added a section on troubleshooting
Elastic Load Balancing that provides
information on issues you might
encounter when using Elastic Load
Balancing, discuss the causes, and the
steps you can take to resolve the issue.
For more information, see Troubleshoot
Elastic Load Balancing (p. 255).
2011-11-15 WSDLNew
troubleshooting
content
April 03,
2012
Added documentation for adding a
listener to your load balancer and for
deleting a listener from your load
balancer using the Query API or the
command line tool. For more information,
see Add a Listener to Your Load
Balancer (p. 136) and Delete a Listener
from Your Load Balancer (p. 142).
2011-11-15 WSDLNew content on
adding and
deleting listeners
API Version 2012-06-01
268
Elastic Load Balancing Developer Guide

Release
Date
DescriptionWSDL and CLI
Download
Feature
November
21, 2011
Updated the API version to 2011-11-15
and added documentation for using
Elastic Load Balancing on Amazon VPC.
For more information, see Elastic Load
Balancing in Amazon VPC (p. 113).
2011-11-15 WSDLElastic Load
Balancing in
Amazon Virtual
Private Cloud
(Amazon VPC)
November
21, 2011
Added new content for de-registering
Amazon EC2 instances from your load
balancer. For more information see,
Deregister and Register Amazon EC2
Instances (p. 145).
2011-11-15 WSDLNew Content
October 17,
2011
Added documentation for monitoring the
load balancer using Amazon
CloudWatch. For more information see
Monitor Your Load Balancer Using
Amazon CloudWatch (p. 218).
2011-08-15 WSDLNew Content
October 17,
2011
Moved Using Domain Names With
Elastic Load Balancing and Using Ipv6
with Elastic Load Balancing topics from
Using Elastic Load Balancing section
and placed it under User Scenarios
section.
2011-08-15 WSDLRestructured
content
August 30,
2011
Updated the API version to 2011-08-15
and added documentation for the new
configurable SSL ciphers, back-end SSL,
and back-end server authentication
features. For more information, see
Create a HTTPS/SSL Load Balancer
(p. 72).
2011-08-15 WSDLNew features
August 04,
2011
Consolidated the instructions for setting
up a load balancer with HTTP support
and with HTTPS support into Create a
HTTPS/SSL Load Balancer (p. 72)
section.
2011-04-05 WSDLRestructured
content
August 04,
2011
Added instructions for installing the
Elastic Load Balancing command line
tool For more information, see Appendix
A: Using the Elastic Load Balancing
Command Line Interface (p. 272).
2011-04-05 WSDLDocument Update
May 24,
2011
Updated the API version to 2011-04-05
and added documentation for the new
zone apex domain names feature. For
more information, see Configure Custom
Domain Name for Your Load
Balancer (p. 158).
2011-04-05 WSDLZone Apex Domain
Name
API Version 2012-06-01
269
Elastic Load Balancing Developer Guide

Release
Date
DescriptionWSDL and CLI
Download
Feature
May 24,
2011
Added documentation for the new Elastic
Load Balancing security group for
back-end application instance lock-down.
For more information, see Manage
Security Groups in Amazon
EC2-Classic (p. 101).
2011-04-05 WSDLApplication
Instance
Lock-down
May 24,
2011
Added documentation for the new
Internet Protocol version 6 (IPv6)
feature. For more information, see Use
IPv6 with Elastic Load Balancing (p.111).
2011-04-05 WSDLSupport for IPv6
October 27,
2010
Added information about
X-Forwarded-Proto and
X-Forwarded-Port headers. The
X-Forwarded-Proto header indicates the
protocol of the originating request, and
the X-Forwarded-Port header indicates
the port of the originating request. The
addition of these headers to requests
enables customers to determine if an
incoming request to their load balancer
is encrypted, and the specific port on the
load balancer that the request was
received on. For more information, see
X-Forwarded Headers (p. 13).
2010-07-01 WSDLSupport for
X-Forwarded-Proto
and
X-Forwarded-Port
headers.
October 14,
2010
Added information about HTTPS
support. With this release, you can
leverage the SSL/TLS protocol for
encrypting traffic and offload SSL
processing from the application instance
to the load balancer.This feature also
provides centralized management of
SSL server certificates at the load
balancer, rather than managing
certificates on individual application
instances. For more information, see
HTTPS Support (p. 11).
2010-07-01 WSDLHTTPS Support
September
02, 2010
Added information about AWS Identity
and Access Management (IAM). For
more information, see Controlling User
Access to Your Load Balancer (p. 248).
2010-07-01 WSDLSupport for AWS
Identity and
Access
Management (IAM)
April 28,
2010
Added Support for the Asia Pacific
(Singapore) Region.
2009-11-25 WSDLSupport for the
Asia Pacific
(Singapore)
Region.
April 07,
2010
Added information about creating
session stickiness. For more information,
see Sticky Sessions (p. 198).
2009-11-25 WSDLSticky Sessions
March 22,
2010
Added support for Java SDK.2009-11-25 WSDLAWS SDK for Java
API Version 2012-06-01
270
Elastic Load Balancing Developer Guide

Release
Date
DescriptionWSDL and CLI
Download
Feature
December
02, 2009
Added support for US-West (Northern
California Region.
2009-11-25 WSDLSupport for
US-West (Northern
California Region
November
11, 2009
Added support for AWS SDK for .NET.2009-05-15 WSDLAWS SDK for .NET
May 18,
2009
Initial public beta release of Elastic Load
Balancing.
2009-05-15 WSDLNew service
API Version 2012-06-01
271
Elastic Load Balancing Developer Guide

Appendices
This Elastic Load Balancing Developer Guide appendix include the following sections.
Topics
• Appendix A: Using the Elastic Load Balancing Command Line Interface (p. 272)
• Appendix B: Using the SOAP API (p. 279)
Appendix A: Using the Elastic Load Balancing
Command Line Interface
Important
Elastic Load Balancing CLI has been replaced by AWS Command Line Interface (AWS CLI), a
unified tool to manage multiple AWS services. New features released after ELB CLI version
1.0.35.0 (dated 7/24/14) will be included in the AWS CLI only. We strongly recommend that you
start using the AWS CLI.
For instructions on installing and configuring the AWS CLI, see Getting Set Up with the AWS
Command Line Interface.
However, if you want to use the ELB CLI, follow the installation instructions in this section.
The ELB CLI wraps the API actions to provide multi-function commands.The CLI commands are written
in Java and include shell scripts for both Windows and Linux/Unix/Mac OSX.The shell scripts are available
as a self-contained ZIP file.There is no installation required, simply download and unzip it.
Process for Installing the Command Line Interface
Task 1: Download the Command Line Interface (p. 273)
Task 2: Set the JAVA_HOME Environment Variable (p. 273)
Task 3: Set the AWS_ELB_HOME Environment Variable (p. 274)
Task 4: Set the AWS_CREDENTIAL_FILE Environment Variable (p. 275)
Task 5: Set the Region (p. 276)
API Version 2012-06-01
272
Elastic Load Balancing Developer Guide
Appendix A: Using the Elastic Load Balancing Command
Line Interface

Note
As a convention, command line text is prefixed with a generic PROMPT> command line prompt.
The actual command line prompt on your computer is likely to be different. We also use $ to
indicate a Linux/UNIX–specific command and C:\> for a Windows–specific command. Although
we don't provide explicit instructions, the tool also works on the Mac OS X. (Commands on the
Mac OS X resemble the Linux and UNIX commands.) The example output resulting from the
command is shown immediately thereafter without any prefix.
Task 1: Download the Command Line Interface
The command line tool is available as a ZIP file on the Elastic Load Balancing API Tools. The tool is
written in Java and includes shell scripts for both Windows and Linux/UNIX/Mac OSX.The ZIP file is self-
contained; no installation is required.You just download it and unzip it.
Some additional setup is required before you can use the tool.These steps are discussed next.
Task 2: Set the JAVA_HOME Environment Variable
The Elastic Load Balancing command line tool reads an environment variable (JAVA_HOME) on your
computer to locate the Java runtime.The command line tool requires Java version 5 or later to run. Either
a JRE or JDK installation is acceptable.
To set the JAVA_HOME Environment Variable
1. If you do not have Java 1.5 or later installed, download and install it now. To view and download
JREs for a range of platforms, including Linux/UNIX and Windows, go to http://java.oracle.com/.
2. Set JAVA_HOME to the full path of the directory that contains a subdirectory named bin that in turn
contains the Java executable. For example, if your Java executable is in the /usr/jdk/bin directory,
set JAVA_HOME to /usr/jdk. If your Java executable is in C:\jdk\bin, set JAVA_HOME to C:\jdk.
Note
If you are using Cygwin, you must use Linux/UNIX paths (e.g., /usr/bin instead of C:\usr\bin)
for AWS_ELB_HOME and AWS_CREDENTIAL_FILE. However, JAVA_HOME should have a
Windows path. Additionally, the value cannot contain any spaces, even if the value is quoted
or the spaces are escaped.
The following Linux/UNIX example sets JAVA_HOME for a Java executable in the /usr/loc-
al/jre/bin directory.
$ export JAVA_HOME=/usr/local/jre
The following Windows example uses set and setx to set JAVA_HOME for a Java executable in the
C:\java\jdk1.6.0_6\bin directory.The set command defines JAVA_HOME for the current session
and setx makes the change permanent.
C:\> set JAVA_HOME=C:\java\jdk1.6.0_6
C:\> setx JAVA_HOME C:\java\jdk1.6.0_6
Note
• The setx command does not use the = sign.
• Don't include the bin directory in JAVA_HOME; that's a common mistake some users make.
The command line tool won't work if you do.
API Version 2012-06-01
273
Elastic Load Balancing Developer Guide
Task 1: Download the Command Line Interface

• The value for JAVA_HOME cannot contain any spaces, even if the value is quoted or the
spaces are escaped. If the value contains a space character, the command line tool will
return an error when you add JAVA_HOME to your path in the next step.
3. Add your Java directory to your path before other versions of Java.
On Linux and UNIX, you can update your PATH as follows:
$ export PATH=$JAVA_HOME/bin:$PATH
On Windows the syntax is slightly different:
C:\> set PATH=%JAVA_HOME%\bin;%PATH%
C:\> setx PATH %JAVA_HOME%\bin;%PATH%
4. On Linux or UNIX, verify your JAVA_HOME setting with the command $JAVA_HOME/bin/java -
version.
$ $JAVA_HOME/bin/java -version
java version "1.5.0_09"
Java(TM) 2 Runtime Environment, Standard Edition (build 1.5.0_09-b03)
Java HotSpot(TM) Client VM (build 1.5.0_09-b03, mixed mode, sharing)
The syntax is different on Windows, but the output is similar.
C:\> %JAVA_HOME%\bin\java -version
java version "1.5.0_09"
Java(TM) 2 Runtime Environment, Standard Edition (build 1.5.0_09-b03)
Java HotSpot(TM) Client VM (build 1.5.0_09-b03, mixed mode, sharing)
Task 3: Set the AWS_ELB_HOME Environment
Variable
The command line tool depends on an environment variable (AWS_ELB_HOME) to locate supporting libraries.
You'll need to set this environment variable before you can use the tool.
To set the AWS_ELB_HOME Environment Variable
1. Set AWS_ELB_HOME to the path of the directory into which you unzipped the command line tool.This
directory is named ElasticLoadBalancing-w.x.y.z (w, x, y, and z are version/release numbers)
and contains sub-directories named bin and lib.
The following Linux/UNIX example sets AWS_ELB_HOME for a directory named ElasticLoadBalan-
cing-1.0.12.0 in the /usr/local directory.
$ export AWS_ELB_HOME=/usr/local/ElasticLoadBalancing-1.0.12.0
The following Windows example sets AWS_ELB_HOME for a directory named ElasticLoadBalan-
cing-1.0.12.0 in the C:\CLIs directory.
API Version 2012-06-01
274
Elastic Load Balancing Developer Guide
Task 3: Set the AWS_ELB_HOME Environment Variable

C:\> set AWS_ELB_HOME=C:\CLIs\ElasticLoadBalancing-1.0.12.0
C:\> setx AWS_ELB_HOME C:\CLIs\ElasticLoadBalancing-1.0.12.0
2. Add the tool's bin directory to your system PATH. The rest of this guide assumes that you've done
this.
On Linux and UNIX, you can update your PATH as follows:
$ export PATH=$PATH:$AWS_ELB_HOME/bin
On Windows the syntax is slightly different:
C:\> set PATH=%PATH%;%AWS_ELB_HOME%\bin
C:\> setx PATH %PATH%;%AWS_ELB_HOME%\bin
Task 4: Set the AWS_CREDENTIAL_FILE Environ-
ment Variable
After you sign up for AWS, you must create access keys for the account.Your access keys are your Ac-
cessKeyId and SecretAccessKey.You must provide your access keys to the command line tools so
that they know that the commands that you issue come from your account.The command line tool reads
your access keys from a credential file that you create on your local system.
You can either specify your access keys with the --aws-credential-file parameter every time you
issue a command or you can create an environment variable that points to the credential file on your
local system. If the environment variable is properly configured, you can omit the --aws-credential-
file parameter when you issue a command.The following procedure describes how to create a credential
file and a corresponding AWS_CREDENTIAL_FILE environment variable.
To create a credential file on your local system
1. Retrieve your access keys.
Although you can retrieve the access key ID from the Security Credentials page, you cannot retrieve
the secret access key.You'll need to create new access keys if the secret access key was lost or
forgotten.You can create new access keys for the account by going to the Security Credentials page.
In the Access Keys section, click Create New Root Key.
2. Write down your secret access key and access key ID, or save them.
3. Add your access key ID and secret access key to the file named credential-file-path.tem-
plate:
a. Open the file credential-file-path.template included in your command line interface
(CLI) archive.
b. Copy and paste your access key ID and secret access key into the file.
c. Rename the file and save it to a convenient location on your computer.
d. If you are using Linux, set the file permissions as follows:
$ chmod 600 credential-file-name
API Version 2012-06-01
275
Elastic Load Balancing Developer Guide
Task 4: Set the AWS_CREDENTIAL_FILE Environment
Variable
4. Set the AWS_CREDENTIAL_FILE environment variable to the fully qualified path of the file you just
created.
The following Linux/UNIX example sets AWS_CREDENTIAL_FILE for myCredentialFile in the
/usr/local directory.
$ export AWS_CREDENTIAL_FILE=/usr/local/myCredentialFile
The following Windows example sets AWS_CREDENTIAL_FILE for myCredentialFile.txt in the
C:\aws directory.
C:\> set AWS_CREDENTIAL_FILE=C:\aws\myCredentialFile.txt
C:\> setx AWS_CREDENTIAL_FILE C:\aws\myCredentialFile.txt
Task 5: Set the Region
By default, the Elastic Load Balancing tools use the US East (N. Virginia) region(us-east-1) with the
elasticloadbalancing.us-east-1.amazonaws.com service endpoint URL. If your instances are
in a different region, you must specify the region where your instances reside. For example, if your instances
are in EU (Ireland) region, you must specify the eu-west1 Region by using the --region eu-west-1
parameter or by setting the AWS_ELB_URL environment variable.
This section describes how to specify a different Region by changing the service endpoint URL.
To specify a different region
1. To view available regions go to Regions and Endpoints in the Amazon Web Services General Reference.
2. If you want to change the service endpoint, set the AWS_ELB_URL environment variable.
• The following Linux/UNIX example sets AWS_ELB_URL to the EU (Ireland) Region.
$ export AWS_ELB_URL=https://elasticloadbalancing.eu-west-1.amazonaws.com
• The following Windows example sets AWS_ELB_URL to the EU (Ireland) region.
C:\> set AWS_ELB_URL=https://elasticloadbalancing.eu-west-1.amazonaws.com
C:\> setx AWS_ELB_URL https://elasticloadbalancing.eu-west-1.amazonaws.com
Verify if Elastic Load Balancing Command Line
Interface(CLI) is Installed
To verify the installation and configuration of Elastic Load Balancing CLI
1. On your Linux or Windows workstation, open a new command prompt.
2. Type the command elb-cmd.
API Version 2012-06-01
276
Elastic Load Balancing Developer Guide
Task 5: Set the Region

3. You should see output similar to the following:
Command Name Description
------------ -----------
elb-apply-security-groups-to-lb Apply VPC security groups to Load
Balancer.
elb-associate-route53-hosted-zone Associate LoadBalancer DNS... a
Route53 resource record.
elb-attach-lb-to-subnets Attach existing LoadBalancer to
Subnets in VPC.
elb-configure-healthcheck Configure the parameters f...tered
with a LoadBalancer.
elb-create-app-cookie-stickiness-policy Create an application-generated
stickiness policy.
elb-create-lb Create a new LoadBalancer.
elb-create-lb-cookie-stickiness-policy Create an LB-generated stickiness
policy.
elb-create-lb-listeners Create a new LoadBalancer listener.
elb-create-lb-policy Create a LoadBalancer poli...ed
LoadBalancerPolicyType.
elb-delete-lb Deletes an existing LoadBalancer.
elb-delete-lb-listeners Deletes a listener on an existing
LoadBalancer.
elb-delete-lb-policy Delete a LoadBalancer policy.
elb-deregister-instances-from-lb Deregisters instances from a Load
Balancer.
elb-describe-instance-health Describes the state of instances.
elb-describe-lb-policies Describes the details of LoadBalancer
Policies.
elb-describe-lb-policy-types Describes the details of LoadBalancer
PolicyTypes.
elb-describe-lbs Describes the state and properties
of LoadBalancers.
elb-detach-lb-from-subnets Detach existing LoadBalancer from
Subnets in VPC.
elb-disable-zones-for-lb Remove availability zones from an
LoadBalancer.
elb-disassociate-route53-hosted-zone Disassociate LoadBalancer ... a
API Version 2012-06-01
277
Elastic Load Balancing Developer Guide
Verify if Elastic Load Balancing Command Line Inter-
face(CLI) is Installed

Route53 resource record.
elb-enable-zones-for-lb Add availability zones to existing
LoadBalancer.
elb-register-instances-with-lb Registers instances to a LoadBalancer.
elb-set-lb-listener-ssl-cert Set the SSL Certificate fo...ecified
LoadBalancer port.
elb-set-lb-policies-for-backend-server Set LoadBalancer policies for backend
servers.
elb-set-lb-policies-of-listener Set LoadBalancer policies for a
port.
version Prints the version of the CLI tool
and the API.
For help on a specific command, type '<commandname> --help'
This completes your installation and configuration of the Elastic Load Balancing command line interface
tool.You're ready to start accessing Elastic Load Balancing using the command line interface (CLI). For
descriptions of all the Elastic Load Balancing commands, see Elastic Load Balancing Quick Reference
Card.
API Version 2012-06-01
278
Elastic Load Balancing Developer Guide
Verify if Elastic Load Balancing Command Line Inter-
face(CLI) is Installed

Appendix B: Using the SOAP API
Endpoints
For information about this product's regions and endpoints, go to Regions and Endpoints in the Amazon
Web Services General Reference.
WSDL and Schema Definitions
You can access the Elastic Load Balancing web service using the SOAP web services messaging protocol.
This interface is described by a Web Services Description Language (WSDL) document, which defines
the operations and security model for the particular service.The WSDL references an XML Schema
document, which strictly defines the data types that might appear in SOAP requests and responses. For
more information on WSDL and SOAP, see Web Services References (p. 282).
Note
Elastic Load Balancing supports SOAP only through HTTPS.
All schemas have a version number.The version number appears in the URL of a schema file and in a
schema's target namespace.This makes upgrading easy by differentiating requests based on the version
number.
Programming Language Support
Because the SOAP requests and responses in Elastic Load Balancing follow current standards, nearly
any programming language can be used.
Note
AWS provides libraries, sample code, tutorials, and other resources for software developers who
prefer to build applications using language-specific APIs instead of Elastic Load Balancing's
SoapRequestQuery.These libraries provide basic functions (not included in Elastic Load Balan-
cing's SoapRequestQuery), such as request authentication, request retries, and error handling
so you can get started more easily. Libraries and resources are available for the following lan-
guages:
• Java
• PHP
• Python
• Ruby
• Windows and .NET
For libraries and sample code in all languages, go to Sample Code & Libraries.
Request Authentication
Elastic Load Balancing complies with the current WS-Security standard, which requires you to hash and
sign SOAP requests for integrity and non-repudiation. WS-Security defines profiles which are used to
implement various levels of security. Secure SOAP messages use the BinarySecurityToken profile, con-
sisting of an X.509 certificate with an RSA public key.
The following is the content of an insecure RunInstances operation (using EC2 as an example):
API Version 2012-06-01
279
Elastic Load Balancing Developer Guide
Appendix B: Using the SOAP API

<Runinstances xmlns="http://ec2.amazonaws.com/doc/2009-05-05">
<instancesSet>
<item>
<imageId>ami-60a54009</imageId>
<minCount>1</minCount>
<maxCount>3</maxCount>
</item>
</instancesSet>
<groupSet/>
</RunInstances>
To secure the request, we add the BinarySecurityToken element.
The secure version of the request begins with the following:
<SOAP-ENV:Envelope xmlns:SOAP-ENV="http://schemas.xmlsoap.org/soap/envelope/">
<SOAP-ENV:Header>
<wsse:Security xmlns:wsse="http://docs.oasis-open.org/wss/2004/01/oasis-
200401-wss-wssecurity-secext-1.0.xsd">
<wsse:BinarySecurityToken
xmlns:wsu="http://docs.oasis-open.org/wss/2004/01/oasis-200401-wss-wsse
curity-utility-1.0.xsd"
EncodingType="http://docs.oasis-open.org/wss/2004/01/oasis-200401-wss-
soap-message-security-1.0#Base64Binary"
ValueType="http://docs.oasis-open.org/wss/2004/01/oasis-200401-wss-X.509-
token-profile-1.0#X.509v3"
wsu:Id="CertId-1064304">....many, many lines of base64 encoded
X.509 certificate...</wsse:BinarySecurityToken>
<ds:Signature xmlns:ds="http://www.w3.org/2000/09/xmldsig#">
<ds:SignedInfo>
<ds:CanonicalizationMethod Algorithm="http://www.w3.org/2001/10/xml-
exc-c14n#"></ds:CanonicalizationMethod>
<ds:SignatureMethod Algorithm="http://www.w3.org/2000/09/xmldsig#rsa-
sha1"></ds:SignatureMethod>
<ds:Reference URI="#id-17984263">
<ds:Transforms>
<ds:Transform Algorithm="http://www.w3.org/2001/10/xml-exc-
c14n#"></ds:Transform>
</ds:Transforms>
<ds:DigestMethod Algorithm="http://www.w3.org/2000/09/xmld
sig#sha1"></ds:DigestMethod>
<ds:DigestValue>0pjZ1+TvgPf6uG7o+Yp3l2YdGZ4=</ds:DigestValue>
</ds:Reference>
<ds:Reference URI="#id-15778003">
<ds:Transforms>
<ds:Transform Algorithm="http://www.w3.org/2001/10/xml-exc-
c14n#"></ds:Transform>
</ds:Transforms>
<ds:DigestMethod Algorithm="http://www.w3.org/2000/09/xmld
sig#sha1"></ds:DigestMethod>
<ds:DigestValue>HhRbxBBmc2OO348f8nLNZyo4AOM=</ds:DigestValue>
</ds:Reference>
</ds:SignedInfo>
<ds:SignatureValue>bmVx24Qom4kd9QQtclxWIlgLk4QsQBPaKESi79x479xgbO9PEStXMi
HZuBAi9luuKdNTcfQ8UE/d
API Version 2012-06-01
280
Elastic Load Balancing Developer Guide
Request Authentication

jjHKZKEQRCOlLVy0Dn5ZL1RlMHsv+OzJzzvIJFTq3LQKNrzJzsNe</ds:SignatureValue>
<ds:KeyInfo Id="KeyId-17007273">
<wsse:SecurityTokenReference
xmlns:wsu="http://docs.oasis-open.org/wss/2004/01/oasis-200401-
wss-wssecurity-utility-1.0.xsd" wsu:Id="STRId-22438818">
<wsse:Reference URI="#CertId-1064304"
ValueType="http://docs.oasis-
open.org/wss/2004/01/oasis-200401-wss-X.509-token-profile-1.0#X.509v3">
</wsse:Reference>
</wsse:SecurityTokenReference>
</ds:KeyInfo>
</ds:Signature>
<wsu:Timestamp
xmlns:wsu="http://docs.oasis-open.org/wss/2004/01/oasis-200401-wss-
wssecurity-utility-1.0.xsd" wsu:Id="id-17984263">
<wsu:Created>2006-06-09T10:57:35Z</wsu:Created>
<wsu:Expires>2006-06-09T11:02:35Z</wsu:Expires>
</wsu:Timestamp>
</wsse:Security>
</SOAP-ENV:Header>
If you are matching this against requests generated by Elastic Load Balancing supplied libraries, or those
of another vendor, the following are the most important elements.
Elements
• BinarySecurityToken—Contains the X.509 certificate in base64 encoded PEM format
• Signature—Contains an XML digital signature created using the canonicalization, signature algorithm,
and digest method
• Timestamp—Requests to Elastic Load Balancing are valid within 5 minutes of this value to help prevent
replay attacks
The Response Structure
In response to a request, the Elastic Load Balancing service returns an XML data structure that conforms
to an XML schema defined as part of the Elastic Load Balancing WSDL.The structure of a XML response
is specific to the associated request.
The following is an example response (using EC2 as an example):
<RuninstancesResponse xmlns="http://ec2.amazonaws.com/doc/2009-05-05">
<reservationId>r-47a5402e</reservationId>
<ownerId>UYY3TLBUXIEON5NQVUUX6OMPWBZIQNFM</ownerId>
<groupSet>
<item>
<groupId>default</groupId>
</item>
</groupSet>
<instancesSet>
<item>
<InstanceId>i-2ba64342</InstanceId>
<imageId>ami-60a54009</imageId>
<InstanceState>
API Version 2012-06-01
281
Elastic Load Balancing Developer Guide
The Response Structure

<code>0</code>
<name>pending</name>
</InstanceState>
<DNSName></DNSName>
</item>
<item>
<InstanceId>i-2bc64242</InstanceId>
<imageId>ami-60a54009</imageId>
<InstanceState>
<code>0</code>
<name>pending</name>
</InstanceState>
<DNSName>ec2-67-202-51-176.compute-1.&api-domain;</DNSName>
</item>
<item>
<InstanceId>i-2be64332</InstanceId>
<imageId>ami-60a54009</imageId>
<InstanceState>
<code>0</code>
<name>pending</name>
</InstanceState>
<DNSName>ec2-67-202-51-122.compute-1.&api-domain;</DNSName>
<keyName>example-key-name</keyName>
<instanceType>m1.small</instanceType>
<launchTime>2007-08-07T11:54:42.000Z</launchTime>
</item>
</instancesSet>
</RunInstancesResponse>
Web Services References
For more information about using web services, go to any of the following resources:
• Web Service Description Language (WSDL)
• WS-Security BinarySecurityToken Profile
API Version 2012-06-01
282
Elastic Load Balancing Developer Guide
Web Services References

